


 Loading...
Fast Track Ultra 8R
Rack-mountable 8 x 8 USB 2.0 Interface with MX Core DSP Technology
English
User Guide

Fast Track Ultra 8R |
User Guide |
1 |
1 Introduction
Thanks for choosing M-Audio Fast Track Ultra 8R. Fast Track Ultra 8R is a professional, high-quality audio and MIDI interface for your Windows or Macintosh laptop or desktop computer. Using the convenience and dependability of a USB 2.0 connection, Fast Track Ultra 8R provides your computer with an exceptionally flexible audio interface that will handle virtually any recording task with ease. Fast Track Ultra 8R delivers high-resolution 24-bit audio to and from your computer at sampling rates up to 96kHz. Its on-board DSP gives you a useful selection of reverb and delay effects and versatile monitoring options. Fast Track Ultra 8R also gives you sixteen channels of MIDI in and out – all in a sleek, rugged, compact single rack space design. It connects to your computer with a single USB cable – no tools needed, no cards to install.
Fast Track Ultra 8R was created with the home or project studio user in mind. With eight inputs, eight outputs and eight high-quality preamps featuring M-Audio’s award-winning OctaneTM technology, Fast Track Ultra 8R gives you a great sounding, easy-to-use interface for your digital audio software. The eight combo XLR/TRS inputs can accommodate microphone or line levels, with phantom power switchable in groups of four and individual 20dB pads. Channels one and two also provide insert points, and are switchable to accommodate instrument level input. The rear panel also offers you MIDI input and output ports, as well as dedicated S/PDIF inputs and outputs on the included breakout cable.
The front panel is also set up for easy monitoring, and features input signal and clipping indicators, two discrete headphone outputs with independent level controls, MIDI input and output LEDs, and phantom power indicators, making
Fast Track Ultra 8R an ideal solution for beginning and advanced computer recording users alike.
Even if you’re an experienced musician and digital recording enthusiast, please take some time to read through this User Guide and familiarize yourself with the features and operation of Fast Track Ultra 8R. You may also want to refer to your audio software’s documentation to better understand how Fast Track Ultra 8R may be integrated with the program. Your experience and enjoyment of your Fast Track Ultra 8R will be greatly enhanced by a good working knowledge of your audio software.

Fast Track Ultra 8R |
User Guide |
2 |
2Fast Track Ultra 8R Features
•Eight balanced/unbalanced Mic/Line Inputs on combo XLR/TRS jacks
•Two front-panel 1/4” Instrument-level inputs
•Eight high-quality microphone preamps, featuring M-Audio’s award-winning OctaneTM technology
•Individual mic pre input level controls with 20dB pads
•Dual front-panel Signal and Clip LED indicators
•Eight balanced/unbalanced line outputs on TRS jacks
•Two 1/4” inserts on TRS jacks
•Phantom Power switches with front-panel indicator LEDs
•Stereo S/PDIF digital I/O on coaxial jacks
•Two stereo headphone jacks with individual level controls
•MIDI Input and Output with front-panel MIDI I/O indicators
•Output Level control for main output pair 1/2
•Powerful onboard DSP providing four near-zero latency 16x2 monitor mixers
•Built-in reverb and delay effects
•Supports sample rates up to 96kHz, with full 24-bit resolution
•Integrated rear-panel Kensington security lock port
•Driver support for WDM/MME, ASIO2 (Windows XP, Windows Vista (32-bit editions)) and CoreAudio (Mac OS X 10.4.11 / 10.5.2 or later)
IMPORTANT NOTE: Fast Track Ultra 8R is a USB 2.0 device. USB 1.1 operation is not supported.
IMPORTANT NOTE: Fast Track Ultra 8R must be powered via the included power supply. It will not operate on USB bus power.

Fast Track Ultra 8R |
User Guide |
3 |
Windows
Fast Track Ultra 8R is supported under Windows XP with Service Pack 2 or later, or Windows Vista (32-bit editions). It is not supported under Windows 2000, Windows 98, 98SE or Windows ME. Please see the note below regarding System Updates before making any updates to your operating system.
Minimum System Requirements*
Windows XP with SP2
• 1.6 GHz CPU
(CPU requirements may be higher for laptops)
•DirectX 9.0c
•USB 2.0 port
•512 MB RAM
Windows Vista (32-bit editions)
• 1.6 GHz CPU
(CPU requirements may be higher for laptops)
•USB 2.0 port
•1 GB RAM
Mac OS X
Fast Track Ultra 8R is supported by Intel-based and PowerPC-based Macs running Mac OS X version 10.4.11 or 10.5.2 or later.
Minimum System Requirements* |
|
|
PowerPC |
Intel |
|
• Mac OS X – 10.4.11/10.5.2 |
• |
Mac OS X – 10.4.11/10.5.2 |
• native USB 2.0 port |
• |
native USB 2.0 port |
• 512 MB RAM |
• |
512 MB RAM |
• G4 1GHz CPU |
• Intel CPU |
|
(G4 accelerator cards not supported) |
|
|
*M-Audio suggests that you also check the minimum system requirements for your audio software, as they may be greater than the above.
IMPORTANT NOTE: Fast Track Ultra 8R has been designed as a USB 2.0 device. USB 1.1 operation is not supported.
A Note About System Updates: Please check the M-Audio driver download page at http://www.m-audio.com/drivers for the availability of an updated driver before you decide to install operating system updates.
Before new M-Audio device drivers are released, they are tested for use with the operating system versions that are available at that time. When updates for an operating system are released by Microsoft or Apple, all M-Audio device drivers have to be retested and possibly updated to ensure proper operation.
M-Audio recommends refraining from installing operating system updates until a driver
has been posted to the M-Audio website for that specifi c operating system.

Fast Track Ultra 8R |
User Guide |
4 |
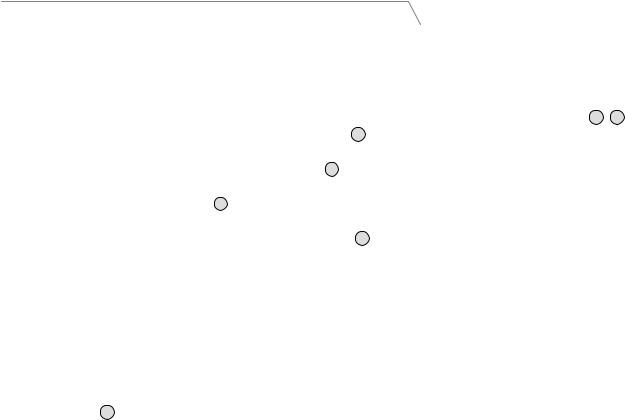
Front Panel
1
22
3 |
|
|
|
|
|
|
|
|
|
|
|
|
|
|
|
|
|
|
|
|
|
|
|
|
|
|
|
|
|
|
|
|
|
|
|
|
|
|
|
|
|
|
|
3 |
|
|
|
|
|
3 |
3 |
3 |
3 |
3 |
3 |
|
|||||||||||||||||||||||||||||||
4 |
|
|
|
|
|
|
|
|
|
|
|
|
|
|
|
|
|
|
|
|
|
|
|
|
|
|
|
|
|
|
|
11 |
|||||||||||
4 |
4 |
4 |
4 |
4 |
4 |
4 |
|||||||||||||||||||||||||||||||||||||
|
|
|
|
|
|
|
|||||||||||||||||||||||||||||||||||||
5 |
|
|
|
|
|
|
|
|
|
|
|
|
|
|
|
|
|
12 |
|||||||||||||||||||||||||
5 |
5 |
5 |
5 |
5 |
5 |
5 |
|||||||||||||||||||||||||||||||||||||
|
|
|
|
|
|
|
|
|
|
|
|
|
|
|
|
|
|
|
|
|
|
|
|
|
|
|
|
|
|
|
|
|
|
|
|
6 |
13 |
||||||
|
|
|
|
|
|
|
|
|
|
|
|
|
|
|
|
|
|
|
|
|
|
|
|
|
|
|
|
|
|
|
|
|
|
|
|
7 |
14 |
||||||
10
9 9
8 8
1.Instrument Inputs 1 and 2 (Inst) – These front-panel connectors provide instrument-level inputs for channels 1 and 2. Each of these two inputs will accept a high-impedance instrument level signal on an unbalanced 1/4” plug. Set the Mic/Line - Instrument switch 2 to the “in” position to activate the corresponding front-panel input.
2.Mic/Line - Instrument Level Switches (


 /
/ 


 ) – These switches select the input source for channels 1/2 between the front-panel Instrument inputs 1 and the rear-panel Mic/Line inputs 20.
3.LED Clip Meters (Clip) – These red LEDs illuminate when an input signal reaches a sustained clipping level. Reduce the channel’s Input Gain level 5 if the LED glows steadily red.
4.LED Level Meters – These green LEDs illuminate when an input signal of -40 dBFS is present at the corresponding input.
5.Mic/Instrument Gain/Pad 1-8 (Mic/Inst Gain Pull -20dB) – These knobs adjust the input gain level for channels 1 through 8. Pulling the knob out will engage a 20 dB pad on the Mic and Instrument input. Pushing the knob in will disengage the pad. (Note that the level controls only affect the XLR mic and front panel instrument inputs, but do not affect the line-level inputs.)
6.Phantom Power Switches (Phantom Power) – Pressing these switches activates the phantom power circuitry for the corresponding group of four mic inputs (1 through 4 or 5 through 8), illuminating the Phantom Power LED 7 and sending 48V power to the four associated XLR inputs 20, for use with condenser microphones requiring external power.
7.Phantom Power LED – These red LEDs light to indicate that the corresponding phantom power switch 6 has been pressed, applying +48V phantom power to the selected group of four mic inputs.
8. Headphone Output Levels ( 1 / 2 ) – These two knobs control the volume level for the two headphone outputs 9 .
9.Headphone Outputs ( 1 / 2 ) – These two 1/4” stereo (TRS) jacks are independent of the main audio output level, and are controlled by the headphone output knobs 8 . The fi rst headphone jack outputs the same audio signal as rear-panel outputs 1/2 while the second headphone jack outputs the same audio signal as rear-panel outputs 3/4.
10.Main Output Level (Output) – This knob controls the main output level (output pair 1/2).
11.MIDI Input LED (MIDI In) –This green LED lights when MIDI data is present at the MIDI input 18 .
12.MIDI Output LED (MIDI Out) – This green LED lights when MIDI data is present at the MIDI output 18 .
13.Power Switch (  ) – Pressing this button will power on Fast Track Ultra 8R, illuminating the front-panel Power LED 14 . The unit must be connected to the external power supply.
14.Power LED (Power) – This blue LED lights when the power switch 13 has been pressed and power is being received from the external power supply.
Fast Track Ultra 8R |
|
User Guide |
5 |
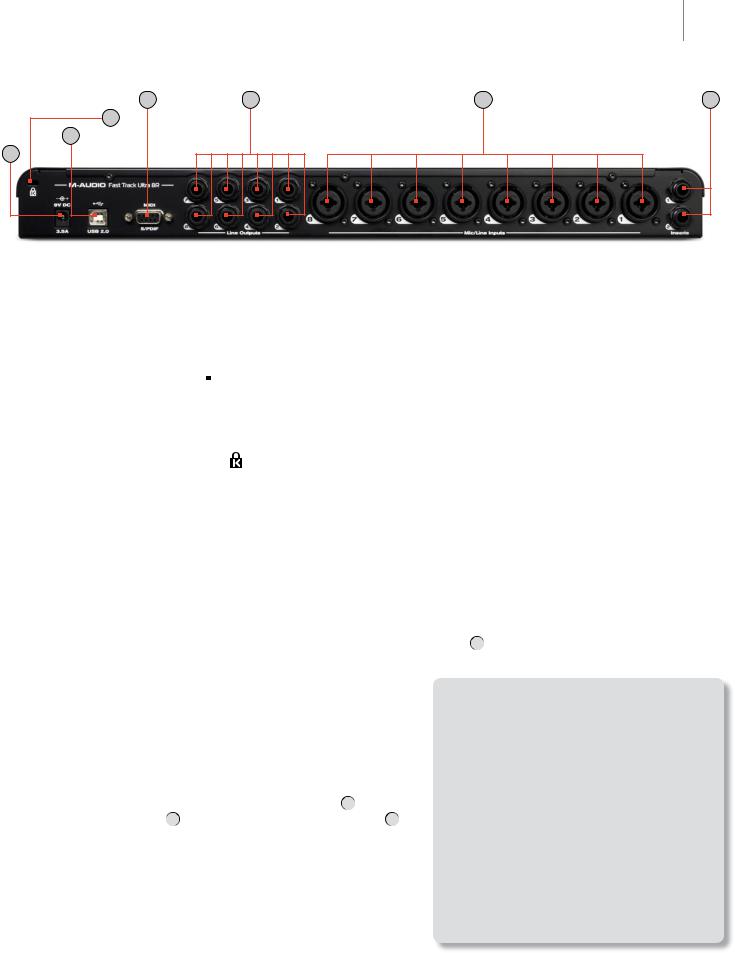
Rear Panel |
|
|
|
18 |
19 |
20 |
21 |
17 |
|
|
|
16 |
|
|
|
15 |
|
|
|
15.Power Input ((9V DC 3.5A - 4A) – Connect the included power supply to this jack.
NOTE: Fast Track Ultra 8R is designed to work with 9V DC power supplies with a 3.5 - 4A rating. If you need to purchase an additional power supply for your
Fast Track Ultra 8R, be sure to buy one with the correct rating and polarity. Replacement power supplies are available at the M-Audio webstore.
16.USB Connector (
 USB 2.0) – Connect a standard USB cable to this port, connecting the other end to your host computer.
NOTE: Fast Track Ultra 8R is a USB 2.0 device and must be connected to a USB 2.0 port on your computer. USB 1.0/1.1 operation is not supported.
17. |
Kensington® Lock Port ( ) – This connector is compatible with Kensington® security cables to protect your |
|
device from theft. |
18.MIDI and S/PDIF Connector (MIDI S/PDIF) – The accompanying breakout cable connecting to this multi-pin jack provides MIDI input and output on 5-pin DIN connectors, and S/PDIF input and output on coaxial RCA connectors.
•When the Sync Source drop-down menu is set to “External” in the Control Panel, input channels 7 and 8 will receive their signal from the S/PDIF input instead of analog inputs 7/8.
•The S/PDIF output signal is identical to the output of Line Outputs 7/8.
•The S/PDIF output will also support pass-through of AC-3 or DTS encoded surround formats.
19.Line Outputs – These eight balanced/unbalanced 1/4” (TRS) jacks provide eight analog outputs. The level of output pair 1/2 is controlled by the front-panel master volume knob 10 . Signal present at outputs 7 and 8 is duplicated at the S/PDIF outputs.
20.Mic/Line Inputs – These eight combo jacks provide eight
analog inputs, and can accommodate microphone or line-level sources via XLR or 1/4” TRS or TS connectors. The microphone (XLR) inputs route signals to the interface’s preamplifi ers while the line-level (1/4”) jacks bypass the preamplifi ers.
The input source for channels 1 and 2 can be selected via the front-panel Mic/Line – Instrument switches 2 between Mic/Line inputs 20 or the front-panel Instrument inputs 1 .
Selecting “External” from the Sync Source drop-down menu in the control panel will activate the S/PDIF input as the signal source for input channels 7 and 8. Mic/Line inputs
7 and 8 will be disabled in this confi guration.
21.Inserts – Insert jacks allow you to add analog outboard effects (compressors, limiters, etc.) into the signal path of the fi rst two channels of your Fast Track Ultra 8R. Outboard
effects are “inserted” between the preamp and the A/D converter.
About Insert Cables:
An insert cable is wired in a way that lets you send and receive signals over a single cable. This cable features a “TRS” (tip-ring-sleeve) connector on one side and two “TS” (tip-sleeve) connectors on the other. The TRS side connects to one of the insert jacks of Fast Track Ultra 8R. The TS connectors are usually labeled “tip” (send) and “sleeve” (return). Attach the “tip” connector to your external device’s input and the “sleeve” connector to the device’s output. This allows signals to be sent to the external device and returned to the A/D converter on
Fast Track Ultra 8R.
These 1/4” TRS jacks are only active when a a special “insert” cable is connected to these jacks (see the box entitled “About Insert Cables” to learn more about these cables). If no insert cable is connected, these jacks do not affect the signal path.

Fast Track Ultra 8R |
User Guide |
6 |
5 Installing Fast Track Ultra 8R
For instructions on installing Fast Track Ultra 8R, please refer to the accompanying Quick Start Guide.
6 Hardware Connections
Recording Microphones
Fast Track Ultra 8R can record audio from up to eight individual microphones simultaneously, connected to input channels 1 through 8 via the rear-panel Mic/Line input connectors 20. On inputs 1 and 2, the Mic/Line – Instrument selector switches 2 must be set to the Mic/Line (out) position.
Recording Line-Level Inputs
Fast Track Ultra 8R can record audio from up to eight individual line inputs simultaneously, connected to input channels 1 through 8 via the rear-panel Mic/Line input connectors 20. On inputs 1 and 2, the Mic/Line – Instrument selector switches 2 must be set to the Mic/Line (out) position.
Additionally the gain pots for the associated mic inputs should be turned down when using the line inputs to avoid unwanted amplification of idle noise.
Recording Instruments
Fast Track Ultra 8R can record audio from up to two individual instrument-level sources simultaneously, connected to input channels 1 and 2 via the two front-panel Instrument inputs 1 . The Mic/Line – Instrument selector switches 2 must be set to the Instrument (in) position.
Recording Digital Input
Fast Track Ultra 8R can record two channels of digital input signal, on input channels 7 and 8 via the rear-panel S/PDIF input 18 . Connect a digital S/PDIF source to the rear-panel S/PDIF input. Go to the Settings tab in the Fast Track Ultra 8R Control Panel and select “External” as the sync source to activate the S/PDIF input and ensure
proper digital clocking. See the Sync Source section of this User Guide for more information on digital synchronization.
Adjusting the Output Level
Connect the rear-panel line outputs 19 to a mixing console, amplifier or powered monitors. Output pair 1/2 can be directly controlled by the front-panel main output level knob 10 . Other outputs are controlled via your DAW application or the Fast Track Ultra 8R Control Panel.
Headphone Monitoring
Use the “Monitor 1/2” and “Monitor 3/4” Control Panel tabs to create separate monitor mixes for the two front-panel headphone outputs. See the section titled “Monitor Tabs” for more information about creating monitor mixes.
Fast Track Ultra 8R |
User Guide |
7 |
7 Using Fast Track Ultra 8R
Setting Your Recording Levels
Using the Mic, Line or Instrument Inputs
Connect your microphone, instrument or line level source to the Mic/Line - Instrument inputs 1 , 20. Make sure the associated channel’s Mic/Line - Instrument switch 2 is set to the correct position for your chosen inputs, and that the input gain is turned fully counter-clockwise to the lowest level. If you are using a condenser microphone, be certain to activate the Phantom Power switch 6 for the corresponding group of input channels (after connecting the microphone to the XLR input). If you are using the Microphone or Instrument inputs, slowly raise the input level until the Input Signal LED 4 shows input with a fairly steady green signal while audibly testing your input levels (i.e., strumming the guitar, or speaking into the mic). If your microphone signal causes an input to clip even at the minimum gain setting, pull the Mic Input Gain knob 5 to activate the 20 dB pad. This will further attenuate (reduce) signal levels to prevent distortion at the input.
IMPORTANT: When recording from a microphone and monitoring in the same room, it is recommended that you turn off your speakers and monitor with headphones. This will greatly reduce the possibility of creating loud feedback loops that may damage your equipment (or hearing).
Using the Coaxial S/PDIF Inputs
Connect the S/PDIF output of your external audio device to the S/PDIF Input, located on the rear-panel breakout cable 18 . The signal level you receive at the S/PDIF In will be the signal level that you record. Any adjustments to that signal level must be made at the source. If you have an output level control on the device that you’ve connected to the S/PDIF inputs, adjust that output level control to change the recording level. Most recording software will allow you to add gain to a recorded track that was made at a level that is initially too low, but be careful that the recording level is not reaching digital clipping (signal going into the red) while recording.
Note: To use the S/PDIF input, you will need configure the sync source of
Fast Track Ultra 8R to “External.” Refer to the section below on the Control Panel and your software’s documentation for more information.
Setting the Sample Rate
The default sample rate for Fast Track Ultra 8R is 44.1 kHz. Supported sample rates are 44.1, 48, 88.2 and 96 kHz. Most applications allow you to change the sample rate from within your audio software. You can also change the sample rate in the Control Panel. It is recommended that you do not change the sample rate from the Control Panel while your DAW application is running, as this can cause some applications to exhibit unexpected behavior.
In order to receive a digital signal via the S/PDIF input, you will need to change the Control Panel’s Sync Source setting (in the Settings tab) to “External,” after which Fast Track Ultra 8R will automatically detect an incoming digital signal and receive its sample rate from that incoming S/PDIF source.
Loading...