


 Loading...
User Guide
English ( 2 – 5 )
Guía del usuario
Español ( 6 – 9 )
Guide d'utilisation
Français ( 10 – 13 )
Guida per l'uso
Italiano ( 14 – 17 )
Benutzerhandbuch
Deutsch ( 18 – 21 )
Appendix
English ( 22 – 23 )

User Guide (English)
Introduction
Box Contents
AIR 192|6 |
Software Download Cards |
USB-C-to-USB-C Cable |
User Guide |
USB-C-to-USB-A Cable |
Safety & Warranty Manual |
Support
For the latest information about this product (system requirements, compatibility information, etc.) and product registration, visit m-audio.com.
For additional product support, visit m-audio.com/support.
Quick Start
Windows users: Before connecting AIR 192|6 to your computer, install the drivers:
1.Go to m-audio.com/drivers and download the latest AIR 192|6 driver for your operating system.
2.Open the file you downloaded and double-click the driver installer file.
3.Follow the on-screen instructions to install the drivers.
Software: We've included Pro Tools | First M-Audio Edition and Ableton Live Lite with your AIR 192|6 so you can get started making music with professional software right out of the box. Register your AIR 192|6 on m-audio.com, and follow the install instructions in your User Account. Also, visit ableton.com to check for any available software updates.
Virtual Instruments: Follow the instructions on the software download card for installing the included virtual instrument plugins. After installation, most DAWs will not load virtual instrument plugins automatically. In order to access the virtual instrument plugins with Pro Tools | First M-Audio Edition and Ableton Live Lite, you will need to choose the plugin folder for the software to scan:
Pro Tools | First M-Audio Edition (AAX) plugin folders:
Windows (32-bit): C:\Program Files (x86)\Common Files\Avid\Audio\Plug-Ins
Windows (64-bit): C:\Program Files\Common Files\Avid\Audio\Plug-Ins macOS: Macintosh HD/Library/Application Support/Avid/Audio/Plug-Ins
Ableton (VST) Plugins:
Windows (32-bit): C:\Program Files (x86)\VSTplugins
Windows (64-bit): C:\Program Files\VSTplugins
macOS: Macintosh HD\Library\Audio\Plugins\VST
To set your plugin folder in Ableton Live Lite:
1.Go to the Preferences menu.
2.Select the File Folder tab. Under Plug-In Sources click Browse and select the appropriate plugin folder.
3.After making your selection, the Use VST Custom Plug-In Folder button should be ON. If it is not, click the button to turn it on.
4.Exit the Preferences menu.
2
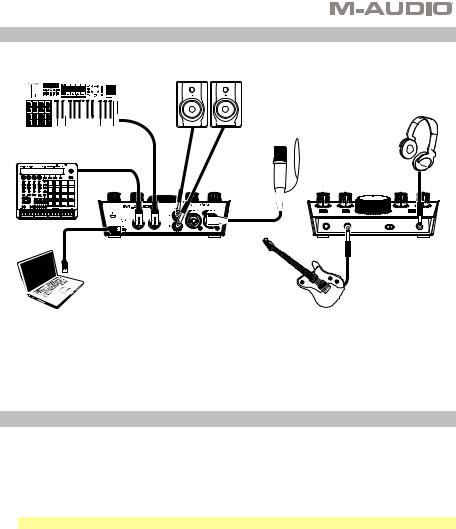
Connection Diagram
Items not listed under Introduction > Box Contents are sold separately.
Monitors |
Headphones |
Microphone
External MIDI Devices
Rear Panel |
Front Panel |
Computer |
Guitar |
Note:
•Use the +48V (Phantom Power) Switch only if a microphone requires phantom power. Most dynamic microphones and ribbon microphones do not require phantom power, but most condenser microphones do. Consult your microphone's documentation to find out whether it needs phantom power.
Setting Up AIR 192|6 with Your Software
Setting Up AIR 192|6 with Pro Tools | First M-Audio Edition
1.Use the included USB cable to connect the AIR 192|6 to your computer.
2.Open Pro Tools | First M-Audio Edition.
3.Go to Setup > Playback Engine….
4.Open the Playback Engine dropdown menu and select M-Audio AIR 192|6.
Note: You may need to save and restart your project.
5.Select your Sample Rate and then click OK to close the Setup window.
6.Go to the Setup > I/O and select M-Audio AIR 192|6 for the Input and Output devices.
You can now add tracks to send and receive audio and MIDI from sources connected to AIR 192|6 inputs and stream recorded audio back through the AIR 192|6 outputs.
Setting Up AIR 192|6 with Ableton Live Lite
1.Use the included USB cable to connect the AIR 192|6 to your computer.
2.Open Ableton Live Lite.
3.Go to Preferences > Audio tab.
4.Click on Driver Type to select CoreAudio (Mac) or ASIO (Windows).
5.Select AIR 192|6 in the Input and Output Config section.
6.Select your Sample Rate and then close the audio preferences window.
You can now add tracks to send and receive audio and MIDI from sources connected to AIR 192|6 inputs and stream recorded audio back through the AIR 192|6 outputs.
3
Features
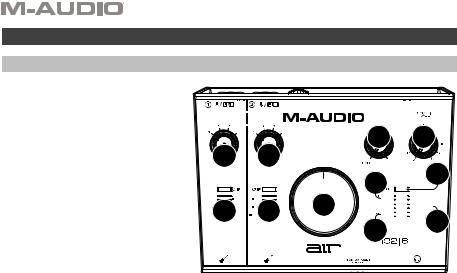
Top Panel
1.Input Gain: Adjusts the input's
gain level. Set this knob so the corresponding LED Meter (located below the knob) displays a "healthy" level during performance—but not so high that the meter "clips" or peaks, causing distortion in the audio.
2.LED Meters: Indicates the input signal level from the
Combo Inputs or Instrument Inputs.
3.USB / Direct Blend: Adjusts the mix of the audio signal from your inputs (Direct) and the audio output of your computer (USB) that will be sent to the
Main Outputs and Headphone Output.


 1
1


 1
1


 3
3


 4
4


 7
7 


 6
6


 2
2


 2
2


 5
5


 9
9


 8
8
This knob is useful for dealing with “latency” when you are recording in your DAW. Latency is a delay in sound that may occur between the incoming sound (playing your instrument, singing, etc.) and outgoing sound (when you hear it in the DAW).
Latency is often the result of the “buffer size” setting, which is usually located in your DAW’s Preferences, Options, or Device Setup menu. Higher buffer sizes generally result in higher latency. In some cases, lower buffer size settings can consume a lot of your computer’s CPU and cause audio glitches. To prevent these audio glitches, you will need to use a higher buffer setting, and this may result in latency.
If you are experiencing latency when recording, adjust the knob towards the Direct position to increase the blend of unprocessed audio from your inputs directly to your Main Outputs and Headphone Output. This will let you hear the incoming audio from your inputs without latency while still being able to hear the audio from your DAW. When listening to the playback, adjust the knob all the way to the USB position.
If your computer is powerful enough, you may be able to set the buffer size setting in your DAW low enough such that you may never need to listen to the direct audio signal from your inputs. In this case, set the USB / Direct Blend knob all the way to the USB position to monitor only the audio output of your DAW.
4.Headphone Level: Adjusts the output volume of the Headphone Output.
5.Monitor Level: Adjusts the output volume of Main Outputs, which should be connected to your powered monitors or amplifier system.
6.Power LED: Lights up when a valid USB connection has been established between your computer and AIR 192|6. Use this light to verify that AIR 192|6 is receiving power and is ready to use.
7.+48V (Phantom Power) LED: Lights up when phantom power is engaged.
8.MIDI In LED: Flashes when MIDI data is received from an external MIDI controller.
9.MIDI Out LED: Flashes when MIDI data is sent from your software to AIR 192|6’s MIDI Out.
4

Rear Panel
1.USB Port (Type C): This connection will allow you to send audio and MIDI data to and from a computer. Use the included USB-C-to-USB-C or USB- C-to-USB-A cables to connect the AIR 192|6 to a computer. The AIR 192|6 requires a USB 2.0 connection (or higher).
6 |
5 |
4 |
3 |
2 |
|
1 |
|||||
|
|
2.Combo Inputs: Connect microphones, a guitar or bass with an active pickup, or linelevel devices to these inputs. For microphones, use an XLR or 1/4” (6.35 mm) TRS cable. For a guitar or bass with an active pickup, use a standard 1/4” (6.35 mm) TS cable. For line-level signals, use a 1/4" (6.35 mm) TRS cable. View the input signal levels with the
LED Meters.
3.Main Outputs: Use standard 1/4" (6.35 mm) TRS cables to connect these outputs to your powered monitors, amplifier system, etc. The mix you hear from these outputs will be determined by the USB / Direct Blend knob. The level of these ouputs is controlled by the Monitor Level knob.
4.MIDI In: Use a standard five-pin MIDI cable to connect this input to the MIDI Out of an external MIDI device.
5.MIDI Out: Use a standard five-pin MIDI cable to connect this output to the MIDI In of an external MIDI device.
6.Kensington Lock Slot: You can use this Kensington lock slot to secure AIR 192|6 to a table or other surface.
Front Panel
1. Headphone Output: Connect 1/4" |
|
|
|
|
(6.35 mm) TRS headphones to this |
|
|
|
|
output. The mix you hear from this |
|
|
|
|
output will be determined by the |
|
|
|
|
USB / Direct Blend knob. The level |
2 |
2 |
3 |
1 |
of this output is controlled by the |
||||
Headphone Level knob. |
2.Instrument Inputs: Connect a guitar with a passive pickup or other high-impedance signal to this input with a 1/4" (6.35 mm) TS cable. View the input signal levels with the
LED Meters.
Note: Using an Instrument Input will mute the Combo Input on the corresponding channel.
3.+48V (Phantom Power) Switch: This switch activates and deactivates phantom power. When activated, phantom power supplies +48 volts to the Combo Inputs. Please note that most dynamic microphones and ribbon microphones do not require phantom power, while most condenser microphones do. Consult your microphone's documentation to find out whether it needs phantom power.
5

Guía del usuario (Español)
Introducción
Contenido de la caja
AIR 192|6 |
Tarjetas de descarga de software |
Cable USB-C-a-USB-C |
Guía del usuario |
Cable USB-C-a-USB-A |
Manual sobre la seguridad y garantía |
|
|
Soporte |
|
Para obtener la información más completa acerca de este product (los requisitos del sistema, compatibilidad, etc) y registro del producto, visite m-audio.com.
Para soporte adicional del producto, visite m-audio.com/support.
Instalación rápida
Usuarios de Windows: Antes de conectar el AIR 192|6 a su computadora, instale los drivers:
1.Vaya a m-audio.com/drivers y descargue el driver AIR 192|6 más reciente para su sistema operativo.
2.Abra el archivo que descargó y haga doble clic en el archivo instalador del driver.
3.Siga las instrucciones de la pantalla para instalar los drivers.
Software: Hemos incluido Pro Tools | First M-Audio Edition y Ableton Live Lite con su AIR 192|6 de modo que puede comenzar a hacer música con software profesional en cuanto lo saca de la caja. Registre su AIR 192|6 en m-audio.com y siga las instrucciones de instalación en su Cuenta de usuario. Visite también ableton.com para comprobar si hay actualizaciones de software disponibles.
Instrumentos virtuales: Siga las instrucciones de la tarjeta de descarga de software para instalar los plugins de instrumentos virtuales incluidos. Tras la instalación, muchos DAW no cargarán plugins de instrumentos virtuales de forma automática. A fin de acceder a los plugins de instrumentos virtuales con Pro Tools | First M-Audio Edition y Ableton Live Lite, deberá seleccionar la carpeta con plugins para que el software explore:
Carpetas de plugins de Pro Tools | First M-Audio Edition (AAX):
Windows (32-bit): C:\Program Files (x86)\Common Files\Avid\Audio\Plug-Ins
Windows (64-bit): C:\Program Files\Common Files\Avid\Audio\Plug-Ins
macOS: Macintosh HD/Library/Application Support/Avid/Audio/Plug-Ins
Plugins de Ableton (VST):
Windows (32-bit): C:\Program Files (x86)\VSTplugins
Windows (64-bit): C:\Program Files\VSTplugins
macOS: Macintosh HD\Library\Audio\Plugins\VST
Para establecer su carpeta de plugins en Ableton Live Lite:
1.Vaya al menú Preferences (Preferencias).
2.Seleccione la pestaña File Folder (Carpeta de archivos). Bajo Plug-In Sources (Fuentes de plugin) haga clic en Browse (Explorar) y seleccione la carpeta de plugins apropiada.
3.Después de hacer su selección, el botón Use VST Custom Plug-In Folder (Usar carpeta de plugins personalizada) debe estar en ON (encendido). Si no lo está, haga clic en el botón para encenderlo.
4.Salga del menú Preferences (Preferencias).
6

Conexión rápida
Los elementos que no se enumeran en Introducción > Contenido de la caja se venden por separado.
Monitores alimentados
Micrófono Auriculares
Dispositivos MIDI externo
Panel trasero
Panel frontal |
Guitarra
Computadora
Nota:
•Utilice el interruptor +48V (potencia fantasma) solamente si un micrófono requiere potencia fantasma. Más dinámicos y de cinta micrófonos no requieren alimentación fantasma, mientras que la mayoría de los micrófonos de condensador la requieren. Consulte la documentación de su micrófono para averiguar si necesita alimentación fantasma.
Configuración del AIR 192|6 con su software
Para configurar el AIR 192|6 con Pro Tools | First M-Audio Edition
1.Use el cable USB incluido para conectar el AIR 192|6 a su ordenador.
2.Abra Pro Tools | First M-Audio Edition.
3.Vaya a Setup > Playback Engine… (Configuración > Motor de reproducción).
4.Abra el menú desplegable Playback Engine y seleccione M-Audio AIR 192|6.
Nota: Es posible que tenga que guardar y reiniciar su proyecto.
5.Seleccione su Sample Rate (Tasa de muestreo) y luego haga clic en OK para cerrar la ventana de configuración.
6.Vaya a Configuración > E/S y seleccione M-Audio AIR 192|6 para los dispositivos de entrada y salida.
Ahora puede añadir pistas para enviar y recibir audio y MIDI desde las fuentes conectadas a las entradas del AIR 192|6 y transmitir el audio grabado de regreso por las salidas del AIR 192|6.
Para configurar el AIR 192|6 con Ableton Live Lite
1.Use el cable USB incluido para conectar el AIR 192|6 a su ordenador.
2.Abra Ableton Live Lite.
3.Vaya a la pestaña Preferencias > Audio.
4.Haga clic en Tipo de controlador para seleccionar CoreAudio (Mac) o ASIO (Windows).
5.Seleccione AIR 192|6 en la sección Configuración de entrada y salida.
6.Seleccione su tasa de muestreo y luego cierre la ventana de preferencias de audio.
Ahora puede añadir pistas para enviar y recibir audio y MIDI desde las fuentes conectadas a las entradas del AIR 192|6 y transmitir el audio grabado de regreso por las salidas del AIR 192|6.
7
Características
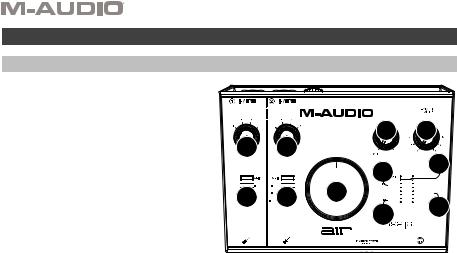
Panel superior
1.Ganancia de entrada: Ajusta el nivel de ganancia de la entrada. Ajuste esta perilla de manera que el LED medidor correspondiente (ubicado
debajo de la perilla) muestre un nivel "saludable" durante la ejecución— pero no tan alto que el medidor "recorte" o llegue al pico, causando distorsiones en el audio.
2.Medidores LED: Indica el nivel de la señal de entrada proveniente de las entradas combinadas o entradas de instrumentos.


 1
1


 1
1


 3
3


 4
4


 7
7 


 6
6


 2
2


 2
2


 5
5


 9
9


 8
8
3.Mezcla USB / Direct (Directo): Ajusta la mezcla de la señal de audio proveniente de sus entradas (Direct) y la salida de audio de su ordenador (USB) que se enviará a las salidas principales y a la salida para auriculares.
Esta perilla es útil para lidiar con la "latencia" cuando está grabando en su DAW. La latencia es el retardo que puede ocurrir entre el sonido entrante (cuando toca su instrumento, canta, etc.) y el sonido saliente (cuando lo oye en la DAW).
La latencia es a menudo el resultado del ajuste del "tamaño del búfer", el cual suele estar ubicado en los menús de preferencias, opciones o configuración de dispositivo de su DAW. Los tamaños de búfer más grandes generalmente producen mayores latencias. En algunos casos, ajustes más bajos del tamaño del búfer pueden consumir una gran cantidad de recursos de la CPU de su ordenador y causar defectos en el audio. Para prevenir estos defectos, deberá utilizar un ajuste mayor del búfer, y esto podría crear latencia como resultado.
Si está experimentando latencia al grabar, ajuste la perilla hacia la posición Direct para aumentar la mezcla de audio sin procesar que proviene de sus entradas directamente a las salidas Main y las salidas para auriculares. Esto le permitirá escuchar el audio entrante proveniente de sus entradas sin la latencia a la vez que escucha el audio proveniente de su DAW. Cuando escuche la reproducción, gire la perilla totalmente a la posición USB.
Si su ordenador es lo suficientemente potente, podrá ajustar el tamaño del buffer en su DAW lo suficientemente bajo como para nunca más tener que escuchar la señal de audio directa proveniente de sus entradas. En este caso, gire la perilla Mezcla USB / Direct totalmente hacia la posición USB para monitorizar solo la salida de audio de su DAW.
4.Nivel de auriculares: Ajusta el nivel de volumen de la salida para auriculares.
5.Nivel de monitoreo: Ajusta el volumen de salida de las salidas salidas principales (Main Outputs), las cuales deberían estar conectadas a monitores alimentados o a un sistema de amplificación.
6.LED de alimentación: Se enciende cuando se establece una conexión USB válida entre su computadora y el AIR 192|6. Use esta luz para verificar que el AIR 192|6 esté recibiendo alimentación y esté listo para usar.
7.LED de phantom power: Se enciende cuando se acopla la alimentación fantasma.
8.LED de entrada MIDI: Destella toda vez que se reciben datos MIDI desde un controlador MIDI externo.
9.LED de salida MIDI: Destella cuando se envían datos MIDI desde su software a salida MIDI del AIR 192|6.
8
Loading...