


 Loading...
User Guide
English ( 3 – 6 )
Guía del usuario
Español ( 7 – 10 )
Guide d’utilisation
Français ( 11 – 14 )
Guida per l’uso
Italiano ( 15 – 18 )
Benutzerhandbuch
Deutsch ( 19 – 22 )
Appendix
English ( 23 )
1

2
User Guide (English)
Introduction
Box Contents
AIR Hub
Power Adapter
USB-C to USB-C Cable
USB-C to USB-A Cable
Software Download Cards
User Guide
Safety & Warranty Manual
Support
For the latest information about this product (system requirements, compatibility information, etc.) and product registration, visit m-audio.com.
For additional product support, visit m-audio.com/support.
Quick Start
Windows users: Before connecting AIR Hub to your computer, install the drivers:
1.Go to m-audio.com/drivers and download the latest AIR Hub driver for your operating system.
2.Open the file you downloaded and double-click the driver installer file.
3.Follow the on-screen instructions to install the drivers.
Software: We've included Pro Tools | First M-Audio Edition with your AIR Hub so you can get started making music with professional software right out of the box. Register your AIR Hub on m-audio.com, and follow the Pro Tools | First M-Audio Edition install instructions in your User Account.
Virtual Instruments: Follow the instructions on the software download card for installing the included virtual instrument plugins. After installation, most DAWs will not load virtual instrument plugins automatically. In order to access the virtual instrument plugins with Pro Tools | First M-Audio Edition, you will need to choose the plugin folder for the software to scan:
Pro Tools | First M-Audio Edition (AAX) plugin folders:
Windows (32-bit): C:\Program Files (x86)\Common Files\Avid\Audio\Plug-Ins
Windows (64-bit): C:\Program Files\Common Files\Avid\Audio\Plug-Ins
macOS: Macintosh HD/Library/Application Support/Avid/Audio/Plug-Ins
3
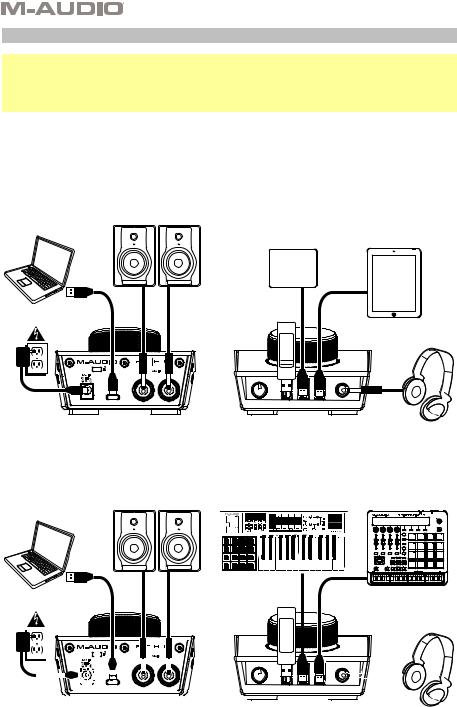
Connection Diagram
Windows users: Before connecting AIR Hub to your computer, install the drivers:
1.Go to m-audio.com/drivers and download the latest AIR Hub driver for your operating system.
2.Open the file you downloaded and double-click the driver installer file.
3.Follow the on-screen instructions to install the drivers.
Items not listed under Introduction > Box Contents are sold separately.
Example 1
Note: Remember to select AIR Hub as your sound card in your Control Panel or System Preferences.
Monitors |
|
Computer |
|
USB Hard Drive |
Tablet |
Power |
USB Flash |
|
Drive |
||
|
||
|
Headphones |
|
Rear Panel |
Front Panel |
|
Example 2 |
|
Note: Remember to select AIR Hub as your interface in the Preferences, Options, Device Setup, etc. in your digital audio workstation (DAW).
Computer |
Monitors |
External MIDI Devices |
|
|
Power |
USB Flash |
|
|
Drive |
Headphones |
||
|
|
|
|
|
|
|
|
|
|
|
|
|
|
|
|
|
|
|
|
|
|
|
|
|
|
|
|
|
|
|
|
|
|
|
|
|
|
|
|
|
|
|
|
|
|
|
|
|
|
|
|
|
|
|
|
|
|
|
|
|
|
|
|
|
|
|
|
|
|
|
|
|
|
|
|
|
|
|
|
|
|
|
|
|
|
|
|
|
|
|
|
|
|
|
|
|
|
|
|
|
|
|
|
|
|
|
|
|
|
|
|
|
|
|
|
|
|
|
|
|
|
|
|
|
|
|
|
|
|
|
|
|
|
|
|
|
|
|
|
|
|
|
|
|
|
|
|
|
|
|
|
|
|
|
|
|
|
|
|
|
|
|
|
|
|
|
|
|
|
|
|
|
|
|
|
|
|
|
|
|
|
|
|
|
|
|
|
|
|
|
|
|
|
|
|
|
|
|
|
|
|
|
|
|
|
|
|
|
|
|
|
|
|
|
|
|
|
|
|
|
|
|
|
|
|
|
|
|
|
|
|
|
|
|
|
|
|
|
|
|
|
|
|
|
|
|
|
|
|
|
|
|
|
|
|
|
|
|
|
|
|
|
|
|
|
|
|
|
|
|
|
|
|
|
|
|
|
|
|
|
|
|
|
|
|
|
|
|
|
|
|
|
|
|
|
|
|
|
|
|
|
|
|
|
|
|
|
|
|
|
|
|
|
|
|
|
|
|
|
|
|
|
|
|
|
|
|
|
|
|
|
|
|
|
|
|
|
|
|
|
|
|
|
|
|
|
|
|
|
|
|
|
|
|
|
|
|
|
|
|
|
|
|
|
|
|
|
|
|
|
|
|
|
|
|
|
|
|
|
|
|
|
|
|
|
|
|
|
|
|
|
|
|
|
|
|
|
|
|
|
|
|
|
|
|
|
|
|
|
|
|
|
|
|
|
|
|
|
|
|
|
|
|
|
|
|
|
|
|
|
|
|
|
|
|
|
|
|
|
|
|
|
|
|
|
|
|
|
|
|
|
|
|
|
|
|
|
|
|
|
|
|
|
|
|
|
|
|
|
|
|
|
|
|
|
|
|
|
|
|
|
|
|
|
|
|
|
|
|
|
|
|
|
|
|
|
|
|
|
|
|
|
|
|
|
|
|
|
|
|
|
|
|
|
|
|
|
|
|
|
|
|
|
|
|
|
|
|
|
|
|
|
|
|
|
|
|
|
|
|
|
Rear Panel |
|
|
|
|
|
|
|
|
|
|
|
|
|
|
|
|
|
Front Panel |
|
|
|
||||||||||||||||||||
4
Setting Up AIR Hub with Pro Tools | First M-Audio Edition
1.Use the included USB cable to connect the AIR Hub to your computer.
2.Open Pro Tools | First M-Audio Edition.
3.Go to Setup > Playback Engine….
4.Open the Playback Engine dropdown menu and select M-Audio AIR Hub.
Note: You may need to save and restart your project.
5.Select your Sample Rate and then click OK to close the Setup window.
6.Go to the Setup > I/O and select M-Audio AIR Hub as the Output device.
You can now add tracks and stream recorded audio back through the AIR Hub outputs.
Features
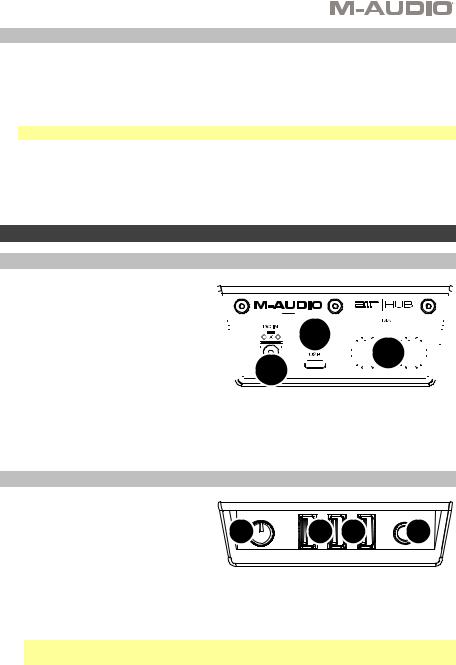
Rear Panel
1.USB Port: This connection will allow you to send audio, MIDI, and other
data to and from a computer. Use a USB cable to connect the AIR Hub to a computer. The AIR Hub requires a USB 2.0 connection (or higher).
2.Power Input: Connect the included power adapter (5 V, 3 A, center– positive) here, then connect the adapter to a power outlet.


 2
2


 1
1


 3
3


3.Main Outputs: Use standard 1/4" (6.35 mm) TRS cables to connect these outputs to your powered monitors, an amplifier system, etc. Use the Monitor Level knob to adjust their levels.
Front Panel
1. |
Headphone |
Output: Connect |
1/4" |
|
|
|
|
|
(6.35 mm) TRS headphones to this |
2 |
3 |
3 |
1 |
||
|
output. |
|
|
||||
|
|
|
|
|
|
|
|
2. |
Headphone |
Volume: Adjusts |
the |
|
|
|
|
|
output volume of the Headphone |
|
|
|
|
||
|
Output. |
|
|
|
|
|
|
3.USB Hub Outputs: You can connect additional USB devices (controllers, hard drives, etc.) to these powered USB ports. In addition to being an audio interface, these ports allow AIR Hub to function as a powered USB hub. This can be useful if you run out of available USB ports on your computer.
Note: In order to use the USB hub outputs, AIR Hub must be connected to the power adapter.
5
Top Panel
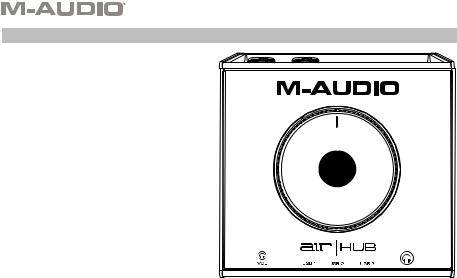
1.Monitor Level: Adjusts the output
volume of Main Outputs, which should be connected to your powered monitors or amplifier system.
1
6
Guía del usuario (Español)
Introducción
Contenido de la caja
AIR Hub
Adaptador de alimentación
Cable USB-C-a-USB-C
Cable USB-C-a-USB-A
Tarjetas de descarga de software
Guía del usuario
Manual sobre la seguridad y garantía
Soporte
Para obtener la información más completa acerca de este product (los requisitos del sistema, compatibilidad, etc) y registro del producto, visite m-audio.com.
Para soporte adicional del producto, visite m-audio.com/support.
Conexión rápida
Usuarios de Windows: Antes de conectar el AIR Hub a su computadora, instale los drivers:
1.Vaya a m-audio.com/drivers y descargue el driver AIR Hub más reciente para su sistema operativo.
2.Abra el archivo que descargó y haga doble clic en el archivo instalador del driver.
3.Siga las instrucciones de la pantalla para instalar los drivers.
Software: Hemos incluido Pro Tools | First M-Audio Edition con su AIR Hub de modo que puede comenzar a hacer música con software profesional en cuanto lo saca de la caja. Registre su AIR Hub en m-audio.com y siga las instrucciones de instalación en su Cuenta de usuario.
Instrumentos virtuales: Siga las instrucciones de la tarjeta de descarga de software para instalar los plugins de instrumentos virtuales incluidos. Tras la instalación, muchos DAW no cargarán plugins de instrumentos virtuales de forma automática. A fin de acceder a los plugins de instrumentos virtuales con Pro Tools | First M-Audio Edition, deberá seleccionar la carpeta con plugins para que el software explore:
Carpetas de plugins de Pro Tools | First M-Audio Edition (AAX):
Windows (32-bit): C:\Program Files (x86)\Common Files\Avid\Audio\Plug-Ins
Windows (64-bit): C:\Program Files\Common Files\Avid\Audio\Plug-Ins
macOS: Macintosh HD/Library/Application Support/Avid/Audio/Plug-Ins
7

Diagrama de instalación
Usuarios de Windows: Antes de conectar el AIR Hub a su computadora, instale los drivers:
1.Vaya a m-audio.com/drivers y descargue el driver AIR Hub más reciente para su sistema operativo.
2.Abra el archivo que descargó y haga doble clic en el archivo instalador del driver.
3.Siga las instrucciones de la pantalla para instalar los drivers.
Los elementos que no se enumeran en Introducción > Contenido de la caja se venden por separado.
Ejemplo 1
Nota: Recuerde seleccionar AIR Hub como su tarjeta de sonido en las Control Panel (panel de control) o System Preferences (sistema preferencias).
Computadora |
Monitores alimentados |
|
|
Disco duro USB |
Tableta |
||
|
|
Unidad |
|
Alimentación |
flash |
|
|
USB |
Auriculares |
|
|
|
|
|
|
|
|
|
|
|
|
|
|
|
|
|
|
|
|
|
|
|
|
|
|
|
|
|
|
|
|
|
|
|
|
|
|
|
|
|
|
|
|
|
|
|
|
|
|
|
|
|
|
|
|
|
|
|
|
|
|
|
|
|
|
|
|
|
|
|
|
|
|
|
|
|
|
|
|
|
|
|
|
|
|
|
|
|
|
|
|
|
|
|
|
|
|
|
|
|
|
|
|
|
|
|
|
|
|
|
|
|
|
|
|
|
|
|
|
|
|
|
|
|
|
|
|
|
|
|
|
|
|
|
|
|
|
|
|
|
|
|
|
|
|
|
|
|
|
|
|
|
|
|
|
|
|
|
|
|
|
|
|
|
|
|
|
|
|
|
|
|
|
|
|
|
|
|
|
|
|
|
|
|
|
|
|
|
|
|
|
|
|
|
|
|
|
|
|
|
|
|
|
|
|
|
|
|
|
|
|
|
|
|
|
|
|
|
|
|
|
|
|
|
|
|
|
|
|
|
|
|
|
|
Panel trasero |
|
|
|
|
|
|
|
|
|
|
|
|
Panel frontal |
|
|
|
|
|
||||||||||||||||||||||||||||
Ejemplo 2
Nota: Recuerde seleccionar AIR Hub como su interfaz en las Preferences (Preferencias), Options (Opciones), Device Setup (Configuración de dispositivo), etc. de su estación de audio digital (DAW).
Monitores alimentados |
Dispositivos MIDI externo |
Computadora
Alimentación |
Unidad |
|
flash |
Auriculares |
|
|
USB |
|
|
|
|
Panel trasero |
|
Panel frontal |
8 |
|
|
Loading...