


ENGLISH |
REMOTE CONTROLLER OPERATION |
|
|||
|
|
|
|
|
|
1. |
Press the desired function button. |
|
|
||
|
CONTROLLING MARANTZ COMPONENTS |
|
|
||
|
2. |
• The selected function name and USE are displayed in the LCD. |
|
|
|
|
Press the desired operation buttons to play the selected component. |
|
|
||
|
|
• For details, refer to the component’s user guide. |
|
|
|
|
|
• It may not be possible to operate some models. |
|
|
|
|
CONTROLLING A MARANTZ DVD PLAYER (DVD MODE) |
|
CONTROLLING A MARANTZ CD PLAYER (CD MODE) |
||
|
POWER |
|
OFF |
ON/OFF |
ON |
|
SOURCE |
|
|
|
M |
|
|
D11 |
|
|
D2 |
|
|
D3 |
|
|
D4 |
|
PAGE 1 |
D5 |
|
|
|
CH |
|
VOL |
OK
PREV |
LIP.SYNC |
MUTE |
|
|
|
||
|
|
GUIDE |
|
MENU |
|
|
EXIT |
TEST |
|
CH.SEL |
SURR |
1 |
|
2 |
3 |
7.1CH |
|
ATT |
SPK-AB |
4 |
|
5 |
6 |
DISP |
|
OSD |
SLEEP |
7 |
|
8 |
9 |
|
|
THX |
|
CLEAR |
|
0 |
MEMO |
TV |
DVD |
VCR |
DSS |
TUNER |
CD |
CD-R |
MD |
TAPE |
AUX1 |
AUX2 |
AMP |
|
|
LIGHT |
|
1 |
|
|
2 |
RC8500SR
Learning Remote Controller
SOURCE ON/OFF |
Turns the DVD player on and off |
POWER ON |
Turns the DVD player on |
|
|
POWER OFF |
Turns the DVD player off |
|
|
D1 - D5 / >(Page) |
(Refer to page vi) |
|
|
Cursor/OK |
Move the cursor, enters the setting |
|
|
MENU |
Calls up the menu of DVD disc |
|
|
0-9 |
Input the numeric |
|
|
MEMO |
Call up the programming menu |
|
|
CLEAR |
Clears the inputting |
2Play
4 / ¢ |
Skip forward or previous chapter/track |
9Stop
;Pause
|
POWER |
|
OFF |
ON/OFF |
ON |
|
SOURCE |
|
|
|
M |
|
|
D11 |
|
|
D2 |
|
|
D3 |
|
|
D4 |
|
PAGE 1 |
D5 |
|
|
|
CH |
|
VOL |
OK
PREV |
LIP.SYNC |
MUTE |
|
|
|
||
|
|
GUIDE |
|
MENU |
|
|
EXIT |
TEST |
|
CH.SEL |
SURR |
1 |
|
2 |
3 |
7.1CH |
|
ATT |
SPK-AB |
4 |
|
5 |
6 |
DISP |
|
OSD |
SLEEP |
7 |
|
8 |
9 |
|
|
THX |
|
CLEAR |
|
0 |
MEMO |
TV |
DVD |
VCR |
DSS |
TUNER |
CD |
CD-R |
MD |
TAPE |
AUX1 |
AUX2 |
AMP |
|
|
LIGHT |
|
1 |
|
|
2 |
RC8500SR
Learning Remote Controller
SOURCE ON/OFF |
Turns the CD player on and off |
POWER ON |
Turns the CD player on |
|
|
POWER OFF |
Turns the CD player off |
|
|
D1 - D5 / >(Page) |
(Refer to page vi) |
|
|
MENU |
Switches the display information |
|
|
0-9 |
Input the numeric |
|
|
MEMO |
Programs |
|
|
CLEAR |
Clears the inputting |
2Play
4 / ¢ |
Skip forward or previous track |
9Stop
;Pause
CONTROLLING A MARANTZ VCR (VCR MODE)
|
POWER |
|
OFF |
ON/OFF |
ON |
|
SOURCE |
|
|
|
M |
|
|
D11 |
|
|
D2 |
|
|
D3 |
|
|
D4 |
|
PAGE 1 |
D5 |
|
|
|
CH |
|
VOL |
OK
PREV |
LIP.SYNC |
MUTE |
|
|
|
||
|
|
GUIDE |
|
MENU |
|
|
EXIT |
TEST |
|
CH.SEL |
SURR |
1 |
|
2 |
3 |
7.1CH |
|
ATT |
SPK-AB |
4 |
|
5 |
6 |
DISP |
|
OSD |
SLEEP |
7 |
|
8 |
9 |
|
|
THX |
|
CLEAR |
|
0 |
MEMO |
TV |
DVD |
VCR |
DSS |
TUNER |
CD |
CD-R |
MD |
TAPE |
AUX1 |
AUX2 |
AMP |
|
|
LIGHT |
|
1 |
|
|
2 |
RC8500SR
Learning Remote Controller
SOURCE ON/OFF |
Turns the VCR on and off |
D1 - D5 / >(Page) |
(Refer to page vi) |
|
|
MENU |
Call up the menu |
|
|
EXIT |
Exits the programming menu |
|
|
0-9 |
Input the numeric |
2Play
4 / ¢ |
Skip forward or previous track |
9Stop
;Pause
0Record
36

CONTROLLING A MARANTZ CD RECORDER (CDR MODE)
|
POWER |
|
OFF |
ON/OFF |
ON |
|
SOURCE |
|
|
|
M |
|
|
D11 |
|
|
D2 |
|
|
D3 |
|
|
D4 |
|
PAGE 1 |
D5 |
|
|
|
CH |
|
VOL |
OK
PREV |
LIP.SYNC |
MUTE |
|
|
|
||
|
|
GUIDE |
|
MENU |
|
|
EXIT |
TEST |
|
CH.SEL |
SURR |
1 |
|
2 |
3 |
7.1CH |
|
ATT |
SPK-AB |
4 |
|
5 |
6 |
DISP |
|
OSD |
SLEEP |
7 |
|
8 |
9 |
|
|
THX |
|
CLEAR |
|
0 |
MEMO |
TV |
DVD |
VCR |
DSS |
TUNER |
CD |
CD-R |
MD |
TAPE |
AUX1 |
AUX2 |
AMP |
|
|
LIGHT |
|
1 |
|
|
2 |
RC8500SR
Learning Remote Controller
SOURCE ON/OFF |
Turns the CD recorder on and off |
POWER ON |
Turns the CD recorder on |
|
|
POWER OFF |
Turns the CD recorder off |
|
|
D1 - D5 / >(Page) |
(Refer to page vi) |
|
|
MENU |
Switches the display information |
|
|
0-9 |
Input the numeric |
|
|
MEMO |
Programs |
|
|
CLEAR |
Clears the inputting |
2Play
4 / ¢ |
Skip forward or previous track |
9Stop
;Pause
0Record
CONTROLLING A MARANTZ MD DECK (MD MODE)
|
POWER |
|
OFF |
ON/OFF |
ON |
|
SOURCE |
|
|
|
M |
|
|
D11 |
|
|
D2 |
|
|
D3 |
|
|
D4 |
|
PAGE 1 |
D5 |
|
|
|
CH |
|
VOL |
OK
PREV |
LIP.SYNC |
MUTE |
|
|
|
||
|
|
GUIDE |
|
MENU |
|
|
EXIT |
TEST |
|
CH.SEL |
SURR |
1 |
|
2 |
3 |
7.1CH |
|
ATT |
SPK-AB |
4 |
|
5 |
6 |
DISP |
|
OSD |
SLEEP |
7 |
|
8 |
9 |
|
|
THX |
|
CLEAR |
|
0 |
MEMO |
TV |
DVD |
VCR |
DSS |
TUNER |
CD |
CD-R |
MD |
TAPE |
AUX1 |
AUX2 |
AMP |
|
|
LIGHT |
|
1 |
|
|
2 |
RC8500SR
Learning Remote Controller
SOURCE ON/OFF |
Turns the MD deck on and off |
POWER ON |
Turns the MD deck on |
|
|
POWER OFF |
Turns the MD deck off |
|
|
D1 - D5 / >(Page) |
(Refer to page vi) |
|
|
MENU |
Switches the display information |
|
|
0-9 |
Input the numeric |
|
|
MEMO |
Programs |
|
|
CLEAR |
Clears the inputting |
2Play
4 / ¢ |
Skip forward or previous track |
9Stop
;Pause
0Record
ENGLISH
CONTROLLING A MARANTZ TAPE DECK (TAPE MODE)
|
POWER |
|
OFF |
ON/OFF |
ON |
|
SOURCE |
|
|
|
M |
|
|
D11 |
|
|
D2 |
|
|
D3 |
|
|
D4 |
|
PAGE 1 |
D5 |
|
|
|
CH |
|
VOL |
OK
PREV |
LIP.SYNC |
MUTE |
|
|
|
||
|
|
GUIDE |
|
MENU |
|
|
EXIT |
TEST |
|
CH.SEL |
SURR |
1 |
|
2 |
3 |
7.1CH |
|
ATT |
SPK-AB |
4 |
|
5 |
6 |
DISP |
|
OSD |
SLEEP |
7 |
|
8 |
9 |
|
|
THX |
|
CLEAR |
|
0 |
MEMO |
TV |
DVD |
VCR |
DSS |
TUNER |
CD |
CD-R |
MD |
TAPE |
AUX1 |
AUX2 |
AMP |
|
|
LIGHT |
|
1 |
|
|
2 |
RC8500SR
Learning Remote Controller
SOURCE ON/OFF |
Turns the TAPE deck on and off |
POWER ON |
Turns the TAPE deck on |
|
|
POWER OFF |
Turns the TAPE deck off |
|
|
D1 - D5 / >(Page) |
(Refer to page vi) |
|
|
0-9 |
Input the numeric |
|
|
MEMO |
Programs |
|
|
CLEAR |
Clears the inputting |
2Play
4 / ¢ |
Skip forward or previous track |
9Stop
;Pause
0Record
37
ENGLISH |
This remote control is preset with a total of 12 |
||
|
BASIC OPERATION |
||
|
USE MODE |
|
|
|
(Normal operation status) |
||
|
types of remote codes, including Marantz TV |
||
|
(television), DVD, VCR (VCR deck), DSS (satellite |
||
|
broadcasting tuner), TUNER, CD, CD-R, MD, |
||
|
TAPE (tape deck), AUX1, AUX2, and AMP |
||
|
(amplifier). |
|
|
|
Learning is not necessary for Marantz products. |
||
|
You can use these products without setting any |
||
|
codes. |
|
|
|
1. Press the SOURCE button. |
||
|
For this example, press DVD. |
||
|
DVD is shown on the LCD, and the remote control is |
||
|
set for DVD. |
||
|
Pressing the source button once changes the remote |
||
|
control to the settings for the source that was |
||
|
pressed. |
|
|
|
To change the amplifier or other source, press the |
||
|
SOURCE button twice (double-click). The code is |
||
|
sent, and then the amplifier source changes to DVD. |
||
|
2. Press the buttons to operate the DVD. |
||
|
The |
indicator is shown on the LCD while the |
|
remote control codes are being transmitted. It is not displayed when buttons without stored code are pressed.
3. The direct buttons can be used to perform up to 20 operations for each of the 12 sources, including DVD, TV, AMP, and other AV equipment.
The buttons consist of the D1 to D5 buttons, and the equipment is operated by pressing the buttons corresponding to the indicators on the LCD.
Four pages are available, and press the > button to select a page. The current page position is displayed on the LCD.
PRESET MODE
(When operating non-Marantz AV equipment products)
This remote control is preset with remote control codes from AV equipment by other manufacturers. The preset codes are TV, VCR, LD, CABLE, DSS, DVD, TAPE, TUNER, CD, CD-R, MD and AMP. Settings can be made in one of two ways.
When the preset codes are set, the following codes are contained in the source button of the remote control.
See the attached manufacturer number list for the preset manufacturers, devices, preset numbers, and other settings.
Remote control |
Corresponding |
Device name |
source name |
preset code |
|
TV |
TV |
Television |
DVD |
DVD |
DVD player |
VCR |
VCR |
Video deck |
DSS |
SATELLITE |
Satellite broadcasting |
|
|
tuner equipment |
TUNER |
RECEIVER/TUNER |
AM FM TUNER |
CD |
CD/CD-R PLAYER |
CD player |
CD-R |
CD/CD-R PLAYER |
CD recorder |
MD |
CD/CD-R PLAYER |
MD deck |
TAPE |
TAPE |
Cassette deck |
AUX1 |
CABLE |
Cable television |
AUX2 |
LASER DISC |
Laser disc player |
AMP |
AMPLIFIER |
Amplifier or receiver |
|
RECEIVER/TUNER |
|
•When using Marantz products, TV and DVD can be set to TV1 (TV/VDP: Projector) and TV2 (PDP: Plasma display), and DVD1 (first DVD player) and DVD2 (second DVD player), respectively, to match the customer’s operating environment. These settings are made in PRESET mode.
In the factory default state, the remote control is set to TV1 and DVD1. To make the presets, enter the numbers below while referring to the section “Entering and Setting the Manufacturer Number Directly”.
TV1: 0001, TV2: 0002
DVD1: 0001, DVD2: 0002
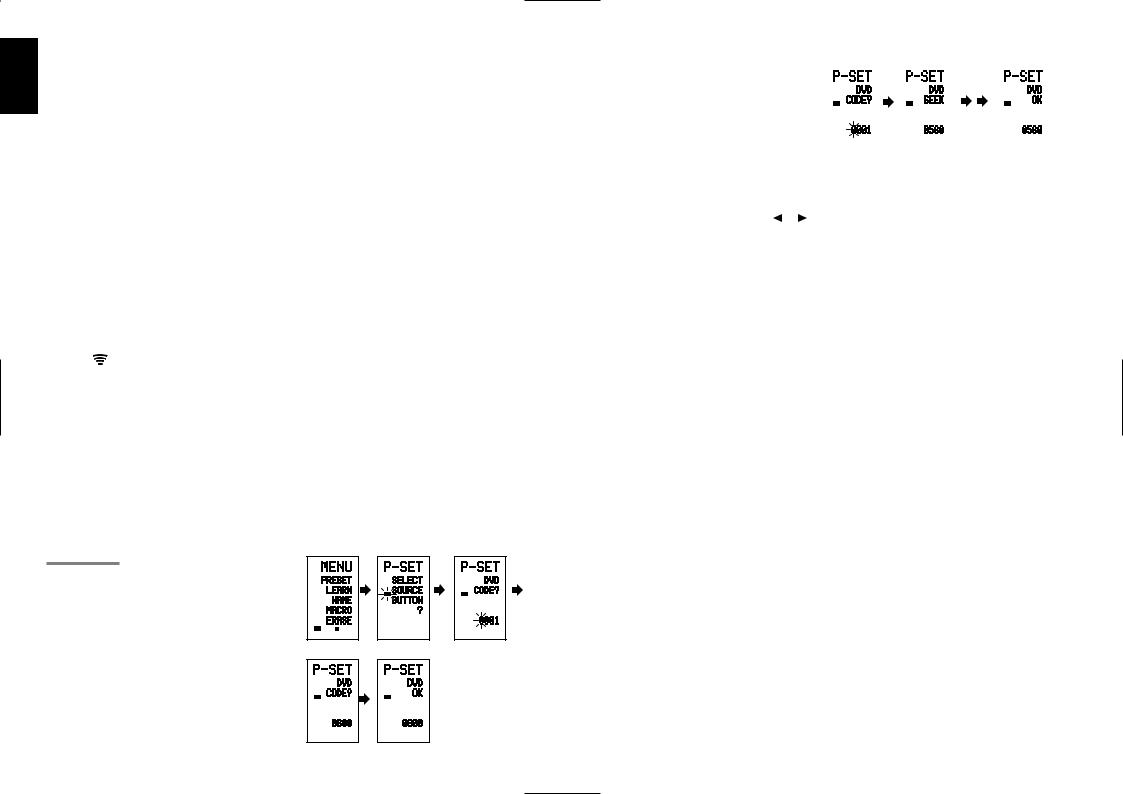
Entering and Setting the Manufacturer Number
Directly
Refer to the manufacturer number list.
This example shows how to set a SAMSUNG DVD player.
2 |
|
3 |
|
4 |
|
|
LEARN |
|
LEARN |
USE PAGE 1 |
|
1 |
2 |
1 2 |
5 |
|
6 |
|
|
LEARN |
|
LEARN |
|
|
1 |
2 |
1 |
2 |
|
1. View the supplied manufacturer number list, and find the number of the manufacturer for the device that you are using.
2. Hold down the M button for three seconds or more.
The menu is displayed.
3. Press the D1 (PRESET) direct button.
The Preset setting (P-SET) is displayed.
4. Press the DVD source button.
5. Press the numeric buttons to enter the fourdigit manufacturer number.
Example: To enter “0600” from the manufacturer number list.
To correct the entered number, use the |
or |
cursor button to enter the correct number. |
|
•If no button is pressed for over one minute during the setting process, any settings that were made are cancelled.
6.Press the OK cursor button.
7.Confirm the OK is displayed and then the display returns to the Preset Setting (P-SET).
When the manufacturer number is entered correctly, OK is displayed momentarily on the screen.
• I f y o u e n t e r a n u m b e r n o t i n t h e manufacturer number list, WRONG CODE is displayed, and then you return to the preset setting again
Check the manufacturer number list, and either set a different number or use the sequence function to set.
8. To set the manufacturer number for another source device, repeat the procedure in steps 4 to 6.
9. After the settings are completed, press the M button.
10. Press the buttons on the remote control to check that the DVD can be operated correctly.
Setting Equipment Not Appearing in Manufacturer
Number List
Use the sequence function to set equipment not appearing in the manufacturer number list. You may still be unable to set some equipment even when using the sequence function. In this case, the remote control can be programmed with codes individually.
In the sequence function, the power ON/OFF codes are transmitted by pressing the remote control buttons in order.
If the power for the equipment is left on, hold down the button until the equipment is turned off, and then release. This completes the setting.
This example shows how to set a DVD player.
4 |
|
|
5 |
|
7 |
|
|
||
LEARN |
|
|
|
LEARN |
|
|
LEARN |
|
|
|
1 |
2 |
|
1 |
2 |
|
1 |
2 |
|
|
|
|
|
|
|
|
|
||
1. |
Turn on the power of the DVD player. |
|
|
||||||
2. |
Hold down the M button for three seconds or |
||||||||
more.
The menu is displayed.
3. Press the D1 (PRESET) direct button.
The Preset setting (P-SET) is displayed.
4. Press the DVD source button.
5. Hold down the CH+ or CH– button for one second or more.
6. Press the CH+ button repeatedly in the interval for one second.
The signal is transmitted, and the display cycles through the code number.
Press the CH– button to go back to a number screen.
7. Release the button once the DVD player turns off.
8. Press the OK cursor button.
9. Confirm the OK is displayed and then the display returns to the Preset Setting (P-SET).
10. To set the manufacturer number for another source device, repeat the procedure in steps 4 to 8.
11. After the settings are completed, press the M button.
12. Press the buttons on the remote control to check that the DVD can be operated correctly.
Check the following points if the equipment which was set does not operate properly.
•If there is more than one number in the manufacturer number list, try setting a different number.
•There may be some buttons which cannot be used. Program the codes to the required buttons.
38

LEARN MODE
Programming the (PLAY) and Other Control
Buttons and Numeric Buttons
This remote control is capable of learning and storing codes used by other remote controls that you already own.
For codes which are not learned, the remote control will transmit either the Marantz preset codes from the initial settings, or remote codes from another manufacturer’s AV equipment which is set by the customer.
The receiver sensor for the remote control signals is located at the top of the remote control.
This example shows how to learn the codes from the remote control of a DVD player.
1 |
|
|
|
2 |
|
4 |
|
|
|
|
|
|
|
LEARN |
|
|
LEARN |
|
|
|
USE PAGE 1 |
|
|
PAGE 1 |
2 |
|
1 |
2 |
|
|
|
|
|
|
|
|
|||
6 |
(When OK) |
(failed) |
(codes are full) |
||||||
|
|
|
|
|
|
|
|
|
|
|
LEARN |
|
|
LEARN |
|
|
|
|
|
|
PAGE 1 |
2 |
|
PAGE 1 |
2 |
|
1 |
2 |
|
|
|
|
|
|
|
|
|
|
|
1. |
Hold down the M button for three seconds or |
|
more. |
2. |
The menu is displayed. |
Press the D2 (LEARN) direct button. |
|
|
The LEARN setting (LEARN) is displayed. The LEARN |
3. |
indicator then blinks. |
Press the DVD source button. |
|
4. |
Press the (PLAY) button. |
|
The LEARN indicator blinks, and then displays to |
5. |
indicate that learning is ready. |
Place the receiver sensor of the remote |
control (top) so that it is facing the transmitter of the DVD remote control (top) at a distance of about 5 cm (2 inches).
6. Press and hold down the (PLAY) button of the transmitting DVD remote control, and check that OK is displayed on the LCD.
The remote control has finished learning when OK is displayed on the LCD.
If ERROR is displayed on the LCD, some error has prevented the command from being learned. If this happens, repeat the procedure for steps 4 and 5.
In some rare cases, ERROR may be displayed repeatedly during the learning operation. In this case, the transmitting remote control may have special signal codes. These codes cannot be learned by this remote control.
7. Follow the same procedure to make the remote control learn the other buttons.
8. Repeat the procedure in steps 3 to 6 to have the remote control learn the signal codes from a TV, CD player, or other AV equipment.
•When no buttons are pressed for approximately one minute during the learning operation, the remote control automatically returns to USE mode.
•When programming the source buttons, switch to the source in step 3, and then press the source button again.
9.When you have finished programming the codes for each button, press the M button.
The USE indicator is displayed on the LCD, and the newly stored codes can be used.
•If FULL is displayed on the LCD, the memory cannot hold any more learned codes in LEARN mode.
If FULL is displayed no matter how many times you try the learning operation, the remote control cannot accept any more new codes until some of the previously learned codes are deleted from the memory. Delete some of the learned buttons from the sources.
The M button and > button cannot be taught. Only each one code can be learned for the LIGHT buttons 1 and 2, regardless of the source.
Programming the Direct Buttons and Rewriting
Names
This example shows how to program codes from other manufacturer products to the DVD MENU button (D1) and change the display to OSD.
6 |
7 |
|
8 |
LEARN |
|
LEARN |
LEARN |
PAGE 1 |
2 |
PAGE 1 2 |
PAGE 1 2 |
1. Hold down the M button for three seconds or more.
The menu is displayed.
2. Press the D2 (LEARN) direct button.
The LEARN setting (LEARN) indicator is displayed. The LEARN indicator then blinks.
3. Press the DVD source button.
The first page of the direct button screen is displayed. There are four available pages. Pressing the > buttons cycles through the pages in this order 1
→ 2 → 3 → 4 → 1.
4.Press the D1 (MENU) direct button.
The LEARN indicator blinks, and then displays to indicate that learning is ready.
5.Place the receiver sensor of the remote control (top) so that it is facing the transmitter of the DVD remote control (top) at a distance of about 5 cm (2 inches).
6.Press and hold down the OSD button of the transmitting DVD remote control, and check that OK is displayed on the LCD.
The remote control has finished learning when OK is displayed on the LCD.
If ERROR is displayed on the LCD, some error has prevented the command from being learned. If this happens, repeat the procedure for steps 4 and 5.
• After learning is completed, the remote control automatically switches to name rewriting mode. The left end “ ” indicator on the MENU blinks to indicate that the blinking part can be rewritten.
• If no names will be rewritten, press the OK cursor button. The display returns to learning standby mode by pressing the OK cursor button.
7. To change the name, press the numeric |
|
|||
ENGLISH |
||||
buttonsto enter the text. |
|
|||
|
|
|||
• |
Use the cursor buttons |
to move to the |
|
|
|
sections to be rewritten on the LCD. |
|
||
• |
To change MENU to OSD, press the 5 |
|
||
|
numeric button. |
|
|
|
|
|
|
||
|
Each time the button is pressed, the |
|
||
|
display cycles through M → N → O → 5 → |
|
||
|
M. |
|
|
|
8. After rewriting of the text is completed, press |
|
|||
the OK cursor button. |
|
|
||
To delete text that is already entered, press the 0 |
|
|||
button to insert a space. |
|
|
||
• |
In this example, MENU is changed to |
|
||
|
“OSD (space) (space)” in this step, and |
|
||
|
then OSD is displayed in the right side by |
|
||
|
pressing the OK button. |
|
|
|
For details, refer to the section “Rewriting Names”.
9. In the same way, use the > button to select the page, and then press the direct button to program the codes.
10. After programming the codes for each of the buttons, press the M button.
The USE indicator displays on the LCD, and the newly stored codes can be transmitted.
REWRITING NAMES
This remote control allows the rewriting of names for the sources and direct buttons. This operation is performed for each individual source.
This example shows how to change the source name from DVD to AVD and AUDIO to SOUND.
3 |
|
|
4 |
|
|
5 |
|
NAME |
|
|
NAME |
|
|
NAME |
|
PAGE |
1 |
2 |
PAGE |
1 |
2 |
PAGE |
1 2 |
7 |
|
|
8 |
|
|
9 |
|
NAME |
|
|
NAME |
|
|
NAME |
|
PAGE |
1 |
2 |
PAGE |
1 |
2 |
PAGE 1 |
2 |
1. Hold down the M button for three seconds or more.
The menu is displayed.
2. Press the D3 (NAME) direct button .
39
ENGLISH
3. Press the DVD source button .
The NAME indicator blinks.
The “ ” blinks to indicate that the letter can be changed.
4. Press the  cursor button twice.
The D in DVD blinks to indicate that the letter can be changed.
5. Press the 1 numeric button to select A.
Each time the numeric buttons are pressed, the button cycles through the alphanumeric characters shown below.
1:A → B → C → 1 → A
2:D → E → F → 2 → D
3:G → H → I → 3 → G
4:J → K → L → 4 → J
5:M → N → O → 5 → M
6:P → Q → R → 6 → P
7:S → T → U → 7 → S
8:V → W → X → 8 → V
9:Y → Z → / → 9 → Y
0: SPACE ( ) → + → — → , → ’ → < → > → ? → 0 → SPACE ( )
6. Press the  or
or  cursor button .
The letter is changed to “A”.
•The  and
and  cursor buttons can be used to move the blinking indicator of the section to be rewritten.
7.Press the  or
or  cursor buttons to select AUDIO on the direct button indicator. The A flashes to indicate that the name can be changed.
8.Press the 7 numeric button to select S.
Each time the button is pressed, the button cycles through S → T → U → 7 → S.
9.Press the  cursor button to move the flashing section.
10. Press the 5 numeric button to select O.
11. Follow the same procedure to enter U, N, and
D.
12. When finished entering the text, press the OK cursor button .
13. Press the M button .
The USE indicator displays on the LCD, and the newly stored codes can be used.
The input is overwritten, and so the currently displayed text is erased.
Up to six characters can be entered for the direct button indicator.
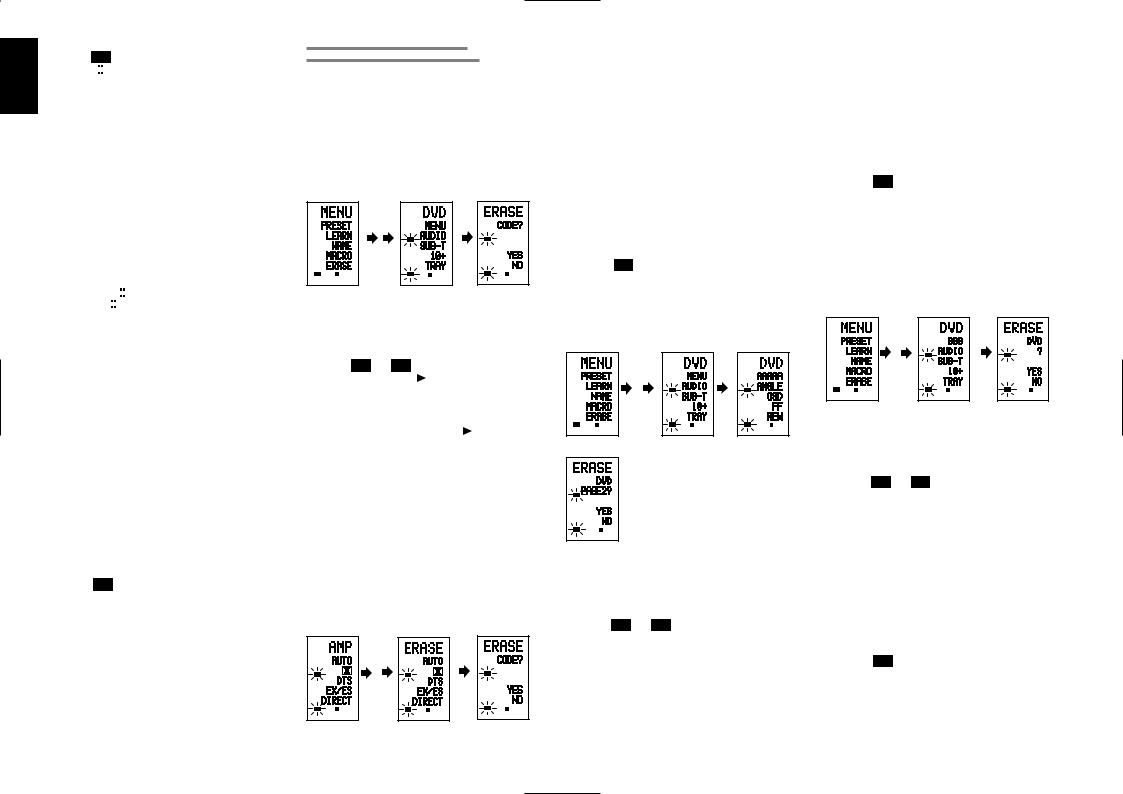
ERASING PROGRAMMED CODES (RETURNING TO INITIAL SETTINGS)
Codes can be erased in five ways: by buttons, direct buttons, direct button pages, sources, and by all memory contents.
Erasing Buttons and Erasing Direct Buttons
This example shows how to erase the code learned from the PLAY button of the DVD player and the AUTO code of the AMP direct button.
Erasing buttons
1 |
|
3 |
|
4 |
|
|
|
|
LEARN |
|
LEARN |
|
|
USE |
PAGE 1 |
USE |
PAGE 1 2 |
USE |
PAGE |
1 2 |
|
1. Hold down the M button for three seconds or more.
The menu is displayed.
2. Press the D5 (ERASE) direct button .
3. Press the DVD source button .
The USE and LEARN indicators blink.
4. Press the button (PLAY) that you want to erase while holding down the CLEAR button .
A message is displayed on the LCD.
5. Press the D4 (YES) direct button to erase.
The code programmed to the (PLAY) button is erased.
When the code is cleared, the code for this button resets to the factory default code or becomes blank.
•To cancel the erasing operation, press the D5 (NO) button to return to the previous display.
To erase codes programmed for the CLEAR button, simply press the CLEAR button twice.
To erase codes programmed for the SOURCE button, simply press the SOURCE button twice.
Erasing direct buttons |
|
|
|
6 |
8 |
9 |
|
LEARN |
LEARN |
LEARN |
|
USE PAGE 1 2 |
USE PAGE 1 2 |
USE |
PAGE 1 2 |
|
|||
6. Press the AMP source button .
7. Press the > button to display the first page for AMP.
8. Press the D1 (AUTO) direct button to be erased while holding down the CLEAR button
.
9. Press the D4 (YES) direct button to erase.
The code programmed to the AUTO button is erased.
When the code is cleared, the code for this button resets to the factory default code or becomes blank. The rewritten name returns to the original name.
•To cancel the erasing operation, press the D5 (NO) button to return to the previous screen.
10.When the erasing operation is finished, press the M button .
The USE indicator displays to indicate that the remote control can now be operated.
Erasing Direct Button Pages
This example shows how to erase the entire direct button second page learned from the DVD player.
1 |
|
3 |
|
4 |
|
|
|
LEARN |
|
LEARN |
|
USE |
PAGE 1 |
USE |
PAGE 1 2 |
USE |
PAGE 1 2 |
5
LEARN
USE |
PAGE 1 2 |
1. Hold down the M button for three seconds or more.
The menu is displayed.
2. Press the D5 (ERASE) direct button .
3. Press the DVD source button .
The USE and LEARN indicators blink.
4. Press the > button to display the second page.
5. Press the > button while holding down the
CLEAR button .
6. Press the D4 (YES) direct button to erase.
All codes and names programmed to page 2 are erased. When the codes are cleared, the codes for this button reset to the factory default code or become blank. Any rewritten names return to the original name.
• To cancel the erasing operation, press the D5 (NO) button to return to the previous screen.
7. When the erasing operation is finished, press the M button .
The USE indicator lights up to indicate that the remote control can now be operated.
Erasing Sources
This procedure clears all codes and names programmed to the DVD, TV, or other sources. All codes and names in the four direct button pages are also erased.
This example shows how to erase the names and codes learned from the DVD player.
1 |
|
3 |
|
4 |
|
|
|
LEARN |
|
LEARN |
|
USE |
PAGE 1 |
USE |
PAGE 1 2 |
USE |
PAGE 1 2 |
1. Hold down the M button for three seconds or more.
The menu is displayed.
2. Press the D5 (ERASE) direct button .
3. Press the DVD source button .
The USE and LEARN indicators blink.
4. Press the DVD source button while holding down the CLEAR button .
5. Press the D4 (YES) direct button to erase.
All codes and names programmed to the DVD source are erased. When the codes are cleared, the codes for this button reset to the factory default code or become blank. Any rewritten names return to the original name.
•To cancel the erasing operation, press the D5 (NO) button to return to the previous display.
6.When the erasing operation is finished, press the M button .
The USE indicator displays to indicate that the remote control can now be operated.
40
 Loading...