


User Guide
Guía del usuario
Guide d’utilisation
Guida per l’uso
Benutzerhandbuch
Appendix
English ( 3 – 20 )
Español ( 21 – 39 )
Français ( 40 – 58 )
Italiano ( 59 – 77 )
Deutsch ( 78 – 96 )
English ( 97 – 98 )

2

User Guide (English)
Introduction
Box Contents
PMD-706
SD Card
Micro-USB Cable
(2) XLRF-1/4" TRS Cables
User Guide
Safety & Warranty Manual
Support
For the latest information about this product (documentation, technical specifications, system
requirements, compatibility information, etc.) and product registration, visit marantzpro.com.
For additional product support, visit marantzpro.com/support.
3
1
1
2
4
5
7
8
9
10
11
12
13
3
6
1
Features
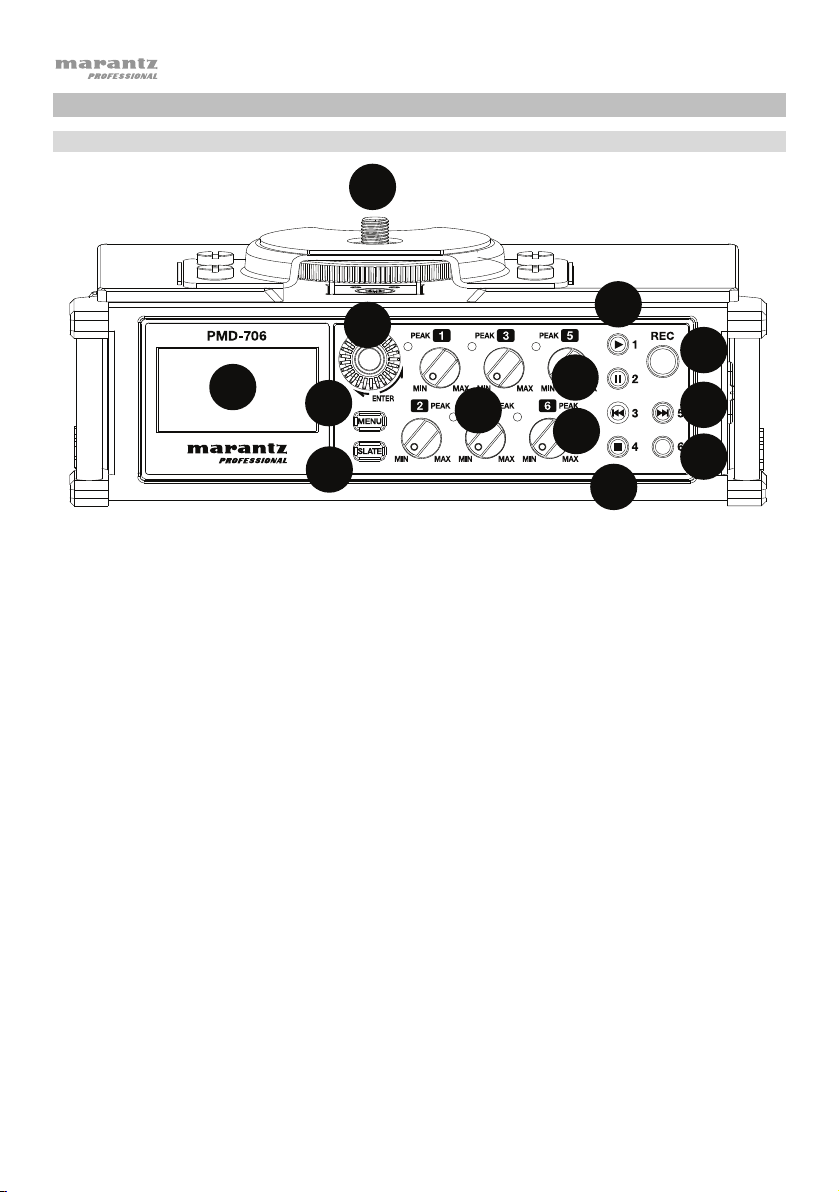
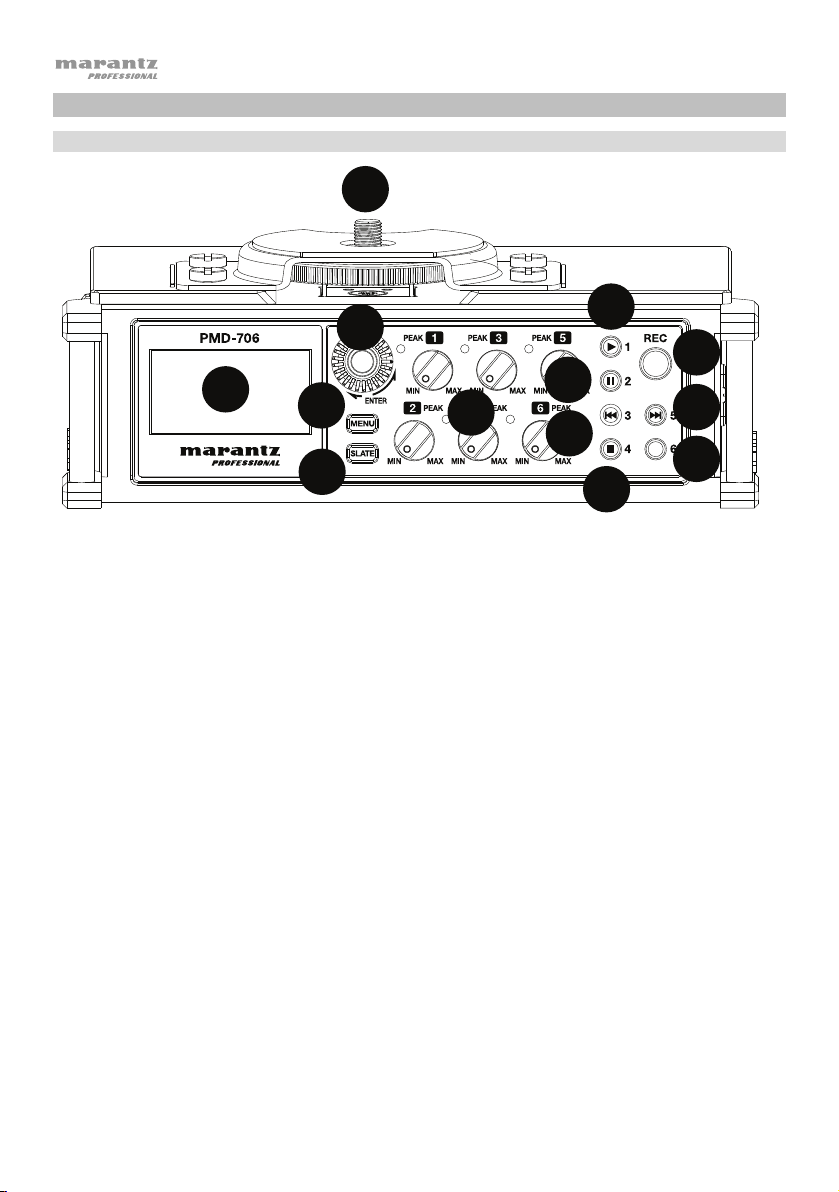
Front Panel
11
12
13
10
1. Hot Shoe Mount: Attach a camera or lighting panel on top of this hot shoe mount.
2. Display: Use this display to view and change PMD-706's settings. See the Setup chapter for examples of
how to configure your settings in different scenarios.
3. Enter Dial: Rotate the dial to select from the Menu options. Push the dial to select the current
Menu:
4.
5. Slate: Press and hold this button to mark a track with the slate sound. The slate tone generator allows for
6. Input Level Control: Turn each knob to adjust the level of its corresponding input. The LED will turn red if the
7. Input 1/Play: When in Playback mode, press this button to play an audio file. When in Menu mode, press this
8. Input 2/Pause: Press this button to pause an audio file when the unit is in playback mode. When in Menu
9. Input 3/Rewind: When an audio file is playing in Playback mode, press and hold this button to search
10. Input 4/Stop: When in Playback mode, press this button to stop an audio file during playback or recording.
11. Record: When a formatted SD card is in the SD card slot, press this button to start recording. See Features >
12. Input 5/Fast Forward: When an audio file is playing in Playback mode, press and hold this button to search
13. Input 6: When in Menu mode, press this button to go to the CH6 column settings.
4
Push this button to show the menu options on the display. Press the Menu button again to return to
the home screen. See Features > Menu Options for more details on navigating through the menus.
easy audio file alignment with video files when using video editing software.
input signal is "clipping" or distorting. If this happens, turn down the Input Level control until the red LED is no
longer illuminated.
button to go to the CH1 column settings. When a file or folder is selected on the Browse screen, press this
button to return to the Home screen and play the first file in the folder.
mode, press this button to go to the CH2 column settings.
backward through the audio file. When an audio file is stopped in Playback mode, press and release this
button to skip to the previous audio file. When in Menu mode, press this button to go to the CH3 column
settings.
Use this button to answer “NO” to a confirmation message on a setting screen. When in Menu mode, press
this button to go to the CH4 column settings.
Menu Options > Media for details on formatting a SD card.
forward through the audio file. When an audio file is stopped in Playback mode, press and release this button
to skip to the next audio file. When in Menu mode, press this button to go to the CH5 column settings.
option.

1
2
1
2
3
4
5
6
7
8
9
10
11
12
13
1
1
2
3
4
5
6
1
1
2
3
4
5
6
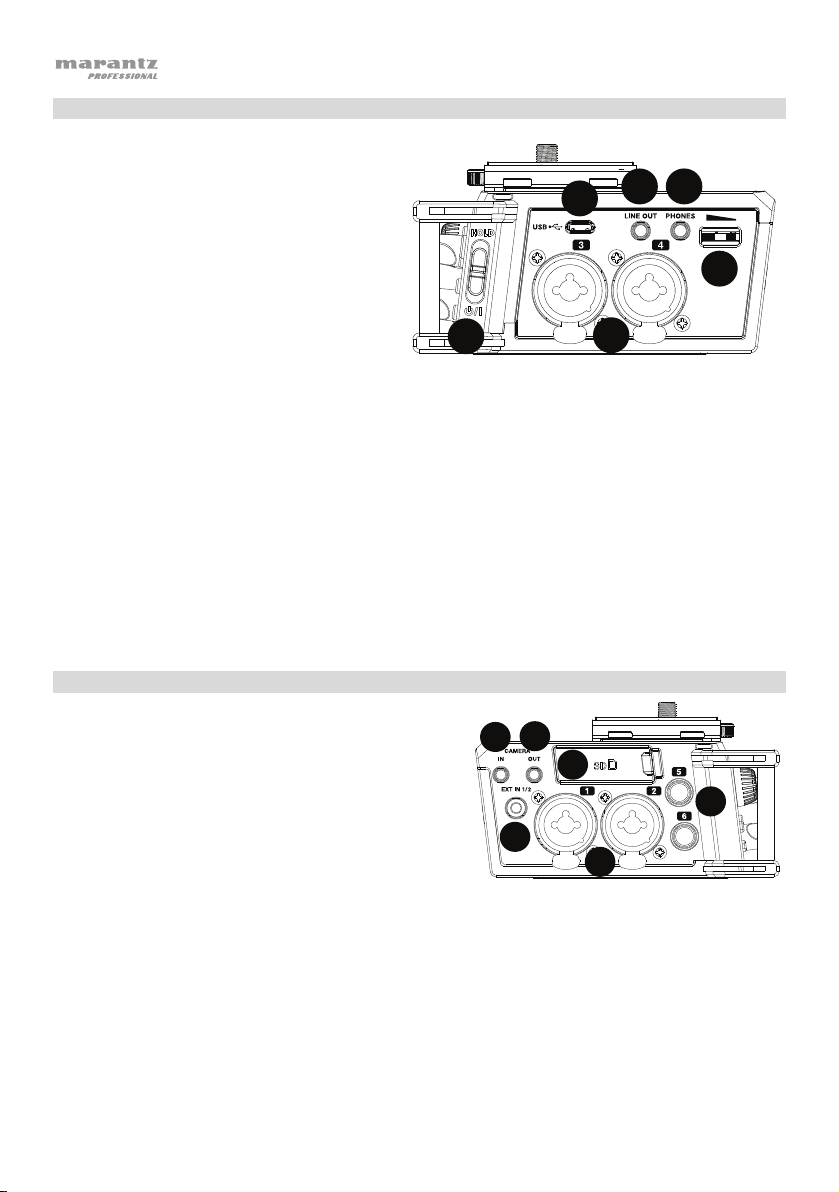
Rear Panel
1. Battery Compartment: Insert 4
AA batteries into this
compartment to power the unit.
Note: If recording with 4 or more
channels using 48V phantom
power, a USB power adapter or a
computer’s USB bus power must
be used in order to provide the
necessary power (1A) to all
channels.
Bottom Panel
1. Tripod Locking Hole: Attach your tripod here for a
secure connection.
2. 1/4” Threaded Insert: Connect your mounting
adapter from a tripod here.
Right Side Panel
1. Power On/Off/Hold Switch: Slide this switch
down to power PMD-706 on or off. Slide this
switch up to activate or deactivate the Hold
feature. When Hold is activated, all of PMD-706's
buttons will be disabled to prevent accidental
changes.
2. XLR+1/4” TRS Inputs: Connect a microphone or
line-level device to these XLR+1/4” (6.35 mm)
inputs.
3. Micro USB Port: Connect this port to a
computer with the included USB cable. This
connection will power PMD-706. You can also
use this connection to transfer files between PMD-706 and your computer. You can also connect this
port to a USB power adapter (sold separately) to power PMD-706 from a standard power outlet.
Note: If recording with 4 or more channels using 48V phantom power, a USB power adapter or a
computer’s USB bus power must be used in order to provide the necessary power (1A) to all channels.
4. Line Out: Connect this 1/8” (3.5 mm) output to a mixer, another recorder, or powered speakers. Go to
Menu > Output Control to adjust the volume output.
5. Headphone Output: Connect this 1/8” (3.5 mm) output to headphones for monitoring the incoming
audio signal or audio playback.
6. Headphone Volume Control: Adjust the headphone output volume using this control.
Note: Before connecting any device (condenser or dynamic microphones, line-level devices, etc.) to
any XLR, 1/4” input, or external inputs, ensure phantom power is turned off. Connecting or
disconnecting devices to or from these inputs while phantom power is on can damage the device or
PMD-706.
5
1
2
3
4
5
6
1
1
2
4
5
8
9
3
6
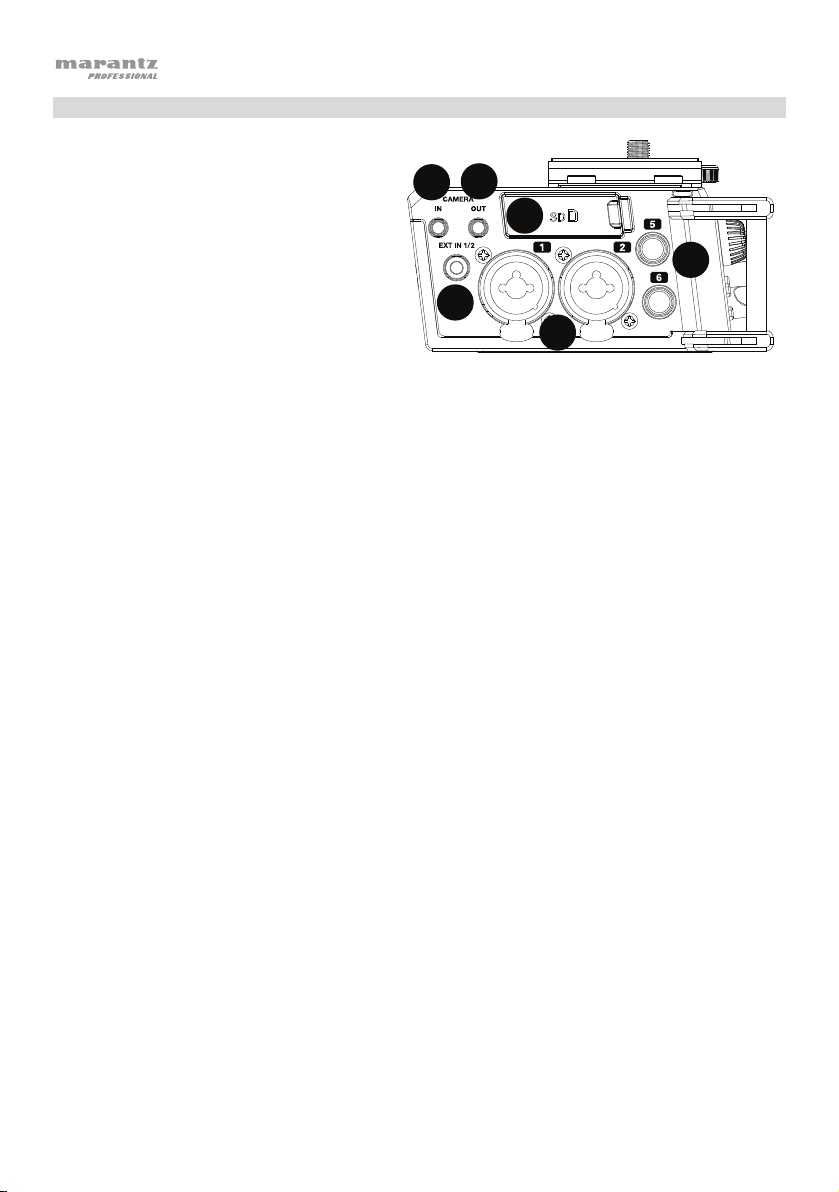
Left Side Panel
1. XLR+1/4” TRS inputs: Connect a
microphone or line-level device to these
XLR+1/4” (6.35 mm) inputs.
2. 1/8” (3.5 mm) Camera Input: Connect
the audio output of a camera to this 1/8”
(3.5 mm) TRS input.
3. 1/8” (3.5 mm) Camera Output:
Connect this
to the audio input of a camera. Go to
Menu > Output Control
volume output.
4. External Input: Connect a stereo
microphone or audio source to this 1/8” (3.5 mm) TRS input. See Menu > Mic Power to learn
how to turn phantom power on or off for this input.
5. SD Card Slot: Insert an SD card here.
6. 1/4” (6.35 mm) Inputs: Connect a mic-level or line-level device to these 1/4” (6.35 mm) inputs
using the included XLRF-1/4" cables. Phantom power can be supplied to these inputs.
Note: Before connecting any device (condenser or dynamic microphones, line-level devices,
etc.) to any XLR, 1/4” input, or external inputs, ensure phantom power is turned off. Connecting
or disconnecting devices to or from these inputs while phantom power is on can damage the
device or PMD-706.
1/8” (3.5 mm) TRS
output
to adjust the
6
1 2 3
4
5
6
7
8
9
10
11
12
13
1
2
3
4
5
6
7
8
9
10
11
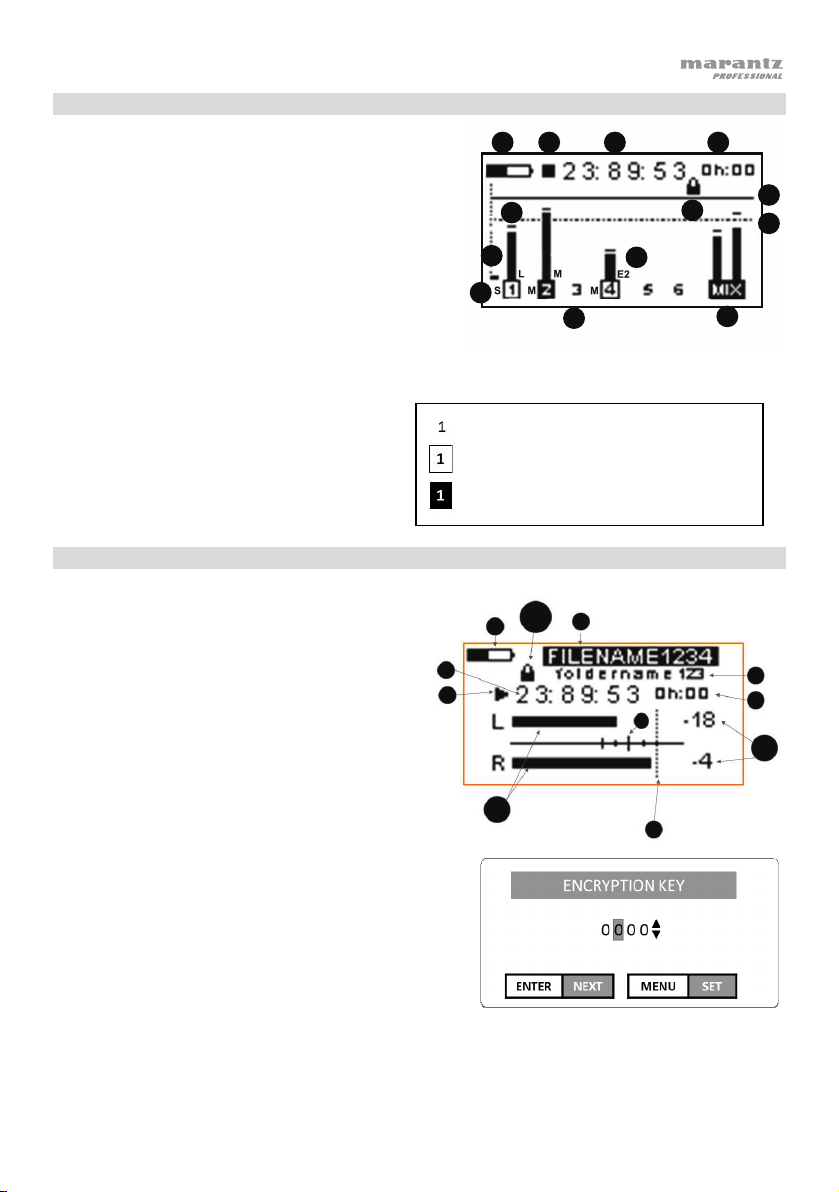
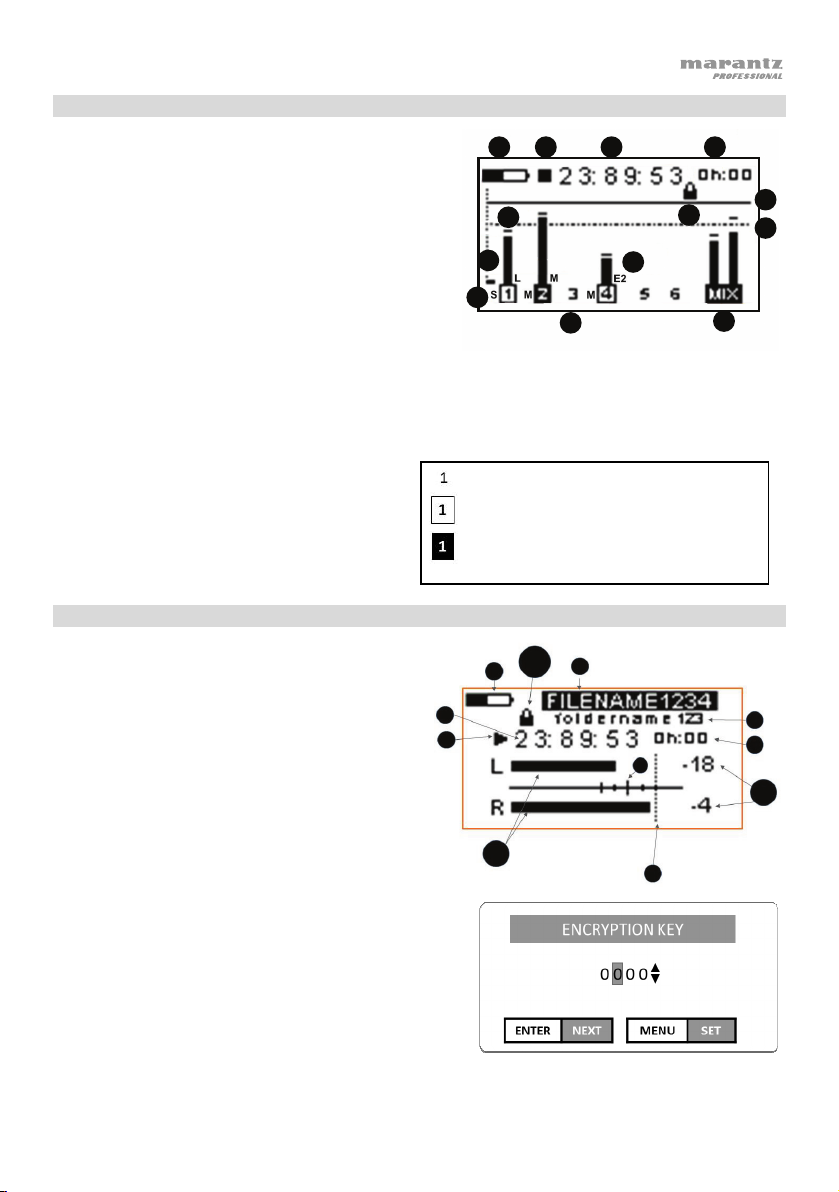
Home Screen Display
1. Record/Pause/Stop indicator
2. Elapsed time
3. Remaining record time available
4. 0 dB reference line
5. -12 dB reference line
6. Battery indicator
7. Mix channel
8. Channels 1-6 setup info
9. Signal indicator bar
10. Peak threshold
11. Recording type: stereo (S), mono (M), dual (D)
12. Input setting: mic (M), line (L), Ext 1 (E1), Ext 2
(E2)
13. Encryption on/off
Play Screen
1. Battery indicator
2. File name
3. Folder name
4. Running time of playback
5. Remaining time of playback
6. Play/Stop/Pause/FF/Rewind indicator
7. Left/Right playback meters
8. 0 dB level
9. Level indicators: -6 dB, -12 dB (major),
-15 dB, -18 dB
10. Digital readout of playback level
11. Encryption on/off: See Menu 7 – Rec Set for
details on how to enter an encryption key.
Note: If you try to play an encrypted file, you
must enter the encryption key first.
10
12
11
Channel Reporting Symbols
Channel is not active
Channel is active and has phantom power applied
Channel is active and has NO phantom power applied
11
1
13
10
7
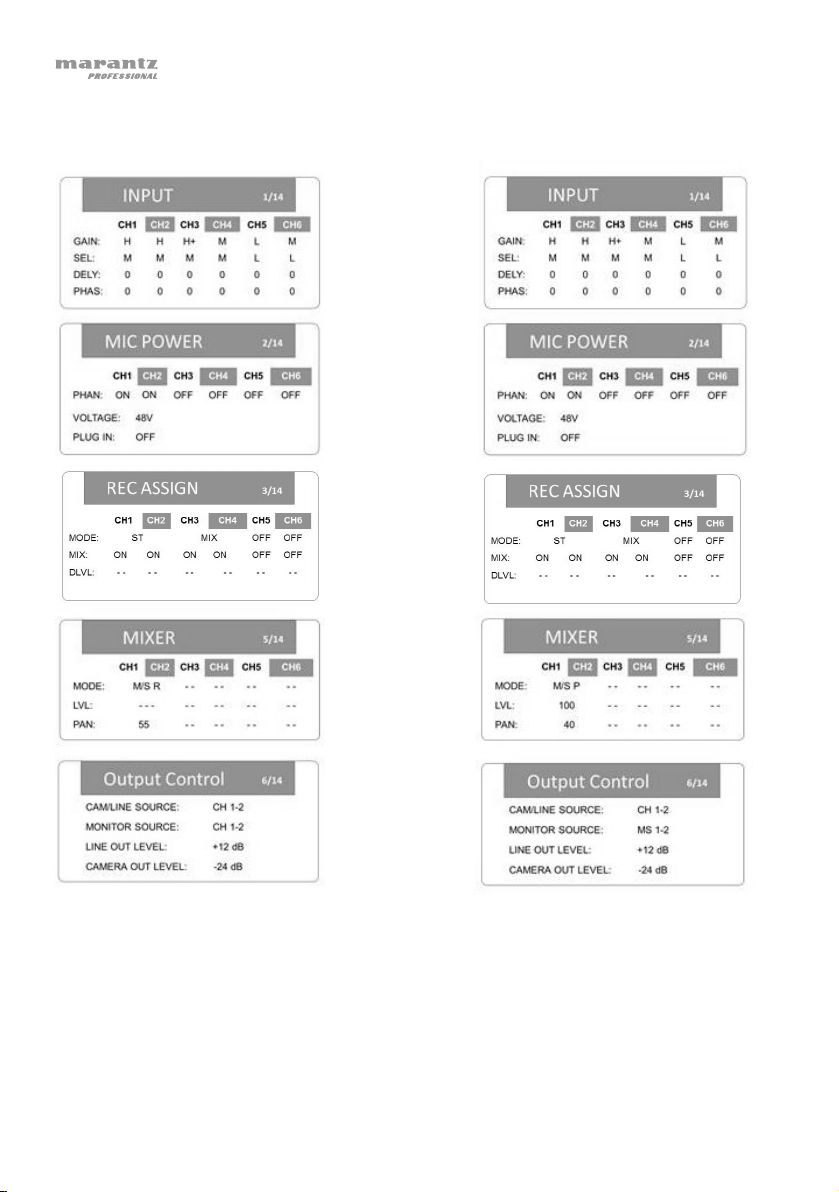
Menu Options
Press the Menu button to show the menu options on the display. To move vertically on a page or to
the next page, scroll with the Enter dial. To select a menu item or sub item, press the Enter dial and
change the item’s options by turning the dial. Press the Enter dial to confirm the item’s changes. Use
Input 1-6 buttons to jump to a specific column for CH1-CH6.
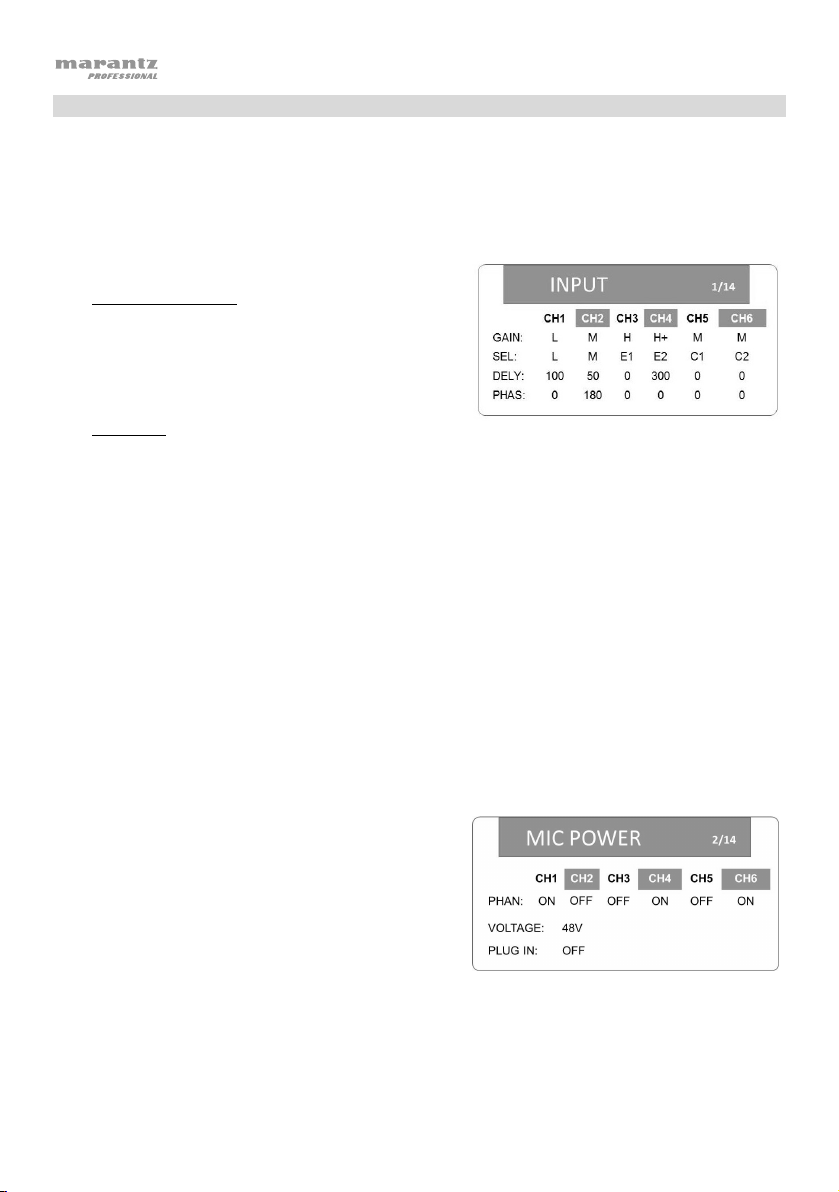
1. Input
Gain Setting (GAIN)
• L (Low)
• M (Mid)
• H (High)
• H+ (High Plus)
Selection (SEL)
• CH1–CH4
• CH5 & CH6
Delay (DELY): 0-300 ms (@ 44.1 kHz) in 1 ms increments
0-270 ms (@ 48 or 96 kHz) in 1 ms increments
Phase (PHAS): 0, 180
2. Mic Power
Phantom Power (PHAN): On, Off
Phantom Power Voltage (VOLTAGE): 24V, 48V
Plug-in Voltage for Ext Input (PLUG IN): On, Off
8
• M (mic level)
• L (line level)
• E1 (external 1) (1 or 3)
• E2 (external 2) (2 or 4)
• M (mic level)
• L (line level)
• E1 (external 1) (5) / E2 (external 2) (6)
• C1 (Camera In 1) (5) / C2 Camera In 2 (6)
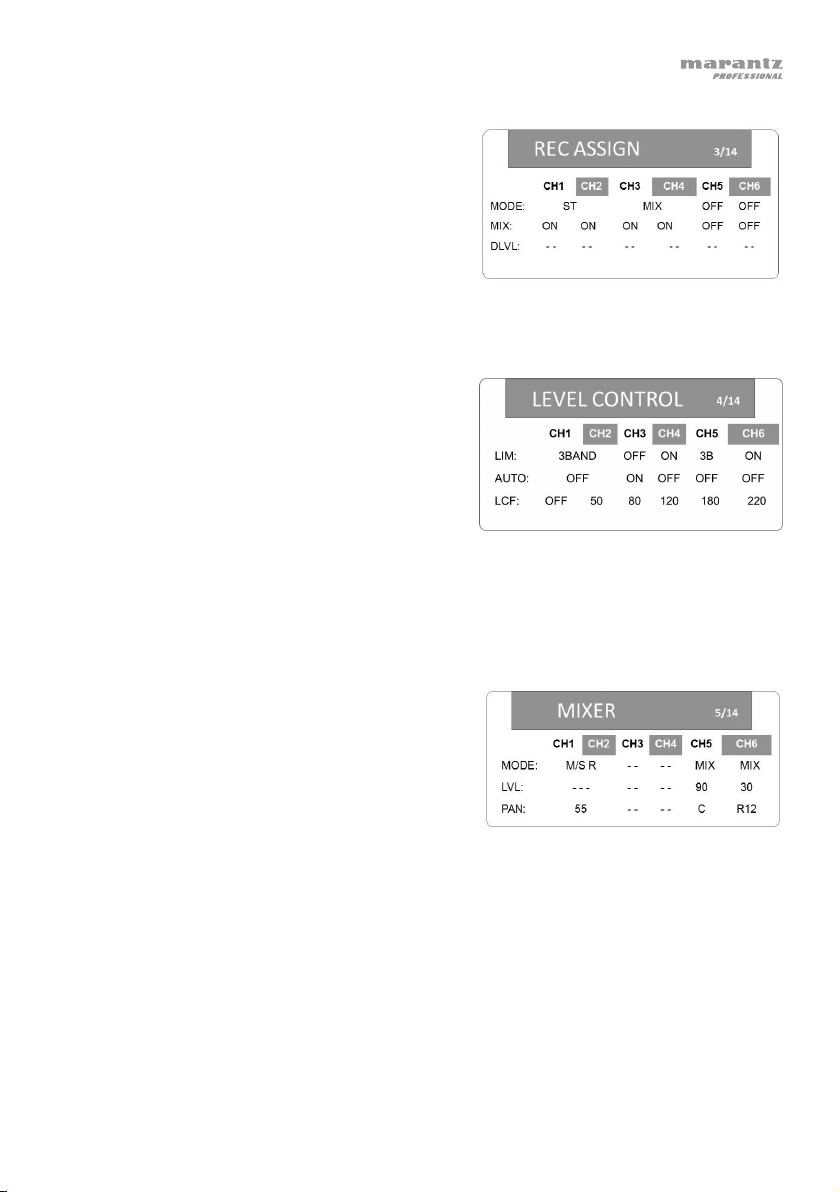
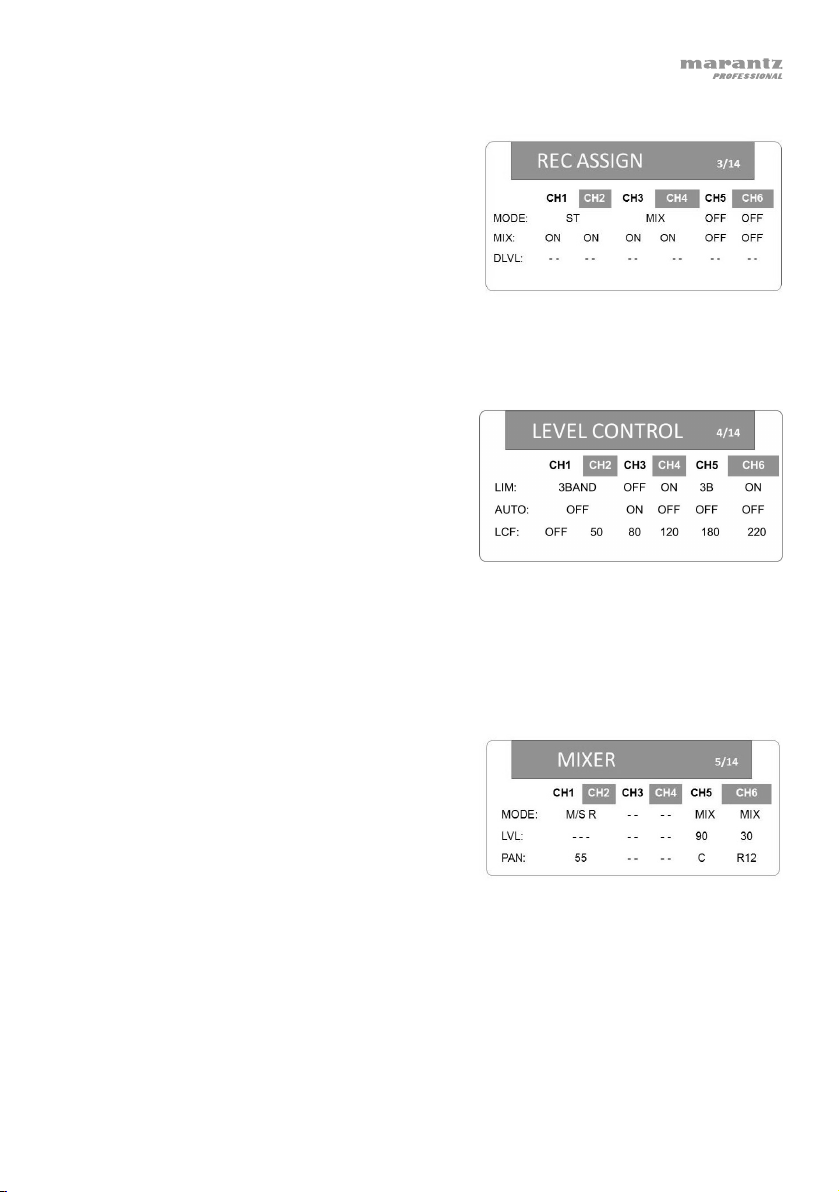
3. Rec (Record) Assign
Recording Mode (MODE): M (mono), ST (stereo),
DM (dual mono), DST (dual stereo), M/S R
(mid/side recording), MIX
Mix Setting (MIX): On, Off
DLVL (Dual Level): -12 dB to -1 dB in 1 dB
increments (available only in dual mono and dual
stereo modes)
Note: If sampling rate on Menu 7 – Rec Set is set to 96 kHz, CH5 and CH6 will be unavailable
to use for recording.
4. Level Control
Limiter (LIM): Off, On, 3B (that channel only), LINK
(CH1/2 and/or CH3/4), 3BAND (CH1/2 and/or
CH3/4)
Auto Level Control (AUTO): On (all LIM settings
will be set to OFF), Off
Low Cutoff Frequency (LCF): Off, 50 Hz, 80 Hz,
120 Hz, 180 Hz, 220 Hz
Note: The limiter can only be turned on if the sampling rate is 44.1/48 kHz. When set to ON or
3B, the limiter only affects the channel that has excessive input. When set to LINK or 3BAND,
the limiter affects channels that have excessive input and the channels linked to them.
5. Mixer
Recording Mode (MODE): M/S R (mid/side
recording: record), M/S P (mid/side recording:
playback), MIX
Level (LVL): --- (off), 0–100
Panning (PAN): L1–12 (left), C (center), R1–12 (right)
Note: To set the MODE, use the Rec Assign Menu (3). To set the LVL when MODE is set to
M/S P, use the Output Control Menu (6). To set the LVL when MODE is set to M/S R or MIX,
use the Rec Assign Menu (3).
9
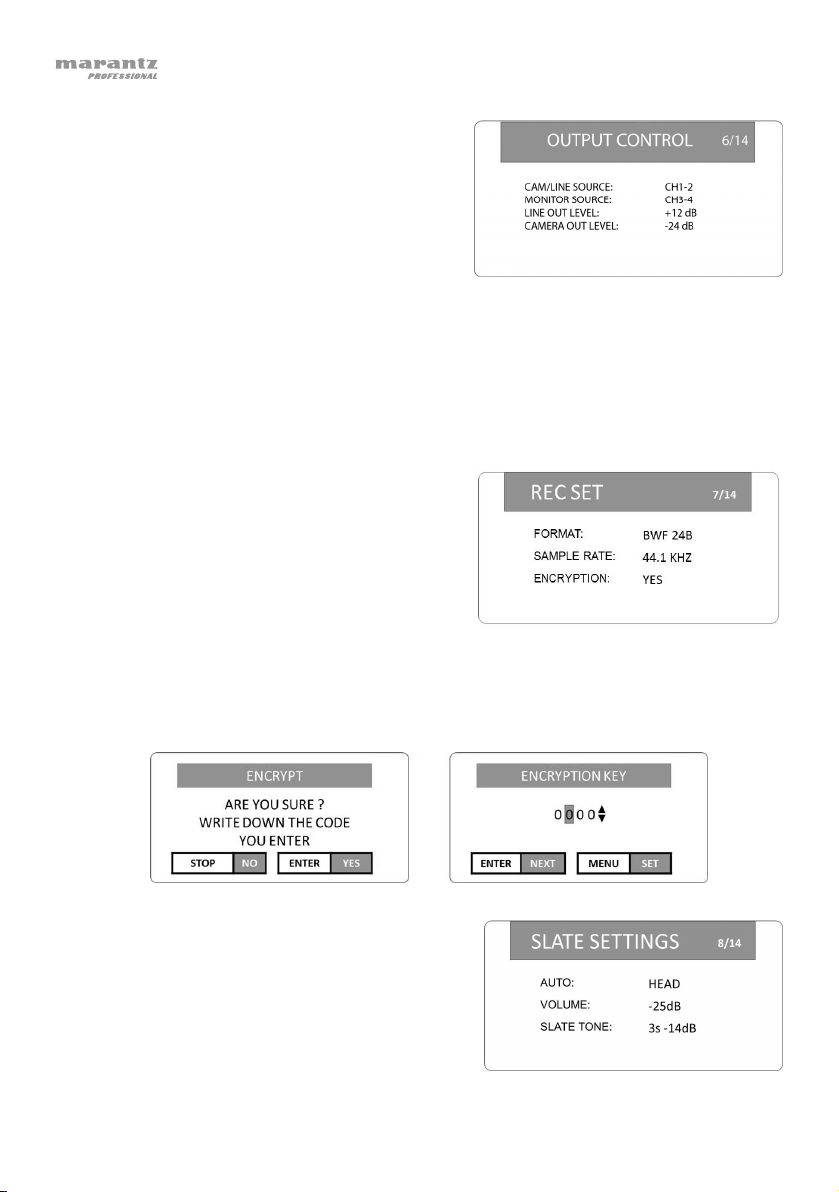
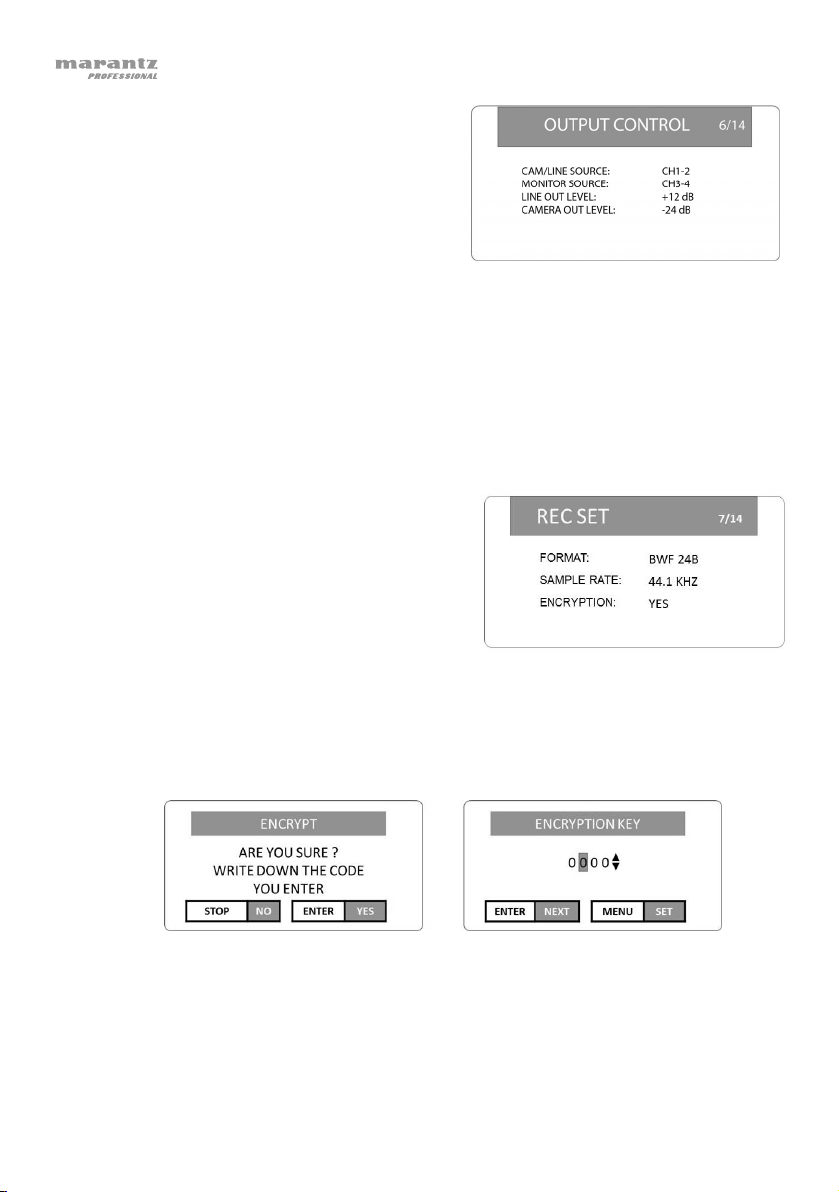
6. Output Control
Camera/Line Source (CAM/LINE SOURCE) &
Monitor Source (MONITOR SOURCE) :
- MIX: sent to mix
- CH1-CH6: mono signal sent to left and right
- CH1-2: CH1 (left), CH2 (right)
- CH3-4: CH3 (left), CH4 (right)
- CH5-6: CH5 (left), CH6 (right)
- M/S 1-2: CH1+CH2 (left), CH1-CH2 (right)
- M/S 3-4: CH3+CH4 (left), CH3-CH4 (right)
- M/S 5-6: CH5+CH6 (left), CH5-CH6 (right)
Line Out Level (LINE OUT LEVEL): -12 dB to +12 dB in 1 dB increments
Camera Out Level (CAMERA OUT LEVEL): -24 dB to +42 dB in 1 dB increments
7. Rec (Record) Set
Recorded File Format (FORMAT): BWF 16B (16-
bit), BWF 24B (24-bit), WAV 16B (16-bit), WAV24B
(24-bit)
Recording Sample Rate (SAMPLE RATE): 44.1
kHz, 48 kHz, 96 kHz
Note: If sampling rate on Menu 7 – Rec Set is set
to 96 kHz, CH5 and CH6 will be unavailable to use
for recording.
Encryption (ENCRYPTION): Yes, No. When creating an encryption key, use the Enter dial to
change the numbers, press the Enter dial to enter each number, and press Menu to set the
code and exit this screen.
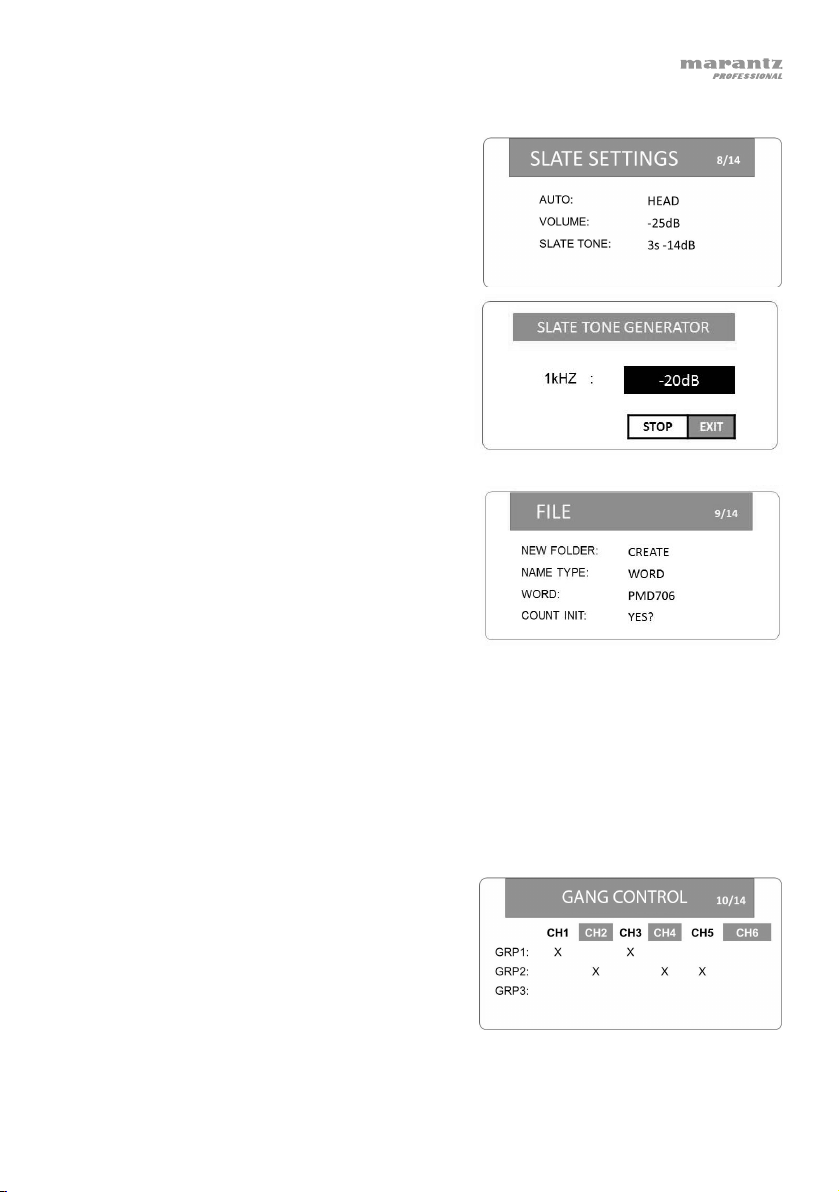
8. Slate Settings
Automatic Slate (AUTO): Off, Head (start of
recording), Head Tail (start and stop of recording)
Slate Volume (VOLUME): -36 dB to -12 dB in 1 dB
increments
10
Slate Tone Settings (SLATE TONE): 1–# s
(seconds), -14 dB to -20 dB (level)
To set the slate tone, select SLATE TONE and
press the Enter dial. Turn the Enter dial to set the
volume level (-20 dB to -14 dB). Press the Enter
dial to start or stop the tone. Press Stop to save
this level and return to the previous screen.
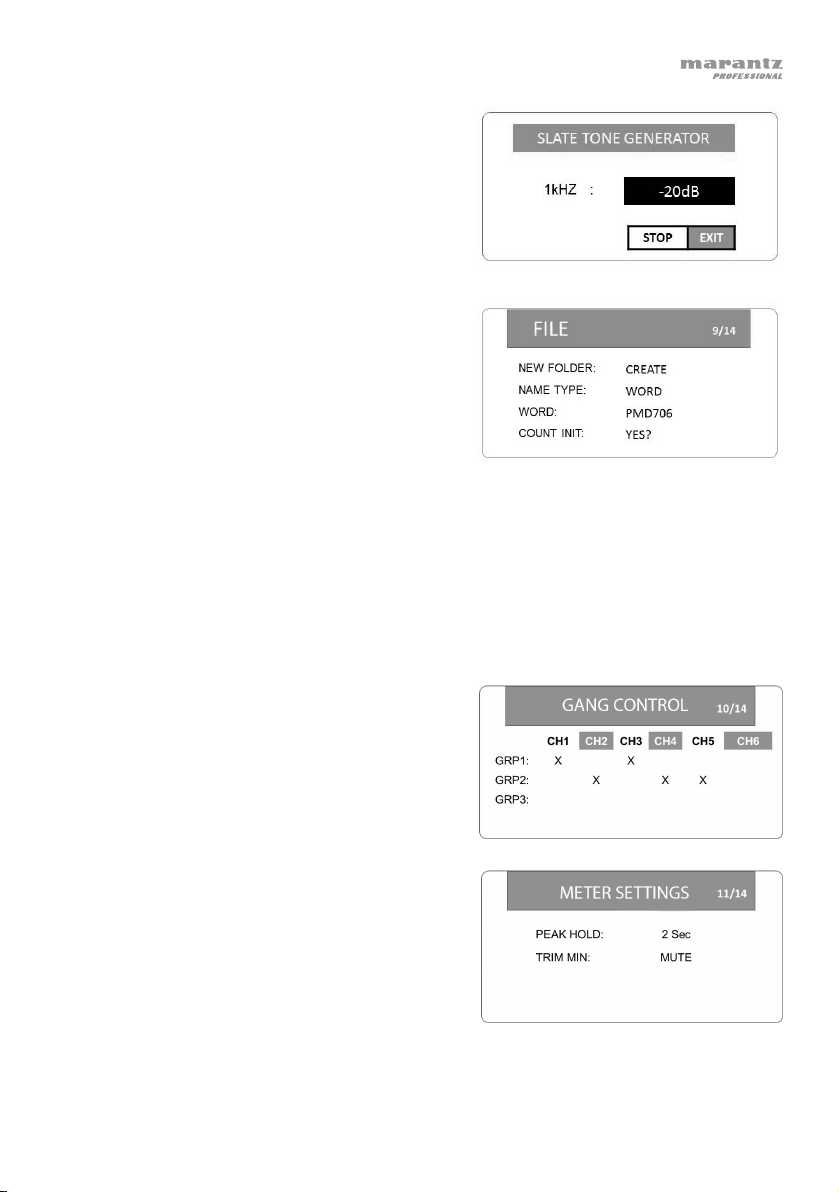
9. File
Create New Folder (NEW FOLDER): This creates
a new folder on the SD card.
File Name Type (NAME TYPE): WORD (text),
DATE (time/date)
File Name Text (WORD): up to 6 characters
Count Initialize (COUNT INIT): This resets the sequential file numbering system used to name
the file.
Files are named in the following way:
- When TYPE is set to WORD: WORD_File#_CH#_RecordingMode (e.g.,
PMD706_0001_CH1_M or PMD706_0003_CH34_St).
- When TYPE is set to DATE: YYYY_MM_DD_HH_MM_CH#_RecordingMode (e.g.,
2017_05_16_17_CH3_M or 2017_03_10_08_CH34_St).
10. Gang Control
This screen allows you to link volume controls by
creating 3 groups and tying any channel input to
the same input level control. The input level control
with the lowest number in a group will control the
level for all of them.
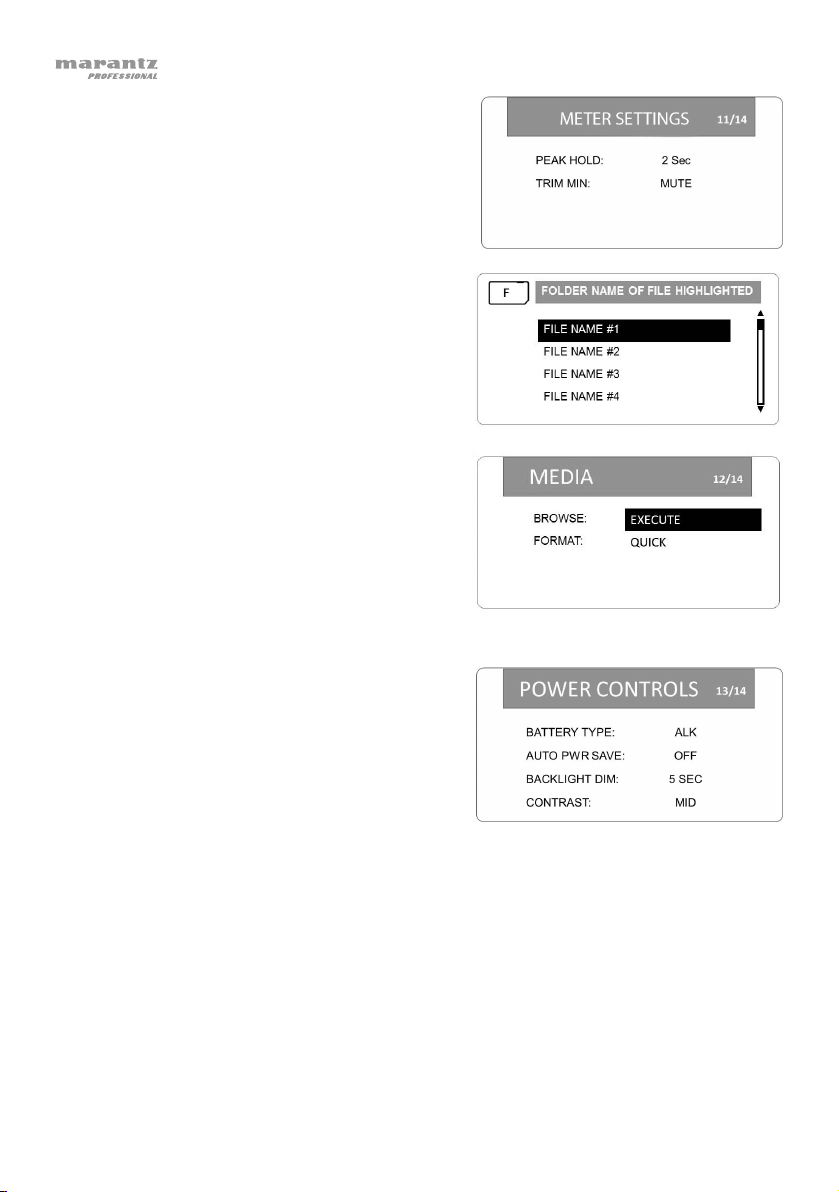
11. Meter Settings
Peak Hold (PEAK HOLD): 1 sec, 2 sec, 10 sec,
Hold, Off
Input Control Minimum Setting (TRIM MIN): -40
dB (from maximum setting), MUTE
11
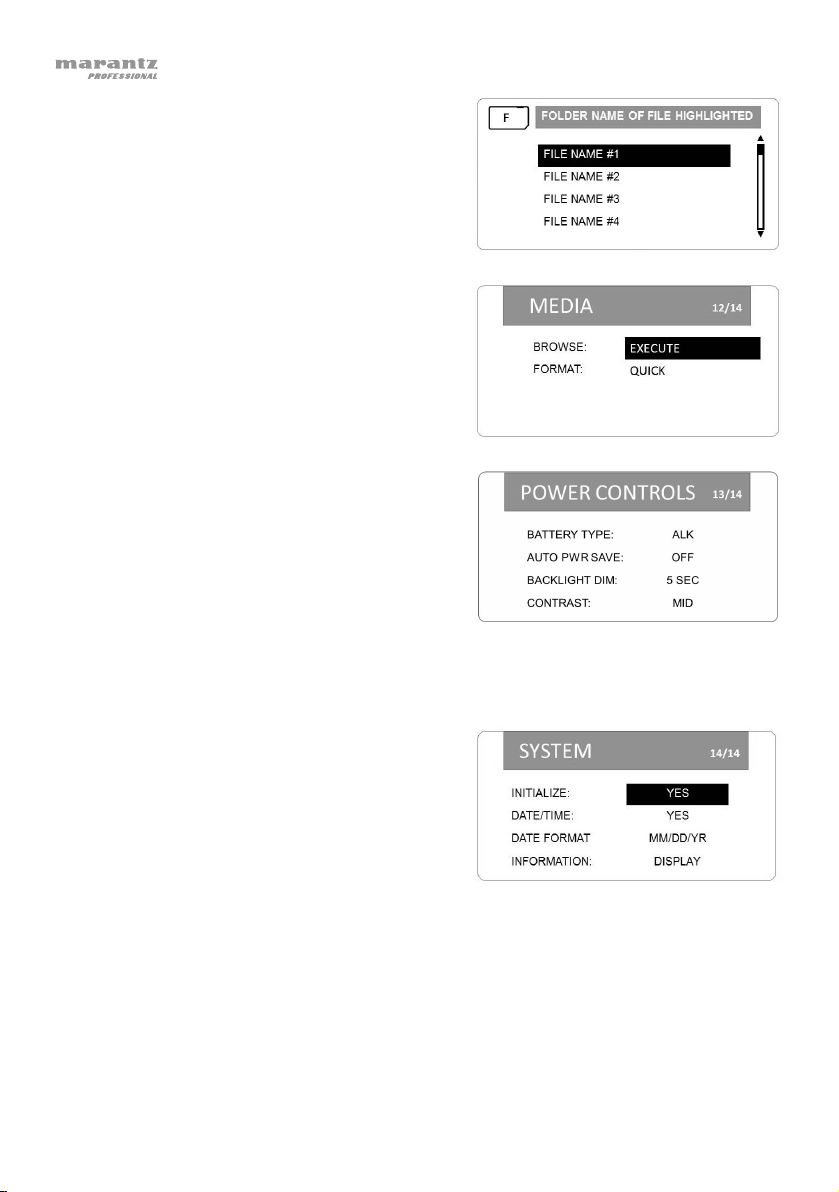
12. Media
Browse Files (BROWSE): EXECUTE (to view
sequential list of all files in the current folder; turn
the Enter dial to scroll and press the Enter dial to
play a file)
Format SD Card (FORMAT): QUICK (to format
the SD card in the SD card slot)
When Browse is activated, a screen appears with
all files listed sequentially in the current folder
listed. Scroll through the files and press Enter to
play a file.
Select Format and choose Quick to format the SD
card.
13. Power Controls
Battery Type (BATTERY TYPE): ALK (alkaline), NIH (nickel-hydrogen), LIT (lithium)
Automatic Power Save (AUTO PWR SAVE): OFF,
3 MIN, 5 MIN, 10 MIN, 30 MIN
Backlight Dimming (BACKLIGHT DIM): 5 SEC, 15
SEC, 30 SEC, ALWAYS
Display Contrast (CONTRAST): Low, Mid, Hi
14. System
Initialize (INITIALIZE): This resets all PMD-706
settings to their original (factory) defaults.
Set Date & Time (DATE/TIME): Press the Enter
dial to cycle through the year, month, day, hour,
minute, and second. Turn the Enter dial to set
each one. Press Menu to confirm the entire
setting.
Date Format (DATE FORMAT): MM/DD/YY (month/day/year) or DD/MM/YY (day/month/year)
System Information (INFORMATION): BWF/WAV (audio format), TITLE (file name), DATE (date
and time stamp), SIZE (file size and number of channels used), FILES (number of files on SD
card), FOLDERS (number of folders on SD card), SD SIZE (total capacity of SD card), SD AVAIL
(free space on SD card), AUTO POWER SAVE (automatic power saving time), AA/LI/NIH
BATTERY LEVEL (battery life remaining), FIRMWARE VERSION (current firmware)
12

Operation
Setup
1. Ensure the tripod is level, set on stable ground, and the tripod legs are securely locked in place.
2. Attach the threaded insert on PMD-706 to your tripod mount, and use PMD-706's tripod locking hole,
if needed.
3. Attach your camera securely on top of PMD-706’s hot shoe mount.
4. Connect microphones or line-level devices to the XLR+1/4" inputs.
5. Connect the audio output of your camera to the Camera Input on PMD-706 using an 1/8” (3.5 mm)
cable.
6. Connect PMD-706’s Camera Output to the audio input of your camera using an 1/8” (3.5 mm) cable.
7. If your microphone requires phantom power, select the appropriate voltage for your microphone from
Menu > Mic Power.
8. Adjust the input level controls to set the gain for the input signal for each channel.
9. Connect headphones to the Headphone Output to monitor the audio input signal or to hear the audio
playback from your camera.
See the following examples in this chapter to learn how to set up PMD-706 in specific scenarios.
Recording Modes
Mono: Record up to 6 mono tracks.
- Recorded File 1 = CH1
- Recorded File 2 = CH2
- Recorded File 3 = CH3
- Recorded File 4 = CH4
- Recorded File 5 = CH5
- Recorded File 6 = CH6
Stereo: Record up to 3 tracks in stereo pairs.
- Recorded File 1 = CH1 (left), CH2 (right)
- Recorded File 2 = CH3 (left), CH4 (right)
- Recorded File 3 = CH5 (left), CH6 (right)
Dual Mono:
Dual Stereo:
M/S R:
- Recorded File 1 = CH1
- Recorded File 2 = CH1 - dlvl
- Recorded File 3 = CH3
- Recorded File 4 = CH3 - dlvl
- Recorded File 5 = CH5
- Recorded File 6 = CH5 - dlvl
- Recorded File 1 = CH1 (left), CH2 (right)
- Recorded File 2 = CH1 -dlvl (left), CH2 -dlvl (right)
- Recorded File 1 = Left (CH1 + (CH2 x Pan Setting)), Right (CH1 – (CH2 x Pan Setting))
- Recorded File 2 = Left (CH3 + (CH4 x Pan Setting)), Right (CH3 – (CH4 x Pan Setting))
- Recorded File 3 = Left (CH5 + (CH6 x Pan Setting)), Right (CH5 – (CH6 x Pan Setting))
13

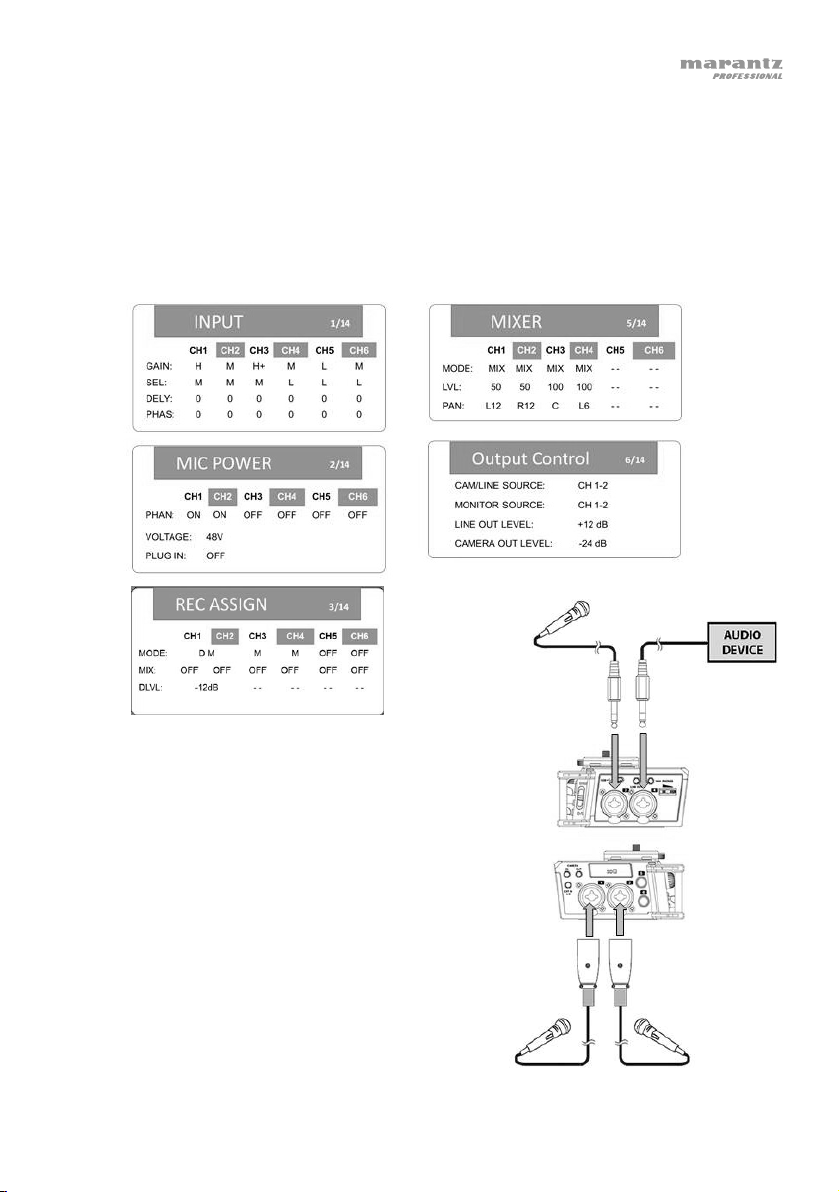
Setup Examples
Example 1 – Mono/Stereo Recording
This example shows:
- condenser microphones on Inputs 1 and 2 (using +48V phantom power)
- a dynamic microphone on Input 3
- an audio device on Input 4 with a 50 ms delay
The menu options are configured to record a stereo file from Inputs 1 and 2 and two mono files from
Inputs 3 and 4.
The recorded files will be named as follows:
PMD706_0001_CH3_M.WAV
PMD706_0001_CH4_M.WAV
PMD706_0001_CH12_St.WAV
14
Example 2 – Stereo and Mix Recording
This example shows:
- condenser microphones on Inputs 1 and 2 (using +48V phantom power)
- a dynamic microphone on Input 3
- an audio device on Input 4
The menu options are configured to record a stereo file and mix track from Inputs 1 and 2 (with
Left/Right level at 50%), Input 3 center panned, and Input 4 level at 75% (left) and 25% (right).
The recorded files will be named as follows:
PMD706_0001_CH12_St.WAV
PMD706_0001_CH34_MIX.WAV
15

Example 3 – Stereo and Mix Recording
This example shows:
- condenser microphones on Inputs 1 and 2 (using +48V phantom power)
- a dynamic microphone on Input 3
- an audio device on Input 4
The menu options are configured to record 4 mono files from Inputs 1-4 and a mix of Inputs 1-4 on
tracks 5/6 with CH1 going to the left, CH2 to the right, and CH3 and CH4 mono.
The recorded files will be named as follows:
PMD706_0001_CH1_M.WAV
PMD706_0001_CH2_M.WAV
PMD706_0001_CH3M.WAV
PMD706_0001_CH4_M.WAV
PMD706_0001_CH56_MIX.WAV
16
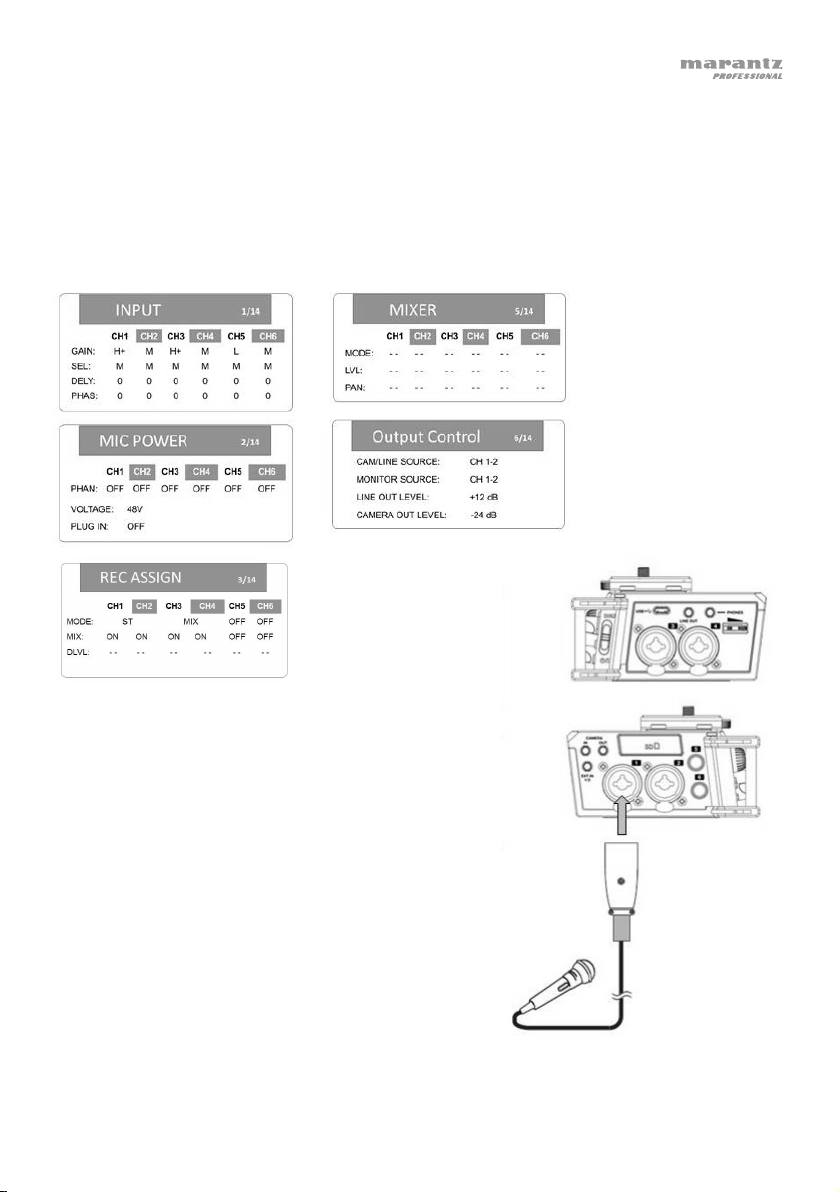
Example 4 – Dual Mono Recording
This example shows:
- a dynamic microphone on Input 1
The menu options are configured to record a dual mono file with the safety track at -9 dB lower than
Input 1.
The recorded files will be named as follows:
PMD706_0001_CH1_DM1.WAV
PMD706_0001_CH1_DM2.WAV
17
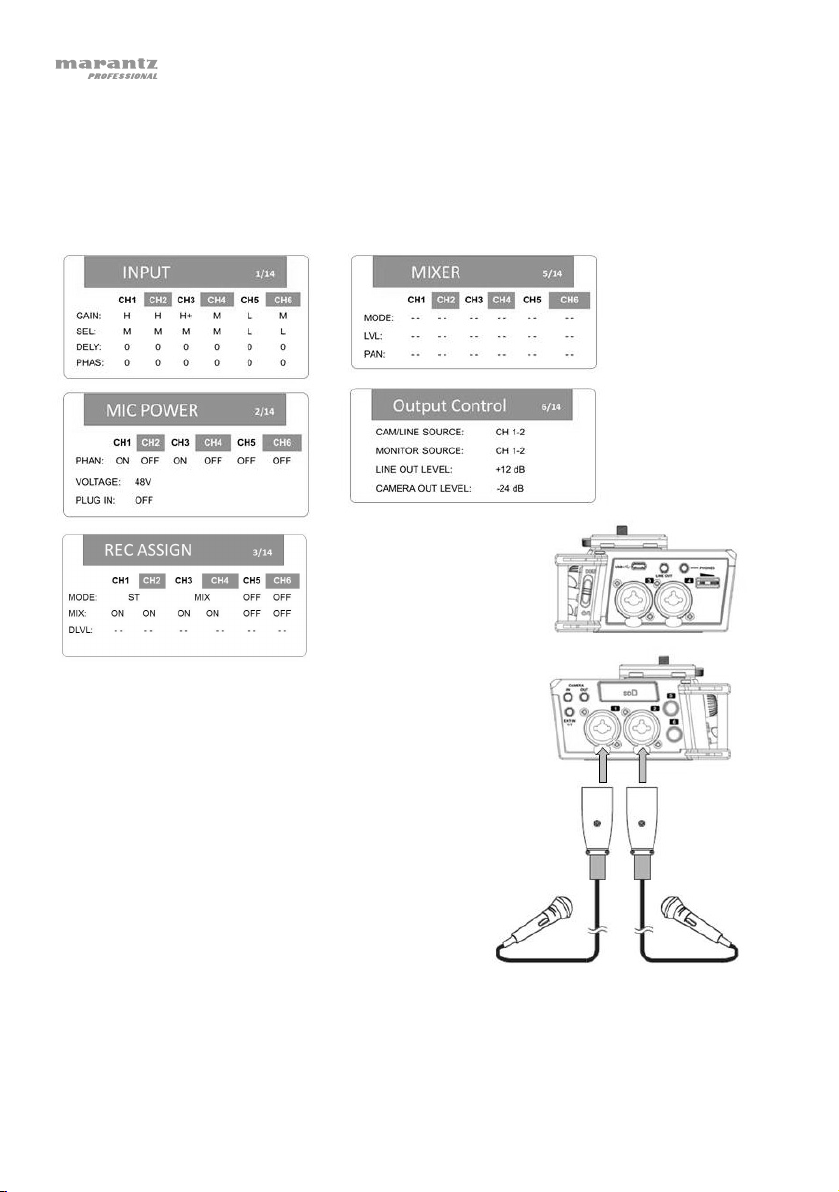
Example 5 – Dual Stereo Recording
This example shows:
- condenser microphones on Inputs 1 and 2 (using +48V phantom power)
The menu options are configured to record a dual stereo file with the safety track at -12 dB lower
than inputs 1 and 2. The left stereo channel will be CH1, and the right stereo channel will be CH2.
The recorded files will be named as follows:
PMD706_0001_CH12_DSt1.WAV
PMD706_0001_CH12_DSt2.WAV
18
p
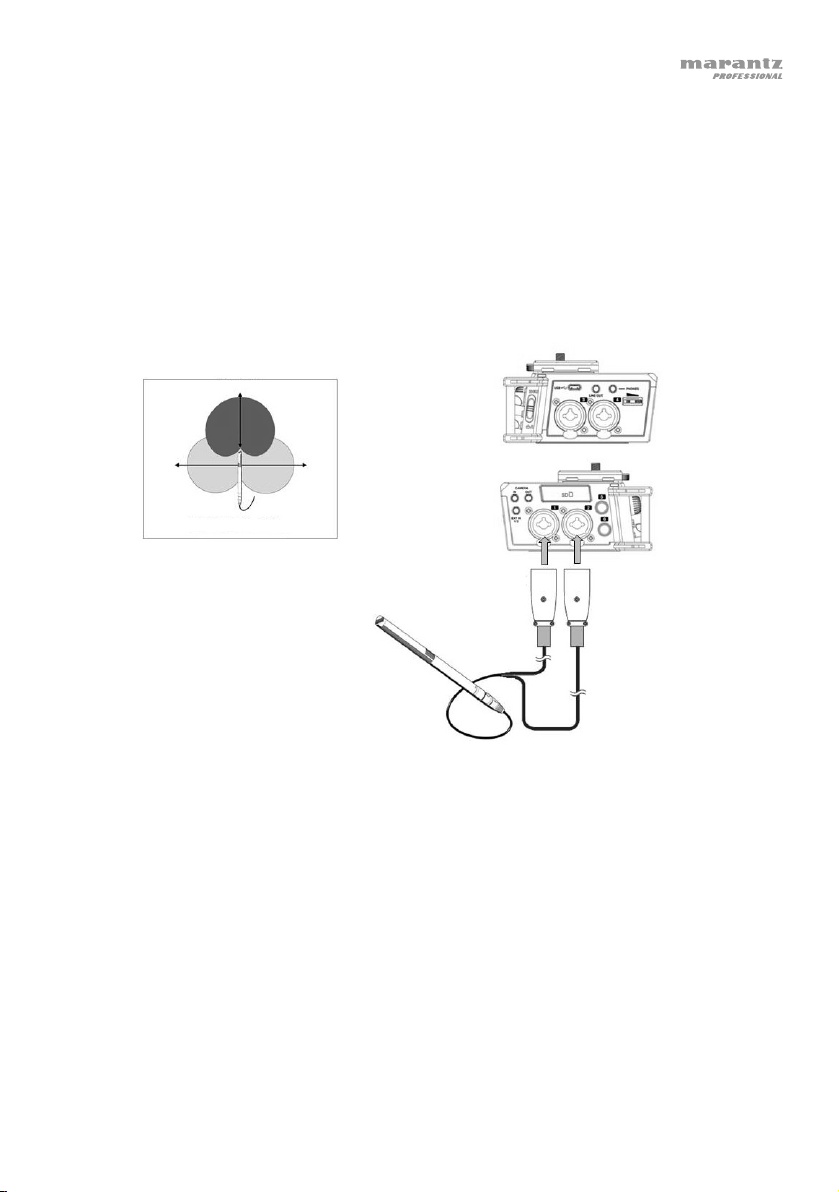
Example 6 – M/S Recording
M/S (Mid/Side) recording consists of two microphones: a directional mic pointed towards the sound
source and a figure 8 mic pointed towards the sides (Figure 1).
• Plug the mics into PMD-706 as shown in Figure 2. You can use Input 3 or 5 instead of Input 1 or
4, or you could use Input 6 instead of Input 2.
• To record without processing, use the M/S R mode. You will be able to monitor CH1 and CH2
without processing.
• To record without processing but monitor it with processing, use the M/S P mode.
• To record without processing or monitoring it, use mono (M) recording for Input 1 and Input 2, or
use stereo (ST) recording for Inputs 1/2.
Stage Center
Figure 1: Set up microphone on stand and
oint toward the source.
Mid Mic
Side Mic
Figure 2: Connect mid and side mics to inputs.
Note: This example shows a specialized mid/side recording microphone. You could alternatively use
a standard cardioid mic to capture the mid field and figure-8 mic (perpendicular to the cardioid mic)
to capture the side fields.
19
20
M/S R Menus M/S P Menus

Guía del usuario (Español)
Introducción
Contenido de la caja
PMD-706
Tarjeta SD
Cable Micro USB
(2) Cables TRS XLRF de 6,35 mm (1/4 pulg.)
Guía del usuario
Manual sobre la seguridad y garantía
Soporte
Para obtener la información más reciente acerca de este producto (documentación, especificaciones
técnicas, requisitos de sistema, información de compatibilidad, etc.) y registrarlo, visite
marantzpro.com.
Para obtener soporte adicional del producto, visite marantzpro.com/support.
21
1
1
2
4
5
7
8
9
10
11
12
13
3
6
1
Características
Panel frontal
11
12
13
10
1. Zapata para cámara: Sujete una cámara o panel de iluminación en la parte superior de esta zapata para
cámara.
2. Pantalla: Use la pantalla para ver y modificar los ajustes del PMD-706. Consulte en el capítulo Configuración
los ejemplos sobre cómo configurar sus ajustes en diferentes escenarios.
3. Cuadrante Enter: Gire el cuadrante para seleccionar una opción del menú Pulse el cuadrante para
seleccionar la opción actual.
4.
Menu:
Pulse este botón para mostrar las opciones del menú en la pantalla. Pulse el botón Menu
nuevamente para retornar a la pantalla de inicio. Consulte Características > Opciones del menú para
obtener más detalles en cómo navegar por los menús.
5. Slate: Mantenga pulsado este botón para marcar una pista con el sonido de una claqueta. El generador de
tonos de claqueta facilita la sincronización de archivos de audio con archivos de vídeo cuando se usa un
software de edición de vídeo.
6. Control de nivel de entrada: Gire cada perilla para ajustar el nivel de su entrada correspondiente. El LED se
enciende con luz roja si la señal de entrada se está distorsionando o recortando. Si esto ocurre, disminuya el
control Input Level hasta que se apague el LED rojo.
7. Entrada 1/Reproducir: Cuando esté en modo Reproducción, pulse este botón para reproducir un archivo de
audio. Cuando esté en modo Menú, pulse este botón para acceder a los ajustes de la columna del canal
CH1. Cuando se selecciona un archivo o carpeta en la pantalla Browse (exploración), pulse este botón
para regresar a la pantalla de inicio y reproducir el primer archivo de la carpeta.
8. Entrada 2/Pausa: Pulse este botón para hacer una pausa en el archivo de audio cuando la unidad se
encuentra en modo de reproducción. Cuando esté en modo Menú, pulse este botón para acceder a los
ajustes de la columna del canal CH2.
9. Entrada 3/Rebobinar: Cuando se está reproduciendo un archivo en modo Reproducción, mantenga pulsado
este botón para recorrer el archivo de audio hacia atrás. Cuando se detiene un archivo en modo
Reproducción, pulse y suelte este botón para pasar al archivo de audio anterior. Cuando esté en modo
Menú, pulse este botón para acceder a los ajustes de la columna del canal CH3.
22

1
1
2
1
2
3
4
5
6
7
8
9
10
11
12
13
1
1
2
3
4
5
6
10. Entrada 4/Parar: Cuando esté en modo Reproducción, pulse este botón para detener un archivo de audio
durante la grabación o reproducción. Utilice este botón para responder "NO" a un mensaje confirmación en
la pantalla de ajustes. Cuando esté en modo Menú, pulse este botón para acceder a los ajustes de la
columna del canal CH4.
11. Grabar: Cuando se inserta una tarjeta SD formateada en la ranura para tarjetas SD, pulse este botón para
comenzar a grabar. Consulte en Características > Opciones del menú > Medios los detalles sobre cómo
formatear una tarjeta SD.
12. Entrada 5/Avance rápido: Cuando se está reproduciendo un archivo en modo Reproducción, mantenga
pulsado este botón para recorrer el archivo de audio hacia adelante. Cuando se detiene un archivo en modo
Reproducción, pulse y suelte este botón para pasar al siguiente archivo de audio. Cuando esté en modo
Menú, pulse este botón para acceder a los ajustes de la columna del canal CH5.
13. Entrada 6: Cuando esté en modo Menú, pulse este botón para acceder a los ajustes de la columna del
canal CH6.
Panel trasero
1. Compartimiento para pilas: Inserte
4 pilas AA en este compartimento
para alimentar la unidad.
Nota: Si está grabando con 4
canales o más utilizando potencia
fantasma de 48 V, debe utilizar un
adaptador de corriente USB o
alimentación de bus USB de un
ordenador a fin de proporcionar la
corriente necesaria (1 A) a todos los
canales.
Panel inferior
1. Orificio de fijación de trípode. Sujete su trípode aquí
para conectarlo de forma segura.
2. Inserción roscada de 6,35 mm (1/4 pulg.): Conecte su
adaptador de montaje desde un trípode aquí.
23
1
2
3
4
5
6
1
2
3
4
5
6
1
1
2
4
5
7
8
9
11
12
13
3
6
Panel lateral derecho
1. Interruptor de encendido/apagado/espera:
Deslice este interruptor hacia abajo para
encender y apagar el PMD-706. Deslice este
interruptor hacia arriba para activar o
desactivar la característica Hold. Cuando se
activa Hold todos los botones del PMD-706 se
deshabilitarán para evitar cambios
accidentales.
2. Entrada XLR TRS de 6,35 mm (1/4 pulg.):
Conecte un micrófono o dispositivo de nivel de
línea a estas entradas XLR de 6,35 mm (1/4
pulg.).
3. Puerto micro USB: Conecte este puerto a un
ordenador con el cable USB incluido. Esta
conexión suministrará energía al PMD-706. También puede utilizar esta conexión para transferir archivos entre
el PMD-706 y su ordenador. También puede conectar este puerto a un adaptador de corriente USB (que se
vende por separado) para suministrar energía al PMD-706 desde una toma de corriente estándar.
Nota: Si está grabando con 4 canales o más utilizando potencia fantasma de 48 V, debe utilizar un adaptador
de corriente USB o alimentación de bus USB de un ordenador a fin de proporcionar la corriente necesaria (1
A) a todos los canales.
4. Line Out: Conecte esta salida de 3,5 mm (1/8 pulg.) a un mezclador, otra grabadora o a altavoces
alimentados. Vaya a Menú > Output Control
5. Salida para auriculares: Conecte auriculares de 3,5 mm (1/8 pulg.) a esta salida para monitorizar la señal de
audio entrante o la reproducción de audio.
6. Control de volumen de los auriculares: Ajusta el volumen de salida de los auriculares utilizando este control.
Nota: Antes de conectar un dispositivo (micrófonos condensadores o dinámicos, dispositivos de nivel de
línea, etc.) a una entrada XLR de 6,35 mm (1/4 pulg.), o salidas externas, asegúrese de que la potencia
fantasma esté apagada. Conectar o desconectar dispositivos de estas entradas mientras la potencia
fantasma está activada puede dañar el dispositivo o el PMD-706.
para ajustar la salida de volumen.
Panel lateral izquierdo
1. Entradas XLR TRS de 6,35 mm (1/4 pulg.): Conecte un
micrófono o dispositivo de nivel de línea a estas entradas
XLR de 6,35 mm (1/4 pulg.).
2. Entrada de cámara de 3,5 mm (1/8 pulg.): Conecte la
salida de audio de una cámara a esta entrada TRS de 3,5
mm (1/8 pulg.).
3. Salida de la cámara de 3,5 mm (1/8 pulg.):
esta salida
audio de una cámara. Vaya a
para ajustar la salida de volumen.
4. Salida externa: Conecte un micrófono estéreo o fuente de audio a esta entrada TRS de 3,5 mm (1/8 pulg.).
Consulte Menú > Mic Power para aprender a activar o desactivar la potencia fantasma de esta entrada.
5. Ranura para tarjeta SD: Inserte una tarjeta SD aquí.
6. Entradas de 6,35 mm (1/4 pulg.): Conecte un dispositivo de nivel de línea o de nivel de micrófono a estas
entradas de 6,35 mm (1/4 pulg.) utilizando los cables XLRF de 6,35 mm (1/4 pulg.) incluidos. A estas entradas
se les puede suministrar potencia fantasma.
Nota: Antes de conectar un dispositivo (micrófonos condensadores o dinámicos, dispositivos de nivel de
línea, etc.) a una entrada XLR de 6,35 mm (1/4 pulg.), o salidas externas, asegúrese de que la potencia
fantasma esté apagada. Conectar o desconectar dispositivos de estas entradas mientras la potencia
fantasma está activada puede dañar el dispositivo o el PMD-706.
24
TRS de 3,5 mm (1/8 pulg.)
Menú > Output Control
Conecte
a la entrada de
1 2 3
4
5
6
7
8
9
10
11
12
13
1
2
3
4
5
6
7
8
9
10
11
Pantalla de inicio
1. Indicador de grabación/pausa/detener
2. Tiempo transcurrido
3. Tiempo de grabación restante disponible
4. Línea de referencia de 0 dB
5. Línea de referencia de -12 dB
6. Indicador de la batería
7. Canal de mezcla
8. Información de configuración de los canales 1-6
9. Barra indicadora de señal
10. Umbral de pico
11. Tipo de grabación: estéreo (S), mono (M), dual
(D)
12. Ajuste deentrada: micrófono (M), línea (L), Ext 1
(E1), Ext 2 (E2)
13. Encender/apagar encriptación:
Pantalla de reproducción
1. Indicador de la batería
2. Nombre de archivo
3. Nombre de carpeta
4. Tiempo de ejecución de la
reproducción
5. Tiempo restante de la
reproducción
6. Indicador de
reproducir/detener/pausa/avance
rápido/rebobinar
7. Indicadores de reproducción
izquierdo/derecho
8. Nivel de 0 dB
9. Indicadores de nivel: -6 dB, -12 dB,
-15 dB, -18 dB
10. Lectura digital del nivel de reproducción
11. Encender/apagar encriptación: Consulte Menú 7 –
Nota: Si intenta reproducir un archivo encriptado,
deberá primero introducir la clave de encriptación
Rec Set para obtener más detalles sobre como
introducir una clave de encriptación.
10
13
12
11
Símbolos de estado del canal
El canal está inactivo
El canal está activo y tiene potencia fantasma
aplicada
El canal está activo y tiene no potencia fantasma
aplicada
11
1
10
25
Menú de opciones
Pulse el botón Menu para mostrar las opciones del menú en la pantalla. Para desplazarse
verticalmente en una página o en la página siguiente, desplácese con el cuadrante Enter. Para
seleccionar un elemento o subelemento del menú, pulse el cuadrante Enter y cambie las opciones
del elemento girando el cuadrante. Pulse el cuadrante Enter para confirmar los cambios al elemento.
Utilice los botones Input 1-6 para saltar a una columna específica de los canales CH1-CH6.
1. Input
Ajuste de ganancia (GAIN)
• L (baja)
• M (media)
• H (alta)
• H+ (muy alta)
Selección (SEL)
• CH1–CH4
• CH5 y CH6
Delay (DELY): 0-300 ms (@ 44,1 kHz) en incrementos de 1 ms
0-270 ms (@ 48 o 96 kHz) en incrementos de 1 ms
Fase (PHAS): 0, 180
2. Mic Power
Potencia fantasma (PHAN): Encendido, apagado
Voltaje de la potencia fantasma (VOLTAGE): 24
V, 48 V
Enchufe de voltaje para entrada externa (PLUG
IN): Encendido, apagado
26
• M (nivel de micrófono)
• L (nivel de línea)
• E1 (externo 1) (1 o 3)
• E1 (externo 2) (2 o 4)
• M (nivel de micrófono)
• L (nivel de línea)
• E1 (externo 1) (5 o 2) / E2 (externo 2) (6)
• C1 (entrada de cámara 1) (5) / C2 entrada de cámara 2 (6)
3. Rec (Record) Assign
Modo de grabación (MODE): M (mono), ST
(estéreo), DM (mono doble), DST (estéreo doble),
M/S R (grabación del medio/costado), MIX
Configuración del mezclador (MIX): Encendido,
apagado
DLVL (Nivel doble): De -12 a -1 dB en incrementos
de 1 dB (disponible solamente en los modos mono
doble y estéreo doble)
Nota: Si la tasa de muestreo de grabación en el Menú 7 – Rec Set está ajustada a 96 kHz, el
canal 5 y el canal 6 (CH5 y CH6) no estarán disponibles para su uso en la grabación.
4. Level Control
Limitador (LIM): Encendido, apagado, 3B (ese
canal solamente), LINK (CH1/2 y/o CH3/4), 3BAND
(CH1/2 y/o CH3/4)
Control de nivel automático (AUTO): Encendido
(todos los ajustes LIM se colocan en OFF),
apagado
Frecuencia de corte bajo (LCF): Apagado, 50 Hz, 80 Hz, 120 Hz, 180 Hz, 220 Hz
Nota: El limitador sólo se puede encender si la tasa de muestreo es de 44,1/48 kHz. Cuando se
ajusta a ON o 3B, el limitador sólo afecta el canal con exceso de entrada. Cuando se ajusta a
LINK o 3BAND, el limitador afecta los canales con exceso de entrada y los canales vinculados a
ellos.
5. Mixer
Modo de grabación (MODE): M/S R (grabación
del medio/costado: grabar), M/S P (grabación del
medio/costado: reproducción), MIX
Nivel (LVL): --- (apagado), 0–100
Balance (panning) (PAN): L1–12 (izquierdo), C (centro), R1–12 (derecho)
Nota: Para ajustar el MODE, utilice el Rec Assign (3). Para ajustar el LVL cuando MODE está en
M/S P, utilice el menú Output Control (6). Para ajustar el LVL cuando MODE está en M/S R o
MIX, utilice el Rec Assign (3).
27
6. Output Control
Fuente de la cámara/línea (CAM/LINE
SOURCE) y fuente del monitor (MONITOR
SOURCE):
- MIX: enviada al mezclador
- CH1-CH6: señal mono enviada a la izquierda de
la derecha
- CH1-2: CH1 (izquierdo), CH2 (derecho)
- CH3-4: CH3 (izquierdo), CH4 (derecho)
- CH5-6: CH5 (izquierdo), CH6 (derecho)
- M/S 1-2: CH1+CH2 (izquierdo), CH1-CH2 (derecho)
- M/S 3-4: CH3+CH4 (izquierdo), CH3-CH4 (derecho)
- M/S 5-6: CH5+CH6 (izquierdo), CH5-CH6 (derecho)
Nivel de salida de línea (LINE OUT LEVEL): -12 a +12 dB en incrementos de 1 dB
Nivel de salida de cámara (LINE OUT LEVEL): -24 a +42 dB en incrementos de 1 dB
7. Rec (Record) Set
Formato del archivo grabado (FORMAT): BWF
16B (16 bits), BWF 24B (24 bits), WAV 16B (16 bits),
WAV 24B (24 bits)
Tasa de muestreo de grabación (SAMPLE
RATE): 44,1 kHz, 48 kHz, 96 kHz
Nota: Si la tasa de muestreo de grabación en el
Menú 7 – Rec Set está ajustada a 96 kHz, el canal 5 y el canal 6 (CH5 y CH6) no estarán
disponibles para su uso en la grabación.
Encriptación (ENCRYPTION): Si, no. Al crear una clave de encriptación, utilice el cuadrante
Enter para modificar los números, pulse el cuadrante Enter para introducir cada número y pulse
Menu para aplicar el código y salir de esta pantalla.
28
8. Slate Settings
Claqueta automática (AUTO): Apagada, Head
(inicio de la grabación), Head Tail (inicio y fin de la
grabación)
Volumen de la claqueta (VOLUME): -36 a -12 dB
en incrementos de 1 dB
Ajustes del tono de la claqueta (SLATE TONE):
1–# s (segundos), -14 a -20 dB (nivel)
Para ajustar el tono de la claqueta, seleccione
SLATE TONE y pulse el cuadrante Enter. Gire el
cuadrante Enter para ajustar el nivel de volumen (20 a -14 dB). Pulse el cuadrante Enter para iniciar
o detener el tono. Pulse Stop para guardar este
nivel y regresar a la pantalla anterior.
9. File
Crear carpeta nueva (NEW FOLDER): Esto crea
una carpeta nueva en la tarjeta SD.
Tipo de nombre de archivo (NAME TYPE):
WORD (texto), DATE (hora/fecha)
Texto del nombre de archivo (WORD): hasta 6
caracteres
Inicializar conteo (COUNT INIT): Reinicia el sistema de numeración secuencial de archivos que
se utiliza para nombrar los archivos.
Los archivos se nombran de la siguiente forma:
- Cuando TYPE se ajusta a WORD: WORD_NroDeArchivo_CH#_ModoDeGrabación (por ej.,
PMD706_0001_CH1_M o PMD706_0003_CH34_St).
- Cuando TYPE se ajusta a DATE: YYYY_MM_DD_HH_MM_CH#_ModoDeGrabación (por ej.,
2017_05_16_17_CH3_M o 2017_03_10_08_CH34_St).
10. Gang Control
Esta pantalla le permite vincular controles de
volumen mediante la creación de 3 grupos y
vinculando cualquier entrada de canal al mismo
control de nivel de entrada. El control de nivel de
entrada con el número más bajo de un grupo
controlará el nivel de todos ellos.
29
11. Meter Settings
Retención de pico (PEAK HOLD): 1 sec, 2 sec, 10
sec, Hold, Off
Ajuste mínimo del control de entrada (TRIM
MIN): -40 dB (desde el ajuste máximo), MUTE
12. Media
Explorar archivos (BROWSE): EXECUTE (para
ver una lista secuencial de todos los archivos en la
carpeta actual; gire el cuadrante Enter para
desplazarse por la lista y pulse el cuadrante Enter
para reproducir un archivo)
Formatear tarjeta SD (FORMAT): QUICK (para
formatear la tarjeta SD en la ranura para tarjeta
SD)
Cuando se activa Browse, aparece una pantalla
con todos los archivos enumerados
secuencialmente en la carpeta actualmente
enumerada. Recorra los archivos y pulse Enter
para reproducir un archivo.
Seleccione Format y luego Quick para formatear
la tarjeta SD.
13. Power Controls
Tipo de pila (BATTERY TYPE): ALK (alcalina), NIH (níquel-hidrógeno), LI (litio)
Ahorro de energía automático (AUTO PWR
SAVE): OFF, 3 MIN, 5 MIN, 10 MIN, 30 MIN
Atenuación de la retroiluminación (BACKLIGHT
DIM): 5 SEC, 15 SEC, 30 SEC, ALWAYS
Contraste de la pantalla (CONTRAST): Low, Mid, Hi
30

14. System
Inicializar (INITIALIZE): Reinicia todos los ajustes
del PMD-706 a sus valores predeterminados
originales (de fábrica).
Ajustar fecha y hora (DATE/TIME): Pulse el
cuadranteEnter para recorrer los años, meses,
días, horas, minutos y segundos. Gire el
cuadrante Enter para definir cada uno. Pulse
Menu para confirmar la totalidad del ajuste.
Formato de la fecha (DATE FORMAT): MM/DD/YY (mes/día/año) o DD/MM/YY (día/mes/año)
Información del sistema (INFORMATION): BWF/WAV (formato de audio), TITLE (nombre de
archivo), DATE (marca de fecha y hora), SIZE (tamaño del archivo y cantidad de canales
utilizados), FILES (cantidad de archivos en la tarjeta SD), FOLDERS (cantidad de carpetas en la
tarjeta SD), SD SIZE (capacidad total de la tarjeta SD), SD AVAIL (espacio libre en la tarjeta SD),
AUTO POWER SAVE (hora del ahorro de energía automático), AA/LI/NIH BATTERY LEVEL
(carga restante de la batería), FIRMWARE VERSION (versión actual del firmware)
Funcionamiento
Instalación
1. Asegúrese de que el trípode esté nivelado, sobre terreno estable y que las patas del trípode
estén trabadas firmemente en su lugar.
2. Enrosque la inserción roscada del PMD-706 en el montaje de su trípode, y utilice el orificio de
bloqueo de trípode del PMD-706 de ser necesario.
3. Sujete su cámara firmemente en la parte superior de la zapata para cámara del PMD-706.
4. Conecte micrófonos o dispositivos de nivel de línea a las entradas XLR de 6,35 mm (1/4 pulg.)
5. Conecte la salida de audio de su cámara a la entrada de cámara del PMD-706 utilizando un
cable de 3,5 mm (1/8 pulg.).
6. Conecte la salida de cámara del PMD-706 a la entrada de audio de su cámara utilizando un
cable de 3,5 mm (1/8 pulg.).
7. Si su micrófono requiere potencia fantasma, seleccione el voltaje apropiado para su micrófono
en Menu > Mic Power.
8. Ajuste los controles de nivel de línea para ajustar la ganancia de la señal de entrada de cada
canal.
9. Conecte auriculares a la salida para auriculares para monitorizar la señal de entrada de audio o
para escuchar la reproducción del audio proveniente de su cámara.
Consulte los siguientes ejemplos en este capítulo para aprender a configurar el PMD-706 en
escenarios específicos.
31

Modos de grabación
Mono: Graba hasta 6 pistas mono.
- Archivo grabado 1 = CH1
- Archivo grabado 2 = CH2
- Archivo grabado 3 = CH3
- Archivo grabado 4 = CH4
- Archivo grabado 5 = CH5
- Archivo grabado 6 = CH6
Estéreo: Graba hasta 3 pistas en pares estéreo.
- Archivo grabado 1 = CH1 (izquierdo), CH2 (derecho)
- Archivo grabado 2 = CH3 (izquierdo), CH4 (derecho)
- Archivo grabado 3 = CH5 (izquierdo), CH6 (derecho)
Mono doble:
Estéreo doble:
M/S R:
32
- Archivo grabado 1 = CH1
- Archivo grabado 2 = CH1 - DLVL
- Archivo grabado 3 = CH3
- Archivo grabado 4 = CH3 - DLVL
- Archivo grabado 5 = CH5
- Archivo grabado 6 = CH5 - DLVL
- Archivo grabado 1 = CH1 (izquierdo), CH2 (derecho)
- Archivo grabado 2 = CH1 - DLVL (izquierdo), CH2 - DLVL (derecho)
- Archivo grabado 1 = izquierdo (CH1 + (CH2 x ajuste de balance)), derecho (CH1 –
(CH2 x ajuste de balance))
- Archivo grabado 2 = izquierdo (CH3 + (CH4 x ajuste de balance)), derecho (CH3 –
(CH4 x ajuste de balance))
- Archivo grabado 3 = izquierdo (CH5 + (CH6 x ajuste de balance)), derecho (CH5 –
(CH6 x ajuste de balance))

Ejemplos de configuraciones:
Ejemplo 1 – Grabación mono/estéreo
Este ejemplo muestra:
- micrófonos condensadores en las entradas 1 y 2 (utilizando potencia fantasma de +48 V)
- un micrófono dinámico en la entrada 3
- un dispositivo de audio en la entrada 4 con un retardo de 50 ms
Las opciones del menú están configuradas para grabar un archivo estéreo desde las entradas 1 y 2 y
dos archivos mono desde las entradas 3 y 4.
Al archivo grabado se le asignará el siguiente nombre:
PMD706_0001_CH3_M.WAV
PMD706_0001_CH4_M.WAV
PMD706_0001_CH12_St.WAV
33

Ejemplo 2 – Grabación estéreo y de la mezcla
Este ejemplo muestra:
- micrófonos condensadores en las entradas 1 y 2 (utilizando potencia fantasma de +48 V)
- un micrófono dinámico en la entrada 3
- un dispositivo de audio en la entrada 4
Las opciones del menú están configuradas para grabar un archivo estéreo y una pista de mezcla
desde las entradas 1 y 2 (con el nivel de izquierda/derecha al 50%), la entrada 3 balanceada al centro
y el nivel de entrada 4 al 75% (izquierda) y 25% (derecha).
Al archivo grabado se le asignará el siguiente nombre:
PMD706_0001_CH12_St.WAV
PMD706_0001_CH34_MIX.WAV
34

Ejemplo 3 – Grabación estéreo y de la mezcla
Este ejemplo muestra:
- micrófonos condensadores en las entradas 1 y 2 (utilizando potencia fantasma de +48 V)
- un micrófono dinámico en la entrada 3
- un dispositivo de audio en la entrada 4
Las opciones del menú están configuradas para grabar cuatro archivos mono desde las entradas 1-4
y una mezcla de las entradas 1-4 en las pistas 5/6 con el CH1 yendo hacia la izquierda, CH2 a la
derecha y el CH3 y el CH4 en mono.
Al archivo grabado se le asignará el siguiente nombre:
PMD706_0001_CH1_M.WAV
PMD706_0001_CH2_M.WAV
PMD706_0001_CH3M.WAV
PMD706_0001_CH4_M.WAV
PMD706_0001_CH56_MIX.WAV
35

Ejemplo 4 – Grabación mono doble
Este ejemplo muestra:
- un micrófono dinámico en la entrada 1
Las opciones del menú están configuradas para grabar un archivo mono doble con la pista de
seguridad a -9 dB más abajo que la entrada 1.
Al archivo grabado se le asignará el siguiente nombre:
PMD706_0001_CH1_DM1.WAV
PMD706_0001_CH1_DM2.WAV
36

Ejemplo 5 – Grabación estéreo doble
Este ejemplo muestra:
- micrófonos condensadores en las entradas 1 y 2 (utilizando potencia fantasma de +48 V)
Las opciones del menú están configuradas para grabar un archivo estéreo doble con la pista de
seguridad a -12 dB más abajo que las entradas 1 y 2. El canal estéreo izquierdo será el CH1 y el
canal estéreo derecho será CH2.
Al archivo grabado se le asignará el siguiente nombre:
PMD706_0001_CH12_DSt1.WAV
PMD706_0001_CH12_DSt2.WAV
37

Ejemplo 6 – Grabación M/S
La grabación M/S (medio/costado) consta de dos micrófonos: un micrófono direccional que apunta
hacia la fuente de sonido y un micrófono en figura 8 que apunta hacia los costados (Figura 1).
• Conecte los micrófonos al PMD-706 tal como se muestra en la Figura 2. Puede utilizar la
entrada 3 o 5 en lugar de la entrada 1 o 4, o puede utilizar la entrada 6 en lugar del entrada 2.
• Para grabar sin procesar, utilice el modo M/S R. Será capaz de monitorizar el CH1 y CH2 sin
procesar.
• Para grabar sin procesar pero monitorear procesando, utilice el modo M/S P.
• Para grabar sin procesar ni monitorizar, utilice la grabación mono (M) para las entradas 1 y 2 o
utilice la grabación estéreo (ST) para las entradas 1/2.
Centro del escenario
Figura 1: Instale el micrófono en un soporte y
Apunte lo hace la fuente.
Micrófono
Micrófono
lateral
Figura 2: Conecte los micrófonos central y lateral a las entradas.
Nota: Este ejemplo muestra un micrófono especializado para grabación de medio/costado. Como
alternativa, puede utilizar un micrófono cardioide estándar para capturar el campo del medio y un
micrófono en figura 8 (perpendicular a micrófono cardiode) para capturar los campos laterales.
38

M/S R Menús M/S P Menús
39

Guide d’utilisation (Français)
Présentation
Contenu de la boîte
PMD-706
Carte SD
Câble micro-USB
2 câbles TRS XLRF-6,35 mm
Guide d’utilisation
Consignes de sécurité et informations concernant la garantie
Assistance technique
Pour les toutes dernières informations concernant la documentation, les spécifications techniques, la
configuration requise, la compatibilité et l’enregistrement du produit, veuillez visiter marantzpro.com.
Pour de l’assistance supplémentaire, veuillez visiter le site marantzpro.com/support.
40

1
1
2
4
5
7
8
9
10
11
12
13
3
6
1
Caractéristiques
Panneau avant
11
12
13
10
1. Sabot pour griffe standard d’appareil photo : Ce sabot permet de fixer un appareil photo ou un panneau
lumineux.
2. Écran d’affichage : Cet écran permet d'afficher et de modifier les réglages du PMD-706. Consultez la section
Installation pour des exemples de configuration des réglages selon différents scénarios.
3. Molette Enter : Tourner la molette permet de sélectionner des options du menu. Appuyer sur la molette
permet de sélectionner l’option affichée.
4.
Menu :
Appuyer sur cette touche permet d’afficher les options du menu. Appuyer de nouveau sur la
touche Menu permet de revenir à la fenêtre d’accueil. Veuillez consulter la section Caractéristiques
> Options menu afin d’en savoir plus sur les menus.
5. Slate : Maintenir cette touche enfoncée permet d'enregistrer une tonalité repère sur la piste. Le générateur de
tonalité repère permet de facilement synchroniser un fichier audio avec des fichiers vidéo lorsque vous utilisez
un logiciel de montage vidéo.
6. Réglage du niveau d'entrée : Tourner chaque bouton permet d'ajuster le niveau de l’entrée correspondant.
En présence d'écrêtage, la DEL devient rouge. Si cela se produit, diminuez le réglage du niveau d’entrée
jusqu’à ce que la DEL s’éteigne.
7. Entrée 1/Lecture : En mode lecture, cette touche permet de lancer la lecture d’un fichier audio. En mode
menu, cette touche permet d’accéder aux réglages de la colonne CH1. Lorsqu’un fichier ou dossier est
sélectionné sur l’écran de navigation, cette touche permet de revenir à la fenêtre d’accueil et de lancer la
lecture du premier fichier dans le dossier.
8. Entrée 2/Pause : En mode lecture, cette touche permet d’interrompre la lecture d’un fichier audio. En mode
menu, cette touche permet d’accéder aux réglages de la colonne CH2.
9. Entrée 3/Retour arrière : En mode lecture, lorsqu’un fichier audio joue, maintenir cette touche enfoncée
permet de balayer la piste vers l’arrière. En mode lecture, lorsque la lecture d’un fichier audio est interrompue,
appuyer sur cette touche permet de sauter au fichier audio précédent. En mode menu, cette touche permet
d’accéder aux réglages de la colonne CH3.
10. Entrée 4/Arrêt : En mode lecture, cette touche permet d’arrêter la lecture ou l’enregistrement d’un fichier
audio. Cette touche permet également de répondre « NON » à un message de confirmation sur les fenêtres
des réglages. En mode menu, cette touche permet d’accéder aux réglages de la colonne CH4.
41

1
1
2
1
2
3
4
5
6
7
8
9
10
11
12
13
1
1
2
3
4
5
6
1
2
3
4
5
6
11. Enregistrement : Lorsqu’une carte SD formatée est insérée dans le lecteur de carte SD, cette touche permet
de lancer l’enregistrement. Veuillez consulter la section Caractéristiques > Options menu > Média afin d’en
savoir plus sur le formatage des cartes SD.
12. Entrée 5/Avance rapide : En mode lecture, lorsqu’un fichier audio joue, maintenir cette touche enfoncée
permet de balayer la piste vers l’avant. En mode lecture, lorsque la lecture d’un fichier audio est interrompue,
appuyer sur cette touche permet de sauter au fichier audio suivant. En mode menu, cette touche permet
d’accéder aux réglages de la colonne CH5.
13. Entrée 6 : En mode menu, cette touche permet d’accéder aux réglages de la colonne CH6.
Panneau arrière
1. Compartiment des piles : Ce
compartiment permet d’insérer 4
piles de type AA afin d’alimenter
l’appareil.
Remarque : Pour effectuer un
enregistrement avec 4 canaux ou
plus utilisant une alimentation
fantôme de 48, l’appareil doit être
branché à l’alimentation secteur
en utilisant un adaptateur
d’alimentation USB ou connecté
au bus USB d'un ordinateur afin
de fournir la puissance (1 A)
nécessaire à tous les canaux.
Panneau inférieur
1. Connecteur de verrouillage pour trépied : Ce
connecteur permet de fixer un trépied pour une connexion
sécurisée.
2. Embase filetée 6,35 mm : Cette embase permet de fixer
un adaptateur pour trépied.
Panneau droit
1. Interrupteur d’alimentation/verrouillage :
Glisser cet interrupteur vers le bas permet de
mettre le PMD-706 sous et hors tension. Glisser
cet interrupteur vers le haut pour activer et
désactiver la fonction de verrouillage (Hold).
Lorsque la fonction de verrouillage est activée,
toutes les touches du PMD-706 sont désactivées
afin d’empêcher toute modification accidentelle.
2. Entrées TRS XLR+6,35 mm : Ces entrées
XLR+6,35 mm permettent de brancher un
microphone ou un appareil à niveau ligne.
42

1
2
3
4
5
6
1
1
2
4
5
8
9
3
6
3. Port micro-USB : Ce port USB permet de brancher un ordinateur en utilisant le câble USB fourni.
Cette connexion permet d'alimenter le PMD-706. Cette connexion permet également de transférer des
fichiers entre le PMD-706 et l’ordinateur. Vous pouvez également alimenter le PMD-706 en raccordant
ce port USB à une prise secteur à l'aide d'un chargeur USB standard (vendu séparément).
Remarque : Pour effectuer un enregistrement avec 4 canaux ou plus utilisant une alimentation
fantôme de 48, l’appareil doit être branché à l’alimentation secteur en utilisant un adaptateur
d’alimentation USB ou connecté au bus USB d'un ordinateur afin de fournir la puissance (1 A)
nécessaire à tous les canaux.
4. Line Out : Cette sortie 3,5 mm permet de brancher une console de mixage, un autre enregistreur ou
des enceintes amplifiées. Allez à Menu > Output Control pour ajuster niveau de la sortie.
5. Sortie casque : Cette sortie 3,5 mm permet de brancher un casque d’écoute pour contrôler le signal
d’entrée ou la lecture audio.
6. Volume de la sortie casque : Cette commande permet de régler le niveau de sortie du casque
d’écoute.
Remarque : Avant de brancher un appareil (microphone à condensateur, appareil à niveau ligne, etc.)
à l’une des entrées XLR-6,35 mm ou externes, veillez à ce que l’alimentation fantôme soit désactivée.
Brancher ou débrancher des appareils de ces entrées alors que l’alimentation fantôme est activée peut
endommager l’appareil ou le PMD-706.
Panneau gauche
1. Entrées TRS XLR+6,35 mm : Ces
entrées XLR+6,35 mm permettent de
brancher un microphone ou un appareil à
niveau ligne.
2. Entrée pour appareil photo 3,5 mm :
Cette entrée TRS 3,5 mm permet de
brancher la sortie d’un appareil photo.
3. Sortie pour appareil photo 3,5 mm :
Cette sortie TRS 3,5 mm
brancher l’entrée d’un appareil photo
Allez à
ajuster niveau de la sortie.
4. Entrée externe : Cette entrée TRS 3,5 mm permet de brancher un microphone stéréo ou une
autre source audio. Allez à Menu > Mic Power afin d’activer et désactiver l’alimentation
fantôme pour cette entrée.
5. Lecteur de carte SD : Ce lecteur permet de recevoir les cartes SD.
6. Entrées 6,35 mm : Ces entrées permettent de brancher un microphone ou un appareil à niveau
ligne en utilisant les câbles XLRF-6,35 mm fournis. L’alimentation fantôme peut être activée sur
ses entrées.
Remarque : Avant de brancher un appareil (microphone à condensateur, appareil à niveau ligne,
etc.) à l’une des entrées XLR-6,35 mm ou externes, veillez à ce que l’alimentation fantôme soit
désactivée. Brancher ou débrancher des appareils de ces entrées alors que l’alimentation
fantôme est activée peut endommager l’appareil ou le PMD-706.
Menu > Output Control
permet de
pour
.
43

1 2 3
4
5
6
7
8
9
10
11
12
13
1
2
3
4
5
6
7
8
9
10
11
Fenêtre d’accueil
1. Indicateur d'enregistrement/pause/arrêt
2. Temps écoulé
3. Temps d’enregistrement restant
4. Ligne de référence 0 dB
5. Ligne de référence -12 dB
6. Indicateur de charge de la batterie
7. Canal du mix
8. Configuration des canaux 1 à 6
9. Indicateur de signal
10. Seuil d’écrêtage
11. Type d’enregistrement : stéréo (S), mono (M),
deux canaux (D)
12. Réglage d’entrée : micro (M), ligne (L), externe 1
(E1), externe 2 (E2)
13. Indicateur d’activation/désactivation du chiffrement
Fenêtre de lecture
1. Indicateur de charge de la batterie
2. Nom du fichier
3. Nom du dossier
4. Durée de lecture
5. Temps de lecture restant
6. Indicateur de lecture/arrêt/pause/avance
rapide/retour arrière
7. Vumètres de lecture gauche et droit
8. Niveau 0 dB
9. Indicateurs de niveau : -6 dB, -12 dB, -15
dB, -18 dB
10. Affichage numérique du niveau de lecture
11. Activation et désactivation du chiffrement :
Veuillez consulter la section Caractéristiques
> Options menu > Rec Set afin d’en savoir plus sur
la saisi d’une clé de chiffrement.
Remarque : Pour lire un fichier chiffré, vous devez
d’abord entrer la clé de chiffrement.
44
10
13
12
11
Légende des symboles pour les canaux
Le canal n’est pas actif
Le canal est actif et utilise l’alimentation fantôme
Le canal est actif, mais n’utilise pas l’alimentation
11
1
10

Options menu
Appuyez sur la touche Menu afin d’afficher les options du menu. Pour déplacer le curseur
verticalement sur une fenêtre ou accéder à la fenêtre suivante, utilisez la molette Enter. Pour
sélectionner un élément du menu ou d’un sous-menu, appuyez sur la molette Enter et modifiez les
options en tournant la molette. Appuyez sur la molette Enter pour confirmer les modifications.
Utilisez les touches d'entrée 1 à 6 pour accéder aux colonnes CH1-CH6.
1. Réglages des entrées (menu Input)
Réglage du gain (GAIN)
• L (faible)
• M (moyen)
• H (élevé)
• H+ (gain maximal)
Sélection (SEL)
• CH1 à CH4
• M (niveau microphone)
• L (niveau ligne)
• E1 (externe 1) (1 ou 3)
• E2 (externe 2) (2 ou 4)
• CH5 et CH6
• M (niveau microphone)
• L (niveau ligne)
• E1 (externe 1) (5) / E2 (externe 2) (6)
• C1 (entrée appareil photo 1) (5) / C2 (entrée appareil photo 2) (6)
Retard (DELY) : 0-300 ms (@ 44,1 kHz) en incréments de 1 ms
0-270 ms (@ 48 ou 96 kHz) en incréments de 1 ms
Phase (PHAS) : 0, 180
2. Alimentation microphone (menu Mic Power)
Alimentation fantôme (PHAN) : Activée (ON) et
désactivée (OFF)
Tension de l’alimentation fantôme
(VOLTAGE) : 24V et 48V
Alimentation sur l’entrée externe (PLUG IN) :
Activée (ON) et désactivée (OFF)
45

3. Rec (Record) Assign
Mode d’enregistrement (MODE) : M (mono), ST
(stéréo), DM (deux canaux mono), DST (deux
canaux stéréo), M/S R (enregistrement mid/side),
MIX (enregistrement du mix)
Réglage du mixage (MIX) : Activée (ON) et
désactivée (OFF)
DLVL (niveau des canaux) : -12 dB à -1 dB en
incréments de 1 dB (seulement en modes d’enregistrement deux canaux mono et stéréo)
Remarque : Si la fréquence d'échantillonnage sur le Menu 7 – Rec Set est réglée sur 96 kHz,
les canaux CH5 et CH6 seront indisponibles pour l'enregistrement.
4. Commande des niveaux (menu Level Control)
Limiteur (LIM) : Activée (ON) et désactivée (OFF),
3B (pour ce canal seulement), LINK (CH1/2 et/ou
CH3/4), 3BAND (CH1/2 et/ou CH3/4)
Contrôle des niveaux automatique (AUTO) :
Activée (ON) (tous les réglages LIM seront
désactivés (OFF)), désactivée (OFF)
Fréquence de coupure du filtre passe-bas (LCF) : Désactivée (OFF), 50 Hz, 80 Hz, 120 Hz,
180 Hz et 220 Hz
Remarque : Le limiteur peut seulement être activé si la fréquence d’échantillonnage est de
44,1/48 kHz. Lorsque réglé sur ON ou 3B, le limiteur modifie seulement le canal ayant un signal
d’entrée trop élevé. Lorsque réglé sur LINK ou 3BAND, le limiteur modifie les canaux ayant un
signal d’entrée trop élevé et les canaux qui leur sont reliés.
5. Mixage (menu Mixer)
Mode d’enregistrement (MODE) : M/S R
(enregistrement mid/side : enregistrement), M/S P
(enregistrement mid/side : lecture), MIX
Niveau (LVL) :---(désactivée), 0 à 100
Panoramique (PAN) : L1–12 (gauche), C (centre),
R1–12 (droit)
Remarque : Pour régler le MODE, utilisez le menu Rec Assign (3). Pour régler l’option LVL
lorsque le MODE est réglé sur M/S P, utilisez le menu Output Control (6). Pour régler l’option
LVL lorsque le MODE est réglé sur M/S R ou MIX, utilisez le menu Rec Assign (3).
46

6. Réglages des sorties (menu Output Control)
Appareil photo/source à niveau ligne
(CAM/LINE SOURCE) et source contrôlée
(MONITOR SOURCE) :
- MIX : signal acheminé au mix
- CH1-CH6 : signal mono acheminé aux canaux
gauche et droit
- CH1-2 : CH1 (gauche), CH2 (droit)
- CH3-4 : CH3 (gauche), CH4 (droit)
- CH5-6 : CH5 (gauche), CH6 (droit)
- M/S 1-2 : CH1+CH2 (gauche), CH1-CH2 (droit)
- M/S 3-4 : CH3+CH4 (gauche), CH3-CH4 (droit)
- M/S 5-6 : CH5+CH6 (gauche), CH5-CH6 (droit)
Niveau de la sortie ligne (LINE OUT LEVEL) :-12 dB à +12 dB en incréments de 1 dB
Niveau de la sortie appareil photo (CAMERA OUT LEVEL) :-24 dB à +42 dB en incréments de
1 dB
7. Rec (Record) Set
Format de fichier (FORMAT) : BWF 16B (16 bits),
BWF 24B (24 bits), WAV 16B (16 bits) et WAV 24B
(24 bits)
Fréquence d'échantillonnage (SAMPLE RATE) :
44,1 kHz, 48 kHz et 96 kHz
Remarque : Si la fréquence d'échantillonnage sur le Menu 7 – Rec Assign est réglée sur 96
kHz, les canaux CH5 et CH6 seront indisponibles pour l'enregistrement.
Chiffrement (ENCRYPTION) : Activé (YES) et désactivé (NON). Lorsque vous créez une clé de
chiffrement, utilisez la molette Enter pour modifier les numéros, appuyez sur la molette Enter
pour déplacer le curseur sur chaque numéro, puis appuyez sur la touche Menu pour saisir le
code et quitter cet écran.
47

8. Réglages des tonalités repères (Slate Settings) :
Générateur de tonalités repères automatique
(AUTO) : OFF (désactivé), Head (début de
l’enregistrement), Head Tail (début et fin de
l’enregistrement)
Volume des tonalités repères (VOLUME) :-36 dB
à -12 dB en incréments de 1 dB
Réglages du générateur de tonalité repère
automatique (SLATE TONE) : 1–# s (secondes), -
14 dB à -20 dB (niveau)
Pour définir les réglages du générateur de tonalité
repère automatique, sélectionnez SLATE TONE et
appuyez sur la molette Enter. Tournez la molette
Enter pour régler le volume (-20 dB à -14 dB).
Appuyez sur la molette Enter afin d’entendre puis
arrêter la tonalité repère. Appuyez sur la touche
Stop afin de sauvegarder ce niveau et revenir à la
fenêtre précédente.
9. Fichiers (menu File)
Créer un nouveau dossier (NEW FOLDER) :
Cette option permet de créer un nouveau dossier
sur la carte SD.
Format du nom de fichier (NAME TYPE) : WORD
(texte) et DATE (heure/date)
Texte du nom de fichier (WORD) : jusqu'à 6
caractères
Numérotation des fichiers réinitialisée (COUNT INIT) : Cette option permet de réinitialiser la
numérotation des fichiers sauvegardés.
Les fichiers sont nommés de la façon suivante :
- Lorsque TYPE est réglé sur WORD : WORD_numérodefichier_CHnumérodecanal_
Moded'enregistrement (p. ex., PMD706_0001_CH1_M ou PMD706_0003_CH34_St).
- Lorsque TYPE est réglé sur DATE : AAAA_MM_JJ_HH_MM_CHnumérodecanal_
Moded'enregistrement (p. ex., 2017_05_16_17_CH3_M ou 2017_03_10_08_CH34_St).
48

10. Groupage des niveaux d’entrée (menu Gang
Control)
Ce menu permet de créer 3 groupes afin de
regrouper les commandes de volume de n’importe
quels canaux afin qu’ils aient le même niveau
d’entrée. La commande de volume d'entrée du
canal ayant le réglage le plus faible commandera le
niveau pour tous les autres canaux.
11. Réglages des vumètres (menu Meter Settings) :
Réglage de la durée d’affichage de l’écrêtage
(PEAK HOLD) : 1 sec, 2 sec, 10 sec, Hold et Off
Réglage minimum de la commande d'entrée
(TRIM MIN) : -40 dB (à partir du réglage maximum)
et mise en sourdine (MUTE)
12. Média (menu Media)
Parcourir les fichiers (BROWSE) : EXECUTE
(pour afficher la liste de tous les fichiers dans le
dossier sélectionné ; tournez la molette Enter pour
parcourir les fichiers et appuyez sur la molette
Enter pour lancer la lecture d’un fichier)
Formater une SD Card (FORMAT) : QUICK (pour
formater la carte SD dans le lecteur de carte SD)
Lorsque Browse est activé, une fenêtre s’affiche
avec tous les fichiers répertoriés en ordre dans le
dossier sélectionné. Parcourez les fichiers, puis
appuyez sur la molette Enter pour lancer la
lecture du fichier sélectionné.
Sélectionnez Format puis Quick pour formater la
carte SD.
13. Alimentation (menu Power Controls) :
Type de piles (BATTERY TYPE) : ALK (alkalines),
NI-H (nickel-hydrogène), LI (lithium)
Mode économie d'énergie automatique (AUTO
PWR SAVE) : OFF, 3 MIN, 5 MIN, 10 MIN et 30
MIN
Rétroéclairage (BACKLIGHT DIM) : 5 SEC, 15
SEC, 30 SEC et ALWAYS
Contraste de l’affichage (CONTRAST) : Low (faible), Mid (moyen) et Hi (élevé)
49

14. Réglages système (menu System) :
Réinitialisation des réglages (INITIALIZE) : Cette
option permet de réinitialiser tous les réglages du
PMD-706 à leurs valeurs par défaut (réglages
d’usine).
Réglage de la date et de l'heure (DATE/TIME) :
Appuyez sur la molette Enter pour parcourir
l’année, le mois, le jour, l’heure, les minutes et les secondes. Tournez la molette Enter pour
modifier chacun des caractères. Appuyez sur la touche Menu pour confirmer le réglage de la
date et l’heure.
Format de la date (DATE FORMAT) : MM/JJ/AA (mois/jour/année) ou JJ/MM/AA
(jour/mois/année)
Informations système ( menu INFORMATION) : BWF/WAV (format audio), TITLE (nom du
fichier), DATE (date et heure du fichier), SIZE (taille du fichier et nombre de canaux utilisés),
FILES (nombre de fichiers sur la carte SD), FOLDERS (nombre de dossiers sur la carte SD), SD
SIZE (capacité totale de la carte SD), SD AVAIL (espace libre sur la carte SD), AUTO POWER
SAVE (réglage du mode d’économie d’énergie automatique), AA/LI/NIH BATTERY LEVEL (durée
de vie restante des piles) et FIRMWARE VERSION (version du progiciel)
50

Fonctionnement
Installation
1. Veillez à ce que le trépied soit de niveau, sur un sol stable, et que les pieds du trépied soient bien
verrouillés en place.
2. Visez l’embase filetée du PMD-706 sur la fixation du trépied et utilisez l’orifice de verrouillage, si
nécessaire.
3. Fixez l’appareil photo sur le sabot de la griffe du PMD-706.
4. Branchez les microphones ou les appareils à niveau ligne aux entrées XLR+6,35 mm.
5. Reliez la sortie audio de l’appareil photo à l'entrée appareil photo du PMD-706 en utilisant un câble
3,5 mm.
6. Reliez la sortie appareil photo du PMD-706 à l'entrée audio de l’appareil photo en utilisant un câble
3,5 mm.
7. Si le microphone nécessite une alimentation fantôme, sélectionnez la tension appropriée pour le
microphone en appuyant sur Menu > Mic Power.
8. Réglez les commandes du niveau d’entrée afin de régler le gain d’entrée de chaque canal.
9. Branchez un casque d’écoute à la sortie casque pour contrôler le signal d’entrée audio ou pour
écouter la lecture audio depuis l’appareil photo.
Veuillez consulter les exemples de réglages présentés dans cette section afin d'apprendre comment
procéder à la configuration du PMD-706 selon différents scénarios.
Modes d’enregistrement
Mono : Ce mode permet d’enregistrer jusqu'à 6 pistes mono.
- Fichier enregistré 1 = CH1
- Fichier enregistré 2 = CH2
- Fichier enregistré 3 = CH3
- Fichier enregistré 4 = CH4
- Fichier enregistré 5 = CH5
- Fichier enregistré 6 = CH6
Stéréo : Ce mode permet d’enregistrer jusqu'à 3 pistes en paires stéréo.
- Fichier enregistré 1 = CH1 (gauche), CH2 (droit)
- Fichier enregistré 2 = CH3 (gauche), CH4 (droit)
- Fichier enregistré 3 = CH5 (gauche), CH6 (droit)
Deux canaux mono :
- Fichier enregistré 1 = CH1
- Fichier enregistré 2 = CH1 - DLVL
Fichier enregistré 3 = CH3
- Fichier enregistré 4 = CH3 - DLVL
- Fichier enregistré 5 = CH5
- Fichier enregistré 6 = CH5 - DLVL
Deux canaux stéréo :
- Fichier enregistré 1 = CH1 (gauche), CH2 (droit)
- Fichier enregistré 2 = CH1 - DLVL (gauche), CH2 - DLVL (droit)
M/S R :
- Fichier enregistré 1 = gauche (CH1 + (CH2 x réglage du panoramique)), droit (CH1 –
(CH2 x réglage du panoramique))
- Fichier enregistré 2 = gauche (CH3 + (CH4 x réglage du panoramique)), droit (CH3 –
(CH4 x réglage du panoramique))
- Fichier enregistré 3 = gauche (CH5 + (CH6 x réglage du panoramique)), droit (CH5 –
(CH6 x réglage du panoramique)
51

Exemples de configuration
Exemple 1 – Enregistrement mono/stéréo
Cet exemple montre :
- des microphones à condensateur sur les entrées 1 et 2 (utilisant une alimentation fantôme de +48 V)
- un microphone électrodynamique sur l’entrée 3
- un appareil audio sur l’entrée 4 avec un retard de 50 ms
Les options menu sont configurées pour enregistrer un fichier stéréo à partir du signal des entrées 1
et 2 et deux fichiers mono à partir du signal des entrées 3 et 4.
Les fichiers enregistrés seront nommés comme suit :
PMD706_0001_CH3_M.WAV
PMD706_0001_CH4_M.WAV
PMD706_0001_CH12_St.WAV
52

Exemple 2 - Enregistrement stéréo et d’un mix
Cet exemple montre :
- des microphones à condensateur sur les entrées 1 et 2 (utilisant une alimentation fantôme de +48 V)
- un microphone électrodynamique sur l’entrée 3
- un appareil audio sur l’entrée 4
Les options menu sont configurées pour enregistrer un fichier stéréo et un mix à partir du signal des
entrées 1 et 2 (avec les niveaux gauche/droit à 50 %), l’entrée 3 avec le panoramique réglé au centre
et l’entrée 4 réglé sur 75 % (gauche) et 25 % (droit).
Les fichiers enregistrés seront nommés comme suit :
PMD706_0001_CH12_St.WAV
PMD706_0001_CH34_MIX.WAV
53

Exemple 3 - Enregistrement stéréo et du mix
Cet exemple montre :
- des microphones à condensateur sur les entrées 1 et 2 (utilisant une alimentation fantôme de +48 V)
- un microphone électrodynamique sur l’entrée 3
- un appareil audio sur l’entrée 4
Les options menu sont configurées pour enregistrer 4 fichiers mono à partir du signal des entrées 1 à
4 et un mix à partir du signal des entrées 1 à 4 sur les pistes 5/6 avec CH1 à gauche, CH2 à droite et
CH3 et CH4 mono.
Les fichiers enregistrés seront nommés comme suit :
PMD706_0001_CH1_M.WAV
PMD706_0001_CH2_M.WAV
PMD706_0001_CH3M.WAV
PMD706_0001_CH4_M.WAV
PMD706_0001_CH56_MIX.WAV
54

Exemple 4 – Enregistrement deux canaux mono
Cet exemple montre :
- un microphone électrodynamique sur l’entrée 1
Les options menu sont configurées pour enregistrer deux fichiers mono à partir du signal de
l’entrée 1 avec la piste de secours enregistrée avec un niveau inférieur de -9 dB.
Les fichiers enregistrés seront nommés comme suit :
PMD706_0001_CH1_DM1.WAV
PMD706_0001_CH1_DM2.WAV
55

Exemple 5 – Enregistrement deux canaux stéréo
Cet exemple montre :
- des microphones à condensateur sur les entrées 1 et 2 (utilisant une alimentation fantôme de +48 V)
Les options menu sont configurées pour enregistrer deux fichiers stéréo à partir du signal des
entrées 1 et 2 avec la piste de secours enregistrée avec un niveau inférieur de -12 dB. Le canal stéréo
gauche est CH1, et le canal stéréo droit est CH2.
Les fichiers enregistrés seront nommés comme suit :
PMD706_0001_CH12_DSt1.WAV
PMD706_0001_CH12_DSt2.WAV
56

g
Exemple 6 – Enregistrement M/S
L'enregistrement M/S (Mid/Side) est fait en utilisant deux microphones : un microphone
unidirectionnel est pointé vers la source audio et un microphone bidirectionnel est pointé vers les
côtés (Figure 1).
• Branchez les microphones au PMD-706 comme indiqué dans la Figure 2. Vous pouvez utiliser
l'entrée 3 ou 5 au lieu de l’entrée 1 ou 4, ou vous pouvez utiliser l’entrée 6 au lieu de l’entrée 2.
• Pour pouvoir enregistrer sans traitement, utilisez le mode M/S R. Vous pourrez contrôler le
signal des canaux CH1 et CH2 sans traitement.
• Pour pouvoir enregistrer sans traitement, mais pouvoir contrôler avec traitement, utilisez le mode
M/S P.
• Pour enregistrer ou contrôler sans traitement, utilisez l’enregistrement mono (M) pour l’entrée 1
et 2, ou l’enregistrement stéréo (ST) pour les entrées 1/2.
Centre de la scène
Figure 1 : Installez le microphone sur le
support et dirigez-le vers la source.
Microphone mid
Microphone side
Fi
ure 2 : Brancher les microphones mid et side aux entrées.
Remarque : Cet exemple montre l’enregistrement mid/side avec un microphone mid/side. Vous
pourriez également utiliser un microphone cardioïde standard pour capturer le champ du centre et un
microphone bidirectionnel (perpendiculaire au microphone cardioïde) pour capturer les champs des
côtes gauche et droits.
57

58
Menus M/S R Menus M/S P

Guida per l’uso (Italiano)
Introduzione
Contenuti della confezione
PMD-706
Scheda SD
Cavo Micro USB
2 cavi TRS XLRF da 1/4"
Guida per l’uso
Istruzioni di sicurezza e garanzia
Assistenza
Per le ultime informazioni in merito a questo prodotto (documentazione, specifiche tecniche, requisiti
di sistema, informazioni sulla compatibilità, ecc.) e per effettuarne la registrazione, recarsi alla pagina
marantzpro.com.
Per ulteriore assistenza sul prodotto, recarsi alla pagina marantzpro.com/support.
59

1
1
2
4
5
7
8
9
10
11
12
13
3
6
1
Caratteristiche
Pannello anteriore
11
12
13
10
1. Base di supporto hot shoe: fissare una videocamera o un pannello di illuminazione su questo supporto hot
shoe.
2. Display: servirsi di questo display per visualizzare e modificare le impostazioni del PMD-706. Si veda il
capitolo Configurazione per trovare esempi di come configurare le impostazioni in diversi scenari.
3. Manopola Enter: ruotare la manopola per scegliere tra le opzioni del menù. Premere la manopola per
selezionare l’opzione corrente
4.
Menu:
premere questo tasto per mostrare le opzioni a display. Premere nuovamente il tasto Menu per
tornare alla schermata principale. Si veda Caratteristiche > Opzioni menu per maggiori dettagli sulla
navigazione tra i menù.
5. Slate: Tenere premuto questo tasto per contrassegnare una traccia con il suono slate. Il generatore di tonalità
slate consente un facile allineamento del file audio con file video quando si utilizza un software di video
editing.
6. Comando Input Level: girare ciascuna manopola per regolare il livello dell'ingresso corrispondente. Il LED
diventa rosso se il segnale d’ingresso salta o è distorto. Se ciò accade, abbassare il comando di livello di
Ingresso fino a quando il LED rosso non è più acceso.
7. Ingresso 1/Play: quando in modalità di riproduzione (Playback), premere questo tasto per riprodurre un file
audio. Quando in modalità Menu, premere questo tasto per passare alle impostazioni della colonna CH1.
Quando un file o una cartella sono selezionati nella schermata Browse, premere questo tasto per tornare
alla Home e riprodurre il primo file presente nella cartella.
8. Ingresso 2/Pause: premere questo tasto per interrompere momentaneamente un file audio quando l’unità è
in modalità di riproduzione. Quando in modalità Menu, premere questo tasto per passare alle impostazioni
della colonna CH2.
9. Ingresso 3/Rewind: quando viene riprodotto un file audio in modalità di riproduzione, tenere premuto questo
tasto per tornare indietro lungo il file audio. Quando un file audio è all’arresto in modalità di riproduzione,
tenere premuto questo tasto per passare al file audio precedente. Quando in modalità Menu, premere questo
tasto per passare alle impostazioni della colonna CH3.
60
.

1
2
1
2
3
4
5
6
7
8
9
10
11
12
13
1
1
2
3
4
5
6
1
1
2
3
4
5
6
10. Ingresso 4/Stop: quando in modalità di riproduzione (Playback), premere questo tasto per fermare la
riproduzione o la registrazione di un file audio. Servirsi di questo tasto per rispondere “NO” a un messaggio
di conferma in una schermata di configurazione. Quando in modalità Menu, premere questo tasto per
passare alle impostazioni della colonna CH4.
11. Record (registra): quando una scheda SD formattata è presente nell’apposito slot, premere questo tasto per
avviare la registrazione. Si veda Caratteristiche > Opzioni menu > Media per maggiori dettagli sulla
formattazione di una scheda SD.
12. Ingresso 5/Fast Forward: quando viene riprodotto un file audio in modalità di riproduzione, tenere premuto
questo tasto per avanzare rapidamente lungo il file audio. Quando un file audio è all’arresto in modalità di
riproduzione, tenere premuto questo tasto per passare al file audio successivo. Quando in modalità Menu,
premere questo tasto per passare alle impostazioni della colonna CH5.
13. Ingresso 6: quando in modalità Menu, premere questo tasto per passare alle impostazioni della colonna
CH6.
Pannello posteriore
1. Scomparto batterie: inserire 4
batterie AA in questo scomparto
per alimentare l’apparecchio.
Nota bene: se si registra con 4 o
più canali utilizzando
un’alimentazione phantom da 48V,
occorre utilizzare un adattatore di
alimentazione USB o
un’alimentazione bus USB del
computer per fornire
l’alimentazione necessaria (1A) a
tutti i canali.
Pannello inferiore
1. Foro di bloccaggio del treppiede: fissare il treppiede
a questo livello per un collegamento sicuro.
2. Inserto filettato da 1/4": collegare l’adattatore di
montaggio dal treppiede a questo livello.
Pannello lato destro
1. Interruttore On/Off/Hold
(accensione/spegnimento/mantenimento
): far scorrere verso il basso l’interruttore per
accendere e spegnere il PMD-706. Far
scorrere verso l’alto l’interruttore per attivare
o disattivare la funzione Hold. Quando la
funzione Hold è attiva, tutti i tasti delPMD706 saranno disattivati per impedire
modifiche accidentali.
61

1
2
3
4
5
6
1
1
2
4
5
8
9
3
6
2. Ingressi TRS XLR+1/4": collegare un microfono o un dispositivo a livello di linea a questi ingressi
XLR+1/4” (6,35 mm).
3. Porta micro USB: collegare questa porta a un computer servendosi del cavo USB in dotazione.
Questo collegamento alimenterà il PMD-706. Si può anche utilizzare questa connessione per trasferire
file tra il PMD-706 e il computer. Si può inoltre collegare questa porta a un adattatore di alimentazione
USB (venduto separatamente) per alimentare il PMD-706 da una presa di alimentazione standard.
Nota bene: se si registra con 4 o più canali utilizzando un’alimentazione phantom da 48V, occorre
utilizzare un adattatore di alimentazione USB o un’alimentazione bus USB del computer per fornire
l’alimentazione necessaria (1A) a tutti i canali.
4. Line Out: collegare questa uscita da 1/8” (3,5 mm) a un mixer, a un altro registratore o a casse
alimentate. Recarsi su Menu > Output Control per regolare il volume.
5. Uscita cuffie: collegare questa uscita da 1/8” (3,5 mm) alle cuffie per monitorare il segnale audio in
ingresso o la riproduzione dell’audio.
6. Controllo volume cuffie: regolare il volume dell’uscita cuffie servendosi di questo comando.
Nota bene: prima di collegare qualsiasi dispositivo (microfoni a condensatore o dinamici, dispositivi a
livello di linea, ecc.) a qualsiasi ingresso XLR da 1/4” o ingressi esterni, assicurarsi che l’alimentazione
phantom sia spenta. Il collegamento o lo scollegamento di dispositivi da questi ingressi quando
l’alimentazione phantom è accesa può danneggiare il dispositivo o il PMD-706.
Pannello lato sinistro
1. Ingressi TRS XLR+1/4": collegare un
microfono o un dispositivo a livello di linea a
questi ingressi XLR+1/4” (6,35 mm).
2. Ingresso videocamera da 1/8” (3,5 mm):
collegare l’uscita audio di una videocamera
a questo ingresso TRS da 1/8” (3,5 mm).
3. Uscita videocamera da 1/8” (3,5 mm):
collegare questa uscita
mm)
videocamera. Recarsi su
Control
4. Ingresso esterno: collegare un microfono
stereo o una fonte audio a questo ingresso TRS da 1/8” (3,5 mm). Si veda Menu > Mic Power per
sapere come accendere o spegnere l’alimentazione phantom per questo ingresso.
5. Slot scheda SD: inserire una scheda SD a questo livello.
6. Ingressi da 1/4” (6,35 mm): collegare un dispositivo a livello mic o di linea a questi ingressi da 1/4”
(6,35 mm) servendosi dei cavi XLRF-1/4” in dotazione. È possibile fornire alimentazione phantom a
questi ingressi.
Nota bene: prima di collegare qualsiasi dispositivo (microfoni a condensatore o dinamici, dispositivi a
livello di linea, ecc.) a qualsiasi ingresso XLR da 1/4” o ingressi esterni, assicurarsi che l’alimentazione
phantom sia spenta. Collegare o scollegare dispositivi da questi ingressi con l’alimentazione phantom
attiva può danneggiare il dispositivo stesso o il PMD-706.
62
all’ingresso audio di una
per regolare il volume.
TRS da 1/8” (3,5
Menu > Output

1 2 3
4
5
6
7
8
9
10
11
12
13
1
2
3
4
5
6
7
8
9
10
11
Display Schermata Home
1. Indicatore
Record/Pause/Stop
(registra/pausa/Arresto)
2. Tempo trascorso
3. Tempo di registrazione
rimanente disponibile
4. 0 dB linea di riferimento
5. -12 dB linea di riferimento
6. Indicatore batteria
7. Mix canale
8. Informazioni configurazione
canali 1-6
9. Barra indicatore segnale
10. Soglia di picco
11. Tipo di registrazione: stereo
(S), mono (M), doppia (D)
12. Configurazione ingresso: mic
(M), line (L), Ext 1 (E1), Ext 2 (E2)
13. Crittografia on/off
Schermata di riproduzione
1. Indicatore batteria
2. Nome file
3. Nome cartella
4. Tempo di riproduzione in corso
5. Tempo di riproduzione rimanente
6. Indicatore Play/Stop/Pause/FF/Rewind
7. Misuratori di riproduzione sinistro/destro
8. Livello 0 dB
9. Indicatori di livello: -6 dB, -12 dB,
-15 dB, -18 dB
10. Lettura digitale del livello di riproduzione
11. Crittografia on/off: si veda il Menu 7 – Rec
Set per maggiori dettagli su come inserire
un codice di crittografia
Nota bene: se si prova a riprodurre un file
crittografato, occorre prima inserire la chiave di
crittografia.
10
13
12
11
Simboli report canale
Il canale non è attivo
Il canale è attivo e l’alimentazione phantom vi è
applicata
Il canale è attivo e l’alimentazione phantom NON vi è
applicata
11
1
10
63

Opzioni menu
Premere il tasto Menu per mostrare le opzioni a display. Per muoversi verticalmente in una pagina o
per passare alla pagina successiva, scorrere con la manopola Enter. Per selezionare una voce o una
sotto voce del menu, premere la manopola Enter e modificare le opzioni di tale voce girando la
manopola stessa. Premere la manopola Enter per confermare le modifiche. Servirsi dei tasti Input 1-
6 per passare a una colonna specifica per CH1-CH6.
1. Input
Impostazione guadagno (GAIN)
• L (basso)
• M (medio)
• H (alto)
• H+ (alto +)
Selezione (SEL)
• CH1–CH4
• CH5 & CH6
Ritardo (DELY): 0-300 ms (@ 44,1 kHz) in incrementi da 1 ms
0-270 ms (@ 48 o 96 kHz) in incrementi da 1 ms
Fase (PHAS): 0, 180
2. Mic Power
Alimentazione phantom (PHAN): On, Off
Tensione alimentazione phantom (VOLTAGE):
24V, 48V
Tensione di plug-in per ingresso esterno
(PLUG IN): On, Off
64
• M (livello mic)
• L (livello linea)
• E1 (esterno 1) (1 o 3)
• E2 (esterno 2) (2 o 4)
• M (livello mic)
• L (livello linea)
• E1 (esterno 1) (5) / E2 (esterno 2) (6)
• C1 (Ingresso videocamera 1) (5) / C2 Ingresso videocamera 2 (6)

3. Rec (Record) Assign
Modalità di registrazione (MODE): M (mono), ST
(stereo), DM (doppio mono), DST (doppio stereo),
M/S R (registrazione mid/side), MIX
Impostazione Mix (MIX): On, Off
DLVL (livello doppio): da -12 dB a -1 dB in
incrementi da 1 dB (disponibile solo in modalità
dual mono e dual stereo)
Nota bene: Se la frequenza campione di registrazione nel Menu 7 – Rec Set è impostata a
96 kHz, i canale 5 e 6 (CH5 e CH6) non saranno disponibili per l'utilizzo per la registrazione.
4. Level Control
Limitatore (LIM): Off, On, 3B (solo quel canale),
LINK (CH1/2 e/o CH3/4), 3BAND (CH1/2 e/o
CH3/4)
Controllo di livello auto (AUTO): On (tutte le
impostazioni LIM saranno su OFF), Off
Frequenza di taglio basso (LCF): Off, 50 Hz, 80 Hz, 120 Hz, 180 Hz, 220 Hz
Nota bene: il limitatore può essere acceso unicamente se la frequenza di campionamento è di
44,1/48 kHz. Se impostato su ON o su 3B, il limitatore influisce unicamente sul canale che
presenta l’ingresso eccessivo. Se impostato su LINK o 3BAND, il limitatore influisce sui canali
che hanno un ingresso eccessivo e su quelli ad essi collegati.
5. Mixer
Modalità di registrazione (MODE): M/S R
(registrazione mid/side: registrazione), M/S P
(registrazione mid/side: riproduzione), MIX
Livello (LVL): --- (off), 0–100
Panning (PAN): L1–12 (sinistra), C (centro), R1–12 (destra)
Nota bene: per impostare la modalità MODE, servirsi del menù Rec Assign (3). Per impostare il
LVL quando la modalità MODE è su M/S P, servirsi del menù Output Control (6). Per impostare
il LVL quando la modalità MODE è su M/S R o MIX, servirsi del Rec Assign (3).
65

6. Output Control
Fonte videocamera/Linea (CAM/LINE SOURCE)
& Fonte Monitor (MONITOR SOURCE):
- MIX: inviata a mix
- CH1-CH6: segnale mono inviato a sinistra e a
destra
- CH1-2: CH1 (sinistra), CH2 (destra)
- CH3-4: CH3 (sinistra), CH4 (destra)
- CH5-6: CH5 (sinistra), CH6 (destra)
- M/S 1-2: CH1+CH2 (sinistra), CH1-CH2 (destra)
- M/S 3-4: CH3+CH4 (sinistra), CH3-CH4 (destra)
- M/S 5-6: CH5+CH6 (sinistra), CH5-CH6 (destra)
Livello uscita di linea (LINE OUT LEVEL): da -12 dB a +12 dB in incrementi da 1 dB
Livello uscita videocamera (CAMERA OUT LEVEL): da -24 dB a +42 dB in incrementi da 1 dB
7. Rec (Record) Set
Formato file registrato (FORMAT): BWF 16B (16-
bit), BWF 24B (24-bit), WAV 16B (16-bit), WAV 24B
(24-bit)
Frequenza campione di registrazione (SAMPLE
RATE): 44,1 kHz, 48 kHz, 96 kHz
Nota bene: Se la frequenza campione di
registrazione nel Menu 7 – Rec Set è impostata a
96 kHz, i canale 5 e 6 (CH5 e CH6) non saranno disponibili per l'utilizzo per la registrazione.
Crittografia (ENCRYPTION): Sì, No. Al momento di creare una chiave di crittografia, servirsi
della manopola Enter per modificare i numeri, premere la manopola Enter per inserire ciascun
numero e premere Menu per impostare il codice e uscire da questa schermata.
66

8. Slate Settings
Slate automatico (AUTO): Off, Head (inizio della
registrazione), Head Tail (inizio e fine della
registrazione)
Volume slate (VOLUME): da -36 dB a -12 dB in
incrementi da 1 dB
Impostazioni tonalità slate (SLATE TONE): 1–# s
(secondi), da -14 dB a -20 dB (livello)
Per impostare la tonalità slate, selezionare SLATE
TONE e premere la manopola Enter. Girare la
manopola Enter per impostare il livello del volume
(da -20 dB a -14 dB). Premere la manopola Enter
per avviare o fermare la tonalità. Premere Stop per
salvare questo livello e tornare alla schermata
precedente.
9. File
Crea nuova cartella (NEW FOLDER): crea una
nuova cartella sulla scheda SD.
Tipo nome file (NAME TYPE): WORD (testo),
DATE (ora/data)
Testo nome file (WORD): fino a 6 caratteri
Inizializza conteggio (COUNT INIT): azzera il sistema di numerazione sequenziale dei file
impiegato per nominare i file.
I file sono nominati nel seguente modo:
- Quando il tipo TYPE è impostato su parola WORD: WORD_File#_CH#_Modalità di
registrazione (ad es., PMD706_0001_CH1_M o PMD706_0003_CH34_St).
- Quando il tipo TYPE è impostato su data DATE: YYYY_MM_DD_HH_MM_CH#_Modalità di
registrazione (ad es. 2017_05_16_17_CH3_M o 2017_03_10_08_CH34_St).
10. Gang Control
Questa schermata consente di collegare i comandi
di volume creando 3 gruppi e legando qualsiasi
ingresso canale allo stesso controllo di livello di
ingresso. Il controllo di livello di ingresso con il
numero più basso in un gruppo controllerà il livello
di tutti.
67

11. Meter Settings
Mantieni picco (PEAK HOLD): 1 sec, 2 sec, 10
sec, Hold, Off
Impostazione minima controllo ingresso (TRIM
MIN): -40 dB (dall’impostazione massima), MUTE
12. Media
Navigazione File (BROWSE): EXECUTE (per
visualizzare un elenco sequenziale di tutti i file
contenuti nella cartella corrente; girare la
manopola Enter per scorrere e premere la
manopola Enter per riprodurre un file)
Formattazione scheda SD (FORMAT): QUICK
(per formattare la scheda SD nello slot per scheda
SD)
Quando Browse è attivo, compare una schermata
con tutti i file elencati sequenzialmente nella
cartella elencata correntemente. Scorrere lungo i
file e premere Enter per riprodurne uno.
Selezionare Format e scegliere Quick per
formattare la scheda SD.
13. Power Controls
Tipo di batteria (BATTERY TYPE): ALK (alcalina),
NI-H (nickel-idrogeno), LI (litio)
Salvataggio automatico alimentazione (AUTO
PWR SAVE): OFF, 3 MIN, 5 MIN, 10 MIN, 30 MIN
Smorzatura retroilluminazione (BACKLIGHT
DIM): 5 SEC, 15 SEC, 30 SEC, ALWAYS
Contrasto del display (CONTRAST): Low, Mid, Hi
68

14. System
Inizializza (INITIALIZE): riporta tutte le
impostazioni del PMD-706 ai valori predefiniti
originali (di fabbrica).
Configura data e ora (DATE/TIME): premere la
manopola Enter per scorrere lungo anno, mese,
giorno, ora, minuto e secondo. Girare la manopola
Enter per impostare ciascuno dei valori. Premere
Menu per confermare l’intera configurazione.
Formato data (DATE FORMAT): MM/DD/YY (mese/giorno/anno) o DD/MM/YY
(giorno/mese/anno)
Informazioni di sistema (INFORMATION): BWF/WAV (formato audio), TITLE (nome file), DATE
(data e timbro orario), SIZE (dimensioni del file e numero di canali utilizzato), FILES (numero di
file sulla scheda SD), FOLDERS (numero di cartelle sulla scheda SD), SD SIZE (capacità totale
della scheda SD), SD AVAIL (spazio libero sulla scheda SD), AUTO POWER SAVE (tempo di
salvataggio automatico di alimentazione), AA/LI/NIH BATTERY LEVEL (durata rimanente della
batteria), FIRMWARE VERSION (firmware corrente)
Operazione
Configurazione
1. Assicurarsi che il treppiede sia uniforme, ben stabile sul terreno e che le gambe siano bloccate in
maniera sicura.
2. Fissare l’inserto filettato sul PMD-706 al treppiede e servirsi del foro di bloccaggio del treppiede del
PMD-706, se necessario.
3. Fissare con cura la videocamera alla base di supporto hot shoe del PMD-706.
4. Collegare i microfoni o dispositivi a livello di linea agli ingressi XLR+1/4”.
5. Collegare l’uscita audio della videocamera all’Ingresso videocamera del PMD-706 servendosi di un
cavo da 1/8” (3,5 mm).
6. Collegare l’uscita videocamera del PMD-706 all’ingresso audio della videocamera servendosi di un
cavo da 1/8” (3,5 mm).
7. Se il microfono richiede un’alimentazione phantom, selezionare la tensione adeguata per il proprio
microfono da Menu > Mic Power.
8. Regolare i comandi Level per impostare il guadagno del segnale di ingresso di ciascun canale.
9. Collegare cuffie all’apposita uscita per monitorare il segnale di ingresso audio o per ascoltare la
riproduzione dell’audio dalla propria videocamera.
Si vedano gli esempi che seguono nel presente capitolo per sapere come configurare il PMD-706 in
situazioni specifiche.
69

Modalità di registrazione
Mono: Registrazione fino a 6 tracce mono.
- File registrato 1 = CH1
- File registrato 2 = CH2
- File registrato 3 = CH3
- File registrato 4 = CH4
- File registrato 5 = CH5
- File registrato 6 = CH6
Stereo: Registrazione fino a un massimo di 3 tracce in coppie stereo.
- File registrato 1 = CH1 (sinistra), CH2 (destra)
- File registrato 2 = CH3 (sinistra), CH4 (destra)
- File registrato 3 = CH5 (sinistra), CH6 (destra)
Dual Mono:
Dual Stereo:
M/S R:
70
- File registrato 1 = CH1
- File registrato 2 = CH1 - DLVL
- File registrato 3 = CH3
- File registrato 4 = CH3 - DLVL
- File registrato 5 = CH5
- File registrato 6 = CH5 - DLVL
- File registrato 1 = CH1 (sinistra), CH2 (destra)
- File registrato 2 = CH1 - DLVL (sinistra), CH2 - DLVL (destra)
- File registrato 1 = Sinistra (CH1 + (CH2 x Impostazione Pan)), Destra (CH1 – (CH2 x
Impostazione Pan))
- File registrato 2 = Sinistra (CH3 + (CH4 x Impostazione Pan)), Destra (CH3 – (CH4 x
Impostazione Pan))
- File registrato 3 = Sinistra (CH5 + (CH4 x Impostazione Pan)), Destra (CH5 – (CH6 x
Impostazione Pan))

Esempi di configurazione
Esempio 1 – Registrazione Mono/Stereo
Questo esempio mostra:
- microfoni a condensatore sugli ingressi 1 e 2 (servendosi di alimentazione phantom da +48V)
- un microfono dinamico sull’Ingresso 3
- un dispositivo audio sull’Ingresso 4 con un ritardo di 50 ms
Le opzioni del menù sono configurate per registrare un file stereo dagli Ingressi 1 e 2 e due file mono
dagli Ingressi 3 e 4.
I file registrati saranno nominati come segue:
PMD706_0001_CH3_M.WAV
PMD706_0001_CH4_M.WAV
PMD706_0001_CH12_St.WAV
71

Esempio 2 – Registrazione stereo e Mix
Questo esempio mostra:
- microfoni a condensatore sugli ingressi 1 e 2 (servendosi di alimentazione phantom da +48V)
- un microfono dinamico sull’Ingresso 3
- un dispositivo audio sull’ingresso 4
Le opzioni del menu sono configurate per registrare un file stereo e mischiare le tracce dagli ingressi
1 e 2 (con il livello sinistra/destra al 50%), ingresso 3 con panning centrale e il livello dell’ingresso 4 al
75% (sinistra) e al 25% (destra).
I file registrati saranno nominati come segue:
PMD706_0001_CH12_St.WAV
PMD706_0001_CH34_MIX.WAV
72

Esempio 3 – Registrazione stereo e Mix
Questo esempio mostra:
- microfoni a condensatore sugli ingressi 1 e 2 (servendosi di alimentazione phantom da +48V)
- un microfono dinamico sull’Ingresso 3
- un dispositivo audio sull’ingresso 4
Le opzioni del menu sono configurate per registrare 4 file mono dagli ingressi 1-4 e un mix di ingressi
1-4 sulle tracce 5/6 con il CH1 convogliato a sinistra, il CH2 a destra e il CH3 e CH4 mono.
I file registrati saranno nominati come segue:
PMD706_0001_CH1_M.WAV
PMD706_0001_CH2_M.WAV
PMD706_0001_CH3M.WAV
PMD706_0001_CH4_M.WAV
PMD706_0001_CH56_MIX.WAV
73

Esempio 4 – Registrazione Dual Mono
Questo esempio mostra:
- un microfono dinamico sull’Ingresso 1
Le opzioni del menu sono configurate per registrare un doppio file mono con la traccia di sicurezza a
-9 dB in meno dell’ingresso 1.
I file registrati saranno nominati come segue:
PMD706_0001_CH1_DM1.WAV
PMD706_0001_CH1_DM2.WAV
74

Esempio 5 – Registrazione Dual Stereo
Questo esempio mostra:
- microfoni a condensatore sugli ingressi 1 e 2 (servendosi di alimentazione phantom da +48V)
Le opzioni del menu sono configurate per registrare un doppio file stereo con la traccia di sicurezza a
-12 dB in meno degli ingressi 1 e 2. Il canale sinistro stereo sarà il CH1, e il canale destro stereo sarà
il CH2.
I file registrati saranno nominati come segue:
PMD706_0001_CH12_DSt1.WAV
PMD706_0001_CH12_DSt2.WAV
75

g
Esempio 6 – Registrazione M/S
La registrazione M/S (Mid/Side) prevede due microfoni: un microfono direzionale puntato verso la
fonte audio e un microfono a 8 puntato verso i lati (Figura 1).
• Collegare i microfoni nel PMD-706 come illustrato in Figura 2. Si può utilizzare l’ingresso 3 o 5 al
posto dell’ingresso 1 o 4 oppure l’ingresso 6 al posto dell’ingresso 2.
• Per registrare senza elaborazione, servirsi della modalità M/S R. Sarà possibile monitorare il
CH1 e il CH2 senza elaborazione.
• Per effettuare la registrazione senza elaborazione, ma monitorarla con l’elaborazione, servirsi
della modalità M/S P.
• Per registrare senza elaborazione o monitoraggio, servirsi della registrazione mono (M) per
l’ingresso1 e l’ingresso 2 oppure servirsi della registrazione stereo (ST) per gli ingressi 1/2.
Centro del palco
Figura 1: posizionare il microfono sul supporto e
erlo verso la fonte.
rivol
Mic mid
Mic laterale
Figura 2: collegare i microfoni mid e laterale agli ingressi.
Nota bene: questo esempio mosra un microfono specializzato di registrazione mid/side.
Alternativamente, è possibile utilizzare un mic standard cardioide per acquisire il campo mid e un
microfono a 8 (perpendicolare a quello cardioide) per acquisire i campi laterali.
76

Menù M/S R Menù M/S P
77

Benutzerhandbuch (Deutsch)
Einführung
Lieferumfang
PMD-706
SD-Karte
Mikro-USB-Kabel
(2) XLRF-6,35mm TRS-Kabel
Benutzerhandbuch
Sicherheitshinweise und Garantieinformationen
Kundendienst
Für die neuesten Informationen zu diesem Produkt (Dokumentation, technische Daten,
Systemanforderungen, Informationen zur Kompatibilität etc.) und zur Produktregistrierung besuchen
Sie marantzpro.com.
Für zusätzlichen Produkt-Support besuchen Sie marantzpro.com/support.
78

1
1
2
4
5
7
8
9
10
11
12
13
3
6
1
Funktionen
Vorderseite
11
12
13
10
1. Blitzschuh-Anschluss: Befestigen Sie eine Kamera oder ein Leuchtfeld auf diesem Blitzschuh-Anschluss.
2. Display: Verwenden Sie dieses Display, um die Einstellungen des PMD-706 anzuzeigen und zu ändern.
Informationen zum Konfigurieren der Einstellungen in verschiedenen Szenarien finden Sie im Kapitel Setup.
3. Enter-Rad: Drehen Sie das Wahlrad, um aus den Menüoptionen auszuwählen. Drücken Sie das Wahlrad, um
die aktuelle Option auszuwählen.
4.
Menu:
Drücken Sie diese Taste, um die Menüoptionen auf dem Display anzuzeigen. Drücken Sie die
Menütaste erneut, um zum Startbildschirm zurückzukehren. Siehe
weitere Details zum Navigieren durch die Menüs.
5. Slate: Halten Sie diese Taste gedrückt, um einen Track mit dem Slate-Sound zu markieren. Der Slate-
Tongenerator ermöglicht eine einfache Ausrichtung von Audiodateien mit Videodateien bei der Verwendung
einer Video-Bearbeitungs-Software.
6. Eingangspegelregler: Drehen Sie jeden Regler, um den Pegel des entsprechenden Eingangs einzustellen. Die
LED leuchtet rot, wenn das Eingangssignal "clippt" oder verzerrt. Wenn dies geschieht, drehen Sie den
Eingangspegelregler herunter, bis die rote LED nicht mehr leuchtet.
7. Eingang 1/Wiedergabe: Im Wiedergabemodus drücken Sie diese Taste, um eine Audiodatei abzuspielen.
Wenn Sie sich im Menümodus befinden, drücken Sie diese Taste, um zu den Einstellungen der CH1-Spalte zu
gelangen. Wenn eine Datei oder ein Ordner auf dem Durchsuchen-Bildschirm ausgewählt ist, drücken Sie
diese Taste, um zur Startseite zurückzukehren und die erste Datei im Ordner abzuspielen.
8. Eingang 2/Pause: Drücken Sie diese Taste, um eine Audiodatei anzuhalten, wenn sich das Gerät im
Wiedergabemodus befindet. Wenn Sie sich im Menümodus befinden, drücken Sie diese Taste, um zu den
Einstellungen der CH2 -Spalte zu gelangen.
9. Eingabe 3/Rücklauf: Wenn eine Audiodatei im Wiedergabemodus abgespielt wird, halten Sie diese Taste
gedrückt, um rückwärts durch die Audiodatei zu suchen. Wenn eine Audiodatei im Wiedergabemodus
gestoppt wird, drücken Sie diese Taste und lassen Sie diese Taste los, um zur vorherigen Audiodatei zu
springen. Wenn Sie sich im Menümodus befinden, drücken Sie diese Taste, um zu den Einstellungen der CH3Spalte zu gelangen.
10. Eingang 4/Stop: Im Wiedergabemodus drücken Sie diese Taste, um eine Audiodatei während der
Wiedergabe oder Aufnahme zu stoppen. Verwenden Sie diese Taste, um auf eine Bestätigungsnachricht auf
einem Einstellungsbildschirm mit "NEIN" zu antworten. Wenn Sie sich im Menümodus befinden, drücken Sie
diese Taste, um zu den Einstellungen der CH4-Spalte zu gelangen.
Funktionen > Menüoptionen
für
79

1
1
2
1
2
3
4
5
6
7
8
9
10
11
12
13
1
1
2
3
4
5
6
1
2
3
4
5
6
11. Aufnehmen: Wenn eine formatierte SD-Karte im SD-Kartensteckplatz ist, drücken Sie diese Taste, um die
Aufnahme zu starten. Siehe Funktionen > Menüoptionen > Medien für Details zum Formatieren einer SDKarte.
12. Eingang 5/Schnellvorlauf: Wenn eine Audiodatei im Wiedergabemodus abgespielt wird, halten Sie diese
Taste gedrückt, um vorwärts durch die Audiodatei zu suchen. Wenn eine Audiodatei im Wiedergabemodus
gestoppt wird, drücken Sie diese Taste und lassen Sie diese Taste los, um zur nächsten Audiodatei zu
springen. Wenn Sie sich im Menümodus befinden, drücken Sie diese Taste, um zu den Einstellungen der CH5
-Spalte zu gelangen.
13. Eingang 6: Wenn Sie sich im Menümodus befinden, drücken Sie diese Taste, um zu den Einstellungen der
CH6 -Spalte zu gelangen.
Rückseite
1. Batteriefach: Legen Sie 4 AABatterien in dieses Seitenfach ein,
um das Gerät mit Strom zu
versorgen.
Hinweis: Bei Aufnahmen mit 4
oder mehr Kanälen mit 48V
Phantomspeisung muss ein USBNetzadapter oder ein USB-Bus
des Computers verwendet
werden, um die notwendige
Leistung (1A) für alle Kanäle
bereitzustellen.
Unterseite
1. Stativverriegelungsloch: Befestigen Sie hier Ihr
Stativ für eine sichere Verbindung.
2. 6,35mm Gewindeeinsatz Verbinden Sie hier Ihren
Montageadapter mit einem Stativ.
Rechte Seite
1. Schalter Ein/Aus/Halten: Bringen Sie
diesen Schalter nach unten, um das
PMD-706 ein- oder auszuschalten.
Bringen Sie diesen Schalter nach oben,
um die Hold-Funktion zu aktivieren oder
zu deaktivieren. Wenn Hold aktiviert ist,
werden alle Tasten des PMD-706
deaktiviert, um versehentliche
Änderungen zu verhindern.
2. XLR-6,35mm TRS-Eingänge:
Schließen Sie ein Mikrofon oder LineGerät an diese XLR-6,35mm Eingänge
an.
80

1
2
3
4
5
6
1
1
2
4
5
8
9
3
6
3. Mikro-USB-Anschluss: Verbinden Sie diesen Port mit einem Computer mit dem mitgelieferten USBKabel. Diese Verbindung versorgt das PMD-706 mit Strom. Sie können diese Verbindung auch
verwenden, um Dateien zwischen dem PMD-706 und Ihrem Computer zu übertragen. Sie können
diesen Anschluss auch mit einem USB-Netzadapter (separat erhältlich) verbinden, um das PMD-706
über eine Steckdose mit Strom zu versorgen.
Hinweis: Bei Aufnahmen mit 4 oder mehr Kanälen mit 48V Phantomspeisung muss ein USBNetzadapter oder ein USB-Bus des Computers verwendet werden, um die notwendige Leistung (1A)
für alle Kanäle bereitzustellen.
4. Line-Out: Verbinden Sie diesen 1/8" (3,5 mm) Ausgang mit einem Mixer, einem anderen Recorder oder
mit Aktiv-Lautsprechern. Gehen Sie auf Menü > Ausgabesteuerung, um die Lautstärke einzustellen.
5. Kopfhörerausgang: Schließen Sie diesen 1/8" (3,5 mm) Ausgang an Kopfhörer an, um das
eingehende Audiosignal oder die Audiowiedergabe zu überwachen.
6. Kopfhörer-Lautstärkeregelung: Stellen Sie die Lautstärke des Kopfhörers mit diesem Regler ein.
Hinweis: Bevor Sie ein Gerät (Kondensator- oder dynamische Mikrofone, Line-Level-Geräte usw.) an
beliebige XLR-, 6,35mm-Eingänge oder externe Eingänge anschließen, stellen Sie sicher, dass die
Phantomspeisung ausgeschaltet ist. Anschließen oder Trennen von Geräten an oder von diesen
Eingängen, während die Phantomspeisung eingeschaltet ist, kann das Gerät oder das PMD-706
beschädigen.
Linke Seite
1. XLR-6,35mm TRS-Eingänge: Schließen
Sie ein Mikrofon oder Line-Gerät an
diese XLR-6,35mm Eingänge an.
2. 1/8” (3,5 mm) Kameraeingang:
Schließen Sie den Audioausgang einer
Kamera an diesen 1/8" (3,5 mm) TRS
Eingang an.
3. 1/8” (3,5 mm) Kameraausgang:
Verbinden Sie diesen 1/8" (3,5 mm) TRS
Ausgang mit dem Audioeingang einer
Kamera. Gehen Sie auf Menü >
Ausgabesteuerung, um die Lautstärke einzustellen.
4. Externer Eingang: Schließen Sie ein Stereomikrofon oder eine Audioquelle an diesen 1/8" (3,5
mm) TRS-Eingang an. Siehe Menü > Stromversorgung für das Mikrofon, um zu erfahren, wie
man die Phantomspeisung für diesen Eingang ein- oder ausschaltet.
5. SD-Kartensteckplatz: Setzen Sie hier eine SD-Karte ein.
6. 6,35mm Eingänge: Verbinden Sie mit den mitgelieferten XLRF-6,35mm-Kabeln ein Mic-Leveloder Line-Level-Gerät an diese 6,35mm Eingänge an. Diese Eingänge können Phantomspeisung
verwenden.
Hinweis: Bevor Sie ein Gerät (Kondensator- oder dynamische Mikrofone, Line-Level-Geräte
usw.) an beliebige XLR-, 6,35mm-Eingänge oder externe Eingänge anschließen, stellen Sie
sicher, dass die Phantomspeisung ausgeschaltet ist. Anschließen oder Trennen von Geräten an
oder von diesen Eingängen, während die Phantomspeisung eingeschaltet ist, kann das Gerät
oder das PMD-706 beschädigen.
81

1 2 3
4
5
6
7
8
9
10
11
12
13
1
2
3
4
5
6
7
8
9
10
11
Home-Bildschirm
1. Aufnahme/Pause/Stopp-Anzeige
2. Verstrichene Zeit
3. Verbleibende, verfügbare Aufnahmezeit
4. 0 dB Referenzlinie
5. -12 dB Referenzlinie
6. Akkuanzeige
7. Mix-Kanal
8. Kanäle 1-6 Setup-Info
9. Signalanzeigeleiste
10. Spitzenschwelle
11. Aufnahmetyp: Stereo (S), Mono (M), Dual (D)
12. Eingangseinstellung: Mic (M), Line (L), Ext 1 (E1),
Ext 2 (E2)
13. Verschlüsselung ein/aus
Wiedergabebildschirm
1. Akkuanzeige
2. Dateiname
3. Ordnername
4. Verstrichene Wiedergabezeit
5. Verbleibende Wiedergabezeit
6. Wiedergabe/Stopp/Pause/Schnellvorlauf/Rü
cklaufanzeige
7. Linke/Rechte Wiedergabeanzeigen
8. 0 dB Pegel
9. Pegelanzeigen: -6 dB, -12 dB,
-15 dB, -18 dB
10. Digitale Anzeige des Wiedergabepegels
11. Verschlüsselung ein/aus: Siehe Menü 7 –
Rec Set für Details zum Eingeben eines
Verschlüsselungscodes.
Hinweis: Wenn Sie versuchen, eine verschlüsselte Datei
abzuspielen, müssen Sie zuerst den
Verschlüsselungscode eingeben.
82
10
12
11
Kanalinformationssymbole
Kanal ist inaktiv
Kanal ist aktiv und nutzt Phantomspeisung
Kanal ist aktiv und nutzt KEINE Phantomspeisung
11
1
13
10

Menüoptionen
Drücken Sie die Taste Menu, um die Menüoptionen auf dem Display anzuzeigen. Um sich vertikal
auf einer Seite zu bewegen oder zur nächsten Seite zu springen, blättern Sie mit dem Enter-Rad.
Um einen Menüpunkt oder Unterpunkt auszuwählen, drücken Sie das Enter-Rad und ändern die
Optionen des Elements, indem Sie das Wahlrad drehen. Drücken Sie das Enter-Rad, um die
Änderungen des Artikels zu bestätigen. Verwenden Sie die Tasten Eingang 1-6, um zu einer
bestimmten Spalte für CH1-CH6 zu springen.
1. Input
Gain-Einstellung (GAIN)
• L (Niedrig)
• M (Mittel)
• H (Hoch)
• H+ (Extra hoch)
Auswahl (SEL)
• CH1–CH4
• M (Mic-Pegel)
• L (Line-Pegel)
• E1 (extern 1) (1 oder 3)
• E2 (extern 2) (2 oder 4)
• CH5 & CH6
• M (Mic-Pegel)
• L (Line-Pegel)
• E1 (extern 1) (5) / E2 (extern 2) (6)
• C1 (Kameraeingang 1) (5) / C2 Kameraeingang 2 (6)
Delay (DELY): 0-300 ms (@ 44.1 kHz) in 1 ms Schritten
0-270 ms (bei 48 oder 96 kHz) in 1 ms Schritten
Phase (PHAS): 0, 180
2. Mic Stromversorgung
Phantomspeisung (PHAN): Ein, Aus
Spannung der Phantomspeisung (VOLTAGE):
24V, 48V
Ansteckspannung für Ext Eingang (PLUG IN):
Ein, Aus
83

3. Rec (Record) Assign
Aufnahmemodus (MODE): M (mono), ST (stereo),
DM (dual-mono), DST (dual-stereo), M/S R (Mitten/Seitenaufnahme), MIX
Mix-Einstellung (MIX): Ein, Aus
DLVL (Dual-Pegel): -12 dB bis -1 dB in 1 dB
Schritten (nur in den Dual-Mono- und Dual-StereoModi verfügbar)
Hinweis: Wenn die Abtastrate der Aufnahme auf Menü 7 – Rec Set auf 96 kHz eingestellt ist,
können Kanal 5 (CH5) und Kanal 6 (CH6) für die Aufnahme nicht verfügbar sein.
4. Level Control
Limiter (LIM): Aus, Ein, 3B (nur dieser Kanal), LINK
(CH1/2 und/oder CH3/4), 3BAND (CH1/2 und/oder
CH3/4)
Autopegelregler (AUTO): Ein (alle LIMEinstellungen werden AUSGESCHALTET), Aus
Untere Grenzfrequenz (LCF): Aus, 50 Hz, 80 Hz, 120 Hz, 180 Hz, 220 Hz
Hinweis: Der Limiter kann nur eingeschaltet werden, wenn die Abtastrate 44,1 / 48 kHz beträgt.
Wenn auf ON oder 3B gestellt, wirkt sich der Limiter nur auf den Kanal aus, der den
übermäßigen Signaleingang hat. Bei der Einstellung auf LINK oder 3BAND wirkt sich der Limiter
auf jene Kanäle aus, die übermäßigen Signaleingang zeigen und die damit verbundenen Kanäle.
5. Mixer
Aufnahmemodus (MODE): M/S R (Mitten/Seitenaufnahme: Aufnahme), M/S P (Mitten/Seitenaufnahme: Wiedergabe), MIX
Pegel (LVL): --- (aus), 0–100
Panning (PAN): L1–12 (links), C (Mitte), R1–12
(rechts)
Hinweis: Um den MODE einzustellen, verwenden Sie das Rec Assign (3). Um LVL einzustellen,
wenn MODE auf M/S P eingestellt ist, verwenden Sie das Menü Output Control (6). Um die LVL
einzustellen, wenn MODE auf M/ S R oder MIX eingestellt ist, verwenden Sie das Menü Rec
Assign (3).
84

6. Output Control
Kamera/Line-Quelle (CAM/LINE SOURCE) &
Monitor-Quelle (MONITOR SOURCE):
- MIX: zum Mix gesendet
- CH1-CH6: Monosignal nach links und rechts
geschickt
- CH1-2: CH1 (links), CH2 (rechts)
- CH3-4: CH3 (links), CH4 (rechts)
- CH5-6: CH5 (links), CH6 (rechts)
- M/S 1-2: CH1+CH2 (links), CH1-CH2 (rechts)
- M/S 3-4: CH3+CH4 (links), CH3-CH4 (rechts)
- M/S 5-6: CH5+CH6 (links), CH5-CH6 (rechts)
Line Out-Pegel (LINE OUT LEVEL): -12 dB bis +12 dB in 1 dB Schritten
Kamera-Ausgangspegel (CAMERA OUT LEVEL): -24 dB bis +42 dB in 1 dB Schritten
7. Rec (Record) Set
Aufnahmeformat (FORMAT): BWF 16B (16-bit),
BWF 24B (24-bit), WAV 16B (16-bit), WAV 24B (24bit)
Abtastrate der Aufnahme (SAMPLE RATE): 44.1
kHz, 48 kHz, 96 kHz
Hinweis: Wenn die Abtastrate der Aufnahme auf
Menü 7 – Rec Set auf 96 kHz eingestellt ist,
können Kanal 5 (CH5) und Kanal 6 (CH6) für die
Aufnahme nicht verfügbar sein.
Verschlüsselung (ENCRYPTION): Ja, Nein. Wenn Sie einen Verschlüsselungscode erstellen,
verwenden Sie das Enter-Rad, um die Nummern zu ändern, drücken dann das Enter-Rad, um
jede Nummer einzugeben und drücken anschließend Menu, um den Code einzustellen und
diesen Bildschirm zu verlassen.
85

8. Slate-Einstellungen
Automatischer Slate (AUTO): Aus, Head (Beginn
der Aufnahme), Head Tail (Beginn und Ende der
Aufnahme)
Slate-Pegel (VOLUME): -36 dB bis -12 dB in 1 dB
Schritten
Slate-Toneinstellungen (SLATE TONE): 1- # s
(Sekunden), -14 dB bis -20 dB (Pegel)
Um den Slate-Ton einzustellen, wählen Sie
SLATE TONE und drücken das Enter-Rad.
Drehen Sie das Enter-Rad, um die Lautstärke
einzustellen (-20 dB bis -14 dB). Drücken Sie das
Enter-Rad, um den Ton zu starten oder zu
stoppen. Drücken Sie Stop, um diesen Pegel zu
speichern und zum vorherigen Bildschirm
zurückzukehren.
9. Datei
Neuen Ordner erstellen (NEW FOLDER): So wird
ein neuer Ordner auf der SD-Karte erstellt.
Dateinamentyp (NAME TYPE): WORD (Text),
DATE (Zeit/Datum)
Dateinamentext (WORD): bis zu 6 Zeichen
Nummerierungen initialisieren (COUNT INIT): Dies setzt das sequentielle
Dateinummerierungssystem zurück, mit dem die Datei benannt wird.
Dateien werden wie folgt benannt:
- Wenn TYPE auf WORD gestellt ist: WORD_File#_CH#_RecordingMode (z.B.
PMD706_0001_CH1_M oder PMD706_0003_CH34_St).
- Wenn TYPE auf DATE gestellt ist: YYYY_MM_DD_HH_MM_CH#_RecordingMode (z.B.
2017_05_16_17_CH3_M oder 2017_03_10_08_CH34_St).
10. Gang Control
In diesem Bildschirm können Sie Lautstärkeregler
verknüpfen, indem Sie 3 Gruppen erstellen und
einen beliebigen Kanaleingang an die gleiche
Eingangspegelregelung binden. Der
Eingangspegelregler mit der niedrigsten Nummer
in einer Gruppe steuert den Pegel für alle.
86

11. Meter Settings
Spitzenwert halten (PEAK HOLD): 1 Sekunde, 2
Sekunden, 10 Sekunden, Halten, Aus
Eingangssteuerung Minimaleinstellung (TRIM
MIN): -40 dB (von der Maximaleinstellung), MUTE
12. Media
Dateien durchsuchen (BROWSE): EXECUTE (um
die sequentielle Liste aller Dateien im aktuellen
Ordner anzuzeigen, drehen Sie das Enter-Rad, um
zu blättern und drücken Sie das Enter-Rad, um
eine Datei abzuspielen)
SD-Karte formatieren (FORMAT): QUICK (um die
SD-Karte im SD-Kartensteckplatz zu formatieren)
Wenn Browse aktiviert ist, erscheint ein Bildschirm
mit allen Dateien, die sequentiell im aktuellen
Ordner aufgeführt sind. Blättern Sie durch die
Dateien und drücken Sie das Enter-Rad, um eine
Datei abzuspielen.
Wählen Sie Format und Quick, um eine SD-Karte
zu formatieren.
13. Power Controls
Batterietyp (BATTERY TYPE): ALK (alkalisch), NIH (Nickel-Wasserstoff), LI (Lithium)
Automatischer Energiesparmodus (AUTO PWR
SAVE): OFF, 3 MIN, 5 MIN, 10 MIN, 30 MIN
Hintergrund-Dimmer (BACKLIGHT DIM): 5 SEC,
15 SEC, 30 SEC, ALWAYS
Display-Kontrast (CONTRAST): Low, Mid, Hi
87

14. System
Initialisieren (INITIALIZE): Damit werden alle
PMD-706-Einstellungen auf ihre ursprünglichen
(Werks-) Einstellungen zurückgesetzt.
Datum & Zeit (DATE/TIME): Drücken Sie das
Enter-Rad, um durch Jahr, Monat, Tag, Stunde,
Minute und Sekunde zu blättern. Drehen Sie das
Enter-Rad, um jeden Wert einzustellen. Drücken
Sie Menu, um die gesamte Einstellung zu
bestätigen.
Datumsformat (DATE FORMAT): MM/DD/YY (Monat/Tag/Jahr) oder DD/MM/YY
(Tag/Monat/Jahr)
Systeminformation (INFORMATION): BWF/WAV (Audioformat), TITLE (Dateiname), DATE
(Datum- und Zeitstempel), SIZE (Dateigröße und Anzahl der verwendeten Kanäle), FILES (Anzahl
der Dateien auf SD-Karte), FOLDERS (Anzahl der Ordner auf SD-Karte), SD SIZE
(Gesamtkapazität der SD-Karte), SD AVAIL (freier Speicherplatz auf SD-Karte), AUTO POWER
SAVE (automatische Energiesparzeit), AA/LI/NIH BATTERY LEVEL (Batterielebensdauer),
FIRMWARE VERSION (aktuelle Firmware)
Betrieb
Setup
1. Stellen Sie sicher, dass das Stativ gerade und auf stabilem Boden steht und die Stativbeine sicher
verriegelt sind.
2. Befestigen Sie den Gewindeeinsatz des PMD-706 an Ihrem Stativhalter und verwenden Sie bei Bedarf
das Stativverriegelungsloch des PMD-706.
3. Befestigen Sie Ihre Kamera sicher am Blitzschuh-Anschluss des PMD-706.
4. Schließen Sie ein Mikrofon oder Line-Gerät an diese XLR-6,35mm Eingänge an.
5. Verbinden Sie den Audioausgang Ihrer Kamera mit einem 1/8" (3,5 mm) Kabel mit dem Kameraeingang
am PMD-706.
6. Schließen Sie den Kameraausgang des PMD-706 an den Audioeingang Ihrer Kamera mit einem 1/8"
(3,5 mm) Kabel an.
7. Wenn Ihr Mikrofon Phantomspeisung benötigt, wählen Sie die entsprechende Spannung für Ihr
Mikrofon aus Menü> Mic Stromversorgung.
8. Stellen Sie die Eingangspegelregler ein, um die Verstärkung für das Eingangssignal für jeden Kanal
einzustellen.
9. Verbinden Sie den Kopfhörer mit dem Kopfhörerausgang, um das Audioeingangssignal zu überwachen
oder die Audiowiedergabe von der Kamera zu hören.
In den folgenden Beispielen in diesem Kapitel lernen Sie, wie Sie das PMD-706 in bestimmten Szenarien
verwenden können.
88

Aufnahmemodi
Mono: Nehmen Sie bis zu 6 Mono-Tracks auf.
- Aufgenommene Datei 1 = CH1
- Aufgenommene Datei 2 = CH2
- Aufgenommene Datei 3 = CH3
- Aufgenommene Datei 4 = CH4
- Aufgenommene Datei 5 = CH5
- Aufgenommene Datei 6 = CH6
Stereo: Nehmen Sie bis zu 3 Tracks in Stereo-Paaren auf.
- Aufgenommene Datei 1 = CH1 (links), CH2 (rechts)
- Aufgenommene Datei 2 = CH3 (links), CH4 (rechts)
- Aufgenommene Datei 3 = CH5 (links), CH6 (rechts)
Dual-Mono:
Dual-Stereo:
M/S R:
- Aufgenommene Datei 1 = CH1
- Aufgenommene Datei 2 = CH1 - DLVL
- Aufgenommene Datei 3 = CH3
- Aufgenommene Datei 4 = CH3 - DLVL
- Aufgenommene Datei 5 = CH5
- Aufgenommene Datei 6 = CH5 - DLVL
- Aufgenommene Datei 1 = CH1 (links), CH2 (rechts)
- Aufgenommene Datei 2 = CH1 - DLVL (links), CH2 - DLVL (rechts)
- Aufgenommene Datei 1 = Links (CH1 + (CH2 x Pan-Einstellung)), Rechts (CH1 – (CH2
x Pan-Einstellung))
- Aufgenommene Datei 2 = Links (CH3 + (CH4 x Pan-Einstellung)), Rechts (CH3 – (CH4
x Pan-Einstellung))
- Aufgenommene Datei 3 = Links (CH5 + (CH6 x Pan-Einstellung)), Rechts (CH5 – (CH6
x Pan-Einstellung))
89

Setup-Beispiele
Beispiel 1 - Mono-/Stereo-Aufnahme
Dieses Beispiel zeigt:
- Kondensatormikrofone an den Eingängen 1 und 2 (mit + 48V Phantomspeisung)
- ein dynamisches Mikrofon auf Eingang 3
- ein Audiogerät auf Eingang 4 mit einer Verzögerung von 50 ms
Die Menüoptionen sind so konfiguriert, dass sie eine Stereodatei aus den Eingängen 1 und 2 und
zwei Mono-Dateien aus den Eingängen 3 und 4 aufnehmen können.
Die aufgezeichneten Dateien werden wie folgt benannt:
PMD706_0001_CH3_M.WAV
PMD706_0001_CH4_M.WAV
PMD706_0001_CH12_St.WAV
90

Beispiel 2 - Stereo und Mix-Recording
Dieses Beispiel zeigt:
- Kondensatormikrofone an den Eingängen 1 und 2 (mit + 48V Phantomspeisung)
- ein dynamisches Mikrofon auf Eingang 3
- ein Audiogerät am Eingang 4
Die Menüoptionen sind so konfiguriert, dass sie eine Stereo-Datei und einen Mix-track von den
Eingängen 1 und 2 (mit Links-/Rechts-Pegel bei 50%), Eingang 3 mittleres Panning und Eingang 4
Pegel bei 75% (links) und 25% (rechts) aufnehmen.
Die aufgezeichneten Dateien werden wie folgt benannt:
PMD706_0001_CH12_St.WAV
PMD706_0001_CH34_MIX.WAV
91

Beispiel 3 - Stereo und Mix-Recording
Dieses Beispiel zeigt:
- Kondensatormikrofone an den Eingängen 1 und 2 (mit + 48V Phantomspeisung)
- ein dynamisches Mikrofon auf Eingang 3
- ein Audiogerät am Eingang 4
Die Menüoptionen sind so konfiguriert, dass sie 4 Mono-Dateien von den Eingängen 1-4 und einen
Mix aus den Eingängen 1-4 auf den Tracks 5/6 mit CH1 links, CH2 rechts und CH3 und CH4 mono
aufnehmen können.
Die aufgezeichneten Dateien werden wie folgt benannt:
PMD706_0001_CH1_M.WAV
PMD706_0001_CH2_M.WAV
PMD706_0001_CH3M.WAV
PMD706_0001_CH4_M.WAV
PMD706_0001_CH56_MIX.WAV
92

Beispiel 4 - Dual-Mono-Aufnahme
Dieses Beispiel zeigt:
- ein dynamisches Mikrofon auf Eingang 1
Die Menüoptionen sind so konfiguriert, dass eine Dual-Mono-Datei mit einem Sicherheits-Track mit 9 dB niedriger als Eingang 1 aufgenommen wird.
Die aufgezeichneten Dateien werden wie folgt benannt:
PMD706_0001_CH1_DM1.WAV
PMD706_0001_CH1_DM2.WAV
93

Beispiel 5 - Dual-Stereo-Aufnahme
Dieses Beispiel zeigt:
- Kondensatormikrofone an den Eingängen 1 und 2 (mit + 48V Phantomspeisung)
Die Menüoptionen sind so konfiguriert, dass eine Dual-Stereo-Datei mit einem Sicherheits-Track mit 12 dB niedriger als die Eingänge 1 und 2 aufgenommen wird. Der linke Stereokanal ist CH1 und der
rechte Stereokanal ist CH2.
Die aufgezeichneten Dateien werden wie folgt benannt:
PMD706_0001_CH12_DSt1.WAV
PMD706_0001_CH12_DSt2.WAV
94

Beispiel 6 – M/S-Aufnahme
Die M/S (Mid/Side) Aufnahme nutzt zwei Mikrofone: ein Richtmikrofon, das auf die Schallquelle
gerichtet ist und ein bidirektionales Mikrofon, das auf die Seiten gerichtet ist (Abbildung 1).
• Stecken Sie die Mikrofone in das PMD-706, wie in Abbildung 2 gezeigt wird. Sie können die
Eingänge 3 oder 5 anstelle der Eingänge 1 oder 4 verwenden oder Eingang 6 anstelle von
Eingang 2 verwenden.
• Um ohne Verarbeitung aufzunehmen, verwenden Sie den Modus M/S R. Sie können CH1 und
CH2 ohne Verarbeitung überwachen.
• Wenn Sie ohne Verarbeitung aufnehmen möchten, aber beim Monitoring eine Verarbeitung
nutzen möchten, verwenden Sie den Modus M/S P.
• Um ohne Verarbeitung oder Monitoring aufzunehmen, verwenden Sie die Mono (M)-Aufnahme
für Eingang 1 und Eingang 2 oder die Stereo (ST)-Aufnahme für die Eingänge 1/2.
Bühnenmitte
Abbildung 1: Bringen Sie das Mikro am Ständer an
und richten es zur Tonquelle hin aus.
Mitten-Mic
Seiten-Mic
Abbildung 2: Verbinden Sie die Mitten- und Seiten-Mics an die Eingänge.
Hinweis: Dieses Beispiel zeigt ein spezialisiertes Mitten-/Seiten-Aufnahmemikrofon. Sie können
wahlweise ein handelsübliches, nierenförmiges Mikrofon verwenden, um das mittlere Feld und das
bidirektionale Mikrofon (senkrecht zum nierenförmigen Mikrofon) zu erfassen und so die Seitenfelder
abzudecken.
95

96
M/S R Menüs M/S P Menüs

Appendix (English)
Technical Specifications
Connectors
Power
Battery Life
Supported SD Media
Recording Channels
Recording Formats WAV (44.1, 48, or 96 kHz; 16- or 24-bit)
Recording Modes
Audio Performance Signal to Noise:
Audio Channels Inputs 1, 2, 3, 4 (set to Mic or Mic + phantom power)
(4) XLR+1/4” (6.35 mm) inputs
(2) 1/4” TRS (6.35 mm) inputs
(2) 1/8” (3.5 mm) inputs
(3) 1/8” (3.5 mm) outputs
(1) Micro-USB port, Type B
Via 4 AA batteries (Alkaline or NI-MH), USB bus power, or a USB power adapter.
Consumption: 2 W (with phantom power off), 4 W (with 6 channels and phantom
power on)
Operating Humidity: 25–85%, non-condensing
Operating Temperature: 41–140°F / 5–60°C
Up to 5.5 hours (with phantom power off)
SD card (64 MB – 2 GB)
SDHC card (4 – 32 GB)
SDXC card (48 – 128 GB)
6-channels (stereo × 3, mono × 6), 4-channels in Dual Stereo mode, 4 channels max
with 96 kHz sampling rate
BWF (44.1, 48, or 96 kHz; 16- or 24-bit)
Mono, Stereo, Dual Mono, Dual Stereo, Mid/Side Recording, Mix
93 dB (Line in -> Line Out)
88-90 dB (Mic in -> Line Out)
93 dB (Ext In -> Line Out)
93 dB (Camera In -> Line Out)
92 dB (Line In -> Phone Out)
92 dB (Line In -> Camera Out)
Frequency Response: 20 Hz–20 kHz (+1.0 dB)
Input Impedance: 2 KΩ
Phantom Power: 48 V (+4 V, 10 mA/channel), 24 V (+4 V, 10 mA/channel)
Input Impedance: 4.7 KΩ
Maximum Input Level: -8 dBu
Mic Input Gain: +28 dB (Low), +47 dB (Mid), +59 dB (High), +64 dB (Hi Plus)
Inputs 1, 2, 3, 4, 5, 6 (set to Line)
Input Impedance: 4.7 KΩ
Standard Input Level: 0 dBu
Maximum Input Level: +12 dBu
Line Input Gain: +0 dB (Low), +10 dB (Mid), +20 dB (High), +30 dB (Hi Plus)
97

Audio Channels External Inputs 1 &2
Input Impedance: 10 KΩ
Maximum Input Level: -1 dBV
Low: +9 dB, Mid: +20 dB, High: +35 dB, Hi Plus: +45 dB
Camera Input:
Input Impedance: 1 KΩ
Standard Input Level: -10 dBV
Maximum Input Level: +3 dBV
1/8” (3.5 mm) Line Output:
Output Impedance: 1 KΩ
Maximum Output Level: +3 dBV
1/8” (3.5 mm) Camera Output:
Output Impedance: 100 Ω
Maximum Output Level: -4 dBV
Dimensions
(width x depth x height)
Weight
4.3” x 6.5” x 2.0”
10.9 x 16.5 x 5.1 cm
1.20 lbs.
0.54 kg
Specifications are subject to change without notice.
Trademarks & Licenses
Marantz is a trademark of D&M Holdings Inc., registered in the U.S. and other countries. Marantz Professional
products are produced by inMusic Brands, Inc., Cumberland, RI 02864, USA.
All other product names, company names, trademarks, or trade names are those of their respective owners.
98

99

marantzpro.com
Manual Version 1.4
 Loading...