


User Guide
To The
RC3200
Touch Screen Remote Control
Automating Your
Home Theater
With Marantz

Automating Your Home Theater With The Marantz RC3200
RC3200 Remote Control User Guide
The information in this manual is copyright-protected. No part of this manual may be
copied or reproduced in any form without prior written consent from Marantz America,
Inc.
MARANTZ AMERICA, INC. CORPORATION SHALL NOT BE LIABLE FOR OMISSIONS OR FOR TECHNICAL OR EDITORIAL ERRORS CONTAINED IN THIS MANUAL. MARANTZ AMERICA, INC. SHALL NOT BE HELD LIABLE FOR INCIDENTAL
OR CONSEQUENTIAL DAMAGES RESULTING FROM THE SUPPLYING OR USE
OF THIS INFORMATION. MARANTZ AMERICA, INC. SHALL NOT BE HELD LIABLE
FOR INCIDENTAL OR CONSEQUENTIAL DAMAGES RESULTING FROM THE
PERFORMANCE OR USE OF THE MATERIALS DESCRIBED IN THIS MANUAL.
The information in this manual may be subject to change without prior notice.
All other brand or product names are trademarks or registered trademarks of their
respective companies or organizations.
FCC NOTICE: This equipment has been tested and found to comply with the limits for
a Class B digital device, pursuant to part 15 of the FCC rule. These limits are
designed to provide reasonable protection against harmful interference in residential
installation. This equipment generates, uses, and can radiate radio frequency energy
and , if not installed and used in accordance with the instructions, may cause harmful
interference to radio communications. However, there is not guarantee that interference will not occur in a particular installation. If this equipment does cause harmful
interference to radio or television reception, which can be determined by turning the
equipment off and on, the user is encouraged to try to correct the interference by one
or more of the following measures:
n Reorient or relocate the receiving antenna.
n Increase the separation between the equipment and receiver.
n Connect the equipment into an outlet on a different circuit from the receiver.
n Consult the dealer or an experienced radio/TV technician for help.
Note If serial or parallel ports are configured, a filtered/shielded serial or paral-
lel cable is recommended to minimize EMI and ensure FCC class B
compliance.

User Guide
1
Introduction . . . . . . . . . . . . . . . . . . . . . . . . . . . . . . . . . . . . . . . . .2
1. Installing the Batteries . . . . . . . . . . . . . . . . . . . . . . . . . . . . . .3
Using Your RC3200 . . . . . . . . . . . . . . . . . . . . . . . . . . . . . . . . . .4
1. Buttons and Features . . . . . . . . . . . . . . . . . . . . . . . . . . . . . . .4
2. Details of the Touch Screen Display . . . . . . . . . . . . . . . . . . . .5
3. Controlling the LCD Display . . . . . . . . . . . . . . . . . . . . . . . . . .6
Turning on the Display and the Backlight . . . . . . . . . . . . . . . .6
Changing the LCD Contrast . . . . . . . . . . . . . . . . . . . . . . . . . .7
The Battery Status . . . . . . . . . . . . . . . . . . . . . . . . . . . . . . . . .8
4. Operating Audio Video Devices . . . . . . . . . . . . . . . . . . . . . . .8
Using the Two Home Pages . . . . . . . . . . . . . . . . . . . . . . . . . .8
Selecting a Device from a Home Page . . . . . . . . . . . . . . . . . .8
Using the Soft Buttons . . . . . . . . . . . . . . . . . . . . . . . . . . . . . .9
Using the Hard Buttons . . . . . . . . . . . . . . . . . . . . . . . . . . . . .9
Setting Up Your RC3200 . . . . . . . . . . . . . . . . . . . . . . . . . . . . . .10
1. The Mode Button and the Mode Menu . . . . . . . . . . . . . . . . .10
2. Adjusting the Settings . . . . . . . . . . . . . . . . . . . . . . . . . . . . . .11
First Setup Page . . . . . . . . . . . . . . . . . . . . . . . . . . . . . . . . .11
Second Setup Page . . . . . . . . . . . . . . . . . . . . . . . . . . . . . . .13
Third Setup Page . . . . . . . . . . . . . . . . . . . . . . . . . . . . . . . . .14
To Exit Setup Mode . . . . . . . . . . . . . . . . . . . . . . . . . . . . . . .14
3 Learning From Other Remotes . . . . . . . . . . . . . . . . . . . . . . .15
The Learn Sequence . . . . . . . . . . . . . . . . . . . . . . . . . . . . . .16
Tricks for Remote Controls that are “Difficult” . . . . . . . . . . . .17
4. Macro Planning . . . . . . . . . . . . . . . . . . . . . . . . . . . . . . . . . .18
Overview . . . . . . . . . . . . . . . . . . . . . . . . . . . . . . . . . . . . . . .18
Secrets of Great Macros . . . . . . . . . . . . . . . . . . . . . . . . . . .19
Time the Power On Delays . . . . . . . . . . . . . . . . . . . . . . . . . .20
5. Recording Macros . . . . . . . . . . . . . . . . . . . . . . . . . . . . . . . .21
Programming Via PC . . . . . . . . . . . . . . . . . . . . . . . . . . . . . . . . .24
Minimum System Requirements . . . . . . . . . . . . . . . . . . . . . .25
Maintaining RC3200 . . . . . . . . . . . . . . . . . . . . . . . . . . . . . . . . .26
Important Notices . . . . . . . . . . . . . . . . . . . . . . . . . . . . . . . . .26
Cleaning RC3200 . . . . . . . . . . . . . . . . . . . . . . . . . . . . . . . . .26
FAQ . . . . . . . . . . . . . . . . . . . . . . . . . . . . . . . . . . . . . . . . . . . . . .27
Troubleshooting . . . . . . . . . . . . . . . . . . . . . . . . . . . . . . . . . . . . .28
Specifications . . . . . . . . . . . . . . . . . . . . . . . . . . . . . . . . . . . . . . .30
Index . . . . . . . . . . . . . . . . . . . . . . . . . . . . . . . . . . . . . . . . . . . . .31
Table of Contents
User Guide
2
The RC3200 is an intelligent remote control designed to
control virtually all audio video devices that understand
infrared (IR)remote control signals. Its easy-to-use LCD
touchscreen and its intuitive interface make it a perfect
remote control for every user.
The RC3200 is completely customizable and programmable. Although the RC3200 is pre-programmed for
Marantz components, a collection of built-in pages with
pre-arranged button art enables you to easily choose the
perfect interface for any non-Marantz component. The
RC3200 easily “learns” commands from your original
remote control. See page 15 for more details.
To tame complicated home theaters, the RC3200 will
record your favorite sequences of commands as Macros,
so that dozens of commands are initiated with the touch
of one button. See page 18 for more details.
With the RC3200 Setup Programming Software for PC
you can layout your pages, create and label new buttons
to completely personlize your RC3200. In the future, the
software will enable you to update your RC3200. You can
download the software from www.marantz.com. See page
24 for more details.
Introduction
User Guide
3
Introduction
1. Installing the Batteries
Before you use the RC3200 (and whenever the batteries run out),
you will have to install three fresh AA batteries (3 x 1.5V). You can
utilize conventional disposable or rechargeable batteries.
1 Release the catch to the battery cover by pressing it down.
2 Remove the battery cover by pulling it away from the body of
the remote control.
3 Place the batteries in the compartment.
4 Replace the battery cover, bottom first, pressing the top into
place so that the catch snaps into place securely.
Erwin to place
illustration here.
Erwin to place
illustration here.
Erwin to place
illustration here.
Erwin to place
illustration here.
User Guide
4
Using Your RC3200
1. Buttons and Features
The Touchscreen
Sending LED sends the
invisible Infrared commands
to your components
Learning Sensor learns any non-Marantz commands.
The two center hard buttons
are labeled “Back” and
“FWD”. These buttons enable
you to quickly navigate the
last six screens you’ve displayed.
Home Button
takes you to the
Home menu of
devices
Hard buttons for Volume, Mute,
Channel, Menu, Enter, Exit and 4
way navigator buttons will change
their function depending on what
device you are controlling.
Press and Hold the Mode
button to switch to progam-
ming modes
The Backlight
button lights up
the screen.
Page Up and
Page Down but-
tons scroll
between control
pages of each
device.
The Serial Port
enables you to
program vua a
Windows PC.
Touch the Home button to
operate another component. The RC3200 will
immeadiatly display one of
two Home pages listing all
of the components in your
system. Switch between the two pages using
the page up and page down buttons on the
side of the RC3200. When you see the name
of the component you want to operate, press
its button. The RC3200 will display the first
page of several devoted to controling the
device you selected.
User Guide
5
2. Details of the Touch Screen Display
The name of the device you
can control is always displayed in the center. In this
case TV(US) indicates that a
Marantz TV made for the
American market can be controlled.
When in normal
operating mode,
the top row dis-
plays day, date
and time.
The bottom row
displays the
labels for the four
hard buttons
below the screen.
The panel display
indicates which of
the control page
you are viewing (in
this case, the 1/4
means you are
looking at the first
of four page you’ll
use to control the
TV).
The battery indicator changes
to whtn the batteries
need to be replaced.
The Soft buttons you use to
control your components.
Using Your RC3200
User Guide
6
3. Controlling the LCD Display
Using Your RC3200
Turning on the Display and the Backlight
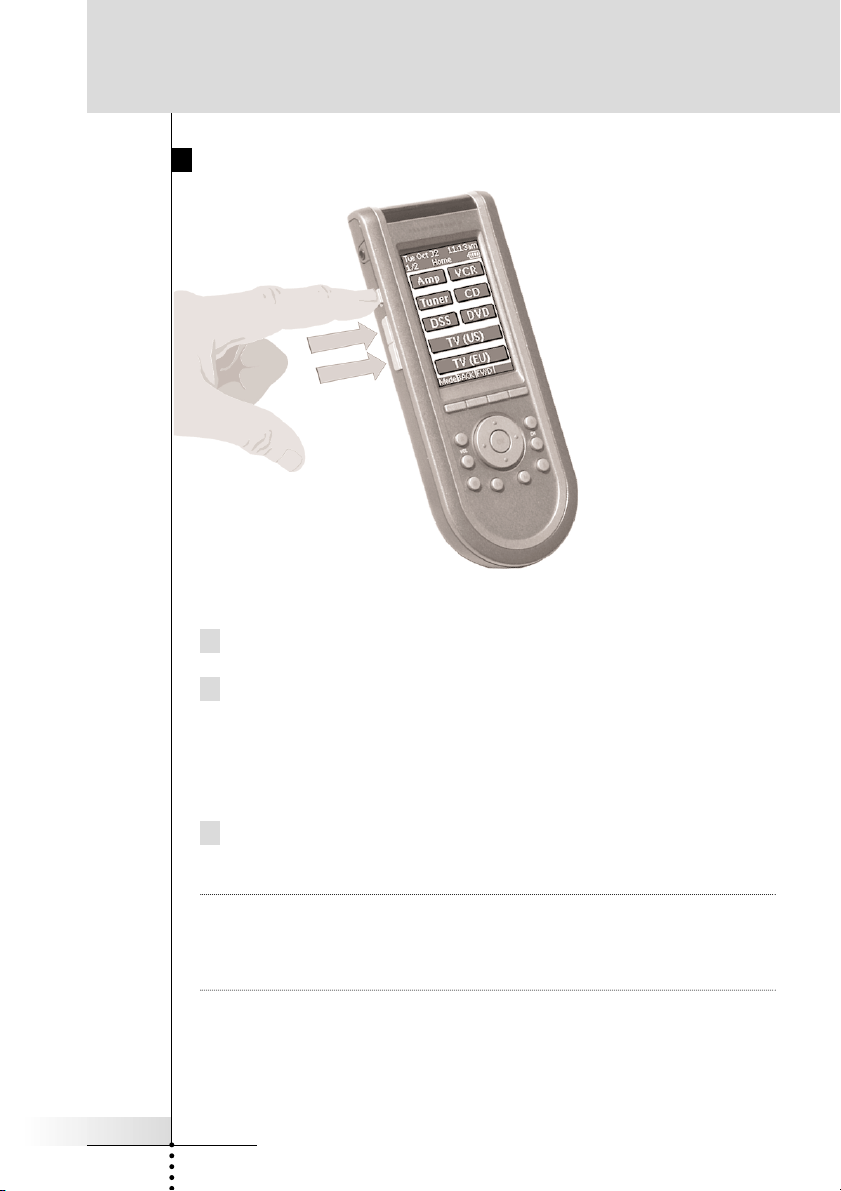
RC3200’s display can be activated in two different ways:
1 Tap the touch screen gently with your finger or a blunt, soft
object like a pencil eraser.
OR
2 Press the Backlight button on the left side of the RC3200.
If the LCD touch screen stays blank or becomes black when turning
on the display, read the next section ‘Changing the LCD Contrast’
to adjust the contrast of the LCD touch screen.
Note RC3200 has a timeout feature: the LCD touch screen and the
backlight automatically turn off to save power. See ‘Adjusting the
Settings’ on p. 11 to adjust the timeout for the LCD and the
backlight.
User Guide
7
Changing the LCD Contrast
To adjust the LCD contrast on the touch screen:
1 Press and hold the Backlight button.
2 While still holding the Backlight button, press the Page Up but-
ton once to increase the LCD contrast one level. The LCD contrast is adjusted one level up. Or, press the Page Down button
once to decrease the LCD contrast one level. The LCD contrast
is adjusted one level down.
3 Release the Backlight button when the contrast is satisfactory.
The LCD contrast can be adjusted 16 levels.
Note To adjust the contrast multiple levels, you have press the Page
Up or Page Down button multiple times. When you press and
hold the Page Up or Page Down button, the LCD contrast will
only change one level.
Using Your RC3200
User Guide
8
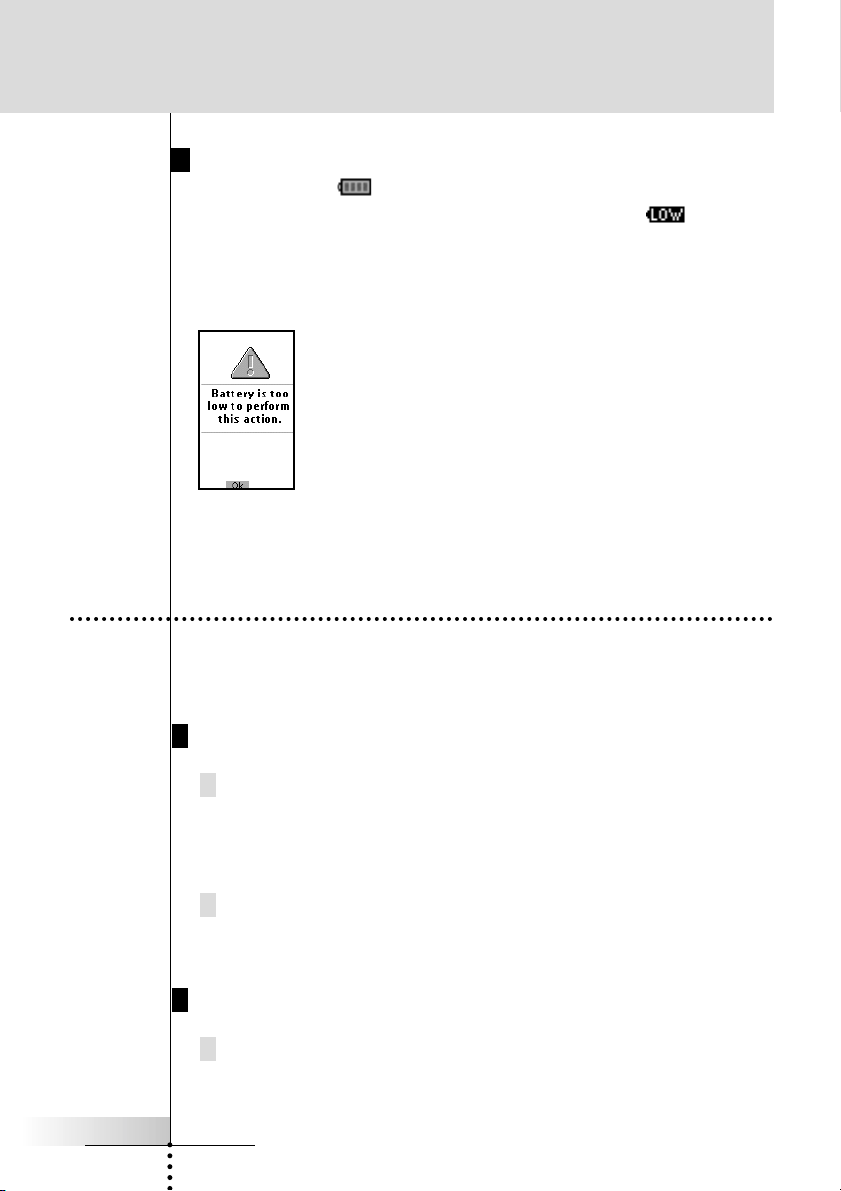
The Battery Status
The battery icon indicates the status of your batteries.
When the battery status is low, the Low Battery icon appears
at the top of the touch screen.
You can still operate your devices, but you cannot adjust the set-
tings, learn commands or record macros anymore. When you try to
perform these actions, a message screen appears.
Replace the batteries to make the RC3200 fully functional again.
See ‘The Batteries’ on p. 3 to replace the batteries.
4. Operating Audio Video Devices
To operate your home theater components via your RC3200 you
have to switch to the Home Page. This screen displays the available devices like TV, VCR, DVD, PreAmp and so on.
Using the Two Home Pages
Press the far right Hard button directly beneath the screen (it’s
labeled “Home” directly above the button).
The first of two home pages appears, showing some of the
available devices in the RC3200.
Use the Page Up and the Page Down hard buttons on the left
side of the body of the remote control to switch between the two
home panels.
Selecting a Device from a Home Page
Tap the soft button of the device you want to operate.
The first page of the selected device appears. Use the Page Up
and Page Down Button to go to another page of the device
Using Your RC3200

User Guide
9
You operate devices using the buttons on your RC3200:
• Soft buttons (touch screen buttons);
• Hard buttons.
Using the Soft Buttons
By tapping the soft buttons on the LCD touch screen you send IR
commands to the device you have selected. The name of the active
device is indicated at the top of the touch screen.
Note You can operate the soft buttons in the same way you operate
hard buttons on a conventional remote control. When you keep
the soft button pressed instead of tapping it, RC3200 keeps
sending the IR command.
Using the Hard Buttons
Hard Buttons can be operated at any time, even without turning on
the LCD touch screen.
Mode button:
Press and hold 3 seconds to activate the
Mode screen (enables
you to program the
RC3200).
Back and Fwd buttons:
Tap to navigate back and
forth between the last few
panels you’ve viewed (like an
internet browser).
Home button:
Tap to activate the
Home screen.
Function button:
Can be programmed
at will.
Status button:
Reserved for status of
special Marantz products.
Volume Up and
Volume Down
Channel Up and
Channel Down
Mute
Menu buttons:
To perform actions in
the menu of a device,
like the on screen display of a TV or a VCR
display. Use the cursor
to move up, down, left
or right in the menu and
press OK to select.
Using Your RC3200
Function button:
Can be programmed at
will.

User Guide
10
Setting Up Your RC3200
1. The Mode Button and the Mode Menu
RC3200 starts up in Use mode. In this mode you operate your
devices. For customizing the RC3200 (adjusting the settings, learning buttons or recording macros) you have to switch to the appropriate mode via the menu that appears when you press and hold the
mode button.
The RC3200 can be put into 4 different modes. These modes are:
Use mode Normal operation. See ‘Operating Devices’ on p. 8.
Setup mode For changing the RC3200 system settings. See
‘Adjusting the Settings’ on p. 11 for more details.
Learn mode For learning commands from other remote controls.
See ‘Learning Commands’ on p. 15 for more details.
Macro mode For recording macros. You can assign multiple com-
mands to one single button. See ‘Recording Macros’
on p. 18 for more details.
Note Learning commands and recording macros is not possible from
either of the Home pages. You must select a device or the
Macro group first, then press and hold the Mode button.
1 On one of the Home pages, tap the soft button of the device you
want to customize.
The first page of the selected device appears.
2 Press and hold the Mode button for 3 seconds
(this prevents accidental reprogramming).
The Mode Menu appears.
3 Select the desired mode from the Mode Menu.
The Mode Menu

User Guide
11
2. Adjusting the Settings
The RC3200 settings can be adjusted in the Setup mode.
1 Press and hold the Mode button for 3 seconds.
The Mode screen appears.
2 Tap Setup in the Mode screen.
The first Setup page appears.
The RC3200 settings consist of 3 setup pages with several settings
per page. Use the Page Up and Page Down buttons to navigate to
the appropriate setup page.
First Setup Page
On the first setup page you can adjust:
• the LCD timeout;
• the backlight timeout;
• the beep volume.
Adjust the LCD Timeout
The LCD timeout indicates how long the LCD touch screen stays
active before it turns off. The LCD will only time out when you don’t
touch any buttons. You can set the timeout between 1 second and
120 seconds.
Press ‘+’ to increase or ‘-’ to decrease the
time the LCD stays active.
Tap ‘+’ or ‘-’ once to adjust the timeout
1 second up or down.
Press and hold ‘+’ or ‘-’ to adjust the
timeout per 10 seconds up or down.
Setting Up Your RC3200

Adjust the Backlight Timeout
The backlight setting indicates how long the backlight of the LCD
touch screen and the buttons stays active. The backlight timeout
can be set between 1 second and 120 seconds.
Note The backlight cannot stay active longer than the LCD. If you
increase the backlight timeout, the LCD timeout will automatically increase as well.
Press ‘+’ to increase or ‘-’ to decrease the time
the backlight stays active.
Tap ‘+’ or ‘-’ once to adjust the timeout 1
second up or down.
Press and hold ‘+’ or ‘-’ to adjust the timeout
per 10 seconds up or down.
Note When the settings for the LCD timeout and the backlight timeout
are high, the battery lifetime may be reduced.
Change the Beep volume
The beep volume setting adjusts or turns off the volume of all button and system beeps on the RC3200. The beep volume levels are
mute, soft, medium and loud.
Press ‘+’ to increase or ‘-’ to decrease the beep volume.
User Guide
12
Setting Up Your RC3200

Second Setup Page
On the second setup page you can adjust:
• the date
• the time
Adjust the Date
You can set the year, the month and the day in the date settings.
Press ‘+’ to increase or ‘-’ to decrease the
value for the year, month and day.
Tap ‘+’ or ‘-’ once to adjust the year,
month and day one value up or down.
Press and hold ‘+’ or ‘-’ to adjust the values
for the year and the month more rapidly.
The value for the day settings will change
per 5 days.
The RC3200 will immediately reflect the date change at the top of
the screen.
Adjust the Time
Tap ‘+’ or ‘-’ once to adjust the time 1 minute up or down.
Press and hold ‘+’ or ‘-’ to adjust the time more rapidly. The time
will increase or decrease per 30 minutes.
The RC3200 will immediately reflect the time change at the top of
the screen.
User Guide
13
Setting Up Your RC3200

User Guide
14
Third Setup Page
RC3200 Information
This page contains information that may be important to the dealer
in case of a defect. The following information is displayed on this
screen:
• Free memory (in percentage), which gives you an indication on
how much memory is left to (further) customize the RC3200;
• Boot version;
• Application version;
• Configuration file;
• The Revert button.
The Revert Button
Warning When you revert the RC3200, all customization is lost perma-
nently. You loose all RC3200 settings, learned codes and
recorded macros.
By tapping the Revert button the RC3200 will be reverted to the
default configuration. Reverting to the original configuration restores
the RC3200 to its initial state. You might have to revert when you
notice that scrolling through pages is slowing down. This might be
the case when you have added a lot of commands to the RC3200.
1 Tap the Revert button.
A message screen appears to confirm or cancel the revert process.
2 Press OK or Cancel.
To Exit Setup Mode
1 Press the Mode button.
The Mode screen appears.
2 Tap the mode button you want to go to.
RC3200 switches to this mode. See also ‘Working with Modes’
on p. 10.
Learning Commands
Setting Up Your RC3200

User Guide
15
3 Learning From Other Remotes
Overview of Learning
If you own any non-Marantz components, you can program
RC3200 to reproduce IR signals from your existing remote controls
via RC3200’s learning eye. To do this, place RC3200 and the
device’s remote control on a flat surface, 1 to 4 inches (2 to 10 cm)
apart.
To learn commands from other remote controls, RC3200 has to be
in Learn mode. Switching to Learn mode is only possible from a
specific device, not from the Home Pages. See “The Mode Button
and the Mode Menu” on p. 10.
Per device you can learn all soft and hard buttons on the RC3200,
except for:
• the Backlight button;
• the Back and FWD buttons;
• the Page Up and Page Down buttons;
• the Mode button;
• the “S” (Status) button;
• the Home button.
Setting Up Your RC3200
1 to 4 inches (2 to 10 cm)

User Guide
16
The Learn Sequence
1 From the Home page, select the device, e.g. TV, with the but-
tons you want to teach new commands to.
The device screen appears.
2 Press and hold the Mode button for 3 seconds.
The Mode Menu appears.
3 Tap Learn on the Mode Menu.
RC3200 is now in Learn Mode. ‘Learn’ and the label of the
selected device appear at the top of the touch screen.
4 Use, if necessary, the Page Up or Page Down button to go to
the next button you want to learn.
5 Press the soft or hard button you want to learn on the RC3200.
The Learn label changes to Learning, which means RC3200 is
ready to receive commands froman existing remote control. The
RC3200 will wait for 3 seconds to receive an IR code from
another remote control.
Note When a hard button is pressed to learn, there is no on screen
feedback to indicate which button is pressed.
6 Press and hold the button on the existing remote control you
want to learn to the RC3200.
When the RC3200 receives an IR code:
• You hear a confirmation beep;
• The label changes from Learning to OK.
The Learn sequence has been successful.
When the RC3200 does not receive an IR code in 3 seconds:
• You will hear an error beep;
• The label changes from Learning to Failed.
The Learn sequence has failed. RC3200 will return to Learn mode.
Return to step 5 of the Learn sequence to relearn the button.
Setting Up Your RC3200

User Guide
17
Tip You do not have to wait for the OK or Failed to disappear. If you
press another button (soft or hard button), the RC3200 Learn
sequence immediately goes back to step 5.
7 Go to other pages of the selected device with the Page Up and
Page Down buttons. Repeat steps 6 and 7 until you have copied
all the commands of the existing remote control.
8 Press Done when you have finished learning commands to the
buttons of your choice.
RC3200 returns to Use Mode.
You can try out the new IR codes or select another device to learn.
Tricks for Remote Controls that are “Difficult”
Replace the batteries in your original remote control. Poor battery
charge in the original remote will still operate original component
from long range, but will corrupt carrier frequency learning.
Change distance. Try increasing distance up to 4 feet. Start in
the normal 1” to 4”, then double the distance to 8” and so on.
Use a short “Tap” instead of a press and hold. A press and hold
is only really necessary when you are learning a button that in
actual operation you would sometimes press and hold (e.g. volume up and down, fast forward scan). If your system is large
and you are concerned about memory, try teaching most commands as taps rather than extended press and holds.
The “Flicker” technique – rapidly tap the button while learning
(7x per second or faster). This is very useful for difficult volume
up and volume down commands from some manufacturers.
The “Swoop”- Start from 2’ away and swoop the remote towards
the learning remote. Use in absolute desperation, out of sight
from anyone who might see you. Reportedly works occasionally.
The “Flasher” – Hold an opaque object in front of the remote
and remove it then quickly replace it. This is especially useful
when you want to capture one part of a macro from another
remote.
Setting Up Your RC3200

User Guide
18
Overview
A macro allows you to send a sequence of commands using one
single button. You can for instance, switch on your TV, select the
external input, switch on your surround receiver, select the DVD
input, switch on your DVD player and begin play. All this can be
done be pressing a single “Watch DVD” button on your RC3200.
Basically, you can assign any button as a macro button. However, it
is recommended that you use the reserved macro buttons in the
Macro Group since they are conveniently labeled with popular
Macro titles. However, any button (except those on the Home
pages) can be reprogrammed to be a Macro.
Making Reliable Macros
If your entire system is new to you, practice using the RC3200
manually for a few days before programming any macros. You’ll
find that your home theater requires many operations that require
multiple steps to do. You have to decide whether to use a Macro or
simply teach everyone how to do the procedure manually. Some
macros will behave very inconsistently and are extremely frustrating
to casual users. An example is turning on a non-Marantz home theater system.
Marantz builds components that are “macro-friendly”. Instead of a
single “power” button, the remote controls have a discrete “On” and
a discrete “Off” button. With a Marantz system, you can record a
Macro that is very reliable from a series of “On” commands.
However, many other brands turn on and off with a single “Power”
button. The RC3200 cannot “look” at your components to see if
they are on or off. So, if you recorded a macro intended to power
up a non-Marantz component with a toggle power command, it
wouldn’t be very reliable. Here’s an example:
Your spouse goes out to the local video store and rents a videotape. When he/she gets home, they pop the tape in the VCR (most
VCR’s automatically turn on when a tape is inserted). Your spouse
touches the macro button you programmed to power up the sys-
4. Macro Planning
Setting Up Your RC3200

User Guide
19
tem. The recorded sequence of “power” buttons is played back.
Unfortunately, since the VCR was already on, it is now off and
everything else is on. Your spouse sees no picture, assumes the
macro didn’t work, so touches the button again. This time, the
macro turns the VCR on and everything else off. Frustrating!
Sometimes, the problem is not with a toggle type “power” command, but a toggling “input” command that scrolls through multiple
tv inputs. There are some great tricks below, but sometimes, when
there is no secret trick, you must simply leave the toggle type of
command out of the macros and teach everyone in your family how
to do some things manually.
Secrets of Great Macros
Sometimes there is a reliable way to use toggle type commands in
macros. Unfortunately, it will not be written down in your component’s instruction manual. You will have to find it through experimentation and imagination. What you are looking for is an “anchor”
command that will put your component in a known state. Once it is
in a known state, you can use toggle commands in your macro.
Powering Up DVD Player Macro:
Most DVD players will turn on when off when they receive a Play
command. Thus a discrete On command is two steps,
1) DVD Play
2) DVD Stop
A discrete off command is constructed by:
1) DVD Play
2) Delay (amount of delay varies with brand and model)
2) DVD Power
Setting Up Your RC3200

User Guide
20
Selecting Source on a TV Macro:
Many televisions will return to a particular input with either a channel up or down command or by selecting a particular channel.
Thus, to construct a macro that selects the EXT1 input:
1) Channel Up (selects the Antenna A input)
2) Input (toggles to the Antenna B input)
3) Input (toggles to the EXT 1 input)
The Ultimate “Watch DVD” Macro
Another secret of recording great macros is to automate processes
that typically frustrate casual users. An example is the typical reaction of a casual user when faced with an older DVD that refuses to
play until a menu is navigated. Typically, the menu can be
bypassed by programming the last few steps (after the DVD player
is turned on) of your “Watch DVD” macro with this sequence:
1. Stop
2. Delay (amount varies with brand and model)
3. Stop
4. Delay (amount varies with brand and model)
5. Play
Almost all DVD players will skip the Menu and begin playing the
Movie directly with this macro!
Time the Power On Delays
As you start acquiring ideas about what multiple step processes
you would like to record as macros, write down the steps. Practice
them manually and try them when all the components are OFF.
Often you will find that extensive delays are necessary immeadiatly
after a component is powered on. When you actually record your
macro, you must enter the correct amount of delay at the time of
progamming. The RC3200 does not enable you to correct the delay
time, you must reprogram the entire macro. Thus, you’ll keep more
of your hair if you time things carefully and write them down first.
Setting Up Your RC3200

User Guide
21
5. Recording Macros
Remember, you can assign any button as a macro button.
However, it is recommended that you use the reserved macro buttons in the Macro Group since they are conveniently labeled with
popular Macro titles. However, any button (except those on the
Home pages) can be reprogrammed to be a Macro.
1 Navigate to the second Home page by pressing the Home but-
ton, then using either the Page Up or the Page Down buttons.
2 Select the Macro group of pages by tapping the Macro button.
3 Press and hold the Mode button for 3 seconds.
The Mode Menu appears.
4 Tap Macro on the Mode Menu.
A message screen appears instructing you to select the button
that will trigger the macro. RC3200 is now in Macro Mode.
5 Tap Next.
The Macro pages reappear so that you can pick the button that
you want to issue a macro.
Setting Up Your RC3200
Tap the Macro button on the second home page to
navigate to the Macro group of pages.
The buttons on the Macro pages have popular labels
preprogrammed for you. Use the page up and page
down buttons to scroll through both of the Macro
pages to see all of the available Macro buttons.

User Guide
22
6 Tap the soft or hard button you want to select as a macro.
A message screen appears instructing you that the RC3200 is
now recording the buttons you press as macro steps.
7 Tap Start.
The Home Pages appears with the ‘Recording’ label at the top
of the screen. The buttons you tap on this screen will not be
recorded. From the Home Pages you can go to the different
devices or you can press the Extra hard button to go to the
Extra screen with delays and beeps.
8 Tap the button of the device you want to go to.
The device screen appears.
9 Tap the soft or hard buttons with the commands you want to
record.
10 Press the Page Up and Page Down buttons to go to different
screens of the same device.
-or-
Press the Home button to go to the Home Pages again.
11 To add delays and beeps to the macro, press the Extra hard but-
ton on the Home Pages.
The Extra screen appears.
Delays Use delays to compensate
for the dead time when a
component first powers up
and will not respond to
another IR command.
Additionally, short .5 second
delays make channel
macros more reliable.
Beeps Use beeps to signal that the
macro is finished.
To add a delay or a beep, tap the corresponding button.
TIP By tapping several Delay buttons, the duration of the delay will
be increased.
Setting Up Your RC3200

User Guide
23
12 Press Stop to stop recording.
A message screen appears.
13 Press OK to save the macro and return to the Mode Menu. The
existing command of the selected button is replaced by the
macro.
-orPress Cancel to return to the Mode Menu without saving the
macro. The button retains its previous command.
14 Set the RC3200 in Use mode to test the recorded macro. If you
need to make changes, re-record the macro from the beginning.
Setting Up Your RC3200

User Guide
24
Programming Via PC
1. RC3200 Setup Programming Software
If you want to personalize your RC3200 even more beyond its standard programming features, RC3200 Setup Programming Software
is the tool for you to use. You can find more information and
updates of the software on http://www.marantz.com. RC3200 Setup
Programming Software is the visual editor for creating and configuring RC3200 Configuration Files (windows file extention .NCF) on
your computer. An NCF is a file that is used to define the RC3200
behaviour and look for the LCD touch screen.
Note It is advised to make backup copies of your own configurations. This
can be done with RC3200 Setup Programming Software.
With RC3200 Setup Programming Software you can:
• define the types and brands of your devices;
• generate the Home Pages;
• design the page layout and the appearance of buttons;
• configure the behavior of the hard buttons and soft buttons;
• save, duplicate and share NCFs, devices, buttons, bitmaps or
codes with another RC3200;
• preview the NCF on the RC3200 emulator;
• download the new configurations to your RC3200 by means of the
included serial cable;
1 Plug one end of the serial cable in the serial port on your com-
puter.
2 Plug the other end of the serial cable in the serial port on the
RC3200.
Note When the RC3200 is connected to the PC, the battery lifetime
may be reduced.

User Guide
25
Minimum System Requirements
• PC with a Pentium 166 MHz or higher
• Windows 95/98/ME/XP or NT 4.0/2000
• 32 MB of RAM
• 16 MB of free hard disk space
• Free serial port
The first time you run RC3200 Setup Programming Software, you
have to accept the license agreement. Otherwise RC3200 Setup
Programming Software will not run.
Programming Via PC

User Guide
26
In
Important Notices
Take care not to scratch the touch screen
Use your finger to tap the LCD touch screen or use plastic-tipped
pens intended for use with touch screens.
Never use an actual pen, pencil or other sharp object on the LCD
touch screen.
Protect RC3200 from extreme temperatures
Keep RC3200 away from heaters and other heat sources.
RC3200 is not waterproof
RC3200 should not be exposed to rain or moisture.
Do not store or use RC3200 in any location that is extremely damp
or wet.
When you have spilled water on RC3200, you have to take out the
batteries and let RC3200 dry for 48 hours before you place the batteries back.
When you have spilled other liquids like coffee on the RC3200, you
can clean it with distilled water. Make sure no water gets into the
housing.
The touch screen of RC3200 contains a glass element
Do not drop RC3200 or subject it to any strong impact.
Cleaning RC3200
Use a soft, damp cloth to clean RC3200.
If the LCD touch screen of RC3200 is spoiled, clean it with a soft
cloth moistened with a diluted window-cleaning solution.
Do not use a corrosive detergent or an abrasive sponge.
Avoid the use of abundant water.
Maintaining RC3200

User Guide
27
How do I reset the RC3200?
Under normal circumstances, you will never have to reset the
RC3200. However, on rare occasions, if the RC3200’s touch screen
freezes or if you notice unusual behavior, you need to perform a
reset to get the RC3200 running again. All customized commands
and devices are retained.
1 Slide the battery cover off the
back of the RC3200. You will
see the Reset button in the
battery compartment.
2 Use an unfolded paperclip or a sharp pencil to carefully press the
Reset button.
The RC3200 restarts and an Introduction screen appears. The
RC3200 beeps twice to indicate it is ready for use.
How do I revert to the original configuration?
Reverting to the original configuration restores the RC3200’s
devices and commands to its state when you purchased it. This
means that all programming is lost permanently. Normally, you
never have to revert the RC3200. See ‘Revert’ on p. 14.
1 Press and hold the Mode button for 3 seconds.
The Mode Menu appears.
2 Tap the Setup button.
3 Scroll to the third setup page.
4 Tap the Revert button.
A message screen appears to confirm or cancel the revert process.
5 Press OK or Cancel.
Do I have to calibrate the touch screen?
The RC3200’s touch screen is calibrated when it leaves the factory.
You only have to re-calibrate when the software is upgraded.
FAQ
Erwin to place
illustration here.

User Guide
28
General Problems
The display stays blank or becomes black
• Make sure the batteries are properly installed.
See “The Batteries” on page 3.
• Press the Backlight button to make sure RC3200 and the back-
light are turned on.
See ‘Turning on the Display and the Backlight’ on p. 6.
• Adjust the contrast using the Backlight button and the Page Up or
Page Down buttons on the left side of RC3200. See ‘Changing the
LCD Contrast’ on p. 7.
The display is too light or too dark
• Adjust the contrast using the Backlight button and the Page Up or
Page Down buttons on the left side of RC3200. See ‘Changing the
LCD Contrast’ on p. 7.
RC3200 shuts off automatically
• This is a timeout feature of the RC3200 to save power. You can
change the time RC3200 stays on in the Settings. See ‘Adjust the
LCD Timeout’ on p. 12.
Devices do not respond to commands from RC3200
• Make sure RC3200 is in Use mode. See ‘Working with Modes’ on
p. 10.
• Make sure RC3200’s sending LED is pointed towards the device
you’re operating.
• Check if the battery level is low. If so, replace the batteries. See
‘The Batteries’ on page 3.
• Check that you have correctly learned the IR commands.
See ‘Tricks for Remote Controls that are “Difficult”’ on p. 17
• If the button is programmed with a macro, and all other buttons
are working correctly, reprogram the macro. See ‘Recording
Macros’ on p. 21.
RC3200 does not learn commands from an existing remote
control.
• Do not learn commands directly under fluorescent lights.
• Do not learn commands on a reflecting table surface.
• Check if the battery level is low. If so, replace the batteries.
See ‘Tricks for Remote Controls that are “Difficult” ’ on p. 18.
After exhausting all previous suggestions, still cannot learn
one more IR command.
• Check if there is sufficient memory to learn commands (more than
1% free memory). If not, revert the RC3200. See ‘RC3200
Information’ and ‘Revert’ on p. 14.
Troubleshooting

User Guide
29
RC3200 is not recognized by the RC3200 Setup Programming
Software software
• Make sure the serial cable is properly connected. See ‘RC3200
Setup Programming Software’ on p. 24.
• Disconnect other equipment connected to the serial ports, e.g.
PDA’s.
• Plug the serial cable in another serial port.
• Try to connect multiple times.
Programming Problems
Buttons are not sending the correct commands
• Check whether the button of the device is learned properly.
See ‘Learning Commands’ on p. 15.
• Check whether the macro is recorded properly. See ‘Recording
Macros’ on p. 21.
RC3200 will not switch modes
• Replace the batteries. When the batteries are low RC3200 prevents you from switching to customizing modes so that no customization can get lost.
RC3200 is low on memory
• Revert the RC3200. See ‘Revert’ on p. 14.
The configuration file is corrupted
• When this unlikely event occurs, you have to revert to the originalconfiguration or use RC3200 Setup Programming Software to
download a new configuration file. All your customized commands
and devices will be lost and you will have to reprogram your
RC3200. If you use RC3200 Setup Programming Software, it is
advised to make backup copies of your customized configurations.
See ‘Revert’ on p. 14 and ‘RC3200 Setup Programming Software’
on p. 24.
RC3200 error message
If the error message ‘Invalid CF version or corrupt Flash!’ occurs:
• Use the Reset button on the back of the RC3200. See ‘How do I
reset the RC3200?’ on p. 27.
• Try to recover the RC3200 Configuration File (NCF) by downloading a backup copy or the default file from RC3200 Setup
Programming Software. See ‘RC3200 Setup Programming
Software’ on p. 24.
• Go to the Marantz website http://www.marantz.com for more information.
Troubleshooting

User Guide
30
The specifications and design of this product are subject to change without notice.
Display Monochrome touch screen LCD with 4 gray levels and
digital contrast control.
Resolution: 160 x 100 pixels
Blue EL backlighting for LCD and hard buttons
Interface 3-wire (RS232) serial port connector
Software Marantz Digital Learning to operate different brands
Built-in Marantz IR codes
Total number of devices limited only by memory
Infrared (IR) Infrared sending LED and learning eye
Operating distance of 33 feet (10 meters)
Learning frequency up to 56 kHz and 455 kHz
Learning distance 1 inch (2 cm) up to 4 inch (10 cm)
Memory 1 MB non-volatile flash memory
Batteries 3 AA-batteries (3 x 1,5V): disponsable or recharge-
able
Power management Power on by tapping the LCD touch screen or by
pressing the Backlight button
Power off automatically
Dimensions 7.8 inch x 3 inch x 1.3 inch (177mm x 74mm x 33mm)
Operating temperature 41°F to 113°F (5°C to 45°C)
Accessories RS232 cable for PC connection
3 AA-batteries
Specifications

User Guide
31
A
Ahead 4
Anchor macro technique 19
Application version 14
Adjusting
Backlight timeout 12
Beep volume 13
Date 13
LCD Contrast 7
LCD Timeout 12
Settings 11
time 13
B
Back 4
Back and Ahead buttons: 9
Backlight 6
adjusting 12
Switching off 6
Switching on 6
Backlight button 4, 6, 10
Batteries 3
Battery cover 3
Battery indicator 5, 8
Battery Status 8
beep 12
adjusting 12
two beeps 3
Boot version 14
Buttons that can't learn 1
C
changing batteries 3
Cleaning RC3200 26
Cloning 16
Computer Programming 24
Connecting to PC 24
Configuration file 14
Contrast 7
D
Date 13
Delays 22
Device name 5
Difficult remote control tricks 17
Discrete Codes 18
DVD Movie Macro 20
DVD Off Macro 19
DVD On Macro 19
F
Flasher technique 17
Flicker technique 17
Function button 9
H
Hard buttons 4, 9
Home Button 4, 5, 8, 9
Home Menu 5, 8
Home Pages 8
L
LCD 30
LCD Contrast 7
LCD timeout 6, 11
Learn mode 10, 15
Learning 15
buttons that can't learn 15
Learn Sequence 16
learning distance 15
learning tricks 17
Learning Sensor 4
M
Macro mode 10
Macro Planning 18
Macros 21
Index

User Guide
32
beeps in 22
delays in 22
Maintaining 26
Menu buttons 9
Mode button 4, 9, 10
Mode Menu 10
Modes 10
Learn 10
Macro 10
Setup 10
Use 10
P
Page Down 4
Page Up 4
Page Number 4
PC Programming 24
PC System Requirements 25
Power On Delays 20
R
RC3200 Setup 24
Recording Macros 21
Reset 27
Revert 27
RS232 Programming 24
S
Sending LED 4
Sequences 18
Serial Cable 24
Serial Port 4
Service and Support 31
Settings 11
Backlight Timeout 12
Beep volume 12
Date 13
LCD Timeout 11
Revert 14
Tim e 1 3
Setup mode 10
Exit Setup 14
Soft buttons 5, 9
Software 24
Specifications 30
Status button 9
Swoop technique 17
T
Tap technique 17
Teaching 16
Time 13
timeout 6
Toggle codes 18
Touchscreen 4
Tricks for Learning 17
TV Input Macro 20
U
Use mode 10
W
Website 35
Index

User Guide
33
Service and Support
For service and support, please contact Marantz customer service
at 1-800-447-1970. When you contact Marantz customer service,
you will be asked for the technical information listed on the Info
panel.
To view this information, follow these steps.
1 In Use mode, press and hold the Mode button.
2 Touch the Setup button on the Mode Menu.
3 Navigate to the third setup page using the page up and page
down buttons on the side of the body of the remote.
Updates and New Products
For news about updates and new products, please visit us on the
World Wide Web at:
http://www
.marantz.com
Service and Support

Printed in the USA
 Loading...