

Page 1
94799_livx_LED-Unterbauleuchte_Model_B_Cover_CZ.indd 2 09.10.13 09:31
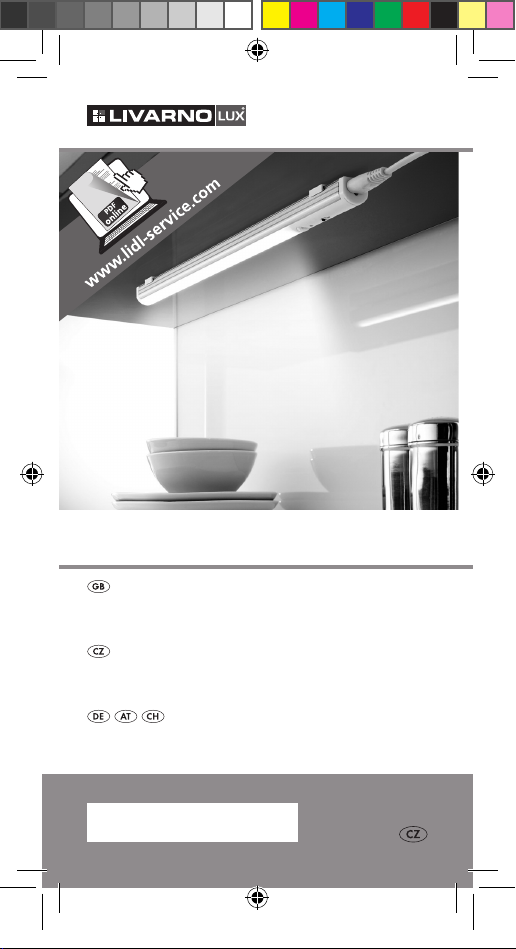
LED UNDER-CABINET LIGHT
LED UNDER-CABINET LIGHT
Assembly, operating and safety instructions
LED SVÍTIDLO POD SKŘÍŇKU
Pokyny k montáži, obsluze a bezpečnostní pokyny
LED-UNTERBAULEUCHTE
Montage-, Bedienungs- und Sicherheitshinweise
IAN 94799
Page 2

94799_livx_LED-Unterbauleuchte_Model_B_Cover_CZ.indd 3 09.10.13 09:31
GB Assembly, operating and safety
instructions Page 5
CZ Pokyny k montáži, obsluze a
bezpečnostní pokyny Strana 15
DE / AT / CH Montage-, Bedienungs- und
Sicherheitshinweise Seite 26
Page 3

A
9 10 11 2 3
8
1
+
+
56
4
7
3
94799_livx_LED-Unterbauleuchte_Model_B_Content_CZ.indd 3 09.10.13 09:31
Page 4

B
12
13
14
13
6
7
1
94799_livx_LED-Unterbauleuchte_Model_B_Content_CZ.indd 4 09.10.13 09:31
4
Page 5

Proper Use .........................Page 6
Description of parts ....Page 6
Technical Data .................Page 7
Scope of Delivery .........Page 7
General safety
instructions .........................Page 8
Installation .........................Page 9
Extensions ................................Page 11
Use ............................................Page 11
Cleaning and care ........Page 12
Disposal ................................Page 13
Guarantee ..........................Page 13
94799_livx_LED-Unterbauleuchte_Model_B_Content_CZ.indd 5 09.10.13 09:31
5 GB
Page 6

LED Under-cabinet light
Q
Proper Use
This under cabinet light is designed for
lighting purposes and for installation on
furniture and walls. It turns itself on automatically in dark environments when it
detects movement and turns off again
after 30 seconds. You can electronically
link up to three of these under cabinet
lights together. This light is solely suitable
for use in dry, closed indoor spaces. This
product is intended for use in private,
domestic environments only and not for
commercial purposes.
Q
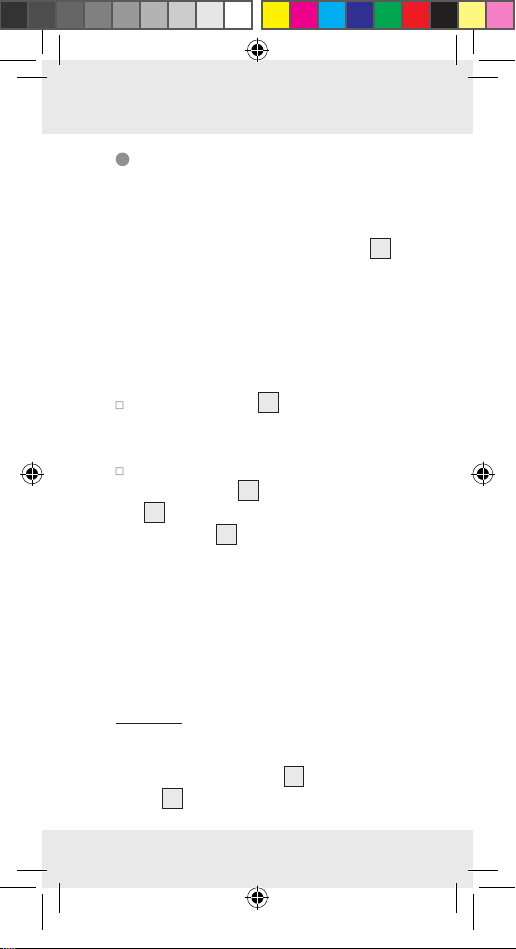
Description of parts
1
Indicator field
2
Screw (ø 4 x 12 mm) for furniture
fastening
3
Screw (ø 3.7 x 29.5 mm) for wall
fastening
4
Wall plug (ø 6 mm)
5
Mounting bracket
6
Input socket
94799_livx_LED-Unterbauleuchte_Model_B_Content_CZ.indd 6 09.10.13 09:31
6 GB
Page 7

7
Lead
8
Switch / sensor unit
9
Infrared motion sensor
10
Light sensor
11
Choice-switch ON / AUTO / OFF
12
Connection cable
13
Output socket
14
Cap
Q
Technical Data
Operating voltage: 230 V ~ 50 Hz,
max. 7.3 W
LED: 60 LEDs (LEDs
non replaceable)
Coverage of the
motion sensor: approx. 1.5 - 2 m
at an angle of
120°
Protection category:
Q
Scope of Delivery
1 under-cupboard light
1 lead
1 connection cable
2 fastening clips
94799_livx_LED-Unterbauleuchte_Model_B_Content_CZ.indd 7 09.10.13 09:31
7 GB
Page 8

2 screws (ø 4 x 12 mm)
2 screws (ø 3.7 x 29.5 mm)
2 wall plugs (ø 6 mm)
1 instructions for assembly and use
General safety
instructions
BEFORE USING THIS PRODUCT; PLEASE
FAMILIARISE YOURSELF WITH ALL OF
THE SAFETY INFORMATION AND INSTRUCTIONS FOR USE! WHEN PASSING THIS PRODUCT ON TO OTHERS;
PLEASE ALSO INCLUDE ALL OF THE
DOCUMENTS!
DANGER TO LIFE AND
RISK OF ACCIDENTS
FOR INFANTS AND CHILDREN!
This appliance may be used by children
age 8 years and up, as well as by
persons with reduced physical, sensory
or mental capacities, or lacking experience and/or knowledge, so long
as they are supervised or instructed
in the safe use of the appliance and
understand the associated risks. Children should not be allowed to play
94799_livx_LED-Unterbauleuchte_Model_B_Content_CZ.indd 8 09.10.13 09:31
8 GB
Page 9

with the appliance. Cleaning and user
maintenance should not be performed
by children without supervision.
Danger to life by electric
shock
Always check lamp for damage be-
fore connecting it to power. Never
use the light if it shows any signs of
damage.
For the prevention of hazards, a dam-
aged cable of this lamp may only be
replaced with a cable which is supplied by the manufacturer or his service
representative.
Before assembly, ensure that the avail-
able mains voltage (230 V ~ 50 Hz)
corresponds to the operating voltage
necessary for the light (230 V ∼ 50 Hz).
Otherwise do not install the light.
Q
Installation
Note: you will need an electric drill for
the installation.
CAUTION! RISK OF INJURY! Please
refer to the operating instructions of your
electric drill.
94799_livx_LED-Unterbauleuchte_Model_B_Content_CZ.indd 9 09.10.13 09:31
9 GB
Page 10

Mark the two fastening holes on the
desired installation location approx.
20 cm apart.
For furniture installation: Ensure
that the 12 mm screws are suitable
for installation on your furniture.
Drill two holes in the areas marked
with a 2 mm wood bit.
Secure the mounting brackets 5, by
screwing the screws
2
in the holes.
For wall installation: Ensure that
the wall plugs
4
provided are suitable
for your chosen material. The wall
plugs are designed for masonry.
Drill a 6 mm hole in the marked area
with a masonry drill.
Put the wall plugs in the hole.
Secure the mounting bracket by screw-
ing the screws
3
into the wall plugs.
Attach the light to the secured mounting bracket
5
.
Plug the lead 7 in the input socket
of your under cabinet light.
Then plug the European plug of the
lead in a socket.
Your under cabinet light is now ready for
operation.
94799_livx_LED-Unterbauleuchte_Model_B_Content_CZ.indd 10 09.10.13 09:31
10 GB
Page 11
Extensions (fig. C)
Note: Ensure that no more than three
under cabinet lights of the same type are
connected together in series. Unplug
the the first light from the mains before
connecting the lights together.
Note: Only connect lights of the same
type, model no. Z31791B. Do not connect
any other type to this lamp.
Remove the cap 14 of the under
cabinet light which is connected to
the mains.
Connect the first under cabinet light‘s
output socket
6
of the next light using the connec-
tion cable
13
with the input socket
12
. You only need one
lead for the power supply.
CAUTION! First ensure that all the
under-unit lights are connected by
connection leads before you plug the
first light into the mains.
Q
Use
7
94799_livx_LED-Unterbauleuchte_Model_B_Content_CZ.indd 11 09.10.13 09:31
You can chose the following functions on
the switch / sensor unit‘s
11
switch
:
8
choice-
11 GB
Page 12

In the position „ON“ the light is
permanently on.
In the position „OFF“ the light is
permanently off.
In the position „AUTO“ the light is in
automatic mode.
The light sensor
10
detects the light levels
of the environment.
The infrared sensor
9
detects movement
near it and switches the under cabinet light
on automatically. If the motion detector
does not sense any movement for approx.
30 seconds the light turns it self off again.
Q
Cleaning and care
Unplug the light from the mains socket
and let it cool down at least 10 minutes.
Never immerse the product in water
or other liquids. The product may
otherwise be damaged.
Clean the spotlight with a lint-free,
slightly moist cloth and mild cleaning
agent.
12 GB
94799_livx_LED-Unterbauleuchte_Model_B_Content_CZ.indd 12 09.10.13 09:31
Page 13

Q
Disposal
The packaging is made of environmentally friendly materials,
which may be disposed of
through your local recycling
facilities.
Contact your municipal authorities for details on how to dispose of your worn-out product.
Q
Guarantee
The product has been manufactured
according to strict quality guidelines and
meticulously examined before delivery. In
the event of product defects, you have legal rights against the retailer of this product. Your statutory rights are not limited in
any way by our warranty detailed below.
This device is covered by a 3-year warranty
from the date of purchase. The warranty
period begins on the date of purchase.
Please retain the original receipt safely.
This document is required as your proof
of purchase.
94799_livx_LED-Unterbauleuchte_Model_B_Content_CZ.indd 13 09.10.13 09:31
13 GB
Page 14

Should this device show any fault in materials or manufacture within three years
from date of purchase, it will be repaired
or replaced - at our choice - by us free of
charge. This warranty becomes void if the
device has been damaged or improperly
used or maintained.
The warranty applies to faults in material
or manufacture. This guarantee does not
apply to product parts which are subject
to normal wear and tear (e.g. batteries)
and can be regarded as wearing parts,
or for damage to breakable parts, e.g.,
switch, rechargeable batteries, or parts
which are made of glass.
EMC
94799_livx_LED-Unterbauleuchte_Model_B_Content_CZ.indd 14 09.10.13 09:31
14 GB
Page 15

Použití ke
stanovenému účelu...Strana 16
Popis dílů .......................... Strana 16
Technické údaje ..........Strana 17
Rozsah dodávky ........ Strana 17
Všeobecná
bezpečnostní
upozornění .....................Strana 18
Montáž ............................... Strana 19
Rozšíření ...............................Strana 21
Obsluha .............................Strana 22
Čistění a ošetřování ... Strana 23
Odstranění do
odpadu ............................... Strana 23
Záruka ................................ Strana 24
94799_livx_LED-Unterbauleuchte_Model_B_Content_CZ.indd 15 09.10.13 09:31
15 CZ
Page 16

LED svítidlo pod skříňku
Q
Použití ke stanovenému
účelu
Toto vestavné svítidlo je určené k osvětlení
a k montáži na nábytek nebo stěny. Zapíná
se automaticky ve tmě při zaznamenání
pohybu a po 30 vteřinách zase zhasne.
Elektricky můžete spolu spojit až tři vestavná
světla. Svítidlo je určeno výhradně k používání ve vnitřních prostorech, v suchých a
uzavřených místnostech. Výrobek je určen
pouze pro privátní použití v domácnosti,
není vhodný pro komerční účely.
Q
Popis dílů
1
Osvětlovací plocha
2
Šroub (ø 4 x 12 mm) k připevnění na
nábytek
3
Šroub (ø 3,7 x 29,5 mm) k připevnění
na stěnu
4
Hmoždinka (ø 6 mm)
5
Upevňovací sponka
6
Vstupní zásuvka
7
Přívodní kabel
94799_livx_LED-Unterbauleuchte_Model_B_Content_CZ.indd 16 09.10.13 09:31
16 CZ
Page 17

8
Vypínač / Senzorová jednotka
9
Infračervený pohybový senzor
10
Senzor intenzity světla
11
Volič ON / AUTO / OFF
12
Spojovací kabel
13
Výstupní zásuvka
14
Kryt
Q
Technické údaje
Provozní napětí: 230 V ~50 Hz,
max. 7,3 W
LED: 60 LED (LED
nelze vyměnit)
Prostor dosahu
pohybového senzoru: cca 1,5 – 2 m
při úhlu 120°
Třída ochrany:
Q
Rozsah dodávky
1 vestavné svítidlo
1 přívodní kabel
1 spojovací kabel
2 upevňovací sponky
2 šrouby (ø 4 x 12 mm)
2 šrouby (ø 3,7 x 29,5 mm)
94799_livx_LED-Unterbauleuchte_Model_B_Content_CZ.indd 17 09.10.13 09:31
17 CZ
Page 18

2 hmoždinky (ø 6 mm)
1 návod kmontáži a obsluze
Všeobecná
bezpečnostní
upozornění
PŘED PRVNÍM POUŽITÍM VÝROBKU
SE SEZNAMTE SE VŠEMI POKYNY K
OBSLUZE A BEZPEČNOSTI! PŘI PŘEDÁVÁNÍ VÝROBKU TŘETÍ OSOBĚ
PŘEDÁVEJTE SOUČASNĚ I VŠECHNY
JEHO PODKLADY!
NE-
BEZPEČÍ OHROŽENÍ
ŽIVOTA A ZRANĚNÍ
MALÝCH A VĚTŠÍCH DĚTÍ!
Tento přístroj mohou používat děti
starší než 8 let, osoby se sníženými
fyzickými, senzorickými nebo duševními schopnosti nebo s nedostatečnými
zkušenostmi a znalostmi o používání
přístroje jen tehdy, jestliže byly poučeny o jeho bezpečném používání
a porozuměly možným ohrožením.
Děti si nesmí s přístrojem hrát. Děti
94799_livx_LED-Unterbauleuchte_Model_B_Content_CZ.indd 18 09.10.13 09:31
18 CZ
Page 19

nesmí provádět čištění a údržbu bez
dohledu.
Nebezpečí ohrožení
života zásahem elektrického proudu
Před každým připojením na rozvod
elektrického proudu zkontrolujte svítidlo
jestli není poškozené. Nikdy nepoužívejte svítidlo, pokud jste zjistili, že je
poškozené.
Aby nedošlo k ohrožení osob, smí se
nahrazovat poškozený vnější přívodní
kabel jen kabelem od výrobce nebo
pracovníka příslušného servisu.
Před montáží se přesvědčte, že se
shoduje napětí elektrického proudu,
které máte k dispozici s napětím potřebným pro svítidlo (230 V∼ 50 Hz).
V opačném případě lampu nepřipojujte.
Q
Montáž
Upozornění: Kmontáži budete potře-
bovat vrtačku.
94799_livx_LED-Unterbauleuchte_Model_B_Content_CZ.indd 19 09.10.13 09:31
19 CZ
Page 20

POZOR! NEBEZPEČÍ ZRANĚNÍ! Použijte ktomu návod k obsluze vaší vrtačky.
Označte si na vybraném místě k mon-
táži polohy dvou budoucích otvorů, s
rozestupem 20 cm.
Při montáži na nábytek: Pře-
svědčte se, že jsou šrouby 12 mm
dlouhé vhodné k montáži na Váš
nábytek.
Vyvrtejte vrtákem do dřeva, o průměru
2 mm, dva otvory na označených
místech.
Přišroubujte sponky 5 šrouby 2 do
vyvrtaných otvorů.
Při montáži na stěnu: Přesvědčte
se, že jsou přiložené hmoždinky
4
vhodné k připevnění do materiálu
Vámi zvolené stěny. Přiložené hmoždinky jsou vhodné k použití do zdiva.
Vyvrtejte vrtákem do zdiva, o průměru
6 mm, dva otvory na označených
místech.
Nastrčte do otvorů přiložené hmož-
dinky.
Přišroubujte pomocí šroubů 3 sponky
do hmoždinek. Nasaďte svítidlo do
5
sponek
.
94799_livx_LED-Unterbauleuchte_Model_B_Content_CZ.indd 20 09.10.13 09:31
20 CZ
Page 21

Připojte přívodní kabel 7 do vstupní
zásuvky svítidla.
Nakonec zasuňte zástrčku přívodního
kabelu do zásuvky elektrického
proudu.
Vaše svítidlo je nyní připraveno kprovozu.
Rozšíření (obr. C)
Upozornění: Do jedné zásuvky se smí
zapojit maximálně jen tři vestavná svítidla
stejného typu. Před spojením dvou svítidel
nejdříve vytáhněte ze zásuvky zástrčku
přívodního kabelu
Upozornění: Na model č. Z31791B
připojujte jen jedno svítidlo stejného typu.
Nepřipojujte zde žádný jiný typ svítidla.
Odstraňte kryt 14 na svítidle, které
chcete připojit na síť.
Spojte spojovacím kabelem 12 vý-
stupní zásuvku
vstupní zásuvkou
svítidla. Potom potřebujete pro připojení na proud jen jeden přívodní kabel.
POZOR! Dbejte na to, aby byla nej-
dříve všechna svítidla spojená kabely
7
.
13
prvního svítidla se
6
následujícího
94799_livx_LED-Unterbauleuchte_Model_B_Content_CZ.indd 21 09.10.13 09:31
21 CZ
Page 22

než připojíte přívodní kabel prvního
svítidla do zásuvky s elektrickým
proudem.
Q
Obsluha
Voličem 11 na senzorové jednotce 8
můžete navolit následující funkce svítidla:
V poloze „ON“ je svítidlo trvale
zapnuté.
V poloze „OFF“ je svítidlo trvale
vypnuté.
V poloze „AUTO“ je svítidlo v auto-
matickém režimu.
94799_livx_LED-Unterbauleuchte_Model_B_Content_CZ.indd 22 09.10.13 09:31
Senzor intenzity
10
kontroluje intenzitu
světla v okolním prostředí.
Zaznamená-li infračervený, pohybový
9
senzor
pohyb v jeho blízkosti zapne
automaticky vestavné svítidlo. Vestavné
svítidlo se zase vypne, jestliže pohybový
senzor v tomto stavu nezaznamená po
dobu 30 vteřin žádný další pohyb.
22 CZ
Page 23

Q
Čistění a ošetřování
Vytáhněte zástrčku ze zásuvky a nechte
svítidlo nejméně 10 minut vychladnout.
Neponořujte výrobek v žádném pří-
padě do vody nebo do jiných tekutin.
V opačném případě může dojít k jeho
poškození.
Čistěte svítidlo mírně navlhčenou tka-
ninou, která nepouští vlákna a jemným
čisticím prostředkem.
Q
Odstranění do odpadu
Balení je vyrobeno z ekologických materiálů, které můžete
odstranit do odpadu v místních
sběrnách tříděného odpadu.
O možnostech likvidace vysloužilých zařízení se informujte u správy vaší obce nebo
města.
94799_livx_LED-Unterbauleuchte_Model_B_Content_CZ.indd 23 09.10.13 09:31
23 CZ
Page 24

Q
Záruka
Výrobek byl vyroben snejvyšší pečlivostí
podle přísných kvalitativních směrnic a
před odesláním prošel výstupní kontrolou.
V případě závad máte možnost uplatnění
zákonných práv vůči prodejci. Vaše práva
ze zákona nejsou omezena naší níže
uvedenou zárukou.
Na tento přístroj platí tříletá záruka od
data zakoupení. Záruční lhůta začíná od
data zakoupení. Uschovejte si dobře originál pokladní stvrzenky. Tuto stvrzenku
budete potřebovat jako doklad o zakoupení.
Pokud se do tří let od data zakoupení
tohoto výrobku vyskytne vada materiálu
nebo výrobní vada, výrobek Vám – dle
našeho rozhodnutí – bezplatně opravíme
nebo vyměníme. Tato záruka zaniká, jestliže se výrobek poškodí, neodborně použil nebo neobdržel pravidelnou údržbu.
Záruka platí na vady materiálu a výrobní
vady. Tato záruka se nevztahuje na díly
výrobku podléhající opotřebení (např. na
baterie), dále na poškození křehkých,
94799_livx_LED-Unterbauleuchte_Model_B_Content_CZ.indd 24 09.10.13 09:31
24 CZ
Page 25

choulostivých dílů, např. vypínačů, akumulátorů nebo dílů zhotovených ze skla.
EMC
94799_livx_LED-Unterbauleuchte_Model_B_Content_CZ.indd 25 09.10.13 09:31
25 CZ
Page 26

Bestimmungsgemäße
Verwendung ....................Seite 27
Teilebeschreibung ........Seite 27
Technische Daten ..........Seite 28
Lieferumfang ....................Seite 29
Allgemeine
Sicherheitshinweise ....Seite 29
Montage ...............................Seite 31
Erweiterung ..............................Seite 33
Bedienung ..........................Seite 34
Reinigung und
Pflege......................................Seite 34
Entsorgung .........................Seite 35
Garantie ...............................Seite 35
94799_livx_LED-Unterbauleuchte_Model_B_Content_CZ.indd 26 09.10.13 09:31
26 DE/AT/CH
Page 27

LED-Unterbauleuchte
Q
Bestimmungsgemäße
Verwendung
Diese Unterbauleuchte ist für Beleuchtungszwecke und zur Montage an Möbeln und
Wänden vorgesehen. Sie schaltet sich in
dunkler Umgebung bei Erfassung einer
Bewegung automatisch ein und nach
30 Sekunden wieder aus. Sie können bis
zu drei dieser Unterbauleuchten elektrisch
miteinander verbinden. Die Leuchte ist
ausschließlich für den Betrieb im Innenbereich, in trockenen und geschlossenen
Räumen geeignet. Das Produkt ist nur für
den Einsatz in privaten Haushalten und
nicht für den kommerziellen Gebrauch
vorgesehen.
Q
Teilebeschreibung
1
Leuchtfeld
2
Schraube (ø 4 x 12 mm) zur Möbel-
befestigung
3
Schraube (ø 3,7 x 29,5 mm) zur
Wandbefestigung
94799_livx_LED-Unterbauleuchte_Model_B_Content_CZ.indd 27 09.10.13 09:31
27 DE/AT/CH
Page 28

4
Dübel (ø 6 mm)
5
Befestigungsklammer
6
Eingangssteckdose
7
Zuleitung
8
Schalter- / Sensoreinheit
9
Infrarot-Bewegungsmelder
10
Helligkeitssensor
11
Wahl-Schalter ON / AUTO / OFF
12
Verbindungskabel
13
Ausgangssteckdose
14
Abdeckkappe
Q
Technische Daten
Betriebsspannung: 230 V ~50 Hz,
max. 7,3 W
LED: 60 LEDs (LEDs
nicht austausch-
bar)
Erfassungsbereich des
Bewegungsmelders: ca. 1,5 – 2 m
bei einem Winkel
von 120°
Schutzklasse:
94799_livx_LED-Unterbauleuchte_Model_B_Content_CZ.indd 28 09.10.13 09:31
28 DE/AT/CH
Page 29

Q
Lieferumfang
1 Unterbauleuchte
1 Zuleitung
1 Verbindungskabel
2 Befestigungsklammern
2 Schrauben (ø 4 x 12 mm)
2 Schrauben (ø 3,7 x 29,5 mm)
2 Dübel (ø 6 mm)
1 Montage- und Bedienungsanleitung
Allgemeine
Sicherheitshinweise
MACHEN SIE SICH VOR DER ERSTEN
BENUTZUNG DES PRODUKTS MIT
ALLEN BEDIEN- UND SICHERHEITSHINWEISEN VERTRAUT! HÄNDIGEN
SIE ALLE UNTERLAGEN BEI WEITERGABE DES PRODUKTS AN DRITTE
EBENFALLS MIT AUS!
LEBENS- UND UNFALLGEFAHR FÜR
KLEINKINDER UND KINDER!
Dieses Gerät kann von Kindern ab
8 Jahren und darüber sowie von
94799_livx_LED-Unterbauleuchte_Model_B_Content_CZ.indd 29 09.10.13 09:31
29 DE/AT/CH
Page 30

Personen mit verringerten physischen,
sensorischen oder mentalen Fähigkeiten
oder Mangel an Erfahrung und Wissen
benutzt werden, wenn sie beaufsichtigt
oder bezüglich des sicheren Gebrauchs
des Gerätes unterwiesen wurden und
die daraus resultierenden Gefahren
verstehen. Kinder dürfen nicht mit dem
Gerät spielen. Reinigung und Benutzerwartung dürfen nicht von Kindern
ohne Beaufsichtigung durchgeführt
werden.
Lebensgefahr durch
elektrischen Schlag
Überprüfen Sie vor jedem Netzan-
schluss die Leuchte auf etwaige
Beschädigungen. Benutzen Sie Ihre
Leuchte niemals, wenn Sie irgendwelche
Beschädigungen feststellen.
Zur Vermeidung von Gefährdungen
darf eine beschädigte äußere Leitung
ausschließlich durch eine Leitung
ersetzt
werden, welche beim Hersteller oder
seinem Servicevertreter erhältlich ist.
Vergewissern Sie sich vor der Montage,
dass die vorhandene Netzspannung
(230 V ~ 50 Hz) mit der benötigten
94799_livx_LED-Unterbauleuchte_Model_B_Content_CZ.indd 30 09.10.13 09:31
30 DE/AT/CH
Page 31

Betriebsspannung der Leuchte
(230 V ~ 50 Hz) übereinstimmt. Montieren Sie die Leuchte nicht, wenn
dies nicht der Fall ist.
Q
Montage
Hinweis: Für die Montage benötigen
Sie eine Bohrmaschine.
VORSICHT! VERLETZUNGSGEFAHR!
Ziehen Sie die Bedienungsanleitung Ihrer
Bohrmaschine hinzu.
Markieren Sie am gewünschten
Montageort in einem Abstand von
ca. 20 cm zwei Befestigungslöcher.
Bei Möbelmontage: Stellen Sie
sicher, dass die Schrauben mit ihrer
Länge von ca. 12 mm für eine Befestigung im Material Ihrer Möbel geeignet
sind.
Bohren Sie mit einem 2-mm-Holzbohrer
zwei Löcher in die Markierungen.
Befestigen Sie die Befestigungsklammern
5
, indem Sie sie mithilfe der Schrau-
2
ben
in den soeben gebohrten
Löchern festschrauben.
94799_livx_LED-Unterbauleuchte_Model_B_Content_CZ.indd 31 09.10.13 09:31
31 DE/AT/CH
Page 32

Bei Wandmontage: Stellen Sie
sicher, dass die beiliegenden Dübel
4
für eine Befestigung in dem von
Ihnen gewählten Material geeignet
sind. Die beiliegenden Dübel sind für
eine Verwendung in Mauerwerk vorgesehen.
Bohren Sie mit einem 6-mm-Steinboh-
rer in die Markierungen.
Stecken Sie die beiliegenden Dübel
in die Löcher.
Befestigen Sie die Befestigungsklam-
mern, indem Sie sie mithilfe der
Schrauben
3
in den Dübeln festschrauben. Stecken Sie die Leuchte in
die Befestigungsklammern
5
.
Stecken Sie die Zuleitung 7 in die
Eingangssteckdose Ihrer Unterbauleuchte.
Stecken Sie anschließend den Euro-
stecker der Zuleitung in eine Steckdose.
Ihre Unterbauleuchte ist nun betriebsbereit.
94799_livx_LED-Unterbauleuchte_Model_B_Content_CZ.indd 32 09.10.13 09:31
32 DE/AT/CH
Page 33

Erweiterung (Abb. C)
Hinweis: Achten Sie darauf, dass Sie nur
maximal drei Unterbauleuchten des gleichen
Typs über eine Steckdose zusammenschalten. Ziehen Sie vor dem Verbinden
der beiden Leuchten die Zuleitung
ersten Leuchte aus der Steckdose.
Hinweis: Schließen Sie nur eine Lampe
gleichen Typs an Modell Nr. Z31791B.
Schließen Sie keinen anderen Typ an
diese Lampe an.
Entfernen Sie die Abdeckkappe 14
der ans Netz anzuschließenden
Unterbauleuchte.
Verbinden Sie die Ausgangssteckdose
13
der ersten Unterbauleuchten mittels Verbindungkabel
Eingangssteckdose
6
Sie benötigen dann für die Stromversorgung nur eine Zuleitung.
VORSICHT! Achten Sie darauf, dass
erst alle Unterbauleuchten mittels
Verbindungskabel verbunden sind,
bevor Sie die Zuleitung der ersten
Leuchte wieder in die Steckdose
stecken.
7
der
12
mit der
der nächsten.
94799_livx_LED-Unterbauleuchte_Model_B_Content_CZ.indd 33 09.10.13 09:31
33 DE/AT/CH
Page 34

Q
Bedienung
Sie können folgende Funktionen der Leuchte
am Wahlschalter 11 der Schalter- / Sensoreinheit
8 auswählen:
In Schalterstellung „ON“ ist die
Leuchte dauerhaft eingeschaltet.
In Schalterstellung „OFF“ ist die
Leuchte dauerhaft ausgeschaltet.
In Schalterstellung „AUTO“ befindet
sich die Leuchte im Automatikmodus.
94799_livx_LED-Unterbauleuchte_Model_B_Content_CZ.indd 34 09.10.13 09:31
Der Helligkeitssensor
10
erfasst die Helligkeit der Umgebung.
Erfasst der Infrarot-Bewegungsmelder
eine Bewegung in seiner Nähe, wird die
Unterbauleuchte automatisch eingeschaltet.
Wenn der Bewegungsmelder in diesem
Zustand ca. 30 Sekunden lang keine
Bewegung erfasst, schaltet sich die Unterbauleuchte wieder aus.
Q
Reinigung und Pflege
Entfernen Sie die Leuchte aus der Steckdose
und lassen Sie sie mindestens 10 Minuten
lang abkühlen.
34 DE/AT/CH
9
Page 35

Tauchen Sie das Produkt niemals in
Wasser oder in andere Flüssigkeiten.
Andernfalls kann das Produkt beschädigt werden.
Reinigen Sie die Leuchte mit einem
fusselfreien, leicht angefeuchteten
Tuch und mildem Reinigungsmittel.
Q
Entsorgung
Die Verpackung besteht aus
umweltfreundlichen Materialien,
die Sie über die örtlichen
Recyclingstellen entsorgen
können.
Möglichkeiten zur Entsorgung
des ausgedienten Produkts erfahren Sie bei Ihrer Gemeindeoder Stadtverwaltung.
Q
Garantie
Das Produkt wurde nach strengen Qualitätsrichtlinien sorgfältig produziert und vor
Anlieferung gewissenhaft geprüft. Im Falle
von Mängeln dieses Produkts stehen Ihnen
94799_livx_LED-Unterbauleuchte_Model_B_Content_CZ.indd 35 09.10.13 09:31
35 DE/AT/CH
Page 36

gegen den Verkäufer des Produkts gesetzliche Rechte zu. Diese gesetzlichen
Rechte werden durch unsere im Folgenden
dargestellte Garantie nicht eingeschränkt.
Sie erhalten auf dieses Gerät 3 Jahre
Garantie ab Kaufdatum. Die Garantiefrist
beginnt mit dem Kaufdatum. Bitte bewahren
Sie den Original Kassenbon gut auf. Diese
Unterlage wird als Nachweis für den Kauf
benötigt.
Tritt innerhalb von drei Jahren ab dem
Kaufdatum dieses Produkts ein Materialoder Fabrikationsfehler auf, wird das Produkt von uns – nach unserer Wahl – für Sie
kostenlos repariert oder ersetzt. Diese
Garantie verfällt, wenn das Produkt beschädigt, nicht sachgemäß benutzt oder
gewartet wurde.
Die Garantieleistung gilt für Materialoder Fabrikationsfehler. Diese Garantie
erstreckt sich nicht auf Produktteile, die
normaler Abnutzung ausgesetzt sind (z. B.
Batterien) und daher als Verschleißteile
angesehen werden können oder für Beschädigungen an zerbrechlichen Teilen,
z. B. Schalter, Akkus oder die aus Glas
gefertigt sind.
94799_livx_LED-Unterbauleuchte_Model_B_Content_CZ.indd 36 09.10.13 09:31
36 DE/AT/CH
Page 37

EMC
94799_livx_LED-Unterbauleuchte_Model_B_Content_CZ.indd 37 09.10.13 09:31
37 DE/AT/CH
Page 38

OWIM GmbH & Co. KG
Stiftsbergstraße 1
D-74167 Neckarsulm
Modell Nr.: Z31791B
Version: 09 / 2013
Last Information Update
Stav informací · Stand der Informationen:
10 / 2013 · Ident.-No.: Z31791B102013-CZ
94799_livx_LED-Unterbauleuchte_Model_B_Cover_CZ.indd 1 09.10.13 09:31
IAN 94799
4
 Loading...