


 Loading...
Owner's Manual
DLP PROJECTOR
Please read this manual carefully before operating your projector and retain it for future reference.
PG60G
P/NO : MFL67868401 (1306-REV01) |
www.lg.com |

2 LICENSES
LICENSES
Supported licenses may differ by model. For more information about licenses, visit www.lg.com.
Manufactured under license from Dolby Laboratories.
“Dolby “and the double-D symbol are trademarks of Dolby Laboratories.
ABOUT DIVX VIDEO: DivX® is a digital video format created by DivX, LLC, a subsidiary of Rovi Corporation. . This is an official DivX Certified® device that plays DivX video. Visit divx.com for more information and software tools to convert your files into DivX video.
ABOUT DIVX VIDEO-ON-DEMAND: This DivX Certified® device must be registered in order to play purchased DivX Video-on-Demand (VOD) movies. To obtain your registration code, locate the DivX VOD section in your device setup menu. Go to vod.divx.com for more information on how to complete your registration.
“DivX Certified® to play DivX® video up to HD 1080p, including premium content.”
“DivX®, DivX Certified® and associated logos are trademarks of Rovi Corporation or its subsidiaries and are used under license.”
“Covered by one or more of the following U.S. patents : 7,295,673; 7,460,668; 7,515,710; 7,519,274”
The terms HDMI and HDMI High-Definition Multimedia Interface, and the HDMI logo are trademarks or registered trademarks of HDMI Licensing LLC in the United States and other countries.
This device meets the EMC requirements for home appliances (Class B) and is intended for home usage. This device can be used in all regions.
 NOTE
NOTE
yyImage shown may differ from your projector.
yyYour projector’s OSD (On Screen Display) may differ slightly from that shown in this manual.
SAFETY INSTRUCTIONS |
3 |
SAFETY INSTRUCTIONS
Please take note of the safety instructions to prevent any potential accident or misuse of the projector.
yySafety precautions are given in two forms, i.e. Warning and Caution as detailed below.
WARNING: Failure to follow the instructions may cause serious injury and even death. CAUTION: Failure to follow the instructions may cause injury to persons or damage
to the product.
yyRead the owner's manual carefully and keep it to hand.
WARNING/CAUTION
RISK OF ELECTRIC SHOCK
DO NOT OPEN
The lightning flash with
WA
arrowhead symbol, within
RIS
an equilateral triangle, is intended to alert the user
to the presence of uninsulated “dangerous voltage” within the product’s enclosure that may be of sufficient magnitude to constitute a risk of electric shock to persons.
The exclamation point within
ION |
an equilateral triangle is |
|
OCK |
||
intended to alert the user to |
||
|
||
|
the presence of important |
operating and maintenance (servicing) instructions in the literature accompanying the appliance.
WARNING/CAUTION
-TO REDUCE THE RISK OF FIRE AND ELECTRIC SHOCK, DO NOT EXPOSE THIS PRODUCT TO RAIN OR MOISTURE.
Read these instructions.
Keep these instructions.
Heed all warnings.
Follow all instructions.
Indoor Installation
WARNING
yyDo not place the projector in direct sunlight or near heat sources such as radiators, fires, stoves, etc.
- This may cause a fire.
yyDo not place flammable materials such as aerosols near the projector. - This may cause a fire.
yyDo not allow your children to cling to or climb up to the projector.
- The projector may fall down and cause personal injury or death.
yyDo not place the projector directly on a carpet, rug or place where ventilation is restricted such as a book shelf or closet.
- This may cause the projector's internal temperature to rise and cause a fire.
yyDo not place the projector close to sources of steam or oil such as a humidifier or kitchen counter.
- This may cause a fire hazard or an electric shock.
ENGLISH

4 SAFETY INSTRUCTIONS
yyDo not place the projector where it might be exposed to excessive dust. - This may cause a fire.
yyDo not use the projector in a damp place such as a bathroom where it is likely to get wet.
- This may cause a fire or an electric shock.
yyDo not allow a tablecloth or curtain to block the vents.
- This may cause the internal temperature of the projector to rise and cause a fire.
yyThe distance between the projector and the wall should be more than 30 cm for ventilation purposes.
- Otherwise, this may cause the internal temperature of the projector to rise and cause a fire.
CAUTION
yyWhen installing the projector on a table, be careful not to place it near the edge.
- The projector may fall causing injury to persons or damage to the projector. Make sure that you use a stand suitable for the size of projector.
yyTurn off the projector, disconnect the power supply and remove all connec tions before moving the projector.
- A damaged cord may cause a fire or an electric shock.
yyDo not install the projector on an unstable or vibrating surface such as a vibrating shelf or tilted surface.
- It may fall and cause injury.
yyBe careful not to tip the projector over when connecting external devices to the projector.
- This may cause injury to persons or damage to the projector.
Power
WARNING
yyThe ground wire should be connected.
- Inappropriate earth grounding may cause damage to the projector or an electric shock when there is an electrical surge.
If the projector must be installed at a place where earth grounding is not possible, purchase a circuit breaker and connect the projector to its wall outlet.
Do not ground the projector to the gas pipe, water pipe, lightning rod or telephone line, etc.
yyThe power plug should be fully inserted into the wall outlet.
- Unstable connection may cause a fire.
yyDo not place heavy objects on the power cord or place the cord underneath the projector.
- This may cause a fire or an electric shock.
yyNever touch the power plug with a wet hand.
-This may cause an electric shock. yyDo not connect too many devices to
the same power extension.
-Overheating may cause a fire.
yyRemove dust or contaminants around power plug pins or wall outlets.
- This may cause a fire.
yyTo turn off the main power, remove the power plug, which should be positioned so it is easy to access for operation.

SAFETY INSTRUCTIONS |
5 |
|
CAUTION |
|
When in Use |
||
yyHold the plug firmly when unplug- |
|
|
|
||
|
WARNING |
|
|||
|
ging. |
|
|
||
|
- A broken wire in the cord may |
yyDo not place anything containing |
|||
|
cause a fire. |
|
liquid, such as a vase, flowerpot, cup, |
||
yyEnsure the power cord or plug is not |
|
cosmetics, chemicals, decorations or |
|||
|
damaged, modified, severely bent, |
|
candles, etc., on top of the projector. |
||
|
twisted, pulled, sandwiched or heated. |
|
- Possible fire, electric shock or falling |
||
|
Do not use a loose wall outlet. |
|
may cause physical injury. |
||
|
- This may cause a fire or an electric |
yyIn the event that there is a big im- |
|||
|
shock. |
|
pact to the projector or the cabinet is |
||
yyKeep the power cord away from any |
|
damaged, switch it off, unplug it from |
|||
|
heating devices. |
|
the wall outlet and contact an autho- |
||
|
- The cord coating may melt and |
|
rized service center. |
||
|
cause an electric shock. |
|
- Otherwise, this may cause a fire or |
||
yyPlace the projector where people will |
|
an electric shock. |
|||
|
not trip over or tread on the power |
yyDo not insert pieces of metal such as |
|||
|
cord or plug to protect the power |
|
coins, hairpins or metal debris, nor |
||
|
cord and plug from any damage. |
|
flammable materials such as paper or |
||
|
- This may cause a fire hazard or an |
|
matches into the projector. |
||
|
electric shock. |
|
- This may cause a fire or an electric |
||
yyDo not turn the projector on or off by |
|
shock. |
|||
|
plugging in the power plug or un- |
yyIn the event that liquid or a foreign |
|||
|
plugging it from the wall outlet. |
|
object falls into the projector, please |
||
|
(Do not use the power plug as a |
|
switch it off and unplug it from the |
||
|
switch.) |
|
wall outlet and contact an LG Elec- |
||
|
- This may cause an electric shock or |
|
tronics Service Center. |
||
|
damage to the projector. |
|
- Otherwise, this may cause a fire or |
||
yyDo not insert a conductor into the |
|
an electric shock. |
|||
|
other side of the wall outlet while the |
yyWhen replacing a battery of the re- |
|||
|
power plug is inserted into the wall |
|
mote control, make sure a child does |
||
|
outlet. |
|
not swallow the battery. Keep the bat- |
||
|
In addition, do not touch the power |
|
tery out of reach of children. |
||
|
plug immediately after it is discon- |
|
- In the case of a battery being swal- |
||
|
nected from the wall outlet. |
|
lowed by a child, please consult a |
||
|
- This may cause an electric shock. |
|
doctor immediately. |
||
yyUse only the official power cord which |
yyDo not remove any covers except for |
||||
|
is provided by LG Electronics, Inc. Do |
|
the lens cap. There is a high risk of |
||
|
not use other power cords. |
|
electric shock. |
||
|
- This may cause a fire or an electric |
|
|
|
|
|
shock. |
|
|
|
|
ENGLISH

6 SAFETY INSTRUCTIONS
yyDo not look directly into the lens when the projector is in use. The strong light may damage your eyes.
yyWhen the lamp is on or has just been turned off, avoid touching the air vent or lamp because these will be very hot.
yyIf there is a gas leak, do not touch the wall outlet. Open the window for ventilation.
-A spark may cause a fire or burn. yyNever touch the projector or power
cord during thunder or lightning.
-This may cause an electric shock. yyDo not use the projector near an
electronic device which generates a strong magnetic field.
yyStore the vinyl envelope used to pack the projector in a safe place away from children.
-It could cause suffocation if used improperly.
yyDo not keep your hand on the projector for a long time when it is running. yyWhen you play a game by connecting a game console to a projector, it is recommended that you maintain a distance of more than four times the
diagonal length of the screen. yyMake sure that the length of
connecting cable is long enough. Otherwise, the product may fall causing personal injury or damage to the product.
CAUTION
yyDo not place a heavy object on the projector.
- It may fall down and cause physical injury.
yyBe careful to prevent the lens from heavy impact during transportation.
yyDo not touch the lens.
The lens may be damaged.
yyDo not use any sharp tools on the projector such as a knife or hammer, because this may damage the casing.
yyIn the event that no image appears on the screen, switch the projector off, unplug it from the wall outlet and contact an authorized service center. - Otherwise, this may cause a fire or an electric shock.
yyDo not drop an object onto the projector or apply heavy pressure to it.
- This may cause injury to persons or damage to the projector.
yyThe distance between your eyes and the screen must be around 5 - 7 times the diagonal length of the screen.
- If you watch the screen at a close distance for a long time, your eye sight may become worse.

SAFETY INSTRUCTIONS |
7 |
Cleaning |
|
CAUTION |
|
||
|
|
|
yyContact your seller or the Service |
||
|
WARNING |
|
|||
|
|
|
Center once a year to clean the inter- |
||
yyDo not spray the projector with water |
|
nal parts of the projector. |
|||
|
when cleaning. Do not allow water to |
|
- If you do not clean the contaminat- |
||
|
go into the projector or do not allow it |
|
ed interior of the projector for a long |
||
|
to get wet. |
|
time, there may be a fire or damage |
||
|
- This may cause a fire or an electric |
|
to the projector. |
||
|
shock. |
yyWhen cleaning plastic parts such as |
|||
yyWhen there is smoke or a strange |
|
the projector case, unplug the power |
|||
|
smell coming out from the projector |
|
first and wipe with a soft cloth. Do |
||
|
or a foreign object falls into the pro- |
|
not spray with water or wipe with a |
||
|
jector, please switch it off and unplug |
|
wet cloth. When cleaning the plastic |
||
|
it from the power outlet and contact |
|
parts, such as the projector case, |
||
|
an LG Electronics Service Center. |
|
do not use cleanser, automobile or |
||
|
- If not, this may cause a fire or an |
|
industrial shiner, abrasive or wax, ben- |
||
|
electric shock. |
|
zene, alcohol, etc., which can damage |
||
yyUse an air spray or soft cloth or |
|
the product. |
|||
|
cotton swab moistened with a lens |
|
- This can cause fire, electric shock or |
||
|
cleaning chemical or alcohol to |
|
product damage (deformation, cor- |
||
|
remove dust or stains on the front |
|
rosion and damage). |
||
|
projection lens. |
|
|
|
|
ENGLISH

8 SAFETY INSTRUCTIONS
OTHERS
WARNING
yyOnly a qualified technician can disassemble or modify the projector. For inspection, adjustment or repair, contact your seller or the Service Center. - Otherwise, this may cause a fire or an electric shock.
yyDispose of the used battery properly. - Otherwise, this may result in explosion or fire.
yyThe correct method of disposal may vary depending on your country
or region. Dispose of the battery pack according to the appropriate instructions.
yyDo not throw or disassemble the battery.
-Otherwise, this may result in fire or explosion due to damage to the battery.
yyAlways use batteries approved and certified by LG Electronics.
- Otherwise, this may result in fire or explosion.
yyStore the battery away from metallic objects, such as keys and paper clips.
yyExcess current may cause a rapid increase in temperature, resulting in fire or burns.
yyDo not store the battery near any heat source, such as a heater.
- This may result in fire or damage the product.
yyDo not store it at temperatures higher than 60 °C or in high humidity.
yyKeep the battery out of reach of children.
- This may result in personal injury or damage to the product.
yyMake sure that the battery is installed correctly.
yyIncorrect battery replacement may cause fire.
CAUTION
yyUnplug the power cord if the projector is not used for a long period.
- Accumulated dust may cause overheating, an electric shock from corroded insulation and a fire from an electrical surge.
yyOnly use the specified type of battery. - Otherwise, this may cause an electric shock caused by overheating and leakage.
Additional information of the manual
The owner’s manual in a PDF file format is supplied on a CD. Install the Adobe
Acrobat Reader to view the owner’s manual on your PC.
1 Insert the supplied CD. The web page appears automatically.
2 Select language on the web page.
3 Click Model name on the web page.
4 View the owner’s manual.
NOTE
yy If the web page does not appear automatically, access My computer and then click LG and index.htm to view
-This DLP Projector is a Risk Group 2 device that meets safety standard IEC 62471 standard.
Risk Group 2
CAUTION. Possibly hazardous optical radiation emitted from this product. DO not stare at operating lanp. May be harmful to the eye.
SAFETY INSTRUCTIONS |
9 |
ENGLISH

10 CONTENTS
TABLE OF CONTENTS
LICENSES |
2 |
|
|
SAFETY INSTRUCTIONS |
3 |
ADDITIONAL INFORMATION |
|
OF THE MANUAL |
9 |
|
|
PREPARATION |
11 |
|
|
Accessories |
11 |
Optional Extras |
12 |
Parts and Components |
13 |
Installation |
14 |
-- Installation Precautions |
14 |
-- Connecting an adapter |
14 |
-- Projection Distance per |
|
Screen Size |
15 |
-- Using the Lens Hood |
16 |
-- Using the Cradle scene |
16 |
-- Connecting a battery |
17 |
-- How to Install the Projector On a |
|
Tripod |
18 |
-- Kensington Security System |
18 |
REMOTE CONTROL |
19 |
USING THE PROJECTOR |
21 |
Watching the Projector |
21 |
-- Turning on the Projector |
21 |
-- Focus and Position of the Screen |
|
Image |
21 |
-- Watching the Projector |
21 |
-- Using the battery |
22 |
-- Battery using time information |
22 |
Using Additional Options |
24 |
-- Adjusting Aspect Ratio |
24 |
-- Using the Keystone |
|
Function |
25 |
-- Using the Input List |
25 |
-- Blank Function |
26 |
Using the Quick Menu |
26 |
ENTERTAINMENT |
27 |
|
|
Wireless Display Setup (Notebook) |
27 |
Wireless Display Setup |
|
(Moblie phone) |
27 |
MY MEDIA |
28 |
-- Connecting USB Storage Devices 28 |
|
-- MOVIE LIST |
30 |
CUSTOMIZING SETTINGS |
31 |
SETUP Menu |
31 |
MAKING CONNECTIONS |
32 |
Connecting to an HD Receiver, DVD |
|
Player or VCR |
33 |
-- HDMI Connection |
33 |
Connecting to a PC |
33 |
-- RGB Connection |
33 |
Connecting to the AV INPUT |
34 |
-- Component Connection |
35 |
Connecting to Headphones |
35 |
MHL Connection |
36 |
MAINTENANCE |
36 |
Cleaning the Projector |
36 |
-- Cleaning the Lens |
36 |
-- Cleaning the Projector Case |
36 |
SPECIFICATIONS |
37 |
|
|
PREPARATION 11
PREPARATION
Accessories
Check enclosed accessories.
The picture may be different from an actual product.
219'4 +0276
|
/76' |
|
81.7/' |
|
2#)' |
#761 |
|
$.#0- |
|
1- |
|
':+6 |
|
|
|
|
|
5'66+0)5 |
|
3 /'07 |
56+.. |
4#6+1 |
75$ |
*'.2 |
-';5 |
-';5 |
Remote Control
Coin Battery Owner's Manual RGB Cable
(CR 2032)
Adapter |
Power Cord |
Owner's Manual CD |
Hood |
Battery |
Cradle |
Composite video cable |
Bag |
yyWhen connecting a cable to the HDMI or USB port, it may not be connected properly if the size of jack to the USB/HDMI port is too big. Use a standard sized jack.
ENGLISH

12 PREPARATION
Optional Extras
To purchase optional extras, visit an electronics store or online shopping site or contact the retail store where you purchased the product.
Without prior notice, optional extras are subject to change in order to improve the performance of the product, and new accessories may be added.
Projector Screen |
Tripod |
|
HDMI Cable |
|||
|
|
|
|
|
|
|
|
|
|
|
|
|
|
|
|
|
|
|
|
|
|
|
|
|
|
|
|
Video Cable |
Audio Cable |
MHL Cable |
|
|
|
|
|
|
|
|
|
|
|
|
|
|
|
|
|
|
|
|
|
|
|
|
|
RGB to Component Cable |
Component Cable |

PREPARATION 13
Parts and Components
* The projector is manufactured using high-precision technology. You may, however, |
ENGLISH |
|
see tiny black dots and/or bright colored dots (red, blue or green) that continuously appear on the projector screen. This is a normal result of the manufacturing process and does not indicate a malfunction. When powered on, the LED of the control panel turns on.
Left
Back
Control Panel
Speaker
A/V IN
DC IN
HDMI/DVI
RGB IN
Focus Ring
Lens2 
Vent1
Button |
Description |
(Power) |
Turns the projector on or off. |
(Settings) |
Selects or closes menus. |
|
Moves between menus and changes the settings. |
,,, |
( , button : The volume can be adjusted according to the |
|
input mode) |
(OK) |
Checks present mode and saves function changes. |
1Due to the high temperature air coming out of the vents, do not get close to the vents.
2Do not touch the lens when using the projector. The lens may be damaged.
14 PREPARATION
Installation
Installation Precautions
yyPlace the projector in a well-ventilat- ed environment.
-To prevent internal heat from building up, install the projector in a wellventilated place.
Do not place anything near the projector as this may block the air vents. If the air vents are blocked, the internal temperature will increase.
-Do not place the projector on a carpet or rug. Do not block any vents on the bottom and use the projector on a leveled solid surface.
-Be sure to prevent foreign objects such as paper debris from entering the projector.
-Leave an adequate open area (30 cm, 11.8 inch or more) around the projector.
yyDo not place the projector in a hot or humid environment.
- Do not place the projector in a hot, cold or humid environment.
yyDo not place the projector in a place where it will easily attract dust.
- This may cause a fire.
yyDo not remove any covers except for the lens cap. There is a high risk of electric shock.
yyThe projector is manufactured using high-precision technology. You may, however, see tiny black dots and/
or bright colored dots (red, blue or green) that continuously appear on the projector screen. This is a normal result of the manufacturing process and does not indicate a malfunction.
yyThe remote control may not work in an environment where a lamp equipped with electronic ballasts or
a three-wavelength fluorescent lamp is installed. Replace the lamp with an internationally standardized lamp for the remote control to work normally.
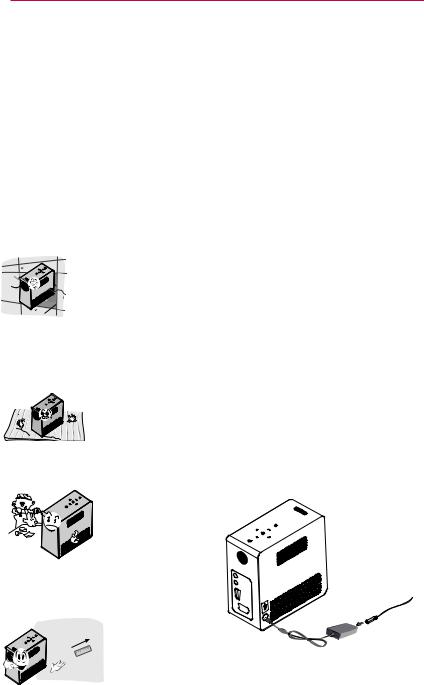
Connecting an adapter
Connect the DC adapter plug to the power input jack on the projector.

PREPARATION 15
Projection Distance per Screen Size
1 Place the projector on a sturdy, level surface, together with the PC or audio/video source.
2 Place the projector at an appropriate distance from the screen. The distance between the projector and the screen determines the actual size of the image.
3 Position the projector so that the lens is set at a right angle to the screen. If the projector is not set at a right angle, the image on the screen will be tilted and the image quality will be poor. If the screen image is crooked, use the Keystone function.
4 Connect the power cords of the projector and the connected devices to the wall outlet.
|
|
|
|
|
|
|
|
|
|
Ratio of upward projection: 100 % |
|
|
|
|
|
|
|
|
|
|
|||||||||
|
|
|
|
|
|
|
|
|
|
|
|
|
|
|
|
|
|
|
|
|
|
|
|
|
|
|
|
|
|
(X)HeightScreen |
|
|
|
|
|
|
|
|
|
DISPLAY |
|
|
|
|
|
|
WidthScreen |
|
|
|
|
|
|
|
|
|
|
||
|
|
|
|
|
|
|
|
|
|
|
|
|
|
|
|
|
|
|
|
|
|
|
|
|
|||||
|
|
X/2 |
|
|
|
|
|
|
|
|
|
|
|
|
|
|
|
|
|
|
|
|
|
|
|
|
|
|
|
|
|
|
|
|
|
|
|
|
|
|
|
|
|
|
|
|
|
Y/2 |
|
|
DISPLAY |
|
|
|
|
||||
|
|
|
|
|
|
|
|
|
|
|
|
|
|
|
|
|
|
|
|
|
|
|
|
|
|
||||
|
|
|
|
|
|
|
|
|
|
|
|
|
|
|
|
|
|
|
|
|
|
|
|
|
|
|
|||
|
|
|
|
|
|
|
|
|
|
|
|
|
|
|
|
|
|
|
|
|
|
|
|
|
|
||||
|
|
|
|
|
|
|
|
|
|
|
|
|
|
|
|
|
|
|
|
|
|
|
|
|
|
|
|||
|
|
|
|
|
|
|
|
|
|
|
|
|
|
|
|
|
|
|
|
|
|
|
|
|
30 mm |
|
|
||
|
|
X/2 |
|
|
|
|
|
|
|
|
|
|
|
|
|
|
|
|
|
|
|
|
|||||||
|
|
|
|
|
|
|
|
|
|
|
|
|
|
|
|
(Y) |
|
|
|
|
|
|
(1.1 inch) |
|
|
|
|||
|
|
|
|
|
|
|
|
|
|
|
|
|
|
|
|
|
|
|
|
|
|
|
|
|
|
||||
|
|
|
|
|
|
|
|
|
|
|
|
|
|
|
|
|
|
|
Y/2 |
|
|
|
|
|
|
|
|
|
|
|
|
|
|
|
|
|
|
|
|
|
|
|
|
|
|
|
|
|
|
|
|
|
|
|
|
|
|
||
|
|
|
|
|
|
|
|
|
|
|
|
|
|
|
|
|
|
|
|
|
|
|
|
|
|
|
|
|
|
|
|
|
|
|
|
|
|
|
|
|
|
|
|
|
|
|
|
|
|
|
|
|
|
|
|
|
|
|
|
|
|
|
|
|
|
|
|
|
Projection distance (D) |
|
|
|
|
|
|
|
|
|
|
|
|
|
|
|
|||||
|
|
|
|
|
|
|
|
|
|
|
|
|
|
|
|
Projection distance (D) |
|||||||||||||
|
|
|
|
|
|
|
|
|
|
|
|
|
|
|
|
|
|
|
|
|
|
|
|
|
|||||
|
|
|
|
|
|
|
|
|
|
|
|
|
16:10 Screen |
|
|
|
|
|
|
|
|
|
|
||||||
Screen Size |
Screen Size |
|
Screen |
Screen |
|
|
Screen |
|
Screen |
Projection |
Projection |
||||||||||||||||||
|
Width (Y) |
Width (Y) |
|
Height (X) |
Height (X) |
Distance |
Distance |
||||||||||||||||||||||
|
(mm) |
|
|
(inch) |
|
(mm) |
(inch) |
|
|
|
(mm) |
|
|
(inch) |
(D) (mm) |
(D) (inch) |
|||||||||||||
|
|
|
|
|
|
|
|
|
|
|
|
|
|
|
|
|
|||||||||||||
|
635 |
|
|
|
|
25 |
|
538 |
21.1 |
|
|
337 |
|
13.2 |
|
803 |
|
31.6 |
|
||||||||||
|
762 |
|
|
|
|
30 |
|
646 |
25.4 |
|
|
404 |
|
15.9 |
|
966 |
|
38.0 |
|
||||||||||
|
889 |
|
|
|
35 |
|
754 |
29.6 |
|
|
471 |
|
18.5 |
|
1130 |
|
44.4 |
|
|||||||||||
|
1016 |
|
|
|
40 |
|
861 |
33.8 |
|
|
539 |
|
21.2 |
|
1293 |
50.9 |
|
||||||||||||
|
1143 |
|
|
|
45 |
|
969 |
38.1 |
|
|
606 |
|
23.8 |
|
1456 |
57.3 |
|
||||||||||||
|
1270 |
|
|
|
50 |
|
1077 |
42.4 |
|
|
673 |
|
26.4 |
|
1619 |
|
63.7 |
|
|||||||||||
|
1397 |
|
|
|
55 |
|
1185 |
46.6 |
|
|
741 |
|
29.1 |
|
1783 |
|
70.1 |
|
|||||||||||
|
1524 |
|
|
|
60 |
|
1292 |
50.8 |
|
|
808 |
|
31.8 |
|
1946 |
76.6 |
|
||||||||||||
|
1651 |
|
|
|
65 |
|
1400 |
55.1 |
|
|
875 |
|
34.4 |
|
2109 |
83.0 |
|
||||||||||||
|
1778 |
|
|
|
70 |
|
1508 |
59.3 |
|
|
943 |
|
37.1 |
|
2272 |
89.4 |
|
||||||||||||
|
1905 |
|
|
|
75 |
|
1615 |
63.5 |
|
|
1010 |
|
39.7 |
|
2436 |
95.9 |
|
||||||||||||
|
2032 |
|
|
|
80 |
|
1723 |
67.8 |
|
|
1077 |
|
42.4 |
|
2599 |
102.3 |
|
||||||||||||
|
2159 |
|
|
|
85 |
|
1831 |
72.1 |
|
|
1145 |
|
45.0 |
|
2762 |
108.7 |
|
||||||||||||
|
2286 |
|
|
|
90 |
|
1938 |
76.2 |
|
|
1212 |
|
47.7 |
|
2925 |
115.1 |
|
||||||||||||
|
2413 |
|
|
|
95 |
|
2046 |
80.5 |
|
|
1279 |
|
50.3 |
|
3089 |
121.6 |
|
||||||||||||
|
2540 |
|
|
|
100 |
|
2154 |
84.8 |
|
|
1347 |
|
53.0 |
|
3252 |
128.0 |
|
||||||||||||
ENGLISH

16 PREPARATION
Using the Lens Hood
Turn the lens hood as shown by the arrow.
NOTE
yy Be careful not to use excessive force when mounting the lens hood. Failure to do so may damage the product.
Using the Cradle scene
DC IN
DC IN
Normal Scene |
Top Scene |
NOTE
yy When projecting images onto the ceiling, you must only use the provided angle-type antenna cable and USB storage device.

PREPARATION 17
Connecting a battery
1. Assemble the projector as shown.
ENGLISH
2. Turn the knob as shown by the arrow.
18 PREPARATION
How to Install the Projector On a Tripod
yyYou can install this projector on a camera tripod as shown below.
yyWhen stabilizing the tripod, we recommend using a locking bolt of standard size 4.5 mm (0.1 inch) or less. The maximum size allowed for the locking bolt is 5.5 mm (0.2 inch). (If it is longer than the maximum allowed size, it may damage the projector.)
Bottom side of the |
Bolt used to attach |
|
projector |
||
the projector |
||
|
||
+ |
|
The projector is connected |
Tripod |
to this part. |
|
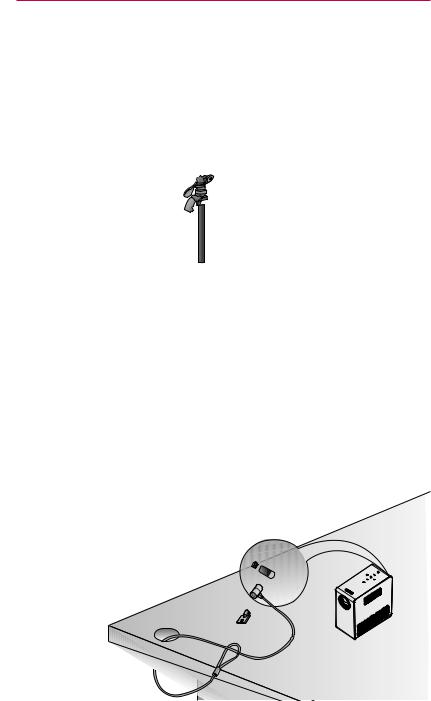
Kensington Security System
yyThis projector has a Kensington Security System Connector on the panel. Connect a Kensington Security System cable as below.
yyFor detailed installation and use of the Kensington Security System, refer to the user’s guide included with the Kensington Security System set.
yyThe Kensington Security System is an optional item. yyWhat is Kensington?
Kensington is a company that sells security systems that prevent expensive electronic equipment such as a computer or laptop from being stolen.
Internet Homepage: http://www.kensington.com

REMOTE CONTROL 19
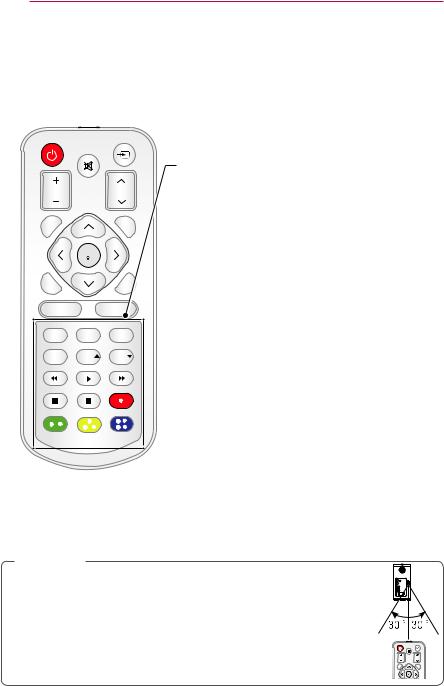
REMOTE CONTROL
Open the battery cover on the back of the remote control and insert the
specified batteries as per instructions |
. The same type of batteries must |
be used. |
|
|
|
219'4 |
+0276 |
|
/76' |
81.7/' |
2#)' |
POWER
Turns the projector on or off.
INPUT
Changes the input source.
MUTE
Mutes all sounds.
VOLUME +, -
Adjusts the volume level.
PAGE
Moves to the previous/next page.
|
|
|
AUTO |
|
#761 |
|
$.#0- |
Automatically adjusts the RGB-PC input image. |
|
|
1- |
|
BLANK |
|
|
|
|
||
':+6 |
|
|
Turns the projector screen on or off. |
|
|
|
|
Up/Down/Left/Right Buttons |
|
|
|
Sets the function or moves the cursor. |
||
|
|
|
||
5'66+0)5 |
|
3 /'07 |
OK |
|
|
|
|
Checks present mode and saves function changes. |
|
56+.. |
4#6+1 |
75$ |
EXIT |
|
*'.2 |
-';5 |
-';5 |
Clears all on-screen displays and returns to |
|
projector viewing. |
||||
|
|
|
Returns to the previous level.
SETTINGS
Selects or closes menus.
Q.MENU
Accesses the quick menu.
ENGLISH
20 REMOTE CONTROL
219'4 +0276 /76'
81.7/' 2#)'
#761 |
|
$.#0- |
|
1- |
|
':+6 |
|
|
|
|
|
5'66+0)5 |
|
3 |
56+.. |
4#6+1 |
75$ |
*'.2 |
-';5 |
-';5 |
STILL
Freezes the moving image.
(Available in any mode other than USB mode.)
RATIO
Resizes an image.
USB
Accesses USB mode.
HELP
Enables the self-diagnosis.
KEY.S u, v
Adjusts Keystone.
Playback Control Buttons
Controls playback of MY MEDIA.
Color buttons
Access special functions in some menus.
 NOTE
NOTE
yyWhen using the remote control, the optimal remote range is less than
3 meters (9.8 feet) (left/right) and within a 30 degree arc of the IR receiver. yyFor seamless operation, do not block the IR receiver.
yyWhen you carry the remote control in the portable bag, make sure that the buttons on the remote control are not pressed by the projector, cables, documents or any other accessories in the bag. Otherwise, it may significantly reduce the battery life.
219'4 +0276 /76'
81.7/' 2#)'
#761 |
$.#0- |
1-
':+6
USING THE PROJECTOR 21
USING THE PROJECTOR
Watching the Projector
Turning on the Projector
1 Connect the power cord correctly.
2 After waiting for a moment, press the POWER button on the remote control or the control panel.
(The light on the control panel will be turned on.)
3 In the Language Selection screen, select a language.
4 Select an input signal by using the INPUT button on the remote control.
Focus and Position of the
Screen Image
When an image appears on the screen, check if it is in focus and fits the screen properly.
Focus ring

Watching the Projector
1 In Standby mode, press the POWER button to turn the projector on.
2 Press the INPUT button and select the input signal you want.
3 Control the projector using the following buttons while watching projector.
Button Description
VOL -, + Adjusts the volume level.
MUTE Mutes all sounds.
Q.MENU Accesses the quick menu.
RATIO Resizes an image.
KEY.S u, v Adjusts Keystone.
4 To turn the projector off, press the POWER button.
yyTo adjust the focus of the image, rotate the focus ring.
yyTo adjust the focus ring, be careful not to touch the keys on the control panel.
ENGLISH

22 USING THE PROJECTOR
Using the battery
Low battery! The projector will turn |
off soon |
*It is displayed when the battery is running out..
*As your bettery is low, the projector will be turned off in a minute.
Battery using time information
Status |
Time and Display |
Charging |
About 3 hours |
Standard Usage |
About 2 hour |
Hours |
(Available battery using time |
|
approximately 1 hour 30 mins |
|
when Energy Saving mode set to |
|
Max) |
Battery Level |
|
Indicator |
Step 1 Step 2 Step 3 Step 4 |
*If you do not use the projector for long periods of time, remove the battery from the projector and store it separately.
It is recommended to charge the battery to 40 - 50 percent for long-term storage.
*The battery is automatically recharged when the projector is connected to a power supply.
*Charge the battery fully when you first use the projector.
*The battery standard usage time given in the manual is based on measurements taken by LG; the actual time may vary depending on usage.
*Battery usage time may vary depending on broadcast type, operating temperature, period of use, and user preferences.
*As the battery is consumable, its lifetime gradually decreases. When the battery’s life is reduced by half, replace it with a new battery from an LG Electronics customer center.
*In battery mode, energy saving mode is disabled.
*Do not charge the battery using any equipment other than that supplied with the product. This may damage the battery or cause a fire.

USING THE PROJECTOR 23
* Dispose of the used battery appropriately. Failure to do so may result in an |
|
|
explosion or fire. Methods for disposing of batteries vary depending on your country |
|
|
or region. Ensure the battery is disposed of in accordance with applicable laws and |
|
|
ENGLISH |
||
regulations. |
||
* Do not throw or disassemble the battery. Damage to the battery may result in fire or |
||
|
||
an explosion. |
|
|
* Always use a battery that is approved and certified by LG Electronics, Inc. Failure to |
|
|
do so may result in an explosion or fire. |
|
|
* Store the battery away from metallic objects, such as keys and paper clips. Overcur- |
|
|
rent may cause a rapid increase in temperature, resulting in fire or burns. |
|
|
* Do not store the battery near any heat source, such as a heater. This may cause a |
|
|
fire or malfunction. |
|
|
* Do not store the battery in temperatures higher than 60°C or in a humid place. |
|
|
Failure to do so may result in an explosion or fire. |
|
|
* Keep away from children. Failure to do so may result in personal injury and damage to |
|
|
the product. |
|
|
* Make sure that the battery is connected correctly. Failure to do so may result in an |
|
|
explosion or fire. |
|
|
* If the battery leaks or smells, remove it from the projector immediately and contact an |
|
|
LG Electronics customer center. |
|
|
* The battery contains lithium-ion, so please handle with care. Failure to do so may |
|
|
result in an explosion or fire. |
|
|
* Danger of explosion if battery is incorrectly replaced. Replace only with the same or |
|
|
equivalent type. |
|
24 USING THE PROJECTOR
Using Additional Options
Adjusting Aspect Ratio
You can adjust the aspect ratio of the picture by pressing RATIO while watching projector.
 NOTE
NOTE
yyAvailable options may vary depending on the input signal.
yyYou can also change the image size by pressing Q.MENU or
SETTINGS.
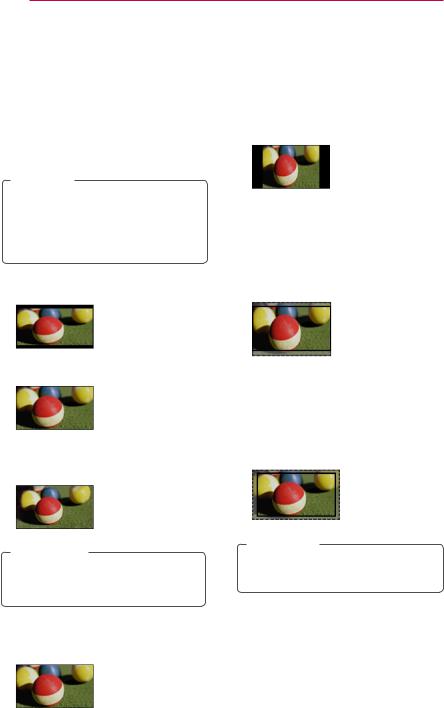
-16:9: Resizes images to fit the screen width.
-4:3: Resizes images to the 4:3 aspect ratio.
-Zoom: Enlarges an image to fit the screen width. The top and bottom of the image may be truncated.
yyPress the or button to zoom in or out of the image.
yyPress the or button to move the image.
-FULL: Changes to the full screen regardless of the aspect ratio.
-Just Scan: Displays video images in the original size without cutting off the edges.
Just Scan
 NOTE
NOTE
yyIf you select Just Scan, you may see image noises at the edge or edges of the screen.
-Set By Program: Displays images in the same aspect ratio as the original image.
-Cinema Zoom 1 : Formats an image to the cinemascope ratio, 2.35:1. It ranges from 1 to 16.
yyPress the or button to zoom in or out of the image.
yyPress the or button to move the image.
 NOTE
NOTE
yyIf you enlarge or reduce an image, the image may be distorted.
Set By Program
USING THE PROJECTOR 25
Using the Keystone
Function
To prevent the screen image from becoming trapezoidal, Keystone adjusts the top and bottom width of the image if the projector is not set at a right angle to the screen.
Because the Keystone function may cause inferior screen image quality, use this function only when it is not possible to set up the projector at an optimal angle.
•Keystone 0 |
- |
+ |

CLOSE
1 Press the SETTINGS button.
2 Press the , , or button to select OPTION and press the OK button.
3 Press the , , or button to select Keystone and press the OK button.
4 Press the or button to adjusted Keystone.
yyKeystone can be adjusted from -40 to 40.
5 Press the OK button after adjustment.
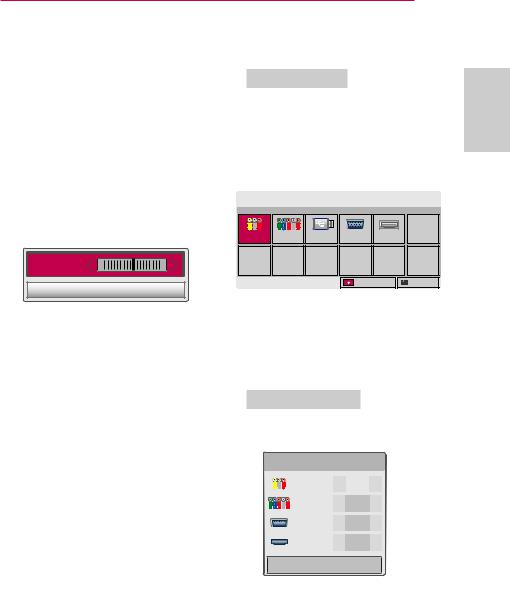
Using the Input List
Using the Input List
1 Press the INPUT button to access the input sources.
-The connected input mode appears first. However, AV / Component input is always activated.
Input List |
|
|
|
Move OK |
|
AV |
Component |
USB |
RGB-PC |
HDMI |
|
|
|
|
Input Label |
Exit |
|
2 Select an input signal using the INPUT button and the projector is switched only to the connected input mode. You can use the , , or button to switch between all the input modes.
Adding an Input Label
to
Input Label
|
AV |
|
|
|
|
|
|
|
|
|
Component |
|
|
|
|
|
|
|
|
|
RGB-PC |
|
|
|
|
|
|
|
|
|
HDMI |
|
|
|
|
|
|
|
|
|
|
|
|
|
Close
1 Press the INPUT button to access the input sources.
2 Press the RED button.
3 Use the or button to scroll to one of the input sources.
4 Use the or button to select one of the input labels.
ENGLISH
26 USING THE PROJECTOR
Blank Function
Using the Blank Function
This function may be effective when you need to draw attention during a meeting or training.
1 Press the BLANK button, and the screen is covered by the background color.
You can change the background color by referring to "Selecting a Blank Image".
2 Press any button to clear the blank function.
To cover the screen temporarily, press the BLANK button on the remote control.
Do not block the lens with any object while the projector is running.
It may become overheated and deformed or even cause a fire.
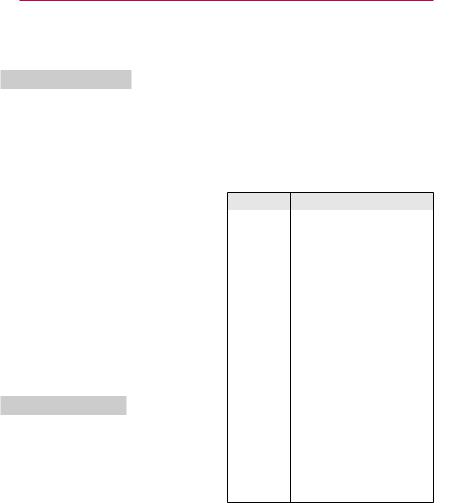
Selecting a Blank Image
1 Press the SETTINGS button.
2 Press the , , or button to select OPTION and press the OK button.
3 Press the , , or button to select BLANK IMAGE and press the OK button.
4 Use the or button to move to the setting or option you want and press the OK button.
Using the Quick Menu
You can customize frequently used menus.
1 Press Q.MENU to access the quick menus.
2 Press the or button to scroll through the following menus and press OK.
Menu |
Description |
Aspect |
Changes the aspect ratio |
Ratio |
(see 24 page) |
Picture |
Changes the picture |
Mode |
mode. |
Energy |
Adjusts the brightness. |
Saving |
|
Clear |
Makes the voice from the |
Voice II |
projector crisp and clear. |
Sound |
Sets the sound mode. |
Mode |
|
Sleep |
Sets the Projector to be |
Timer |
turned off at the specified |
|
time. |
PJT Mode |
Turns the projected image |
|
upside down or flips it |
|
horizontally. |
USB |
Disconnects a USB |
Device |
device. |
3 Press the , , or button to scroll through the following menus.

ENTERTAINMENT 27
ENTERTAINMENT
Wireless Display Setup (Notebook)
1 Run the WiDi( ) program on your notebook.
2 After running the WiDi program on your notebook, a list will show all available devices that were detected. In the list, select the Projector you want and click Connect.
Enter the number shown(a) on the screen (b) and then click Continue.
|
1SPQFSUJFT |
)FMQ |
1SPQFSUJFT |
)FMQ |
|
$POOFDUFE BEBQUFS |
|
|
|
|
|
|
|
|
|
|
'PVGT UGEWTKV[ EQFG |
|
|
||
|
|
|
|
|
Request connection |
7KLV LV WKH ILUVW WLPH \RXĜUH FRQQHFWLQJ WR /* :L'L 3URMHFWRU |
|
|
|||||||
|
|
|
|
|
|
|
|
||||||||
z aGu G G U |
|
|
|
|
|
|
|
|
|
3OHDVH HQWHU VHFXULW\ FRGH \RX VHH RQ \RXU 3URMHFWRU VFUHHQ |
|
|
|||
|
|
|
|
To connect, enter the PIN |
|
b |
|
|
|||||||
|
|
|
|
|
|
|
|
|
|||||||
%FUFDUFE BEBQUFST |
|
|
|
|
|
|
My PIN******** |
|
|
||||||
|
|
|
|
|
|
|
|
|
|||||||
{ GGGGGGGGGu GGGGGGGGGGGGGGGGGGGGGGGGGGGGGGGGGGGGGpkGGGGGGGG GGt GGGGGGGGGGGGGGGGGGGGGGGGGGGGGz |
|
|
|
|
|
|
|
|
|
||||||
snG~ k Gw |
km^Y |
u j GZUW |
|
|
|
|
a |
|
|
|
|
|
|
||
|
|
|
|
Remain: 92 second(s) |
|
|
|
|
|
|
|||||
|
|
|
|
|
|
|
|
|
|
|
|
|
|||
|
|
|
|
|
|
|
|
Cancel |
|
|
|
|
|
|
|
|
|
|
|
|
|
|
|
|
|
|
|
|
|
|
|
|
|
|
|
|
|
|
|
|
|
|
|
|
&RQWLQXH |
|
&DQFHO |
,QGLFDWHV DQ DGDSWHU \RX KDYH SUHYLRXVO\ FRQQHFWHG WR |
|
|
|
|
|
|
|
|
|
|
|
|
|
|
|
|
|
|
|
|
|
|
|
|
|
|
|
|
|
|
|
z G G G |
|
|
&RQQHFW |
|
|
Projector Screen |
Notebook Screen |
||||||||
|
|
|
|
|
|
||||||||||
3 The Notebook screen will appear on the projector screen soon. Note that the wireless connection speed will affect the quality of the video displayed on the notebook.
If the connection is poor, the Wireless Display connection may be lost or quality of the video may be poor.
Wireless Display Setup (Moblie phone)
1 Run the Wireless Display program on your mobile phone.
2 After running the Wireless Display program on your mobile phone, a list will show all available devices that were detected.
3 In the list, select the Projector you want and click Connect. If you need to enter the PIN number, Enter the number on the screen and then click Continue.
4 The mobile phone screen will appear on the projector screen soon. Note that the wireless connection speed will affect the quality of the video displayed on the mobile phone.
If the connection is poor, the Wireless Display connection may be lost or quality of the video may be poor.
*For more information on Intel WiDi, visit http://intel.com/go/WiDi.
*If you change the input signal while watching in Wireless Display mode, the Wireless Display connection will be disabled.
*Some menus may not work while Using Wireless Display.
ENGLISH

28 ENTERTAINMENT
MY MEDIA
Connecting USB Storage
Devices
Connect a USB flash drive as shown below.
When a USB storage device is connected, the USB adjustment screen appears. You cannot write or delete data on the USB storage device.
USB flash drive
To disconnect the USB storage device,
1 Press the Q.MENU button.
2 Use the or button to move to USB Device and press the OK button.
3 Remove the USB device.
 NOTE
NOTE
yyAfter the USB storage device is disconnected, it cannot be read. Remove the USB storage device and connect it again.


ENTERTAINMENT 29
Tips for Using USB Devices
yyOnly a USB storage device is recognizable.
yyUSB hubs are not supported.
yyA USB storage device which uses its own driver may not be recognized.
yyThe recognition speed of a USB storage device will depend on each device.
yyIf a normal USB device does not work, disconnect and reconnect it. Please do not turn off the projector or unplug the USB device when the connected USB device is working. The USB device or stored files may be damaged.
yyPlease do not connect the USB storage device that has been manipulated on the PC. The projector may not operate properly or fail to play files. Use a USB storage device which contains normal music, photo, video or document files.
yyPlease only use a USB storage device formatted as a FAT16, FAT32 or NTFS file system provided by Windows. In case a storage device formatted as a different utility program is not supported by Windows, it may not be recognized.
yyPlease connect power to a USB storage device which requires an external power supply. If not, the device may not be recognized.
yyPlease connect a USB storage device with a cable provided by the USB manufacturer. When you use a cable that is not provided by a USB manufacturer or an excessively long cable, the device may not be recognized. yySome USB devices may not be sup-
ported or will not work properly. yyIf the length of a folder or file is too
long, the folder or file may not be recognized properly.
yyThe files in a USB storage device are sorted in the same way as Windows XP. Up to 100 English characters for a file name are allowed.
yyThe data of a USB device may be damaged, so it is recommended to backup any important files. Because a user is responsible for data management, the manufacturer is not responsible.
yyIt is recommended to use a USB flash drive which is 32 GB or less and a USB hard disk which is 1 TB or less. Any device with more than the recommended capacity may not work properly.
yyIf a USB storage device is not working properly, disconnect it and connect it again.
yyIf a USB external hard disk with the power saving function does not work, turn the hard disk off and on again to make it work properly.
yyUSB storage devices below USB 2.0 are supported as well. However, they may not work properly in the movie list.
ENGLISH

30 ENTERTAINMENT
MOVIE LIST
In the Movie List, you can watch movies stored on the connected USB device.
Tips for Playing Video Files
yySome subtitles created by a user may not work.
yySome special characters are not supported in subtitles.
yyHTML tags are not supported in subtitles.
yyTime information in a subtitle file should be arranged in ascending order to play the subtitle properly.
yyChanging font and color in subtitles is not supported.
yyA language which is not specified in the subtitle languages is not supported.
yySubtitle files of 1 MB or larger are not supported.
yyThe screen may suffer temporary interruptions (image stoppage, faster playback, etc.) when the audio language is changed.
yyA damaged video file may not be played properly or some functions may not be available.
yyVideo files created with some encoders may not be played properly.
yyEither audio or video may only be supported depending on the video or audio packet structure of a video file.
yyVideo files with higher resolution than the maximum supported for each frame may not be played properly. yyVideo files in formats other than the ones specified above may not be
played properly.
yyStreaming files which include GMC (Global Motion Compensation) or Qpel (Quarterpel Motion Estimation) is not supported.
yyUp to 10,000 sync blocks are supported in the subtitle file.
yySeamless playback is not guaranteed for files encoded level 4.1 or higher in H.264/AVC.
yyDTS audio codec is not supported. yyVideo files larger than 30 GB (Giga-
bytes) are not supported.
yyPlaying a video via a USB connection that does not support high speed may not work properly.
yyA video file and its subtitle file must be located in the same folder. A video file name and its subtitle file name must be identical in order to display the subtitle properly.
yyWhile watching a video using the movie list function, you cannot adjust the picture mode.
yyTrick Mode does not support other functions than if video files do not have index information.
yyWhen playing a video file using network, the Trick mode is limited to 2X speed.
yyVideo file names that contain special characters may not be playable.
Loading...