


<![endif]>ЯЗЫК РУССКИЙ PORTUGUÊS
OWNER’S &
INSTALLATION MANUAL
AIR
CONDITIONER
Please read this manual carefully before operating your set and retain it for future reference.
Wireless Remote Controller
Original instruction
|
|
|
|
|
|
|
|
|
|
|
|
|
|
|
|
|
|
|
|
|
|
|
|
|
|
|
|
|
|
|
|
|
|
|
|
|
|
|
|
|
|
|
|
www.lg.com |
|
|
MFL70585313 |
|
|
|
|
|
|
|
|
|
|
|
|
|
|
||||||||||||||||||||||||||||
|
|
|
|
|
|
|
|
|
|
|
|
|
|
|
|
|
|
|
|
|
|
|
|
|
|
|
|
|
|
Copyright © 2019 - 2020 LG Electronics Inc. All Rights Reserved. |
||||||||||||||
|
Rev.02_062920 |
|
|
|
|
|
|
|
|
|
|
|
|
|
|
|
|
|
|
|
|
|
|
|
|
|
|
|
|
|||||||||||||||
<![endif]>ROMÂNĂ LIMBA POLSKI NEDERLANDS ČEŠTINA ΕΛΛΗΝΙΚΆ DEUTSCH FRANÇAIS ESPAÑOL ITALIANO ENGLISH

<![endif]>ENGLISH
Table of Contents
Safety instructions................................ |
3 |
Operating instruction............................ |
4 |
How to insert the batteries ....................................... |
4 |
Wireless remote controller maintenance.................. |
4 |
Operating method .................................................... |
4 |
Part description..................................... |
5 |
Owner's Instruction............................... |
6 |
Cooling Mode - Standard Operation ........................ |
6 |
Cooling Mode - Power Cooling ................................ |
6 |
Auto Operation Mode............................................... |
6 |
Auto Changeover Mode ........................................... |
7 |
Auto Changeover Mode - Setting the Mode Change |
|
Temperature............................................................. |
7 |
Dehumidification Mode ............................................ |
8 |
Heating Mode - Standard Operation ........................ |
8 |
Heating Mode - Power Heating................................ |
9 |
Fan Mode................................................................. |
9 |
Temperature Setting/Room |
|
Temperature checking ........................ |
10 |
Airflow Setting ..................................... |
11 |
Up/Down Airflow Direction Control (Optional) ........ |
11 |
Left/Right Airflow Direction Control (Optional)........ |
11 |
Indirect Wind .......................................................... |
11 |
Direct Wind............................................................. |
11 |
Smart Mode ........................................................... |
12 |
Refresh Mode ........................................................ |
12 |
Sub function ........................................ |
13 |
Air Purification (Optional) ....................................... |
13 |
Smart Indicator (Air Quality) Always On Setting |
|
(Optional) ............................................................... |
13 |
Auto Clean (Optional) ............................................ |
13 |
Energy Saving Cooling (Optional).......................... |
13 |
Smart Clean (Optional) .......................................... |
14 |
Brightness Setting (Optional) ................................. |
14 |
Celsius/Fahrenheit Switching................................. |
14 |
Electric heater (Optional) ....................................... |
14 |
Individual vane angle control (Optional)................. |
15 |
Comfort Cooling (Optional) .................................... |
15 |
Timer..................................................... |
16 |
Setting the Current Time ........................................ |
16 |
Sleep Timer Setting................................................ |
16 |
On Timer Setting .................................................... |
16 |
Off Timer Setting .................................................... |
16 |
To cancel the Timer Setting.................................... |
16 |
Installation instructions...................... |
17 |
Setting address of central control .......................... |
17 |
Checking address of central control....................... |
17 |
How to enter installer setting mode........................ |
17 |
Installer setting code table ..................................... |
18 |
2

Safety instructions
The following safety guidelines are intended to prevent unforeseen risks or damage from unsafe or incorrect operation of the appliance.
The guidelines are separated into ‘WARNING’ and ‘CAUTION’ as described below.
!This symbol is displayed to indicate matters and operations that can cause risk. Read the part with this symbol carefully and follow the instructions in order to avoid risk.
!WARNING
This indicates that the failure to follow the instructions can cause serious injury or death.
! CAUTION
This indicates that the failure to follow the instructions can cause the minor injury or damage to the product.
! WARNING
Installation
•Replace all the batteries in the remote control with new ones of the same type. Do not mix old and new batteries or different types of batteries. There is risk of fire or explosion
•Do not disassemble, repair, or modify the product at your discretion in order to prevent fire or an electric shock.
•The appliance must only be supplied at safety extra low voltage corresponding to the marking on the appliance.
Operation
•Do not recharge or disassemble the batteries. Do not dispose of batteries in a fire. They may burn or explode.
•If the liquid from the batteries gets onto your skin or clothes, wash it well with clean water. Do not use the remote if the batteries have leaked. The chemicals in batteries could cause burns or other health hazards.
•Push the button at one time. There will be no operation if you several buttons at one time.
•Do not drop or throw the remote controller. Do not give any strong impact and step on it.
•Do not use this at the moisture and humidity places.
•Do not use this at heating and firing conditions.
•Do not place the remote controller in a location exposed to direct sunlight.
•Aim at the signal receptor on the wiress remote controller so as to operate.
•The remote control signal can be received at a distance of up to about 7 m.
•Be sure that there are no obstructions between the remote controller and the signal receptor.
! CAUTION
Installation
•If anyone other than a licensed Professional installs, repairs, or alters LG Electronics air conditioning products, the warranty is voided.
-All costs associated with repair are then the full responsibility of the owner.
•Do not install the unit in potentially explosive atmospheres.
3
<![endif]>ENGLISH
<![endif]>ENGLISH
Operating instruction
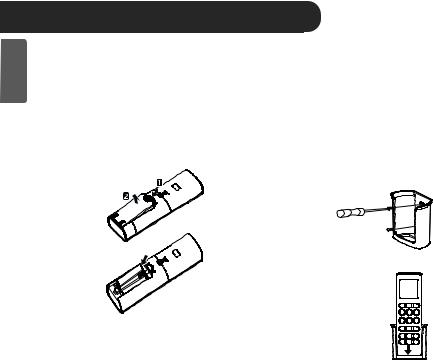
How to insert the batteries
1Remove the battery cover by pulling it according to the arrow direction.
2Insert new batteries making sure that the (+) and (-) of battery are installed correctly.
3Reattach the cover by sliding it back into position.
Note
1 Always use/replace both batteries of same type.
2If the system is not to be used for a long time, remove the batteries to save their working life.
3If the display screen of remote controller starts fading, replace both of the batteries.
4
Wireless remote controller maintenance
1Choose a suitable place where its safe & easy to reach.
2Fix the holder to wall etc with the supplied screws firmly.
3 Slide the remote controller inside the holder.
Note
1Remote controller should never be exposed to direct sunlight.
2Signal transmitter & receiver should always be clean for proper communication. Use a soft cloth to clean them.
3In case some other appliances also get operated with remote control, change their position or consult your serviceman.
Operating method
1 The signal receiver is inside the unit.
2Aim the remote controller towards the unit to operate it. There should not be any blockage in between.

Part description
Accessory
Holder(1EA) |
Fixing screw (2EA) |
Owner's / |
AAA(1.5 V) |
Installation manual |
Batteries(2 EA) |
Part |
Description |
LCD
Used to start or stop the air purification function. Smart Indicator(Air quality) always on setting (If it press for 3 s)
Used to set each vane angle.
Used to set airflow.
Used to turn on/off the unit.
Used to select the room temperature.
Used to select the operation mode.
Speed cooling(heating) operates super high fan speed.
Used to set fan speed.
Used to set or clear additional function. Celsius/Fahrenheit Switching (If it press for 5 s)
Used to stop or start louver movement and set the desired up/down airflow direction.
Used to set the desired left/right(horizontal) airflow direction.
Used to set the time of sleeping operation.
Used to set the time of starting operation.
Used to set the time of stopping operation.
Used to set the timer. (If it is timer mode) Used to adjust the brightness.
(If it is not timer mode)
Used to check the room temperature. (If it is not timer mode)
Used to set/clear the timer.
Used to set the current time (If it press for 3 s)
Used to reset the remote controller.
5
<![endif]>ENGLISH

Owner's Instruction
| <![if ! IE]> <![endif]>ENGLISH |
Cooling Mode - |
||
|
|||
|
Standard Operation |
||
|
|
|
|
|
|
|
|
|
|
|
|
1 Press the  button to start the unit.
2 Press the  button to select Cooling Mode.
3 Set the desired temperature by pressing
button.
Press the  button to check the room temperature. When setting the desired temperature is higher than room temperature, cooling wind isn’t blow out.
η Setting Temp. Range : 18~30°C(64~86°F)
 To raise the temperature
 To lower the temperature
4You can select the fan speed in five steps - super low, low, medium, high and chaos. Each time the button is pressed, the fan speed mode is shifted.
Cooling Mode - Power Cooling
1 Press the  button to start the unit.
2 Press the  button to select Cooling Mode.
6
3Press the  button. The unit will operate in super high fan speed in cooling mode.
ηWall mounted models operate power cooling mode for 30 minutes.
4To cancel the Power cooling Mode press the Jet Mode button or the fan button or the room temperature setting button again and the unit will operate in high fan speed in cooling mode.
 or
or  or
or 

Auto Operation Mode
1 Press the  button to start the unit.
2Press the  button to select Auto Operation Mode.
3Set the desired temperature.
<For Cooling Model>
The temperature and fan speed are automatically set by the electronic controls based on the actual room temperature.
If you feel hot or cold, press the 
 buttons for more cooling or heating effect. You cannot switch the indoor fan speed. It has already been set by the Auto Operation Mode rule.
 To raise the temperature
 To lower the temperature
Please select the code depend on your feeling.
Code |
Feel |
2 |
Cold |
1 |
Slightly cool |
0 |
Neutral |
-1 |
Slightly warm |
-2 |
Warm |
 Loading...