


LWHD8000RY5
wwwJgservice.com
LG
Window-TypeAir Conditioner
OWNER'S MANUAL
MODELS: L WHD8OOOR, L WHD8OOOR Y5, L VVHDIO00R
after
para el futuro
,o
FOR "{OUR RECORDS
Write the mode_ and sedai numbers here:
Model #
_ria! #
You can fir_d the humors on a _abel on the side of the
product,
Dealer's Name
Date Purchased
[] Stap# your receipt to this pa_ in t_ _ent you need it
to prove date of purchase or for warra_ly issues,
READ THIS MANUAL
Inside you will find many helpful hints on how to use and
maintain your air conditioner pro_rly: Just a littlepreventive
care on your part can save you a great dea_ of time and
mor_y over the life of your air cond_ioner,
You'll flr_J many answers to common problems in the chin1
d troubleshooting tips, I_you _ev#w ou_ chart of
Troubleshooting Tips first, you may not aeed _o call f(_
serv_e at aE
PRECAUTION
, Contact an Authorized Service Center for repair or
maintenance of this unit. Call 1-800-243-0000 to
locate the neare_ ASC.
,This air conditioner is not intended for use by young
children or tnvafids without supervision_
,Young children should be su_tvised to ensure that
they do not play with the air conditioner.
,ff the power cord requires replacement have an
Authorized Servicer install an exact rep|acement part.
, |nstallation work must he performed in accordance
with the Nations| E_ectric Code by qualified and
authorized personnet on|y:
2 Room Air Conditioner

To prevent injury to the user or other _ople and property damage, the following instructions
must be foIFowed.
[] _n_rrect operation due to ignoring instructions wfl] cause harm or damage. The seriousness
is classified b,y the foi]]o,wing indications.
[] B_ause of the weight of the product, it is recommend_ that you have a hel_r to assist in
the instaHatiion.
• Meanings of sym_]s used in this manual are as shown bel_.
Be sure not to do.
Be sure to follow the instruction.
miinstallation
* Improper as_mbly or ins_lfation rray _use
inco_ operation, including iniury, fire, and
• It may cau_ fire and _ectric sh_
• It may _u_ ex or fiire. * litmay cau_ el_fic :_oc_ and failure.
Owner_ Manual 3

[] Operation
. ._he_ise, it will cause
electric shock or fire
, _will _use electric shock or
fire.
, ,_herwise it will cause fire
and electric shock accident.
4 Room Air Conditioner
• It willlcause e_ectric shock or
fire.
• It will cause ele_ric sho_ or
fire.
• It may cause fire and electri.c
shock...
• litwiill cause ellectric shock or
fire.
• No grounding may _use
ele_ric sho_.
• It may cause electric shock.
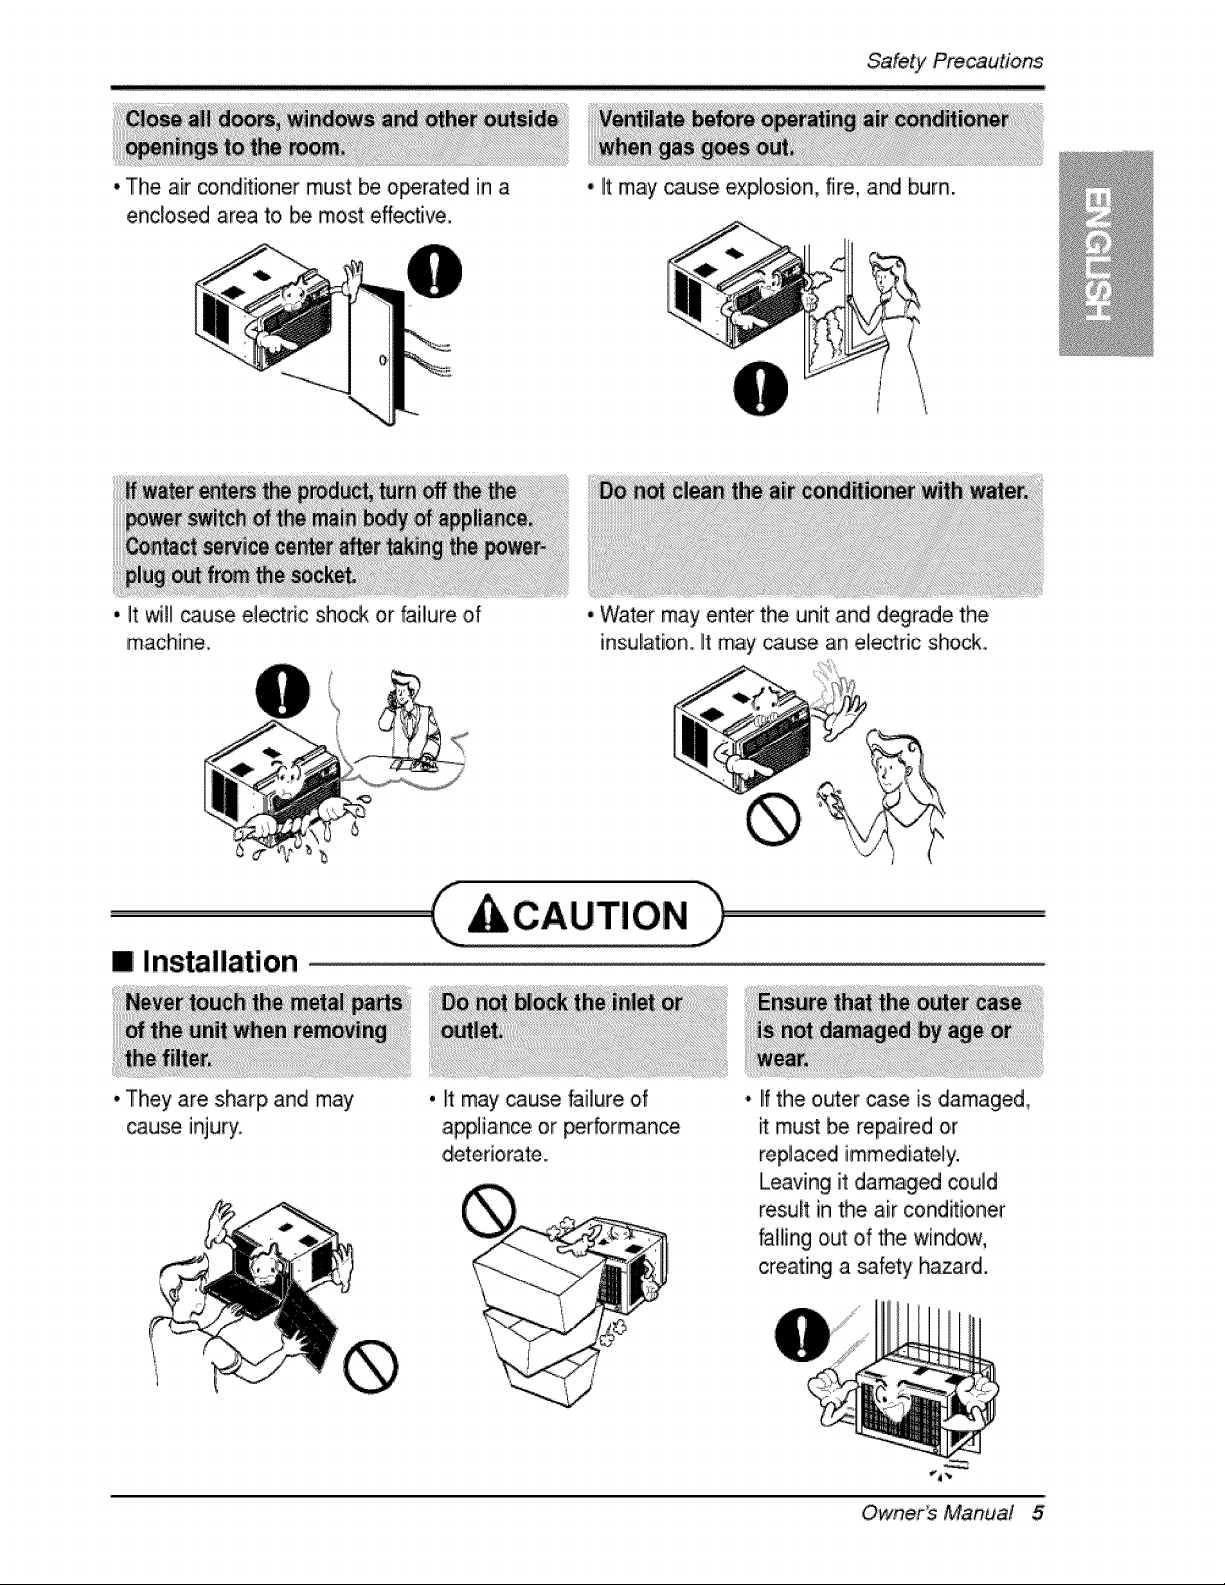
*The air co,nd_ioner must be operated ina
enclosed area to _ most effective,
* It may cause explosion, fire, and burn.
'i _t _I cause ele_ric sho_ or faillure of
machine..
[] Installation
*They are sharp and may
cause inju_.
* Water may enter the unit and degrade the
insulation. It may cause an electric shock..
,CC.UT,O.h
, It may cause failure of
appliance or performance
• IIfthe outer case is damaged,
must be repaired or
replaced immediately.
Leaving it damaged could
result in the air cond_ioner
falling out of the window,
creating a safety hazard.
Owner_ Manual 5

m Operation
. It may cause iniury • It may cause electric shock
and damage
, it will waste power
consumption in vain and it
may cause accident,
, Since the fan rotates at high
spe_ during operation, it may
cause injury
, Operation without riflers will
cause failure
• This _uld iniury the _t or
plant
• It is an air _nditioner, not a
precision refrigeration system
• Tlheap_arance of the air
c:ond_i,onermay deteriorate,
change color, or develop
s.uffaceflaws.
, It is not sanitary and coulld
cause illness or _r_nal
injury hiazard
6 Room Air Conditioner
Before, Operation
1. Plug in the power cord properly.
i ¸?
2. Use a dedicated circuit. Ovedoadiing the line could create a fire, Ihazard.
3. Do not use an extension cord. See page 10 for more details.
4. Do not start/stop operation by plugging/unplugging the power cord.
5. If the power co_d is damaged and requires replacement, Ihave an Authorized
Servicer install an exact replacement part.
ii _i_(i_i!_!_!_!_!__ I
i. Being exposed to direct aidlow for an extended p,eriodl of time could Ibe
hazardous to your health. Do not expose occupants, pets, or plants to direct
airflow for extended periods of tiime.
2. Due to the possibility of oxygen deficiency, ventilate the room when used
together with stoves or other heating devices,
3 Do not use this air conditioner for non-specified sp,ecia! purposes (e.g_
preserving precision devices, food, pets, plants, and art objects). Such usage
co,uid damage the items.
4 The air conditioner is a consumer comfort appliance, not a precision climate
control system.
1. Do not touch the metal parts of the unit when removing the filter. Injuries can
occur when handling sharp metal edges.
2. Do not use water to clean inside the air conditioner. Exposure to water can
destroy the insulation, leading to, p,ossible electric shock.
3. When cleaning the unit, first make sure that the power and breaker are turned
off. The fan rotates at a very high speed during operation. There iisa
possibility of injury if the unit's power is accidentally triggered on while
cleaning inner parts o,fthe unit.
For repair .and maintenance, contact an Authorized Service Center. See the
warranty page for details or cal! (800) 243-0000. Have your model number and
serial number available. They should be written on page 2 of this manual.
Owner_ Manual 7
/ntrodu'c#on
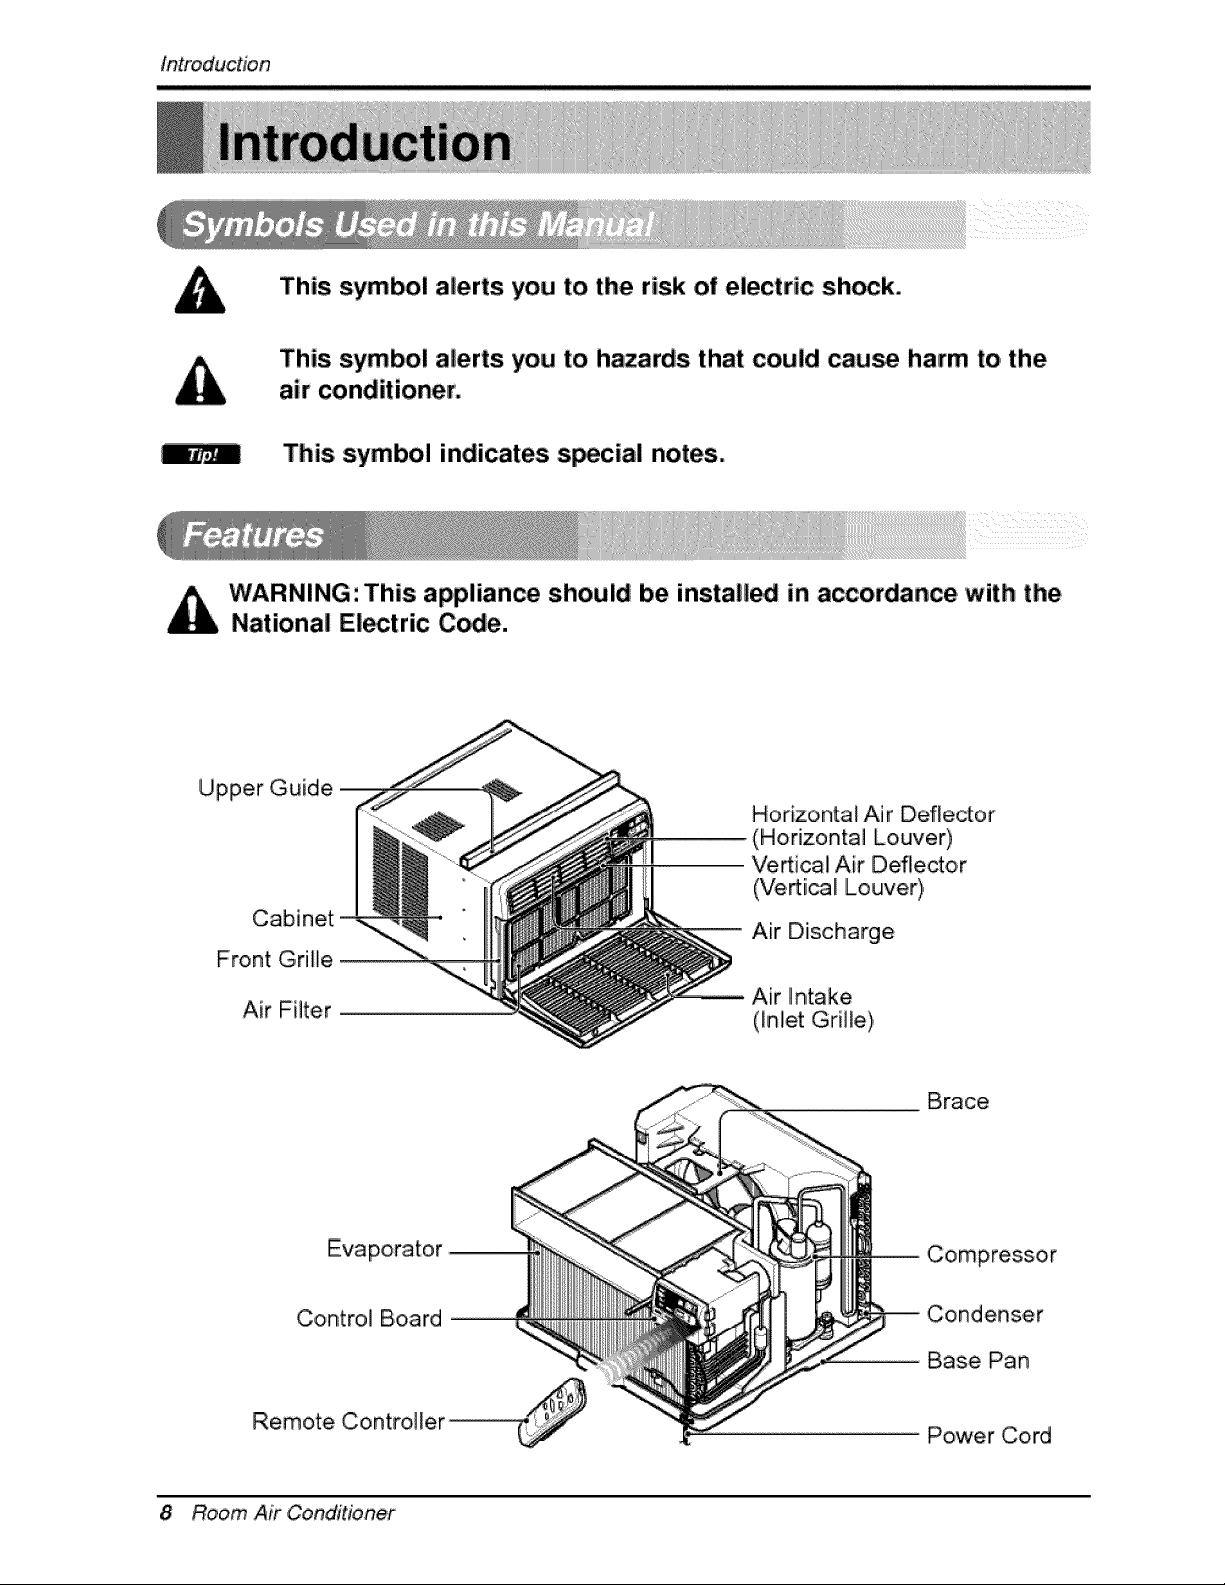
This symbol alerts you to the risk of electric shock.
This symbol alerts you to hazards that could cause harm to the
air conditioner.
This symbol indicates s_cial notes.
WARNING: This appliance should be install_ in accordance with the
National El_tric C_e.
Upper Guide
Cabinet
Front Grille
Air Filter
Horizontal Air Deflector
(Horizontal Louver)
Ve_ica! Air Deflector
(Vertical Louver),
Air Diischarge
Brace
Evaporator
Control Board
Remote Controi][er ...............................................
Compressor
Condenser
Base Pan
Power Cord
8 Room Air Conditioner
Elect'ricalSafety,
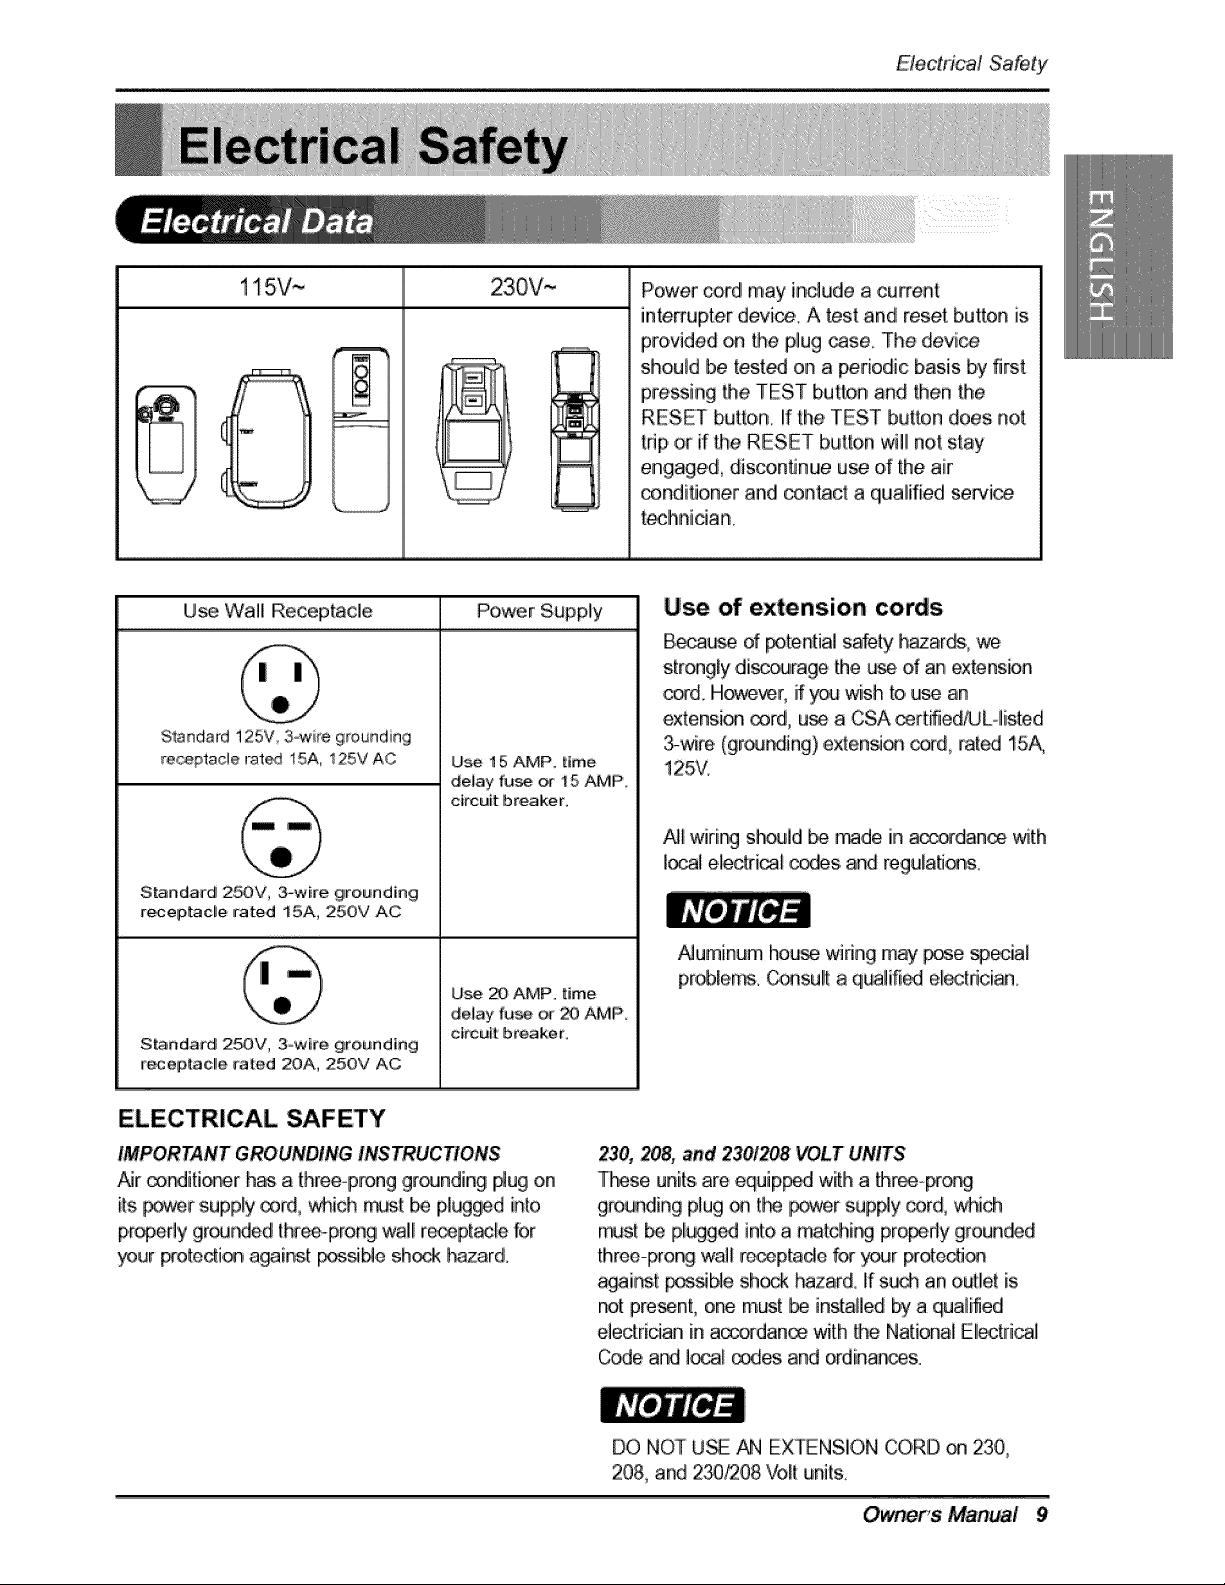
115V~ 230V,--
Power cord may include a current
interrupter d_i_,. A _st and reset button is
provided on the plug _se, The device
should be tes,t_ on a _riodic basis b_ first,
p_,ssing the TEST button and then Me
RESET button, If the TEST button does not
trip ,oirif the RESET button will not stay
engaged, disco,nfinue use d' the air
conditioner and _n_ct a qualified sewic_
teclhnician.
Use Wall Receptacle Power Supply
Standard125V 3_ire grounding
re_pta,cle rat_ 15A, t25V AC
Standa#d 25OV, 3-wire grounding
receptac_,e rated 15A, 250V AC
S_ndard 25OV, 3ow#e grouted[rig
_%epiacl!e _'ated 2OA, 25OV AC
U_ 15 AMP, titme
de_ay fu_ _ 15 AMP,
circuit breaker.
Use 20 AMP. time
de_ay fu_ _ _ AMP.
ckcutt: breaker.
Use of extension cords
B_u,=_ d _tential safety _zar_,, we
strongly di_lrage the _ d an extension
or_d_H_ver, if you wish to,u_ an
extension _rd, u_ a CSA _rt_ie_L-,,listed
3-wire, (grou_ing),exten_on exit,rat_ 15A,
125V.
_'J_w#ing sh_]d _ made in a_danoe with
local elecM_ _s, and regulatJ_s.
Numinum house,wiring may pose sp_ial
privies. Co_sult a qt_Jifi_ e[_tdcian.
ELECTRICAL SAFETY
IMPORTANT GROUNDING INSTRUCTIONS
Nr _rditi_r has a threeop_onggr(_Jnding #ug on
its p_r :supply _rd,, which n_t b_ plugged into
p,r_pefly gr_Jr_e,d three-prong wall re_pt_[e for
_ur preterit} a_in,st pestle sh_ [i-,3zard.
230, 208, =nd 230!_38 VOLT UNITS
These units,are equip_ w_h a _reeo_o_
g[ound[ng plug _ tL_ _er sup#y cord, which
_st _ pli_g_ into a match#_ pro_dy grounded
three-prong wai! re_ptade for _r Fotecti_
a_i_,t F_Me shock L_zard. If s_ an outlet is
not present, one must _ installed by a qualified
e]edrician in accofdan_ with the National Eliectfi_J
C_e and ]_ _es, and ordinances.
DO NOT U_ AN EXTENSION CORD on 230,
208, and 2_I208 Volt units
Owner, s' Manual 9
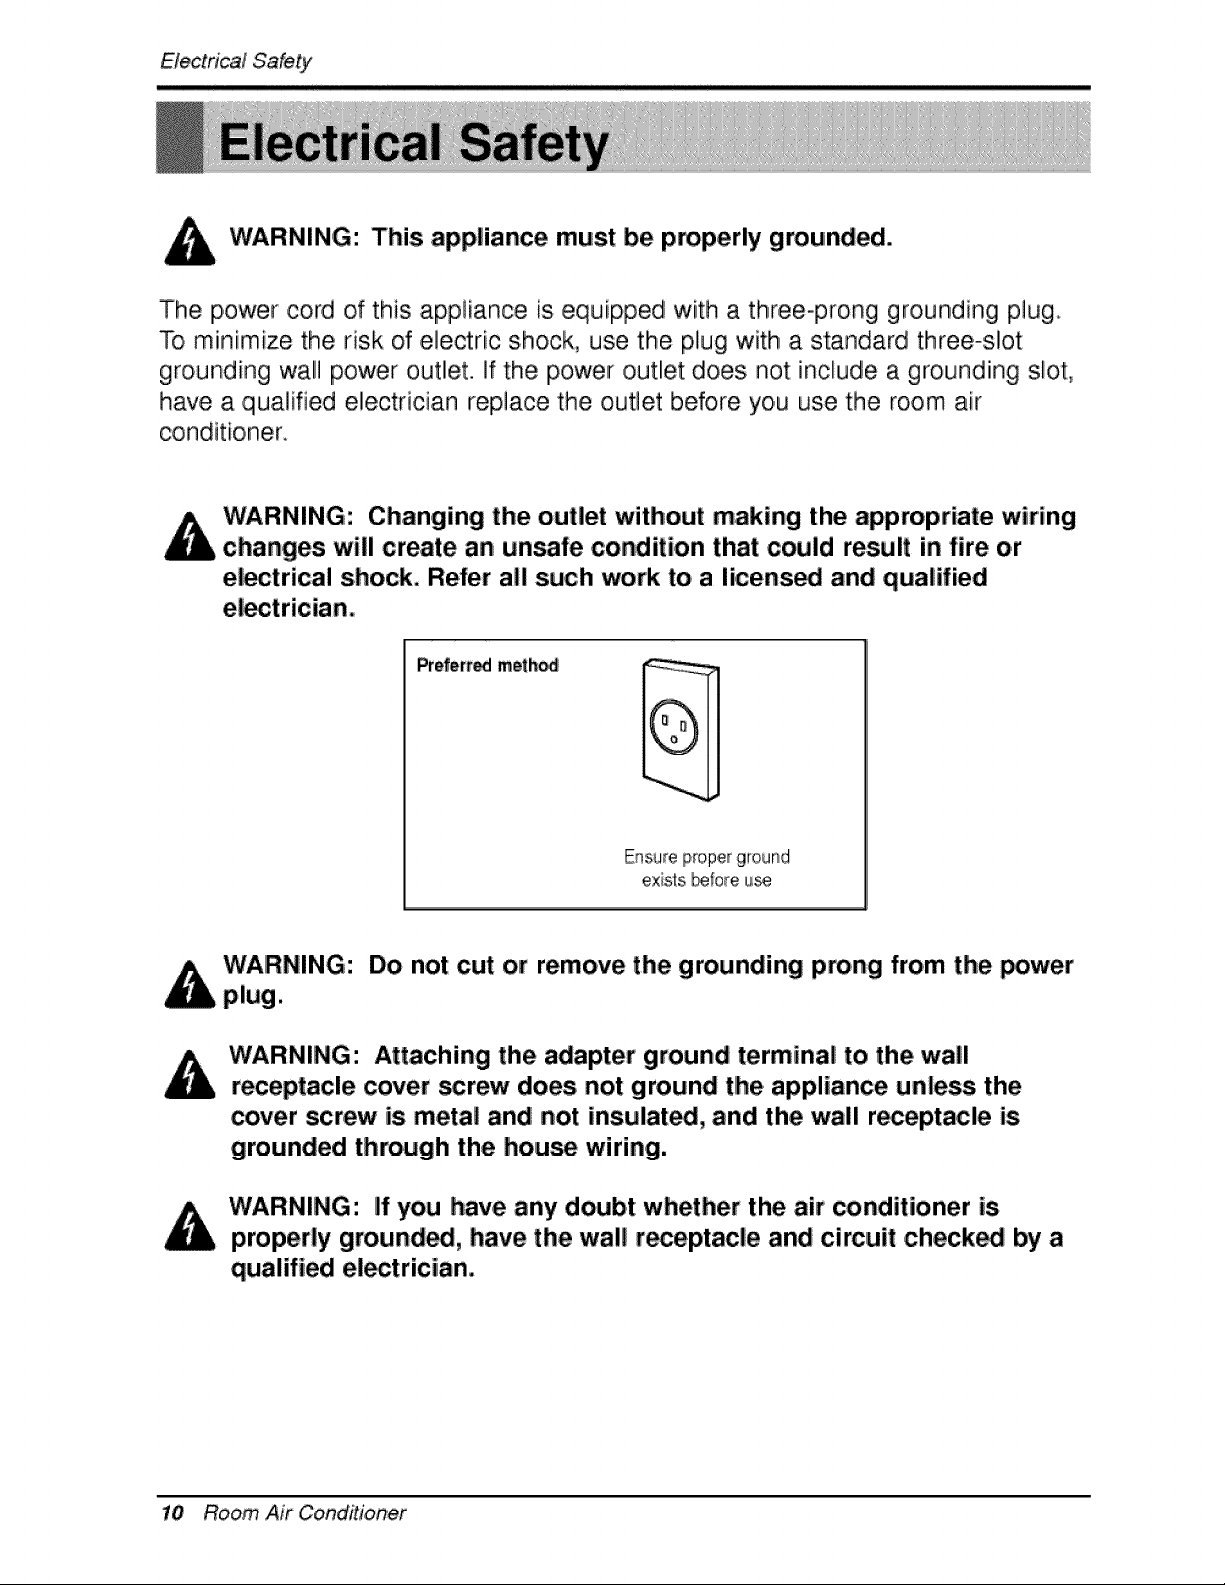
WARNING: This appliance must be properly grounded.
The power cord of this appliance is equipped with a three-prong grounding plug.
To miinimize the risk of electric shock, use the plug with a standard three-slot
grounding wall power ,outlet. If the power ,outlet does not include a grounding slot,
have a qualified eiectrician replace the outlet before you use the room air
conditio, ner_
Changing the outlet without making the appropriate wiring
changes will create an unsafe condition that could result in fire o.r
el_trical shock, Refer all such work to a li.cens_ and qualified
Prefert_ meth_
exists _:ore u_
Do not cut or remove the grounding prong from the _wer
WARNING: Attaching the adapter ground terminal to the wall
receptacle cover _rew does not ground tlhe appliance unless the
cover screw is metal and not insulate, and the wall receptacle is
grounded through the house wiring.
WARNING: If you have any doubt whether the air conditioner is
properly ground_, have the wall r_eptacle and circuit checked by a
qualified el_trician.
10 Room Air Conditioner
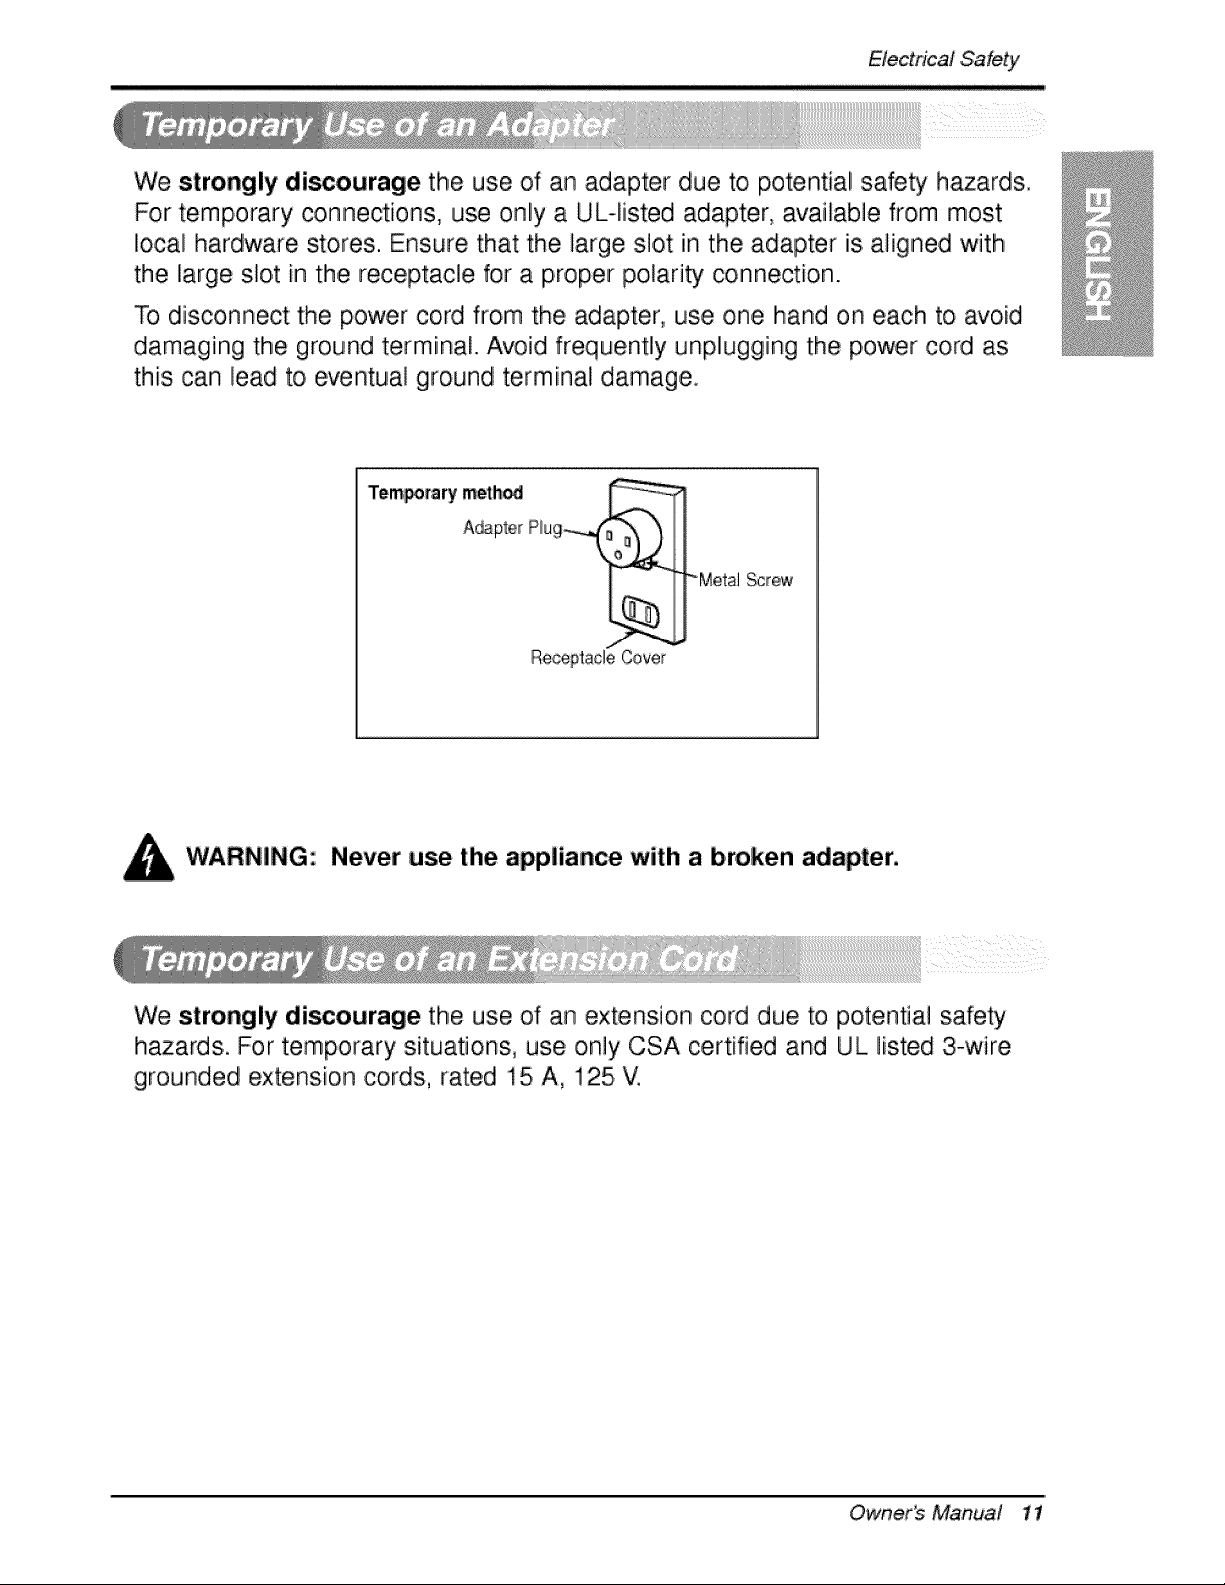
We strongly discourage the use of an adapter due to potential :safety h_ards.
For temporary connections, use only a UL-fisted adapter, available from most
local hardware stores. Ensure that the, large sbt in the adapter is aligned with
the large slot in the receptacle for a proper polarity connection.
To disconnect the power cord from the adapter, use one hand on each to avoid
damaging the ground terminal. Avoid frequently unplugging the p,ower cord as
this can lead to eventual ground terminal damage.
Temporarymeth_ ,_,(_ __..i, .i
A_p_e_ Rug
ReceptacleCover
-Metal Screw
Never use the ,appliance with a broken adapter,
We strongly discourage the use,of an extension cord due to potential safety
hazards. For temporary situations, use only CSA certified and UL listed 3-wire
grounded extensio, n cords, rated 15 A, 125 V.
Ownerb Manud 11

tnstafla#on
TypeA: 11 EA Type B: 5 EA Ty_ C: 1 _ Type D: 3 EA
(ShodScrew) (WoodScr@a_} (DrainJoint Pipe) (L Bra_et)
E
lype E: 1 EA Type F: 1 EA Tyipe G: 2 EA ..../°y_ H: 1 EA
(Seai Strip} (Guide Pane_} /Suppo_ Briacket/
(Adlr_ve _cked} (Not:ad_sive backed)
Have, the following tools available for installation:
* Screwdriver (Slott:edl and Phillips) * Ruler
* Knife * Hiammer
* Pencil * Level
This room air conditioner is
designed for insta!lation iinstandard
double°hung windows with actual
opening widths from 22" to 36"
The upper and Io'wer window sash
must open sufficiently to allow a
clear vertical opening of 13" from the
bosom of the upper sash to the
window sto,ol.,
- 22" to 36" ---,
13'_rain
WARNING: This product is a WINDOW AIR: CONDITIONER.
As such, a standard single-hung or double-hung window is requir_i
for proi_r installation. Non-window installations, including using
sleeves, holes in wails, and other installations are not recommendS.
12 Room Air Conditioner
bstdtation
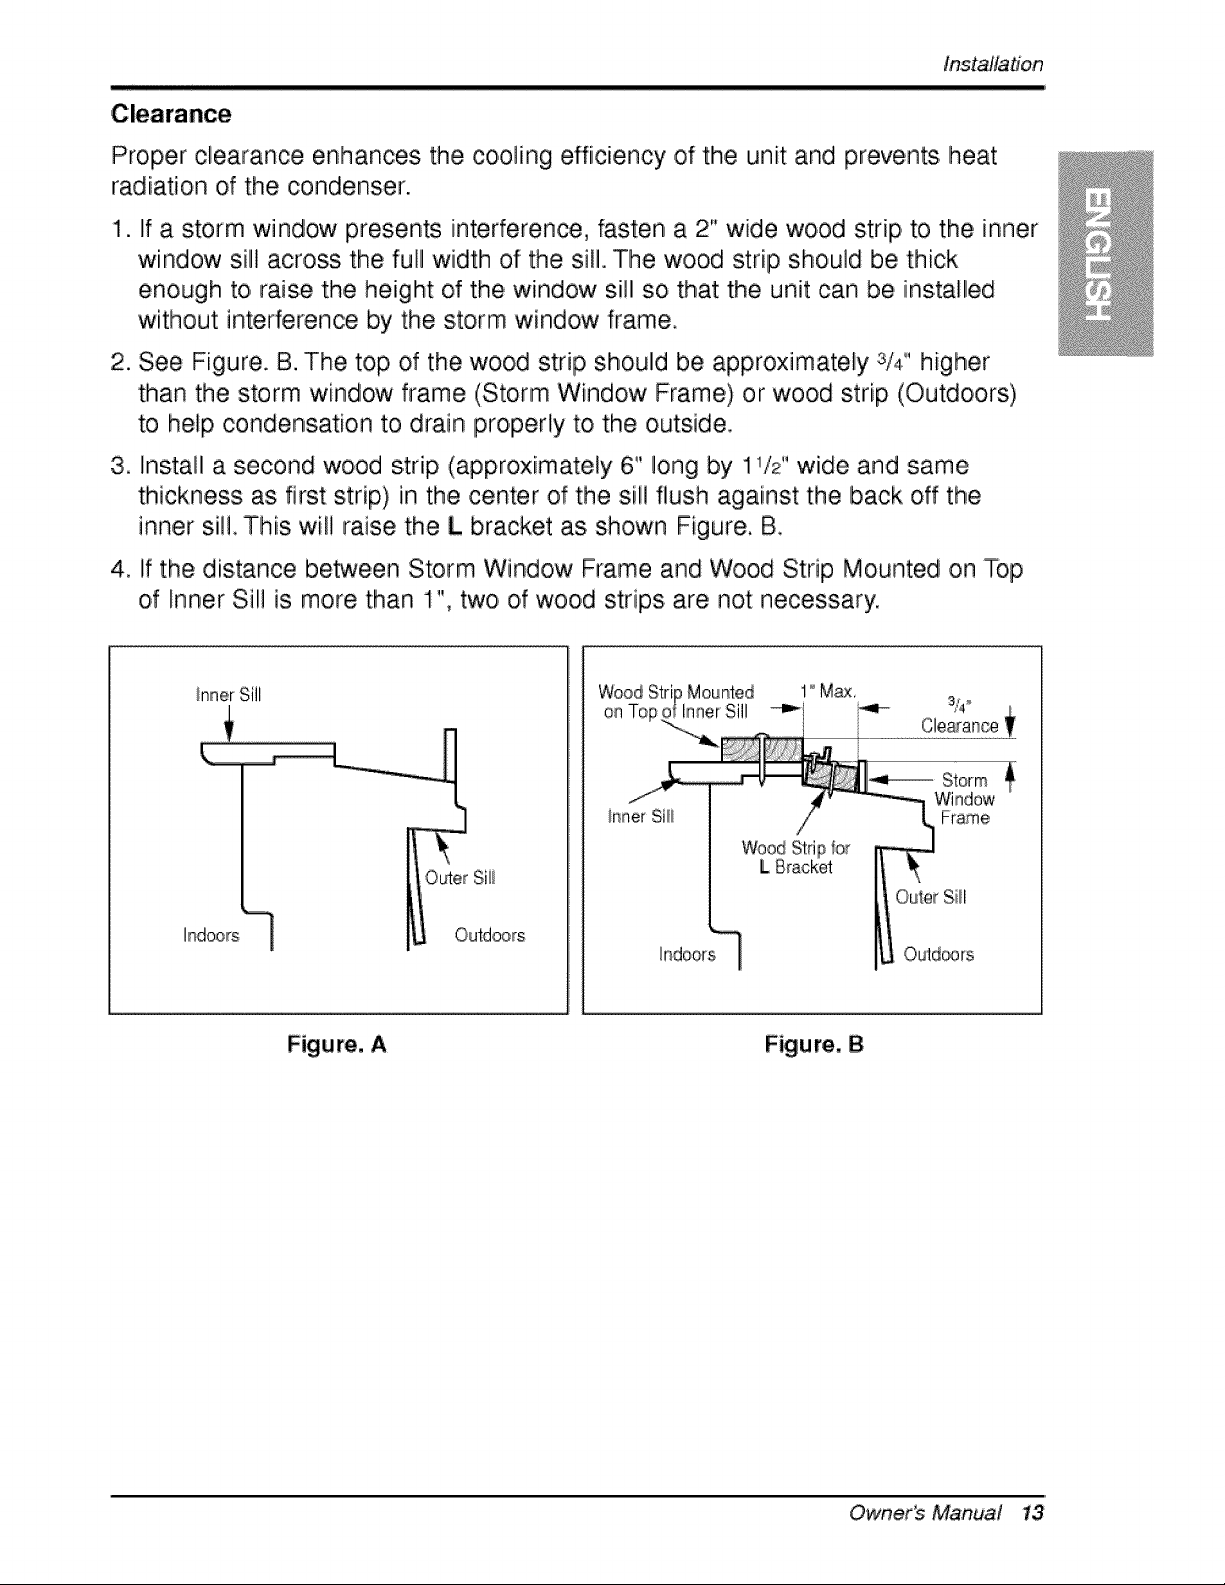
Proper clearance enhances the cooling efficiency of the unit and prevents heat
radiation of the condenser.
1. If a storm window presents interference, fasten a 2" wide wood strip, to the inner
window sill across the full width of the sill. The wood strip should be thick
enough to, raise the height of the window sill so that the unit can be installed
without interference by"the storm window frame.
2. See Figure. B.The top, of the wood strip should be approximately 3/4" higher
than the storm window frame (Storm Window Frame) or wood strip (Outdoors.)
to help condensation to drain properly to the outside
3. Install a second wood strip (approximately 6" long by 1 /2 wide and same
thickness as first strip,) in the center of the sill flush against the back off the
inner sil! This. wil! raise the L bracket as shown Figure, B,
4. if the distance between Storm Window Frame and Wood Strip Mounted on Top
of Inner Sill is more than 1", two, o,fwood strips are not necessary.
hndoors
on
ir'iner Sill
Wood:Stripfor
L 8[iack@t
_ndoors
Outer%
Outd®rs
Figure, A Figure, 8
Owner_ Manud 13
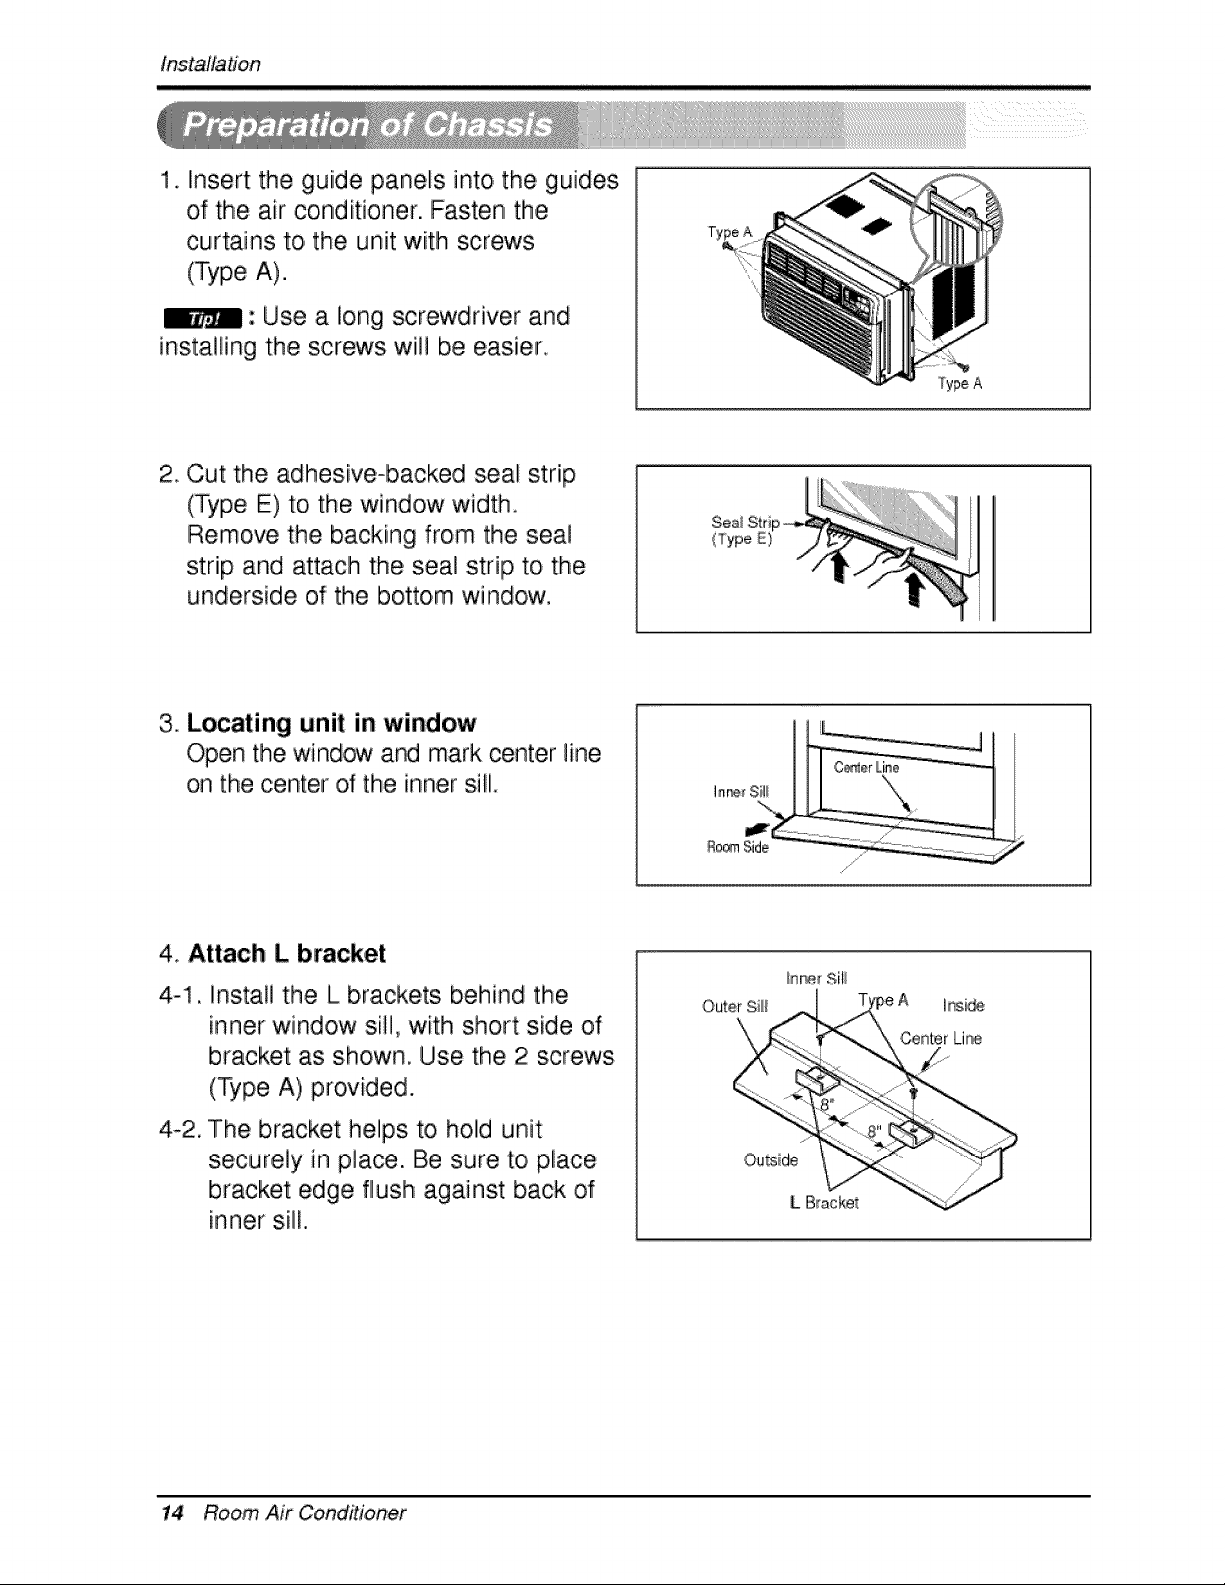
installation
1. Insert the guide panels into,the,guide,s
of the air conditioner. Fasten the
curtains to,the unit with screws
(Type A).
: Use a long screwdriver and
installing the screws will be easier,
2 Cut the adhesive-backed seal strip
(Type E) to the window width.
Remove the backing from the seal
strip and attach the seal strip to the
underside of the bottom window.
(Type
3. Locating unit in window
Open the window ar'd mark center line
on the center of the inner sill.
Ro_ Side
,4. Attach L bracket
4-1, Install the L brackets behind the
inner window sill, with short side of
bracket as shown, Use the 2 screws
(Type A),provided.
4-2. The bracket helps to hold unit
securely in place. Be sure toiplace
bracket edge flush against back of
inner sill.
Outer Sili
hsi,_
Center Lir_
Ou_ide
L Bracket
14 Room Air CoinditioRef
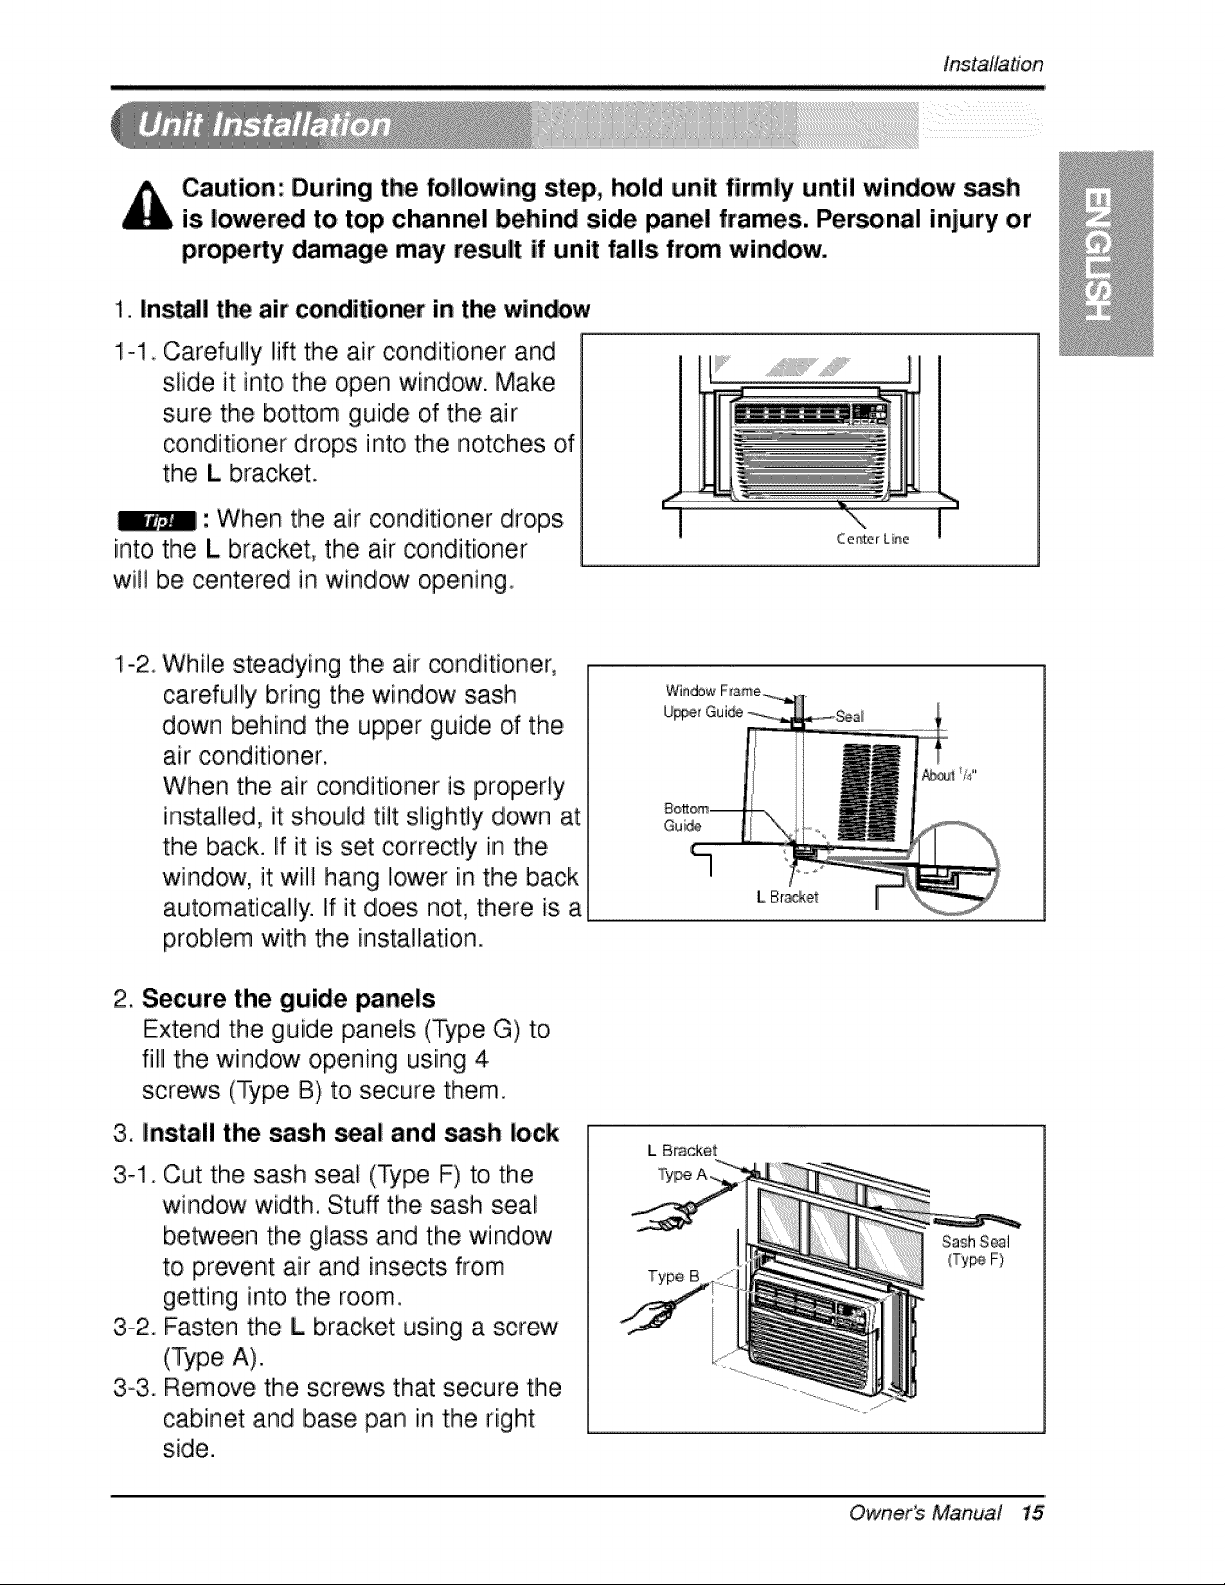
instalfa#on
Caution: During the following step, hold unit firmly until window sash
is lowered to top channel behind side panel frames. Personal injury or
p.ro_dy diamage may result if unit falls from window.
1. Install the air conditioner in the win,_w
1-1 Carefully Iiiftthe air conditioner and
slide it into the open window. Make
sure the bottom guide of the lair
conditioner drops into, the notches of
the L bracket.
_1: When tihe air conditioner drops.
into the L bracket, the air conditioner
will be centered in window opening.
.....................!!'iiii................................II
While steadying the, air conditioner,
carefully bring the window sash
down behind the upper guide of the
air conditioner.
When the air ,conditioner is properly
installlied, it should tilt slightly down at
the back. If it is set correctly in the
window, it will hang Ilower inthe back
automatically. If it does not, there is a
problem with the insta]lati,on.
2. Secure the guide panels
Extend the guide panels (Type G) to,
filll the window opening usiing 4
screws (Type B) to secure them.
3. Install the sash _al and _sh lock
3_1_
3-2°
Cut the sash seal (Type F) to the
window width. Stuff the sash seai
between the glass and the window
to prevent air and insects from
geeing into the room.
Fasten the L bracket using a screw
(Type A).
3-3. Remove the screws that secure the
cabinet and base pan in the right
side.
Gui_
IL Bracket
Type B
SashSeal
{Ty_ F)
Owner_ Manual 15
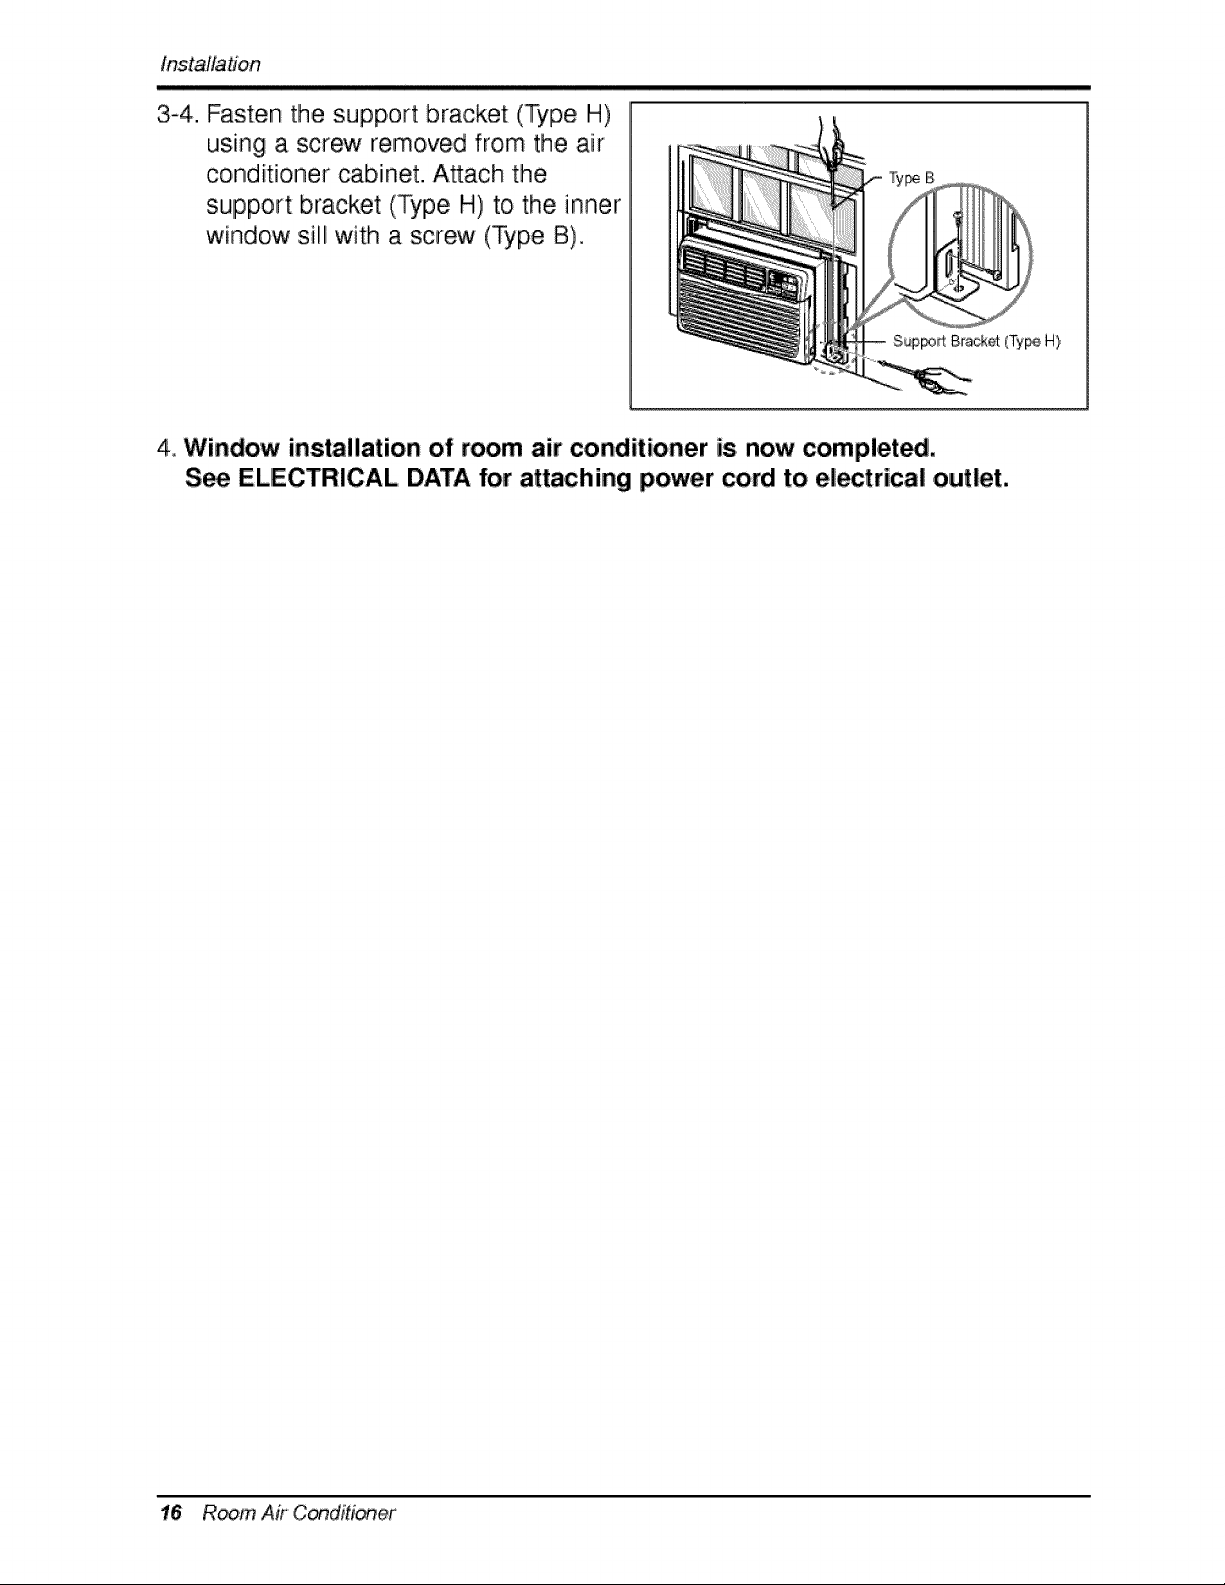
installation
3-4. Fasten the support bracket (Type H)
using a screw removed from the air
conditioner cabinet. Attach the
support bracket (Type H) to the inner
window sill with a screw (Type B),
SupF#_Brackd (Ty_, H}
4,,Window installation of room air conditioner is=now completed,
S_ ELECTRICAL DATA for attaching power cord to electrical outlet.
16 R_m Air C_ditioner
 Loading...