


LW-G0961QC
LG LW-G0961QC, NWC246MGMM1, LW-N2465CIG, LW-C1261QC, LW-N1862BH User guide
...
Room Air Conditioner
(Window Type)
OWNER'S MANUAL
Operating instructions
About the Controls on the Air
Conditioner .........................5
Care and Maintenance .......8
Installation Instructions
Features...............................9
Installation Instructions.........9
Troubleshooting tips
Before You
Call for Service..................11
Safety precautions
Safety Precautions .............3
FOR YOUR RECORDS
Write the model and serial numbers here:
Model #
Serial #
You can find them on a label on the side of each unit.
Dealer's Name
Date Purchased
READ THIS MANUAL
Inside you will find many helpful hints on how to use and
maintain your air conditioner properly. Just a little preventive
care on your part can save you a great deal of time and
money over the life of your air conditioner.
You'll find many answers to common problems in the chart
of troubleshooting tips. If you review our chart of
Troubleshooting Tips first, you may not need to call for
service at all.
CAUTION
Contact the authorized service technician for repair
or maintenance of this unit.
Contact the installer for installation of this unit.
The air conditioner is not intended for use by young
children or infirm persons without supervision.
Young children should be supervised to ensure that
they do not play with the air conditioner.
-2-
Safety Precautions
Operating Instructions
Installation Instructions
Troubleshooting Tips
Safety Precautions
Safety Precautions
To prevent injury to the user or other people and property damage, the following instructions must be
followed.
Incorrect operation due to ignoring of instruction will cause harm or damage, the seriousness is classified
by the following indications.
WARNING
CAUTION
:
:
This sy mbol show s the possibility of caus ing death or serious injury.
This symbol indicates the possibility of injury or damage to
properties only.
The items to be fol lowe d are classified by the fol lowi ng symbols.
Never Do This
Always Do This
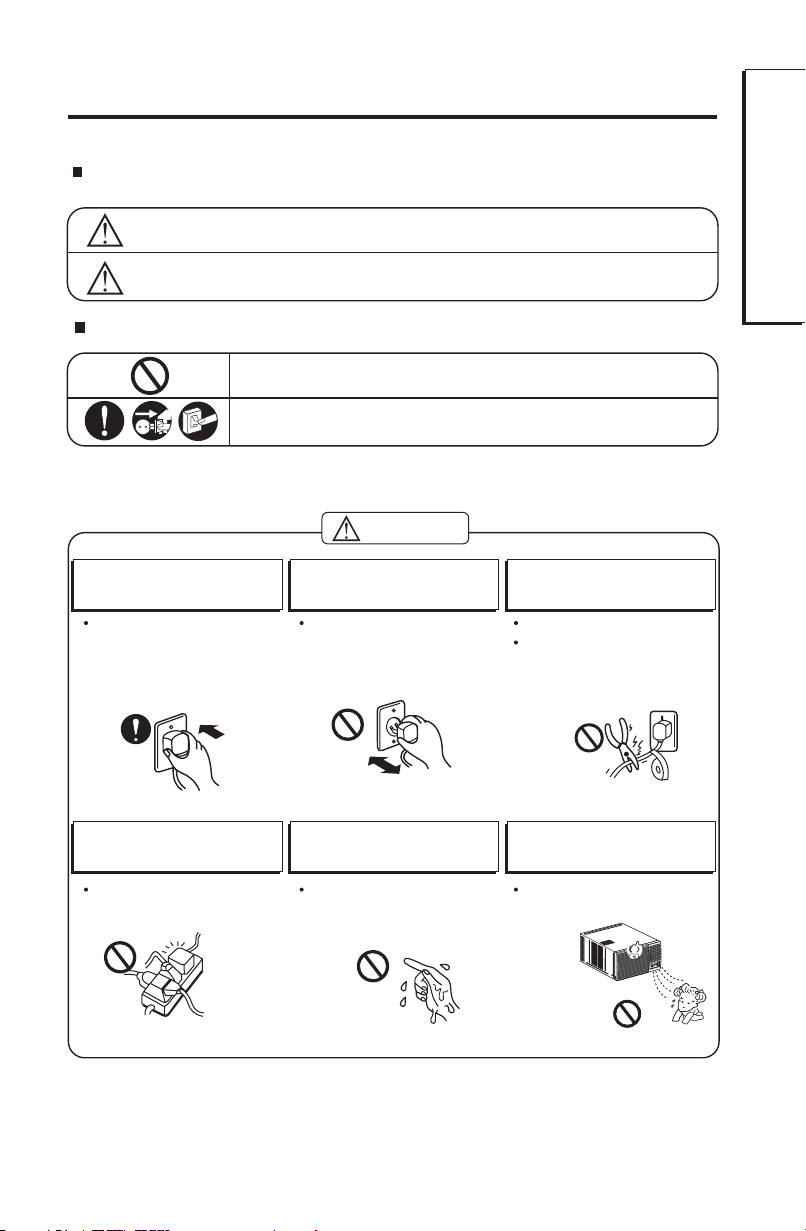
WARNING
Plug in the power plug
properly.
Do not operate or stop the
unit by inserting or pulling
out the power plug.
Do not damage or use an
unspecified power cord.
Otherwise, it will c ause ele ctric
shock or fire due to heat
generatio n or electric al shock.
It will c ause electric al shock or
fire due to heat generation.
It will cause electrical shock or fire.
If the supply cord is damaged, it
must be replaced by a special cord
or assembly available from the
manufacturer or its service agent.
Do not modify power cord
length or share the outlet
with other appliances.
Do not operate with wet
hands or in damp
environment.
Do not direct airflow at room
occupants only.
It will c ause electric al shock or
fire due to heat generation.
It may cause electric al shock.
This could damage your health.
-3-
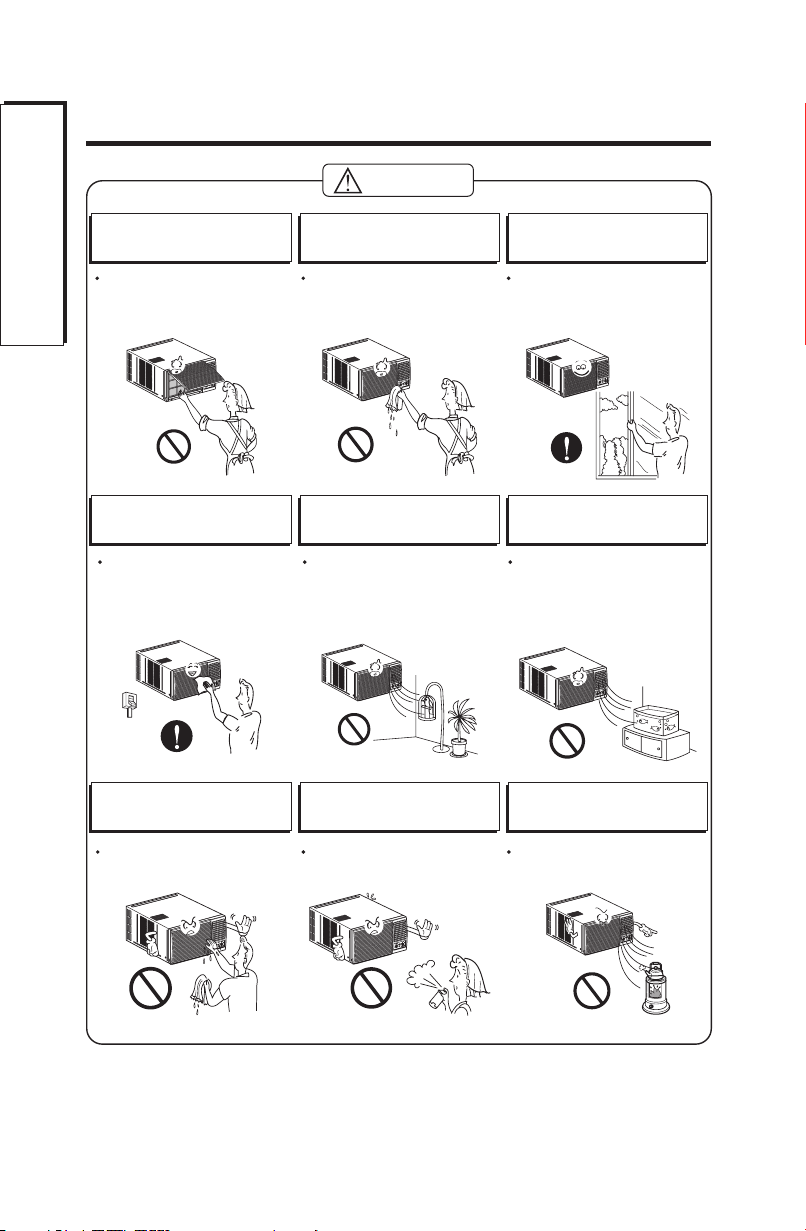
Never touch the metal pa rts
of the unit when removing
the filter.
Do not clean the air
conditioner with water.
Ventilate well when used
together with a stive, etc.
It may cause an injury.
When cleaning the unit, first
make sure the power and
breaker are turned off.
Do not put a pet or house
plant where it will be
exposed to direct air flow.
Do not use for special
purposes.
Since the fan rotates at high
speed during operatio n, it may
cause an inju ry.
CAUTION
Water may enter the unit and
degra de the insulatio n. It may
cause an electric shock.
An oxygen shortage may occur.
This could in jure the pet or plant. Do not use th is air conditioner to
preserve precisio n devices, food,
pets, pla nts, and art objects .
It may cause dete rioratio n of
quality, etc .
Do not operate Switches
with wet hands.
Do not apply an insecticide
or flammable spray.
Do not put a heater, etc.
where is exposed to direct air
flow.
It may cause an electric shock. It may cause a fire or deform atio n
of the cabinet.
It may cause imperfect
combustio n.
Safety Precautions
-4-
About the Controls on the air conditioner
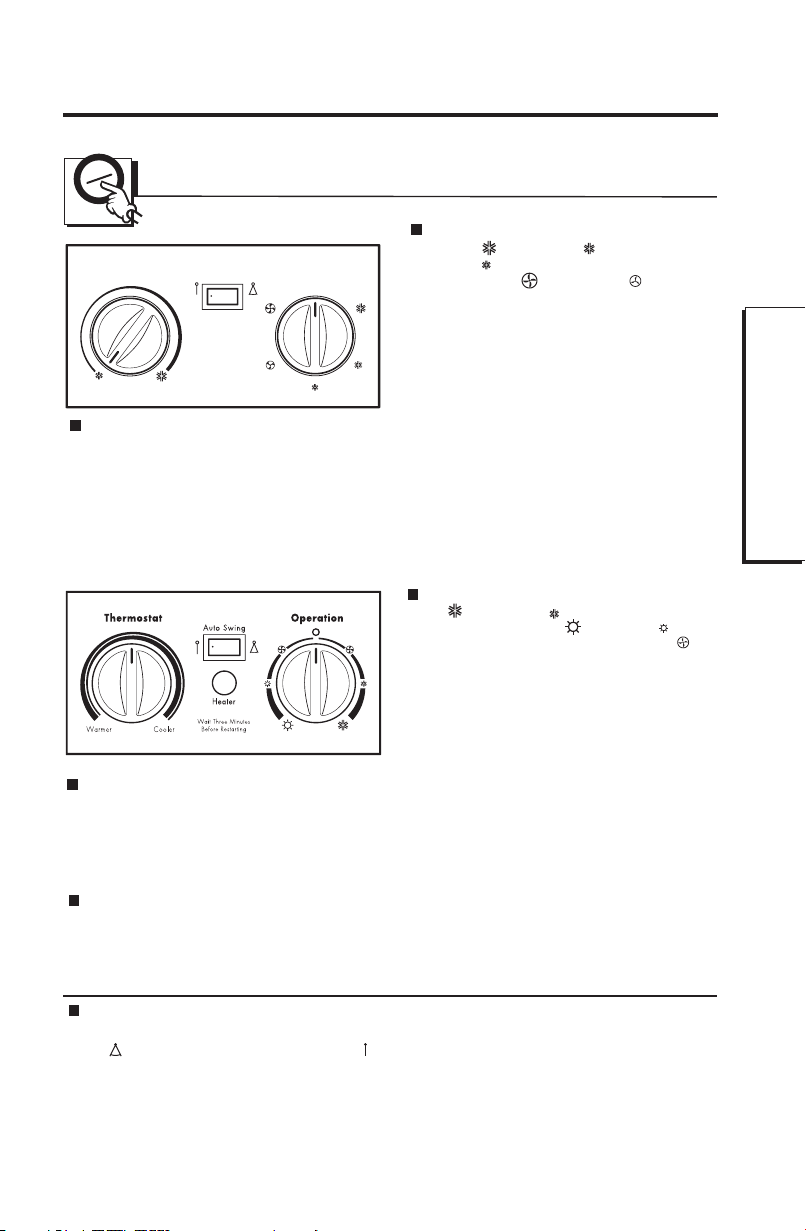
The controls will look like the following.
Controls
THERMOSTAT (TEMPERATURE)
The THERMOSTAT/TEMPERATURE is used to
maintain the room temperature. The compressor
will cycle on and off to keep the room at the same
level of comfort. When you turn the knob to a
higher number (the right side) and the indoor air
will become cooler.
The 5 or 6 position (the middle position of arc)
is a normal setting for average conditions.
THERMOSTAT (TEMPERATURE)
The THERMOSTAT/TEMPERATURE is used to maintain
the room temperature. The compressor will cycle on and
off to keep the room at the same level of comfort. The
temperature is selected by turning the THERMOSTAT/
TEMPERATURE knob to the desired position.
HEATER LAMP
At the heating operation, the lamp is lighted. When the
frost settles on the heat exchanger of the outside,
defrosting is made automatically and the lamp is
unlighted. After defrosting, the heating operation
begins again.
AUTO SWING
Auto swing switch controls the horizontal air direction by air swing system (not on all models).
ON Auto swing is operated. OFF Auto swing is not operated.( ) :
( ) :
OPERATION
High Cool ( ), Med Cool ( ) and
Low Cool
( ) provide cooling with different fan
speeds.
Med Fan
( ) or Low Fan ( ) provides
air circulation and filtering without cooling. Off ( O )
turns the air conditioner off.
NOTE:
If you move the switch from a cool setting to
off or to a fan setting, wait at least 3
minutes before switching back to a cool
setting.
Cooling Descriptions
For Normal Cooling- Select High Cool or Med Cool
with the OPERATION knob at the midpoint of
THERMOSTAT/TEMPERATURE knob.
For Maximum Cooling- Select High Cool with the
OPERATION knob at the highest number available on
your THERMOSTAT/TEMPERARURE knob.
For Quieter & Nighttime Cooling- Select Low Cool
with the OPERATION knob at the midpoint of
THERMOSTAT/TEMPERATURE knob.
OPERATION
HIGH ( ) Cool, LOW ( ) Cool provide cooling with
different fan speeds. HIGH ( )heat, LOW( ) heat
provide heating with different fan speeds. FAN ( )
provides air circulation and filtering without cooling or
heating. OFF ( O ) turns the air conditioner off.
NOTE:
If you move the switch from the cool(or the
heat) setting to off or to a fan setting, wait
at least 3 minutes before switching back to a
cool (or heat) setting.
Cooling Descriptions
For Normal Cooling- Select HIGH Cool with the OPERATION
knob at the midpoint of the THERMOSTAT/TEMPERATURE knob.
For Maximum Cooling- Select HIGH Cool with the OPERATION knob
at the clockwise available on the THERMOSTAT/TEMPERATURE knob.
For Quieter & Nighttime Cooling- Select LOW Cool with the
OPERATION knob at the midpoint of the THERMOSTAT/
TEMPERATURE knob.
Heating Descriptions
For Normal Heating- Select HIGH heat with the OPERATION
knob at the midpoint of the THERMOSTAT/TEMPERATURE knob.
For Maximum Heating- Select HIGH heat with the
OPERATION knob at the counterclockwise available on the
THERMOSTAT/TEMPERATURE knob.
For Quieter Heating- Select LOW heat with the OPERATION
knob at the midpoint of the THERMOSTAT/TEMPERATURE knob.
0
TEMPERATURE OPERATION
AUTO SWING
Wait for 3 minutes before restart
Operating Instructions
-5-

Operating Instructions
-6-
5
3
6
2
4
1
22
2 3
4 5 6
1
7
Mode Timer
Fan Speed Temp Auto Swing Power
Fan Cod On
Dry Energy Saver
Type 3
Type 4
Your Panel m ay look like any
of below mentioned panels.
REMOTE CONTROLLER
Type 2
3
5
6
2
4
1
DOWN UP
POWER
FAN SPEED
TIMER COOLING/FAN
ENERGY SAVERAUTO SWING
( )
2 b
V
V
n
Fa S
pee
d
S p
e
el
Mo
d
e
T
r
m
e
i
oA
tu
S
g
w ni
iA
r
efi
u i
rP r
P e
ow r
1
4
2
63
9
8
5
V
V
a
nF S
pee
d
pS
ele
M
od
e
imeT
r
u oA
t
g
Sw
in
o er
wP
1
4
2
63
9
5
22
5
1
Temp Power
Fan
Cool
Timer
V
V
7
Mode Timer
COOL
DRY
FAN
TEMP
8 8
ENERGY SAVER ON
FAN
SPEED
AUTO
SWING
ON/OFF
(e)
EN ER GY S AV ER
5
Temp
42
7
3 6 1
COOL
FAN
TEMP
8 8
ON/OFF
5
Temp
1
7
Type 1
Controls
The Remote Control unit will not function properly if strong light strikes the sensor
window of the air conditioner or if there are obstacles between the Remote Control
unit and the air conditioner.
Precaution:
POWER BUTTON
Operation starts, when this button is pressed and stops when you press the button again.
1
8
OPERATION MODE SELECTION BUTTON
Select Cooling Fan or Dehumidification (Dry) mode with this button.
ON/OFF TIMER/SLEEP BUTTON
Set the time of on/off operation. The timer can be set by the one hour for a maximum of 12 hours. In the
first 30 minutes set temperature increases by 1°C and in the next 30 minutes temperature increases by
another 1°C, this temperature then remains till the timer function is activated. This is how the sleep
function behaves.
FAN SPEED SELECTOR
Select the fan speed in Three steps Low (F1) / Med. (F2) / High (F3)
ROOM TEMPERATURE SETTING BUTTON
Control the room temperature within a range of 16°C to 30°C.
AUTO SWING
The vertical louver swings horizontally by the automatic system and stops when you press the
button again.
SIGNAL RECEIVER
The fan stops when the compressor stops cooling. Approximately even 3 minutes
ENERGY SAVER
the fan will turn on and check the room air to determine if cooling is needed.
AUTO RESTART
In failure of electric power the unit runs as previous setting operation
when power returns.
2
3
4
5
6
7
8
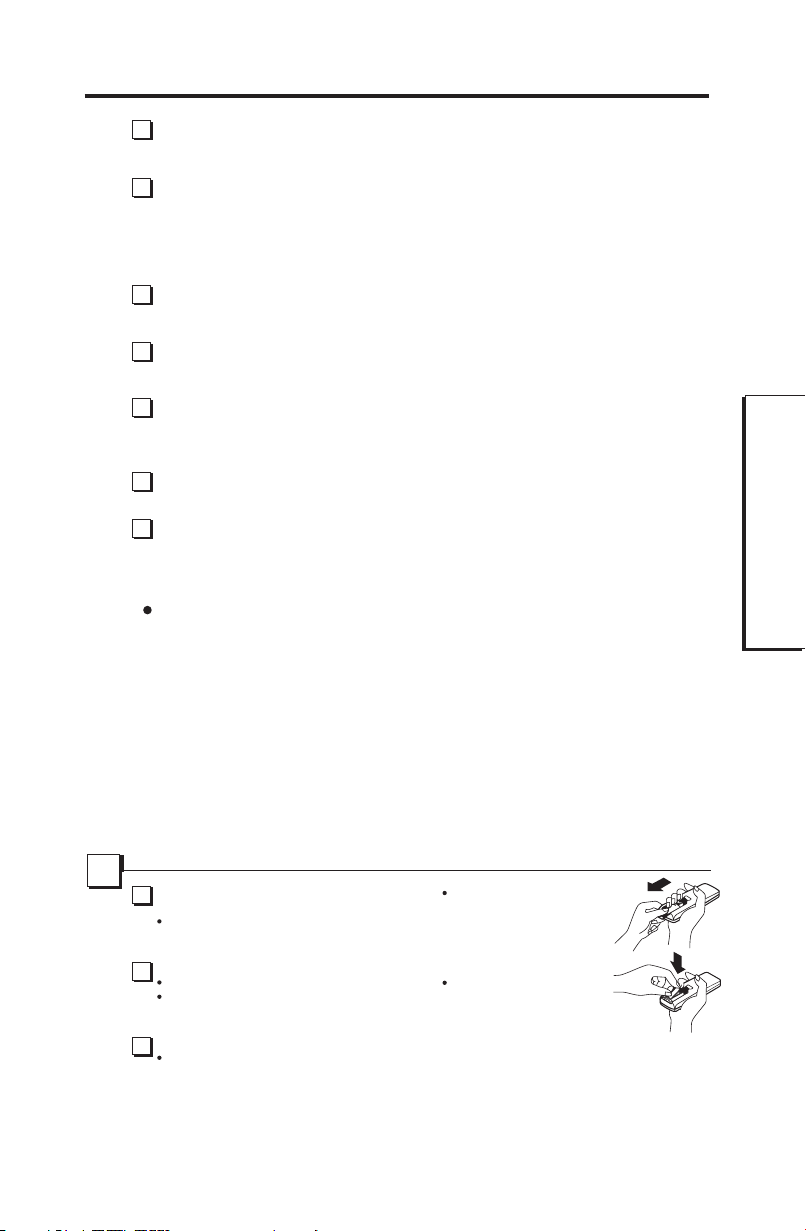
How to Insert the Batteries
Remove the cover from the back of the remote
controller.
Slide the cover according to the arrow direction.
Insert the two batteries.
Be sure that the (+) and (-) directions are correct.
Be sure that both batteries are new.
Re-attach the cover.
Slide it back into the position.
Do not use rechargeable
batteries, such batteries differ
from standard dry cells in shape,
dimensions, and performance.
Remove the batteries from the
remote controller if the air
conditioner is not going to be
used for an extended length of
time.
1
2
3
Operating Instructions
-7-
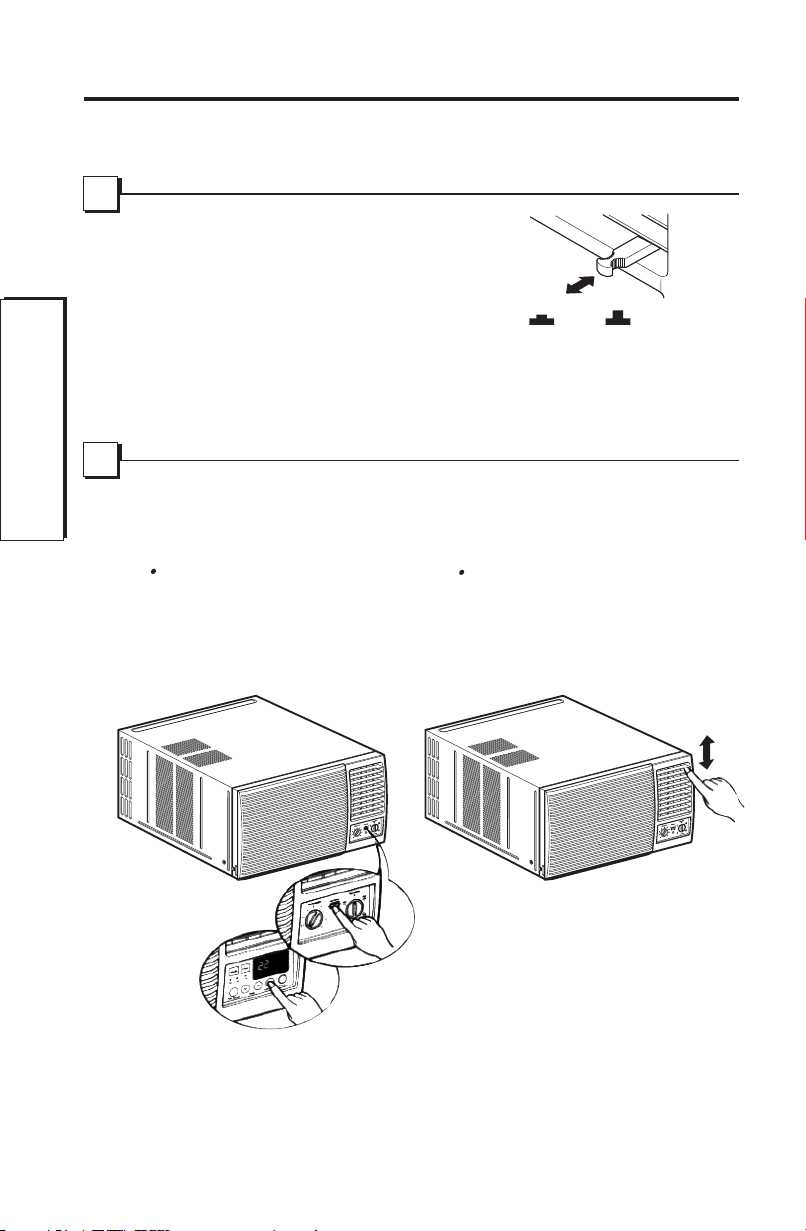
CLOSE VENT OPEN
Additional controls and important information.
Vent Control
The vent control is located above the
control knobs.
When set at CLOSE, only the air inside
the room will be circulated and
conditioned. When set at OPEN, some
inside air is exhausted outside.
To open the vent, pull the lever toward you.
To close it, push it in.
Air Direction
The direction of air can be controlled
horizontally or vertically by using the
horizontal louver or vertical louver.
The horizontal air direction is adjusted
by setting the AUTO SWING switch to
the ON position.
Horizontal Air-Direction
Vertical Air-Direction
Fingertip pressure on the bank of horizontal
louvers adjusts the air direction up or down
-8-
Operating Instructions
CABINET
DRAIN
PAN
SCREW
DRAIN HOSE
(Optional)
Grille and Case
Turn the air conditioner off and remove the plug
from the wall outlet before cleaning.
To clean, use water and a mild detergent. Do not
use bleach or abrasives.
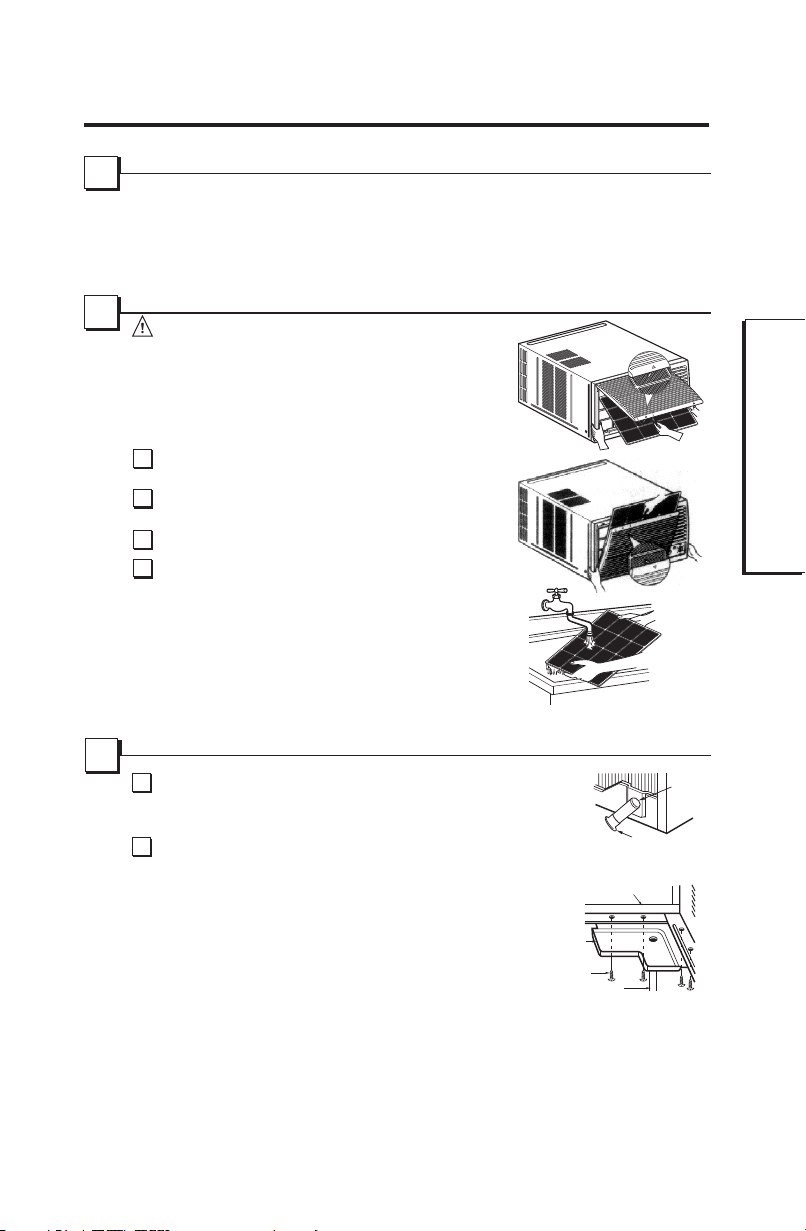
Air Filter
Ensure the power is off before open the front Grill.
The air filter behind the front grille should be checked and cleaned
at least once every 2 weeks or more often if necessary.
The grille is designed to clean the filter both upward and
downward.
To remove:
Open the inlet grille upward by pulling out the bottom of the
inlet grille or downward by pulling out the top of the inlet grille.
Using the tab, pull up slightly on the filter to release it and pull
it down or up.
Clean the filter with warm, soapy water below 40°C (104°/F).
Rinse and gently shake the water from the filter and let it dry
before replacing it.
CAUTION:
DO NOT operate the air conditioner without a filter
because dirt and lint will clog it and reduce
performance.
Drainage
In humid weather, excess water may cause the BASE PAN to overflow.
To drain the water, remove the DRAIN CAP and secure the DRAIN PIPE
to the rear hole of the BASE PAN.
To remove the condensed water, you can install the drain pan as below.
Take the drain pan which is located in the air discharge.
Install the drain pan to the right corner of the cabinet with 4 screws.
Connect the drain hose to the outlet located at the bottom of the drain
pan. You can purchase the drain hose or tubing locally to satisfy your
particular needs. (Drain hose is not supplied).
1.
2.
3.
Care and Maintenance
-9-
1
2
3
4
1
2
DRAIN CAP
BASE
PAN
(Optional)
Operating Instructions
 Loading...