


OWNER’S MANUAL
AIR CONDITIONER
DANSK SUOMI NORSK
Please read this manual carefully before operating your set and retain it for future reference.
TYPE : WINDOW
MODELS LW1017ERSM LW1217ERSM
|
|
|
|
|
|
|
|
|
|
|
|
|
|
|
|
|
|
|
|
|
|
|
|
|
|
|
|
|
|
|
|
|
|
|
|
|
|
|
|
|
|
|
|
|
|
|
|
|
|
|
|
|
|
|
|
|
|
|
|
|
|
|
|
|
|
|
|
|
|
|
|
|
|
|
|
|
|
|
|
|
|
|
|
|
|
|
|
|
|
|
|
|
|
|
|
|
|
|
|
|
|
|
|
|
|
|
|
|
|
|
|
|
|
|
|
|
|
|
|
|
|
|
|
|
|
|
|
|
|
|
|
|
|
|
|
|
|
|
|
|
|
|
|
|
|
|
|
|
|
|
|
|
|
|
|
|
|
|
|
|
|
|
|
|
|
|
|
|
|
|
|
|
|
|
|
|
|
|
|
|
|
|
|
|
|
|
|
|
|
|
|
|
|
|
|
|
|
|
|
www.lg.com |
P/NO : MFL69365407 |
|
|
|
|
|
|
|
|
|
|
|
|
|
|
|
|
|
|
|
|
|
|
|
|
|
|
|
|
|
|
|
|
|
|
|
|
|
|
|
|
|
|
|
|
|
|
|
|
|
|
|
|
|
|
|
|
|
|
|
|
|
|
|
|
|
|
|
|
|
|
|
|
|
|
|
|
|
|
|
|
|
|
|
|
|
|
|
|
|
|
|
|
|
|||||||||||||||||||||||||||||||||||||||||||||||||||||||||||||||||||||||||||||||||||||||||||||||||||||||||||
Safety Precautions |
|
Before Operation |
7 |
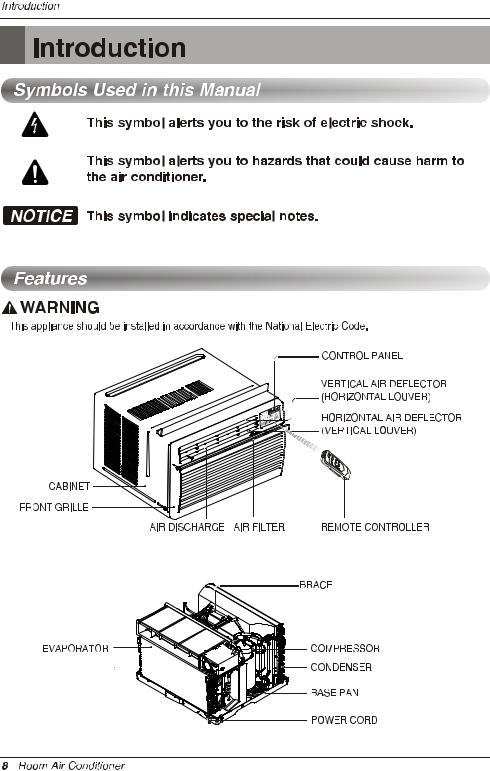
Introduction |
|
Safety |
|
Installation |
|
Operating Instructions |
16 |
Maintenance and Service |
20 |
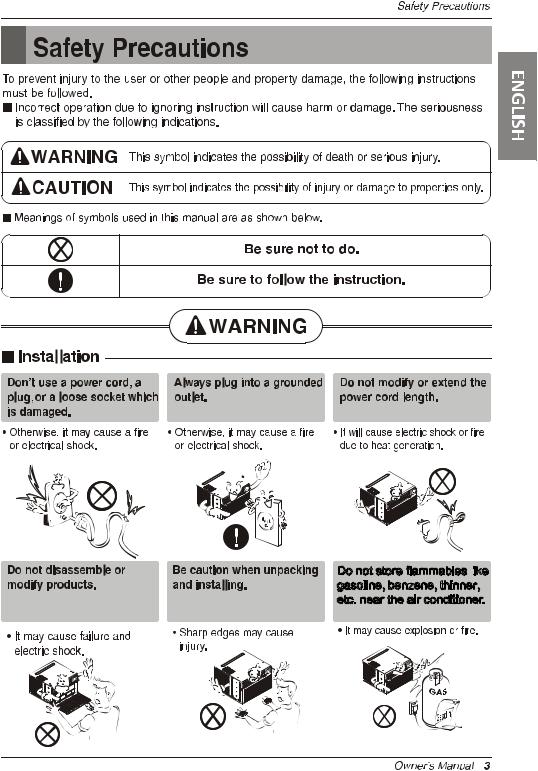
Do not store flammables like
 gasoline benzene thinner etc. near the air conditioner.

No correlation between fan |
Unplug the unit when not |
usage and oxygen depletion. |
using it for a long time. |

Hold the plug by the head |
When gas leaks, open the |
not the cable when taking |
window for ventilation before |
it out. |
operating the unit. |
Never touch the metal
 parts of the unit when removing the filter.
For
 inner
inner
 cleaning, contact an Authorized Service Center or a dealer. Do not use harsh detergent that causes corrosion or damage on the unit. Harsh
 detergent may also cause failure of product, fire, or electric shock.
Install

 the product so the exhaust and noise Follow
 installation
 instructions
 exactly. are not aimed directly at the neighbors.
 Be considerate.
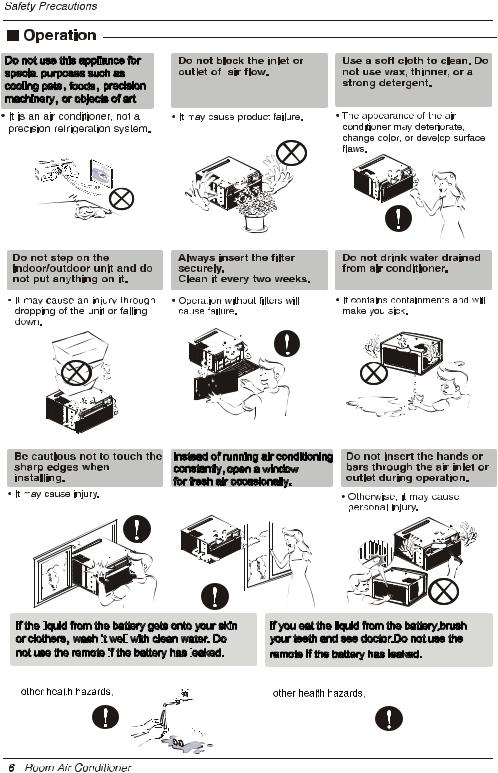
Do not use this appliance for special
 purposes such as cooling pets foods precision machinery or objects of art
Instead of running air conditioning constantly,open a window
for fresh air occasionally.
 You will feel better.
If the liquid
 from the battery gets onto your skin or clothers wash it
 well
well
 with clean water. Do
not use the remote if
 the battery has leaked.


 y
y 


If you eat the liquid from the battery,brush your teeth and see doctor.Do not use the
remote if the battery has leaked.


 y
y 


2.No correlation between fan usage and oxygen depletion.
3.


RESET |
TEST
USE OF EXTENSION CORDS
RISK OF FIRE could cause serious injury or death DO NOT use an extension cord with this window air conditioner
DO NOT use surge protectors or multi-outlet adapters with this window air conditioner


 should be


Avoid shock hazard. This unit cannot be user-serviced. Do NOT open the tamper-resistant sealed portion.
All warranties and performance will be voided. This unit is not intended to be used as an ON/OFF switch.
 WARNING
1.Do not use means to accelerate the defrosting process or to clean, other than those recommended by the manufacturer
2.The appliance shall be stored in a room without continuously operating ignition sources (for example: open flames, an operating gas appliance or an operating electric heater)
3.Do not pierce or burn. Be aware that refrigerants may not contain an odor
This unit contains flammable refrigerant and has special safety precautions not normally associated
with older units. Please follow all precautions and advisories.
1.Use caution while handling and prevent damage to unit.Do not put any holes into product for any reason, this can cause damage to product and prevent unit from cooling.
2.Maintenance and cleaning of unit should be performedby trained personnel. Failure to properly clean unit can result in damage to the refrigeration system and or the electrical system.
3.Make certain that all the air circulation/ventilation openings are free from obstruction.
4.Service should only be performed by technicains properly trained and certified in the use of flammable refrigerants. Any service performed by unauthorized servicers/individuals will void all warranties.
5.When storing the appliance, do not put in a room with any open flame appliances, such as gas water heaters or furnaces. Also keep away from electric
heaters. Damaged units should be repaired before storage.
WARNING: This product contains chemicals known to the State of California to cause cancer and birth defects or other reproductive harm.Wash hands after handling.
14 EA |
3 EA |
5 EA |
2 EA |
2 EA |
2 EA |
|
2 EA |
|
|
Left Guide Panel |
Right Guide Panel |
(Not adhesive backed) |
1 EA |
|
|
1 EA |
|
|
|
|
|
|
Curtain |
|
|
( Adhesive backed) |
FOAM-HEATPROOF |
2 EA |
1 EA |
|
|
|
|
EA |
|
 Phillips head screwdriver
 Scissors or knife
 Adjustable
Wrench


 11
11


 slightly tilted


 between


 27
27
 39
39
 16
16


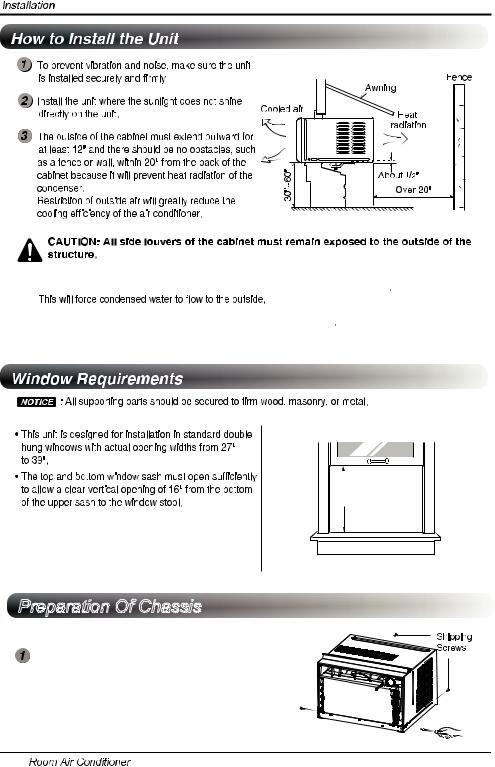
Preparation Of Chassis
Remove 4 screws which fasten the cabinet at both sides and at the back.(Keep the screws for later use.)
12


 the base pan
(Adhesive backed) 


 and bottom of window frame.
Adhesive backed
Upper guide
Right Guide Panel
Left Guide panel


 8
8 

Screws
(Type A)
Frame guide


 hole
hole


upper |
Center hole |
guide


 frame curtain


 sill support.


 13
13
 frame guides


 sill support


 sill support


 frame curtain


 frame curtain


 (removed from the cabinet) at


 See page 12.


 Not adhesive backed
Foam-Strip
(Not adhesive backed)
14

12


13Before installing the front grille, pull out the vent control lever located above the unit control knobs, as shown.
14Cut the adhesive-backed Foam-Heatproofs to the Guide Panel size.
Remove the backing from the FoamHeatproofs and attach he Foam-Heatproofs to Guide Panel.
Foam-Heatproof improves the cooling capability of the unit.
15 Connect the housing.
16Attach the front grille to the cabinet by insertingthe tabs the grille into the slots on the front the cabinet.Push the grille in until it snaps into place.
 Guide the lever carefully through the grille as you push it in.
17Take out the air filter and secure it with 2
Type A screws through the front grille.
 These 2 Type A screws are packaged by bag.
Window installation of room air conditioner is now completed. See ELECTRICAL DATA for attaching power cord to electrical outlet.
Foam-Heatproof


 15
15
 Loading...