


DV276.286-E1M.HA7BLLS_ENG
DVD PLAYER
OWNER’S MANUAL
MODEL : DVX276 / DVX286
Before connecting, operating or adjusting this product, please read this instruction booklet carefully and completely.

CAUTION
RISK OF ELECTRIC SHOCK
DO NOT OPEN
CAUTION: TO REDUCE THE RISK
OF ELECTRIC SHOCK
DO NOT REMOVE COVER (OR BACK) NO USER-SERVICEABLE PARTS INSIDE REFER SERVICING TO QUALIFIED SERVICE PERSONNEL.
This lightning flash with arrowhead symbol within an equilateral triangle is intended to alert the user to the presence of uninsulated dangerous voltage within the product’s enclosure that may be of sufficient magnitude to constitute a risk of electric shock to persons.
The exclamation point within an equilateral triangle is intended to alert the user to the presence of important operating and maintenance (servicing) instructions in the literature accompanying the product.
WARNING: TO PREVENT FIRE OR ELECTRIC SHOCK HAZARD, DO NOT EXPOSE THIS PRODUCT TO RAIN OR MOISTURE.
WARNING: Do not install this equipment in a confined space such as a bookcase or similar unit.
CAUTION:
Do not block any ventilation openings. Install in accordance with the manufacturer's instructions.
Slots and openings in the cabinet are provided for ventilation and to ensure reliable operation of the product and to protect it from overheating.
The openings should be never be blocked by placing the product on a bed, sofa, rug or other similar surface.This product should not be placed in a built-in installation such as a bookcase or rack unless proper ventilation is provided or the manufacturer's instruction have been adhered to.
CAUTION:
This product employs a Laser System.
To ensure proper use of this product, please read this owner’s manual carefully and retain it for future reference. Should the unit require maintenance, contact an authorized service center.
Performing controls, adjustments, or carrying out procedures other than those specified herein may result in hazardous radiation exposure.
To prevent direct exposure to laser beam, do not try to open the enclosure. Visible laser radiation when open. DO NOT STARE INTO BEAM.
CAUTION: The apparatus should not be exposed to water (dripping or splashing) and no objects filled with liquids, such as vases, should be placed on the apparatus.
CAUTION concerning the Power Cord
Most appliances recommend they be placed upon a dedicated circuit;
That is, a single outlet circuit which powers only that appliance and has no additional outlets or branch circuits. Check the specification page of this owner's manual to be certain.
Do not overload wall outlets. Overloaded wall outlets, loose or damaged wall outlets, extension cords, frayed power cords, or damaged or cracked wire insulation are dangerous. Any of these conditions could result in electric shock or fire. Periodically examine the cord of your appliance, and if its appearance indicates damage or deterioration, unplug it, discontinue use of the appliance, and have the cord replaced with an exact replacement part by an authorized servicer.
Protect the power cord from physical or mechanical abuse, such as being twisted, kinked, pinched, closed in a door, or walked upon. Pay particular attention to plugs, wall outlets, and the point where the cord exits the appliance.
To disconnect power from the mains, pull out the mains cord plug. When installing the product, ensure that the plug is easily accessible.
Disposal of your old appliance
1.When this crossed-out wheeled bin symbol is attached to a product it means the product is covered by the European Directive 2002/96/EC.
2.All electrical and electronic products should be disposed of separately from the municipal waste stream via designated collection facilities appointed by the government or the local authorities.
3.The correct disposal of your old appliance will help prevent potential negative consequences for the environment and human health.
4.For more detailed information about disposal of your old appliance, please contact your city office, waste disposal service or the shop where you purchased the product.
This product is manufactured to comply with the EEC DIRECTIVE 89/336/EEC, 93/68/EEC and 73/23/EEC.
2

Contents
Introduction . . . . . . . . . . . . . . . . . .4-7
About the  Symbol Display . . . . . . . . . . . .4 Symbol used in this Manual . . . . . . . . . . . . . .4 Notes on Discs . . . . . . . . . . . . . . . . . . . . . . . .4
Handling Discs . . . . . . . . . . . . . . . . . . . . . .4 Storing Discs . . . . . . . . . . . . . . . . . . . . . . . .4 Cleaning Discs . . . . . . . . . . . . . . . . . . . . . .4
Maintenance and Service . . . . . . . . . . . . . . . .4 Types of Playable Discs . . . . . . . . . . . . . . . . .5 Regional Code . . . . . . . . . . . . . . . . . . . . . . . .5 Front Panel . . . . . . . . . . . . . . . . . . . . . . . . . . .6 Remote Control . . . . . . . . . . . . . . . . . . . . . . . .7
Remote Control Operation . . . . . . . . . . . . . .7 Remote Control Battery Installation . . . . . . .7
Installation and Setup . . . . . . . . . |
8-13 |
Setting up the Player . . . . . . . . . . . . . . . |
. . . .8 |
DVD Player Connections . . . . . . . . . . . . |
. . . .8 |
Video and Audio Connections to Your TV . . .8 |
|
Audio Connection to Optional Equipment . . .9 Displaying Disc Information on-screen . . .10 Initial Settings . . . . . . . . . . . . . . . . . . . . . . . .10
General Operation . . . . . . . . . . . . . . . . . . . |
10 |
|
LANGUAGE . . . . . . . . . . . . . . . . . . . . . . . |
11 |
|
• Menu Language . . . . . . . . . . . . . . . . . . . |
11 |
|
• |
Disc Audio / Subtitle / Menu . . . . . . . . . |
11 |
DISPLAY . . . . . . . . . . . . . . . . . . . . . . . . . . |
11 |
|
• |
TV Aspect . . . . . . . . . . . . . . . . . . . . . . . |
11 |
• |
Display Mode . . . . . . . . . . . . . . . . . . . . . |
11 |
• |
Progressive Scan . . . . . . . . . . . . . . . . . . |
11 |
• |
TV Output Select . . . . . . . . . . . . . . . . . . . |
11 |
AUDIO . . . . . . . . . . . . . . . . . . . . . . . . . . . |
12 |
|
• |
Dolby Digital / DTS / MPEG . . . . . . . . . . |
12 |
• |
Sample Freq. (Frequency) . . . . . . . . . . . . |
12 |
• |
Dynamic Range Control (DRC) . . . . . . . |
12 |
• |
Vocal . . . . . . . . . . . . . . . . . . . . . . . . . . . |
12 |
LOCK (Parental Control) . . . . . . . . . . . . . . |
12 |
|
• |
Rating . . . . . . . . . . . . . . . . . . . . . . . . . . |
12 |
• |
Password . . . . . . . . . . . . . . . . . . . . . . . . |
12 |
• Area Code . . . . . . . . . . . . . . . . . . . . . . . |
13 |
|
OTHERS . . . . . . . . . . . . . . . . . . . . . . . . . . |
13 |
|
• PBC . . . . . . . . . . . . . . . . . . . . . . . . . . . . |
13 |
|
• |
B.L.E. (Black Level Expansion) . . . . . . . |
13 |
• DivX(R) VOD . . . . . . . . . . . . . . . . . . . . . |
13 |
|
Operation . . . . . . . . . . . . . . . . . .14-19
General Features . . . . . . . . . . . . . . . . . . . . |
.14 |
Additional Features . . . . . . . . . . . . . . . . . . . |
15 |
Playing an Audio CD or MP3/WMA file . . . . . |
16 |
Programmed Playback . . . . . . . . . . . . . . . . |
17 |
Repeat Programmed Tracks . . . . . . . . . . . |
17 |
Erasing a Track from Program List . . . . . . |
17 |
Erasing the Complete Program List . . . . . . |
17 |
Playing a DVD VR format Disc . . . . . . . . . . . |
17 |
Viewing a JPEG file . . . . . . . . . . . . . . . . . . . |
18 |
Slide Show . . . . . . . . . . . . . . . . . . . . . . . . |
18 |
Still Picture . . . . . . . . . . . . . . . . . . . . . . . . .18 Moving to another File . . . . . . . . . . . . . . . .18 Zoom . . . . . . . . . . . . . . . . . . . . . . . . . . . . .18 Rotating the picture . . . . . . . . . . . . . . . . . .18 To listen to MP3/WMA music while
watching picture . . . . . . . . . . . . . . . . . . . .18
Playing a DivX Movie file . . . . . . . . . . . . . . . |
19 |
Reference . . . . . . . . . . . . . . . . . .20-22
Controlling other TVs with the remote control . . . .20 Video Mode Setting . . . . . . . . . . . . . . . . . . . . . . .20 Language Codes . . . . . . . . . . . . . . . . . . . . . . .21 Area Codes . . . . . . . . . . . . . . . . . . . . . . . . . . .21 Troubleshooting . . . . . . . . . . . . . . . . . . . . . . .22 Specifications . . . . . . . . . . . . . . . . . . . . . . . . .22
Introduction
Operation Installation and Setup
Reference
3

Introduction
To ensure proper use of this product, please read this owner’s manual carefully and retain it for future reference.
This manual provides information on the operation and maintenance of your DVD player. Should the unit require service, contact an authorized service location.
About the  Symbol Display
“  ” may appear on your TV display during operation and indicates that the function explained in this owner’s manual is not available on that specific DVD video disc.
Symbol Used in this Manual
Note:
Indicates special notes and operating features.
Tip:
Indicates tips and hints for making the task easier.
A section whose title has one of the following symbols is applicable only to the disc represented by the symbol.
ALL All discs listed below
DVD and finalized DVD±R/RW
Video CDs
Audio CDs
MP3 files
WMA files
Notes on Discs
Handling Discs
the playback side of the disc. Hold the the edges so that fingerprints do not get on
. Never stick paper or tape on the disc.
Storing Discs
store the disc in its case. Do not expose to direct sunlight or sources of heat and never
leave it in a parked car exposed to direct sunlight.
Cleaning Discs
Fingerprints and dust on the disc can cause poor picture quality and sound distortion. Before playing, clean the disc with a clean cloth. Wipe the disc from the center out.
Do not use strong solvents such as alcohol, benzine, thinner, commercially available cleaners, or anti-static spray intended for older vinyl records.
Maintenance and Service
Refer to the information in this chapter before contacting a service technician.
Handling the Unit
When shipping the unit
Please save the original shipping carton and packing materials. If you need to ship the unit, for maximum protection, re-pack the unit as it was originally packed at the factory.
Keeping the exterior surfaces clean
•Do not use volatile liquids such as insecticide spray near the unit.
•Do not leave rubber or plastic products in contact with the unit for a long period of time. since they leave marks on the surface.
Cleaning the unit
player, use a soft, dry cloth. If the surfaces are extremely dirty, use a soft cloth lightly moistened with a mild detergent solution.
Do not use strong solvents such as alcohol, benzine, or thinner, as these might damage the surface of the unit.
Maintaining the Unit
The DVD player is a high-tech, precision device. If the optical pick-up lens and disc drive parts are dirty or worn, the picture quality could be diminished.
Depending on the operating environment, regular inspection and maintenance are recommended after every 1,000 hours of use.
For details, please contact your nearest authorized service center.
4

Types of Playable Discs
DVD
(8 cm / 12 cm disc)
Video CD (VCD/SVCD) (8 cm / 12 cm disc)
Audio CD
(8 cm / 12 cm disc)
In addition, this unit plays DVD±R/RW and CD-R/RW, Dual disc that contains audio titles, DivX, MP3, WMA, and/or JPEG files.
This indicates a product feature that is capable of playing DVD-RW discs recorded with Video Recording format.
Notes:
•Depending on the conditions of the recording equipment or the CD-R/RW (or DVD±R/RW) disc itself, some CD-R/RW (or DVD±R/RW) discs may not be played on the unit.
•Do not use irregularly shaped CDs (e.g., heartshaped or octagonal) since they may result in malfunctions.
Regional Code
This unit has a regional code printed on the rear of the unit. This unit can play only DVD discs labelled as the same as the rear of the unit or “ALL”.
Notes on Regional Codes
•Most DVD discs have a globe with one or more numbers in it clearly visible on the cover. This number must match your DVD player’s regional code or the disc cannot play.
•If you try to play a DVD with a different regional code from your player, the message “Check Regional Code” appears on the TV screen.
Notes on Copyrights:
It is forbidden by law to copy, broadcast, show, broadcast via cable, play in public, or rent copyrighted material without permission. This product features the copy protection function developed by Macrovision. Copy protection signals are recorded on some discs. When recording and playing the pictures of these discs picture noise will appear. This product incorporates copyright protection technology that is protected by method claims of certain U.S. patents and other intellectual property rights owned by Macrovision Corporation and other rights owners. The use of this copyright protection technology must be authorized by Macrovision Corporation, and is intended for home and other limited viewing uses only unless otherwise authorized by Macrovision Corporation. Reverse engineering or disassembly is prohibited.
CONSUMERS SHOULD NOTE THAT NOT ALL HIGH DEFINITION TELEVISION SETS ARE FULLY COMPATIBLE WITH THIS PRODUCT AND MAY CAUSE ARTIFACTS TO BE DISPLAYED IN THE PICTURE. IN CASE OF 525 OR 625 PROGRESSIVE SCAN PICTURE PROBLEMS, IT IS RECOMMENDED THAT THE USER SWITCH THE CONNECTION TO THE ‘STANDARD DEFINITION’ OUTPUT. IF THERE ARE QUESTIONS REGARDING OUR TV SET COMPATIBILITY WITH THIS MODEL 525p AND 625p DVD PLAYER, PLEASE CONTACT OUR CUSTOMER SERVICE CENTER.
Introduction
5

Front Panel
DVX276
a |
b |
||||||||
|
|
|
|
|
|
|
|
|
|
|
|
|
|
|
|
|
|
|
|
|
|
|
|
|
|
|
|
|
|
|
|
|
|
|
|
|
|
|
|
|
|
|
|
|
|
|
|
|
|
c d e |
f |
DVX286
a |
|
|
b |
|||||
|
|
|
|
|
|
|
|
|
|
|
|
|
|
|
|
|
|
|
|
|
|
|
|
|
|
|
|
|
|
|
|
|
|
|
|
|
|
|
|
|
|
|
|
|
|
|
|
|
|
|
|
|
|
|
|
|
|
|
|
|
|
|
|
|
|
|
|
|
|
|
|
c e
aPOWER
Switches the unit ON or OFF.
b• N (PLAY)
Starts playback.
•x (STOP)
Stops playback.
•. (SKIP)
Returns to the beginning of current chapter or track or go to the previous chapter or track.
•> (SKIP)
Go to the next chapter or track.
d f
cDisc Tray
Insert a disc here.
dDisplay window
Shows the current status of the unit.
eRemote Sensor
Point the remote control here.
fZ (OPEN / CLOSE)
Opens or closes the disc tray.
6

Remote Control
POWER
Switches DVD Player ON or OFF
OPEN/CLOSE (Z)
Opens and closes the disc tray.
0-9 numerical buttons
Selects numbered options in a menu.
CLEAR
Removes a track number on the
Program List or a mark on the
Marker Search menu.
TV Control Buttons
POWER: Turns the TV on or off.
AV: Selects the TV’s source.
PR/CH +/–: Selects TV’s channel.
VOL +/–: Adjusts TV’s volume.
DVD MENU
Accesses menu on a DVD disc.
TITLE
Displays title menu, if available.
b / B / v / V (left/right/up/down)
Selects an option in the menu.
ENTER
Confirms menu selection.
DISPLAY
Accesses On-Screen Display.
RETURN (O)
Removes the menu. Displays the menu of a video CD with PBC.
Remote Control Operation
Point the remote control at the remote sensor and press the buttons.
Caution:
Do not mix old and new batteries and never mix different types of batteries such as standard, alkaline, etc.
SCAN (m / M)
Search backward or forward.
SKIP (. / >)
Go to the next chapter or track. Returns to the beginning of current chapter or track or go to the previous chapter or track.
PAUSE / STEP ( X )
Pauses playback temporarily/ press repeatedly for frame-by-frame playback.
PLAY (N)
Starts playback.
STOP (x)
Stops playback.
AUDIO
Selects an audio language or an audio channel.
SUBTITLE
Selects a subtitle language.
ANGLE
Selects a DVD camera angle, if available.
SETUP
Accesses or removes the Setup menu.
MARKER
Marks any point during playback.
SEARCH
Displays MARKER SEARCH menu.
PROGRAM
Enter the program edit mode.
ZOOM
Enlarges video image.
REPEAT
Repeat chapter, track, title, all.
A-B
Repeat sequence from point A to point B.
RANDOM
Plays tracks in random order.
Remote Control Battery installation
Detach the battery cover on the rear of the remote control, and insert two batteries
(size AAA) with 3 and # aligned correctly.
Introduction
7
Installation and Setup
Setting up the Player
The picture and sound of a nearby TV, VCR, or radio may be distorted during playback. If this occurs, position the player away from the TV, VCR, or radio, or turn off the unit after removing the disc.
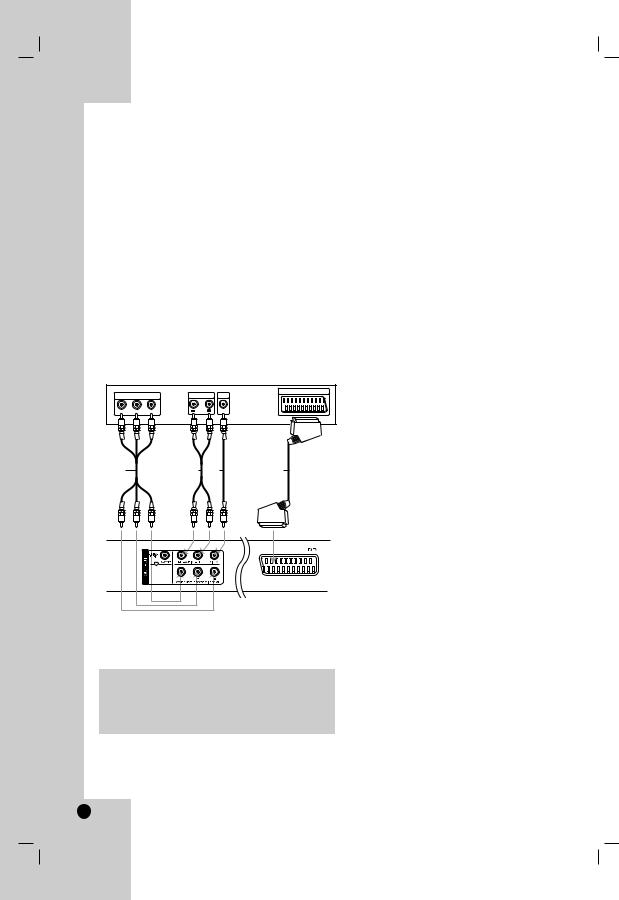
DVD Player Connections
Depending on your TV and other equipment there are various ways you can connect the player. Please refer to the manuals of your TV, stereo system or other devices as necessary for additional connection information.
Rear of TV
|
|
|
|
|
SCART INPUT |
|
COMPONENT VIDEO / |
AUDIO INPUT |
VIDEO |
||
PROGRESSIVE SCAN INPUT |
|
|
INPUT |
||
Pr |
Pb |
Y |
R |
L |
|
C A V T
Rear of DVD player
Caution:
You must set the TV Output Select option on the setup menu to use COMPONENT / PROGRESSIVE SCAN jack or SCART’s RGB signal.
(Refer to page 11.)
Video and Audio Connections to Your TV
Make sure the DVD player is connected directly to the TV and not to a VCR, otherwise the DVD image could be distorted by the copy protection system.
SCART connection – Connect the TO TV scart jack on the DVD player to the corresponding in jacks on the TV using the scart cable (T).
Video – Connect the VIDEO OUT jack on the DVD player to the video in jack on the TV using the video cable (V).
Audio – Connect the left and right AUDIO OUT jacks of the DVD player to the audio left and right IN jacks on the TV using the audio cables (A). Do not connect the unit’s AUDIO OUT jack to the phone in jack (record deck) of your audio system.
Component Video – Connect the COMPONENT /PROGRESSIVE SCAN jacks on the unit to the corresponding jacks on the TV using an Y PB PR cable (C).
Progressive Scan
•If your television is a high-definition or “digital ready” television, you may take advantage of the DVD player’s progressive scan output for the highest possible video resolution.
•Set the Progressive Scan to “On” on the setup menu for progressive scan signal.
(Refer to page 11)
•Progressive scan does not work with the analog video connections (yellow VIDEO OUT jack).
8

Audio Connection to Optional Equipment
Connect the DVD player to your optional equipment for audio output.
Rear of DVD player
X |
A |
COAXIAL |
R |
L |
DIGITAL INPUT |
AUDIO INPUT |
|
Amplifier (Receiver)
Manufactured under license from Dolby Laboratories. “Dolby”, “Pro Logic”, and the double-D symbol are trademarks of Dolby Laboratories.
DTS and DTS Digital Out are trademarks of Digital Theater Systems, Inc.
Amplifier equipped with 2-channel analog stereo or Dolby Pro Logic ll / Pro Logic: Connect the left and right AUDIO OUT jacks on the DVD player to the audio left and right IN jacks on your amplifier, receiver, or stereo system, using the audio cables (A).
Amplifier equipped with 2-channel digital stereo (PCM) or audio / video receiver equipped with a multi-channel decoder (Dolby Digital™, MPEG 2, or DTS): Connect one of the DVD Player’s DIGITAL AUDIO OUT jacks ( COAXIAL X) to the corresponding jack on your amplifier. Use an optional digital (COAXIAL X) audio cable.
Digital Multi-channel sound
A digital multi-channel connection provides the best sound quality. For this you need a multi-channel audio / video receiver that supports one or more of the audio formats supported by your DVD player such as MPEG 2, Dolby Digital and DTS. Check the receiver manual and the logos on the front of the receiver.
Notes:
•If the audio format of the digital output does not match the capabilities of your receiver, the receiver produces a strong, distorted sound or no sound at all.
•Six Channel Digital Surround Sound via a digital connection can only be obtained if your receiver is equipped with a Digital Multi-channel decoder.
Installation and Setup
9

Displaying Disc Information on-screen
You can display various information about the disc loaded on-screen.
1.Press DISPLAY to show various playback information.
The displayed items differ depending on the disc type or playing status.
2.You can select an item by pressing v / V and change or select the setting by pressing b / B.
Title (Track) – Current title (or track) number/total number of titles (or tracks)
Chapter – Current chapter number/total number of chapters
Time – Elapsed playing time
Audio – Selected audio language or channel
Subtitle – Selected subtitle
Angle – Selected angle/total number of angles
Note:
If any button is not pressed for a few seconds, the onscreen display disappears.
Initial Settings
By using the Setup menu, you can make various adjustments to items such as picture and sound. You can also set a language for the subtitles and the Setup menu, among other things. For details on each Setup menu item, see the pages 11 to 13.
To display and exit the Menu :
Press SETUP to display the menu. A second press of SETUP will take you back to initial screen.
To go to the next level :
Press B on the remote control.
To go back to the previous level :
Press b on the remote control.
General Operation
1. Press SETUP. The Setup menu appears.
2.Use v / V to select the desired option then press B to move to the second level. The screen shows the current setting for the selected item, as well as alternate setting(s).
3.Use v / V to select the second desired option and then press B to move to the third level.
4.Use v / V to select the desired setting then press ENTER to confirm your selection. Some items require additional steps.
5.Press SETUP or PLAY to exit the Setup menu.
10
LANGUAGE
Menu Language
Select a language for the Setup menu and then onscreen display.
Disc Audio / Subtitle / Menu
Select the language you prefer for the audio track (disc audio), subtitles, and the disc menu.
Original – Refers to the original language in which the disc was recorded.
Other – To select another language, press numeric buttons and then ENTER to enter the corresponding 4-digit number according to the language code list on the page 21. If you enter the wrong language code, press CLEAR.
DISPLAY
TV Aspect
4:3 – Select when a standard 4:3 TV is connected.
16:9 – Select when a 16:9 wide TV is connected.
Display Mode
The Display Mode setting works only when the TV Aspect mode is set to “4:3”.
Letterbox – Displays a wide picture with bands on the upper and lower portions of the screen.
Panscan – Automatically displays the wide picture on the entire screen and cuts off the portions that do not fit.
Progressive Scan
Progressive Scan Video provides the highest quality pictures with less flickering.
If you are using the Component Video jacks for connection to a TV or a monitor that is compatible with a progressive scan signal, set Progressive Scan to On.
To Turn ON progressive scan:
Connect component video out of this unit to the input of your TV or monitor, set your TV or monitor to Component Input.
1.Select “Progressive Scan” on the DISPLAY menu then press B.
2.Select “On” using the v / V buttons.
3.Press ENTER to confirm your selection. The confirm menu will appear.
4.When the confirm menu appears on your screen Cancel is highlighted as default. Use the b / B buttons to highlight Enter.
5.Pressing ENTER will set the player to Progressive scan mode.
Caution:
Once the setting for progressive scan output is entered, an image will only be visible on a progressive scan compatible TV or monitor. If you set Progressive Scan to On in error, you must reset the unit.
First, remove the disc in the DVD Player.
Next, press STOP ( x ) and hold it for five seconds before releasing it. The video output will be restored to the standard setting, and a picture will once again be visible on a conventional analog TV or monitor.
TV Output Select
Set the player’s TV Output Select options according to the TV connection type.
YPbPr – When your TV is connected with the COMPONENT / PROGRESSIVE SCAN jacks on this DVD player.
RGB – When your TV is connected with the SCART (RGB signal) jack.
Installation and Setup
11

AUDIO
Each DVD disc has a variety of audio output options. Set the player’s AUDIO options according to the type of audio system you use.
Dolby Digital / DTS / MPEG
Bitstream – Select “Bitstream” if you connect this DVD player’s DIGITAL OUT jack to an amplifier or other equipment with a Dolby Digital, DTS or MPEG decoder.
PCM (for Dolby Digital / MPEG) – Select when connected to a two-channel digital stereo amplifier. DVDs encoded in Dolby Digital or MPEG will be automatically downmixed to two-channel PCM audio.
Off (for DTS): If you select “Off”, the DTS signal is not output through the DIGITAL OUT jack.
Sample Freq. (Frequency)
If your receiver or amplifier is NOT capable of handling 96 kHz signals, select 48 kHz. When this choice is made, this unit automatically converts any 96 kHz signals to 48 kHz so your system can decode them.
If your receiver or amplifier is capable of handling 96 kHz signals, select 96 kHz.
Check the documentation for your amplifier to verify its capabilities.
Dynamic Range Control (DRC)
With the DVD format, you can hear a program’s soundtrack in the most accurate and realistic presentation. However, you may wish to compress the dynamic range of the audio output (the difference between the loudest sounds and the quietest ones). This allows you to listen to a movie at a lower volume without losing clarity of sound. Set DRC to On for this effect.
Vocal
Set to On only when a multi-channel karaoke DVD is playing. The karaoke channels on the disc mix into normal stereo sound.
LOCK (Parental Control)
Rating
Blocks playback of rated DVDs based on their contents. Not all discs are rated.
1.Select “Rating” on the LOCK menu then press B.
2.To access the LOCK options, you must input the password you have created. If you have not yet entered password, you are prompted to do so.
Input a password and press ENTER. Enter it again and press ENTER to verify. If you make a mistake before pressing ENTER, press CLEAR.
3.Select a rating from 1 to 8 using the v / V buttons.
Rating 1-8: Rating one (1) has the most restrictions and rating eight (8) is the least restrictive.
Unlock
If you select unlock, parental control is not active and the disc plays in full.
4.Press ENTER to confirm your rating selection, then press SETUP to exit the menu.
Password
You can enter or change password.
1.Select Password on the LOCK menu and then press B.
2.To make a new password:
Press ENTER when the “New” option is highlighted. Enter a new password using the numerical buttons then press ENTER. Enter the password again to verify.
To change the password:
Press ENTER when the “Change” option is highlighted. Enter a current password using the numbered buttons then press ENTER. Enter a new password using the numbered buttons then press ENTER. Enter the password again to verify.
3.Press SETUP to exit the menu.
12

If you forget your password
If you forget your password, you can clear it using the following steps:
1.Press SETUP to display the Setup menu.
2.Input the 6-digit number “210499” and the security code is cleared.
Area Code
Enter the code of the area whose standards were used to rate the DVD video disc, based on the list on page 21.
1.Select “Area Code” on the LOCK menu then press B.
2.Follow the step 2 as shown previous page (Rating).
3.Select the first character using v / V buttons.
4.Press ENTER and select the second character using v / V buttons.
5.Press ENTER to confirm your Area code selection.
OTHERS
PBC
Set Playback Control (PBC) to On or Off.
On: Video CDs with PBC are played according to the PBC.
Off: Video CDs with PBC are played in the same way as Audio CDs.
B.L.E. (Black Level Expansion)
To select the black level of playback pictures. Set your preference and monitor’s ability.
On: Expanded grey scale. (0 IRE cut off)
Off: Standard grey scale. (7.5 IRE cut off)
Note:
The B.L.E. function works NTSC system only.
DivX(R) VOD
We provide you the DivX® VOD (Video On Demand) registration code that allows you to rent and purchase videos based on the DivX® VOD service. For more information, visit www.divx.com/vod.
1.Select “DivX(R) VOD” option and then press B.
2.Press ENTER while “Select” is selected and the registration code will appear.
Use the registration code to purchase or rent the videos from DivX® VOD service at www.divx.com/vod. Follow the instructions and download the video onto a disc for playback on this unit.
3.Press ENTER to exit.
Note:
All the downloaded videos from DivX® VOD can only be played back on this unit.
Installation and Setup
13

Operations
General features
Buttons |
Operations |
Discs |
|
OPEN / CLOSE (Z) |
Opens or closes the disc tray. |
ALL |
|
|
|
|
|
PAUSE/STEP (X) |
During playback, press X to pause playback. |
|
|
|
|
|
|
|
|
Press X repeatedly to play Frame-by-Frame. |
|
|
|
|
|
SKIP (. / >) |
During playback, press SKIP (. or >) to go to the next |
ALL |
|
|
|
chapter/track or to return to the beginning of the current |
|
|
|
chapter/track. |
|
|
|
Press SKIP . twice briefly to step back to the previous |
|
|
|
chapter/track. |
|
|
|
|
|
SCAN (m / M) |
During playback, press SCAN (m or M) repeatedly to |
|
|
|
|
select the required scan speed. |
|
|
|
DVD, DivX disc: 4 steps |
|
|
|
Video CD, MP3, WMA, Audio CD: 3 steps |
|
|
|
|
|
|
|
While the playback is paused, press SCAN (m or M) |
|
|
|
repeatedly to play in slow motion (4 steps). |
(forward only) |
REPEAT |
During playback, press REPEAT repeatedly to select a |
ALL |
|
|
|
desired repeat mode. |
|
|
|
DVD Video discs: Chapter/Title/Off |
|
|
|
Video CD, Audio CD, DivX/MP3/WMA discs: Track/All/Off |
|
|
|
|
|
A-B |
Press the A-B button one at a time to select a point A and |
|
|
|
|
point B and repeats a sequence from point A (Starting point) |
ACD |
|
|
to point B (End point). |
|
|
|
|
|
|
|
|
|
ZOOM |
During playback or pause mode, press ZOOM to enlarge |
|
|
|
|
the video image. (3 steps) |
|
|
|
You can move through the zoomed picture using b B v V |
|
|
|
buttons. Press CLEAR to exit. |
|
|
|
|
|
RANDOM |
During playback or in stop mode, press RANDOM for |
VCD |
|
|
|
random playback. |
WMA |
|
|
|
|
|
|
|
|
TITLE |
If the current DVD title has a menu, the title menu appears |
|
|
|
|
on the screen. Otherwise, the disc menu may appears. |
|
|
|
|
|
DVD MENU |
The disc menu appears on the screen. |
|
|
|
|
|
|
|
(ANGLE) |
During playback of DVD disc that contains scenes recorded |
|
|
|
||
|
|
at different camera angles, press ANGLE repeatedly to |
|
|
|
select a desired angle. |
|
|
|
|
|
|
(SUBTITLE) |
During playback, press SUBTITLE repeatedly to select a |
|
|
|
||
|
|
desired subtitle language. |
|
|
|
|
|
|
(AUDIO) |
During playback, press AUDIO repeatedly to hear a different |
DVD |
|
|||
|
|
audio language or audio track. |
|
|
|
|
|
14

Notes on general features: |
|
|
• |
On a Video CD with PBC, you |
PBC to Off |
|
on the setup menu to use the |
(See |
|
“PBC” on page 13). |
|
• |
If you press SKIP (>) once |
Chapter |
|
(Track) playback, the repeat |
cancels. |
• Zoom may not work on some |
|
|
• |
When you are playing a DVD |
contains |
|
scenes recorded at different |
the |
|
angle indicator will blink on the |
during the |
|
oprations as an indication that |
is |
|
possible. |
|
• |
If you press . once within 3 |
after the |
|
chapter/track has started, the playback goes to the |
|
|
previous chapter/track. |
|
Additional features
Time Search |
DVD |
|
|
To start playing at any chosen |
disc: |
||
1. |
Press DISPLAY during |
|
|
2. |
Press v / V to select the |
and |
|
|
“-:--:--” appears. |
|
|
3. |
Use numerical buttons to |
start |
|
|
time in hours, minutes, |
from left to |
|
|
right. If you enter the |
press |
|
|
CLEAR to remove the |
. Then |
|
|
input the correct numbers. |
|
|
4. |
Press ENTER to confirm. |
from the |
|
|
selected time. |
|
|
Marker Search |
DVD |
|
|
To enter a Marker
You can start playback from up to nine memorized points. To enter a marker, press MARKER at the desired point on the disc. The Marker icon appears on the TV screen briefly. Repeat to enter up to nine markers.
To Recall or Clear a Marked Scene
1.During disc playback, press SEARCH. The marker search menu appears on the screen.
2.Within 9 seconds, press b / B to select a marker number that you want to recall or clear.
3.Press ENTER and playback starts from the marked scene. Or Press CLEAR and the marker number is erased from the list.
4.You can play any marker by inputting its number on the marker search menu.
Last Scene Memory DVD |
|
This player memorizes last scene from |
disc |
that is viewed. The last scene remains |
|
even if you remove the disc from the |
switch |
off the player. If you load a disc that has |
|
memorized, the scene is automatically |
. |
Note: |
|
This player does not memorize the |
disc if |
you switch off the player before |
play |
the disc. |
|
Screen Saver |
|
The screen saver appears when you |
DVD |
player in Stop mode for about five |
|
Screen Saver is displayed for five |
DVD |
Player automatically turns itself off. |
|
System Select |
|
You must select the appropriate system |
for your |
TV system. If NO dSC appears in the |
|
press and hold PAUSE/STEP for more |
|
to be able to select a system (PAL, |
. |
15
Operation

Playing an Audio CD or
MP3/WMA file
This unit can play Audio CDs or MP3/WMA files.
MP3/ WMA/ Audio CD
Once you insert an MP3/WMA files recorded media or Audio CD, a menu appears on the TV screen.
Press v / V to select a track/file and then press PLAY or ENTER and playback starts. You can use variable playback functions. Refer to page 14-15.
ID3 TAG
•When playing a file containing information such as track titles, you can see the information by pressing DISPLAY.
[ Title, Artist, Album, Year, Comment ]
Tips:
•Press DVD MENU to move to the next page.
•On a DISC with MP3/WMA, JPEG and MOVIE file, you can switch MUSIC, PHOTO and MOVIE menu. Press TITLE, and MUSIC, PHOTO or MOVIE word
on top of the menu is highlighted.
MP3 / WMA disc compatibility with this player is limited as follows:
•Sampling frequency: within 8 - 48 kHz (MP3), within 32 - 48kHz (WMA)
•Bit rate: within 8 - 320kbps (MP3), 32 - 192kbps (WMA)
•The player cannot read an MP3/WMA file that has a file extension other than “.mp3” / “.wma”.
•CD-R physical format should be ISO 9660
•If you record MP3 / WMA files using software that cannot create a file system (eg. Direct-CD) it is impossible to playback MP3 / WMA files. We recommend that you use Easy-CD Creator, which creates an ISO 9660 file system.
•File names should have a maximum of 8 letters and must incorporate an .mp3 or .wma extension.
•They should not contain special letters such as / ? * : “ < > l etc.
•The total number of files on the disc should be less than 650.
•This DVD player requires discs and recordings to meet certain technical standards in order to achieve optimal playback quality. Pre-recorded DVDs are automatically set to these standards. There are many different types of recordable disc formats (including CD-R containing MP3 or WMA files) and these require certain pre-existing conditions (see above) to ensure compatible playback.
Customers should note that permission is required in order to download MP3 / WMA files and music from the Internet. Our company has no right to grant such permission. Permission should always be sought from the copyright owner.
16

Programmed Playback
The program function enables you to store your favorite tracks from any disc in the player memory. A program can contain 30 tracks.
1.Insert an Audio CD or MP3/WMA files recorded media. AUDIO CD or MUSIC menu appears.
2.Press PROGRAM. The E mark will appear.
Note:
Press PROGRAM again to exit the program edit mode, then the E mark will disappear.
Video CD: Press PROGRAM while playback is stopped. The program menu appears. Press PROGRAM again to exit the menu.
Note:
On a Video CD with PBC, you must set PBC to Off on the setup menu to use the programmed playback (See “PBC” on page 13).
3.Select a track on the “List” and then press ENTER to place the selected track on the “Program” list. Repeat to place additional tracks on the list.
4.Select the track you want to start playing on the “Program” list.
5.Press PLAY or ENTER to start. Playback begins in the order in which you programmed the tracks. Playback stops after all of the tracks on the “Program” list have played once.
6.To resume normal playback from programmed playback, select a track on the list and then press PLAY.
Repeat Programmed Tracks
Press REPEAT to select a desired repeat mode.
•Track: repeats the current track
•All: repeats all the tracks on the “Program” list.
•Off (No display): does not play repeatedly.
Note:
If you press > once during Repeat Track playback, the repeat playback cancels.
Erasing a Track from “Program” List
1.Use v V b B to select the track that you wish to erase from the Program list.
2.Press CLEAR. Repeat step 1-2 to erase additional tracks on the list.
Erasing the Complete Program List
Use v V b B to select “Clear All”, then press ENTER.
Note:
The programs are also cleared when the power is off or the disc is removed.
Playing a DVD VR format Disc
This unit will play DVD-R/RW disc that are recorded using the DVD-Video format that have been finalized using a DVD-recorder.
This unit will play DVD-RW disc that are recorded using the Video Recording (VR) format.
1.Insert a disc and close the tray. The DVD-VR menu appears on the TV screen.
2.Press v / V to select a track then press PLAY or ENTER and playback starts.
3.Press DVD MENU to move to the list menu.
Note:
•Unfinalized DVD-R/RW discs cannot be played in this player.
•Some DVD-VR disc are made with CPRM data by DVD RECORDER. Player does not support these kinds of discs.
What is ‘CPRM’?
CPRM is a copy protection system (with scramble system) only allowing the recording of ‘copy once’ broadcast programs. CPRM stands for Content Protection for Recordable Media.
Operation
17

Viewing a JPEG file
This unit can play JPEG files.
1.Insert a JPEG files recording media. The PHOTO menu appears on the TV screen.
2.Press v / V to select a folder and then press ENTER. A list of files in the folder appears.
3.If you want to view a particular file, press
v / V to highlight a file and press ENTER or PLAY.
4.To return to the PHOTO menu while watching pictures, press STOP.
Tips:
•If you are in a file list and want to return to the previous Folder list, use v / V buttons to highlight  and press ENTER.
•Press DVD MENU to move to the next page.
•There are three Slide Speed options  : >>>
: >>>
(Fast), >> (Normal) and > (Slow).
Use v V b B to highlight  . Then, use b / B to select the option you want to use then press ENTER.
•On a DISC with MP3/WMA, JPEG and MOVIE file, you can switch MUSIC, PHOTO and MOVIE menu. Press TITLE, and MUSIC, PHOTO or MOVIE word on top of the menu is highlighted.
•While watching a picture, press RETURN to hide the help menu.
Slide Show
Use v V b B to highlight the  (Slide Show) then press ENTER.
Still Picture
1.Press PAUSE/STEP during the slide show. The player will now go into the PAUSE mode.
2.To return to the slide show, press PLAY or press PAUSE/STEP again.
Moving to another File
Press SKIP (. or >) or cursor (b or B) once during viewing a picture to advance to the next or previous file.
Zoom
During watching pictures, press ZOOM to enlarge the video image (3 steps).
You can move through the zoomed picture using b B v V buttons.
Rotating the picture
Press v / V during showing a picture to rotate the picture clockwise or counter clockwise.
To listen to MP3/WMA music while watching picture
1.Insert the disc containing the two types of file in the player.
2.Press TITLE to display the PHOTO menu.
3.Press v / V to select a photo file.
4.Use B to select  icon then press ENTER. Playback starts. The playback will continue until STOP is pressed.
Tip:
To listen to only the desired music while watching pictures, program the desired tracks from the “MUSIC” menu and then proceed as above.
JPEG disc compatibility with this player is limited as follows:
•Depending upon the size and the number of JPEG files, it could take a long time for this unit to read the disc’s contents. If you do not see an onscreen display after several minutes, some of the files may be too large — reduce the resolution of the JPEG files to less than 2M pixels as 2760 x 2048 pixels and burn another disc.
•The total number of files on the disc should be less than 650.
•Some discs may be incompatible due to a different recording format or the condition of disc.
•Ensure that all the selected files have the “.jpg” extensions when copying into the CD layout.
•If the files have “.jpe” or “.jpeg” extensions, please rename them as “.jpg” file.
•File names without “.jpg” extension will not be able to be read by this DVD player. Even though the files are shown as JPEG image files in Windows Explorer.
18

Playing a DivX Movie file
Using this DVD Player you can play DivX file.
1.Insert a DivX file recording media. The MOVIE menu appears on the TV screen.
2.Press v / V to select a folder and then press ENTER. A list of files in the folder appears.
3.If you want to view a particular file, press v / V to highlight a file and press ENTER or PLAY. You can use variable playback functions. Refer to page 1415.
4.To return to the MOVIE menu during playback, press STOP.
Tips:
•If you are in a file list and want to return to the previous Folder list, use v / V buttons to highlight  and press ENTER.
•Press DVD MENU to move to the next page.
•On a DISC with MP3/WMA, JPEG and MOVIE file, you can switch MUSIC, PHOTO and MOVIE menu. Press TITLE, and MUSIC, PHOTO or MOVIE word on top of the menu is highlighted.
•The disc subtitle may not be displayed properly, if a DivX subtitle is downloaded through the internet.
•If the disc subtitle setup menu does not have the DivX subtitle language you are going to play, the subtitle language may not be displayed properly.
Notice for displaying the DivX subtitle
If the subtitle does not display properly, please follow the steps below.
1. Press and hold SUBTITLE for about 3 seconds. The language code will appear.
2. Press b / B to select another language code until the subtitle is displayed properly.
3. Press ENTER to continue playback.
Note:
The DivX subtitle file name has to be identified with the DivX file name to display by this unit.
DivX disc compatibility with this player is limited as follows:
•Available resolution size of the DivX file is under 720x576 (W x H) pixel.
•The file name of the DivX subtitle is available by 56 characters.
•If there is impossible code to express in the DivX file, it may be displayed as " _ " mark on the display.
•If the number of the screen frame is over 30 per 1 second, this unit may not operate normally.
•If the video and audio structure of recorded file is not interleaved, either video or audio is outputted.
•If the file is recorded with GMC, the unit supports only 1-point of the record level.
* GMC?
GMC is the acronym for Global Motion Compensation. It is an encoding tool specified in MPEG4 standard. Some MPEG4 encoders, like DivX, have this option.
There are different levels of GMC encoding, usually called 1-point, 2-point, or 3-point GMC.
Playable DivX file
.avi, .mpg, .mpeg
Playable Subtitle format
SubRip(*.srt/*.txt) SAMI(*.smi)
SubStation Alpha(*.ssa/*.txt) MicroDVD(*.sub/*.txt) SubViewer 2.0(*.sub/*.txt) TMPlayer(*.txt)
Dvd Subtitle System(*.txt)
VobSub (*.sub) b Sub/idx, stream based format.
Playable Codec format
"DIVX3.xx ", "DIVX4.xx ", "DIVX5.xx ", "MP43 ", "3IVX ".
Playable Audio format
"Dolby Digital ", "DTS ", "PCM ", "MP3 ", "WMA ".
•Sampling frequency: within 8 - 48 kHz (MP3), within 32 - 48kHz (WMA)
•Bit rate: within 8 - 320kbps (MP3), 32 - 192kbps (WMA)
Operation
19

Reference
Controlling other TVs with the remote control
You can control the sound level, input source, and power switch of your LG TV with the supplied remote control.
You can control the sound level, input source, and power switch of non-LG TVs as well. If your TV is listed in the table below, set the appropriate manufacturer code.
1.While holding down TV POWER button, press the number buttons to select the manufacturer code for your TV (see the table below).
2.Release TV POWER button.
Code numbers of controllable TVs
If more than one code number is listed, try entering them one at a time until you find the one that works with your TV.
Manufacturer |
Code Number |
LG / GoldStar |
1 (Default), 2 |
|
|
Zenith |
1, 3, 4 |
|
|
Samsung |
6, 7 |
|
|
Sony |
8, 9 |
|
|
Hitachi |
4 |
|
|
Notes:
•Depending on your TV, some or all buttons may not function on the TV, even after entering the correct manufacturer code.
•If you enter a new code number, the code number previously entered will be erased.
•When you replace the batteries of the remote, the code number you have set may be reset to the default setting. Set the appropriate code number again.
Video Mode Setting
•With certain discs, the playback picture may be flickering or Dot Crawl is shown on straight lines. That means Vertical interpolation or De-interlace is not perfectly matched with the disc. In this case, the picture quality may be improved by changing the video mode.
•To change the video mode, press and hold DISPLAY about 3 seconds during disc playback. The new video mode number selected is displayed on the TV screen. Check whether the video quality has improved. If not, repeat the above procedure until picture quality is improved.
•Video mode change sequence:
MODE1 → MODE2 → MODE3 → MODE1
•If you turn off the power, the video mode will be back to initial state (MODE1).
Tip:
Detailed Descriptions for Video Modes
MODE1: The source material of the DVD video (film material or video material) is determined from disc information.
MODE2: Suitable for playing film based content or video based material recorded by the progressive scan method.
MODE3: Suitable for playing video based content with comparatively little motion.
Note:
The video mode setting only works when the Progressive Scan mode is set to “On” in the Setup menu.
20
Language Codes
Use this list to input your desired language for the following initial settings:
Disc Audio, Disc Subtitle, Disc Menu.
Language |
Code |
|
Language |
Code |
|
Language |
Code |
|
Language |
Code |
Abkhazian |
6566 |
|
Fiji |
7074 |
|
Lingala |
7678 |
|
Singhalese |
8373 |
Afar |
6565 |
|
Finnish |
7073 |
|
Lithuanian |
7684 |
|
Slovak |
8375 |
Afrikaans |
6570 |
|
French |
7082 |
|
Macedonian |
7775 |
|
Slovenian |
8376 |
Albanian |
8381 |
|
Frisian |
7089 |
|
Malagasy |
7771 |
|
Somali |
8379 |
Ameharic |
6577 |
|
Galician |
7176 |
|
Malay |
7783 |
|
Spanish |
6983 |
Arabic |
6582 |
|
Georgian |
7565 |
|
Malayalam |
7776 |
|
Sudanese |
8385 |
Armenian |
7289 |
|
German |
6869 |
|
Maltese |
7784 |
|
Swahili |
8387 |
Assamese |
6583 |
|
Greek |
6976 |
|
Maori |
7773 |
|
Swedish |
8386 |
Aymara |
6588 |
|
Greenlandic |
7576 |
|
Marathi |
7782 |
|
Tagalog |
8476 |
Azerbaijani |
6590 |
|
Guarani |
7178 |
|
Moldavian |
7779 |
|
Tajik |
8471 |
Bashkir |
6665 |
|
Gujarati |
7185 |
|
Mongolian |
7778 |
|
Tamil |
8465 |
Basque |
6985 |
|
Hausa |
7265 |
|
Nauru |
7865 |
|
Tatar |
8484 |
Bengali; Bangla |
6678 |
|
Hebrew |
7387 |
|
Nepali |
7869 |
|
Telugu |
8469 |
Bhutani |
6890 |
|
Hindi |
7273 |
|
Norwegian |
7879 |
|
Thai |
8472 |
Bihari |
6672 |
|
Hungarian |
7285 |
|
Oriya |
7982 |
|
Tibetan |
6679 |
Breton |
6682 |
|
Icelandic |
7383 |
|
Panjabi |
8065 |
|
Tigrinya |
8473 |
Bulgarian |
6671 |
|
Indonesian |
7378 |
|
Pashto, Pushto |
8083 |
|
Tonga |
8479 |
Burmese |
7789 |
|
Interlingua |
7365 |
|
Persian |
7065 |
|
Turkish |
8482 |
Byelorussian |
6669 |
|
Irish |
7165 |
|
Polish |
8076 |
|
Turkmen |
8475 |
Cambodian |
7577 |
|
Italian |
7384 |
|
Portuguese |
8084 |
|
Twi |
8487 |
Catalan |
6765 |
|
Japanese |
7465 |
|
Quechua |
8185 |
|
Ukrainian |
8575 |
Chinese |
9072 |
|
Javanese |
7487 |
|
Rhaeto-Romance |
8277 |
|
Urdu |
8582 |
Corsican |
6779 |
|
Kannada |
7578 |
|
Rumanian |
8279 |
|
Uzbek |
8590 |
Croatian |
7282 |
|
Kashmiri |
7583 |
|
Russian |
8285 |
|
Vietnamese |
8673 |
Czech |
6783 |
|
Kazakh |
7575 |
|
Samoan |
8377 |
|
Volapük |
8679 |
Danish |
6865 |
|
Kirghiz |
7589 |
|
Sanskrit |
8365 |
|
Welsh |
6789 |
Dutch |
7876 |
|
Korean |
7579 |
|
Scots Gaelic |
7168 |
|
Wolof |
8779 |
English |
6978 |
|
Kurdish |
7585 |
|
Serbian |
8382 |
|
Xhosa |
8872 |
Esperanto |
6979 |
|
Laothian |
7679 |
|
Serbo-Croatian |
8372 |
|
Yiddish |
7473 |
Estonian |
6984 |
|
Latin |
7665 |
|
Shona |
8378 |
|
Yoruba |
8979 |
Faroese |
7079 |
|
Latvian, Lettish |
7686 |
|
Sindhi |
8368 |
|
Zulu |
9085 |
|
|
|
|
|
|
|
|
|
|
|
Area Codes
Choose an area code from this list.
Area |
Code |
|
Area |
Code |
|
Area |
Code |
|
Area |
Code |
Afghanistan |
AF |
|
Ethiopia |
ET |
|
Malaysia |
MY |
|
Saudi Arabia |
SA |
Argentina |
AR |
|
Fiji |
FJ |
|
Maldives |
MV |
|
Senegal |
SN |
Australia |
AU |
|
Finland |
FI |
|
Mexico |
MX |
|
Singapore |
SG |
Austria |
AT |
|
France |
FR |
|
Monaco |
MC |
|
Slovak Republic |
SK |
Belgium |
BE |
|
Germany |
DE |
|
Mongolia |
MN |
|
Slovenia |
SI |
Bhutan |
BT |
|
Great Britain |
GB |
|
Morocco |
MA |
|
South Africa |
ZA |
Bolivia |
BO |
|
Greece |
GR |
|
Nepal |
NP |
|
South Korea |
KR |
Brazil |
BR |
|
Greenland |
GL |
|
Netherlands |
NL |
|
Spain |
ES |
Cambodia |
KH |
|
Heard and McDonald Islands HM |
|
Netherlands Antilles |
AN |
|
Sri Lanka |
LK |
|
Canada |
CA |
|
Hong Kong |
HK |
|
New Zealand |
NZ |
|
Sweden |
SE |
Chile |
CL |
|
Hungary |
HU |
|
Nigeria |
NG |
|
Switzerland |
CH |
China |
CN |
|
India |
IN |
|
Norway |
NO |
|
Taiwan |
TW |
Colombia |
CO |
|
Indonesia |
ID |
|
Oman |
OM |
|
Thailand |
TH |
Congo |
CG |
|
Israel |
IL |
|
Pakistan |
PK |
|
Turkey |
TR |
Costa Rica |
CR |
|
Italy |
IT |
|
Panama |
PA |
|
Uganda |
UG |
Croatia |
HR |
|
Jamaica |
JM |
|
Paraguay |
PY |
|
Ukraine |
UA |
Czech Republic |
CZ |
|
Japan |
JP |
|
Philippines |
PH |
|
United States |
US |
Denmark |
DK |
|
Kenya |
KE |
|
Poland |
PL |
|
Uruguay |
UY |
Ecuador |
EC |
|
Kuwait |
KW |
|
Portugal |
PT |
|
Uzbekistan |
UZ |
Egypt |
EG |
|
Libya |
LY |
|
Romania |
RO |
|
Vietnam |
VN |
El Salvador |
SV |
|
Luxembourg |
LU |
|
Russian Federation |
RU |
|
Zimbabwe |
ZW |
Reference
21

Troubleshooting
Symptom |
|
Possible Cause |
|
Correction |
|
|
|
|
|
|
|
No power. |
• |
The power cord is disconnected. |
• |
Plug the power cord into the wall outlet |
|
|
|
|
|
securely. |
|
|
|
|
|
|
|
The power is on, but |
• |
No disc is inserted. |
• |
Insert a disc. (Check the disc indicator |
|
the DVD player does |
|
|
|
in the display window is lit.) |
|
not work. |
|
|
|
|
|
No picture. |
• |
The TV is not set to receive DVD |
• |
Select the appropriate video input |
|
|
|
signal output. |
|
mode on the TV. |
|
|
• |
The video cable is not connected |
• |
Connect the video cable securely. |
|
|
|
securely. |
|
|
|
|
|
|
|
|
|
No sound. |
• |
The equipment connected with the |
• |
Select the correct input mode of the |
|
|
|
audio cable is not set to receive DVD |
|
audio receiver so you can listen to the |
|
|
|
signal output. |
|
sound from the DVD player. |
|
|
• |
The power of the equipment connected |
• |
Turn on the equipment connected with |
|
|
|
with the audio cable is turned off. |
|
the audio cable. |
|
|
• |
The AUDIO options are set to the |
• |
Set the AUDIO option to the correct |
|
|
|
wrong position. |
|
position, then turn on the DVD player |
|
|
|
|
|
again by pressing POWER. |
|
|
|
|
|
|
|
The DVD player does |
• |
An unplayable disc is inserted. |
• |
Insert a playable disc. (Check the disc |
|
not start playback. |
|
|
|
type and regional code.) |
|
|
• |
The rating level is set. |
• |
Change the rating level. |
|
|
|
|
|
|
|
The remote control |
• |
The remote control is not pointed at |
• |
Point the remote control at the remote |
|
|
the remote sensor on the DVD player. |
|
sensor of the DVD player. |
||
does not work properly. |
|
|
|||
|
|
|
|
||
• |
The remote control is too far from the |
• |
Operate the remote control closer to |
||
|
|||||
|
|
DVD player. |
|
the DVD player. |
Specifications
General
Power requirements: AC 200-240 V , 50/60 Hz
Power consumption: 8W
Dimensions (Approx.):
430 x 35 x 202 mm (17 x 1.4 x 7.9 inches) (W x H x D) without foot
Net Weight (Approx.): 1.6 kg (3.5 lbs)
Operating temperature:
5 °C to 35 °C (41 °F to 95 °F)
Operating humidity: 5 % to 90 %
Outputs
VIDEO OUT:
1.0 V (p-p), 75 Ω, sync negative, RCA jack x 1 / SCART (TO TV)
COMPONENT VIDEO OUT:
(Y) 1.0 V (p-p), 75 Ω,negative sync, RCA jack x 1 (Pb)/(Pr) 0.7 V (p-p), 75 Ω, RCA jack x 2
AUDIO OUT:
2.0 Vrms (1 KHz, 0 dB), 600 Ω, RCA jack (L, R) x 1 / SCART (TO TV)
DIGITAL OUT (COAXIAL):
0.5 V (p-p), 75 Ω, RCA jack x 1
System
Laser:
Semiconductor laser, wavelength 650 nm
Signal system: PAL/NTSC
Frequency response:
DVD (PCM 96 kHz): 8 Hz to 44 kHz
DVD (PCM 48 kHz): 8 Hz to 22 kHz
CD: 8 Hz to 20 kHz
Signal-to-noise ratio:
More than 90 dB (ANALOG OUT connectors only)
Harmonic distortion: Less than 0.02%
Dynamic range:
More than 95 dB (DVD/CD)
Accessories:
Video cable (1), Audio cable (1), Remote control (1), Batteries (2)
Note: Design and specifications are subject to change without prior notice.
22

DV276.286-E1M.HA7BLLS_DEU
DVD-SPIELER
Bedienungsanleitung
MODELL : DVX276 / DVX286
Lesen Sie diese Anleitung bitte vor dem Anschluss, der Inbetriebnahme oder der Einstellung des Produktes sorgfältig und vollständig durch.

ACHTUNG
STROMSCHLAGGEFAHR
NICHT ÖFFNEN
ACHTUNG: UM DIE GEFAHR VON
STROMSCHLÄGEN ZU VERMEIDEN, DAS GEHÄUSE (BZW. DIE RÜCKSEITE) NICHT ABNEHMEN
ES BEFINDEN SI CH KEINE BAUTEILE IM GERÄT, IE VOM BENUTZER REPARIERTWERDEN KÖNNEN.
REPARATUREN STETS VOM FACHMANN
AUSFÜHREN LASSEN.
Der Blitz mit der Pfeilspitze im gleichseitigen Dreieck dient dazu, den Benutzer vor unisolierten und gefährlichen spannungsführenden Stellen innerhalb des Gerätegehäuses zu warnen, an denen die Spannung groß genug ist, um für den Menschen die Gefahr eines Stromschlages zu bergen.
Das Ausrufezeichen im gleichseitigen Dreieck dient dazu, den Benutzer auf wichtige vorhandene Betriebsund Wartungsanleitungen in der produktbegleitenden Dokumentation hinzuweisen.
ACHTUNG: UM BRANDGEFAHR UND DIE GEFAHR EINES STROMSCHLAGES ZU VERMEIDEN, SETZEN SIE DAS GERÄT WEDER REGEN NOCH SONSTIGER FEUCHTIGKEIT AUS.
WARNING: Installieren Sie das Gerät nicht in einem geschlossenen Raum, z.B. einem Bücherregal, oder an einem ähnlichen Ort.
ACHTUNG: Die Belüftungsöffnungen niemals verdecken. Das Gerät immer laut Herstellerangaben anschließen.
Schlitze und Öffnungen im Gehäuse dienen der Belüftung, gewährleisten einen störungsfreien Betrieb des Gerätes und schützen es vor Überhitzung.
Öffnungen sollten niemals durch Aufstellen des Gerätes auf einem Bett, Sofa, Teppich oder ähnlichen Untergründen verdeckt werden. Das Gerät sollte z. B. nicht in einem Bücherregal oder Schrank aufgestellt werden, wenn keine ausreichende Belüftung gewährleistet werden kann oder die Anleitungen missachtet wurden.
VORSICHT:
Dieses Gerät besitzt ein Laser-System.
Um das Gerät richtig zu verwenden, lesen Sie dieses Benutzerhandbuch sorgfältig durch und bewahren Sie es auf. Setzen Sie sich zur Wartung mit einem qualifizierten Servicebetrieb in Verbindung. Durch Bedienung, Einstellungen oder Verfahren, die in diesem Handbuch nicht erwähnt werden, können gefährliche Strahlungen verursacht werden.
Um direkten Kontakt mit dem Laserstrahl zu vermeiden, darf das Gehäuse nicht geöffnet werden. Ansonsten tritt eine sichtbare Laserstrahlung auf. NIEMALS DIREKT IN DEN LASERSTRAHL BLICKEN.
Vorsicht: Das Gerät darf nicht mit Wasser (Tropfoder Spritzwasser) in Berührung kommen und es sollten keine mit Flüssigkeiten gefüllten Behälter auf das Gerät gestellt werden, wie z. B. Vasen.
VORSICHTSHINWEISE zum Netzkabel
Die meisten Geräte sollten an einen eigenen Stromkreis angeschlossen werden.
D. h. eine separate Steckdose ohne weitere Anschlüsse oder Zweigleitungen, über die ausschließlich dieses Gerät mit Strom versorgt wird. Beachten Sie hierzu die technischen Daten des Gerätes in diesem Benutzerhandbuch.
Steckdosen niemals überlasten. Bei überlasteten, lockeren oder beschädigten Steckdosen, Verlängerungskabeln, bei abgenutzten Kabeln oder beschädigter Isolierung besteht die Gefahr von Stromschlägen oder Bränden. Die Gerätekabel sollten regelmäßig überprüft werden. Bei Beschädigungen oder Abnutzungen der Kabel sofort den Netzstecker ziehen und das Kabel von einem qualifizierten Techniker durch ein gleiches Modell austauschen lassen.
Das Netzkabel vor mechanischen Beschädigungen, schützen, wie z. B. Verdrehen, Knicken, Eindrücken, Einklemmen in einer Tür oder Darauftreten.
Achten Sie besonders auf die Stecker, Steckdosen und den Bereich, an dem das Kabel aus dem Gerät austritt.
Ziehen Sie zum Unterbrechen der Stromversorgung den Netzstecker. Achten Sie beim Aufstellen des Gerätes darauf, dass der Netzstecker leicht erreichbar bleibt.
Entsorgung von Altgeräten
1.Wenn dieses Symbol eines durchgestrichenen Abfalleimers auf einem Produkt angebracht ist, unterliegt dieses Produkt der europäischen Richtlinie 2002/96/EC.
2.Alle Elektround Elektronik-Altgeräte müssen getrennt vom Hausmüll über dafür staatlich vorgesehene Stellen entsorgt werden.
3.Mit der ordnungsgemäßen Entsorgung des alten Geräts vermeiden Sie Umweltschäden sowie eine Gefährdung der eigenen Gesundheit.
4.Weitere Informationen zur Entsorgung des alten Geräts erhalten Sie bei der Stadtverwaltung, beim Entsorgungsamt oder im Geschäft, in dem Sie das Produkt erworben haben.
Dieses Produkt wurde gemäß den EWGRICHTLINIEN 89/336/EEC, 93/68/EEC und 73/23/EEC hergestellt.
2

Inhalt
Einführung . . . . . . . . . . . . . . . . . . .4-7
Info über das Symbol  auf dem Bildschirm 4 Hinweis zu den verwendeten Symbolen . . . . .4 Hinweise zu Discs . . . . . . . . . . . . . . . . . . . . . .4
Handhabung von Discs . . . . . . . . . . . . . . . .4 Aufbewahrung von Discs . . . . . . . . . . . . . . .4 Reinigung von Discs . . . . . . . . . . . . . . . . . .4
Wartung und Pflege . . . . . . . . . . . . . . . . . . . . .4 Unterstützte Disc-Formate . . . . . . . . . . . . . . .5 Ländercode . . . . . . . . . . . . . . . . . . . . . . . . . . .5 Vorderes Bedienfeld . . . . . . . . . . . . . . . . . . . .6 Fernbedienung . . . . . . . . . . . . . . . . . . . . . . . .7
Funktionen der Fernbedienung . . . . . . . . . .7 Einlegen der Batterien in die
Fernbedienung . . . . . . . . . . . . . . . . . . . . . . .7
Installation und Einrichtung . . . .8-13
Einrichtung des Players . . . . . . . . . . . . . . . . .8 DVD-Player-Anschlüsse . . . . . . . . . . . . . . . . .8
Videound Audioanschlüsse an Ihrem Fernsehgerät . . . . . . . . . . . . . . . . . . . . . . . .8
Audioanschluss an Zusatzgeräte . . . . . . . . . .9 Anzeige von Disc-Informationen auf dem Bildschirm . . . . . . . . . . . . . . . . . . . . . . . . . . .10 Grundeinstellungen . . . . . . . . . . . . . . . . . . . .10
Allgemeiner Betrieb . . . . . . . . . . . . . |
. . . . .10 |
|
SPRACHE . . . . . . . . . . . . . . . . . . . . |
. . . . .11 |
|
• |
Menü sprache . . . . . . . . . . . . . . . . . |
. . . .11 |
• |
Disc Audio / Untertitel / Menü . . . . . |
. . . .11 |
ANZEIGE . . . . . . . . . . . . . . . . . . . . . . |
. . . .11 |
|
• |
Bildformat . . . . . . . . . . . . . . . . . . . |
. . . .11 |
• |
Anzeigemodus . . . . . . . . . . . . . . . . |
. . . .11 |
• |
Progressive Scan . . . . . . . . . . . . . . |
. . . .11 |
• |
Video-Ausgang . . . . . . . . . . . . . . . . |
. . . .11 |
AUDIO . . . . . . . . . . . . . . . . . . . . . . . |
. . . .12 |
|
• |
Dolby Digital / DTS / MPEG . . . . . . |
. . . .12 |
• |
Samplingfrequenz (Erkannt) . . . . . . |
. . . .12 |
• |
Steuerung des Dynamikbereichs (DRC) .12 |
|
• |
Vocal . . . . . . . . . . . . . . . . . . . . . . . |
. . . .12 |
BLOCK (Kindersicherung) . . . . . . . . . |
. . . .12 |
|
• |
Einstufung . . . . . . . . . . . . . . . . . . . . |
. . . .12 |
• |
Kennwort . . . . . . . . . . . . . . . . . . . . |
. . . .12 |
• |
Orts Code . . . . . . . . . . . . . . . . . . . . |
. . . .13 |
ANDERE . . . . . . . . . . . . . . . . . . . . . . |
. . . .13 |
|
• PBC . . . . . . . . . . . . . . . . . . . . . . . . |
. . . .13 |
|
• |
B.L.E. (Schwarzpegelverstärkung) |
. . . . .13 |
• DivX(R) VOD . . . . . . . . . . . . . . . . . |
. . . .13 |
|
Betrieb . . . . . . . . . . . . . . . . . . . .14-19
Allgemeine Funktionen . . . . . . . . . . . . . . . . .14 Weitere Funktionen . . . . . . . . . . . . . . . . . . . .15 Wiedergabe einer Audio-CD oder MP3-/ WMA-Datei . . . . . . . . . . . . . . . . . . . . . . . . . . .16 Programmierte Wiedergabe . . . . . . . . . . . . . .17
Programmierte Tracks wiederholen . . . . . . .17 Track aus der Programmliste löschen . . . . .17 Gesamte Programmliste löschen . . . . . . . .17
Wiedergabe von DVD VR-Discs . . . . . . . . . .17 Anzeige von JPEG-Dateien . . . . . . . . . . . . . .18
Diashow . . . . . . . . . . . . . . . . . . . . . . . . . . .18 Standbild . . . . . . . . . . . . . . . . . . . . . . . . . .18 Zu einer anderen Datei wechseln . . . . . . . .18 Zoom . . . . . . . . . . . . . . . . . . . . . . . . . . . . .18 Bild drehen . . . . . . . . . . . . . . . . . . . . . . . . .18 MP3/WMA-Musik während der
Bildanzeige spielen . . . . . . . . . . . . . . . . . .18
Wiedergabe von DivX-Filmen . . . . . . . . . . . .19
Referenzinformationen . . . . . . .20-22
Andere TV-Geräte über die Fernbedienung bedienen . . . . . . . . . . . . . . . . . . . . . . . . . . . . . . . . .20 Videomodus-Einstellung . . . . . . . . . . . . . . . . . . .20 Sprachcodes . . . . . . . . . . . . . . . . . . . . . . . . . .21 Ländercode . . . . . . . . . . . . . . . . . . . . . . . . . . .21 Störungsbehebung . . . . . . . . . . . . . . . . . . . . .22 Technische Daten . . . . . . . . . . . . . . . . . . . . . .22
Introduction
Operation Installation and Setup
Reference
3

Einführung
Lesen Sie zur richtigen Bedienung des Gerätes dieses Benutzerhandbuch sorgfältig durch und bewahren Sie es zum späteren Nachschlagen auf.
Dieses Handbuch enthält Informationen über die Bedienung und Wartung Ihres DVD-Players. Wenn dieses Gerät repariert werden muss, wenden Sie sich an einen autorisierten Fachhändler.
Info über das Symbol  auf dem Bildschirm
“  ” kann während des Betriebs auf dem Bildschirm Ihres Fernsehgerätes angezeigt werden. Das Symbol zeigt dann an, dass die in der vorliegenden Gebrauchsanleitung erläuterte Funktion auf dieser bestimmten DVD-Video-Disc nicht verfügbar ist.
Hinweis zu den verwendeten Symbolen
Hinweis:
Weist auf besondere Hinweise und Betriebsmerkmale hin.
Tipp:
Weist auf Tipps und Tricks hin, die die Bedienung dieses Geräts vereinfachen.
Enthält der Titel eines Kapitels eines der folgenden Symbole, ist dies nur auf die durch das Symbol dargestellte Disc anwendbar.
ALL Jeder der folgenden Disc-Typen
DVD und finalisierte DVD±R/RW
Video-CDs
Audio-CDs
MP3-Dateien
WMA-Dateien
Hinweise zu Discs
Handhabung von Discs
Berühren Sie nicht die bespielte Seite der Disc.
Sie die Disc an den Rändern an, um nicht die Oberfläche mit den Fingern zu berühren. Bringen Sie
der beiden Seiten der Disc Papier oder Aufkleber an.
Aufbewahrung von Discs
Legen Sie die Disc nach der Wiedergabe wieder in die zugehörige Hülle. Setzen Sie die Disc keiner direkten Sonneneinstrahlung oder Wärmequellen aus und lassen Sie sie nie in einem Auto liegen, das direkt
in der Sonne geparkt wird.
Reinigung von Discs
Fingerabdrücke und Staub auf der Disc können die Bildund Tonqualität beeinträchtigen. Reinigen Sie die Disc vor der Wiedergabe mit einem sauberen Tuch. Wischen Sie die Disc von der Mitte zum Rand hin ab.
Verwenden Sie keine starken Lösungsmittel wie Alkohol, Benzin, Verdünner, handelsübliche Reiniger oder für Schallplatten bestimmte Antistatik-Sprays.
Wartung und Pflege
Lesen Sie die Informationen in diesem Kapitel, bevor Sie sich an einen Servicetechniker wenden.
Handhabung des Gerätes
Transport und Versand des Gerätes
Bewahren Sie den Original-Versandkarton und das Verpackungsmaterial auf. Wenn Sie das Gerät einsenden müssen, verpacken Sie es wieder so, wie es ab Werk geliefert wurde, um es optimal zu schützen.
Außenseiten sauber halten
•Verwenden Sie keine flüchtigen Flüssigkeiten wie Insektensprays in der Nähe des Geräts.
•Gummioder Kunststoffgegenstände sollten nie längere Zeit mit dem Gerät in Kontakt bleiben. Sie hinterlassen Spuren auf der Oberfläche.
Reinigung des Gerätes
Reinigen Sie den Player mit einem weichen, trockenen Tuch. Wenn die Oberfläche stark
ist, verwenden Sie ein mit einer milden Putzmittellösung angefeuchtetes weiches Tuch.
Verwenden Sie keine starken Lösungsmittel wie Alkohol, Benzin oder Verdünner, da sie die Oberfläche des Gerätes angreifen können.
Wartung und Pflege des Gerätes
Der DVD-Player ist ein Hightech-Präzisionsgerät. Wenn die optische Abtastlinse und die Teile des Disc-Laufwerks verschmutzt oder abgenutzt sind, kann sich die Bildqualität verschlechtern.
Je nach Betriebsbedingungen empfehlen wir eine regelmäßige Prüfung und Wartung nach jeweils 1.000 Betriebsstunden.
Informationen erhalten Sie bei einem Händler in Ihrer Nähe.
4
Unterstützte Disc-Formate
DVD
(8 cm / 12 cm-Disc)
Video CD (VCD/SVCD) (8 cm / 12 cm-Disc)
Audio CD
(8 cm / 12 cm-Disc)
Zusätzlich können auf diesem Gerät DVD±R/RW-, CD-R/RW- und Dual-Discs mit Audiotiteln, DivX-, MP3-, WMAund/oder JPEG-Dateien wiedergegeben werden.
Dies ist ein Hinweis auf eine Produktfunktion, die im Video-Recording- Format aufgezeichnete DVD-RW-Discs abspielen kann.
Hinweise:
•Abhängig von den Voraussetzungen des Aufnahmegerätes oder der CD-R/RW- (bzw. DVD±R/RW-) Disc können bestimmte CD-R/RW- (bzw. DVD±R/RW-) Discs nicht auf diesem Gerät wiedergegeben werden.
•Verwenden Sie keine ungewöhnlich geformten CDs (z. B. herzförmig oder achteckig). Andernfalls sind Fehlfunktionen nicht auszuschließen.
Ländercode
Der Ländercode dieses Players ist auf der Geräterückseite aufgedruckt. Es können nur DVDDiscs mit derselben Bezeichnung wie auf der Geräterückseite oder mit der Bezeichnung “ALLE” wiedergegeben werden.
Hinweise zu Ländercodes
•Bei den meisten DVDs finden Sie einen Globus mit einer oder mehreren Nummern gut sichtbar auf der Hülle. Diese Nummer muss mit dem Regionalcode Ihres DVD-Players übereinstimmen, damit Sie die Disc wiedergeben können.
•Wenn Sie eine DVD mit einem anderen Ländercode mit Ihrem Player wiedergeben möchten, wird die Meldung “Vérification Code Régional” auf dem Bildschirm des Fernsehgerätes angezeigt.
Hinweise zum Copyright:
Es ist gesetzlich verboten, urheberrechtlich geschütztes Material ohne Genehmigung zu kopieren, auszustrahlen, vorzuführen, über Kabel zu senden, öffentlich wiederzugeben oder zu verleihen. Dieses Gerät ist mit der von Macrovision entwickelten Kopierschutzfunktion ausgestattet. Auf einigen Discs sind Kopierschutzsignale aufgezeichnet. Wenn Sie die Bilder dieser Discs auf einem Videorekorder aufzeichnen und wiedergeben, können Bildstörungen auftreten. Dieses Gerät verwendet Technologien zum Urheberrechtsschutz, die durch Verfahrensansprüche bestimmter US-Patente und sonstiger Rechte zum Schutz geistigen Eigentums der Macrovision Corporation und anderer Rechteeigentümer geschützt sind. Die Verwendung dieser UrheberrechtsschutzTechnologie muss von der Macrovision Corporation genehmigt werden und gilt nur für den privaten oder sonstigen eingeschränkten Gebrauch, sofern keine spezielle Genehmigung der Macrovision Corporation vorliegt. Nachbau und Auseinandernehmen sind verboten.
ES IST ZU BEACHTEN, DASS NICHT JEDER HIGH- DEFINITION-FERNSEHER VOLL KOMPATIBEL MIT DIESEM PRODUKT IST UND DASS BEI DER DARSTELLUNG DES BILDES ARTEFAKTE AUFTRETEN KÖNNEN. BEI FEHLERHAFTER ANZEIGE EINES 525 ODER 625 PROGRESSIVE SCAN-BILDES WIRD EMPFOHLEN, DEN ANSCHLUSS AUF DEN ‘STANDARD DEFINITION’- AUSGANG EINZUSTELLEN. BEI FRAGEN ZUR KOMPATIBILITÄT DES TV-GERÄTES MIT DIESEM DVD-PLAYER SETZEN SIE SICH BITTE MIT UNSEREM KUNDENDIENST IN VERBINDUNG.
Einführung
5
 Loading...