


English
DVD-ROM DRIVE
OWNER’S MANUAL
MODEL : DRD-820B
To enjoy fully all the features and functions of your DVD-ROM Drive, Please read this Owner’s Manual carefully and completely.
CAUTION: The laser used in the DVD-ROM drive can damage your eyes.
Do not attempt to open the cover.
To reduce the risk of electric shock, do not remove cover (or back).
No user-serviceable parts inside.
Refer servicing to qualified service personnel.
COMPACT
This unit uses CD-ROM discs marked with this symbol:
Use of controls or performance of procedures other than those specified herein may result in hazardous radiation exposure.
PRODUCT COMPLIES WITH DHHS
RULES 21 C.F.R. SUB-CHAPTER J,
IN EFFECT AT THE DATE OF MANUFACTURE.
WARNING: To reduce the risk of fire or electric shock,
do not expose this appliance to rain or moisture.
CSA Notice
This class B digital apparatus meets all requirements of the Canadian Interference-Causing Equipment Regulations.
Cet appareil numérique de la classe B respecte toutes les exigences du Règlement sur le matériel brouilleur du Canada.
FCC COMPLIANCE STATEMENT
Note : This equipment has been tested and found to comply with the limits for a Class B digital device, pursuant to Part 15 of the FCC Rules.
These limits are designed to provide reasonable protection against harmful interference in a residential installation. This equipment generates, uses, and can radiate radio frequency energy and, if not installed and used in accordance with the instructions, may cause harmful interference to radio communications. However, there is no guarantee that interference will not occur in a particular installation. If this equipment does cause harmful interference to radio or television reception, which can be determined by turning the equipment off and on, the user is encouraged to try to correct the interference by one or more of the following measures:
-Reorient or relocate the receiving antenna.
-Increase the separation between the equipment and receiver.
-Connect the equipment into an outlet on a circuit different from that to which the receiver is connected.
-Consult the dealer or an Authorized Service Center for help.
•FCC WARNING
Changes or modifications not expressly approved by the party responsible for compliance could void the user’s authority to operate the equipment.
•This DVD-ROM Drive is for use only with UL listed personal computers that have installation instructions detailing user installation of card cage accessory.
E-2

FEATURES
FEATURES
■ATAPI/E-IDE interface
■Average access time (DVD-ROM:150ms, CD-ROM:100ms)
■Multimedia PC compatible
■Photo CD multisession support
■Small CPU band width (MPC spec.)
■Data transfer rate(DVD-ROM 2x-speed:2.70MB/sec,
CD-ROM max-24x-speed: 3.6MB/sec)
■Intelligent 256KB data buffering system
■Horizontal mounting support
■Tray Loading system without caddy
■Designed for internal mounting
■Emergency Eject Support
■Easy audio CD control button support
■Supports Windows 95 Plug and Play ATAPI protocol
■CD-R, CD-RW Support
SYSTEM REQUIREMENTS
An IBM PC or compatible with the following system components:
■IBM Compatible Pentium-133 MHz or above (With PIO mode 4, TX chip set recommended)
■A Minimum of 16MB memory
■Floppy disk drive (3 1/2 inch)
■MS-DOS version 3.1 or greater
■An open, front-facing, half-height drive bay.
■An existing IDE controller in your PC with an available cable connector or a new IDE controller that you will install.
SUPPLIED ACCESSORIES
Item |
Quantity |
Owner’s Manual |
1 |
Setup Diskette |
1 |
|
|
Audio Cable |
1 |
|
|
E-3

LOCATION AND FUNCTION OF CONTROLS
COMPACT
R O M
DVD CD
1 |
2 |
3 |
4 |
5 |
6 |
7 |
|
|
Figure 1. Front View |
|
|
|
|
FRONT VIEW
1Headphone Jack
3.5mm jack for monitoring the audio signal from audio CDs.
2Headphone Volume Control
Adjusts the headphone sound level.
3Busy Indicator (DVD, CD)
The Busy Indicator lights during initialization and data-read operations.
4Disc Drawer
Accepts a CD-ROM/DVD-ROM disc on its tray.
5Play/Skip Button
When an Audio CD is in the Disc Drawer, pressing this button will start playing audio CDs from the first track. If an audio CD is playing, pressing this button will skip to the next track.
6Emergency Eject Hole
Insert a paper clip here to eject the drawer manually or when there is no power.
7Open/Close/Stop Button
This button is pressed to open or close the CD tray.
The button works only when the main power switch is on.
If an audio CD is playing, pressing this button will stop it, and pressing it again will open the tray.
E-4
|
|
|
|
|
|
|
|
|
|
|
|
|
|
|
|
|
|
|
|
|
|
|
|
|
|
|
|
|
|
|
|
|
|
|
|
|
|
|
|
|
|
|
|
|
|
|
|
|
|
|
|
|
|
|
|
|
|
|
|
|
|
|
|
|
|
|
|
|
|
|
|
|
|
|
|
|
|
|
|
|
|
|
|
|
|
|
|
|
DIGITAL |
|
|
ANALOG |
|
INTERFACE |
POWER |
|
|
||||||||||||
|
AUDIO |
|
|
AUDIO |
|
|
|||||||||||||||
|
|
|
|
|
|
|
|
|
|
|
|
+5 |
GND +12 |
|
|||||||
|
|
D G |
R G L C S M |
39 |
|
|
|
||||||||||||||
|
|
|
1 |
|
|
|
|
|
|
|
|
|
|||||||||
|
|
|
|
|
|
|
S L A |
40 |
|
2 |
|
|
|
|
|
|
|
|
|
||
|
|
|
|
|
|
|
|
|
|
|
|
|
|
|
|
|
|
|
|
|
|
|
|
|
|
|
|
|
|
|
|
|
|
|
|
|
|
|
|
|
|
|
|
|
|
|
|
|
|
|
|
|
|
|
|
|
|
|
|
|
|
|
|
|
|
|
|
|
|
|
|
|
|
|
|
|
|
|
|
|
|
|
|
|
|
|
|
|
|
|
|
|
|
|
|
|
|
|
|
|
|
|
|
|
|
|
|
|
|
1 |
2 |
3 |
4 |
5 |
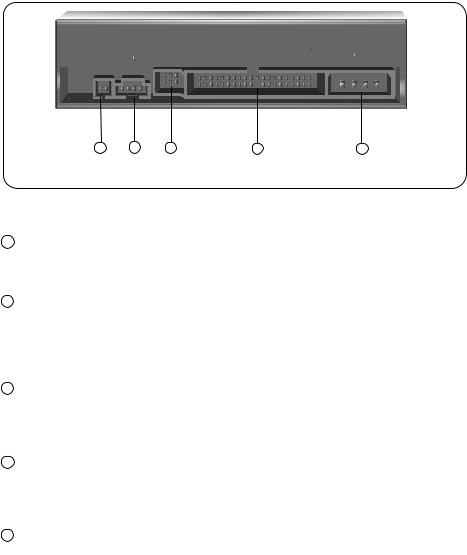
Figure 2. Back View
BACK VIEW
1Digital Audio Ouput Connector
This is a digital audio output connector or Video CD output connector. You can connect this to the digital audio system or Video CD Board.
2Analog Audio Output Connector
The Audio Output Connector connects to a sound card.
The supplied audio cable is a SoundBlaster® type cable. If you have a different sound card, you will need to contact the sound card manufacturer to obtain the proper cable for that card. This cable is necessary to play audio CDs.
3Master / Slave / CSEL Jumper
These three jumpers are used to set the DVD-ROM Drive to either a Master, Slave, or CSEL drive.
Refer to section HARDWARE INSTALLATION.
4Interface Connector
This 40-pin connector is used to transfer and control signals between the DVD-ROM Drive and your PC.
Connect the 40-pin IDE cable in your PC to this connector.
5Power-in Connector
Attach a power cable from the computer’s power supply to this connector.
E-5

INSTALLATION, USAGE AND HANDLING PRECAUTIONS
■ Installation
Avoid placing the drive in a location subject to :
-high humidity
-high temperature
-mechanical vibration
-direct sunlight
■Operation
-During operation, excessive vibration, or a sudden jolt to the drive may cause a malfunction.
-Avoid exposing the drive to sudden changes in temperature. This may cause condensation to collect inside the drive.
■Transportation
-Always remove the disc before moving the drive.
E-6
 Loading...