


 Loading...
2-1. Driving procedures
Driving the vehicle
The following procedures should be observed to ensure safe driving.
nStarting the engine (→P. 95)
nDriving
STEP 1 |
With the brake pedal depressed, shift the shift lever to “D”. |
|
|
|
(→P. 98) |
STEP 2 |
Release the parking brake. |
(→P. 103) |
STEP 3 |
Gradually release the brake pedal and gently push the accel- |
|
|
erator pedal to accelerate the vehicle. |
|
n Stopping |
|
|
STEP 1 |
With the shift lever in “D”, push the brake pedal. |
|
STEP 2 |
If necessary, set the parking brake. |
|
|
|
|
|
When the vehicle is stopped for an extended period of time, shift the |
|
|
|
|
|
shift lever to “P” or “N”. |
(→P.98) |
|
|
n Parking the vehicle |
|
||
|
|
|
|
With the shift lever in “D”, push the brake pedal. |
|
|
|
STEP |
1 |
|
|
|
|
|
Set the parking brake. |
(→P.103) |
|
|
|
STEP |
2 |
||
|
|
|
Shift the shift lever to “P”. |
(→P.98) |
|
|
|
STEP |
3 |
||
|
|
|
Turn the ignition key to stop the engine. |
|
|
|
|
STEP |
4 |
|
|
|
|
|
Lock the door, making sure that you have the key on your per- |
||
|
|
STEP |
5 |
||
|
|
|
|
son. |
|
|
|
|
|
|
|
|
Starting on a steep incline |
|
|||
|
|
|
Firmly set the parking brake and shift the shift lever to “D”. |
||
|
|
STEP |
1 |
||
|
|
|
Gently depress the accelerator pedal. |
|
|
|
|
STEP |
2 |
|
|
|
|
|
Release the parking brake. |
|
|
|
|
STEP |
3 |
|
|
88

2-1. Driving procedures
nBreaking in your new Lexus
To extend the life of the vehicle, the following precautions are recommended to observe:
•For the first 200 miles (300 km): Avoid sudden stops.
•For the first 500 miles (800 km): Do not tow a trailer.
•For the first 1000 miles (1600 km):
•Do not drive at extremely high speeds.
•Avoid sudden acceleration.
•Do not drive continuously in the low gears.
•Do not drive at a constant speed for extended periods.
nOperating your vehicle in a foreign country
Comply with the relevant vehicle registration laws and confirm the availability of the correct fuel. (→P. 370)
2 Whendriving
89

2-1. Driving procedures
 CAUTION
nWhen starting the vehicle
Always keep your foot on the brake pedal while stopped with the engine running. This prevents the vehicle from creeping.
nWhen driving the vehicle
•Do not drive if you are unfamiliar with the location of the brake and accelerator pedals to avoid depressing the wrong pedal.
Accidentally depressing the accelerator pedal instead of the brake pedal will result in sudden acceleration that may lead to an accident that could result in death or serious injury.
•Do not drive the vehicle over or stop the vehicle near flammable materials.
•Do not let the vehicle roll backwards while the shift lever is in a driving position, or roll forward while the shift lever is in “R”.
Doing so may cause the engine to stall or lead to poor brake and steering performance, resulting in an accident or damage to the vehicle.
•If the smell of exhaust is noticed inside the vehicle, open the windows and check that the back door is closed.
Large amounts of exhaust in the vehicle can cause driver drowsiness and eventually, death. Have the cause of the problem inspected immediately.
•Do not under any circumstances shift the shift lever to “P”, “R” or “N” while the vehicle is moving.
Doing so can cause significant damage to the transmission and may result in a loss of vehicle control.
•Do not shift the shift lever to “N” while the vehicle is moving.
Doing so may cause the engine brake not to operate properly and lead to an accident.
•Do not turn the engine off while driving.
The power steering and brake booster systems will not operate properly if the engine is off.
90

2-1. Driving procedures
 CAUTION
nWhen driving the vehicle
•Use engine braking (downshift) to maintain a safe speed when driving down a steep hill.
Using the brakes continuously may cause the brakes to overheat and lose effectiveness. (→P. 99)
•When stopped on an inclined surface, use the brake pedal and parking brake to prevent the vehicle from rolling backward or forward and causing an accident.
•Be careful when driving on slippery surfaces, as the vehicle may spin or skid when downshifting, rapidly accelerating, braking or turning.
•Do not adjust the position of the steering wheel, the seat, or the inside or outside rear view mirrors while driving.
Doing so may result in a loss of vehicle control that can cause accidents that may result in death or serious injury.
•Always check that all passengers' arms, heads or other parts of their bodies are not outside the vehicle, as this may result in death or serious injury.
•Do not drive in excess of the speed limit. Even if the legal speed limit permits it, do not drive over 85 mph (140 km/h) unless your vehicle has high-speed capability tires. Driving over 85 mph (140 km/h) may result in tire failure, loss of control and possible injury. Be sure to consult a tire dealer to determine whether the tires on your vehicle are high-speed capability tires or not before driving at such speeds.
•If you drive through deep water over about 500 mm (20 in.) in depth, put the vehicle height in the HI (High) mode with the active height select switch and then turn off the active height control suspension by pushing the height control switch. Drive your vehicle at 30 km/h (19 mph) or lower speed.
2 Whendriving
91

2-1. Driving procedures
 CAUTION
nWhen shifting the shift lever
Be careful not to shift the shift lever with the accelerator pedal depressed.
This may lead to unexpected rapid acceleration of the vehicle that may cause an accident and result in death or serious injury.
nWhen the vehicle is stopped
•Do not race the engine.
If the vehicle is in any gear other than “P” or “N” the vehicle may accelerate suddenly and unexpectedly, and may cause an accident.
•Do not leave the vehicle with the engine running for a long time.
If such a situation cannot be avoided, park the vehicle in an open space and check that exhaust fumes do not enter the vehicle interior.
•Always keep a foot on the brake pedal while the engine is running to prevent an accident caused by the vehicle moving.
nWhen the vehicle is parked
•Do not leave glasses, cigarette lighters, spray cans, or soft drink cans in the vehicle when it is in the sun.
Failure to do so may result in the following:
•Gas may leak from a cigarette lighter or spray can, and may lead to a fire.
•The temperature inside the vehicle may cause the plastic lenses and plastic material of eye glasses to deform or crack.
•Soft drink cans may fracture, causing the contents to spray over the interior of the vehicle, and may also cause a short circuit in the vehicle's electrical components.
•Always apply the parking brake, shift the shift lever to “P”, stop the engine and lock the vehicle.
Do not leave the vehicle unattended while the engine is running.
•Do not touch the exhaust pipe while the engine is running or immediately after turning the engine off.
Doing so may cause burns.
•Do not leave the engine running in an area with snow build up, or where snow is expected to fall.
Exhaust gases may enter the vehicle and cause gas poisoning.
92

2-1. Driving procedures
 CAUTION
nWhen taking a nap in the vehicle
Always turn the engine off.
Otherwise, you may accidentally move the shift lever or press the accelerator pedal, which could cause an accident or fire due to abnormal engine overheating. Additionally, if the vehicle is parked in a poorly ventilated area, exhaust fumes may enter the vehicle and cause gas poisoning.
nWhen braking the vehicle
•When the brakes are wet, drive more cautiously.
Braking distance increases when the brakes are wet, and may cause one side of the vehicle to brake differently than the other side. Also the parking brake may not securely hold the vehicle.
•If the brake assist function does not operate, do not follow other vehicles closely and avoid downhill or sharp turns that require braking.
In this case, braking is still possible, but it will require more force on the pedal than usual. Braking distance may also increase.
•Do not pump the brake pedal if the engine stalls.
Each push on the pedal uses up your reserved brake fluid pressure.
•The brake system consists of 2 individual hydraulic systems: if one of the systems fails, the other will still operate. In this case, the brake pedal should be depressed more firmly than usual and braking distance becomes longer.
Do not drive your vehicle with only a single brake system. Have your brakes fixed immediately.
2 Whendriving
93

2-1. Driving procedures
 NOTICE
nWhile driving the vehicle
Do not use the accelerator pedal or depress accelerator and brake pedals together to hold the vehicle on a hill.
nWhen parking the vehicle
Always put the shift lever in “P”. Failure to do so may cause the vehicle to move or the vehicle may accelerate suddenly if the accelerator pedal is accidentally depressed.
nAvoiding damage to vehicle parts
•Do not turn the steering wheel fully in either direction and hold it there for a long time.
Doing so may damage the power steering pump.
•When driving over bumps in the road, drive as slowly as possible to avoid damaging the wheels, underside of the vehicle, etc.
nIf you hear a squealing or scraping noise (brake pad wear limit indicators)
Have your Lexus dealer check and replace the brake pads as soon as possible. The rotor damage can result if the pads are not replaced when needed.
It is dangerous to drive the vehicle when the wear limits of the brake pads and/or that of the brake discs are exceeded.
nIf you get a flat tire while driving
A flat or damaged tire may cause the following situations. Hold the steering wheel firmly and gradually press the brake pedal to slow down the vehicle.
•It may be difficult to control your vehicle. •The vehicle will make abnormal sounds. •The vehicle will behave abnormally.
Replace a flat tire with a new one. (→P. 346)
94
2-1. Driving procedures
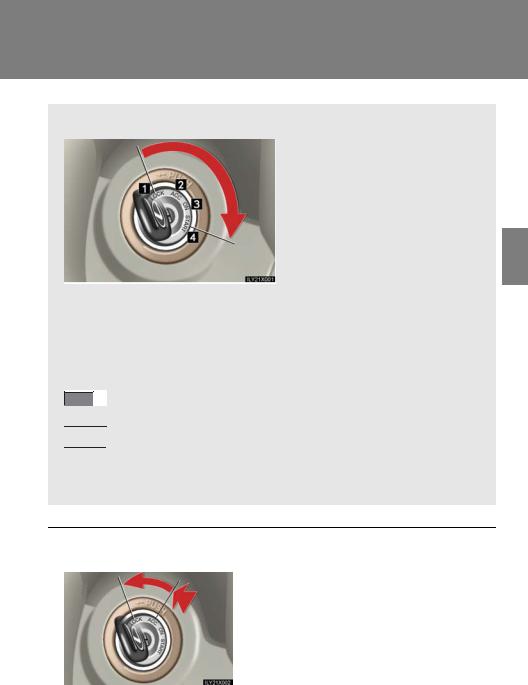
Starting the engine
]
n Ignition switch
 LOCK:
LOCK:
The steering wheel is locked and the key can be removed.
 ACC:
ACC:
Some electrical components such as the audio system can be used.
 ON:
ON:
All electrical components can be used.
 START
START
n Starting the engine
STEP 1 Check that the parking brake is set.  Check that the shift lever is set in “P”.


 Sit in the driver’s seat and firmly depress the brake pedal.
 Turn the ignition key to the “START” position and start the engine.
2 Whendriving
nTurning the key from “ACC” to “LOCK” |
|
||||
|
|
|
|
|
Shift the shift lever to “P”. |
|
|
|
STEP |
1 |
|
|
|
|
|
Push in the key and turn to the |
|
|
|
|
STEP |
2 |
|
|
|
|
|
|
“LOCK” position. |
|
|
|
|
|
|
95

2-1. Driving procedures
T nSteering lock release
When starting the engine, the ignition switch may seem stuck in the “LOCK” position. To free it, turn the ignition key while turning the steering wheel sightly in either direction.
n If the engine does not start
The engine immobilizer system may not have been deactivated. (→P. 47) nStarting the engine using the flat key
STEP |
1 |
Remove the flat key from its case. Insert the |
|
|
key into the ignition switch. |
STEP 2 |
Bring the key case close to the ignition switch |
|
within 10 seconds as indicated by an arrow. |
STEP 3 Put the key case away when the indicator light goes out. This means the engine immobilizer system has turned off.
STEP 4 Start the engine within 60 seconds after the indicator light goes off.
96

2-1. Driving procedures
nCranking hold function
Once you turn the ignition key to “START” position and release it, the function continues to crank the engine in “ON” position until it starts. If the engine has not started, the function stops after about 25 seconds. Wait a few seconds and restart it.
nLeak detection pump
Several hours after the engine is turned off, you may hear a sound coming from
underneath the luggage compartment for several minutes. This is normal operation and does not indicate a malfunction.
 CAUTION
nWhen starting the engine
Always start the engine while sitting in the driver’s seat. Do not press the accelerator pedal while starting the engine under any circumstances.
Doing so may cause an accident resulting in death or serious injury.
nWhen driving
Do not turn the ignition switch to the “LOCK” position while driving. If, in an emergency, you must turn the engine off while the vehicle is moving, turn the key only to the “ACC” position.
 NOTICE
nTo prevent battery discharge
Do not leave the ignition key in the “ACC” or “ON” position for long periods without the engine running.
nWhen starting the engine •Do not race a cold engine.
•If the engine becomes difficult to start or stalls frequently, have the engine checked immediately.
2 Whendriving
97
2-1. Driving procedures
Automatic transmission
Select a shift position appropriate for the driving conditions. n Shifting the shift lever
While the ignition key is in the “ON” position, depress the brake pedal and move the shift lever.
98

2-1. Driving procedures
n Shift position uses
Shift position |
Function |
|
|
P |
Parking the vehicle or starting the engine |
R |
Reversing |
N |
Neutral |
D |
Normal driving* |
4 |
Position for engine braking |
3,2 |
Position for more powerful engine braking |
L |
Position for maximum engine braking |
|
|
*: To improve fuel consumption and reduce noises, set the shift lever in the “D” position for normal driving.
2 Whendriving
99
2-1. Driving procedures
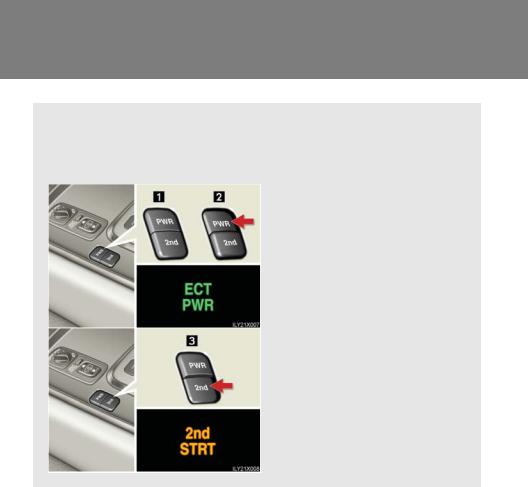
nSelecting a driving mode
The following patterns can be selected to suit current driving and operating conditions.
 Normal mode
 Power mode
For powerful acceleration and driving in mountainous regions.
 “2nd STRT” (second start)
For starting on slippery road surfaces, such as on snow.
Press “2nd” to return to normal mode.
100

2-1. Driving procedures
nDownshifting restrictions
Keep the engine rpm from going into red zone. The maximum allowable speed is as follows:
|
Maximum speed mph (km/h) |
||
Downshifting |
|
|
Transfer |
|
|
“L” |
“H” |
|
|
|
|
4→3 |
32 (51) |
80 (129) |
|
3→2 |
21 |
(35) |
54 (88) |
2→1 |
9 |
(14) |
22 (37) |
|
|
|
|
nWhen driving with the cruise control system
The engine brake will not operate when downshifting from “D” to “4”. (→P. 120) n“2nd STRT” mode automatic deactivation
“2nd STRT” mode is automatically deactivated if the engine is turned off after driving in “2nd STRT” mode.
nIf the shift lever cannot be shifted from “P”
→P. 358
2 Whendriving
101
2-1. Driving procedures
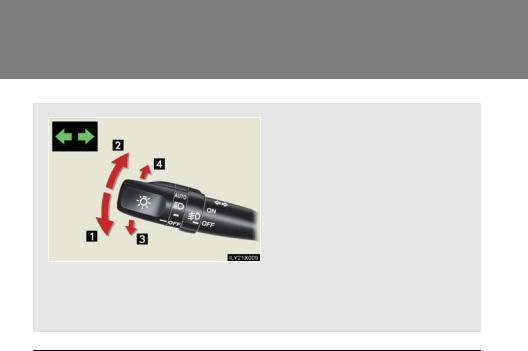
Turn signal lever
 Left turn
 Right turn
 Move and hold the lever partway to signal a lane change
The left hand signal will flash until you release the lever.
 Move and hold the lever partway to signal a lane change
The right hand signal will flash until you release the lever.
nTurn signals can be operated when
The ignition key is in the “ON” position.
nIf the indicators flash faster than usual
Check that a light bulb in the front or rear turn signal lights has not burned out.
102
2-1. Driving procedures
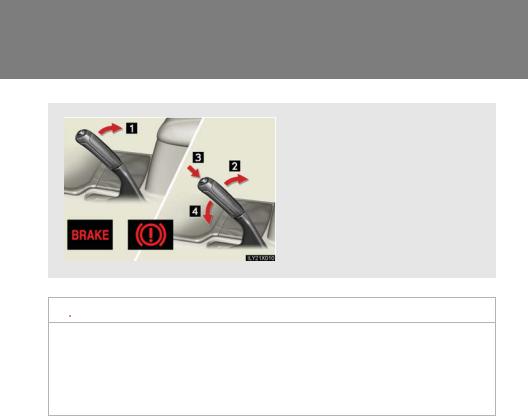
Parking brake
 Sets the parking brake
Fully set the parking brake while depressing the brake pedal.


 Releases the parking brake
U.S.A. |
Canada |
2 |
|
|
|
 NOTICE
nBefore driving
Fully release the parking brake.
Driving the vehicle with the parking brake set will lead to brake components overheating, which may affect braking performance and increase brake wear.
driving When
103
2-4. Using other driving systems
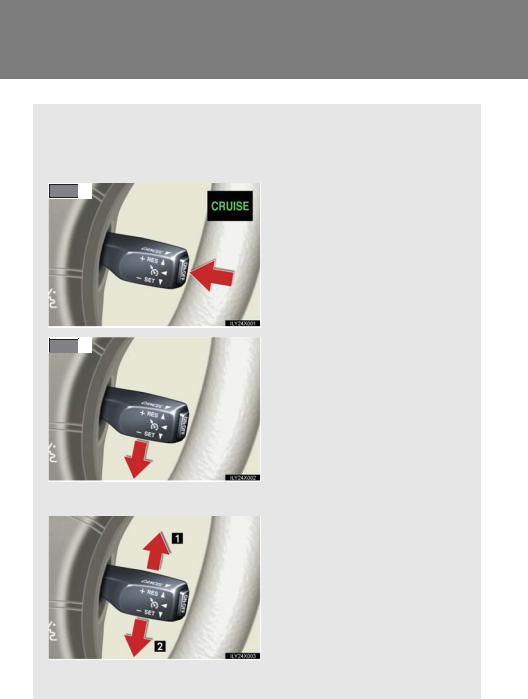
Cruise control
Use the cruise control to maintain a set speed without using the accelerator.
n Set the vehicle speed
STEP |
1 |
STEP 2 |
Turn the “ON-OFF” button ON.
Push the button once more to deactivate the cruise control.
Accelerate or decelerate to the desired speed and press the lever down to set the cruise control speed.
n Adjusting the speed setting
 Increase speed
 Decrease speed
Hold the lever until the desired speed setting is obtained.
Fine adjustment of the set speed (approximately 1.0 mph [1.6 km/ h]) can be made by lightly pressing the lever up or down and releasing it.
120

2-4. Using other driving systems
nCanceling and resuming regular acceleration
 Cancel
Push the lever towards you to cancel cruise control.
The setting is also canceled when the brake pedal is depressed.
 Resume
To resume cruise control and return to the set speed, push the lever up.
nCruise control can be set when •The shift lever is in the “D” or “4”.
•Vehicle speed is between approximately 25 mph (40 km/h) and 125 mph (200 km/h).
nAccelerating
The vehicle can be accelerated normally. After acceleration, the set speed resumes.
nAutomatic cruise control cancelation
The set speed is automatically canceled in any of the following situations.
•Actual vehicle speed falls more than 10 mph (16 km/h) below the preset vehicle speed
•Actual vehicle speed is below 25 mph (40 km/h) •VSC is activated
nIf the cruise control indicator light flashes
Turn the “ON-OFF” button off once, and then reactivate the system.
If the cruise control speed cannot be set or if the cruise control cancels immediately after being activated, there may be a malfunction in the cruise control system. Have the vehicle inspected by your Lexus dealer.
2 Whendriving
121

2-4. Using other driving systems
 CAUTION
nTo avoid operating the cruise control by mistake
Keep the “ON-OFF” button off when not in use.
nSituations unsuitable for cruise control
Do not use cruise control in any of the following situations.
Doing so may result in control of the vehicle being lost and could cause serious or fatal accident.
•In heavy traffic
•On roads with sharp bends
•On slippery roads, such as those covered with rain, ice or snow •On steep hills
•On winding roads
122
2-4. Using other driving systems
Rear view monitor system (if equipped)
The rear view monitor system assists the driver by displaying an image of the view behind the vehicle while reversing. The image is displayed in reverse on the screen. This allows the image to appear in the same manner as that of the rear view mirror.
Rear view image is displayed when the shift lever is in “R”.
If you move the lever out of “R”, the screen returns to the previous one.
nDisplayed area
The area covered by the camera is limited. Objects which are close to either corner of the bumper or under the bumper cannot be seen on the screen.
The area displayed on the screen may vary according to vehicle orientation or road conditions.
 Corner of bumper
2 Whendriving
123
2-4. Using other driving systems
nRear view monitor system camera
In the following cases, it may be difficult to see the images on the screen, even when the system is functioning correctly.
•In the dark (e.g. at night).
•If the temperature near the lens is extremely high or low.
•If water droplets get on the camera, or when humidity is high (e.g. when it rains).
•If foreign matter (e.g. snow or mud) get on the camera lens.
•If the sun or headlights are shining directly into the camera lens.
nSmear effect
If a bright light (e.g., sunlight reflected off the vehicle body) is picked up by the camera, a smear effect* peculiar to the camera may occur.
*: Smear effect—A phenomenon that occurs when a bright light (e.g., sunlight reflected off the vehicle body) is picked up by the camera; when transmitted by the camera, the light source appears to have a vertical streak above and below it.
124

2-4. Using other driving systems
 CAUTION
nObserve these precautions to avoid an accident that could result in death or serious injuries.
•Never depend solely on the monitor system when reversing.
•Always check visually and with the mirrors to confirm your intended path is clear.
•Depicted distances between objects and flat surfaces differ from actual distances.
•Do not use the system if the back door is open.
nConditions which may affect the rear view monitor system
•If the back of the vehicle is hit, the camera's position and mounting angle may change. Contact your Lexus dealer.
•Rapid temperature changes, such as when hot water is poured on the vehicle in cold weather, may cause the system to function abnormally.
•If the camera lens is dirty, it cannot transmit a clear image. Rinse with water and wipe with a soft cloth. If extremely dirty, wash with a mild cleanser and rinse.
•The displayed image may be darker and moving images may be slightly distorted when the system is cold.
2 Whendriving
125

2-4. Using other driving systems
Lexus night view system (if equipped)
The Lexus night view system assists the driver by displaying a monochrome image of the view in front of the vehicle while driving at night.
Near-infrared rays are irradiated forward and an image converted from its irradiated light is shown on the head-up display.
The image is shown ranging from the tip of the low beam to the high beam.
 Near-infrared floodlight
 Near-infrared camera
 Head-up display
 Automatic light control sensor
n Turning on the system and adjusting the brightness of the display
 ON/OFF
“MAIN” indicator light comes on when the system is on.
 Darker
 Brighter
If the display is too bright, you cannot see surroundings through the windshield clearly.
126

2-4. Using other driving systems
nThe Lexus night view system can be operated when •The ignition key is in the “ON” position.
•It is dark outside.
•The headlights are on.
When all the above conditions are met, the head-up display shutter opens automatically and the image sent from the head-up display is shown on the windshield.
n“BEAM” indicator
•When the vehicle starts moving with the system on, the near-infrared floodlight is irradiated and the “BEAM” indicator light comes on.
nConditions unfavorable to correct operation
In the following conditions, the image may not be clear or the view of the road ahead may not be shown at all.
•Driving on hills with many up and down slopes. •Driving on road with curves.
•In severe weather conditions such as rain, fog or snow.
•Strong near-infrared light emission, such as the light coming from a vehicle running in the opposite lane, enters the near-infrared camera.
•An object or clothing of a pedestrian is made of a certain kind of material (ex. leather).
•The windshield or the lens of the near-infrared floodlight is dirty. (Always keep the windshield and the lens clean.)
•Double vision of image reduces clarity in some situation. •The top of the windshield fogs up.
2 Whendriving
127

2-4. Using other driving systems
 CAUTION
nWhile driving
•This system should be used as a supplemental aid to help you see objects. Never depend on this system only. Be sure to view objects with your own eyes.
•This system is designed to help you see objects better when driving in a flat area with few curves in darkness. Use of this function in an area with many curves or slopes or in a well-lit area could cause an accident.
nConditions which may affect the Lexus night view system
•If the front bumper is deformed in a collision, etc., the performance of the nearinfrared floodlight will be affected. Have it repaired or replaced by your Lexus dealer.
•If you notice the inner lens of the near-infrared camera is dirty, have it inspected by your Lexus dealer.
•If the top of the windshield fogs up, the lens of the near-infrared camera will also fog up, resulting in deterioration of the system performance. Defog the windshield by pushing the windshield air flow button on the air conditioning.
•If the outside temperature is low, the head-up display may darken or it may take time to display the image with the system on.
•The automatic light control sensor may not function properly if an object is placed on the sensor, or anything that blocks the sensor is affixed to the windshield.
nTo avoid injury
The near-infrared floodlight irradiates strong energy nut visible to the eyes. Do not stare at the floodlight at close range for a long time.
128

2-4. Using other driving systems
 NOTICE
nTo avoid damaging the head-up display
•Do not put anything in front of the head-up display shutter. It may hinder the opening or closing of the shutter.
•Do not let drinks spill on the head-up display.
•If an object gets caught in the shutter and it dose not close securely, open the shutter with your hand and remove the object. The shutter will function properly after you turn the ignition off and then on.
2 Whendriving
129
2-4. Using other driving systems
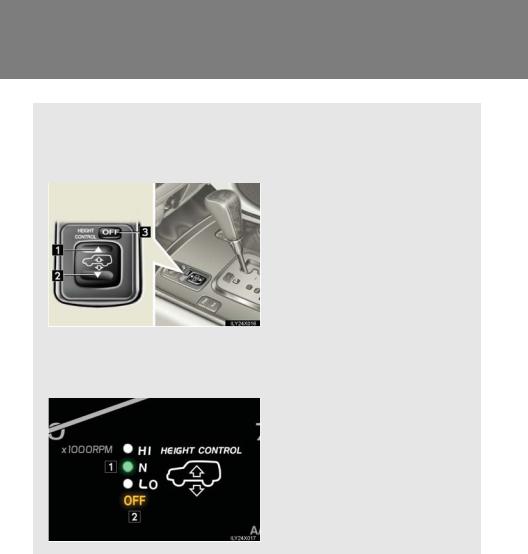
AHC (Active Height Control Suspension)
AHC adjusts the vehicle height in accordance with driving conditions. There are 3 selectable modes, “HI” (high), “N” (normal), and “LO” (low).
n Height control switch
 “s” (Up) switch
 “t” (Down) switch
 “OFF” switch
Push while the vehicle is stopped. The “OFF” indicator light will come on, and the vehicle height will be fixed in the current mode. Push the switch again to turn the system back on.
n AHC indicator lights
 Height control mode indicators
 Height control “OFF” indicator
130

2-4. Using other driving systems
 Vehicle height modes
Press “s” to step up one height mode, and “t” to step down one height mode. (Ex. When in the low height mode, press “s” once to switch to the normal height mode, and twice to switch to the high height mode.)
n“HI” (high) height mode
Vehicle height is 1.6 in. (40 mm) higher at the front, and 2.0 in. (50
mm) higher at the rear than the normal mode height.
This mode is suitable when driving on bumpy roads or through water. High height mode is only available when the vehicle speed is under 19 mph (30 km/h).
n“N” (normal) height mode
The standard vehicle height. This mode is suitable for ordinary driving.
n“LO” (low) height mode
Vehicle height is 2.0 in. (50 mm) lower at the front, and 1.6 in. (40 mm) lower at the rear than the normal mode height.
This mode allows easy access to the vehicle.
Low height mode is only available when the vehicle is stopped. When you start the vehicle, normal height mode is automatically selected.
 Conditions for changing the vehicle height mode
Some modes may not be selectable depending on the vehicle speed when the four-wheel drive control lever is in the “H” position. Refer to the following table.
|
Low mode |
Normal mode |
High mode |
|
|
|
|
Vehicle stopped |
Yes |
Yes |
Yes |
Under 19 mph (30 km/h) |
No |
Yes |
Yes |
19 mph (30 km/h) or over |
No |
Yes |
No |
|
|
|
|
2 Whendriving
131

2-4. Using other driving systems
 AHC indicator lights
If you change the vehicle height mode, the indicator lights change as follows:
•The current mode indicator light will turn off, and the selected mode indicator light will begin flashing.
•Once the change in vehicle height is complete, the selected mode indicator light will change from flashing to continuously lit.
If you press the height control switch while AHC is off, the current mode indicator light will turn on and the selected mode indicator light will begin flashing while the system starts up.
Once the system has started, the current mode indicator light will turn off.
nOperating conditions
•The engine must be running.
•All side doors and the back door must be closed.
nAutomatic change in vehicle height when in the high mode
•If the vehicle speed exceeds 19 mph (30 km/h) with the four-wheel drive control lever in the “H” position, normal mode is automatically selected.
•If the vehicle speed exceeds 30 mph (50 km/h) with the four-wheel drive control lever in the “L” position, the vehicle height is lowered to 1.0 in. (25 mm) higher than the normal mode height. If the vehicle speed drops to 12 mph (20 km/h) or less, high mode is automatically resumed.
132

2-4. Using other driving systems
nExtra high mode
If the vehicle becomes stuck, extra high mode may be automatically selected when the vehicle height is in high mode with the four-wheel drive control lever in the “L” position.
The vehicle height is raised to 2.8 in. (70 mm) higher than the normal mode height, or slightly higher.
Extra high mode will change back to high mode when:
•The vehicle is no longer stuck
•The four-wheel drive control lever is shifted to a position other than “L”
•If you push “t” when in extra high mode, normal mode is selected.
•Extra high mode cannot be manually selected.
nTurning off the active height control suspension
•The system will remain off until the switch is pushed again, even if the ignition is turned off.
•Even if AHC is turned off, the system automatically selects the normal mode if the vehicle's speed exceeds 19 mph (30 km/h).
nAutomatic leveling function
The vehicle is adjusted to a fixed height for each mode, regardless of the number of occupants and the luggage load.
•However the vehicle cannot be raised if the vehicle load exceeds the following limits:
•Up to 4 occupants* plus approximately 661 lb. (300 kg) in the normal mode
•Up to 4 occupants* plus approximately 375 lb. (170 kg) in the high mode
*: average weight 150 lb. (68 kg) per person
•If the vehicle height cannot be raised when in the normal mode, and “LO” is lit on the height mode indicator, the vehicle is loaded too heavily. Take extra care when driving in this condition.
If the vehicle height cannot be raised even after unloading the vehicle, press “t” then “s” on the height mode select switch. If the vehicle height still cannot be raised, turn the ignition off then on again, then try once more.
2 Whendriving
133
Loading...