


Introduction |
|
Safety Instructions |
|
|
|
|
|
|
Thank you for your purchase of the Navigation System. Please read this manual carefully to ensure proper use. Keep this manual stored in your vehicle at all times.
For safety reasons, this manual indicates items requiring particular attention with the following marks.
 CAUTION
This is a warning against something which may cause injury to people if the warning is ignored. You are informed what you must or must not do in order to avoid or reduce the risk to yourself and other people.
NOTICE
This is a warning against something which may cause damage to the vehicle or its equipment if the warning is ignored. You are informed what you must or must not do in order to avoid or reduce the risk of damage to your Lexus and its equipment.
INFORMATION
This provides additional information.
To use your system as safely as possible, follow all safety tips shown below.
This system is intended to assist you in reaching your destination and, if used properly, can do so. You, as the driver, are solely responsible for the safe operation of your vehicle and the safety of your passengers.
Do not use any feature of this system to the extent it distracts you from safe driving. Your first priority while driving should always be the safe operation of your vehicle.
Before attempting to use this system while driving, learn how to use it and become thoroughly familiar with it. Read the entire Navigation System Manual to make sure you understand the system. Do not allow others to use this system until they have read and understand these and other instructions in this manual.
You can input your destination and select your route only when the vehicle is not moving. While driving, listen to the voice instructions as much as possible and glance at the screen briefly and only when safe.
The data in the system may occasionally be incomplete. Road conditions, including driving restrictions (no left turns, street closures, etc.) frequently change. Therefore, before you follow any instruction from the system, look to see whether you can comply with the instruction safely and legally.
This system cannot warn you about such things as the quality of a neighborhood, condition of streets, and availability of emergency services. If you are unsure about the safety of an area, don't drive into it. Under no circumstances is this system a substitute for the driver's personal judgement.
i
1.
Safety Instructions
We recommend that you obtain updated map data as it becomes available in order to help use the system as effectively and safely as possible.
Use this system only in locations where it is legal to do so. Some states/provinces may have laws prohibiting video screens within sight of the driver.
Precautions on use
GPS voice navigation system
This navigation system calculates the current vehicle position using satellite signals, various vehicle signals, map data, etc.
However, the accurate position may not be shown depending on the satellite condition, road configuration, vehicle condition or other circumstances.
The GPS (Global Positioning System) developed and operated by the U.S. Department of Defense provides an accurate current vehicle position using 3 to 4 satellites.
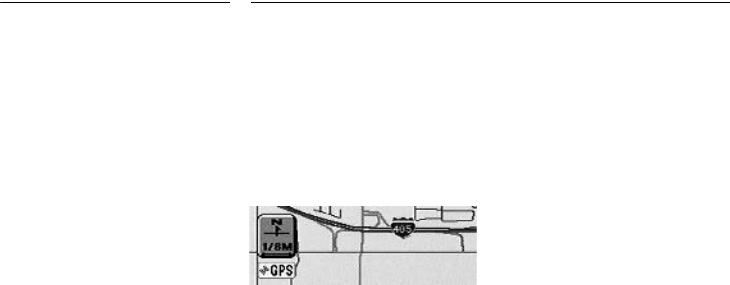
When your vehicle is receiving signals from the satellites, the ºGPSº mark appears at the top left of the screen.
The GPS is not available in the following cases:
Signal obstructions are caused by tunnels, tall buildings, trucks, or even the placement of objects on the instrument panel.
The satellites do not send signals due to the improvement or repair of them.
When driving, be sure to observe traffic regulations.
Route guidance shows a reference route up to the destination surrounding area.
It is neither a shortest route nor a route without a traffic congestion.
Do not totally rely on voice guidance. Use it just for your information.
If the system cannot determine the current position correctly, there is a possibility of incorrect, late or non±voice guidance.
The road and map data stored in your navigation system may not be latest or complete.
When replacing the tire(s), contact your Lexus dealer.
ii
2.

Precautions on use
This navigation system uses the tire turning data. So, replacing the tire may cause a positioning error.
Make sure tire pressures of 4 wheels should be correct.
For your safety, some functions may become inoperable when you start driving.
Unavailable switches are dimmed.
 CAUTION
For safety, the driver should not operate the navigation system during driving. Incorrect maneuvering of steering wheel may cause an accident.
When driving, be sure to follow traffic regulations and keep the road condition in mind. If a traffic sign on the road is changed by the regulation, route guidance may provide wrong information such as the route prohibiting the entry of the vehicle.
Accurate Operation Tips
This navigation system calculates the current vehicle position using satellite signals, various vehicle signals, map data, etc. However, the accurate position may not be shown or inappropriate route guidance may occur in some cases.
When going out from the parking lot with roof.
When driving with the tire chains installed.
When replacing the tire(s).
When using the tire other than specified.
(a) The accurate current vehicle position may not be shown in the following cases:
When driving on a small angled Y± shaped road.
When driving on a spiral road.
When driving on a slippery road such as in sand, gravel, snow, etc.
When driving on a long straight road.
When the freeway and surface streets run in parallel.
When the long route is searched during high speed driving.
When approaching a tall building or large vehicle.
After moving by ferry or vehicle carrier.
After repeating a change of directions by going forward and backward, or turning on the turn table in the parking lot.
When tire pressures of 4 wheels are not correct.
When driving without setting the current position calibration correctly.
When the roof carrier is installed.
When the tires are worn. (i.e., studless tires used in the previous season)
INFORMATION
After your vehicle receives signals from the GPS, the current vehicle position, if it is not placed in correct position or on the wrong road, will be corrected automatically.
If your vehicle cannot receive GPS signals, you can correct it manually. For the information on current position calibration, see page 63.
iii
3.

Accurate Operation Tips
(b) Inappropriate route guidance may occur in the following cases:
When turning at a wrong intersection off route guidance.
In some cases, plural names of places are announced.
In automatic rerouting, route guidance may not be available for the next turning to the right or left.
It may take a long time to operate automatic rerouting during high speed driving.
In automatic rerouting, the detour route may be shown.
If you are heading for the destination without passing through a set way point, automatic rerouting may display a route returning to the set way point.
When turning at an intersection, there is no route guidance.
When passing through the intersection, there is no route guidance.
The route in a U±turn may be shown or announced.
The route prohibiting the entry of the vehicle due to the regulation by time or season or any other regulation may be given.
In automatic rerouting, the route may not be changed.
Some route may not be searched.
If there are only narrow streets up to the destination, the route up to the destination may not be shown.
The destination might be shown opposite to the actual street.
iv
4.

SECTION I
BEFORE OPERATION
Before operation . . . . . . . . . . . . . . . . . . . . . . . . . . . . . . . . . . . . . . . . . . . . . . . . . . . 2 Symbols and switches on map screen . . . . . . . . . . . . . . . . . . . . . . . . . . . . . . . . 6 Map database . . . . . . . . . . . . . . . . . . . . . . . . . . . . . . . . . . . . . . . . . . . . . . . . . . . . . 7
1
Before Operation
This section describes basic operations which are frequently used in the navigation system. You should learn how to use each operation and become thoroughly familiar with it.
Switch operation
This system operates mainly by the switches on the screen.
To protect the screen, lightly touch switches on the screen by your finger.
When you touch switches (on the screen and out of the screen), a beep sounds.
INFORMATION
If the system does not respond to a touch of a switch, keep your finger away from the screen and touch it again.
You cannot operate the dimmed switches.
Wipe off fingerprints on the surface of the display using a glasses cleaning cloth. Use isopropyl alcohol as cleaning solution.
Name input screen
Directly touch alphabet keys on the screen to input a name.
If you touch a wrong letter, delete it using º º. Touching º º erases one character.
When you input numerals, touch º0 9º switch to display the screen for numeral input.
List: The list screen appears. The number of item is shown at the left of the ªListº switch.
2

Before Operation
Touching ºA Zº changes to the screen for inputting a name shown on the previous page.
List selection screen
Touch  of your desired item for selection.
PAGE |
Shifts to the item beginning |
|
|
PAGE |
with the next or previous page. |
|
Scrolls the item up or down.
Scrolls to the end of a long item which cannot be shown on the screen or returns to the beginning.
If it takes longer to change to the next screen after a touch of the switch on the screen, a sandglass icon appears at the center of the screen.
3
Before Operation
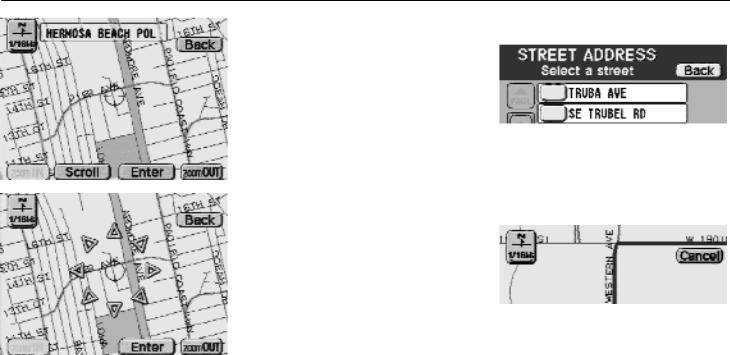
Position locating screen on the map
1. Touch ºScrollº to move the cursor  .
.
2.When you touch an arrow facing your desired point, the map scrolls in that direction. When you release your finger, scrolling stops.
3.If you touch ºEnterº, the position of cursor  is set.
ºBackº switch
To return to the nearest previous screen during the setting of destination or other functions, touch ºBackº at the top right of the screen.
ºCancelº switch
If you touch ºCancelº at the top right of the map screen in the route guidance mode, the route guidance cancel mode screen appears. (For details, see page 39.)
4
Before Operation
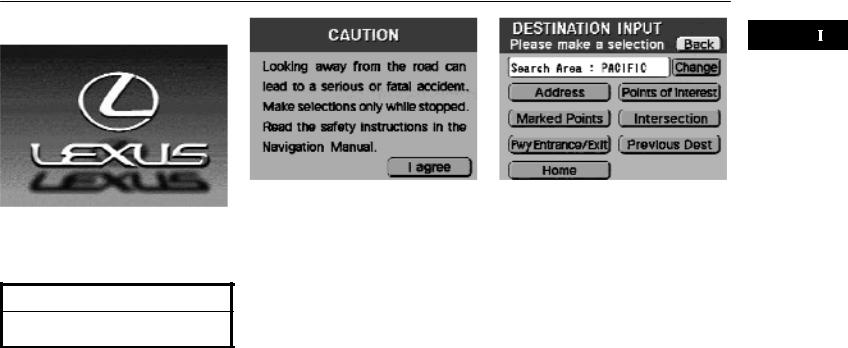
Initial screen
When the engine is started (or the ignition key is turned to ºACCº), the initial ºLEXUSº screen appears and the system begins operating.
 CAUTION
When the engine is running, always apply the parking brake for safety.
After a few seconds, the ºCAUTIONº screen appears.
Please read it and follow the instructions. When you touch ºI agreeº on the screen, the next screen appears.
If you turned off the ignition when a screen other than for the navigation system (i.e., for the audio system or air conditioning) is displayed, the initial screen shown on the previous page reappears when the ignition is turned on. Then the audio or air conditioning screen appears. When you push the ºMAP/GUIDEº, ºDESTINATIONº or ºMENUº switch to change to the navigation system screen, the ºCAUTIONº screen appears.
If the destination is not input, the ºDESTINATION INPUTº screen appears.
If you want to input your destination, follow the steps shown in ºDestination inputºon page 24.
If you want to display your current position without inputting a destination, push the ºMAP/GUIDEº switch.
5
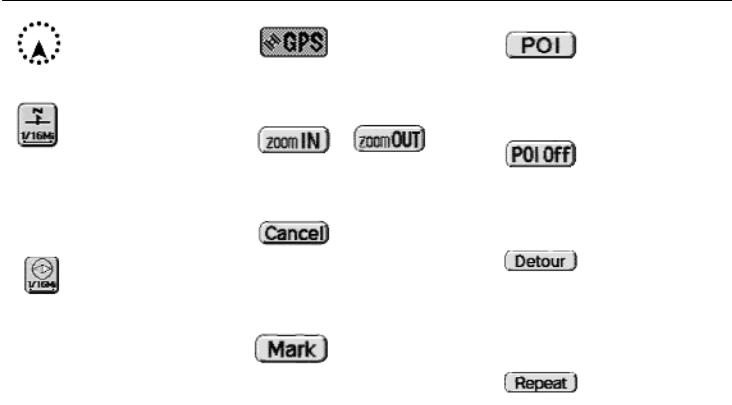
Symbols and Switches on Map Screen
s±001u |
Current Vehicle |
Position Mark |
Indicates the current position.
s±002u |
North±Up Symbol |
and Scale of Map |
Indicates the map with North up. Touching this symbol directly on the screen changes to the map with heading±up.
The figure indicates the map scale.
For details, see page 49.
s±003u |
Heading±Up Symbol |
and Scale of Map |
Indicates the map with the vehicle travel direction up. The red triangle shows North. Touching this symbol directly on the screen changes to the map with North±up.
GPS Mark
s±004u (Global Positioning
System)
On reception of signals from the GPS, this mark is displayed.
s±005u s±006u
Magnification or reduction of the map scale. For details, see page 48.
s±007u
Canceling the Route
Guidance
(on the map screen)
The screen displays the ºCANCEL GUIDANCEº mode. For details, see page 39.
s±008u
One ± Touch Registration of Marked Point
Registers the current vehicle position as a marked point.
For details, see page 56.
s±009u
Display of Point of
Interest
Symbols such as restaurants and hotels, etc. can be displayed on the screen. For details, see page 45.
s±010u
Deletion of Point of
Interest
Symbols such as restaurants and hotels, etc. displayed on the screen can be deleted. For details, see page 45.
s±011u Setting of Detour
A detour can be set in the route guidance mode to avoid a traffic jam caused by road repairs or an accident. For details, see page 44.
s±012u Voice Guidance
If you cannot hear voice guidance, you can hear it once again.
6
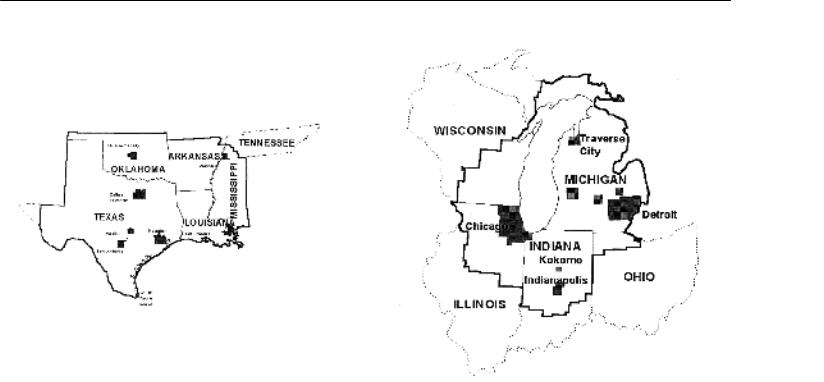
Map Database
Map database is made based on the maps in June, 1998 edi- |
Detailed map coverage area |
|
|
||
tion of DENSO, whose information source comes from Nav |
|
|
Tech maps. |
|
|
|
|
INFORMATION
Nav Tech map data includes 2 types of areas: ºDetailed map coverage areasº providing all detailed road data and other areas showing main roads only. The route calculation may not be made on the border of the detailed map coverage area and the other area.
In order to provide you with accurate map information as much as possible, we are always gathering information such as road repairs and doing site investigation. However, the names of roads, streets, facilities, and their locations are changed so often. In some places, the construction on roads may be in progress. For that reason, information on some parts in this system might be different from the actual one.
For the map information, contact your Lexus dealer.
When you touch ºMap Info.º, the ºMap Database Versionºscreen appears and displays the map database version. The screen goes out 6 seconds later.
September, 1998 by Nav Tech
Detailed map coverage area
(Major cities and their environs only)
7

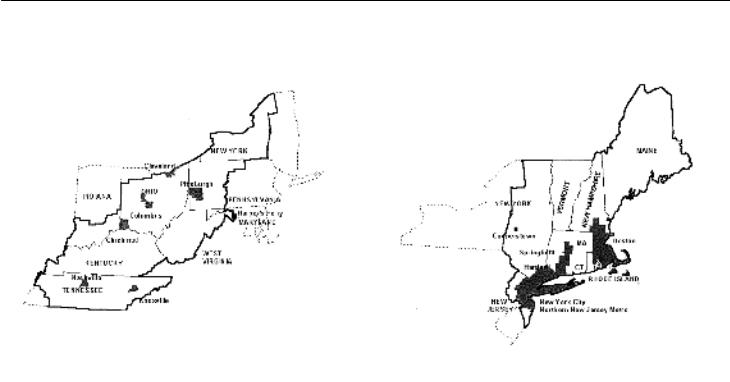
Map Database
Detailed map coverage area |
Detailed map coverage area |
||
|
|
|
|
|
|
|
|
August, 1998 by Nav Tech |
July, 1998 by Nav Tech |
||
|
Detailed map coverage area |
|
Detailed map coverage area |
|
|
||
|
(Major cities and their environs only) |
|
(Major cities and their environs only) |
8
Map Database
Detailed map coverage area |
Detailed map coverage area |
|
|
||
|
|
||||
|
|
|
|
|
|
|
|
|
|
|
|
|
|
|
|
|
|
August, 1998 by Nav Tech |
July, 1998 by Nav Tech |
||
|
Detailed map coverage area |
|
Detailed map coverage area |
|
|
||
|
(Major cities and their environs only) |
|
(Major cities and their environs only) |
9
Map Database
Detailed map coverage area |
Detailed map coverage area |
||
|
|
|
|
|
|
|
|
September, 1998 by Nav Tech |
September, 1998 by Nav Tech |
||
|
Detailed map coverage area |
|
Detailed map coverage area |
|
|
||
|
(Major cities and their environs only) |
|
(Major cities and their environs only) |
10

Map Database
Detailed map coverage area |
Detailed map coverage area |
|
|
||
|
|
||||
|
|
|
|
|
|
|
|
|
|
|
|
|
|
|
|
|
|
August, 1998 by Nav Tech |
August, 1998 by Nav Tech |
||
|
Detailed map coverage area |
|
Detailed map coverage area |
|
|
||
|
(Major cities and their environs only) |
|
(Major cities and their environs only) |
11
12

SECTION III
BASIC FUNCTIONS
Description of basic operations in frequent use
ºMAP/GUIDEº switch . . . . . . . . . . . . . . . . . . . . . . . . . . . . . . . . . . . . . . . . . . . . . . 14 ºDESTINATIONº switch . . . . . . . . . . . . . . . . . . . . . . . . . . . . . . . . . . . . . . . . . . . . 15 ºMENUº switch . . . . . . . . . . . . . . . . . . . . . . . . . . . . . . . . . . . . . . . . . . . . . . . . . . . 16 Current position display . . . . . . . . . . . . . . . . . . . . . . . . . . . . . . . . . . . . . . . . . . . . 18 Registration of your house . . . . . . . . . . . . . . . . . . . . . . . . . . . . . . . . . . . . . . . . . 19 Destination input . . . . . . . . . . . . . . . . . . . . . . . . . . . . . . . . . . . . . . . . . . . . . . . . . . 24 Route search . . . . . . . . . . . . . . . . . . . . . . . . . . . . . . . . . . . . . . . . . . . . . . . . . . . . . 37 Route guidance screen . . . . . . . . . . . . . . . . . . . . . . . . . . . . . . . . . . . . . . . . . . . . 39 Voice guidance . . . . . . . . . . . . . . . . . . . . . . . . . . . . . . . . . . . . . . . . . . . . . . . . . . . 40 Typical voice guidance prompts . . . . . . . . . . . . . . . . . . . . . . . . . . . . . . . . . . . . . 41 Detour setting . . . . . . . . . . . . . . . . . . . . . . . . . . . . . . . . . . . . . . . . . . . . . . . . . . . . 44 POI (display of points of interest) . . . . . . . . . . . . . . . . . . . . . . . . . . . . . . . . . . . . 45 Turn list . . . . . . . . . . . . . . . . . . . . . . . . . . . . . . . . . . . . . . . . . . . . . . . . . . . . . . . . . 47 Map scale . . . . . . . . . . . . . . . . . . . . . . . . . . . . . . . . . . . . . . . . . . . . . . . . . . . . . . . 48 Screen scrolling . . . . . . . . . . . . . . . . . . . . . . . . . . . . . . . . . . . . . . . . . . . . . . . . . . 49 Orientation of map . . . . . . . . . . . . . . . . . . . . . . . . . . . . . . . . . . . . . . . . . . . . . . . . 49 Advance view . . . . . . . . . . . . . . . . . . . . . . . . . . . . . . . . . . . . . . . . . . . . . . . . . . . . 50
13

ºMAP/GUIDEº Switch
The following features are available with the ºMAP/GUIDEº switch.
(a) Displaying the current position
The screen displays the current position. The current vehicle position mark is displayed in the center of the screen.
Even after you move the map by a ºone± touchº scroll (see page 49 for details), pushing the ºMAP/GUIDEº switch displays the screen with the current vehicle position mark in the center of the screen.
(b) Displaying the magnified intersection or freeway exit
When you are approaching an intersection or freeway exit, the intersection or freeway exit display is magnified automatically. The name of the street on which you will run is displayed at the top of the screen.
INFORMATION
Immediately after the beginning of route guidance, the magnified intersection may not be displayed on the screen. If this is a case, push the ºMAP/GUIDEº switch.
In some cases, depending on the map data used, the magnified freeway exit screen may display the freeway exit number above the street name.
Pushing the ºMAP/GUIDEº switch alternates the screens shown above.
Repeat: Voice guidance repeats.
Detour: Sets the detour. (For details, see page 44.)
14
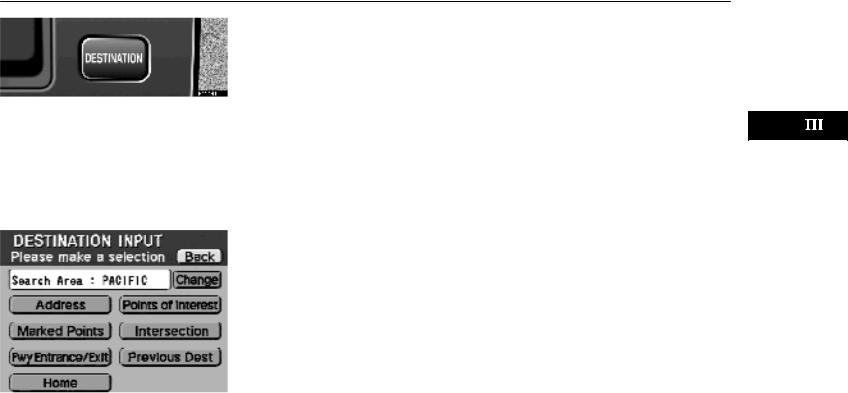
ºDESTINATIONº Switch
Push the ºDESTINATIONº switch to display the screen for inputting your destination.
If you push the ºDESTINATIONº switch during route guidance, the ºCANCEL GUIDANCEº screen appears. Touch ºCancel Guidanceº to display the following destination input screen.
For the steps to input your destination, see the part ºDestination inputº on page 24.
15

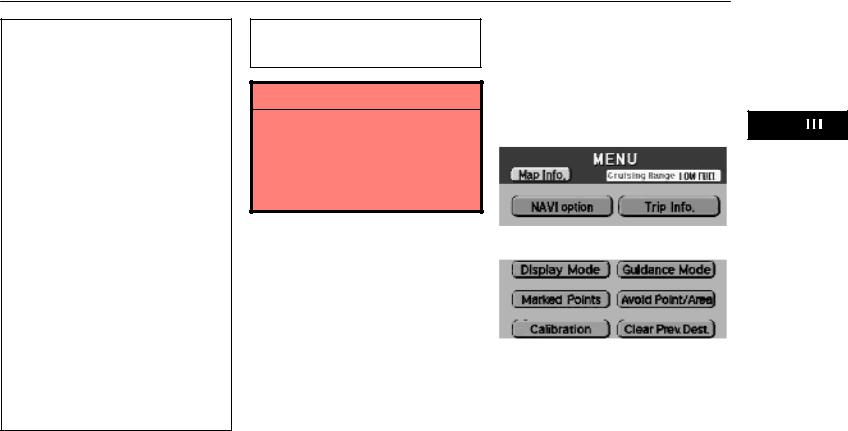
ºMENUº Switch
MENU
NAVI option
Trip Info.
Brightness |
|
|
|
|
(a) |
|||
|
|
|
||||||
Screen Off |
|
|
|
|
(b) |
|||
|
|
|
||||||
Volume |
|
|
|
|
|
(c) |
||
|
|
|
|
|||||
Cruising Range |
|
|
(d) |
|||||
|
|
|||||||
Adjust Clock |
|
|
(e) |
|||||
|
|
|||||||
Map Info. |
|
|
(f) |
|||||
|
|
|||||||
|
|
|
|
|
|
|
|
|
|
|
|
|
|
|
|
|
|
OPTION |
|
Display Mode |
|
Guidance Mode |
|
Marked Points |
|
Avoid Point/Area |
|
Calibration |
|
Clear Prev. |
|
Dest. |
(g) |
TRIP INFO.
Running Time
Distance After
Refueling (h)
Av. Speed
Fuel consumption
Push the ºMENUº switch to display the menu screen.
The settings on this page are available with the switches shown in the above illustration.
INFORMATION
ºAdjust Clockº switch is provided on LS400 only.
DISPLAY MODE
|
Advance View |
|
|
(i) |
|||||||||||||||
|
|
||||||||||||||||||
|
Route Trace |
|
|
|
(j) |
||||||||||||||
|
|
|
|||||||||||||||||
|
Route Display |
|
|
(k) |
|||||||||||||||
|
|
||||||||||||||||||
|
|
|
|
|
|
|
|
|
|
|
|
|
|
|
|
|
|
||
|
|
|
|
|
|
|
|
|
|
|
|
|
|
|
|
|
|
||
|
|
|
GUIDANCE MODE |
|
|
||||||||||||||
|
|
|
|
||||||||||||||||
|
Automatic |
|
|
|
|||||||||||||||
|
|
Reroute |
|
|
|
|
|
|
|
|
|
(l) |
|||||||
|
|
|
|
|
|
|
|
|
|||||||||||
|
Route Preview |
|
|
|
|
(m) |
|||||||||||||
|
|
|
|||||||||||||||||
|
Time to |
|
|
|
|||||||||||||||
|
|
Destination |
|
|
|
|
|
|
(n) |
||||||||||
|
|
|
|
|
|
||||||||||||||
|
|
|
|
|
EDIT MARKED |
|
|
|
|||||||||||
|
|
|
|
|
POINTS |
|
|
|
|||||||||||
|
Register / Edit |
|
|
|
|||||||||||||||
|
/ Delete |
|
|
|
|
|
|
|
|
(o) |
|||||||||
|
|
|
|
|
|
|
|||||||||||||
|
Register Home |
|
|
|
(p) |
||||||||||||||
|
|
||||||||||||||||||
|
|
|
|
|
|
|
|
|
|
|
|
|
|
|
|
|
|
|
|
|
|
|
|
|
|
|
|
|
|
|
|
|
|
|
|
|
|
|
|
|
|
AVOID POINT/AREA |
|
||||||||||||||||
|
|
|
|||||||||||||||||
|
Register / Edit |
|
|
|
|||||||||||||||
|
/ Delete |
|
|
(q) |
|||||||||||||||
|
|
||||||||||||||||||
|
|
|
|
|
|
|
|
|
|
|
|
|
|
|
|
|
|
|
|
|
|
|
|
|
|
|
|
|
|
|
|
|
|||||||
|
|
|
|
CALIBRATION |
|
|
|
|
|||||||||||
|
|
|
|
|
|
|
|
||||||||||||
|
Position / |
|
|
|
|||||||||||||||
|
Distance |
|
|
|
|
|
(r) |
||||||||||||
|
|
|
|
|
|||||||||||||||
|
|
|
|
|
|
|
|
|
|
|
|
|
|
|
|
|
|
|
|
16
ºMENUº Switch
(a) Brightness . . . . . . . . . . . . . . . . . 75
Adjustment of brightness or contrast of the screen
(b) Screen Off . . . . . . . . . . . . . . . . . . 76
Turning off the screen display
(c) Volume . . . . . . . . . . . . . . . . . . . . . 40
Volume adjustment of voice guidance
(d) Cruising Range . . . . . . . . . . . . . 70
Display of available cruising range
(e) Adjust Clock . . . . . . . . . . . . . . . . 74
Adjustment of the clock. Setting or canceling Daylight Saving Time (LS400 only)
(f) Map Info. . . . . . . . . . . . . . . . . . . . |
7 |
Showing the map database version
(g) Clear Prev. Dest. . . . . . . . . . . . . 25
Deletion of all previous destinations
(h) Trip Info. . . . . . . . . . . . . . . . . . . . 70
Display of the values of driving distance, driving distance after being refueled, average vehicle speed, fuel consumption, etc.
(i) Advance View . . . . . . . . . . . . . . 50
Setting or canceling the front wide display
(j) Route Trace . . . . . . . . . . . . . . . . 68
Memorizing the driving route
(k) Route Display . . . . . . . . . . . . . . 68
Display of the memorized route
(l) Automatic Reroute . . . . . . . . . . 66
Automatic route re±setting in case the vehicle runs off the route
(m) Route Preview . . . . . . . . . . . . . . 67
Display of the entire route
(n) Time to Destination . . . . . . . . . 69
Display of the time up to the destination
(o) Register/Edit/Delete . . . . . . . . . 52
Registration/editing/deletion of the marked point
(p) Register Home . . . . . . . . . . . . . . 19
Registration of your house
(q) Register/Edit/Delete . . . . . . . . . 60
Registration/editing/deletion of the point to be avoided
(r) Position/Distance . . . . . . . . . . . 63
Calibration of the current vehicle position and distance
For details, see the page number given for each item.
17

Current Position Display
Push the ºMAP/GUIDEº switch.
The current vehicle position mark appears in the center of the screen.
During driving, the current vehicle position mark is fixed in the center and the map moves.
If you select the advance view display (see page 50 for details), display of the part where your vehicle is heading for is enlarged.
When you move the map with a ºone± touchº scroll (see page 49 for details) to check the road condition, the map is fixed and the current vehicle position mark is movable.
INFORMATION
Because the map is fixed and the current vehicle position mark moves with a ºone±touchº scroll, the current vehicle position mark may disappear from the screen during driving. Move the map with a ºone±touchº scroll again or push the ºMAP/GUIDEº switch to display the current vehicle position mark in the center of the screen.
The name of the street on which you are now driving appears at the bottom of the screen.
zoom IN / zoom OUT: The map can be magnified or reduced on scale. (For details, see page 48.)
Mark: One±touch registration of the marked point. (For details, see page 56.)
POI: The symbols of points of interest such as restaurants and gas stations, etc. can be displayed on the map screen. (For details, see page 45.)
18

Current Position Display |
|
Registration of Your House |
|
|
|
|
|
|
If you register your home address beforehand, you can easily set the route back to your house.
[GPS] means your vehicle is receiving signals from the GPS
The current position is automatically set as your vehicle receives signals from the GPS (Global Positioning System).
If your current position is not correct, it is automatically corrected after your vehicle receives signals from the GPS.
INFORMATION
After disconnection of the battery, or on a new vehicle, the current position may not be correct. After receiving signals from the GPS, the correct current position is displayed.
If you must correct the current position manually, follow the steps on page 63.
Marked points screen
3. Touch ºRegister Homeº.
1. Push the ºMENUº switch to display the menu screen and touch ºNAVI option.º
2. Touch ºMarked Pointsº.
4. Touch and select your desired item from the 3 items on the menu.
19
Registration of Your House
(a) Registering current position
If your vehicle is at your house, the current position is registered as your house.
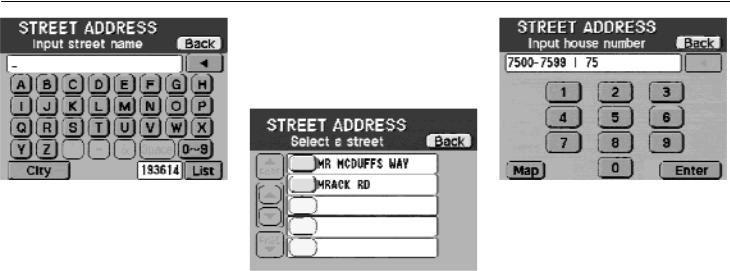
(b) Registering by street address
If you are far away from your house, input your home address to display the map around your house.
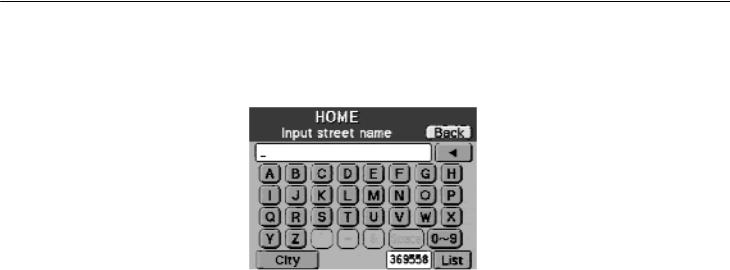
1. Input a street name.
If you touch a wrong letter, delete it using º º.
When you input numerals, touch º0 9º switch to display the screen for numeral input.
Based on the input letters, the number of sites appears next to ºListº at the bottom right of the screen. After the number decreases to some extent, touch ºListº to display the street names. Touch  of the desired street name.
After finishing your entry, the screen for inputting a house number appears.
City: The screen for inputting a city name appears. See step º4.º on page 22.
20
Registration of Your House
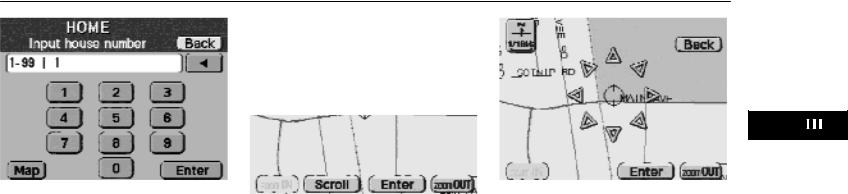
3. Touch ºMapº to display the map screen and determine the position.
If the street input at step º4º is in plural cities, the screen changes and displays the menu to select an applicable city. Select a city in which your house is.
2. Touch numeral keys to input a house number.
After finishing your entry, touch ºEnterº.
The screen changes and displays the menu to determine the condition of the set route. (See page 37.)
If the input house number exists in more than 2 cities, the screen changes and displays the menu of the applicable cities.
Touch ºScrollº to display the screen on which the cursor  can be moved.
Touch an arrow facing your desired point. The map scrolls in that direction. When you release your finger, scrolling stops.
Move the cursor  to the desired position, and touch ºEnterº.
21
Registration of Your House
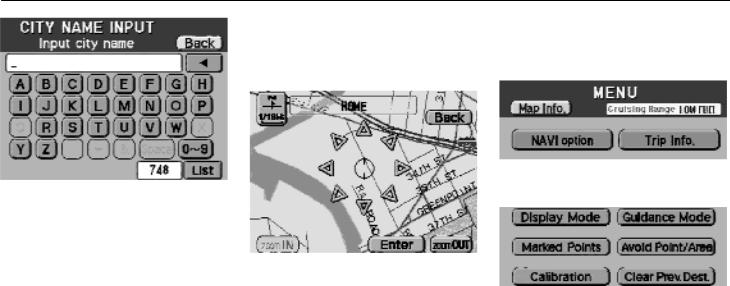
4. Touch alphabet keys directly on the screen to input a city name.
If you touch a wrong letter, delete it using º º.
When you input numerals, touch º0 9º switch to display the screen for numeral input.
Based on the input letters, the number of sites appears next to ºListº at the bottom right of the screen. After the number decreases to some extent, touch ºListº to display the street names. Touch  of the desired city name.
5. After entering the city name, input a street name and house number. Follow the same procedure on the previous page.
(c) Registering by map
If you are not so far away from your house, you can make a registration directly on the map.
The map indicating the current position is displayed. Touch one of the arrows to move the cursor  to your house. (For the method of how to move the cursor, see page 4.)
(d) Changing the registration of your house
1. Push the ºMENUº switch.
2. Touch ºNAVI optionº on the ºMENUº screen.
3. Touch ºMarked Pointsº on the ºOptionº screen.
22
Registration of Your House
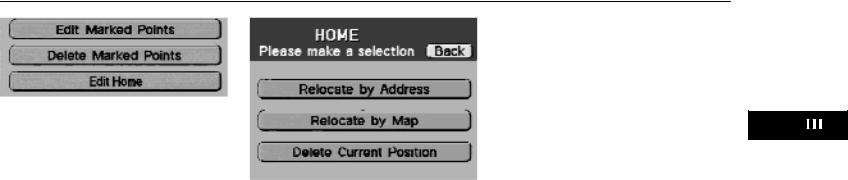
4. Touch ºEdit Homeº.
5. Touch your desired item.
Relocate by Address: Input your new home address. See page 26 for the detailed steps.
Relocate by Map: If your house is not so far away, display the map screen and re± register your house by moving the cursor  .
.
Delete Current Position: The current position is deleted.
23

Destination Input
(a) Destination input
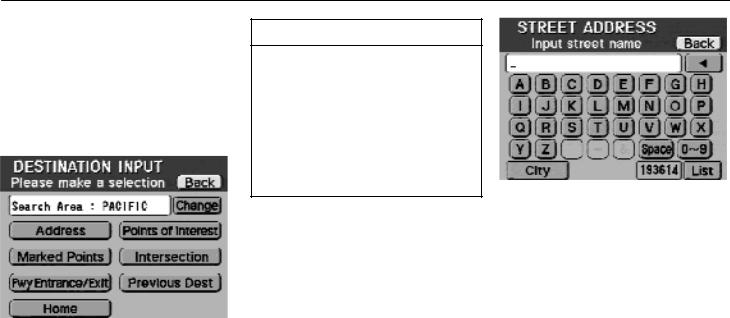
1. Push the ºDESTINATIONº switch.
The destination input screen appears.
2. Select a way of displaying the map of the destination surrounding area.
Address: From an address, the surrounding area map is displayed. See page 26 for the detailed steps.
Points of Interest: From a point of interest, the surrounding area map is displayed. See page 28 for the detailed steps.
Marked Points: From the registered marked point, the surrounding area map is displayed. See page 33 for the detailed steps.
Intersection: From an intersection, the surrounding area map is displayed. See page 36 for the detailed steps.
Fwy Entrance/Exit: From a freeway entrance or exit, the surrounding area map is displayed. See page 34 for the detailed steps.
Previous Dest: From the previously set destination, the surrounding area map is displayed. See page 35 for the detailed steps.
Home: Route guidance up to your house is available. See page 35. In this case, it is necessary to register your house beforehand. See page 20 for the detailed steps.
Change: On the screen, the name of state/province to be searched is shown in abbreviation. When you touch ºChangeº, the search area can be changed on the next screen.
Touch  to change the search area and the previous screen returns.
INFORMATION
When inputting the destination, the response to the switch may be slow.
Destination input by address can be made in ºDetailed map coverage areasº only. (See page 7 for details.)
24
Destination Input
ºPoints of Interestsº are mainly registered in ºDetailed map coverage areasº. The registration is made based on the Nav Tech ºStandard POI Inclusion Listº.
If there is no point registered, switches such as ºMarked Pointsº or ºPrevious Dest.º are dimmed and not available.
The route for returning may not be the same as that for going.
Route guidance shows a reference route up to the destination surrounding area. It is neither a shortest route nor a route without a traffic congestion.
Route guidance may not be available depending on the distance up to the destination surrounding area, or if there is no road data for specific locations.
When setting the destination, you should use the map on a scale of 1/80000 or smaller.
The detour route may be set in areas other than ºDetailed map coverage areasº. (See page 7 for details.)
To set the ºPoints of Interestsº in the different time zone, the area change is necessary.
 CAUTION
When driving, be sure to follow traffic regulations and keep the road condition in mind. If a traffic sign on the road is changed by the regulation, the route guidance may provide wrong information such as the route prohibiting the entry of the vehicle.
(b) Clearing the previous destination
You can delete the old destination whose route guidance is already finished.
Follow the steps below.
1. Push the ºMENUº switch.
2. Touch ºNAVI optionº.
Option screen
3.Touch ºClear Prev. Dest.º.
4.The message appears for confirmation. If you are sure to delete the previous destination, touch ºYESº. If not, touch ºNOº.
25
Destination Input [ADDRESS]
Based on the input characters, the number of sites appears next to ºListº at the bottom right of the screen. After the number decreases to some extent, touch ºListº to display the site names. (See the following illustration.)
There are 2 ways to input a route.
(a) Inputting a street name directly using alphabet keys.
1. Touch letters directly on the screen to input a street name.
As the result of searching memorized names in the system, unavailable characters are dimmed.
When you input numerals, touch º0 9º switch to display the screen for numeral input.
If you find your desired street name, touch  of the item. The ºInput house numberº screen appears.
2. Input a house number.
After input, touch ºEnterº to start ºRoute searchingº.
Map: If you touch this switch, you can confirm the location or determine the location on the map screen.
26
 Loading...