


4-3. Do-it-yourself maintenance
Do-it-yourself service precautions
If you perform maintenance by yourself, be sure to follow the correct procedure as given in these sections.
Items |
|
Parts and tools |
|
|
|
|
|
• Grease |
12-volt battery condition |
(→P. 511) |
• Conventional wrench |
|
|
(for terminal clamp bolts) |
|
|
• FMVSS No.116 DOT 3 or SAE |
|
|
J1703 brake fluid |
Brake fluid level |
(→P. 508) |
• Rag or paper towel |
|
|
• Funnel (used only for adding brake |
|
|
fluid) |
|
|
|
4 Maintenanceand care
489
CT200h_U (OM76004U)

4-3. Do-it-yourself maintenance
|
|
|
|
|
|
|
Items |
Parts and tools |
|
|
|
|
|
|
|
|
|
• “Toyota Super Long Life Coolant” |
|
|
|
|
or a similar high quality ethylene |
|
|
|
|
glycol-based non-silicate, non- |
|
|
|
|
amine, non-nitrite and non-borate |
|
|
|
|
coolant with long-life hybrid |
|
|
|
|
organic acid technology |
|
|
|
|
For the U.S.A.: |
|
|
Engine/power control unit coolant |
“Toyota Super Long Life Coolant” |
|
|
|
level |
(→P. 504) |
is pre-mixed with 50% coolant and |
|
|
|
|
50% deionized water. |
|
|
|
|
For Canada: |
|
|
|
|
“Toyota Super Long Life Coolant” |
|
|
|
|
is pre-mixed with 55% coolant and |
|
|
|
|
45% deionized water. |
|
|
|
|
• Funnel (used only for adding cool- |
|
|
|
|
ant) |
|
|
|
|
|
|
|
|
|
|
|
490
CT200h_U (OM76004U)

4-3. Do-it-yourself maintenance
|
|
|
|
|
|
Items |
|
Parts and tools |
|
|
|
|
|
|
|
|
|
• “Toyota Genuine Motor Oil” or |
|
|
|
|
equivalent |
|
|
Engine oil level |
(→P. 500) |
• Rag or paper towel |
|
|
|
|
• Funnel (used only for adding |
|
|
|
|
engine oil) |
|
|
Fuses |
(→P. 542) |
• Fuse with same amperage rating as |
|
|
original |
|
||
|
|
|
|
|
|
|
|
• Bulb with same number and watt- |
|
|
|
|
age rating as original |
|
|
Light bulbs |
(→P. 554) |
• Phillips-head screwdriver |
|
|
|
|
• Flathead screwdriver |
|
|
|
|
• Wrench |
|
|
Radiator and condenser |
(→P. 507) |
|
|
|
Tire inflation pressure |
(→P. 530) |
• Tire pressure gauge |
|
|
• Compressed air source |
|
||
|
|
|
|
|
|
|
|
• Water or washer fluid containing |
|
|
Washer fluid |
(→P. 510) |
antifreeze (for winter use) |
|
|
• Funnel (used only for adding water |
|
||
|
|
|
|
|
|
|
|
or washer fluid) |
|
|
|
|
|
|
|
|
|
|
|
4 Maintenanceand care
491
CT200h_U (OM76004U)

4-3. Do-it-yourself maintenance
 CAUTION
The engine compartment contains many mechanisms and fluids that may move suddenly, become hot, or become electrically energized. To avoid death or serious injury, observe the following precautions.
nWhen working on the engine compartment
l Make sure that the indicator on the “POWER” switch and the “READY” indicator are both off.
l Keep hands, clothing and tools away from the moving fan and engine drive belt.
l Be careful not to touch the engine, power control unit, radiator, exhaust manifold, etc. right after driving as they may be hot. Oil and other fluids may also be hot.
l Do not leave anything that may burn easily, such as paper and rags, in the engine compartment.
lDo not smoke, cause sparks or expose an open flame to fuel. Fuel fumes are flammable.
nWhen working near the electric cooling fans or radiator grille
Be sure the “POWER” switch is off.
With the “POWER” switch in ON mode, the electric cooling fans may automati-
cally start to run if the air conditioning is on and/or the coolant temperature is high. (→P. 507)
nSafety glasses
Wear safety glasses to prevent flying or falling material, fluid spray, etc. from getting in your eyes.
492
CT200h_U (OM76004U)

4-3. Do-it-yourself maintenance
 NOTICE
nIf you remove the air cleaner filter
Driving with the air cleaner filter removed may cause excessive engine wear due to dirt in the air. Also, a backfire could cause a fire in the engine compartment.
4 Maintenanceand care
493
CT200h_U (OM76004U)
4-3. Do-it-yourself maintenance
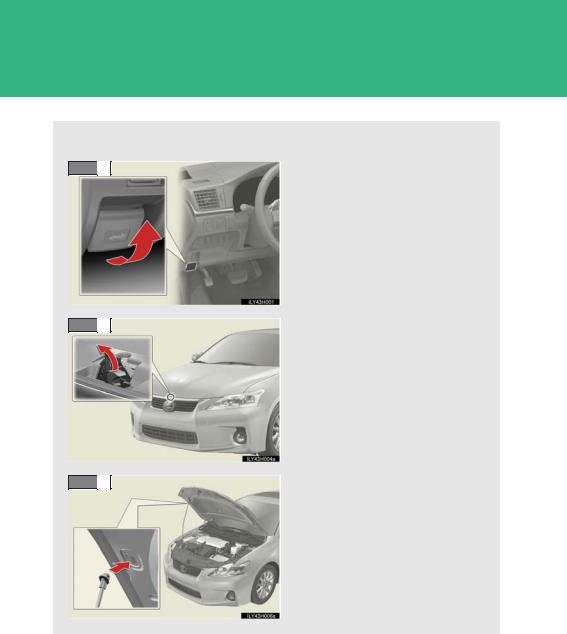
Hood
Release the lock from the inside of the vehicle to open the hood.
STEP |
1 |
Pull the hood release lever. |
The hood will pop up slightly.
STEP 2 |
Pull up the auxiliary catch lever |
|
and lift the hood. |
STEP 3 |
Hold the hood open by inserting |
|
the supporting rod into the slot. |
494
CT200h_U (OM76004U)

4-3. Do-it-yourself maintenance
 CAUTION
nPre-driving check
Check that the hood is fully closed and locked.
If the hood is not locked properly, it may open while the vehicle is in motion and cause an accident, which may result in death or serious injury.
nAfter installing the support rod into the slot
Make sure the rod supports the hood securely from falling down on to your head or body.
 NOTICE
nWhen closing the hood
Be sure to return the support rod to its clip before closing the hood. Closing the hood without returning the support rod properly could cause the hood to bend.
4 Maintenanceand care
495
CT200h_U (OM76004U)

4-3. Do-it-yourself maintenance
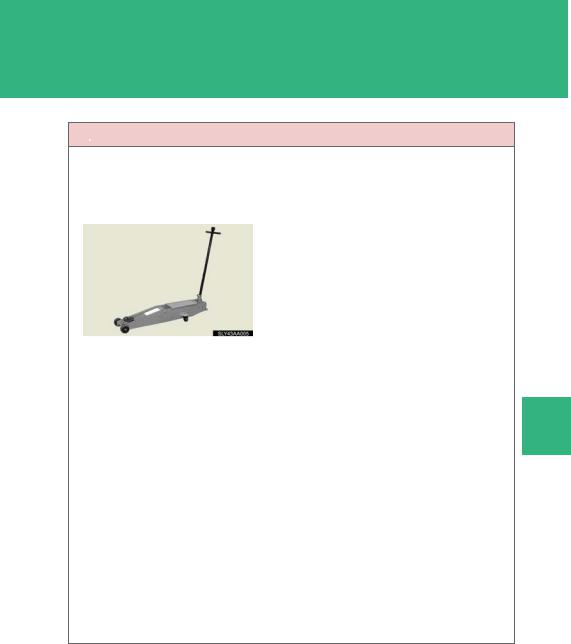
Positioning a floor jack
When raising your vehicle with a floor jack, position the jack correctly. Improper placement may damage your vehicle or cause injury.
Front
Rear
496
CT200h_U (OM76004U)
4-3. Do-it-yourself maintenance
 CAUTION
nWhen raising your vehicle
Make sure to observe the following precautions to reduce the possibility of death or serious injury:
lLift up the vehicle using a floor jack such as the one shown in the illustration.
lWhen using a floor jack, follow the instructions of the manual provided with the jack.
l Do not use the jack that was supplied with your vehicle.
lDo not put any part of your body underneath the vehicle when it is supported only by the floor jack.
l Always use floor jack and/or automotive jack stands on a solid, flat, level surface. l Do not start the hybrid system while the vehicle is supported by the floor jack.
lStop the vehicle on level, firm ground, firmly set the parking brake and shift the shift position to P.
lMake sure to set the floor jack properly at the jack point.
Raising the vehicle with an improperly positioned floor jack will damage the vehicle and may cause the vehicle to fall off the floor jack.
l Do not raise the vehicle while someone is in the vehicle.
lWhen raising the vehicle, do not place any object on top of or underneath the floor jack.
4 Maintenanceand care
497
CT200h_U (OM76004U)

4-3. Do-it-yourself maintenance
Engine compartment
 Engine coolant reservoir (→P. 504)
 Engine oil level dipstick
(→P. 500)  Engine oil filler cap (→P. 500)
|
Power control |
unit coolant |
|
||
|
reservoir |
(→P. 504) |
 Brake fluid reservoir
|
|
(→P. 508) |
|
Fuse box |
(→P. 542) |
|
||
|
Radiator |
(→P. 507) |
|
||
|
Condenser |
(→P. 507) |
|
||
|
Electric cooling fans |
|
|
||
|
Washer fluid tank |
(→P. 510) |
|
||
n12-volt battery
→P. 511
498
CT200h_U (OM76004U)
4-3. Do-it-yourself maintenance
 Engine compartment cover
n Removing the engine compartment cover
n Installing the clips
 Push up center portion
 Insert
 Press
Press
 NOTICE
nAfter installing an engine compartment cover
Make sure that the cover is securely installed in its original position.
4 Maintenanceand care
499
CT200h_U (OM76004U)
4-3. Do-it-yourself maintenance
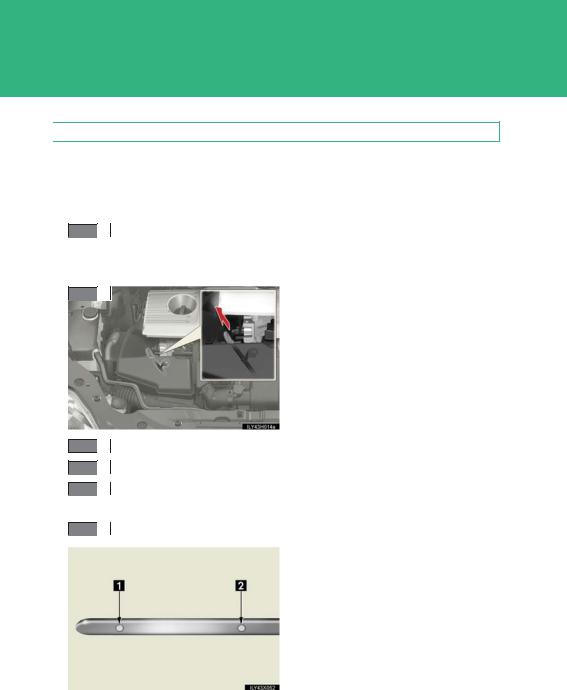
 Engine oil
With the engine at operating temperature and turned off, check the oil level on the dipstick.
n Checking the engine oil
STEP 1 Park the vehicle on level ground. After turning off the hybrid system, wait more than 5 minutes for the oil to drain back into the bottom of the engine.
STEP 2 |
Holding a rag under the end, pull |
|
the dipstick out. |
STEP 3 Wipe the dipstick clean.
STEP 4 Reinsert the dipstick fully.
STEP 5 Holding a rag under the end, pull the dipstick out and check the oil level.
STEP 6 Wipe the dipstick and reinsert it fully.
 Low
Low
 Full
Full
500
CT200h_U (OM76004U)

4-3. Do-it-yourself maintenance
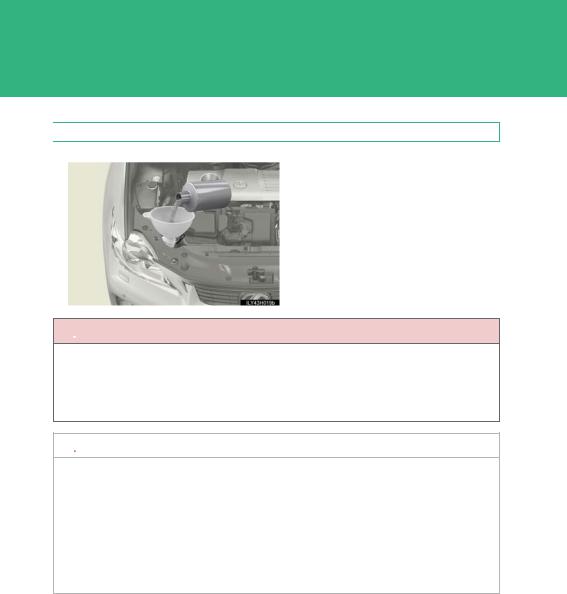
n Adding engine oil
If the oil level is below or near the low level mark, add engine oil of the same type as that already in the engine.
Make sure to check the oil type and prepare the items needed before adding oil.
Engine oil selection |
→P. 654 |
|
Oil quantity |
1.6 qt. (1.5 L, 1.3 lmp.qt.) |
|
(Low →Full) |
||
|
||
Items |
Clean funnel |
|
|
|
STEP 1 Remove the oil filler cap by turning it counterclockwise.
STEP 2 Add engine oil slowly, checking the dipstick.
STEP 3 Install the oil filler cap by turning it clockwise.
501
4 Maintenanceand care
CT200h_U (OM76004U)

4-3. Do-it-yourself maintenance
nEngine oil consumption
l The amount of engine oil consumed depends on the oil viscosity, the quality of the oil and the way the vehicle is driven.
l More oil is consumed under driving conditions such as high speeds and frequent acceleration and deceleration.
l A new engine consumes more oil.
l When judging the amount of oil consumption, keep in mind that the oil may have become diluted, making it difficult to judge the true level accurately.
l Oil consumption: Max. 1.1 qt./600 miles (1.0 L/1000 km, 0.9 lmp.qt./600 miles)
lIf your vehicle consumes more than 1.1 qt. (1.0 L, 0.9 lmp.qt.) every 600 miles (1000 km), contact your Lexus dealer.
nAfter changing the engine oil (U.S.A. only)
The engine oil maintenance data should be reset. Perform the following procedures:
STEP 1
STEP 2
STEP 3
Switch the display to the trip meter “A” (→P. 188) when the hybrid system is operating.
Turn the “POWER” switch off.
While pressing the trip meter reset button (→P. 188), turn the “POWER” switch to ON mode (do not start the hybrid system because otherwise the reset mode will be canceled). Continue to press and hold the button until the trip meter displays “000000” and the multi-information display indicates that the reset is complete.
502
CT200h_U (OM76004U)

4-3. Do-it-yourself maintenance
 CAUTION
nUsed engine oil
l Used engine oil contains potentially harmful contaminants which may cause skin disorders such as inflammation and skin cancer, so care should be taken to avoid prolonged and repeated contact. To remove used engine oil from your skin, wash thoroughly with soap and water.
l Dispose of used oil and filters only in a safe and acceptable manner. Do not dispose of used oil and filters in household trash, in sewers or onto the ground. Call your Lexus dealer, service station or auto parts store for information concerning recycling or disposal.
l Do not leave used engine oil within the reach of children.
 NOTICE
nTo prevent serious engine damage
Check the oil level on a regular basis.
nWhen replacing the engine oil
l Be careful not to spill engine oil on the vehicle components. l Avoid overfilling, or the engine could be damaged.
l Check the oil level on the dipstick every time you refill the vehicle. l Be sure the engine oil filler cap is properly tightened.
503
4 Maintenanceand care
CT200h_U (OM76004U)
4-3. Do-it-yourself maintenance
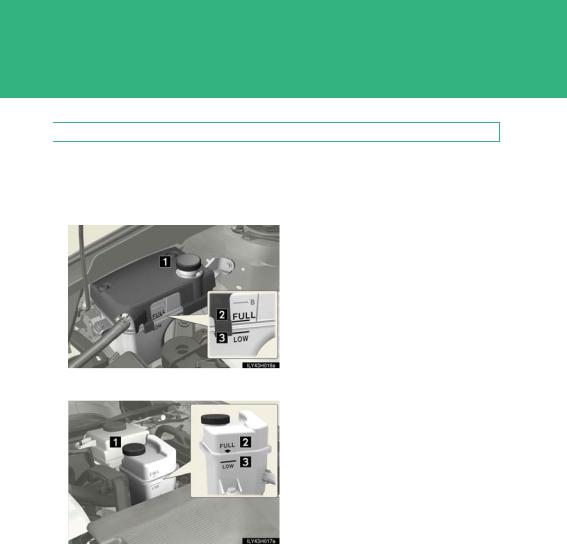
 Coolant
The coolant level is satisfactory if it is between the “FULL” and “LOW” lines on the reservoir when the hybrid system is cold.
Engine coolant reservoir
 Reservoir cap
 “FULL” line
 “LOW” line
If the level is on or below the “LOW” line, add coolant up to the “FULL” line. (→P. 657)
Power control unit coolant reservoir
 Reservoir cap
 “FULL” line
 “LOW” line
If the level is on or below the “LOW” line, add coolant up to the “FULL” line. (→P. 657)
504
CT200h_U (OM76004U)

4-3. Do-it-yourself maintenance
nCoolant selection
Only use “Toyota Super Long Life Coolant” or a similar high quality ethylene glycol based non-silicate, non-amine, non-nitrite, and non-borate coolant with long-life hybrid organic acid technology.
U.S.A.: “Toyota Super Long Life Coolant” is a mixture of 50% coolant and 50% deionized water. (Minimum temperature: -31 °F [-35 °C])
Canada: “Toyota Super Long Life Coolant” is a mixture of 55% coolant and 45% deionized water. (Minimum temperature: -44 °F [-42 °C])
For more details about coolant, contact your Lexus dealer.
nIf the coolant level drops within a short time of replenishing
Visually check the radiator, hoses, engine/power control unit coolant reservoir caps, drain cock and water pump.
If you cannot find a leak, have your Lexus dealer test the cap and check for leaks in the cooling system.
 CAUTION
nWhen the hybrid system is hot
Do not remove the engine/power control unit coolant reservoir caps.
The cooling system may be under pressure and may spray hot coolant if the cap is removed, causing burns or other injuries.
4 Maintenanceand care
505
CT200h_U (OM76004U)

4-3. Do-it-yourself maintenance
 NOTICE
nWhen adding coolant
Coolant is neither plain water nor straight antifreeze. The correct mixture of water and antifreeze must be used to provide proper lubrication, corrosion protection and cooling. Be sure to read the antifreeze or coolant label.
nIf you spill coolant
Be sure to wash it off with water to prevent it from damaging parts or paint.
506
CT200h_U (OM76004U)

4-3. Do-it-yourself maintenance
 Radiator and condenser
Check the radiator and condenser and clear away any foreign objects. If either of the above parts is extremely dirty or you are not sure of their condition, have your vehicle inspected by your Lexus dealer.
 CAUTION
n When the hybrid system is hot
Do not touch the radiator or condenser as they may be hot and cause burns. n When the electric cooling fans are operating
Do not touch the engine compartment.
The electric cooling fans may keep rotating for about 3 minutes even after the “POWER” switch is off.
With the “POWER” switch in ON mode, the electric cooling fans may automatically start to run if the air conditioning is on and/or the coolant temperature is high. Be sure the “POWER” switch is off when working near the electric cooling fans or radiator grille.
4 Maintenanceand care
507
CT200h_U (OM76004U)

4-3. Do-it-yourself maintenance
 Brake fluid
n Checking fluid level
The brake fluid level should be between the “MAX” and “MIN” lines on the tank.
n Adding fluid
Make sure to check the fluid type and prepare the necessary item.
Fluid type |
FMVSS No.116 DOT 3 or SAE J1703 brake fluid |
Items |
Clean funnel |
|
|
nBrake fluid can absorb moisture from the air
Excess moisture in the brake fluid can cause a dangerous loss of braking efficiency. Use only newly opened brake fluid.
508
CT200h_U (OM76004U)
4-3. Do-it-yourself maintenance
 CAUTION
nWhen filling the reservoir
Take care as brake fluid can harm your hands and eyes and damage painted surfaces.
If fluid gets on your hands or in your eyes, flush the affected area with clean water immediately.
If you still experience discomfort, see a doctor.
 NOTICE
nIf the fluid level is low or high
It is normal for the brake fluid level to go down slightly as the brake pads wear out or when the fluid level in the accumulator is high.
If the reservoir needs frequent refilling, there may be a serious problem.
4 Maintenanceand care
509
CT200h_U (OM76004U)
4-3. Do-it-yourself maintenance
 Washer fluid
If any washer does not work or the warning message appears on the multi-information display, the washer tank may be empty. Add washer fluid.
 CAUTION
nWhen adding washer fluid
Do not add washer fluid when the hybrid system is hot or operating as washer fluid contains alcohol and may catch fire if spilled on the engine etc.
 NOTICE
nDo not use any fluid other than washer fluid
Do not use soapy water or engine antifreeze instead of washer fluid. Doing so may cause streaking on the vehicle’s painted surfaces.
nDiluting washer fluid
Dilute washer fluid with water as necessary.
Refer to the freezing temperatures listed on the washer fluid tank.
510
CT200h_U (OM76004U)
4-3. Do-it-yourself maintenance
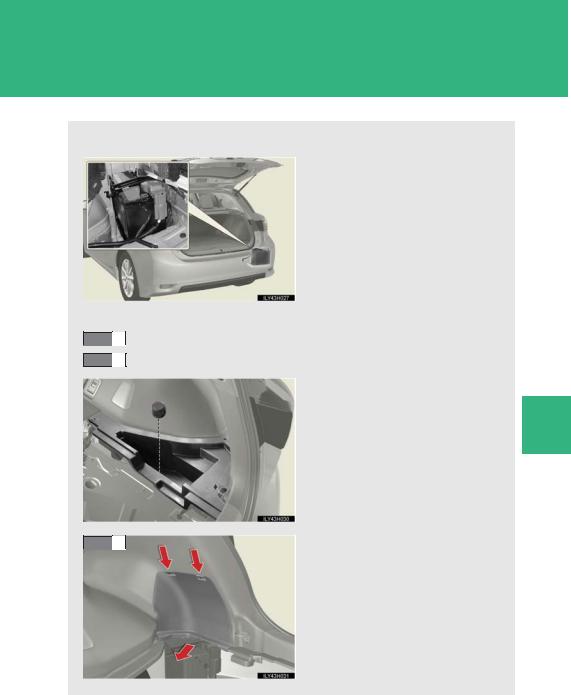
12-volt battery
n Location
The 12-volt battery is located in the right-hand side of luggage compartment.
n Removing the 12-volt battery cover
STEP 1 Open the center and right side auxiliary boxes. (→P. 447)
STEP 2 Remove the center auxiliary box. (→P. 616)
|
|
Remove the right side auxiliary |
STEP |
3 |
|
|
|
box. |
4
STEP 4
|
Maintenance |
|
Remove the 12-volt battery |
and |
|
maintenance cover. |
||
care |
||
|
511
CT200h_U (OM76004U)
4-3. Do-it-yourself maintenance
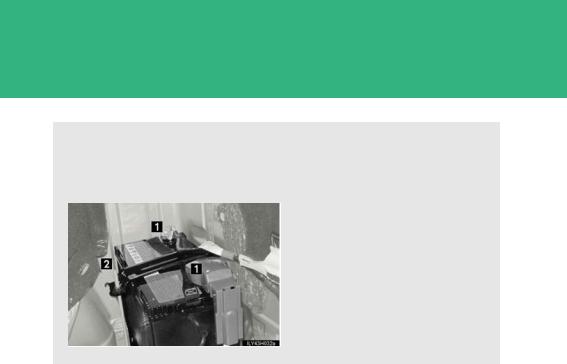
nExterior
Make sure that the 12-volt battery terminals are not corroded and that there are no loose connections, cracks, or loose clamps.
 Terminals
 Hold-down clamp
512
CT200h_U (OM76004U)
 Loading...