


SECTION 1 ± 6
INSTRUMENTS AND CONTROLS
Comfort adjustment
Front seats . . . . . . . . . . . . . . . . . . . . . . . . . . . . . . . . . . . . 112
Rear seats . . . . . . . . . . . . . . . . . . . . . . . . . . . . . . . . . . . . 123
Armrests . . . . . . . . . . . . . . . . . . . . . . . . . . . . . . . . . . . . . 128
Head restraints . . . . . . . . . . . . . . . . . . . . . . . . . . . . . . . . 128
Tilt steering wheell . . . . . . . . . . . . . . . . . . . . . . . . . . . . . 130
Outside rear view mirrors . . . . . . . . . . . . . . . . . . . . . . . . 132
Inside rear view mirror . . . . . . . . . . . . . . . . . . . . . . . . . . 136
Seat belts . . . . . . . . . . . . . . . . . . . . . . . . . . . . . . . . . . . . . 139
Supplemental restraint system (SRS) . . . . . . . . . . . . . . . 152
Child restraint . . . . . . . . . . . . . . . . . . . . . . . . . . . . . . . . . 175
Driving position memory system . . . . . . . . . . . . . . . . . . 210
FRONT SEATS
Front seat precautions
112

COMFORT ADJUSTMENT
 CAUTION
The SRS side airbags are installed in the driver and front passenger seats. Observe the following precautions.
Do not lean over the front door when the vehicle is in use. The side airbag inflates with considerable speed and force; you may be killed or severely injured.
Do not modify or replace the seats or the surface of the seats with side airbags. Such changes may disable the system, or cause the side airbags to inflate, resulting in death or serious injury. Consult your Lexus dealer.
Do not use accessories for the seats which cover the parts where the side airbags should inflate. Such accessories may prevent the side airbags from activating correctly, causing death or serious injury.
113

COMFORT ADJUSTMENT
Seat adjustment precautions
Adjust the driver's seat so that the foot pedals, steering wheel and instrument panel controls are within easy reach of the driver.
 CAUTION
Do not adjust the seat while the vehicle is moving as the seat may unexpectedly move and cause the driver to lose control of the vehicle.
Be careful not to hit the seat against a passenger, luggage or the rear seat.
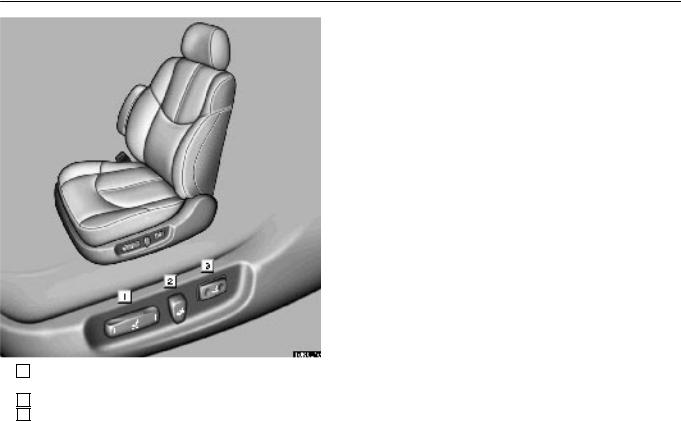
Adjusting front seats
NOTICE
Do not operate the control switch in more than one dimension at a time. It may cause electrical overload.
114
COMFORT ADJUSTMENT
1 Seat position control switch, seat cushion angle and height control switch
2Seatback angle control switch
3Lumbar support control switch
115
COMFORT ADJUSTMENT
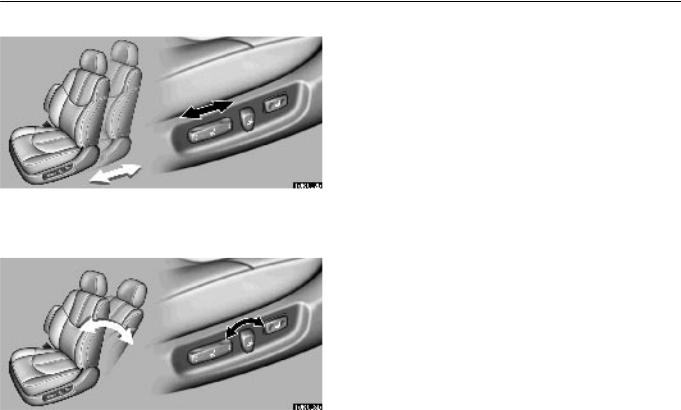
Adjusting seat position
Move the control switch in the desired direction.
Releasing the switch will stop the seat in that position. Do not place anything under the seat. It might interfere with the seat movement.
Adjusting seatback angle
116

COMFORT ADJUSTMENT
Move the control switch in the desired direction.
Releasing the switch will stop the seatback in that position.
 CAUTION
To reduce the risk of sliding under the lap belt during a collision, avoid reclining the seatback any more than needed. The seat belts provide maximum protection in a frontal or rear collision when the driver is sitting up straight and well back in the seats. If you are reclined, the lap belt may slide past your hips and apply restraint forces directly to the abdomen. Therefore, in the event of a frontal collision, the risk of personal injury may increase with increasing recline of the seatback.
117
COMFORT ADJUSTMENT
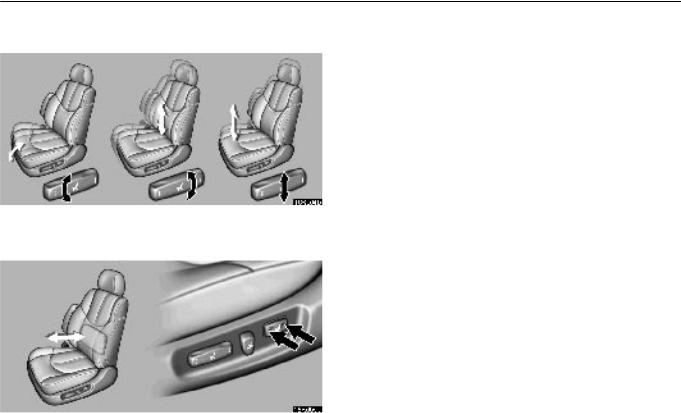
Adjusting seat cushion angle and height (driver's seat only)
Move the control switch in the desired direction.
Releasing the switch will stop the seat cushion in that position.
Adjusting lumbar support (driver's seat only)
118

COMFORT ADJUSTMENT
Push the control switch on either side.
The amount of lumbar support will change as long as the switch is pushed.
Flattening seatbacks
119
COMFORT ADJUSTMENT
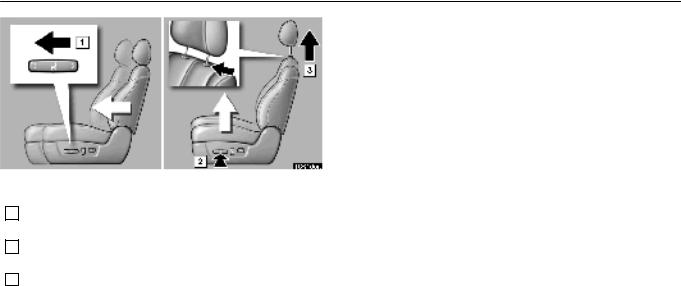
Before flattening seatbacks, slide the rear seats as far back as possible.
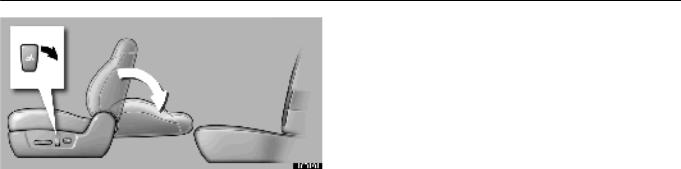
1Push the seat position control switch forward to move the seat forward.
2Push the seat position control switch upward to raise the seat (driver's seat only).
3Push the lock release button on the head restraint to remove it.
120
COMFORT ADJUSTMENT
Move the seatback angle control switch backward to flatten the seatback.
121
COMFORT ADJUSTMENT
Push the seat position control switch downward to lower the seat at the same level as the rear seat (driver's seat only).
After returning the seat to its original position, be certain to replace the head restraint.
 CAUTION
Do not allow passengers to ride on the flattened seat while driving; use the seat in the normal position.
After putting back the seat, try pushing the seatback forward and rearward to make sure it is secured in place. Be certain to replace head restraint.
122
COMFORT ADJUSTMENT
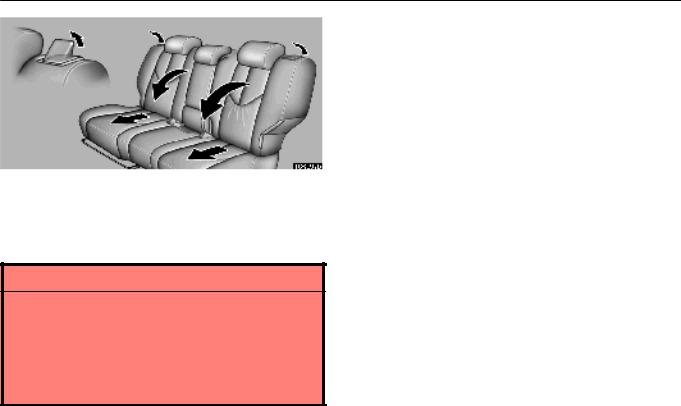
REAR SEATS
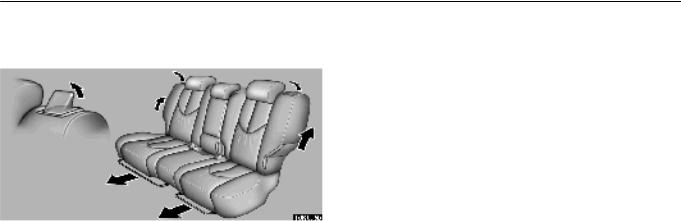
Sliding and reclining rear seats
Pull the lock release lever up. Then slide the seat to the desired position with slight body pressure and release the lever.
When you move the seats forward and unlock the seatbacks, you can tilt the seatbacks a little rearward.
123

COMFORT ADJUSTMENT
 CAUTION
To reduce the risk of sliding under the lap belt during a collision, avoid reclining the seatback any more than needed. The seat belts provide maximum protection when the passengers are sitting up straight and well back in the seats. If you are reclined, the lap belt may slide past your hips and apply restraint forces directly to the abdomen. Therefore, in the event of a frontal collision, the risk of personal injury may increase with increasing recline of the seatback.
124
COMFORT ADJUSTMENT
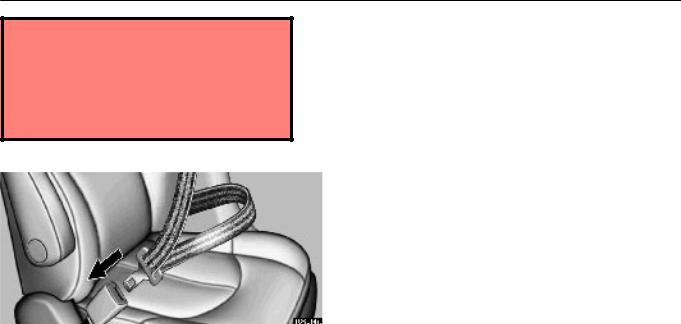
Folding down rear seatbacks
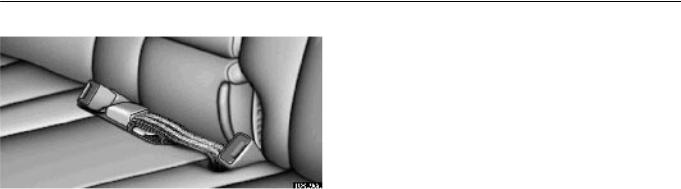
Before folding down rear seatbacks
Stow the rear seat belt buckle and center seat belt as shown in the illustration.
This prevents the belts from falling out when you fold up the rear seats.
125
COMFORT ADJUSTMENT
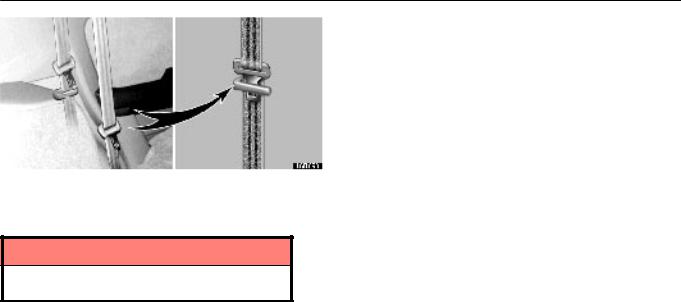
Seat belt hanger
For the outer seat belts, use the seat belt hangers to prevent the belts from being tangled.
NOTICE
The seat belt buckle and center seat belt must be stowed before you fold down the rear seatbacks.
126
COMFORT ADJUSTMENT
Folding down rear seatbacks
Lower the head restraints to the lowest position, unlock the seatbacks and fold them down.
When returning the rear seats to their original position, lift up the seatbacks until they lock.
 CAUTION
When returning seats to their original position:
Make sure the seat belts are not twisted or caught under the seat and are arranged in their proper position and are ready to use.
Make sure the seat is securely locked by pushing forward and rearward on the top of the seatback or by trying to pull up the edge of the bottom cushion.
127

COMFORT ADJUSTMENT
ARMRESTS
Front |
Rear |
To use the armrests, pull them down as shown above.
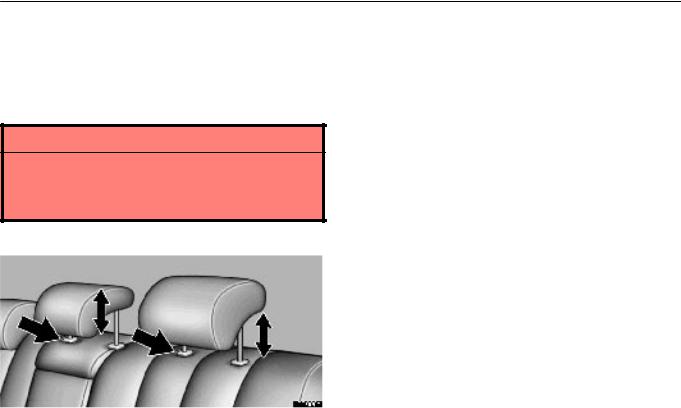
HEAD RESTRAINTS
Front seats
NOTICE
To prevent damage to the armrests, avoid putting heavy loads on them.
128
COMFORT ADJUSTMENT
To raise the head restraint, pull it up. To lower it, press the lock release button and push the head restraint down. To move the head restraint forward or rearward, pull or push on the top.
The head restraint is most effective when it is close to your head. Therefore, using a cushion on the seatback is not recommended.
 CAUTION
Adjust the center of the head restraint so that it is closest to the top of your ears.
After adjusting the head restraint, make sure it is locked in position.
|
Do not drive with the head restraints removed. |
Rear seats |
||
|
||||
|
|
|
|
|
|
|
|
|
|
129
COMFORT ADJUSTMENT
To raise the head restraint, pull it up. To lower it, press the lock release button and push the head restraint down.
The head restraint is most effective when it is close to your head. Therefore, using a cushion on the seatback is not recommended.
 CAUTION
Adjust the center of the head restraint so that it is closest to the top of your ears.
After adjusting the head restraint, make sure it is locked in position.
Do not drive with the head restraints removed.
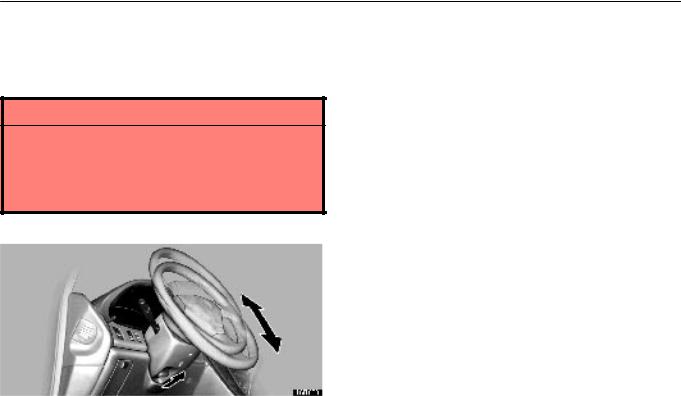
TILT STEERING WHEEL
130

COMFORT ADJUSTMENT
To change the steering wheel angle, hold the steering wheel, pull up the lock release lever, tilt the steering wheel to the desired angle and release the lever.
When the steering wheel is in a low position, it will spring up as you release the lock release lever.
 CAUTION
Do not adjust the steering wheel while the vehicle is moving.
After adjusting the steering wheel, try moving it up and down to make sure it is locked in position.
131
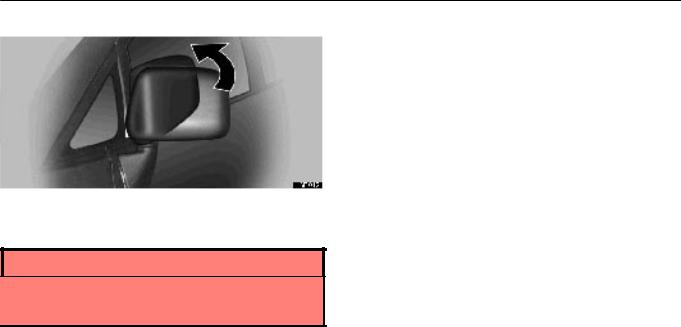
COMFORT ADJUSTMENT
OUTSIDE REAR VIEW
MIRRORS
Adjust the mirror so that you can just see the side of your vehicle in the mirror.
Be careful when judging the size or distance of any object seen in the outside rear view mirror on the passenger's side. It is a convex mirror with a curved surface. Any object seen in a convex mirror will look smaller and farther away than if seen in a normal flat mirror.
When you push the rear window and outside rear view mirror defogger switch, the heater panels in the outside rear view mirrors will quickly clear the mirror surface.
Some models: When the inside rear view mirror darkens in ºAUTOº mode, the outside rear view mirrors also darken to reduce the reflection of the headlights of the following vehicle. For details, see ºInside rear view mirrorº on page
136.
132

COMFORT ADJUSTMENT
 CAUTION
Do not adjust the mirror while the vehicle is moving. It may cause the driver to mishandle the vehicle and an accident may occur, resulting in personal injuries.
Since the mirror surfaces can get hot, keep your hands off them when the rear window and outside rear view mirror defogger switch is on.
133
COMFORT ADJUSTMENT
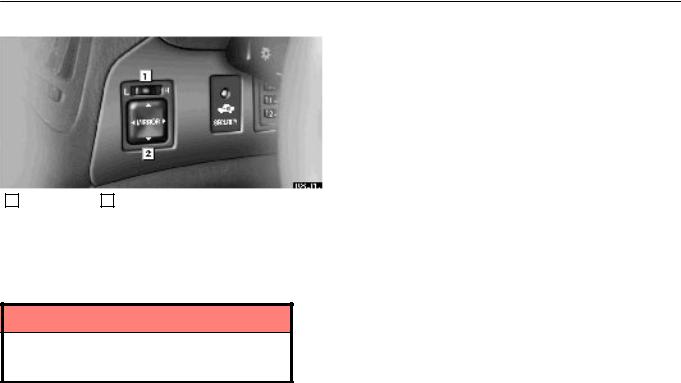
Power rear view mirror control
1 Master switch 2 Control switch
To adjust the power rear view mirror, first place the master switch at ºLº (left) or ºRº (right), and push the control switch on the desired side.
The power rear view mirror can be adjusted when the key is in the ºACCº or ºONº position.
NOTICE
If ice should jam the mirror, do not operate the control or scrape the mirror face. Use a spray de±icer to free the mirror.
134
COMFORT ADJUSTMENT
Folding rear view mirrors
To fold the rear view mirror, push backward.
The rear view mirrors can be folded backward for parking in restricted areas.
 CAUTION
Do not drive with the mirrors folded backward. Both the driver and passenger side rear view mirrors must be extended and properly adjusted before driving.
135
COMFORT ADJUSTMENT
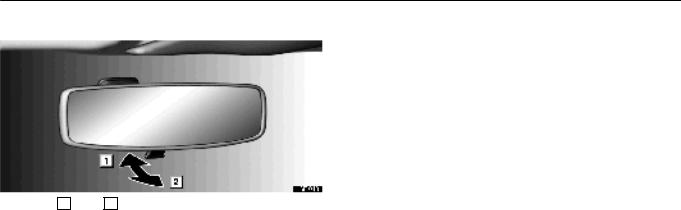
INSIDE REAR VIEW MIRROR
Type A 1 Day 2 Night
Adjust the mirror so that you can just see the rear of your vehicle in the mirror.
When driving at night, pull the lever toward you to reduce the glare from the headlights of vehicles behind you.
Before adjusting the mirror to the position with most clarity, push the day±night change lever forward (daylight driving position).
Remember that by reducing glare you also lose some rear view clarity.
136
COMFORT ADJUSTMENT
 CAUTION
Do not adjust the mirror while the vehicle is moving. It may cause the driver to mishandle the vehicle and an accident may occur resulting in personal injuries.
137

COMFORT ADJUSTMENT
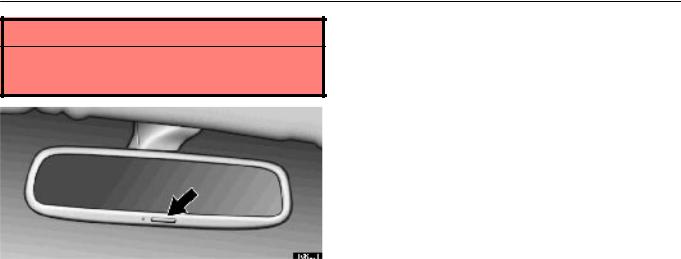
Type B
Adjust the mirror so that you can just see the rear of your vehicle in the mirror.
Pushing the switch changes the mode between ºAUTOº and ºDAYº.
The indicator comes on when the ºAUTOº mode is selected.
ºDAYº mode: The mirror surface is normal.
ºAUTOº mode: If the mirror detects light from the headlights of the vehicle behind you, the mirror surface darkens slightly to reduce the reflected light.
When the inside rear view mirror surface changes, the outside rear view mirror surfaces will also become darker.
When the ignition key is inserted and turned on, the inside rear view mirror always turns on in the ºAUTOº mode.
 CAUTION
Do not adjust the mirror while the vehicle is moving. It may cause the driver to mishandle the vehicle and an accident may occur resulting in personal injuries.
When the outside air temperature is low, it may take a little longer for the mirror to darken in response to the detection of headlights.
138

COMFORT ADJUSTMENT
SEAT BELTS
Seat belt precautions
Lexus strongly urges that the driver and passengers in the vehicle be properly restrained at all times with the seat belts provided. Failure to do so could increase the chance of injury and/or the severity of injury in accidents.
Child. Use a child restraint system appropriate for the child until the child becomes large enough to properly wear the vehicle's seat belts. See ºChild restraintº for details.
If a child is too large for a child restraint system, the child should sit in the rear seat and must be restrained using the vehicle's seat belt. According to accident statistics, the child is safer when properly restrained in the rear seat than in the front seat.
If a child must sit in the front seat, the seat belts should be worn properly. Do not let the child sit on your lap. It does not provide sufficient restraint. If an accident occurs and the seat belts are not worn properly, the force of the rapid inflation of the airbag may cause severe injury to the child.
Do not allow the child to stand up or kneel on either rear or front seats. An unrestrained child could suffer serious injury during emergency braking or a collision.
Pregnant woman. Lexus recommends the use of a seat belt. Ask your doctor for specific recommendations. The lap belt should be worn securely and as low as possible over the hips and not on the waist.
Injured person. Lexus recommends the use of a seat belt. Depending on the injury, first check with your doctor for specific recommendations.
139

COMFORT ADJUSTMENT
 CAUTION
Persons should ride in their seats properly wearing their seat belts whenever the vehicle is moving. Otherwise, they are much more likely to suffer serious bodily injury in the event of sudden braking or a collision.
When using the seat belts, observe the following:
Use the belt for only one person at a time. Do not use a single belt for two or more people ± even children.
Avoid reclining the seatbacks too much. The seat belts provide maximum protection when the seatbacks are in the upright position. (See ºAdjusting seatback angleº.)
Be careful not to damage the belt webbing or hardware. Take care that they do not get caught or pinched in the seat or doors.
Inspect the belt system periodically. Check for cuts, fraying, and loose parts. Damaged parts should be replaced. Do not disassemble or modify the system.
140
COMFORT ADJUSTMENT
Keep the belts clean and dry. If they need cleaning, use a mild soap solution or lukewarm water. Never use bleach, dye, or abrasive cleaners ± they may severely weaken the belts. (See ºCleaning the interiorº on page 468 for instructions.)
Replace the belt assembly (including bolts) if it has been used in a severe impact. The entire assembly should be replaced even if damage is not obvious.
Fastening front and rear outside seat belts
Adjust the seat as needed and sit up straight and well back in the seat. To fasten your belt, pull it out of the retractor and insert the tab into the buckle.
You will hear a click when the tab locks into the buckle.
The seat belt length automatically adjusts to your size and the seat position.
141
 Loading...