


 Loading...
TABLE OF CONTENTS
1 |
|
QUICK GUIDE |
9 |
|
|
|
|
2 |
|
BASIC FUNCTION |
31 |
|
|
|
|
3 |
|
NAVIGATION SYSTEM |
66 |
|
|
|
|
4 |
|
PHONE |
143 |
|
|
|
|
5 |
|
AUDIO/VIDEO SYSTEM |
206 |
|
|
|
|
6 |
|
AIR CONDITIONING |
291 |
|
|
|
|
7 |
|
VOICE COMMAND SYSTEM |
307 |
|
|
|
|
8 |
|
INFORMATION |
321 |
|
|
|
|
9 |
|
LEXUS ENFORM WITH SAFETY |
345 |
|
CONNECT |
||
|
|
|
|
|
|
|
|
10 |
|
PERIPHERAL MONITORING SYSTEM |
373 |
|
|
|
|
|
|
INDEX |
385 |
|
|
|
|
1
ES350/300h_Navi_OM33A07U_(U)
12.05.07 10:16

Introduction

 NAVIGATION SYSTEM OWNER’S MANUAL
This manual explains the operation of the Navigation System. Please read this manual carefully to ensure proper use. Keep this manual in your vehicle at all times.
The screen shots in this document and the actual screens of the navigation system differ depending on whether the functions and/or a contract existed and the map data available at the time of producing this document.

 NAVIGATION SYSTEM
The Navigation System is one of the most technologically advanced vehicle accessories ever developed. The system receives satellite signals from the Global Positioning System (GPS) operated by the U.S. Department of Defense. Using these signals and other vehicle sensors, the system indicates your present position and assists in locating a desired destination.
The navigation system is designed to select efficient routes from your present starting location to your destination. The system is also designed to direct you to a destination that is unfamiliar to you in an efficient manner. The system uses DENSO maps. The calculated routes may not be the shortest nor the least traffic congested. Your own personal local knowledge or “short cut” may at times be faster than the calculated routes.
The navigation system’s database includes Point of Interest categories to allow you to easily select destinations such as restaurants and hotels. If a destination is not in the database, you can enter the street address or a major intersection close to it and the system will guide you there.
The system will provide both a visual map and audio instructions. The audio instructions will announce the distance remaining and the direction to turn in when approaching an intersection. These voice instructions will help you keep your eyes on the road and are timed to provide enough time to allow you to maneuver, change lanes or slow down.
Please be aware that all current vehicle navigation systems have certain limitations that may affect their ability to perform properly. The accuracy of the vehicle’s position depends on satellite conditions, road configuration, vehicle condition or other circumstances. For more information on the limitations of the system, refer to pages 139 through 141.
2
ES350/300h_Navi_OM33A07U_(U)
12.05.07 10:18
IMPORTANT INFORMATION ABOUT THIS MANUAL
For safety reasons, this manual indicates items requiring particular attention with the following marks.
 CAUTION
●This is a warning against anything which may cause injury to people if the warning is ignored. You are informed about what you must or must not do in order to reduce the risk of injury to yourself and others.
 NOTICE
●This is a warning against anything which may cause damage to the vehicle or its equipment if the warning is ignored. You are informed about what you must or must not do in order to avoid or reduce the risk of damage to your vehicle and its equipment.
SYMBOLS USED IN ILLUSTRATIONS
Safety symbol
The symbol of a circle with a slash through it means “Do not”, “Do not do this”, or “Do not let this happen.”
Arrows indicating operations
Indicates the action (pushing, turning, etc.) used to operate switches and other devices.
3
ES350/300h_Navi_OM33A07U_(U)
12.05.07 10:18

HOW TO READ THIS MANUAL
No. |
Name |
Description |
|
|
Operational |
An outline of the operation is explained. |
|
|
Outlines |
|
|
|
|
|
|
|
Main Operations |
The steps of an operation are explained. |
|
|
||
|
|
Related Operations |
A main operation’s supplementary operations are described. |
|
|
||
|
|
||
|
|
Information |
Useful information for the user is described. |
|
|
||
|
|
||
|
|
|
|
|
|
|
|
■INFORMATION FOR HYBRID VEHICLES IS WRITTEN IN BRACKETS NEXT TO THE INFORMATION FOR GASOLINE VEHICLES
Different writing styles for gasoline and hybrid vehicles
Example
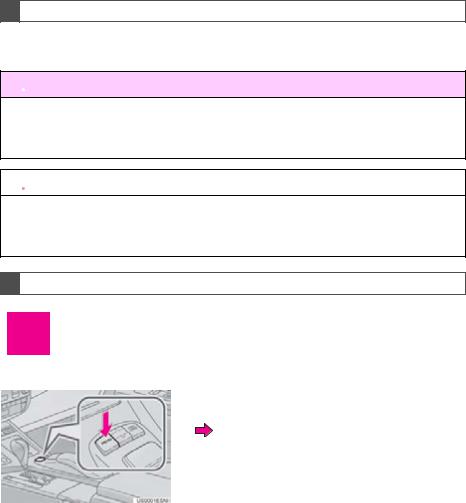
When the “START STOP ENGINE”*1 <“POWER”> *2 switch is in ACCESSORY or
IGNITION ON*1 <ON>*2 mode, the initial screen will be displayed and the system will begin operating.
*1: Gasoline vehicle *2: Hybrid vehicle
4
ES350/300h_Navi_OM33A07U_(U)
12.05.07 10:18
SAFETY INSTRUCTION
To use this system in the safest possible manner, follow all the safety tips shown below.
This system is intended to assist in reaching the destination and, if used properly, can do so. The driver is solely responsible for the safe operation of your vehicle and the safety of your passengers.
Do not use any feature of this system to the extent it becomes a distraction and prevents safe driving. The first priority while driving should always be the safe operation of the vehicle. While driving, be sure to observe all traffic regulations.
Prior to the actual use of this system, learn how to use it and become thoroughly familiar with it. Read the entire Navigation System Owner’s Manual to make sure you understand the system. Do not allow other people to use this system until they have read and understood the instructions in this manual.
For your safety, some functions may become inoperable when driving. Unavailable screen buttons are dimmed. Only when the vehicle is not moving, can the destination and route selection be done.
 CAUTION
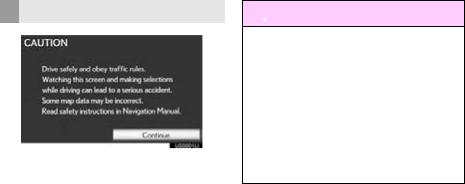
●For safety, the driver should not operate the navigation system while he/she is driving. Insufficient attention to the road and traffic may cause an accident.
●While driving, be sure to obey the traffic regulations and maintain awareness of the road conditions. If a traffic sign on the road has been changed, route guidance may not have the updated information such as the direction of a one way street.
While driving, listen to the voice instructions as much as possible and glance at the screen briefly and only when it is safe. However, do not totally rely on voice guidance. Use it just for reference. If the system cannot determine the current position correctly, there is a possibility of incorrect, late, or non-voice guidance.
The data in the system may occasionally be incomplete. Road conditions, including driving restrictions (no left turns, street closures, etc.) frequently change. Therefore, before following any instructions from the system, look to see whether the instruction can be done safely and legally.
This system cannot warn about such things as the safety of an area, condition of streets, and availability of emergency services. If unsure about the safety of an area, do not drive into it. Under no circumstances is this system a substitute for the driver’s personal judgement.
Use this system only in locations where it is legal to do so. Some states/provinces may have laws prohibiting the use of video and navigation screens next to the driver.
5
ES350/300h_Navi_OM33A07U_(U)
12.05.07 10:18

|
TABLE OF CONTENTS |
|
1 |
QUICK GUIDE |
|
1. NAVIGATION OPERATION..................... |
10 |
|
|
Remote Touch........................................................... |
10 |
|
MAP SCREEN......................................................... |
12 |
|
REGISTERING HOME....................................... |
14 |
|
REGISTERING PRESET |
|
|
DESTINATIONS................................................. |
16 |
|
OPERATION FLOW: |
|
|
GUIDING THE ROUTE.................................. |
18 |
|
SETTING HOME |
|
|
AS THE DESTINATION.................................. |
19 |
2. FUNCTION INDEX ..................................... |
20 |
|
|
NAVIGATION SYSTEM |
|
|
FUNCTION INDEX......................................... |
20 |
3. QUICK REFERENCE.................................. |
22 |
|
|
“Menu” SCREEN ................................................... |
22 |
|
“Destination” SCREEN........................................ |
24 |
|
“Setup” SCREEN.................................................... |
26 |
|
“Information” SCREEN........................................ |
28 |
2 |
BASIC FUNCTION |
|
1. BASIC INFORMATION BEFORE |
|
|
|
OPERATION ............................................... |
32 |
|
INITIAL SCREEN .................................................. |
32 |
|
HOW TO USE THE Remote Touch ............. |
33 |
|
INPUTTING LETTERS AND NUMBERS/ |
|
|
LIST SCREEN OPERATION....................... |
35 |
|
SCREEN ADJUSTMENT.................................. |
38 |
|
MAP SCREEN OPERATION......................... |
40 |
2. SETUP................................................................. |
51 |
|
|
GENERAL SETTINGS ........................................ |
51 |
|
VOICE SETTINGS ............................................... |
62 |
6
3 NAVIGATION SYSTEM |
|
1. DESTINATION SEARCH............................ |
68 |
DESTINATION SEARCH ................................ |
68 |
STARTING ROUTE GUIDANCE ............... |
87 |
2. ROUTE GUIDANCE................................... |
90 |
ROUTE GUIDANCE SCREEN .................... |
90 |
TYPICAL VOICE GUIDANCE |
|
PROMPTS............................................................. |
93 |
DISTANCE AND TIME TO |
|
DESTINATION .................................................. |
96 |
SETTING AND DELETING |
|
DESTINATIONS................................................. |
97 |
SETTING ROUTE................................................. |
99 |
3. ADDRESS BOOK....................................... |
108 |
NAVIGATION SETTINGS............................ |
108 |
4. SETUP.............................................................. |
125 |
DETAILED NAVIGATION |
|
SETTINGS............................................................ |
125 |
VEHICLE SETTINGS......................................... |
133 |
5. GPS (GLOBAL POSITIONING |
|
SYSTEM)...................................................... |
139 |
LIMITATIONS OF THE |
|
NAVIGATION SYSTEM ............................. |
139 |
ES350/300h_Navi_OM33A07U_(U)
12.05.07 10:18

4 |
PHONE |
|
1. PHONE OPERATION................................ |
144 |
|
|
QUICK REFERENCE ....................................... |
144 |
|
PHONE (HANDS-FREE SYSTEM |
|
|
FOR CELLULAR PHONE) ........................ |
146 |
|
REGISTER A Bluetooth® PHONE ............. |
152 |
|
CALL ON THE Bluetooth® PHONE ........ |
157 |
|
RECEIVE ON THE Bluetooth® |
|
|
PHONE................................................................. |
165 |
|
TALK ON THE Bluetooth® PHONE......... |
166 |
|
Bluetooth® PHONE MESSAGE |
|
|
FUNCTION........................................................ |
169 |
2. SETUP .............................................................. |
172 |
|
|
PHONE SETTINGS ........................................... |
172 |
|
Bluetooth® SETTINGS...................................... |
194 |
5 |
AUDIO/VIDEO SYSTEM |
|
1. AUDIO/VIDEO SYSTEM |
|
|
|
OPERATION............................................ |
208 |
|
QUICK REFERENCE ..................................... |
208 |
|
SOME BASICS..................................................... |
210 |
|
RADIO OPERATION....................................... |
217 |
|
HD Radio™ TECHNOLOGY |
|
|
INFORMATION .............................................. |
221 |
|
RADIO OPERATION (XM Satellite |
|
|
Radio BROADCAST) ................................... |
226 |
|
RADIO OPERATION (INTERNET |
|
|
RADIO BROADCAST)............................... |
232 |
|
DVD PLAYER OPERATION....................... |
233 |
|
USB MEMORY OPERATION.................... |
254 |
|
iPod OPERATION............................................ |
260 |
|
Bluetooth® AUDIO OPERATION............ |
264 |
|
AUDIO/VIDEO REMOTE |
|
|
CONTROLS (STEERING |
|
|
SWITCHES)....................................................... |
275 |
|
AUDIO/VIDEO SYSTEM |
|
|
OPERATING HINTS .................................... |
277 |
2. SETUP ............................................................ |
288 |
|
|
AUDIO SETTINGS........................................... |
288 |
6 |
AIR CONDITIONING |
|
|
1. AIR CONDITIONING SYSTEM |
|
|
|
|
OPERATION............................................. |
292 |
1 |
|
QUICK REFERENCE |
292 |
|
|
|
||
|
SOME BASICS ................................................... |
294 |
|
|
AUTOMATIC AIR CONDITIONING |
|
|
|
SYSTEM .............................................................. |
295 |
2 |
7 |
VOICE COMMAND SYSTEM |
|
|
1. VOICE COMMAND SYSTEM |
|
3 |
|
|
|
||
|
OPERATION............................................ |
308 |
|
|
VOICE COMMAND SYSTEM................. |
308 |
4 |
|
NATURAL SPEECH |
|
|
|
INFORMATION |
|
|
|
(ENGLISH ONLY) ......................................... |
314 |
|
|
EXPANDED VOICE |
|
5 |
|
COMMANDS .................................................. |
316 |
|
|
COMMAND LIST ............................................... |
317 |
|
8 |
INFORMATION |
|
6 |
1. INFORMATION DISPLAY ...................... |
322 |
|
|
|
MAP DATABASE VERSION |
|
7 |
|
AND COVERAGE AREA......................... |
322 |
|
2. XM FUNCTION-OVERVIEW............... |
324 |
|
|
|
XM SERVICES .................................................... |
324 |
8 |
3. XM FUNCTION OPERATION............. |
327 |
|
|
|
XM Sports .............................................................. |
327 |
|
|
XM Stocks.............................................................. |
330 |
9 |
|
XM Fuel Prices..................................................... |
333 |
|
|
XM NavWeather™............................................ |
337 |
|
|
XM NavTraffic® ................................................... |
341 |
10 |
4. SETUP.............................................................. |
344 |
|
|
XM SETTINGS.................................................... |
344 |
7
ES350/300h_Navi_OM33A07U_(U)
12.05.07 10:18

TABLE OF CONTENTS
9LEXUS ENFORM WITH SAFETY CONNECT
1.LEXUS ENFORM WITH SAFETY CONNECT-OVERVIEW..................... 346
FUNCTIONAL OVERVIEW ....................... |
346 |
TYPE A: FUNCTION ACHIEVED |
|
BY USING A CELLULAR |
|
PHONE ............................................................... |
347 |
TYPE B: FUNCTION ACHIEVED |
|
BY USING DCM AND THE |
|
NAVIGATION SYSTEM............................ |
352 |
TYPE C: FUNCTION ACHIEVED |
|
BY USING DCM ........................................... |
355 |
2. LEXUS ENFORM WITH SAFETY |
|
CONNECT OPERATION................... |
356 |
APPS......................................................................... |
356 |
Destination Assist ................................................ |
363 |
eDestination........................................................... |
365 |
Lexus Insider......................................................... |
368 |
10PERIPHERAL MONITORING SYSTEM
1. REAR VIEW MONITOR SYSTEM........ |
374 |
REAR VIEW MONITOR SYSTEM............ |
374 |
REAR VIEW MONITOR SYSTEM |
|
PRECAUTIONS.............................................. |
378 |
THINGS YOU SHOULD KNOW ........... |
383 |
INDEX |
|
ALPHABETICAL INDEX............................. |
386 |
8
ES350/300h_Navi_OM33A07U_(U)
12.05.07 10:18

1
QUICK GUIDE
1 |
NAVIGATION OPERATION |
|
1. |
Remote Touch ............................................... |
10 |
2. |
MAP SCREEN.............................................. |
12 |
3. |
REGISTERING HOME............................. |
14 |
4. |
REGISTERING PRESET |
|
|
DESTINATIONS....................................... |
16 |
5. |
OPERATION FLOW: |
|
|
GUIDING THE ROUTE......................... |
18 |
6. |
SETTING HOME AS THE |
|
|
DESTINATION ......................................... |
19 |
2FUNCTION INDEX
1.NAVIGATION SYSTEM
|
FUNCTION INDEX............................... |
20 |
3 |
QUICK REFERENCE |
|
1. |
“Menu” SCREEN........................................ |
22 |
2. |
“Destination” SCREEN............................. |
24 |
3. |
“Setup” SCREEN ........................................ |
26 |
4. |
“Information” SCREEN............................. |
28 |
1
2
3
4
5
6
7
8
9
10
9
ES350/300h_Navi_OM33A07U_(U)
12.04.18 16:47
1. NAVIGATION OPERATION
1. Remote Touch
10
ES350/300h_Navi_OM33A07U_(U)
12.05.07 10:23
1. NAVIGATION OPERATION
No. |
Name |
Function |
Page |
||
|
|
|
|
|
|
|
|
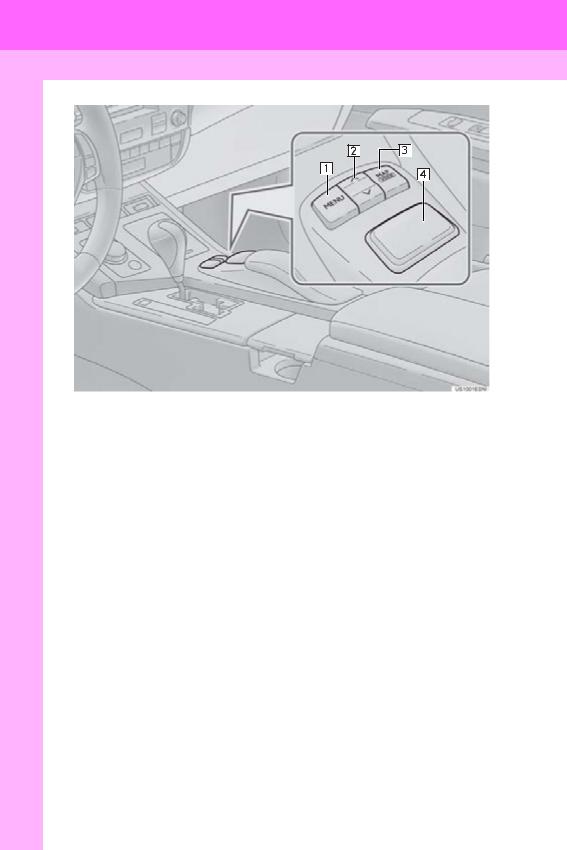
“MENU” button |
Press to display the “Menu” screen. |
22 |
|
|
|
||||
|
|
“ · |
” button |
Press to change the scale of the map and to scroll |
33, 36, 48 |
|
|
||||
|
|
||||
|
|
the list screen. |
|||
|
|
|
|
|
|
|
|
|
|
|
|
|
|
“MAP/VOICE” |
Press to repeat a voice guidance, cancel the |
40 |
|
|
|
screen scroll, start guidance, and display the cur- |
|||
|
|
button |
|||
|
|
rent position. |
|
||
|
|
|
|||
|
|
|
|
|
|
|
|
Remote Touch |
Move in the desired direction to select a function, |
|
|
|
|
letter and map screen button. |
33 |
||
|
|
||||
|
|
knob |
|
Press to enter the selected function, letter or map |
|
|
|
|
|
||
|
|
|
|
screen button. |
|
|
|
|
|
|
|
11
1 QUICKGUIDE
ES350/300h_Navi_OM33A07U_(U)
12.05.07 10:23
1.NAVIGATION OPERATION
2.MAP SCREEN
|
|
|
|
|
|
|
|
|
|
|
|
|
|
|
|
|
|
|
|
|
|
|
|
|
|
|
|
|
|
|
|
|
|
|
|
|
|
|
|
|
|
|
|
|
|
|
|
|
|
|
|
|
|
|
|
|
|
|
|
|
|
|
|
|
|
|
|
|
|
|
|
|
|
|
|
|
|
|
|
|
|
|
|
|
|
|
|
|
|
|
|
|
|
|
|
|
|
|
|
|
|
|
|
|
|
|
|
|
|
|
|
|
|
|
|
|
|
|
|
|
|
|
|
|
|
|
|
|
|
|
|
|
|
|
|
|
|
|
|
|
|
|
|
|
|
|
|
|
|
|
|
|
|
|
|
|
|
|
|
|
|
|
|
|
|
|
|
|
|
|
|
|
|
|
|
|
|
|
|
|
|
|
|
|
|
|
|
|
|
|
|
|
|
|
|
|
|
|
|
|
|
|
|
|
|
|
|
|
|
|
|
|
|
|
|
|
|
|
|
|
|
|
|
|
|
|
|
|
|
|
|
|
|
|
|
|
|
|
|
|
|
|
|
|
|
|
|
|
|
|
|
|
|
|
|
|
|
|
|
|
|
|
|
|
|
|
|
|
|
|
|
|
|
|
|
|
|
|
|
|
|
|
|
|
|
|
|
|
|
|
|
|
|
|
|
|
|
|
|
|
|
|
|
|
|
|
|
|
|
|
|
|
|
|
|
|
|
|
|
|
|
|
|
|
|
|
|
|
|
|
|
|
|
|
|
|
|
|
|
|
|
|
|
|
|
|
|
|
|
|
|
|
|
|
|
|
|
|
|
|
|
|
|
|
|
|
|
|
|
|
|
|
|
|
|
|
|
|
|
|
|
|
|
|
|
|
|
|
|
|
|
|
|
|
|
|
|
|
|
|
|
|
|
|
|
|
|
|
|
|
|
|
|
|
|
|
|
|
|
|
|
|
|
|
|
|
|
|
|
|
|
|
|
|
|
|
|
|
|
|
|
|
|
|
|
|
|
|
|
|
|
|
|
|
|
|
|
|
|
|
|
|
|
|
|
|
|
|
|
|
|
|
|
|
|
|
|
|
|
|
|
|
|
|
|
|
|
|
|
|
|
|
|
|
|
|
|
|
|
|
|
|
|
|
|
|
|
|
|
|
|
|
|
|
|
|
|
|
|
|
|
|
|
|
|
|
|
|
|
|
|
|
|
|
|
|
|
|
|
|
|
|
|
|
|
|
|
|
|
|
|
|
|
|
|
|
|
|
|
|
|
|
|
|
|
|
|
|
|
|
|
|
|
|
|
|
|
|
|
|
|
|
|
|
|
|
|
|
|
|
|
|
|
|
|
|
|
|
|
|
|
|
|
|
|
|
|
|
|
|
|
|
|
|
|
|
|
|
|
|
|
|
|
|
|
|
|
|
|
|
|
|
|
|
|
|
|
|
|
|
|
|
|
|
|
|
|
|
|
|
|
|
|
|
|
|
|
|
|
|
|
|
|
|
|
|
|
|
|
|
|
|
|
|
|
|
|
|
|
No. |
|
|
|
|
Name |
|
|
|
|
|
|
|
|
Function |
Page |
||||||||||||||||||
|
|
|
|
|
|
|
|
|
|
|
|
|
|
|
|
|
|
|
|
|
|
|
|
|
|
|
|
|
|
|
|
|
|
|
|
|
|
|
|
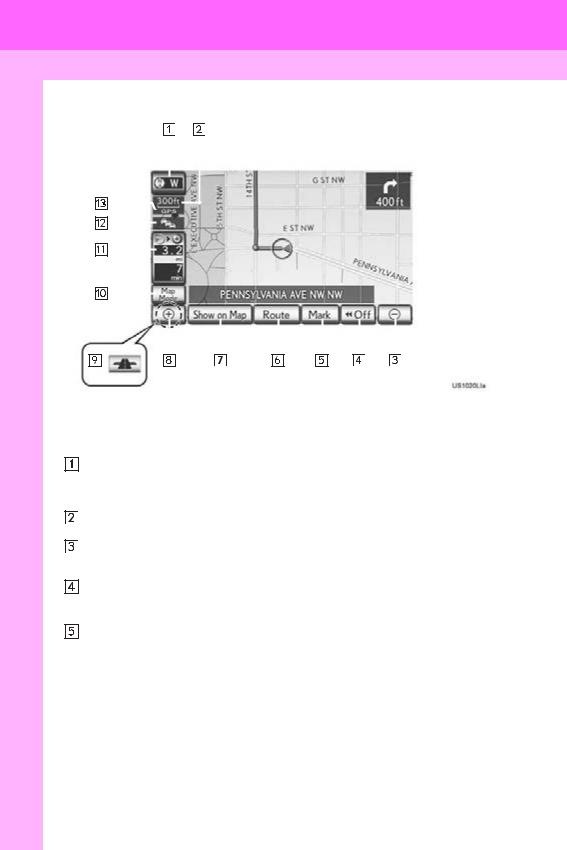
North-up or |
|
This symbol indicates whether the map orienta- |
|
|
|||||||||||||||||||||||
|
|
|
|
|
|
|
tion is set to north-up or heading-up. Selecting this |
49 |
|
||||||||||||||||||||||||
|
|
|
|
|
|
heading-up |
|
symbol changes the map orientation. Both north- |
|
||||||||||||||||||||||||
|
|
|
|
|
|
symbol |
|
up and heading-up symbols display the vehicles |
|
|
|||||||||||||||||||||||
|
|
|
|
|
|
|
|
||||||||||||||||||||||||||
|
|
|
|
|
|
|
|
|
|
|
|
|
|
|
direction as a letter (e.g. N for north). |
|
|
||||||||||||||||
|
|
|
|
|
|
Scale indicator |
|
This figure indicates the map scale. |
48 |
|
|||||||||||||||||||||||
|
|
|
|
|
|
|
|||||||||||||||||||||||||||
|
|
|
|
|
|
Zoom out button |
|
Select to reduce the map scale. |
48 |
|
|||||||||||||||||||||||
|
|
|
|
|
|
|
|
||||||||||||||||||||||||||
|
|
|
|
|
|
|
|||||||||||||||||||||||||||
|
|
|
|
|
|
“Off” |
|
Select to obtain a broader view. Some of the but- |
130 |
|
|||||||||||||||||||||||
|
|
|
|
|
|
|
|
||||||||||||||||||||||||||
|
|
|
|
|
|
|
tons on the screen will not be displayed. They are |
|
|||||||||||||||||||||||||
|
|
|
|
|
|
|
|
|
|
|
|
|
|
|
displayed again by selecting “On ”. |
|
|
||||||||||||||||
|
|
|
|
|
|
|
|
|
|
|
|
|
|
|
|
||||||||||||||||||
|
|
|
|
|
|
“Mark” |
|
Select to register the current position or the cur- |
41 |
|
|||||||||||||||||||||||
|
|
|
|
|
|
|
|||||||||||||||||||||||||||
|
|
|
|
|
|
|
sor position as an address book entry. |
|
|||||||||||||||||||||||||
|
|
|
|
|
|
|
|
|
|
|
|
|
|
|
|
|
|||||||||||||||||
|
|
|
|
|
|
|
|
|
|
|
|
|
|
|
|
||||||||||||||||||
|
|
|
|
|
|
|
|
|
|
|
|
|
|
|
|
|
|
|
|
|
|
|
|
|
|
|
|
|
|
|
|
|
|
12
ES350/300h_Navi_OM33A07U_(U)
12.05.07 10:23

1. NAVIGATION OPERATION
No. |
Name |
Function |
Page |
||
|
|
|
|
|
|
|
|
“Route” |
Select to change the route. |
97, 99 |
|
|
|
||||
|
|
“Show on Map” |
Select to browse information about guidance |
104, 342, |
|
|
|
||||
|
|
route, to set the POI (Point of Interest) icons to be |
|||
|
|
367 |
|||
|
|
|
|
displayed on the screen, to record the route, etc. |
|
|
|
|
|
||
|
|
|
|
|
|
|
|
Zoom in button |
Select to magnify the map scale. |
48 |
|
|
|
||||
|
|
Foot |
print map |
Select to display the foot print map and the build- |
48 |
|
|
||||
|
|
||||
|
|
button |
ing information. |
||
|
|
|
|||
|
|
|
|||
|
|
“Map Mode” |
Select to display the “Map Mode” screen. |
45 |
|
|
|
||||
|
|
Distance and |
Select to display the distance, estimated travel |
96 |
|
|
|
||||
|
|
time |
to destina- |
||
|
|
and arrival time to the destination. |
|||
|
|
tion |
|
|
|
|
|
|
|
||
|
|
|
|
|
|
|
|
XM indicator |
This mark is displayed when XM information is re- |
340, 342 |
|
|
|
||||
|
|
ceived. |
|||
|
|
“GPS” mark |
|
||
|
|
|
|||
|
|
Whenever the vehicle is receiving signals from the |
139 |
||
|
|
(Global Position- |
|||
|
|
GPS, this mark is displayed. |
|||
|
|
ing System) |
|
||
|
|
|
|||
|
|
|
|
||
|
|
|
|
|
|
*: Press and hold the “PWR·VOL” knob for 3 seconds or more to turn off the screen and restart the navigation system. Do this when the vehicle-mounted device response is extremely slow.
INFORMATION
●Remove dirt from the display and its surrounding area by lightly wiping with a soft, dry cloth, such as a cloth used for cleaning glasses with plastic lenses. Scrubbing too hard or using a hard cloth could scratch the display. Also, the display is treated with a coating, and could be damaged by coming into contact with benzine or alkaline solution.
●When the screen is viewed through polarized sunglasses, a rainbow pattern may appear on the screen due to optical characteristics of the screen. If this is disturbing, please operate the screen without polarized sunglasses.
13
1 QUICKGUIDE
ES350/300h_Navi_OM33A07U_(U)
12.05.07 10:23
1. NAVIGATION OPERATION
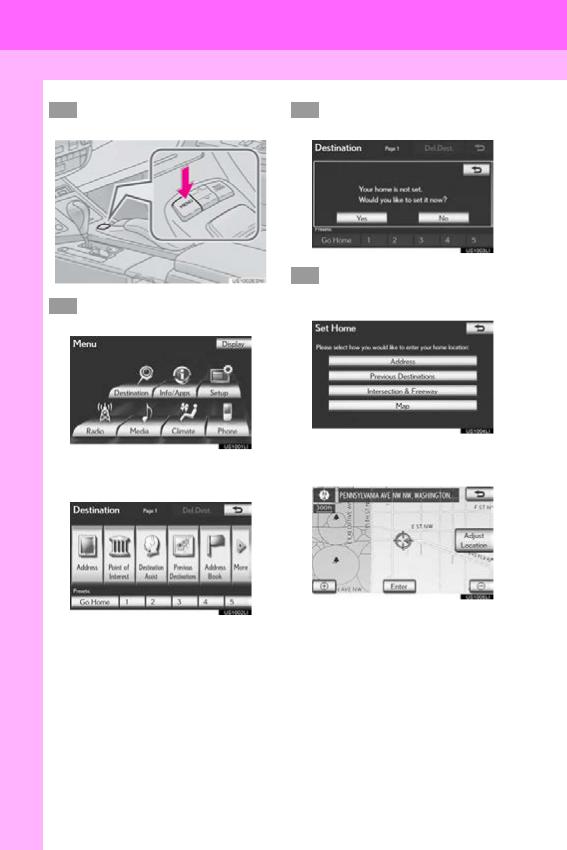
3. REGISTERING HOME
1Press the “MENU” button on the Remote Touch.
4Select “Yes” and press the Remote Touch knob.
2Select “Destination” and press the Remote Touch knob.
5There are 4 different methods to search your home. (See “DESTINATION SEARCH” on page 68.)
|
Select “Enter” and press the |
||
|
6 |
||
3 |
Select “Go Home” and press the |
|
Remote Touch knob. |
|
Remote Touch knob. |
|
|
The “Edit Home” screen is displayed.
If a home address has not been registered, it can be registered by selecting
“Go Home”.
14
ES350/300h_Navi_OM33A07U_(U)
12.05.07 10:23

7Select “OK” and press the Remote Touch knob.
Registration of home is complete.
Home can also be registered by selecting “Navigation” on the “Setup” screen. (See “REGISTERING HOME” on page 109.)
The name, location, phone number and icon can be changed. (See “EDITING HOME” on page 110.)
The registered points can be used on the “Destination” screen. (See “DESTINATION SEARCH BY HOME” on page 69.)
1. NAVIGATION OPERATION
1 QUICKGUIDE
15
ES350/300h_Navi_OM33A07U_(U)
12.05.07 10:23
1. NAVIGATION OPERATION
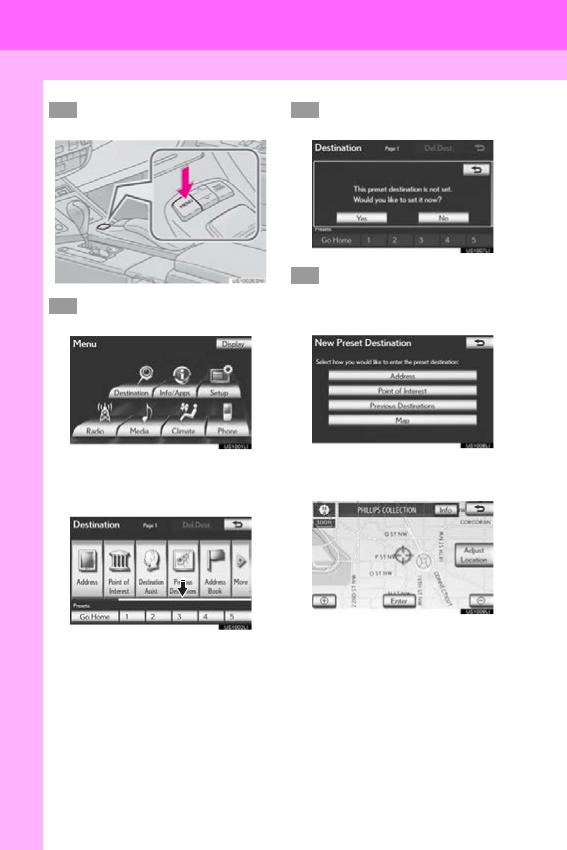
4. REGISTERING PRESET DESTINATIONS
1Press the “MENU” button on the Remote Touch.
4Select “Yes” and press the Remote Touch knob.
2Select “Destination” and press the Remote Touch knob.
5There are 4 different methods to search preset destinations. (See “DESTINATION SEARCH” on page 68.)
|
|
|
Select “Enter” and press the |
||
3 |
Select one of the preset destination |
6 |
|||
|
buttons and press the Remote |
|
Remote Touch knob. |
||
|
Touch knob. |
|
|
||
|
|
|
|
|
|
|
|
|
|
|
|
A preset destination can be set to any preset destination button that has not yet been set.
The “Edit Preset Destination” screen is displayed.
16
ES350/300h_Navi_OM33A07U_(U)
12.05.07 10:23

7Select “OK” and press the Remote Touch knob.
Registration of preset destinations is complete.
Preset destinations can also be registered by selecting “Navigation” on the “Setup” screen. (See “REGISTERING PRESET DESTINATIONS” on page 112.)
The name, location, phone number and icon can be changed. (See “EDITING PRESET DESTINATIONS” on page 113.)
The registered points can be used on the “Destination” screen. (See “DESTINATION SEARCH BY PRESET DESTINATIONS” on page 69.)
1. NAVIGATION OPERATION
1 QUICKGUIDE
17
ES350/300h_Navi_OM33A07U_(U)
12.05.07 10:23

1. NAVIGATION OPERATION
5. OPERATION FLOW: GUIDING THE ROUTE
1Press the “MENU” button on the Remote Touch.
Page 2
4Select “Go to  ” and press the Remote Touch knob.
2Select “Destination” and press the Remote Touch knob.
3There are 11 different methods to search destinations. (See “DESTINATION SEARCH” on page 68.)
Page 1
The navigation system performs a search for the route.
5Select “OK” and press the Remote Touch knob. Then start driving.
Routes other than the one recommended can also be selected. (See “STARTING ROUTE GUIDANCE” on page 87.)
Guidance to the destination is displayed on the screen and can be heard via voice guidance.
18
ES350/300h_Navi_OM33A07U_(U)
12.05.07 10:23
1. NAVIGATION OPERATION
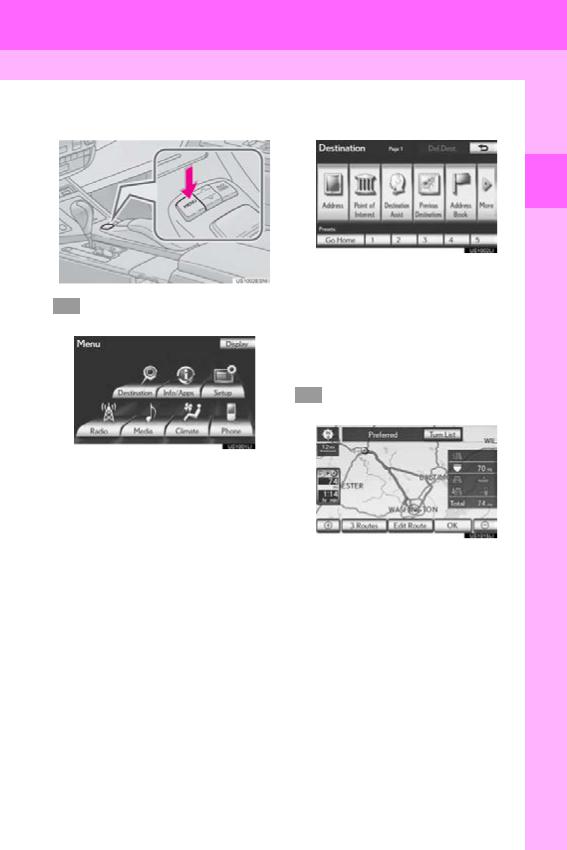
6. SETTING HOME AS THE DESTINATION
|
Press the “MENU” button on the |
|
Select “Go Home” and press the |
1 |
3 |
||
|
Remote Touch. |
|
Remote Touch knob. |
2Select “Destination” and press the Remote Touch knob.
“Go Home” can be used if your home address has been registered. (To register home, see “REGISTERING HOME” on page 109.)
Your home address is set as the destination. The navigation system performs a search for the route.
4Select “OK” and press the Remote Touch knob. Then start driving.
Routes other than the one recommended can also be selected. (See “STARTING ROUTE GUIDANCE” on page 87.)
Guidance to the destination is displayed on the screen and can be heard via voice guidance.
19
1 QUICKGUIDE
ES350/300h_Navi_OM33A07U_(U)
12.05.07 10:23

2. FUNCTION INDEX
1.NAVIGATION SYSTEM FUNCTION INDEX
Map
Displaying maps |
Page |
|
|
Viewing the map screen |
12 |
Displaying the current position |
40 |
Viewing the current position vicinity map |
40 |
Changing the scale |
48 |
Changing the map orientation |
49 |
Displaying Points of Interest |
104 |
Displaying the estimated travel/arrival time to the destination |
96 |
Selecting the map mode |
45 |
Deleting map screen buttons |
130 |
Displaying traffic information |
341 |
|
|
|
|
Searching destinations |
Page |
|
|
Searching the destination |
68 |
Changing the selected search area |
68 |
Operating the map location of the selected destination |
87 |
|
|
Route guidance |
|
|
|
Before starting route guidance |
Page |
|
|
Setting the destination |
87 |
Viewing alternative routes |
88 |
Starting route guidance |
87 |
|
|
|
|
Before starting or during route guidance |
Page |
|
|
Viewing the route |
87 |
Adding destinations |
97 |
Changing the route |
99 |
Displaying the estimated travel/arrival time to the destination |
96 |
|
|
20
ES350/300h_Navi_OM33A07U_(U)
12.05.07 10:23
2. FUNCTION INDEX
During route guidance |
Page |
|
|
Pausing route guidance |
103 |
Adjusting route guidance volume |
63 |
Deleting the destination |
98 |
Displaying the entire route map |
100 |
|
|
Useful functions
Address book |
Page |
|
|
Registering address book entries |
114 |
Marking icons on the map |
116 |
|
|
|
|
Information |
Page |
|
|
Displaying vehicle maintenance |
133 |
|
|
|
|
Hands-free system (for cellular phone) |
Page |
|
|
Initiating Bluetooth® |
146 |
Making a call on a Bluetooth® phone |
157 |
Receiving a call on the Bluetooth® phone |
165 |
|
|
Voice command system |
Page |
|
|
Operating the system with your voice |
308 |
|
|
21
1 QUICKGUIDE
ES350/300h_Navi_OM33A07U_(U)
12.05.07 10:23
3. QUICK REFERENCE
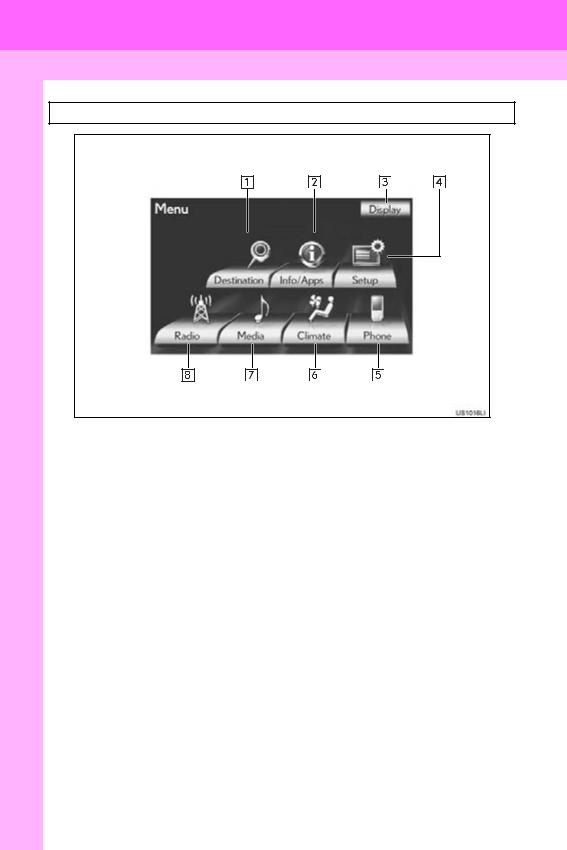
1. “Menu” SCREEN
Press the “MENU” button on the Remote Touch to display the “Menu” screen.
22
ES350/300h_Navi_OM33A07U_(U)
12.05.07 10:23

3. QUICK REFERENCE
No. |
Name |
Function |
Page |
||
|
|
|
|
|
|
|
|
|
“Destination” |
Select to display the “Destination” screen. |
14, 16, 18, 19, |
|
|
|
24, 68, |
||
|
|
|
|
|
363, 365 |
|
|
|
|
|
|
|
|
|
|
Select to display the “Information” screen. |
28, 322, |
|
|
|
“Info/Apps” |
327, 330, |
|
|
|
|
For vehicles sold in Canada, “Info” is used instead |
333, 337, |
|
|
|
|
(“Info”) |
||
|
|
|
of “Info/Apps”. |
341, 356, |
|
|
|
|
|||
|
|
|
|
||
|
|
|
|
|
359, 368 |
|
|
|
“Display” |
Select to adjust the contrast and brightness of the |
38 |
|
|
|
|||
|
|
|
screens, turn the display off, etc. |
||
|
|
|
|
26, 51, 62, |
|
|
|
|
|
||
|
|
|
|
|
|
|
|
|
“Setup” |
Select to display the “Setup” screen. |
108, 125, |
|
|
|
133, 172, |
||
|
|
|
|
|
194, 288, |
|
|
|
|
|
|
|
|
|
|
|
344, 371 |
|
|
|
“Phone” |
Select to display the hands-free operation screen. |
152 |
|
|
|
|||
|
|
|
“Climate” |
Select to display the air conditioning control |
294 |
|
|
|
|||
|
|
|
|||
|
|
|
screen. |
||
|
|
|
|
|
|
|
|
|
|
|
|
|
|
|
“Media” |
Select to display the media control screen. |
211 |
|
|
|
|||
|
|
|
“Radio” |
Select to display the radio control screen. |
211 |
|
|
|
|||
|
|
|
|||
|
|
|
|
|
|
|
|
|
|
|
|
23
1 QUICKGUIDE
ES350/300h_Navi_OM33A07U_(U)
12.05.07 10:23
3. QUICK REFERENCE
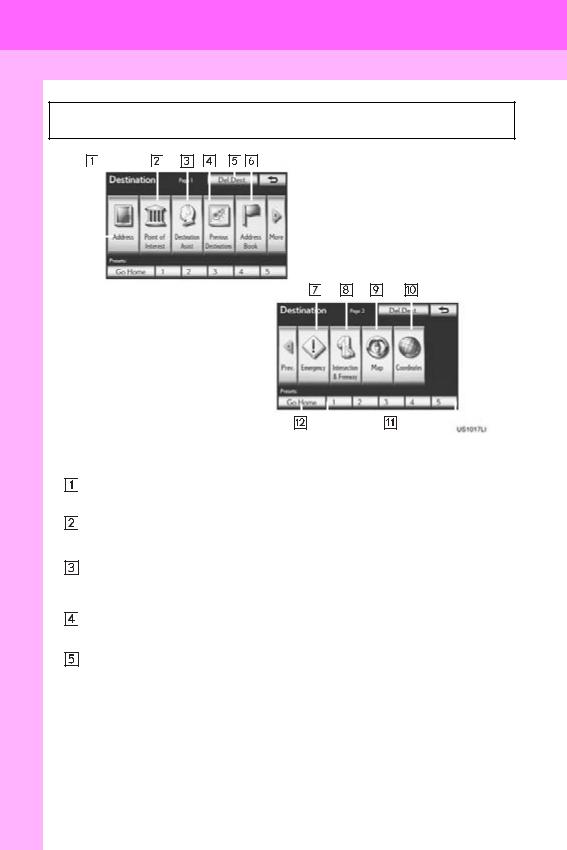
2. “Destination” SCREEN
The “Destination” screen enables a destination search. Press the “MENU” button on the Remote Touch, then select “Destination” to display the “Destination” screen.
|
|
|
|
|
|
|
|
|
|
|
|
|
|
|
|
|
|
|
|
|
|
|
|
|
|
|
|
|
|
|
|
|
|
|
|
|
|
|
|
|
|
|
|
|
|
|
|
|
|
|
|
|
|
|
|
|
|
|
|
|
|
|
|
|
|
|
|
|
|
|
|
|
|
|
|
|
|
|
|
|
|
|
|
|
|
|
|
|
|
|
|
|
|
|
|
|
|
|
|
|
|
|
|
|
|
|
|
|
|
|
|
|
|
|
|
|
|
|
|
|
|
|
|
|
|
|
|
|
|
|
|
|
|
|
|
|
|
|
|
|
|
|
|
|
|
|
|
|
|
|
|
|
|
|
|
|
|
|
|
|
|
|
|
|
|
|
|
|
|
|
|
|
|
|
|
|
|
|
|
|
|
|
|
|
|
|
|
|
|
|
|
|
|
|
|
|
|
|
|
|
|
|
|
|
|
|
|
|
|
|
|
|
|
|
|
|
|
|
|
|
|
|
|
|
|
|
|
|
|
|
|
|
|
|
|
|
|
|
|
|
|
|
|
|
|
|
|
|
|
|
|
|
|
|
|
|
|
|
|
|
|
|
|
|
|
|
|
|
|
|
|
|
|
|
|
|
|
|
|
|
|
|
|
|
|
|
|
|
|
|
|
|
|
|
|
|
|
|
|
|
|
|
|
|
|
|
|
|
|
|
|
|
|
|
|
|
|
|
|
|
|
|
|
|
|
|
|
|
|
|
|
|
|
|
|
|
|
|
|
|
|
|
|
|
|
|
|
|
|
|
|
|
|
|
|
|
|
|
|
|
|
|
|
|
|
|
|
|
|
|
|
|
|
|
|
|
|
|
|
|
|
|
|
|
|
|
|
|
|
|
|
|
|
|
|
|
|
|
|
|
|
|
|
|
|
|
|
|
|
|
|
|
|
|
|
|
|
|
|
|
|
|
|
|
|
|
|
|
|
|
|
|
|
|
|
|
|
|
|
|
|
|
|
|
|
|
|
|
|
|
|
|
|
|
|
|
|
|
|
|
|
|
|
|
|
|
|
|
|
|
|
|
|
|
|
|
|
|
|
|
|
|
|
|
|
|
|
|
|
|
|
|
|
|
|
|
|
|
|
|
|
|
|
|
|
|
|
|
|
|
|
|
|
|
|
|
|
|
|
|
|
|
|
|
|
|
|
|
|
|
|
|
|
|
|
|
|
|
|
|
|
|
|
|
|
|
|
|
|
|
|
|
|
|
|
|
|
|
No. |
|
|
|
Name |
|
|
|
|
|
|
|
|
|
|
Function |
|
Page |
|||||||||||||||||||||||||
|
|
|
|
|
|
|
|
|
|
|
|
|
|
|
|
|
|
|
|
|
|
|
|
|
|
|
|
|
|
|
|
|
|
|
|
|
|
|
|
|
|
|
|
|
|
|
|
|
“Address” |
Select to input a house number and the street ad- |
70 |
|
|||||||||||||||||||||||||||||||||
|
|
|
|
|
|
|
||||||||||||||||||||||||||||||||||||
|
|
|
|
|
|
dress using the input keys. |
|
|||||||||||||||||||||||||||||||||||
|
|
|
|
|
|
|
|
|
|
|
|
|
|
|
|
|||||||||||||||||||||||||||
|
|
|
|
|
|
|
|
|
|
|
|
|
|
|
|
|||||||||||||||||||||||||||
|
|
|
|
|
|
“Point of Interest” |
Select one of the POIs that have already been |
73, 365 |
||||||||||||||||||||||||||||||||||
|
|
|
|
|
|
|||||||||||||||||||||||||||||||||||||
|
|
|
|
|
|
stored in the system’s database. |
||||||||||||||||||||||||||||||||||||
|
|
|
|
|
|
|
|
|
|
|
|
|
|
|
|
|||||||||||||||||||||||||||
|
|
|
|
|
|
|
|
|
|
|
|
|
|
|
|
|||||||||||||||||||||||||||
|
|
|
|
|
|
“Destination |
Select to provide you with live assistance finding |
80, 363 |
||||||||||||||||||||||||||||||||||
|
|
|
|
|
|
destinations via the Lexus Enform with Safety |
||||||||||||||||||||||||||||||||||||
|
|
|
|
|
|
Assist” |
||||||||||||||||||||||||||||||||||||
|
|
|
|
|
|
Connect response center. |
|
|
|
|||||||||||||||||||||||||||||||||
|
|
|
|
|
|
|
|
|
||||||||||||||||||||||||||||||||||
|
|
|
|
|
|
|
|
|
|
|
|
|
|
|
|
|||||||||||||||||||||||||||
|
|
|
|
|
|
“Previous |
Select a destination from any of the last 100 previ- |
80 |
|
|||||||||||||||||||||||||||||||||
|
|
|
|
|
|
ously set destinations and from the previous start- |
|
|||||||||||||||||||||||||||||||||||
|
|
|
|
|
|
Destinations” |
|
|||||||||||||||||||||||||||||||||||
|
|
|
|
|
|
ing point. |
|
|
|
|||||||||||||||||||||||||||||||||
|
|
|
|
|
|
|
|
|
||||||||||||||||||||||||||||||||||
|
|
|
|
|
|
|
|
|
|
|
|
|
|
|
|
|||||||||||||||||||||||||||
|
|
|
|
|
|
“Del.Dest.” |
Select to delete set destinations. |
86 |
|
|||||||||||||||||||||||||||||||||
|
|
|
|
|
|
|
||||||||||||||||||||||||||||||||||||
|
|
|
|
|
|
|
|
|
|
|
|
|
|
|
|
|
|
|
|
|
|
|
|
|
|
|
|
|
|
|
|
|
|
|
|
|
|
|
|
|
|
|
|
|
|
|
|
|
|
|
|
|
|
|
|
|
|
|
|
|
|
|
|
|
|
|
|
|
|
|
|
|
|
|
|
|
|
|
|
|
|
|
|
|
|
24
ES350/300h_Navi_OM33A07U_(U)
12.05.07 10:23

3. QUICK REFERENCE
No. |
Name |
Function |
Page |
||
|
|
|
|
Select the desired location from a registered entry |
|
|
|
|
|
|
|
|
|
|
“Address Book” |
in “Address book”. (To register address book en- |
81 |
|
|
|
|||
|
|
|
tries, see “REGISTERING ADDRESS BOOK |
||
|
|
|
|
|
|
|
|
|
|
ENTRIES” on page 115.) |
|
|
|
|
|
|
|
|
|
|
“Emergency” |
Select one of the 4 categories of emergency ser- |
81 |
|
|
|
vice points that have already been stored in the |
||
|
|
|
|
system’s database. |
|
|
|
|
|
|
|
|
|
|
“Intersection & |
Select to enter the names of 2 intersecting streets |
|
|
|
|
or a freeway (interstate) entrance or exit. This is |
82 |
|
|
|
|
|||
|
|
|
Freeway” |
helpful if only the general vicinity, not the specific |
|
|
|
|
|
||
|
|
|
|
address, is known. |
|
|
|
|
“Map” |
Select to enable setting a destination by specifying |
85 |
|
|
|
|||
|
|
|
a location on the map screen. |
||
|
|
|
|
|
|
|
|
|
|
|
|
|
|
|
“Coordinates” |
Select to enter latitude and longitude coordinates. |
85 |
|
|
|
|||
|
|
|
|
Select one of the 5 preset destination points as a |
|
|
|
|
|
|
|
|
|
|
|
destination. If a preset destination point has not |
|
|
|
|
Preset destina- |
been registered, a message will be displayed ask- |
69 |
|
|
|
ing if it is desirable to set a destination to the preset |
||
|
|
|
tion buttons |
||
|
|
|
screen button. (To register a preset destination, |
|
|
|
|
|
|
||
|
|
|
|
|
|
|
|
|
|
see “REGISTERING PRESET DESTINATIONS” |
|
|
|
|
|
on page 112.) |
|
|
|
|
|
Select your personal home address without hav- |
|
|
|
|
|
ing to enter the address each time. If a home ad- |
|
|
|
|
“Go Home” |
dress has not been registered, a message will be |
69 |
|
|
|
|||
|
|
|
displayed and the setting screen will automatically |
||
|
|
|
|
|
|
|
|
|
|
appear. (To register home, see “REGISTERING |
|
|
|
|
|
HOME” on page 109.) |
|
|
|
|
|
|
|
1 QUICKGUIDE
25
ES350/300h_Navi_OM33A07U_(U)
12.05.07 10:23
3. QUICK REFERENCE
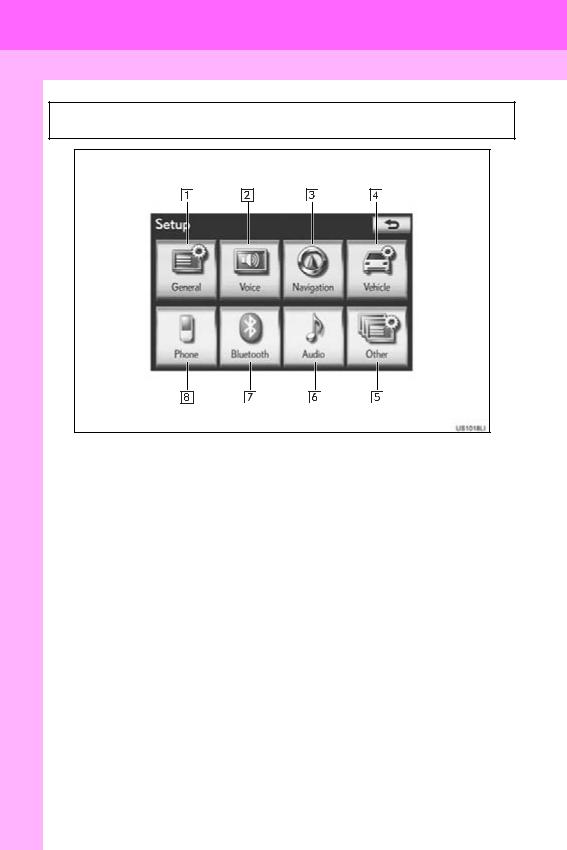
3. “Setup” SCREEN
The items shown on the “Setup” screen can be set. Press the “MENU” button on the Remote Touch, then select “Setup” to display the “Setup” screen.
26
ES350/300h_Navi_OM33A07U_(U)
12.05.07 10:23

3. QUICK REFERENCE
No. |
Name |
Function |
Page |
||
|
|
|
|
|
|
|
|
|
“General” |
Select to change the selected language, opera- |
51 |
|
|
|
|||
|
|
|
tion sound, automatic screen change settings, etc. |
||
|
|
|
|
|
|
|
|
|
|
|
|
|
|
|
“Voice” |
Select to set the voice guidance settings. |
62 |
|
|
|
|||
|
|
|
“Navigation” |
Select to set home, preset destinations, address |
108 |
|
|
|
|||
|
|
|
book, areas to avoid, etc. or to delete previous |
||
|
|
|
|
destinations. |
|
|
|
|
|
|
|
|
|
|
“Vehicle” |
Select to set vehicle information such as mainte- |
133 |
|
|
|
|||
|
|
|
nance information. |
||
|
|
|
|
|
|
|
|
|
|
|
|
|
|
|
“Other” |
Select to set Lexus Insider, XM Sports, XM |
344, 371 |
|
|
|
|||
|
|
|
Stocks and XM Fuel Prices. |
||
|
|
|
|
|
|
|
|
|
|
|
|
|
|
|
“Audio” |
Select to set iPod and HD Radio™ channel set- |
288 |
|
|
|
|||
|
|
|
tings. |
||
|
|
|
|
|
|
|
|
|
|
|
|
|
|
|
“Bluetooth*” |
Select to set Bluetooth® phones and Bluetooth® |
194 |
|
|
|
|||
|
|
|
audio devices. |
||
|
|
|
|
|
|
|
|
|
|
|
|
|
|
|
“Phone” |
Select to set the phone sound, phonebook, mes- |
172 |
|
|
|
|||
|
|
|
sage settings, etc. |
||
|
|
|
|
|
|
|
|
|
|
|
|
|
|
|
|
|
|
*: Bluetooth is a registered trademark of Bluetooth SIG, Inc.
27
1 QUICKGUIDE
ES350/300h_Navi_OM33A07U_(U)
12.05.07 10:23
3.QUICK REFERENCE
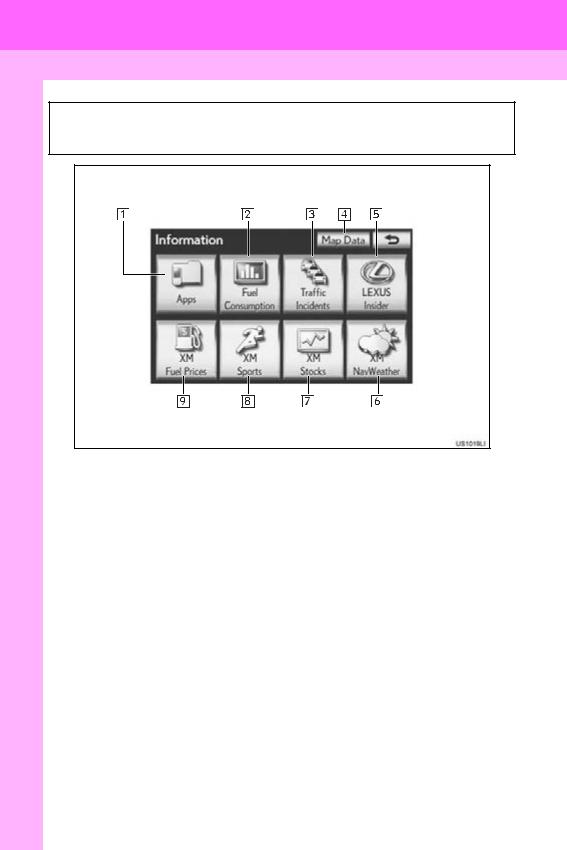
4.“Information” SCREEN
This screen can be used to display the XM satellite system, fuel consumption, etc. Press the “MENU” button on the Remote Touch, then select “Info/Apps” (“Info”) to display the “Information” screen.
28
ES350/300h_Navi_OM33A07U_(U)
12.05.07 10:23

3. QUICK REFERENCE
No. |
Name |
Function |
Page |
||
|
|
|
|
|
|
|
|
|
“Apps” |
Select to display the “Apps” screen. |
356, 359 |
|
|
|
|||
|
|
|
“Fuel |
Select to display the fuel consumption screen. |
Owner’s |
|
|
|
|||
|
|
|
|||
|
|
|
Consumption” |
Manual |
|
|
|
|
|
||
|
|
|
|
||
|
|
|
“Traffic Incidents” |
Select to display traffic incidents. |
341 |
|
|
|
|||
|
|
|
“Map Data” |
Select to display map data information. |
322 |
|
|
|
|||
|
|
|
|||
|
|
|
“LEXUS Insider” |
Select to display the “LEXUS Insider” screen. |
368 |
|
|
|
|||
|
|
|
|||
|
|
|
“XM |
Select to display weather information. |
337 |
|
|
|
|||
|
|
|
|||
|
|
|
NavWeather” |
||
|
|
|
Select to display personally selected stocks infor- |
|
|
|
|
|
|
||
|
|
|
“XM Stocks” |
330 |
|
|
|
|
|||
|
|
|
mation. |
||
|
|
|
|
|
|
|
|
|
|
|
|
|
|
|
“XM Sports” |
Select to display personally selected sports teams |
327 |
|
|
|
|||
|
|
|
information. |
||
|
|
|
|
|
|
|
|
|
|
|
|
|
|
|
“XM Fuel Prices” |
Select to display current fuel prices and gas sta- |
333 |
|
|
|
|||
|
|
|
tion locations information. |
||
|
|
|
|
|
|
|
|
|
|
|
|
|
|
|
|
|
|
29
1 QUICKGUIDE
ES350/300h_Navi_OM33A07U_(U)
12.05.07 10:23
30
ES350/300h_Navi_OM33A07U_(U)
12.05.07 10:23
Loading...