

Page 1

Maintenance and care
4
4-1. Maintenance and care ......... 272
Cleaning and protecting the
vehicle exterior........................ 272
Cleaning and protecting the
vehicle interior......................... 275
4-2. Maintenance ........................... 278
Maintenance
requirements............................ 278
General maintenance............ 280
Emission inspection and
maintenance (I/M)
programs................................... 283
4-3. Do-it-yourself
maintenance ........................ 284
Do-it-yourself service
precautions............................... 284
Hood............................................... 287
Positioning the jack.................. 288
Engine compartment............... 290
Tires................................................ 304
Tire inflation pressure.................. 311
Wheels............................................ 315
Air conditioning filter................ 317
Wireless remote control
battery.......................................... 319
Rear seat entertainment system
controller.................................... 321
Checking and replacing
fuses............................................. 323
Headlight aim (vehicles with
discharge headlights)........... 335
Light bulbs.................................... 336
271
Page 2
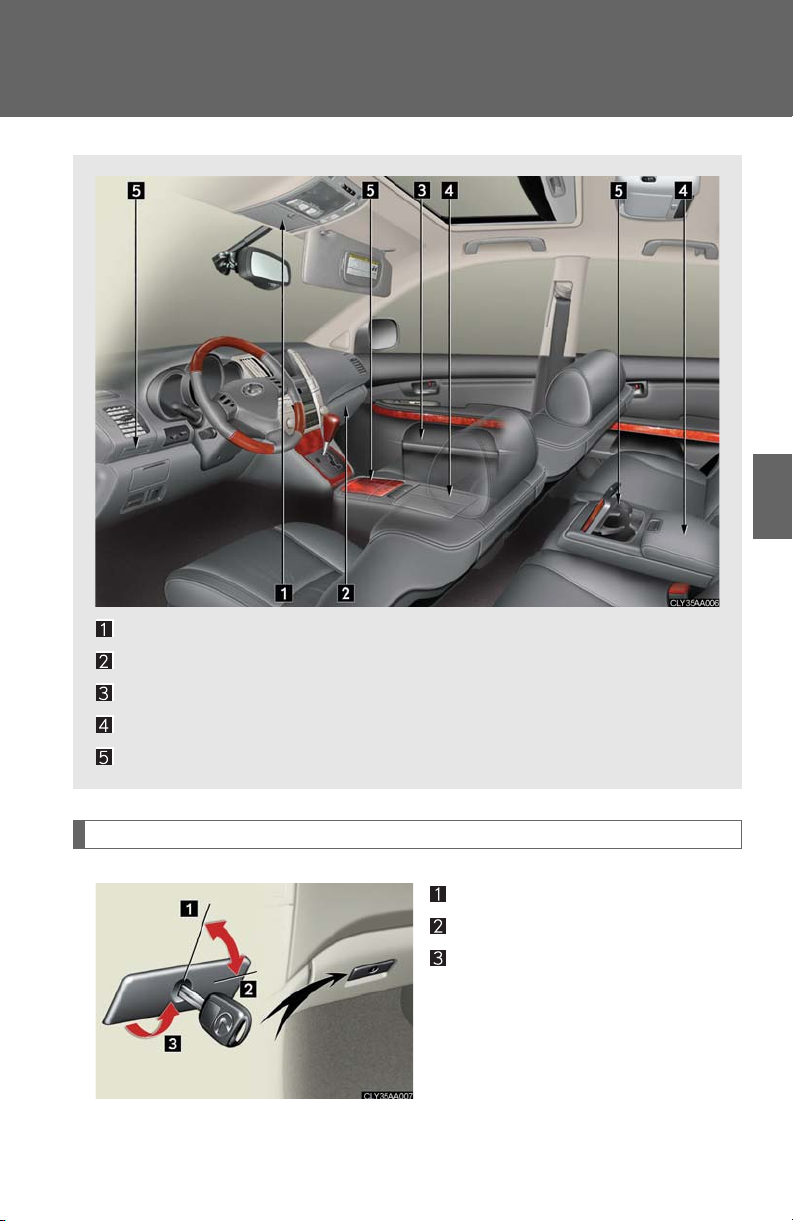
3-5. Using the storage features
List of storage features
Overhead console
Glove box
Door pockets
Console boxes
Cup holders
Glove box
3
Interior features
Glove box
Unlock with the key
Lock with the key
Open (pull lever)
241
Page 3
3-5. Using the storage features
Glove box and console boxes
n Glove box light
The glove box light turns on when the tail lights are turned on.
n Power back door main switch
The power back door main switch is located in the glove box. (→P. 13 )
CAUTIO N
n Caution while driving
Keep the glove box closed. Injuries may result in the event of an accident or sudden braking.
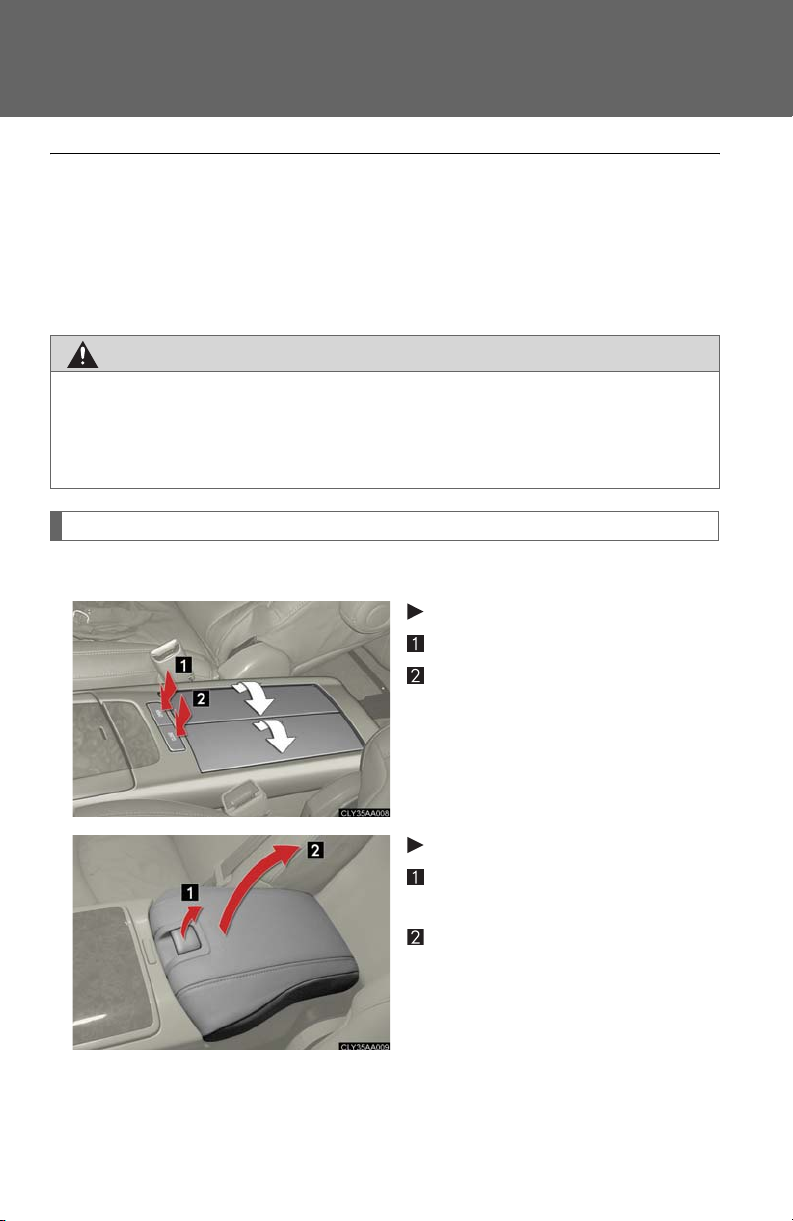
Console boxes
n Using the console box
Front
Open
Close
242
Rear (if equipped)
Pull up the knob to release the
lock.
Lift the armrest to open.
Page 4
3-5. Using the storage features
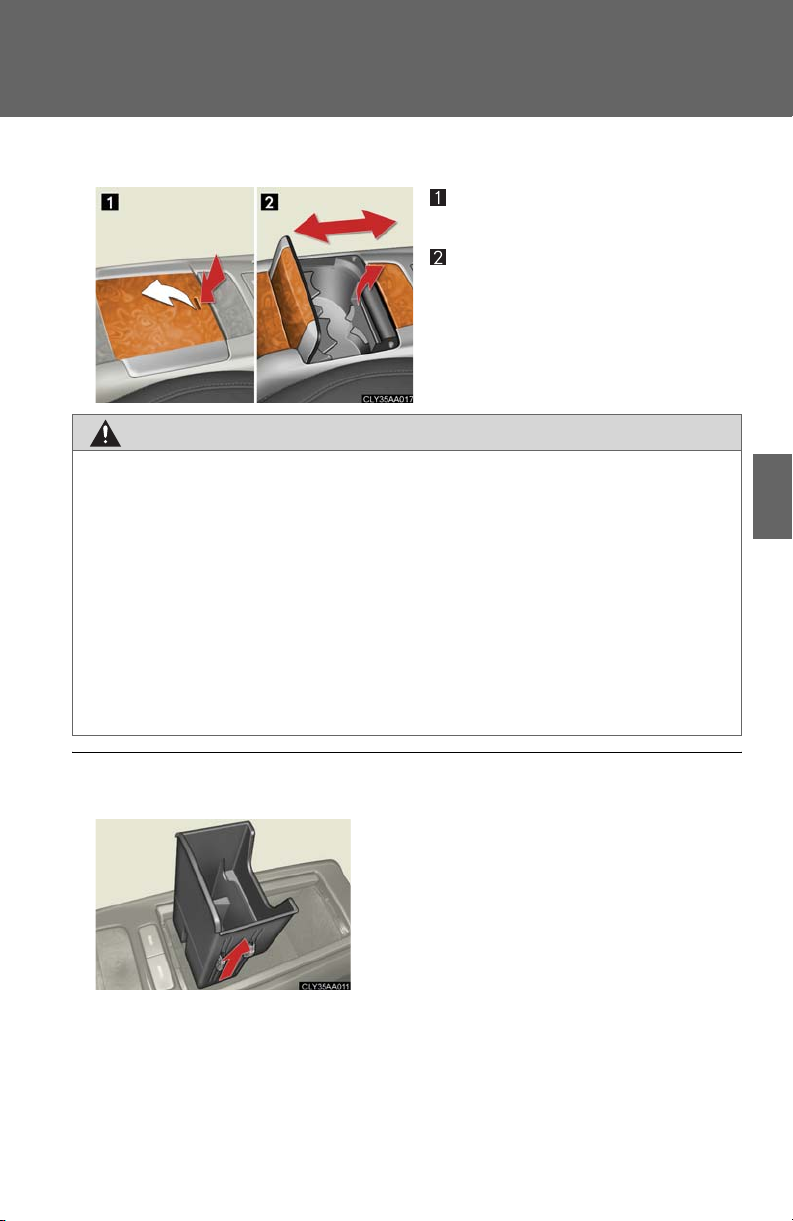
n Adjusting the position of the console box (front)
Open the cup holder lid on the
console box.
Adjust the position of the box
while lifting the lock release
lever.
CAUTIO N
Console boxes
n Console box adjustment precaution
l Do not adjust the position of the console box while the vehicle is moving.
This may cause the driver to mishandle the vehicle and may lead to an accident that
results in death or serious injury.
l Be careful not to get hands or feet pinched between the front console box and the
center panel or rear seat.
l Be careful not to allow the front console box to hit any passengers while adjusting its
position.
l After adjusting the console box, make sure it is securely locked in position.
n Removing the adapter tray
Pull up.
n Console box light (front)
The console box light turn on when the tail lights are turned on.
3
Interior features
243
Page 5
3-5. Using the storage features
Console boxes and overhead console
CAUTIO N
n Caution while driving
Keep the console box closed. Injuries may result in the event of an accident or sudden braking.
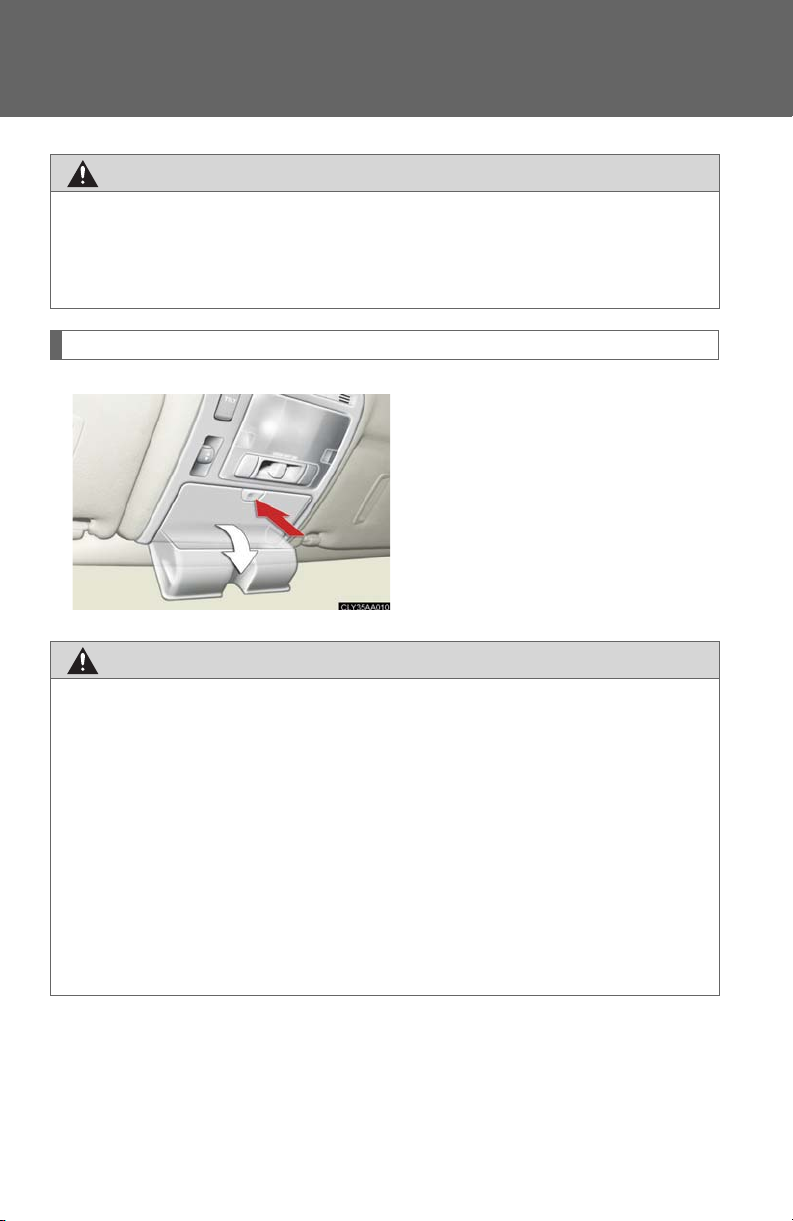
Overhead console
The overhead console is useful for
temporarily storing sunglasses and
similar small items.
CAUTIO N
n Items that should not be left in the overhead console
Do not leave glasses or lighters in the console. If the interior of the vehicle becomes hot, lighters may explode and glasses may warp or become cracked.
n Caution while driving
Do not leave the overhead console open while driving. Items may fall out and cause injury.
n Maximum storage weight
Do not place any object heavier than 0.22 lb. (100 g) in it. The console may be opened and cause injury.
244
Page 6
Cup holders
3-5. Using the storage features
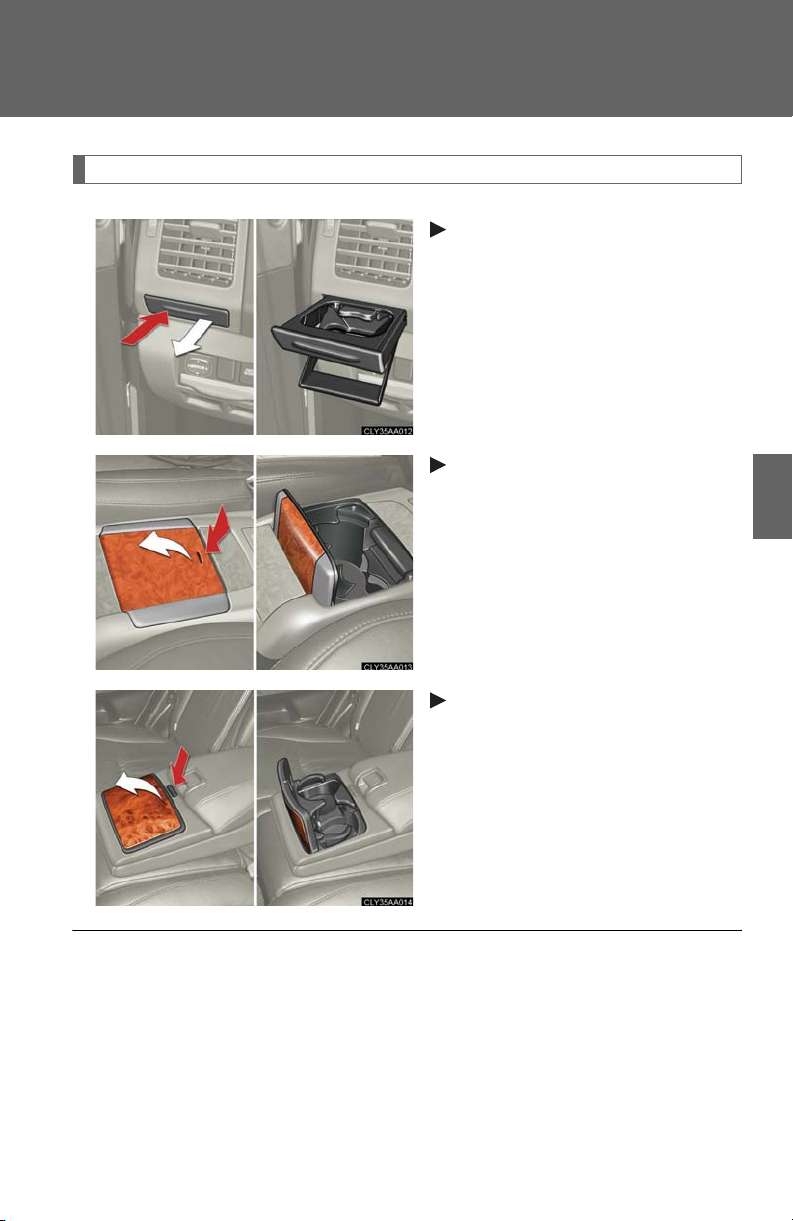
Cup holders
Front (type A)
To open, press in and release the
front cup holder.
Front (type B)
To open, press down and release
the rear of the cup holder lid.
3
Interior features
Rear
To open, press down the button on
the armrest.
n Cup holder light (front-type B)
The cup holder light turn on when the tail lights are turned on.
245
Page 7
3-5. Using the storage features
Cup holders and door pockets
CAUTIO N
n Items unsuitable for the cup holder
Do not place anything other than cups or aluminum cans in the cup holders. Other items may be thrown out of the holders in the event of an accident or sudden braking and cause injury. If possible, cover hot drinks to prevent burns.
n When not in use
Keep the cup holders closed. Injuries may result in the event of an accident or sudden braking.
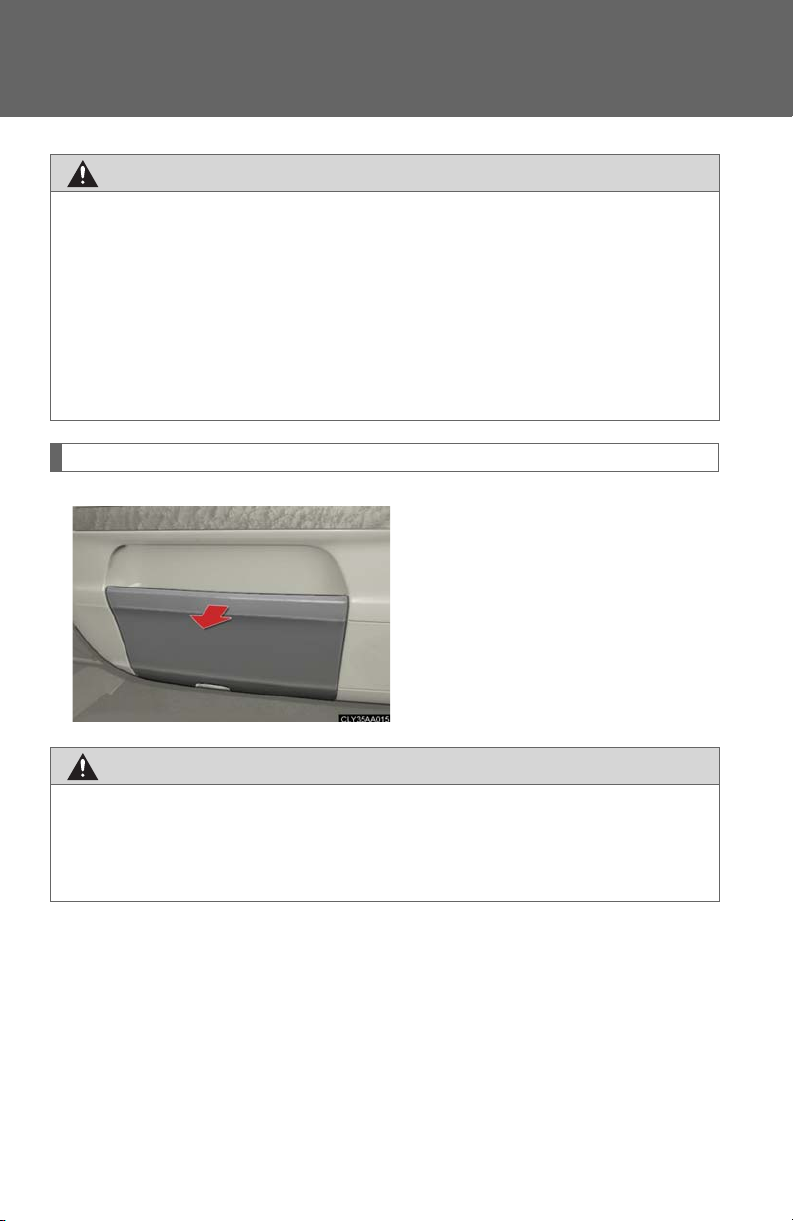
Door pockets
The door pocket can be opened
and closed.
CAUTIO N
n Caution while driving
Keep the door pockets closed. Injuries may result in the event of an accident or sudden braking.
246
Page 8

4-1. Maintenance and care
Cleaning and protecting the vehicle exterior
Perform the following to protect the vehicle and maintain it in prime condition.
l Working from top to bottom, liberally apply water to the vehicle
body, wheel wells and underside of the vehicle to remove any dirt
and dust.
Wash the vehicle body using a sponge or soft cloth, such as a
chamois.
l For hard-to-remove marks, use car wash soap and rinse thor-
oughly with water.
l Wipe away any water.
l Wax the vehicle when the waterproof coating deteriorates.
If water does not bead on a clean surface, apply wax when the vehicle body is cool.
272
Page 9

4-1. Maintenance and care
n Automatic car washes
l Before washing the vehicle:
• Fold the mirrors back.
• Remove the antenna.
• Turn the power back door system off.
l Brushes used in automatic car washes may scratch the vehicle surface and harm
your vehicle’s paint.
n High pressure automatic car washes
Do not allow the nozzles of the car wash to come within close proximity of the windows and the air suspension unit (if equipped). Before entering an automatic car
wash, check that the fuel filler door on your vehicle is closed properly.
n Aluminum wheels
Remove any dirt immediately by using a neutral detergent. Do not use hard brushes or abrasive cleaners. Do not use strong or harsh chemical cleaners. Use the same mild detergent and wax as used on the paint.
n Bumpers and side moldings
Do not scrub with abrasive cleaners.
n To prevent deterioration and corrosion
l Wash the vehicle immediately in the following cases:
• After driving near the sea coast
• After driving on salted roads
• If you see coal tar or tree sap on the paint surface
• If you see dead insects or insect droppings on the paint
• After driving in an area contaminated with soot, oily smoke, mine dust, iron
powder or chemical substances
• If the vehicle becomes heavily soiled in dust or mud
• If liquids such as benzene and gasoline are spilled on the paint surface
l If the paint is chipped or scratched, have it repaired immediately.
4
Maintenance and care
273
Page 10
4-1. Maintenance and care
CAUTIO N
n Caution about the exhaust pipe
Exhaust gasses cause the exhaust pipe to become quite hot.
When washing the vehicle, be careful not to touch the pipe until it has cooled sufficiently, as touching a hot exhaust pipe can cause burns.
NOTICE
n To protect your vehicle’s painted surfaces
Do not use organic cleaners such as benzene or gasoline.
n If the windshield washer nozzle become blocked
Contact your Lexus dealer. Do not try to clear it with a pin or other object. This may damage the nozzle.
n Cleaning the exterior lights
l Wash carefully. Do not use organic substances or scrub with a hard brush.
This may damage the surfaces of the lights.
l Do not apply wax on the surfaces of the lights.
Wax may cause damage to the lenses.
n To prevent damage to the windshield wiper arms
When lifting the wiper arms away from the windshield, pull the driver side wiper arm upward first, and repeat for the passenger side. When returning the wipers to their original position, do so from the passenger side first.
274
Page 11

4-1. Maintenance and care
Cleaning and protecting the vehicle interior
The following procedures will help protect your vehicle's interior and keep it in top condition:
n Protecting the vehicle interior
Remove dirt and dust using a vacuum cleaner. Wipe dirty surfaces with a cloth dampened with lukewarm water.
n Cleaning the leather areas
l Remove dirt and dust using a vacuum cleaner.
l Wipe any excess dirt and dust with a soft cloth dampened with
diluted detergent.
Use a diluted water solution of approximately 5% neutral wool detergent.
l Wring out any excess water from the cloth and thoroughly wipe
off all remaining traces of detergent.
l Wipe the surface with a dry, soft cloth to remove any remaining
moisture. Allow the leather to dry in shaded and ventilated area.
n Synthetic leather areas
l Remove loose dirt using a vacuum cleaner.
l Apply a mild soap solution to the synthetic leather using a sponge
or soft cloth.
l Allow the solution to soak in for a few minutes. Remove the dirt
and wipe off the solution with a clean, damp cloth.
4
Maintenance and care
275
Page 12
4-1. Maintenance and care
n Cleaning the inside of the rear window
Do not use glass cleaner to clean the rear window, as this may cause damage to the
rear window defogger heater wires. Use a cloth dampened with lukewarm water to
gently wipe the window clean. Wipe the window in strokes running parallel to the
heater wires.
n Caring for leather areas
Lexus recommends cleaning the interior of the vehicle at least twice a year to maintain the quality of the vehicle’s interior.
n Shampooing the carpets
There are several commercial foaming-type cleaners available. Use a sponge or
brush to apply the foam. Rub in overlapping circles. Do not apply water. The excellent results are obtained by keeping the carpet as dry as possible.
n Seat belts
Clean with mild soap and lukewarm water using a cloth or sponge. Also check the belts periodically for excessive wear, fraying or cuts.
CAUTIO N
n Water in the vehicle
l Be careful not to splash or spill liquid on the floor.
l Do not get any of the SRS components or wiring in the vehicle interior wet.
(→P. 58 )
Electrical malfunction may cause the airbags to deploy or not function properly,
resulting in death or severe injury.
276
Page 13
4-1. Maintenance and care
NOTICE
n Cleaning detergents
Do not use the following types of detergent, as they may discolor the vehicle interior or cause streaks or damage to painted surfaces.
l Non-seat portions: Organic substances such as benzene or gasoline, alkaline or
acidic solutions, dye, or bleach.
l Seats: Acidic solutions, such as thinner, benzene, or alcohol.
n Preventing damage to leather surfaces
Observe the following precautions to avoid damage to and deterioration of leather surfaces.
l Remove any dust or dirt on leather surfaces immediately.
l Do not expose the vehicle to direct sunlight for extended periods of time. Park
the vehicle in the shade, especially during summer.
l Do not place items made of vinyl, plastic, or that contain wax on the upholstery, as
they may stick to the leather surface if the vehicle interior heats up significantly.
n Water on the floor
Do not wash the vehicle floor with water. Vehicle systems such as the audio system may be damaged if water comes into contact with electrical components under the floor of the vehicle, and may also cause the body to rust.
n Cleaning the inside of the rear window
Be careful not to scratch or damage the heater wires or antenna.
4
Maintenance and care
277
Page 14
3-6. Other interior features
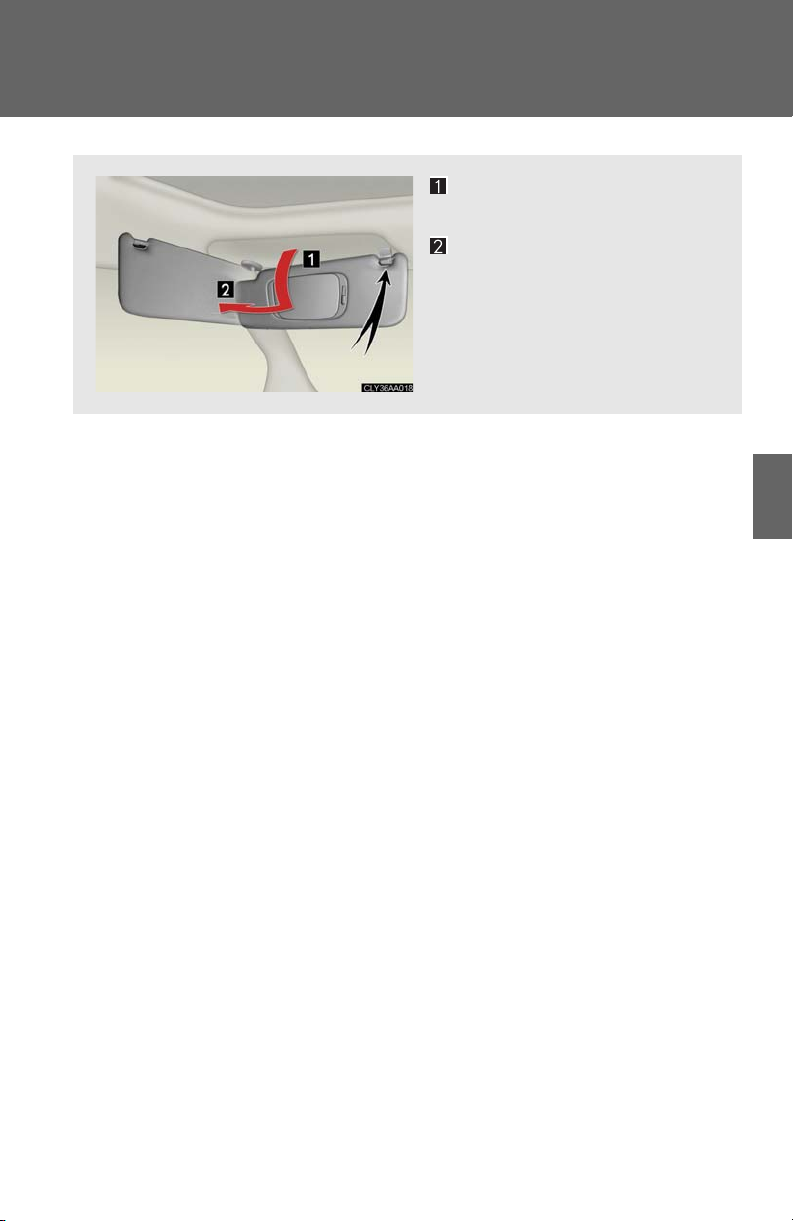
Sun visors
Forward position:
Flip down.
Side position:
Flip down, unhook, and swing
to the side.
At this position, the visors can be
slid backward.
3
Interior features
247
Page 15
3-6. Other interior features
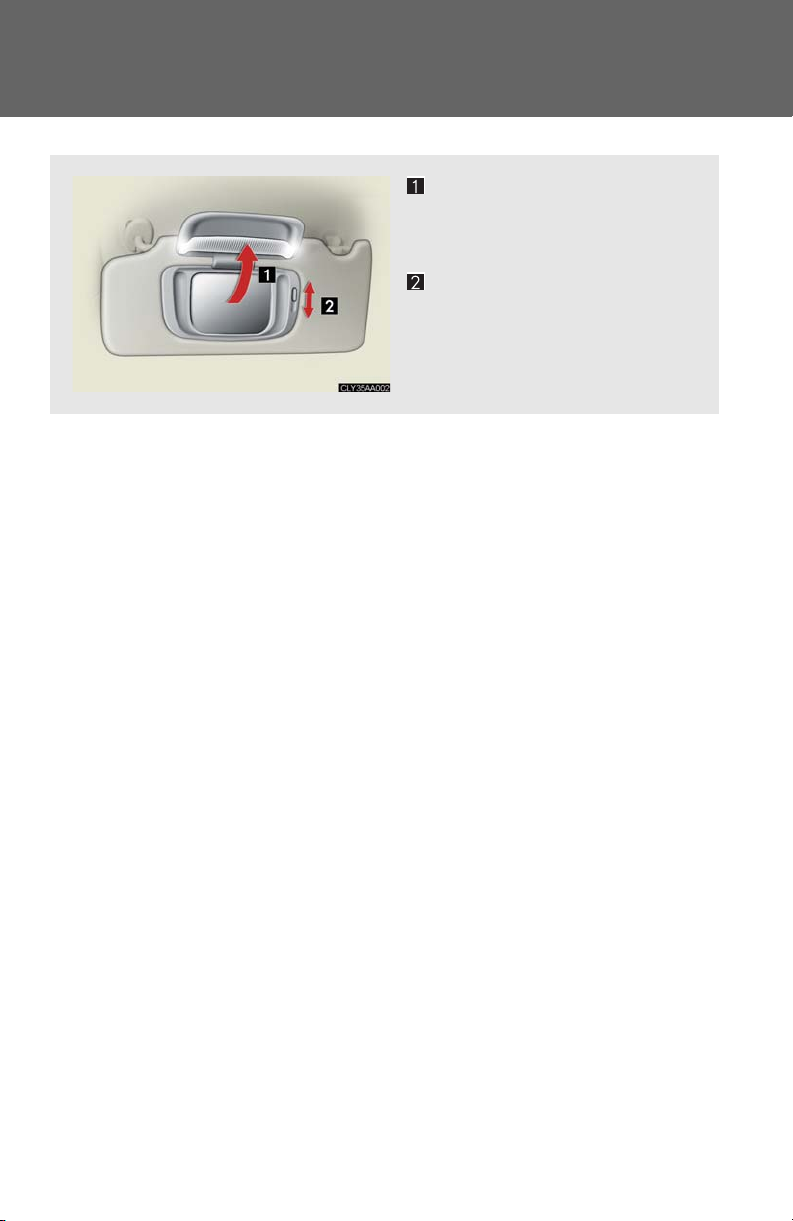
Vanity mirror
Open
The light turns on when the
cover is opened.
Adjust the brightness of the
light
248
Page 16
3-6. Other interior features
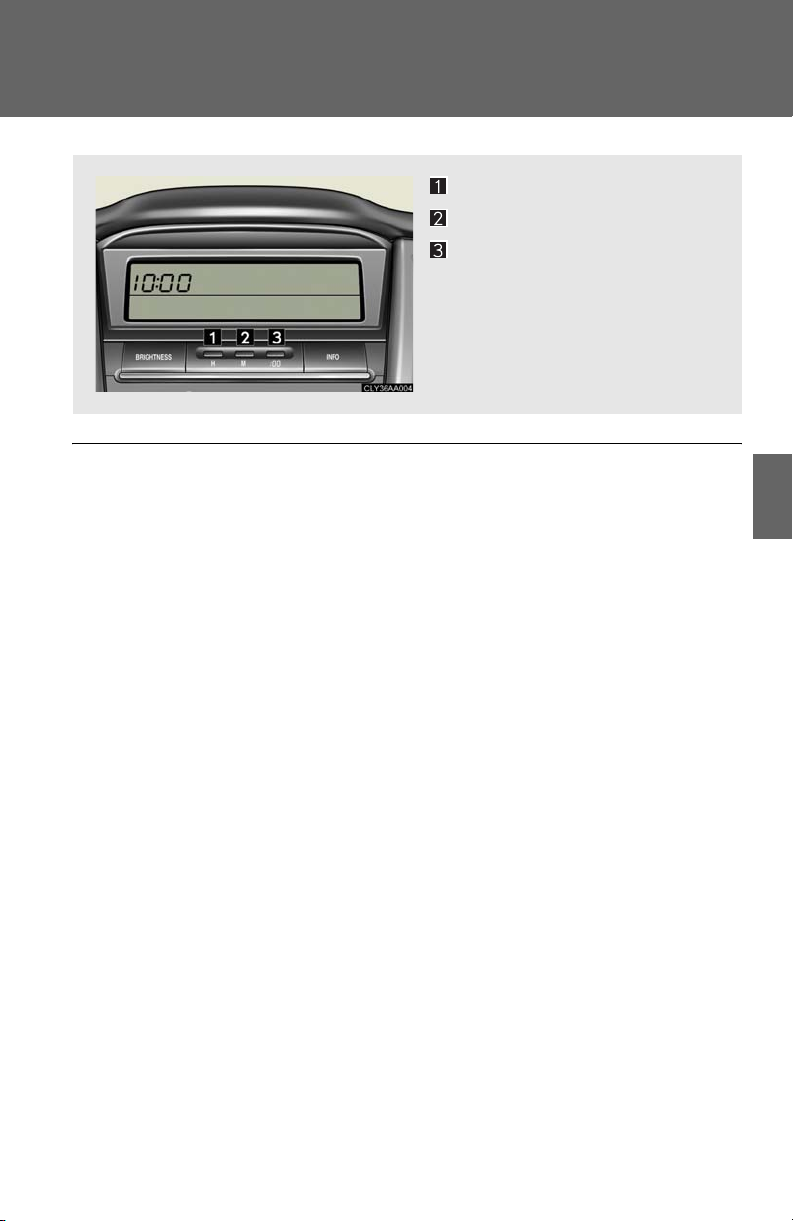
Clock
Adjusts the hour.
Adjusts the minutes.
Rounds to the nearest hour.*
*: e.g. 1:00 to 1:29 → 1:00
1:30 to 1:59 → 2:00
n The clock is displayed when
The ignition switch is in the ACC or ON position.
3
Interior features
249
Page 17
3-6. Other interior features
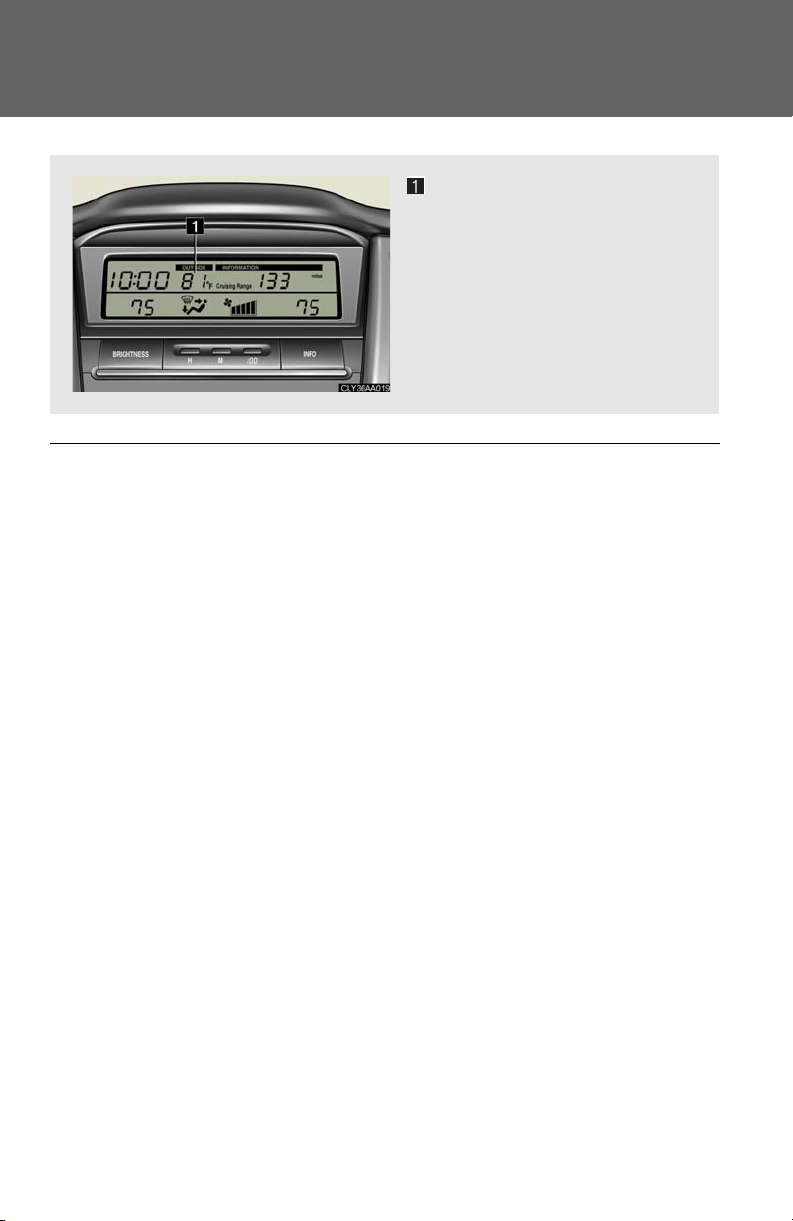
Outside temperature display
n If the temperature does not appear or it shows
Have the vehicle inspected by your Lexus dealer.
Displays the outside air temperature
The temperature range that can
be displayed is from -22°F
(-30°C) to 122°F (50°C).
250
Page 18
3-6. Other interior features
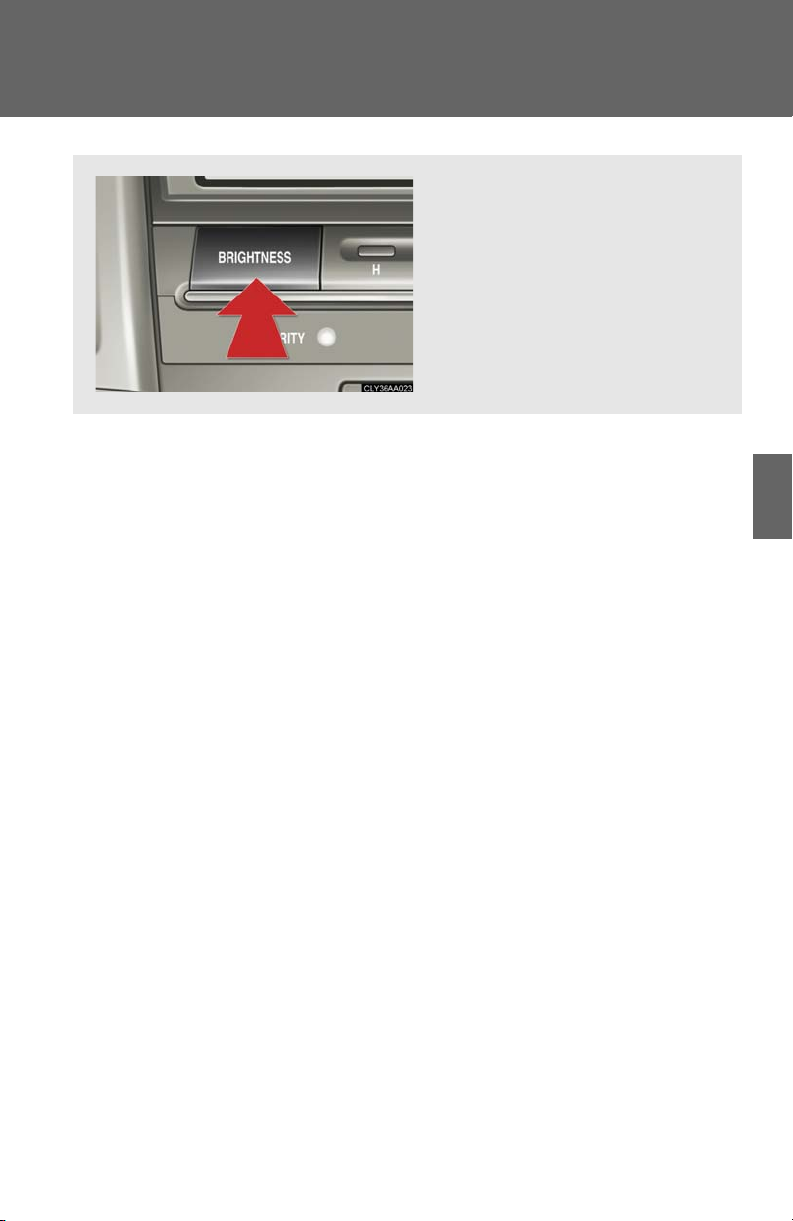
Multi-display light control
Adjusts the brightness of the
light
Push and release the button until
the desired brightness is
obtained.
3
Interior features
251
Page 19
3-6. Other interior features
Power outlet
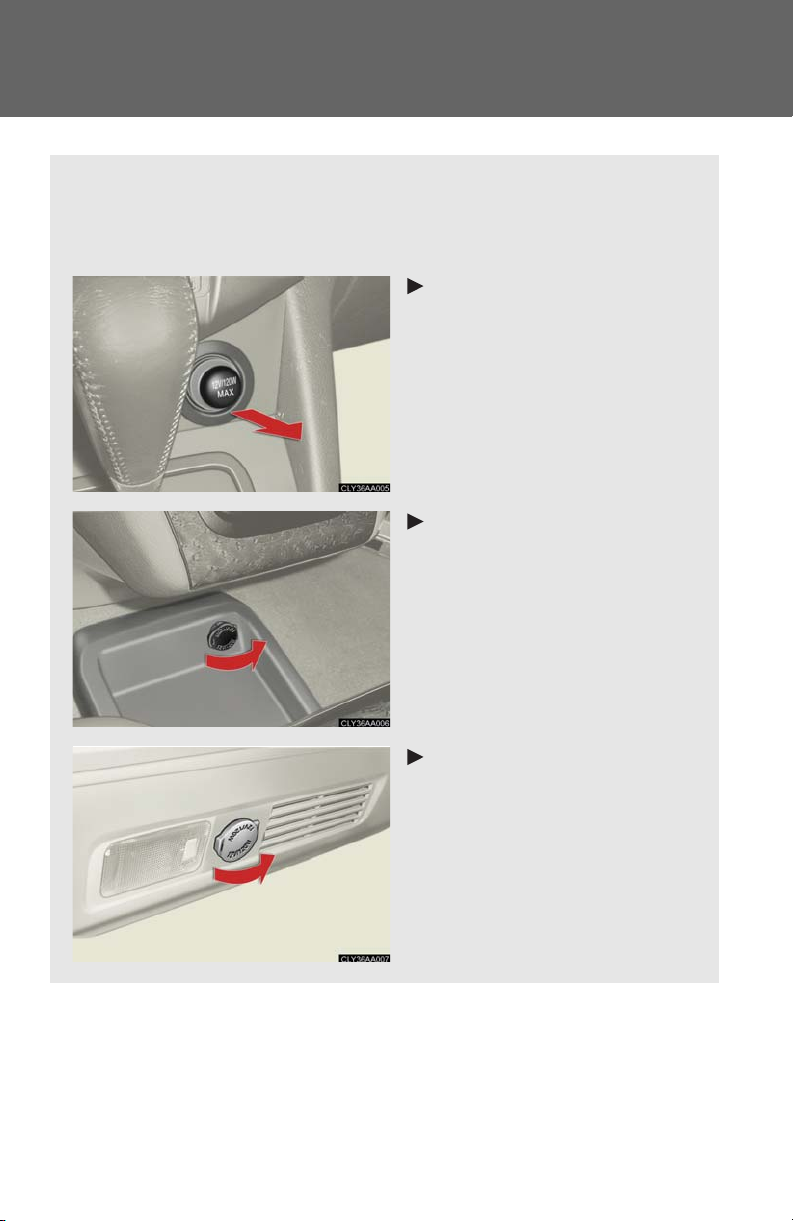
The power outlet can be used for a following component.
12 V: Accessories that run on less than 10 A. 115 VAC: Audio device that use less than 100 W.
On center cluster (12 V)
Tray under the front console
box (12 V)
252
Luggage compartment
(12 V)
Page 20
*: If equipped
3-6. Other interior features
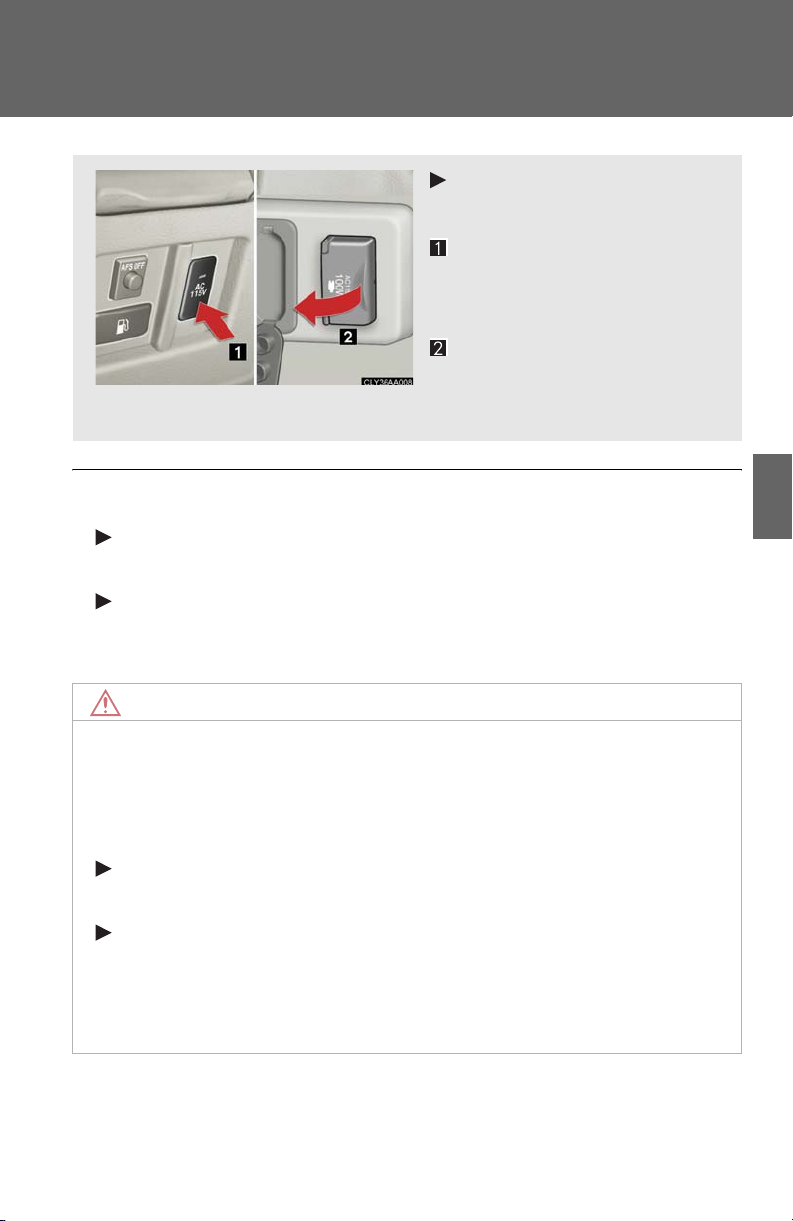
Luggage compartment
(115 VAC*)
Main switch
To use the power outlet, turn
on the main switch.
Power outlet socket
n The power outlet can be used when
12 V
The ignition switch is in the ACC or ON position.
115 VAC
The ignition switch is in the ON position.
NOTICE
n To avoid damaging the power outlet
Close the power outlet lid when the power outlet is not in use. Foreign objects or liquids that enter the power outlet may cause a short circuit.
n To prevent the fuse from being blown
12 V
Do not use an accessory that uses more than 12 V 10 A.
115 VAC
Do not use a 115 VAC appliance that requires more than 100 W.
If a 115 VAC appliance that consumes more than 100 W is used, the protection circuit will cut the power supply.
3
Interior features
253
Page 21
3-6. Other interior features
NOTICE
n To prevent the battery from being discharged
Do not use the power outlet longer than necessary when the engine is not running.
n Appliances that may not operate properly (115 VAC)
The following 115 VAC appliances may not operate properly even if their power consumption is under 100 W.
l Appliances with high initial peak wattage
l Measuring devices that process precise data
l Other appliances that require an extremely stable power supply
254
Page 22
3-6. Other interior features
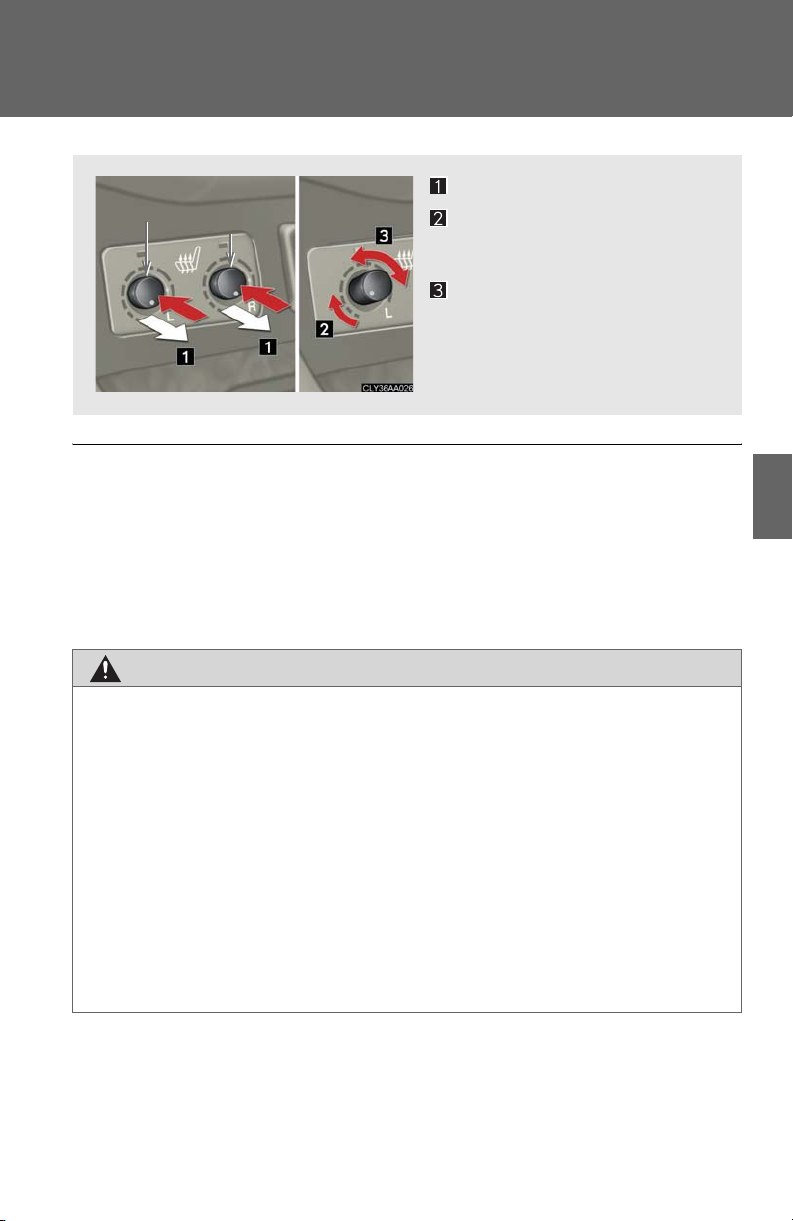
Seat heaters (if equipped)
Driver’s
seat
Front
passenger’s
seat
Pops the switch out
ON
The indicator light comes on.
Adjusts the seat temperature
The further you turn the knob
clockwise, the warmer the seat
becomes.
n The seat heaters can be used when
The ignition switch is in the ON position.
n When not in use
Turn the knob counterclockwise. The indicator light turns off. Press the knob into the recessed position.
CAUTIO N
n Burns
l Use caution when seating the following persons in a seat with the seat heater on
to avoid the possibility of burns:
• Babies, small children, the elderly, the sick and the disabled
• Persons with sensitive skin
• Persons who are fatigued
• Persons who have taken alcohol or drugs that induce sleep (sleeping drugs,
cold remedies, etc.)
l Do not cover the seat with anything when using the seat heater.
Using the seat heater with a blanket or cushion increases the temperature of the
seat and may lead to overheating.
3
Interior features
255
Page 23
3-6. Other interior features
NOTICE
n To prevent seat heater damage
Do not put unevenly weighted objects on the seat and do not stick sharp objects (needles, nails, etc.) into the seat.
n To prevent battery discharge
Turn the switches off when the engine is not running.
256
Page 24
3-6. Other interior features
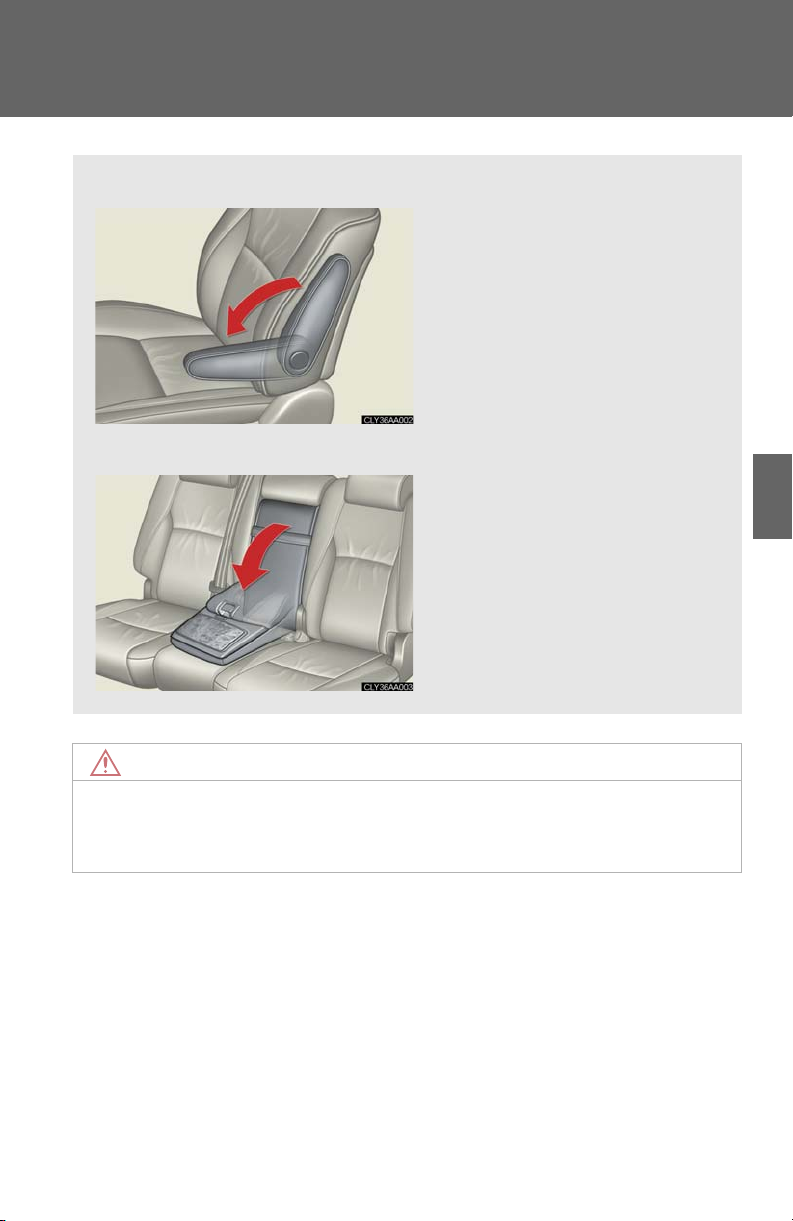
Armrest
n Front
n Rear
Pull the armrest down for use.
NOTICE
n To prevent damage to the armrest
Do not place too much strain on the armrest.
Pull the armrest down for use.
3
Interior features
257
Page 25
3-6. Other interior features
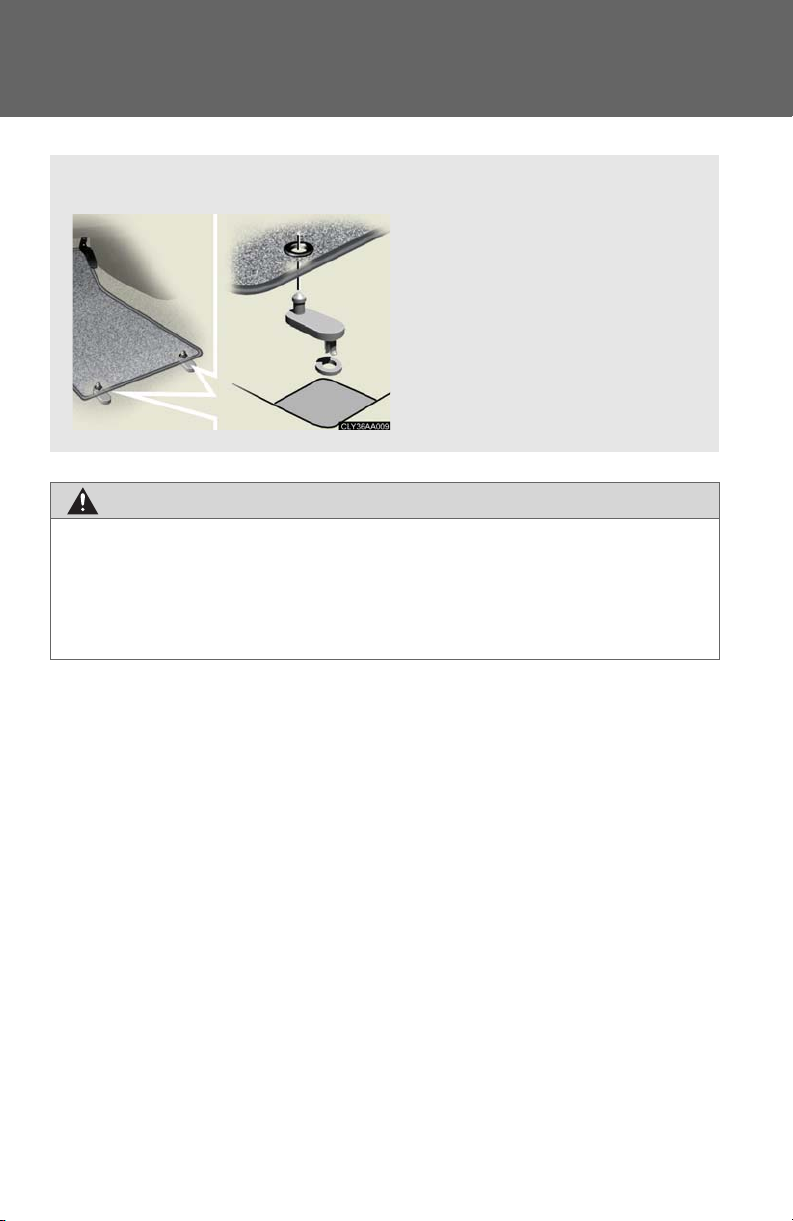
Floor mat
Securely place a mat that matches the size of the space on the carpet.
Secure the driver’s floor mat
using the hooks provided.
CAUTIO N
n When inserting the floor mat
Make sure the floor mat is properly placed on the vehicle carpet. If the floor mat slips and interferes with the movement of the pedals during driving, it may cause an accident.
258
Page 26
3-6. Other interior features
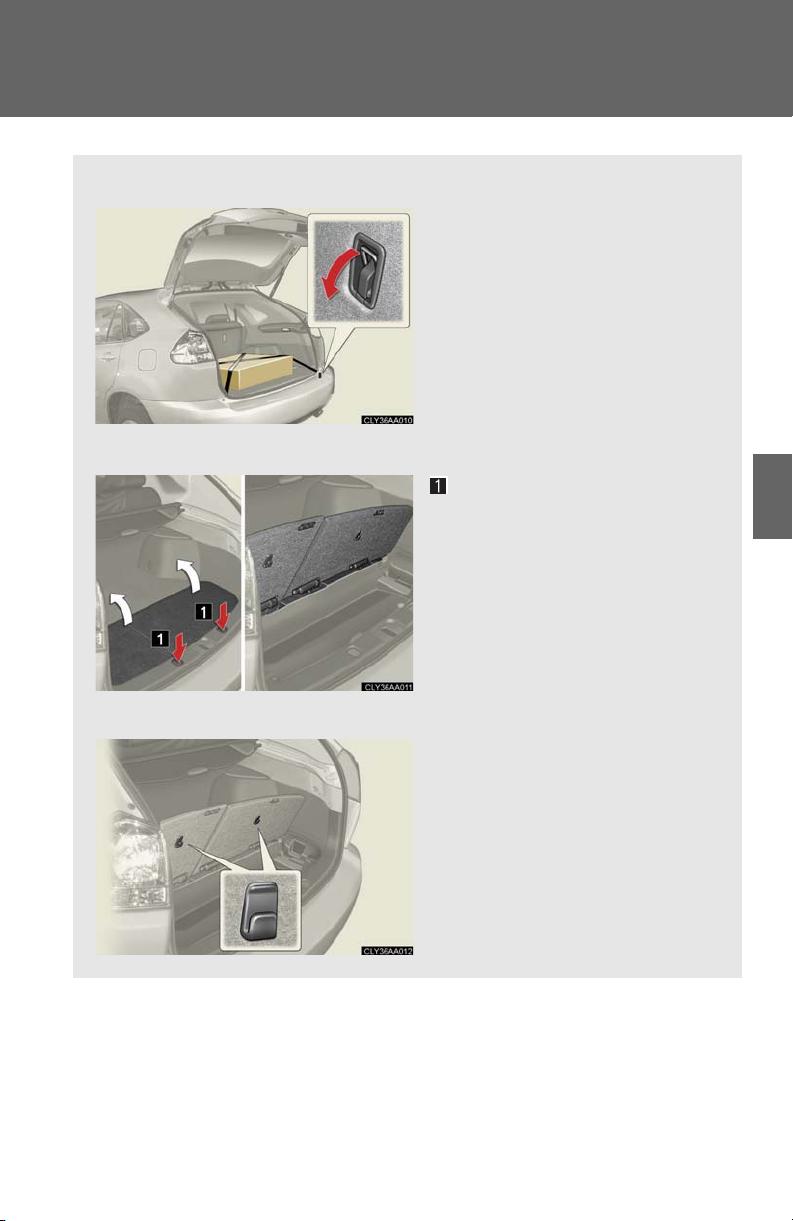
Luggage compartment features
n Cargo hooks
Cargo hooks are provided for
securing loose items.
n Auxilialy box
n Shopping bag hooks
To lift the luggage mat up,
press down the button.
An auxiliary box is under the
luggage mat.
3
Interior features
259
Page 27
3-6. Other interior features
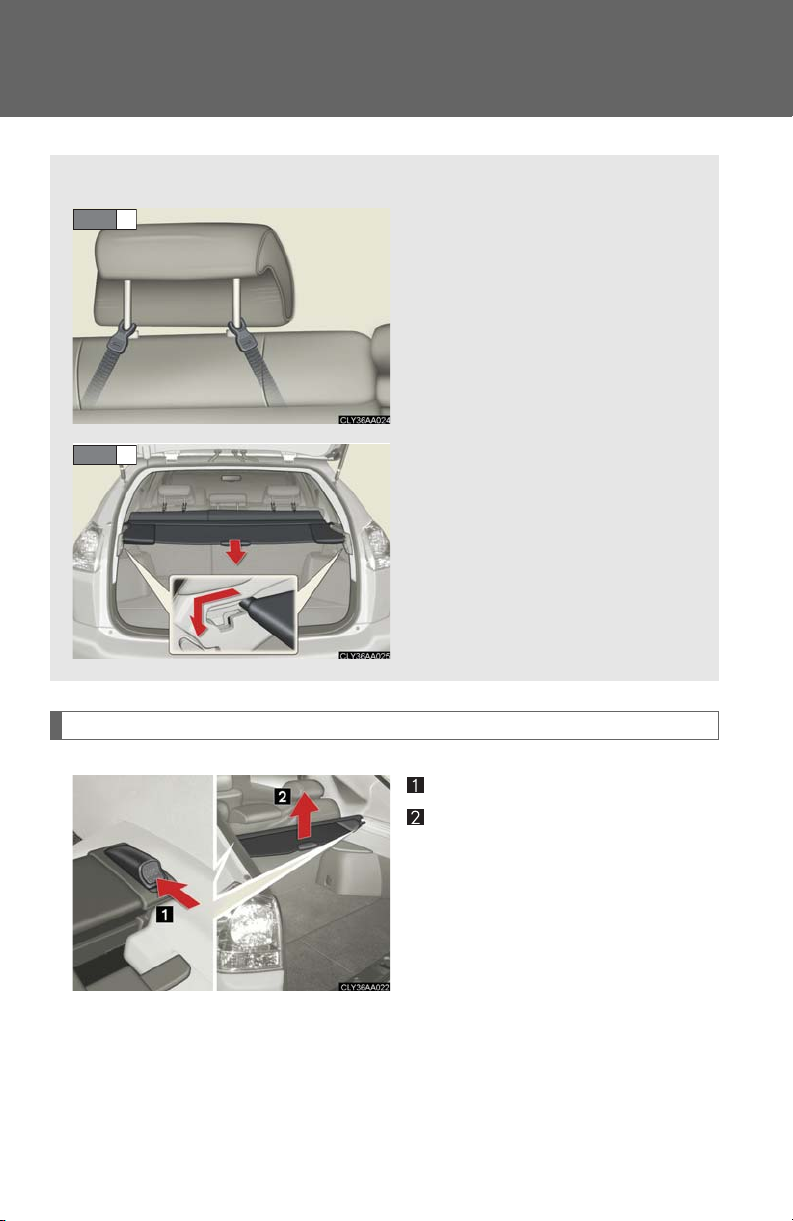
n Luggage cover
STEP 1
STEP 2
Removing luggage cover
Attach the hooks to the head
restraints.
Pull out the luggage cover and
hook it onto the anchors.
Push
Lift up
260
After removing the luggage cover,
stow it in the auxiliary box or place
it somewhere other than the passenger compartment.
Page 28
3-6. Other interior features
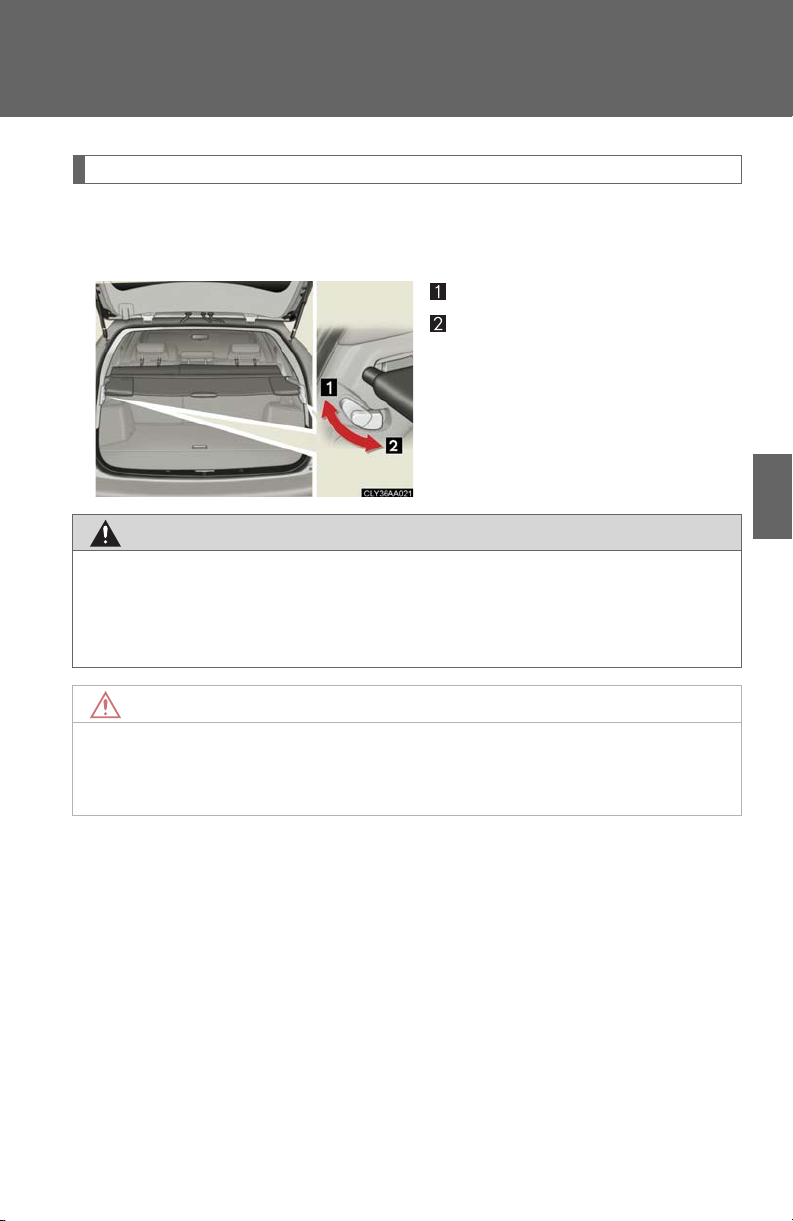
Automatic retract function of luggage cover
The knob is in the active position, the luggage cover is retracted automatically when the back door is opened.
Active position
Inactive position
3
CAUTIO N
n When the cargo hooks are not in use
To avoid injury, always return the cargo hooks to their positions when they are not in use.
NOTICE
n Shopping bag hook weight capacity
Do not hang any object heavier than 4 lb. (2 kg) on shopping bag hooks.
Interior features
261
Page 29
3-6. Other interior features
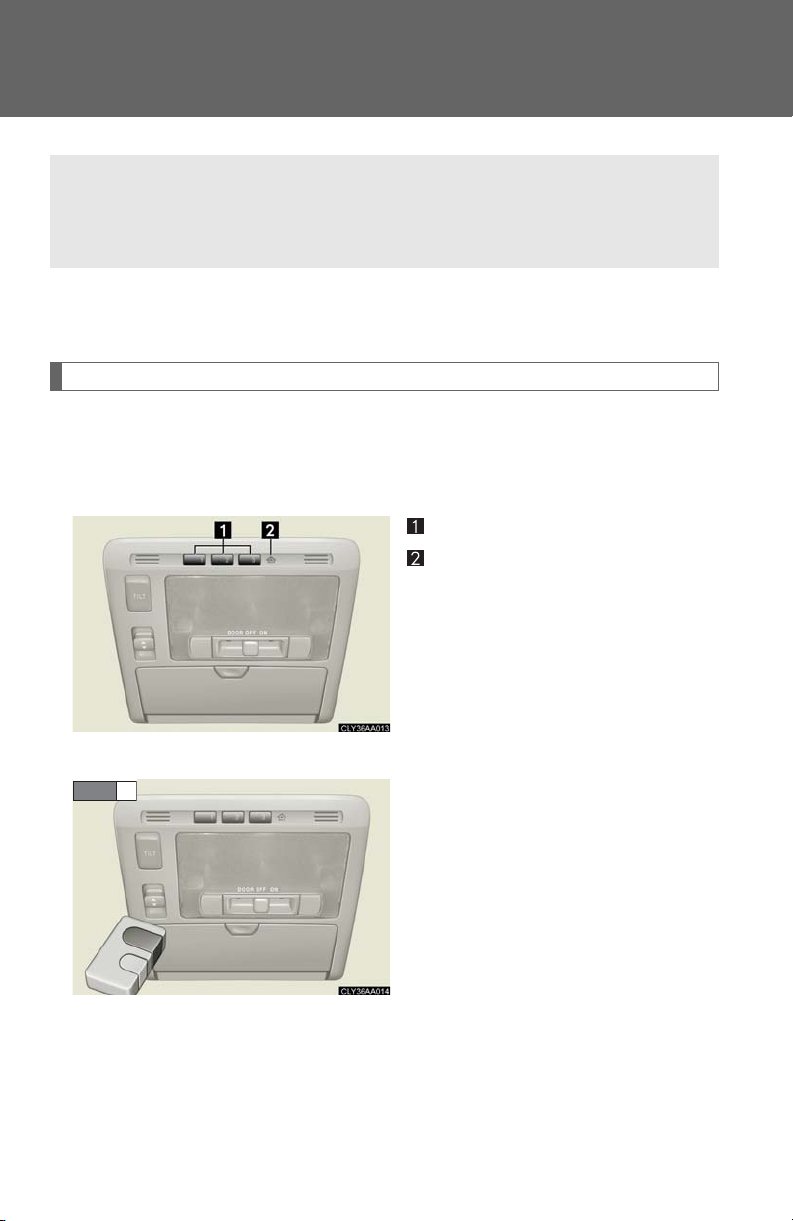
Garage door opener
The garage door opener can be programmed to operate garage doors, gates, entry doors, door locks, home lighting systems, and security systems, and other devices.
The garage door opener (HomeLink® Universal Transceiver) is manufactured
under license from HomeLink
®
.
Programming the HomeLink® (for U.S.A. owners)
The HomeLink® compatible transceiver in your vehicle has 3 buttons
which can be programmed to operate 3 different devices. Refer to the
programming method below appropriate for the device.
Buttons
Indicator
n Programming the HomeLink
STEP 1
®
Point the remote control for the
device 1 to 3 in. (25 to 75 mm)
from the HomeLink® control buttons.
262
Keep the indicator light on the
HomeLink
gramming.
®
in view while pro-
Page 30
3-6. Other interior features
STEP 2
STEP 3
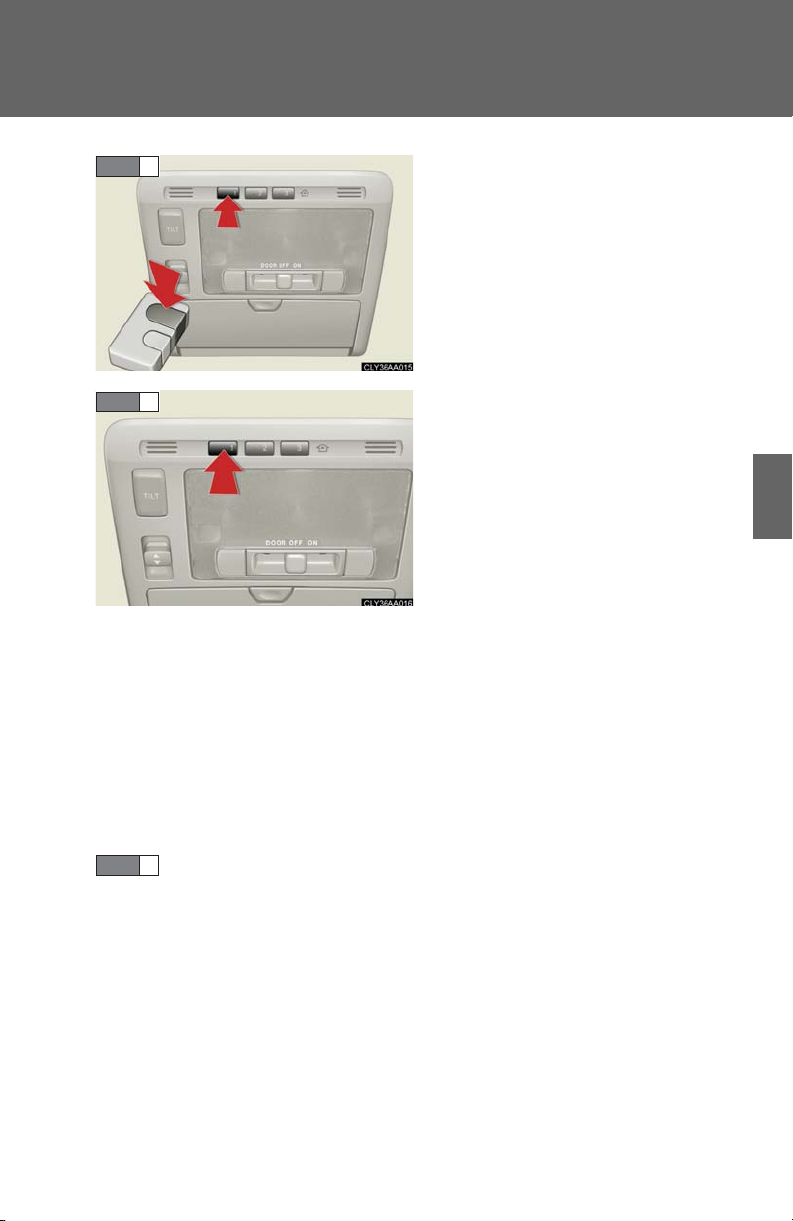
Press and hold down one of the
buttons on the HomeLink® and
the button on the transmitter.
When the indicator light on the
HomeLink® changes from a slow
to a rapid flash after 20 seconds,
you can release both buttons.
Test the operation of the
HomeLink® by pressing the newly
programmed button.
If programming a garage door
opener, check to see if the garage
door opens and closes. If the
garage door does not operate, see
if your garage transmitter is of the
Rolling Code type. Press and hold
the programmed HomeLink
ton. The garage door has the rolling code feature if the indicator
light (on the HomeLink
rapidly for 2 seconds and then
remains lit. If your transmitter is the
Rolling Code type, proceed to the
heading “Programming a rolling
code system”.
®
®
) flashes
but-
3
Interior features
STEP 4
Repeat the steps above to program another device for each of
the remaining HomeLink® buttons.
263
Page 31
3-6. Other interior features
n Programming a Rolling Code system (for U.S.A. owners)
If your device is Rolling Code equipped, follow the steps under the
heading “Programming the HomeLink
®
” before proceeding with the
steps listed below.
STEP 1
Locate the training button on the ceiling mounted garage door opener motor. The exact location and color of the button may vary by brand of garage door opener.
Refer to the operation manual supplied with the garage door opener for the location of the training button.
STEP 2
STEP 3
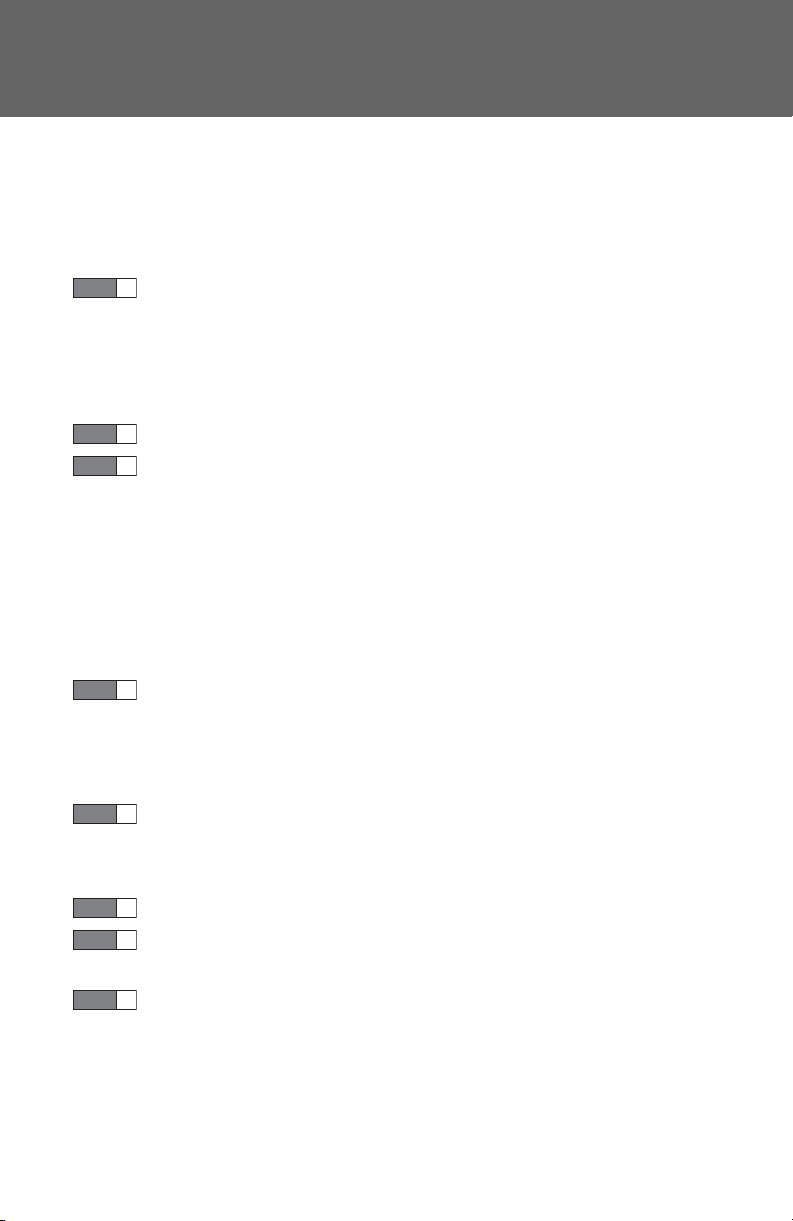
Press the training button.
Press and release the vehicle’s programmed HomeLink® button
twice. The garage door may open.
If the garage door opens, the programming process is complete. If the door does not open, press and release the button a third time. This third press and release will complete the programming process by opening the garage door.
STEP 4
The ceiling mounted garage door opener motor should now recognize
the HomeLink
Repeat the steps above to program another rolling code system
®
transceiver and operate the garage door.
for any of the remaining HomeLink® buttons.
n Programming an entry gate (for U.S.A. owners)/Programming all
devices in the Canadian market
STEP 1
Place your transmitter 1 to 3 in. (25 to 75 mm) away from the surface of the HomeLink®.
Keep the indicator light on the HomeLink® in view while programming.
264
STEP 2
STEP 3
STEP 4
Press and hold the selected HomeLink® button.
Repeatedly press and release (cycle) the device’s remote control
button for two seconds each until step 4 is complete.
When the indicator light on the HomeLink® compatible trans-
ceiver start to flashing rapidly, release the buttons.
Page 32
3-6. Other interior features
STEP 5
Test the operation of the HomeLink
®
by pressing the newly programmed button. Check to see if the gate/device operates correctly.
STEP 6
Repeat the steps above to program another device for each of
®
the remaining HomeLink
buttons.
n Programming other devices
To program other devices such as home security systems, home door locks or lighting, contact your authorized Lexus dealer for assistance.
n Reprogramming a button
The individual HomeLink® buttons cannot be erased but can be
reprogrammed. To reprogram a button, follow the “Programming the
HomeLink®” instructions.
Operating the HomeLink
®
Press the appropriate HomeLink® button. The HomeLink® indicator
®
light on the HomeLink
The HomeLink® continues to send a signal for up to 20 seconds as long as
the button is pressed.
transceiver should turn on.
3
Interior features
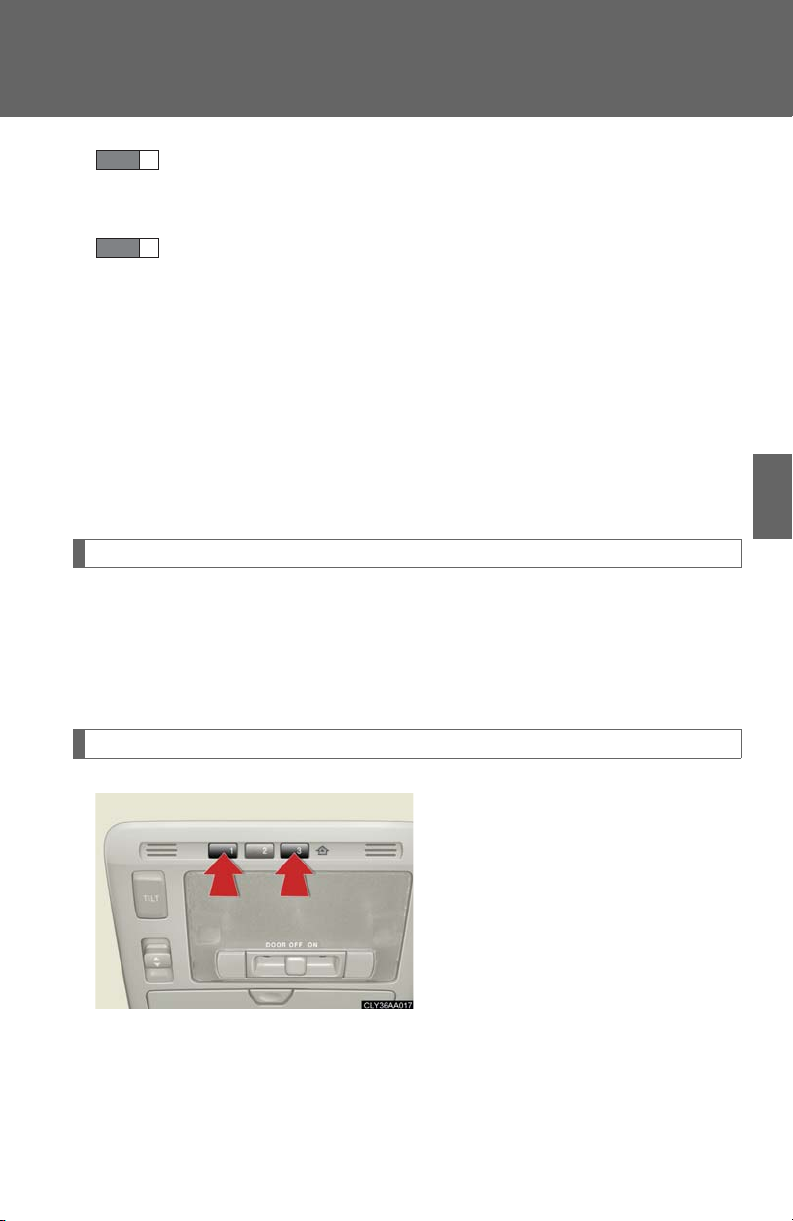
Erasing the entire HomeLink® memory (all three programs)
Press and hold down the 2 outside
buttons for 20 seconds until the
indicator light flashes.
If you sell your vehicle, be sure to
erase the programs stored in the
HomeLink
®
memory.
265
Page 33
3-6. Other interior features
n Before programming
l Install a new battery in the transmitter.
l The battery side of the transmitter must be pointed away from the HomeLink
n Certification for the garage door opener
This device complies with Part 15 of the FCC Rules and with RSS-210 of the IC
Rules.
Operation is subject to the following two conditions: (1) This device may not cause
harmful interference, and (2) this device must accept any interference received,
including interference that may cause undesired operation.
WARNING: This transmitter has been tested and complies with FCC and IC rules. Changes or modifications not expressly approved by the party responsible for compliance could void the user's authority to operate the device.
CAUTIO N
n When programming a garage door or other remote control device
The garage door may operate, so ensure people and objects are out of danger to prevent potential harm.
n Conforming to federal safety standards
Do not use the HomeLink
®
Compatible Transceiver with any garage door opener
or device that lacks safety stop and reverse features as required by federal safety
standards.
This includes any garage door that cannot detect an obstruction object. A door or
device without these features increases the risk of death or serious injury.
®
.
266
Page 34
3-6. Other interior features
Compass
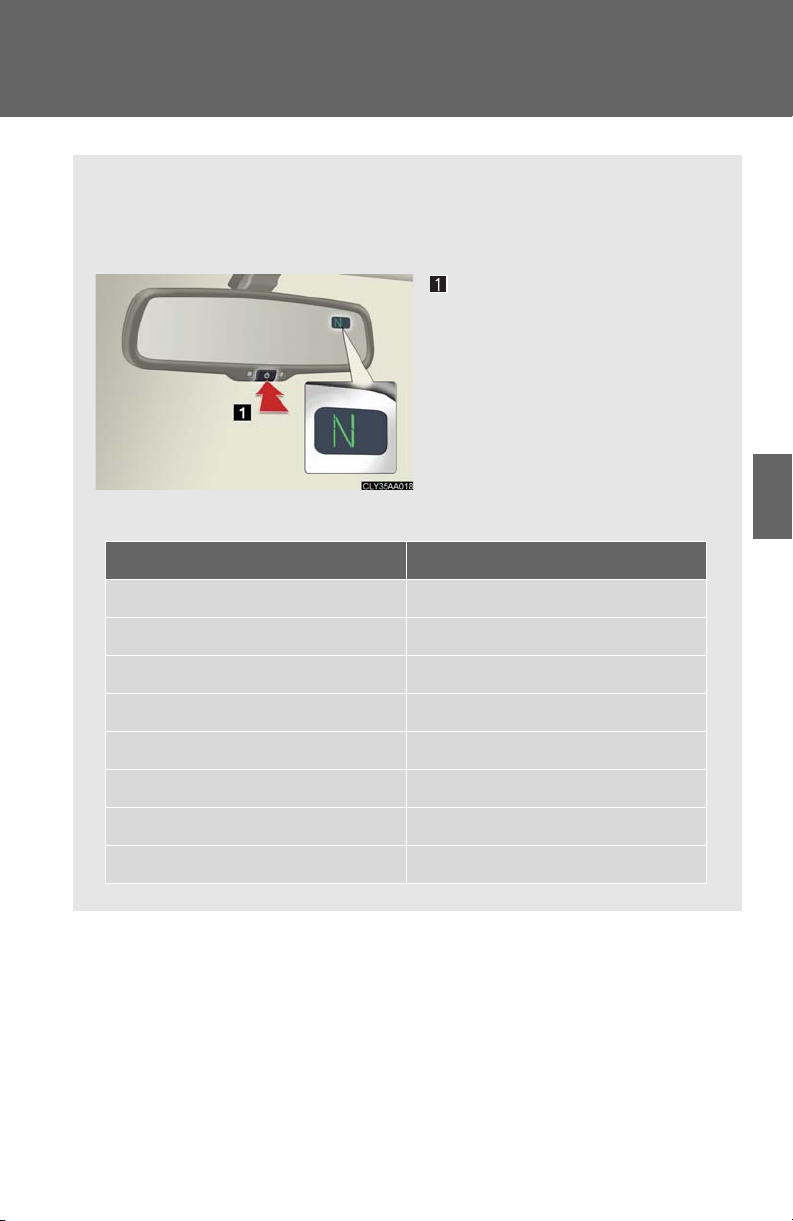
The compass on the inside rear view mirror indicates the direction in which the vehicle is heading.
n Operation
To turn the compass on or off,
press the switch.
n Displays and directions
Display Direction
N North
NE Northeast
E East
SE Southeast
S South
SW Southwest
W We s t
NW Northwest
3
Interior features
267
Page 35
3-6. Other interior features
Calibrating the compass
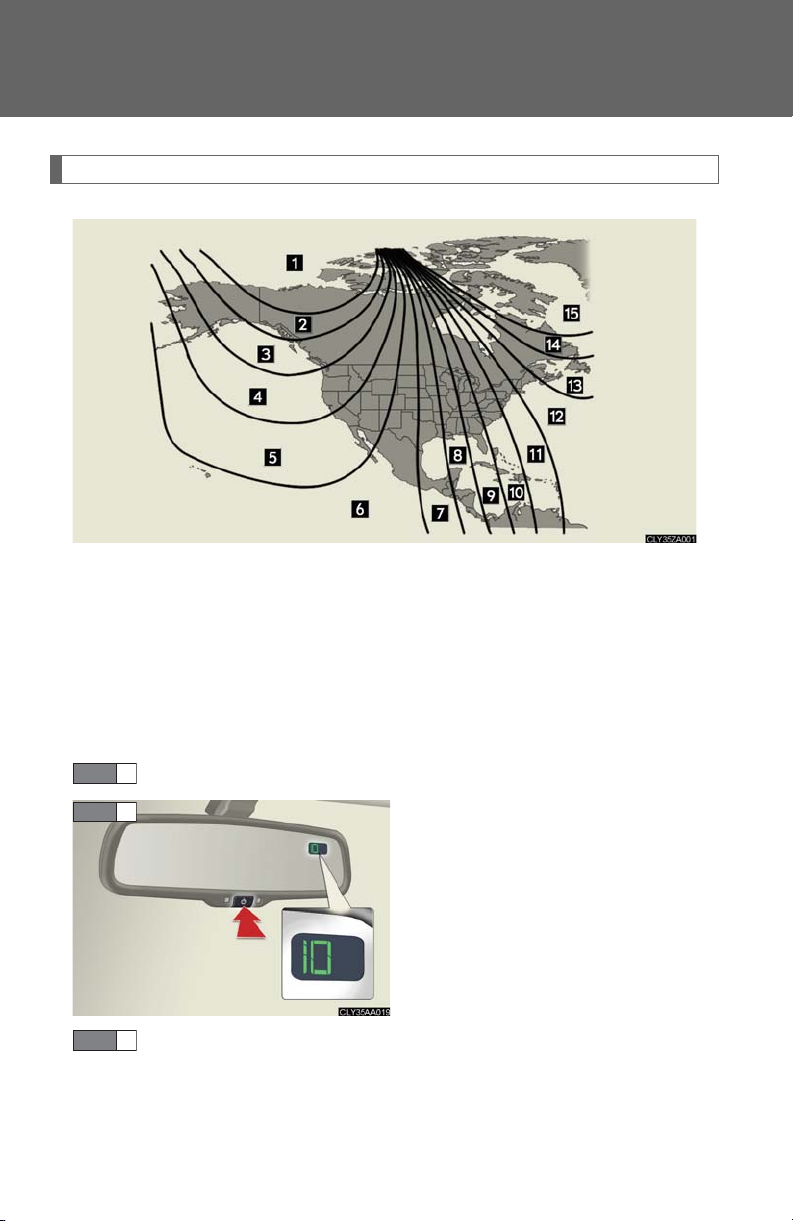
The direction display deviates from the true direction determined by the earth’s magnetic field. The amount of deviation varies according to the geographic position of the vehicle.
If you cross over a map boundary shown in illustration, the compass will deviate.
To obtain higher precision or perfect calibration, refer to the following.
n Deviation calibration
STEP 1
STEP 2
Stop the vehicle where it is safe to drive in a circle.
Press the switch until a number
(1 to 15) appears on the compass
display.
STEP 3
Press the switch, and referring to the map above, select the number of the zone where you are.
If the direction is displayed several seconds after adjustment, the calibration is complete.
268
Page 36
3-6. Other interior features
n Circling calibration
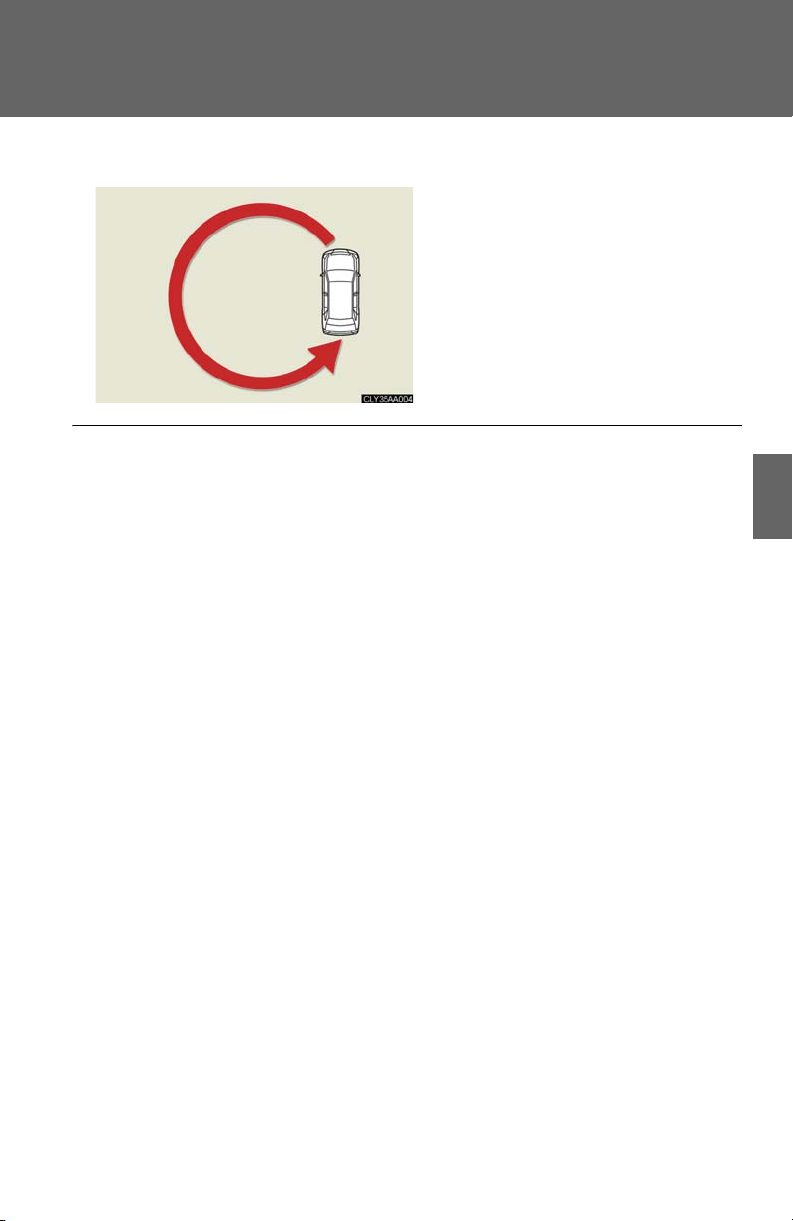
When C appears on the display,
drive the vehicle at 5 mph
(8 km/h) or less in a circle until a
direction is displayed.
If there is not enough space to
drive in a circle, drive around the
block until the direction is displayed.
n Conditions unfavorable to correct operation
The compass may not show the correct direction in the following conditions:
l The vehicle is stopped immediately after turning.
l The vehicle is on an inclined surface.
l The vehicle is in a place where the earth's magnetic field is subject to interference
by artificial magnetic fields (underground car park/parking lot, under a steel
tower, between buildings, roof car park/parking lot, near an intersection, near a
large vehicle, etc.).
l The vehicle has become magnetized.
(There is a magnet or metal object near the inside rear view mirror.)
l The battery has been disconnected.
l A door is open.
3
Interior features
269
Page 37
3-6. Other interior features
CAUTIO N
n While driving the vehicle
Do not adjust the display. Be sure to adjust the display only when the vehicle is stopped.
n When doing the circling calibration
Be sure to secure a wide space, and watch out for people and vehicles in the neighborhood. Do not violate any local traffic rules while performing circling calibration.
NOTICE
n To avoid the compass malfunctions
Do not place magnets or any metal objects near the inside rear view mirror. Doing this may cause a malfunction of the compass sensor.
n To ensure normal operation of the compass
l Do not perform circling calibration of the compass in a place where the earth's
magnetic field is subject to interference by artificial magnetic fields.
l During calibration, do not operate electric systems (moon roof, power windows,
etc.) as they may interfere with the calibration.
270
Page 38
3-4. Using the interior lights
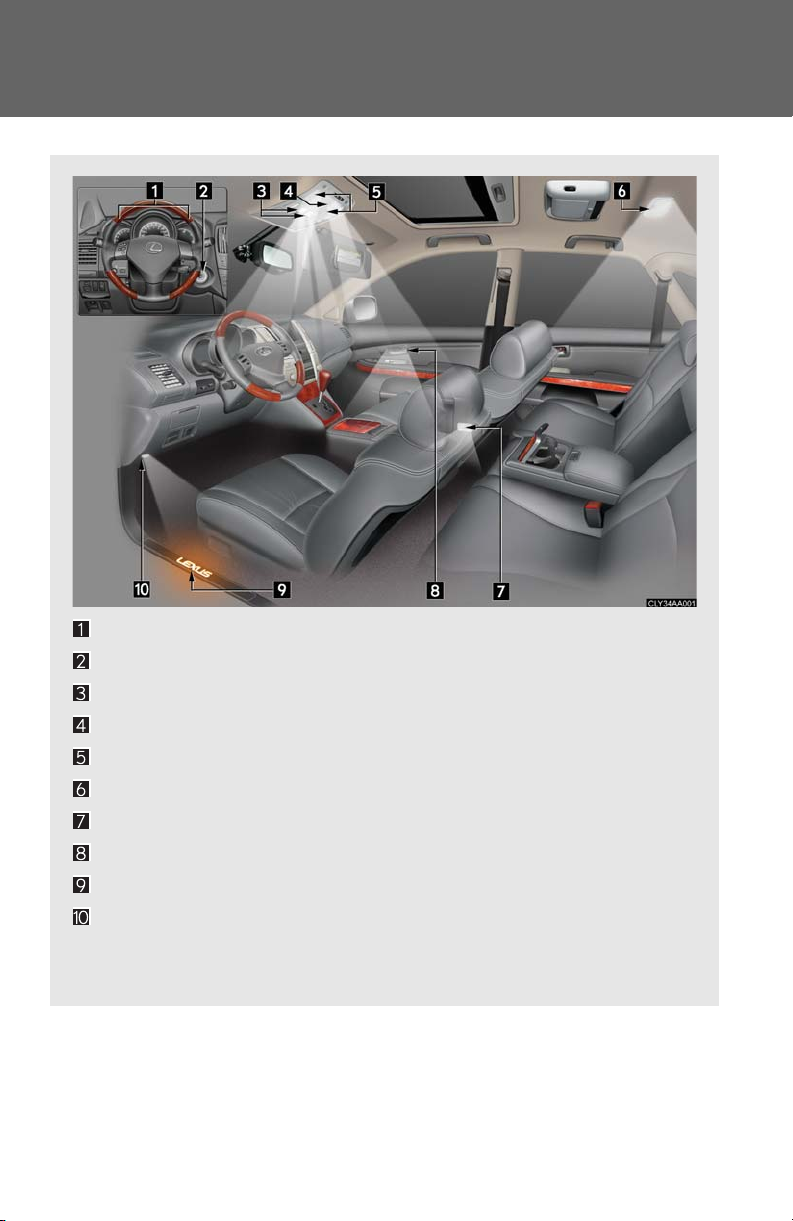
Interior lights list
Meter ring light
Ignition switch light
Front overhead courtesy lights
Front interior light (→P. 2 39 )
Front personal lights (→P. 24 0)
Rear interior light
Front door courtesy lighting
Inside door handle lights (if equipped)
Scuff lighting (if equipped)
Foot well lighting (if equipped)
Turning the instrument panel light control knob fully to the left disables the foot well lighting.
236
Page 39
3-4. Using the interior lights
n Illuminated entry system
The following lights turn on when any of the doors are unlocked or opened. (The lights remain on for approximately 15 seconds when the doors are unlocked, but the lights turn off immediately if the doors are locked.)
l Foot well lighting
l Ignition switch light
l Front interior light (interior light switch is in the DOOR position)
l Rear interior light (interior light switch is in the DOOR position)
l Inside door handle lights
l Scuff lighting
The following lights turn on for approximately 15 seconds when the ignition switch is turned to the LOCK position from the ON or ACC position. (The lights turn off immediately if the ignition switch is turned to the ACC or ON position.)
l Ignition switch light
l Front interior light (interior light switch is in the DOOR position)
l Rear interior light (interior light switch is in the DOOR position)
l Scuff lighting
The following lights turn on when the ignition switch is in the ON position. (The
lights dim when the shift lever is moved out of the P position. The lights remain on
for approximately 15 seconds after turning the ignition switch to the LOCK position
from the ON or ACC position.)
l Inside door handle lights
l Foot well lighting
The front overhead courtesy light turns on when the ignition switch is in the ACC or ON position.
3
Interior features
237
Page 40

3-4. Using the interior lights
n To prevent the battery from being discharged
If the following lights remain ON when the door is not fully closed and the interior light switch is in the DOOR position, the lights will go off automatically after 20 minutes.
l Ignition switch light
l Front interior light
l Rear interior light
l Inside door handle lights
l Scuff lighting
l Foot well lighting
n Customization
Setting (e.g. The time elapsed before lights turn off) can be changed. (
→P. 4 10 )
238
Page 41
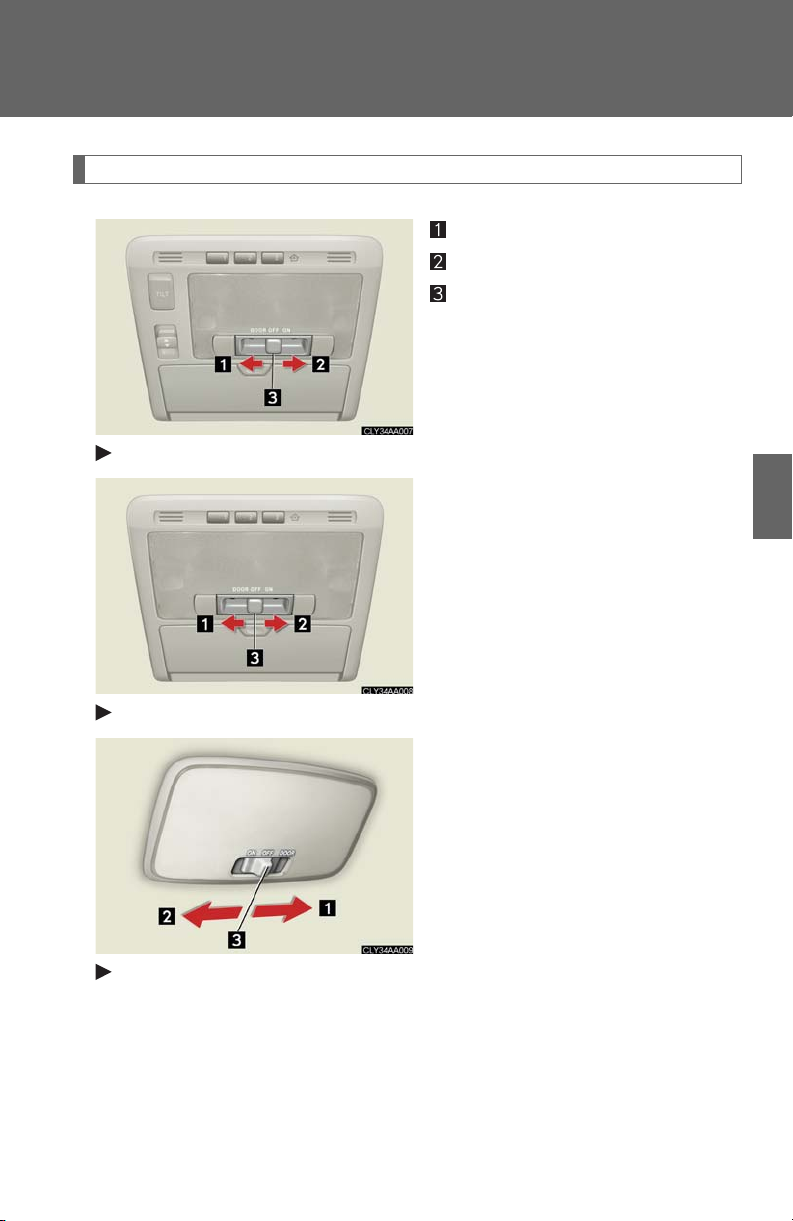
Interior lights
Front (models with an electric moon roof)
3-4. Using the interior lights
Interior lights
Door position ON
ON
OFF
3
Interior features
Front (models without an electric moon roof)
Rear
239
Page 42
3-4. Using the interior lights
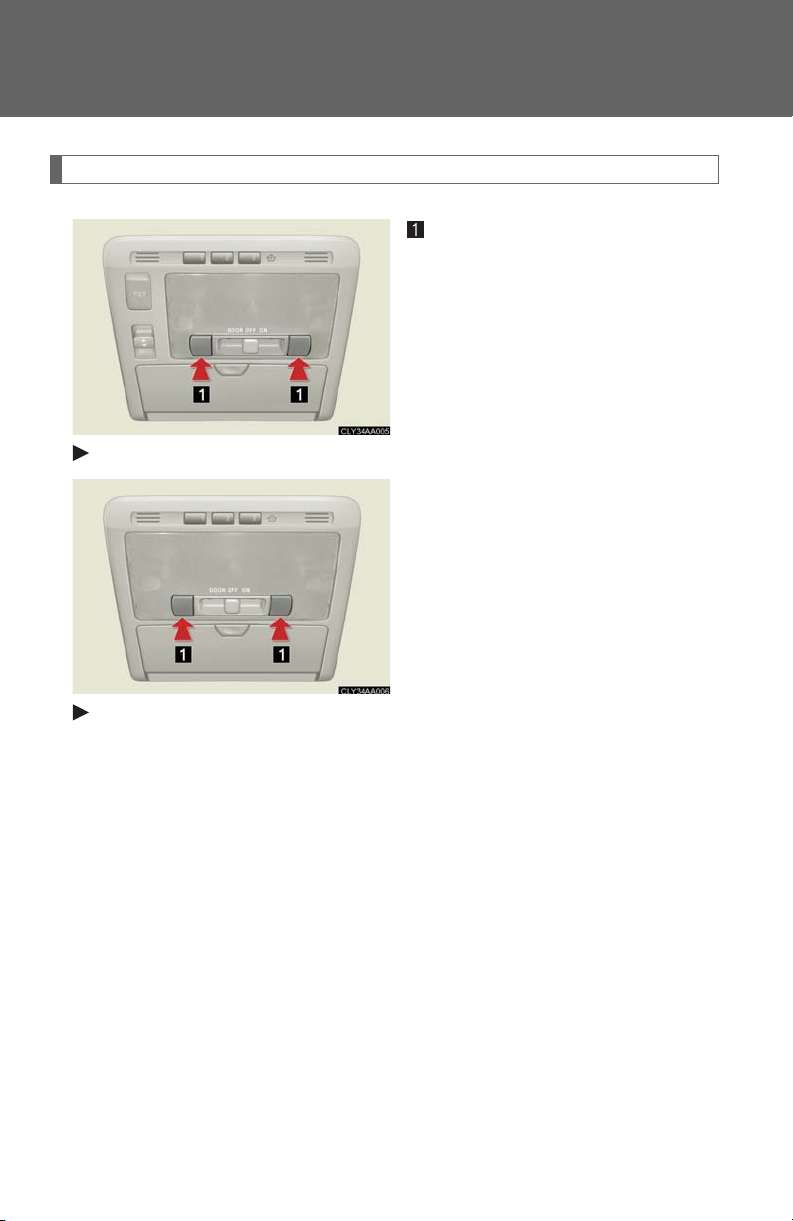
Personal lights
Models with an electric moon roof
Personal lights
ON/OFF
Models without an electric moon roof
240
Page 43
3-3. Using the rear audio system
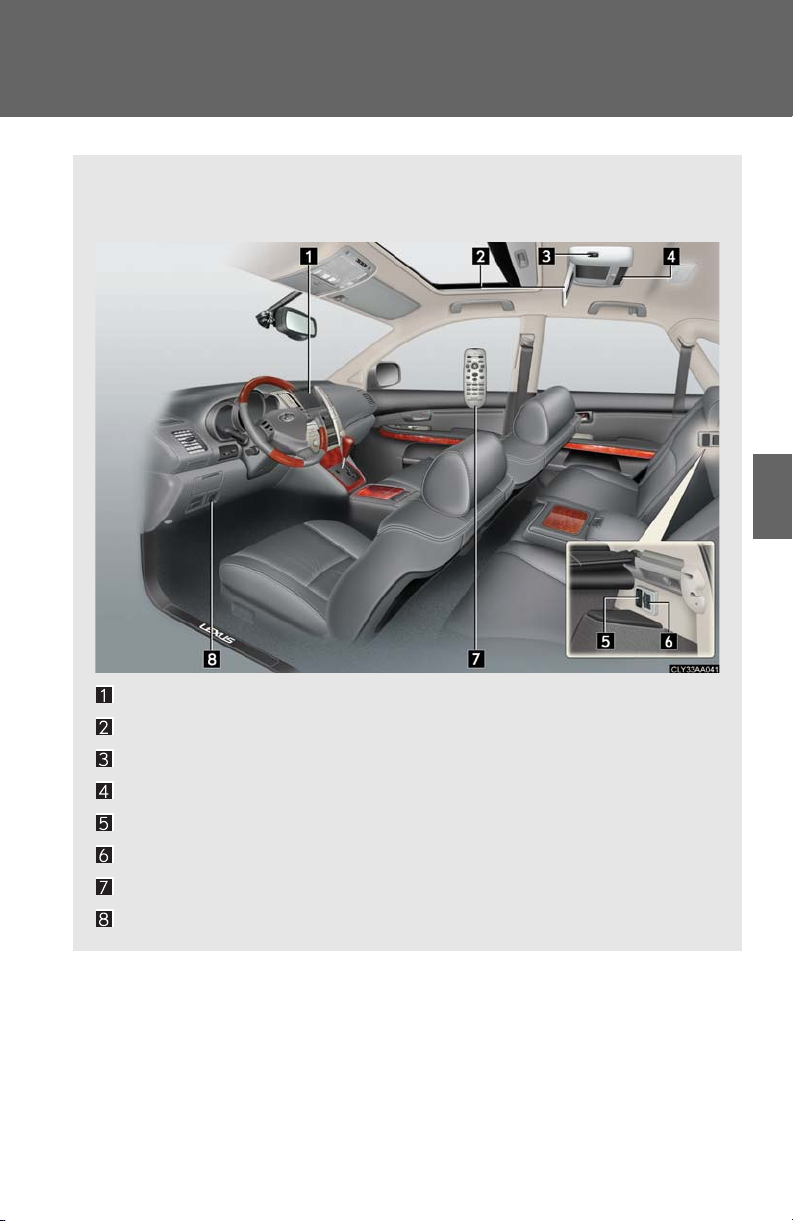
Rear seat entertainment system features (if equipped)
The rear seat entertainment system is designed for the rear passengers to enjoy audio and DVD video separately from the front audio system.
3
Interior features
Front audio system
Display
Headphone volume control dials and headphone jacks
DVD player
A/V input adapter
Power outlet
Rear seat entertainment system controller
Power outlet main switch
209
Page 44
3-3. Using the rear audio system
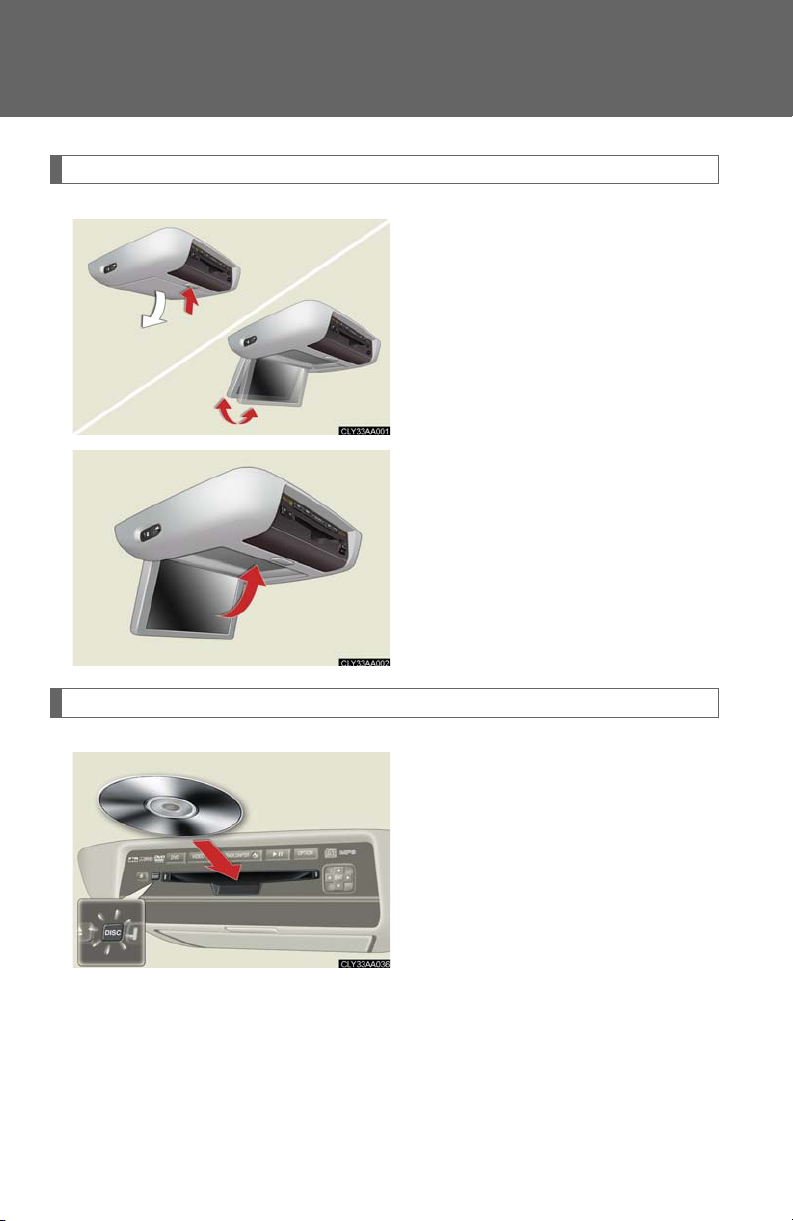
Opening and closing the display
Press the lock release button to
open the display.
Pull the display down to an easily
viewable angle (between 90° and
125°).
To close the display, press the display up until a click is heard to
close the display.
The illumination of the screen is
automatically turned off when the
display is closed. However, the rear
seat entertainment system is not
turned off.
Loading a disc
210
Insert the disc into the slot with the
label side up.
The DISC indicator light turns on
while the disc is loaded.
The player will play the track or
chapter, and will repeat it after it
reaches the end.
Page 45
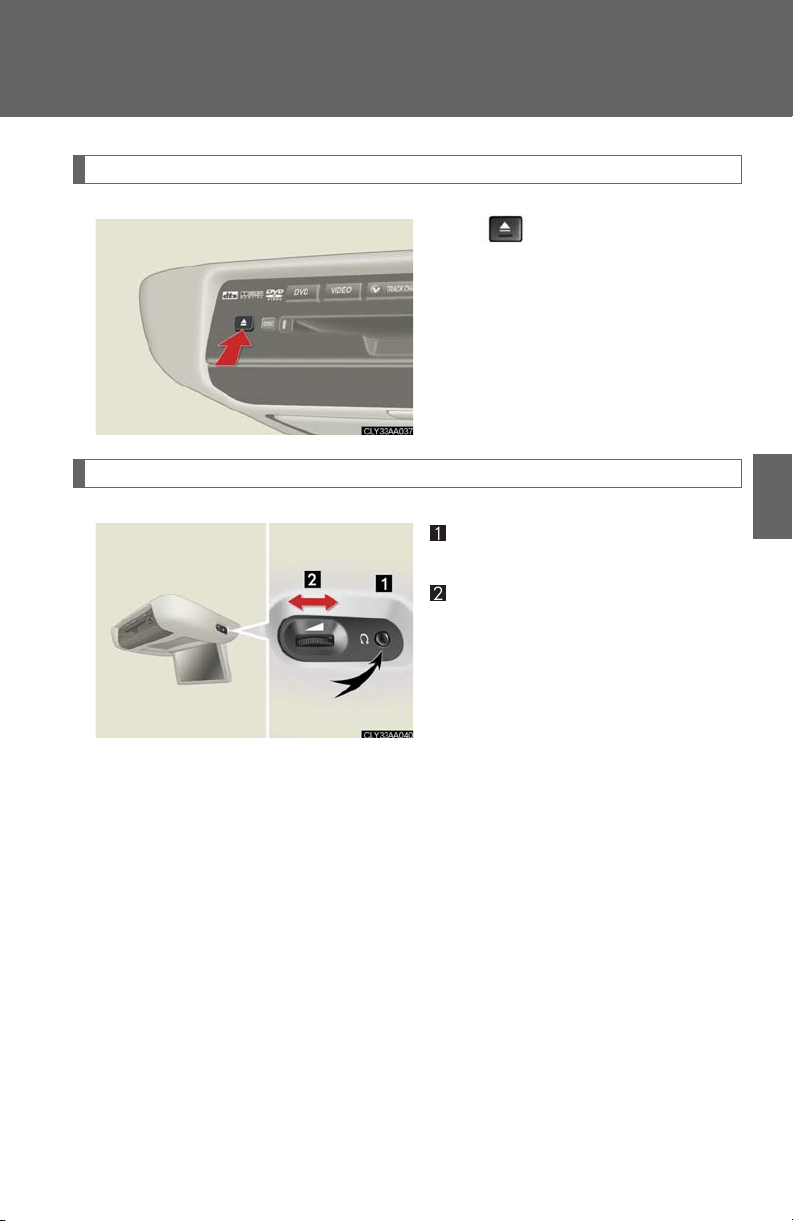
Ejecting a disc
Headphone jacks
3-3. Using the rear audio system
Press and remove the disc.
3
To use the headphones, connect
them to the jack.
To adjust the volume
Right side dial: Turn it toward the
front of the vehicle to increase
the volume. Turn it toward the
rear of the vehicle to decrease
the volume.
Left side dial: Turn it toward the
rear of the vehicle to increase
the volume. Turn it toward the
front of the vehicle to decrease
the volume.
Interior features
211
Page 46
3-3. Using the rear audio system
n The rear seat entertainment system can be used when
The ignition switch is in the ACC or ON position.
n Discs that can be used
Discs with the marks shown below can be used. Playback may not be possible depending on recording format or disc features, or due to scratches, dirt or deterioration.
n When appears on the screen
It indicates that the selected switch cannot work.
n Rear system lock
→P. 2 06
212
Page 47
3-3. Using the rear audio system
n Error messages
DISC CHECK: Indicates that the disc is dirty, damaged or was inserted upside
down. Clean the disc or insert it correctly.
REGION ERROR: Indicates that the DVD region code is not set properly.
DVD ERROR: Indicates that there is a problem inside the player. Eject the disc.
Set the disc again.
If the malfunction still exists, take the vehicle to your Lexus
dealer.
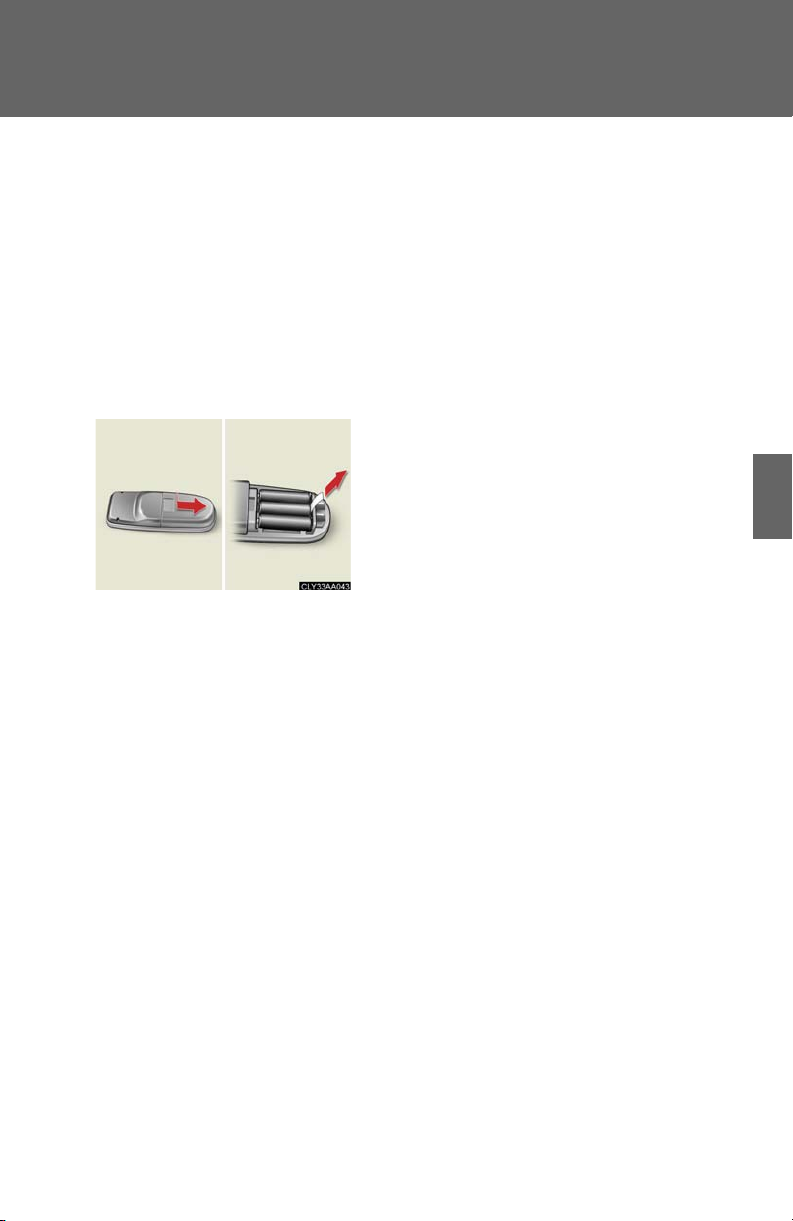
n Before using the remote control (for new vehicle owners)
An insulating sheet is set to prevent the batteries from being discharged. Remove the
insulating sheet before using the remote control.
n Headphones
With some headphones generally available in the market, it may be difficult to catch
signals properly. Lexus recommends the use of Lexus genuine wireless headphones.
Please contact your Lexus dealer for further details.
n Vo l u m e
l Adjust the volume when you connect the headphones to the jack. Loud sounds
may have a significant impact on the human body.
l Conversational speech on some DVDs is recorded at a low volume to emphasize
the impact of sound effects. If you adjust the volume assuming that the conversations represent the maximum volume level that the DVD will play, you may be
startled by louder sound effects or when you change to a different audio source.
Be sure to adjust the volume with this in mind.
3
Interior features
213
Page 48
3-3. Using the rear audio system
CAUTIO N
n While driving
Do not use headphones. Doing so may cause an accident, resulting in death or serious injury.
n When the rear seat entertainment system is not used
Keep the display closed.
In the event of an accident or sudden braking, the opened display may hit an occupant's body, resulting in injury.
n To prevent accidents and electric shock
Do not disassemble or modify the remote control.
n When the remote control is not used
Stow the remote control. Injuries may result in the event of an accident or sudden braking.
214
Page 49
3-3. Using the rear audio system
Using the DVD player (DVD video)
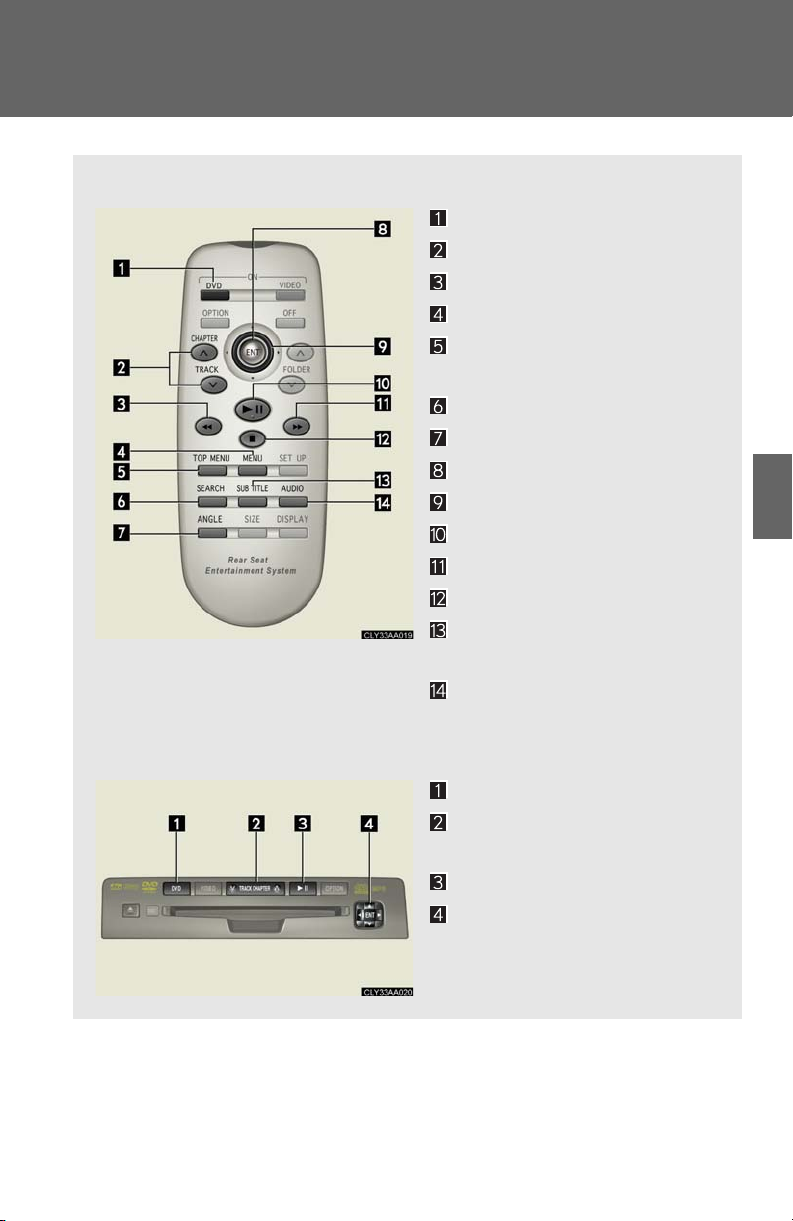
n Remote control
Turning on the DVD mode
Selecting a chapter
Reversing a screen
Turning on the menu screen
Turning on the title selection
screen
Searching the title
Changing the screen angle
Inputting the selected switch
Selecting a switch
Playing/pausing a screen
Fast forwarding a screen
Stopping a screen
Changing the subtitle lan-
guage
Changing the audio lan-
guage
3
Interior features
n Unit
Turning on the DVD mode
Skipping to the desired chap-
ter
Playing/pausing a screen
Selecting a switch/inputting
the selected switch
215
Page 50
3-3. Using the rear audio system
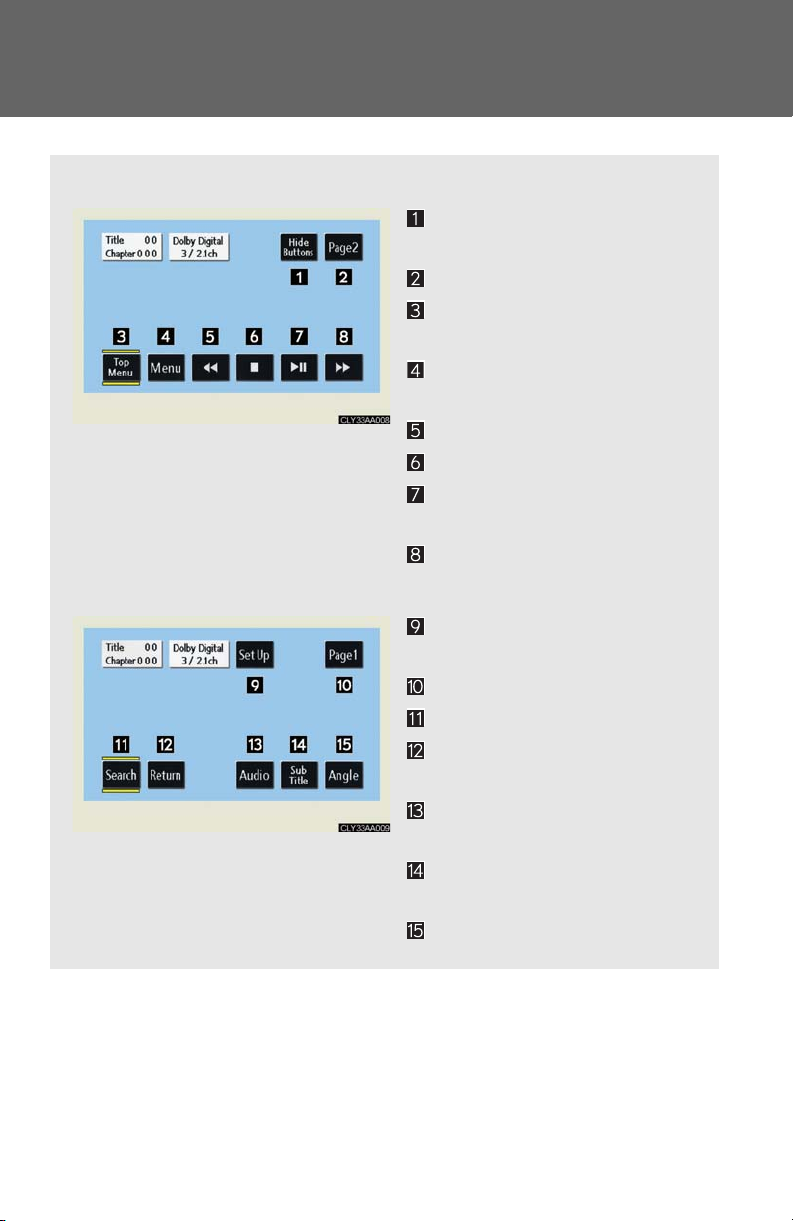
n Display (Page 1)
n Display (Page 2)
Turning off the operation
switches on the display
Displaying Page 2
Turning on or off the title
selection screen for the disc
Turning on or off the menu
screen for the disc
Reversing a screen
Stopping a screen
Pausing the disc/canceling
the pause
Fast forwarding a screen
Displaying to the initial setting
screen
Displaying to Page 1
Search for a title
Returning to the previous
screen
Changing the audio lan-
guage
Changing the subtitle lan-
guage
Changing the angle
216
Page 51
3-3. Using the rear audio system
NOTICE
n Cleaning the display
Wipe the display with a dry soft cloth. If the screen is wiped with a rough cloth, the surface of the screen may be scratched.
n To prevent damage to the remote control
l Keep the remote control away from direct sunlight, temperature heat and high
humidity.
l Do not drop or knock the remote control against hard objects.
l Do not sit on or place heavy objects on the remote control.
n DVD player
Never try to disassemble or oil any part of the DVD player. Do not insert anything other than a disc into the slot.
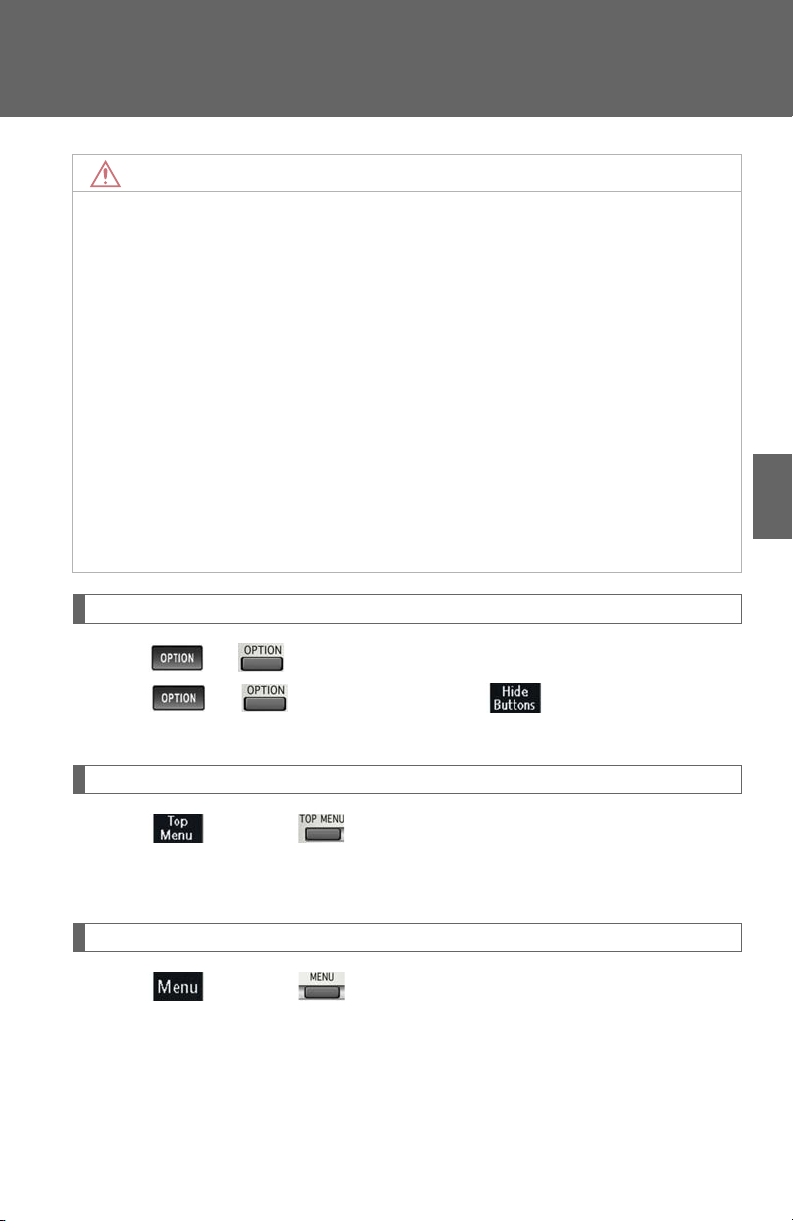
Turning on or off the operation switches
3
Interior features
Press or to turn on the operation switches.
Press or once again or select to turn off the operation switches.
Turning on the title selection screen
Press or select to turn on the title selection screen. For the operation of the title selection screen, see the separate manual for the DVD disc.
Turning on the menu screen
Press or select to turn on the menu screen. For the operation of the menu screen, see the separate manual for the DVD disc.
217
Page 52
3-3. Using the rear audio system
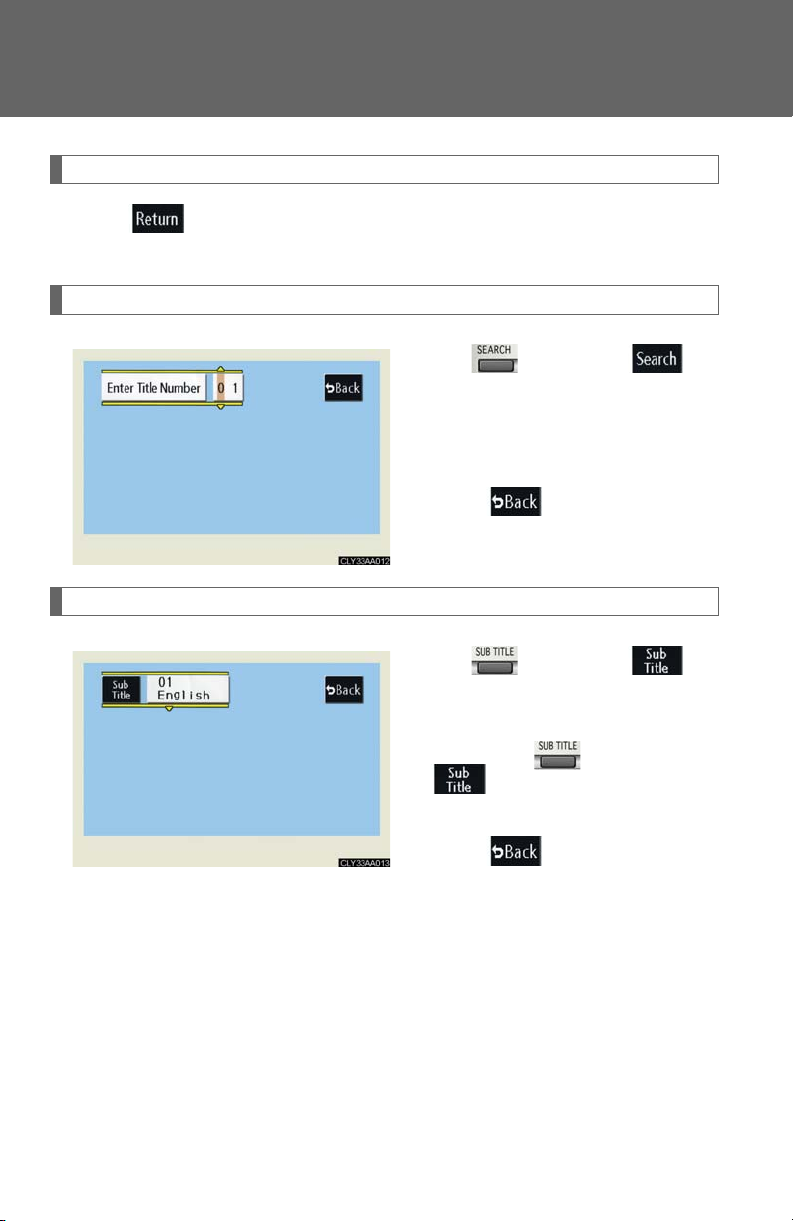
Returning to the previous screen
Press to return to the previous screen. For the operation of the menu screen, see the separate manual for the DVD disc.
Searching for a title
Press or select to
display the screen to search for a
title.
Select the title number, and press
ENT to input it.
Select to return to the previous screen.
Changing the subtitle language
218
Press or select to
display the subtitle language
screen.
Each time is pressed or
is selected, another language stored on the disc is
selected.
Select to return to the previous screen.
Page 53
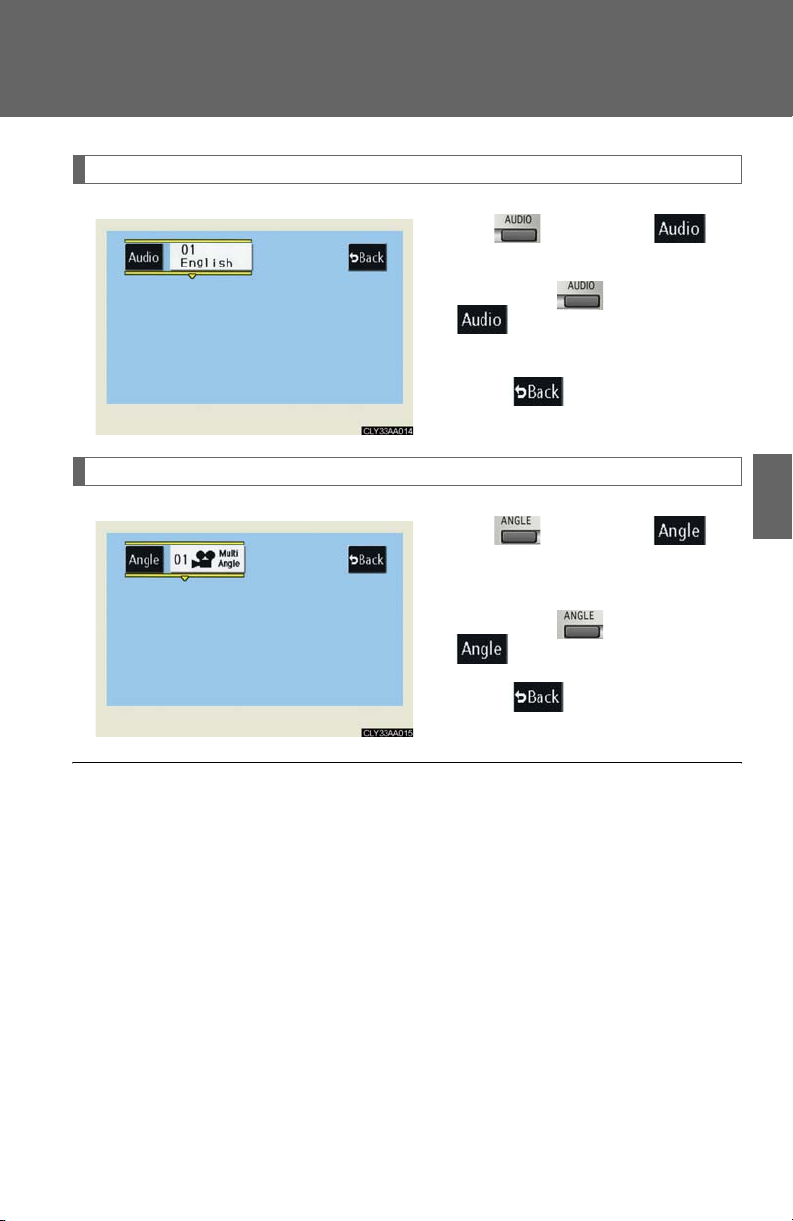
Changing the audio language
Changing the angle
3-3. Using the rear audio system
Press or select to
display the audio language screen.
Each time is pressed or
is selected, another language stored on the disc is
selected.
Select to return to the previous screen.
3
Press or select to
display the screen to change the
angle.
Each time is pressed or
is selected, the angle
changes.
Select to return to the previous screen.
n DVD player and DVD video discs
This DVD player is compatible NTSC color TV formats. DVD video discs conforming to other formats such as PAL or SECAM cannot be used.
n Region codes
Some DVD video discs have a region code indicating where you can use them. If
the DVD video disc is not labeled ALL or I, you cannot use it in this DVD player. If
you attempt to play an inappropriate DVD video disc in this player, REGION
CODE ERROR appears on the screen. Even if the DVD video disc does not have a
region code, in some cases you cannot use it.
Interior features
219
Page 54
3-3. Using the rear audio system
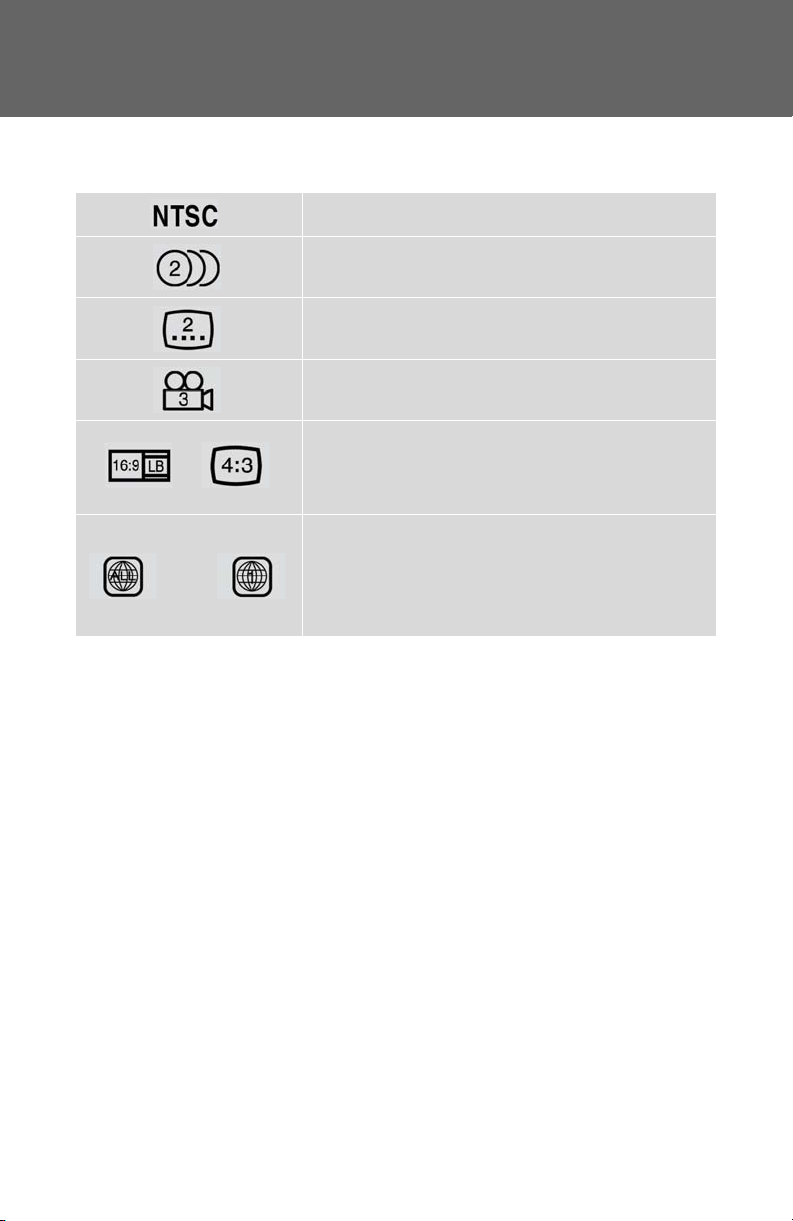
n Marks shown on DVD video discs
Indicates NTSC format of color TV.
Indicates the number of audio tracks.
Indicates the number of language subtitles.
Indicates the number of angles.
Indicates the screen to be selected.
Wide screen: 16:9
Standard: 4:3
Indicates regions in which this video disc can be
played.
All: all countries
Number: region code
n DVD video disc glossary
l DVD video discs: Digital Versatile Discs that holds world’s standard video. DVD
video discs have adopted "MPEG2", one of the world standards of digital compression technologies. The picture data is compressed by 1/40 on average and
stored. Variable rate encoded technology has been adopted in which the volume
of data assigned to the picture is changed depending on the picture format.
Audio data is stored using PCM and Dolby digital, which enables higher sound.
Furthermore, multi-angle and multi-language features will also help you enjoy the
more advanced technology of DVD video.
l Viewer restrictions: This feature limits what can be viewed in conformity with the
level of restrictions of the country. The level of restrictions varies depending on
the DVD video disc. Some DVD video discs cannot be played at all, or violent
scenes are skipped or replaced with other scenes.
• Level 1: DVD video discs for children can be played.
• Level 2 - 7: DVD video discs for children and G-rated movies can be played.
• Level 8: All types of DVD video discs can be played.
220
Page 55
3-3. Using the rear audio system
l Multi-angle feature: Allows you to enjoy the same scene at different angles.
l Multi-language feature: Allows you to select the language of the subtitles and
audio.
l Region codes: Region codes are provided on DVD players and DVD discs. If the
DVD video disc does not have the same region code as the DVD player, you cannot play the disc on the DVD player.
l Audio: This DVD player can play liner PCM, Dolby digital, dts and MPEG audio
format DVD. Other decoded type cannot be played.
l Title and chapter: Video and audio programs stored on DVD video discs are
divided into sections by title and chapter.
l Title: The largest unit of the video and audio programs stored on DVD video discs.
Usually, one piece of a movie, one album, or one audio program is assigned as a
title.
l Chapter: A unit smaller than a title. A title comprises multiple chapters.
n Audio
Manufactured under license from Dolby Laboratories. "Dolby", "Pro Logic",
and are trademarks of Dolby
1992-1997 Dolby
©
Laboratories. All rights reserved.
©
Laboratories. Confidential unpublished works.
"dts" is a trademark of Digital Theater Systems, Inc.
3
Interior features
221
Page 56
3-3. Using the rear audio system
Using the DVD player (video CD)
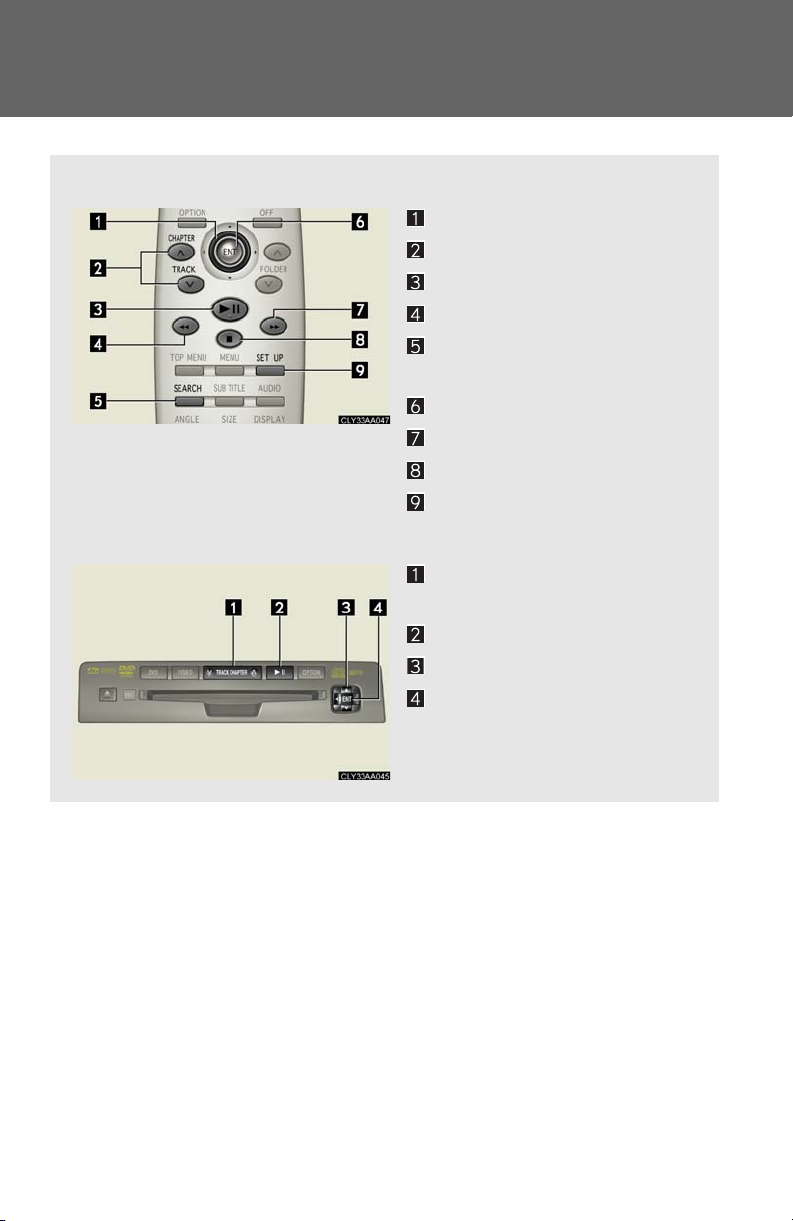
n Remote control
Selecting a switch
Selecting a chapter
Playing/pausing a screen
Reversing a screen
Displaying operation
switches
Inputting the selected switch
Fast forwarding a screen
Stopping a screen
Changing the initial setting
n Unit
Skipping to the desired chapter
Playing/pausing a screen
Selecting a switch
Inputting the selected switch
222
Page 57
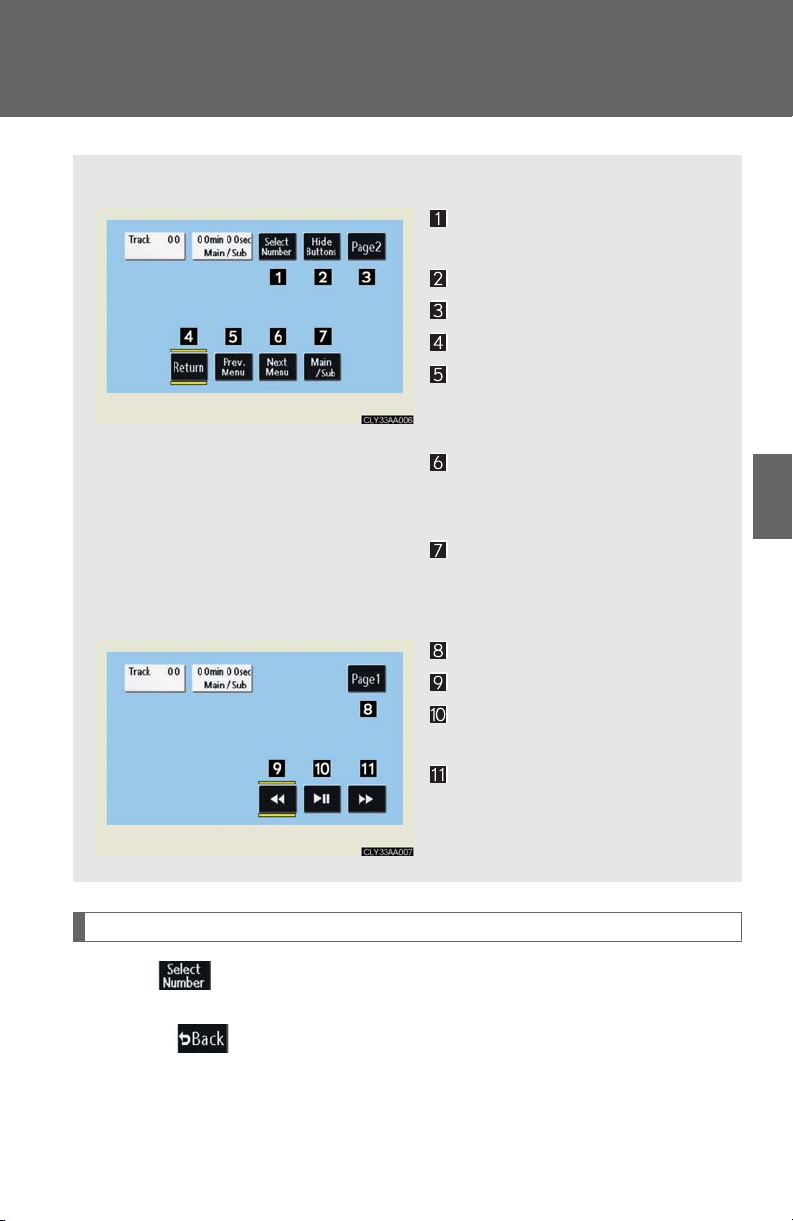
n Display (page 1)
n Display (page 2)
3-3. Using the rear audio system
Selecting a disc menu number
Turning off the menu screen
Displaying page 2
Turning on the disc menu
Returning to the previous
page screen (with the disc
menu displayed)
Proceeding to the next page
screen (with the disc menu
displayed)
Changing to a multiplex
transmission
3
Interior features
Displaying page 1
Reversing a screen
Pausing the disc/canceling
the pause
Fast forwarding a screen
Selecting a disc menu number
Select to display the disc menu number search screen.
Select the disc menu number, and press ENT to input it. Select to return to the previous screen.
223
Page 58
3-3. Using the rear audio system
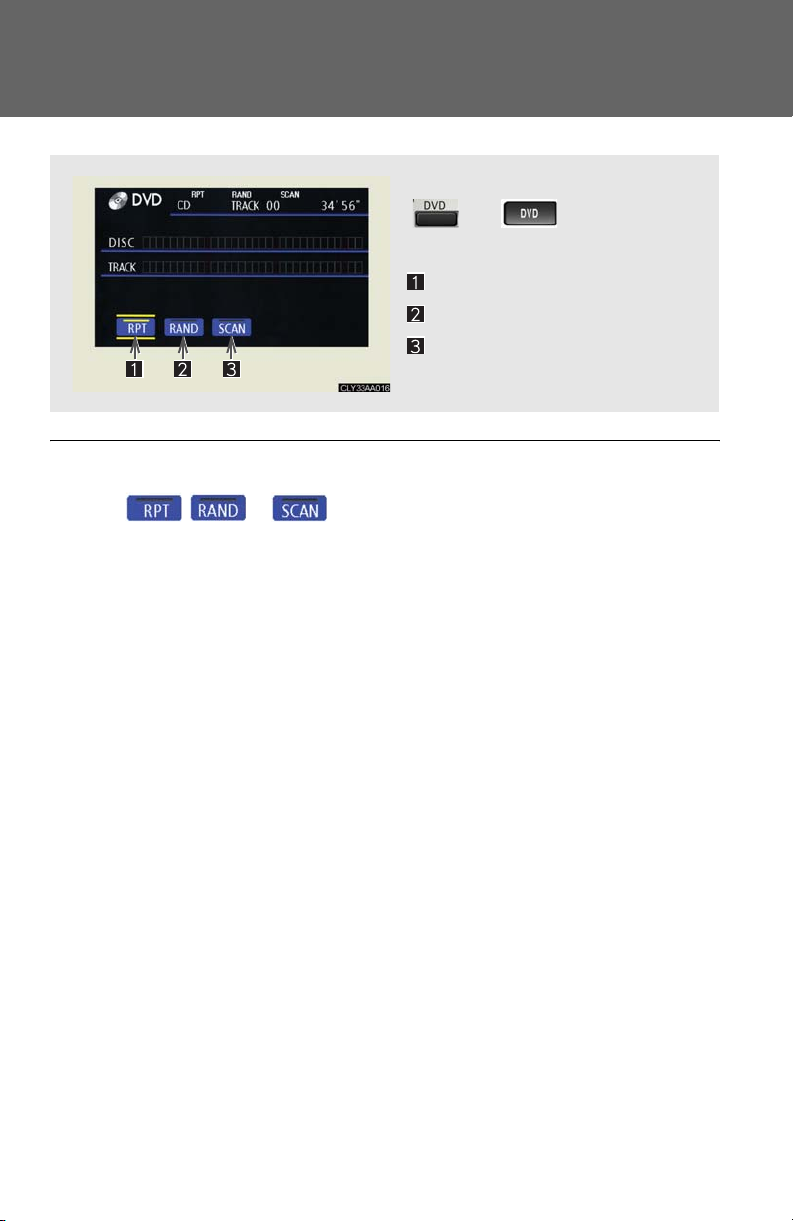
Using the DVD player (audio CD/ CD text)
Using the control screen, press
or to display the
control screen.
Repeat play
Random playback
Search playback
n Canceling random, repeat and scan play
Select , or again.
224
Page 59
3-3. Using the rear audio system
Using the DVD player (MP3 discs)
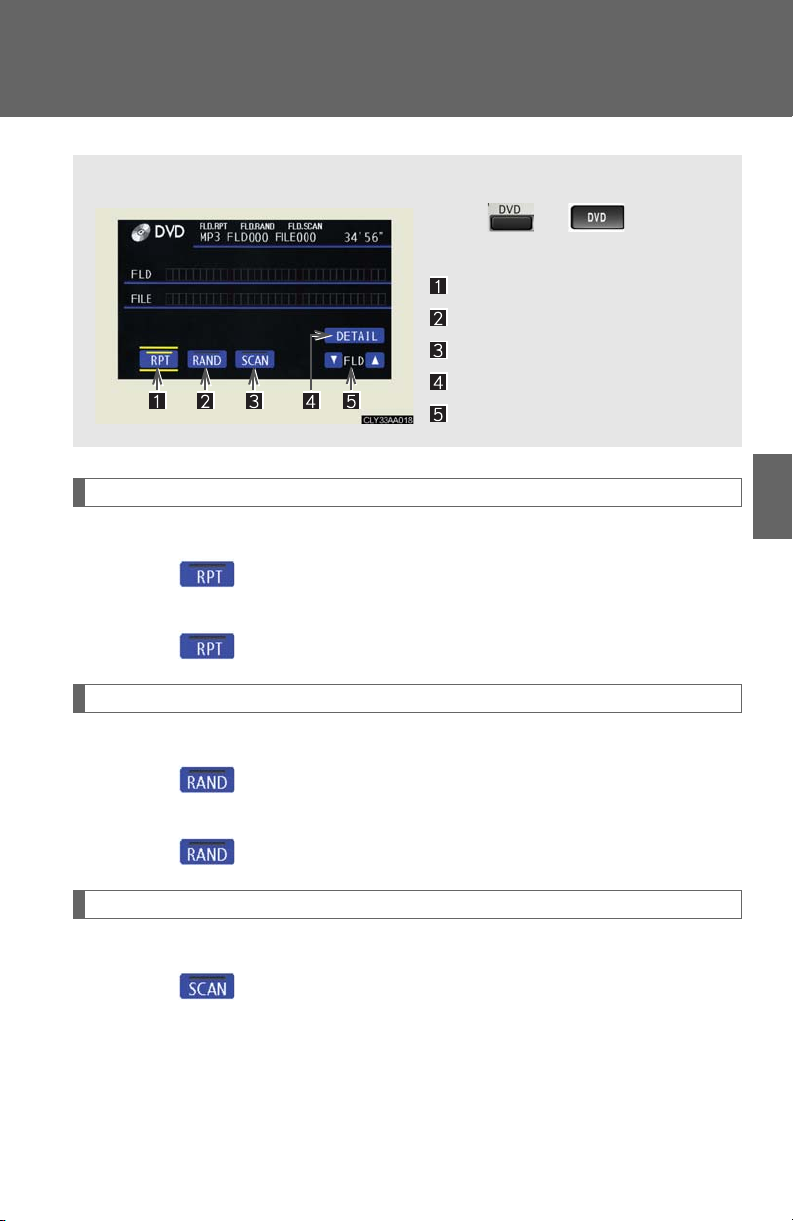
n Using the control screen
Press or to display
the control screen.
Repeat play
Random playback
Search playback
Displaying file information
Selecting folder
Repeat play
n Repeat a file
Select .
n Repeat all of files in a folder
Select , and press and hold ENT on the remote control.
Random playback
n Playing files from a particular folder in random order
Select .
n Playing all of the files on a disc in random order
Select , and press and hold ENT on the remote control.
Search playback
n Selecting the desired file by cueing the files in the folder
Select . The player will scan all the files in the folder. Each file will be played for 10 seconds.
3
Interior features
225
Page 60
3-3. Using the rear audio system
n Selecting the desired file by cueing the folders on the disc
Select , and press and hold ENT the remote control. The player will scan all the folders on the disc. The first file in each folder will be played for 10 seconds.
n Canceling random, repeat and play back
Select , or again.
226
Page 61
3-3. Using the rear audio system
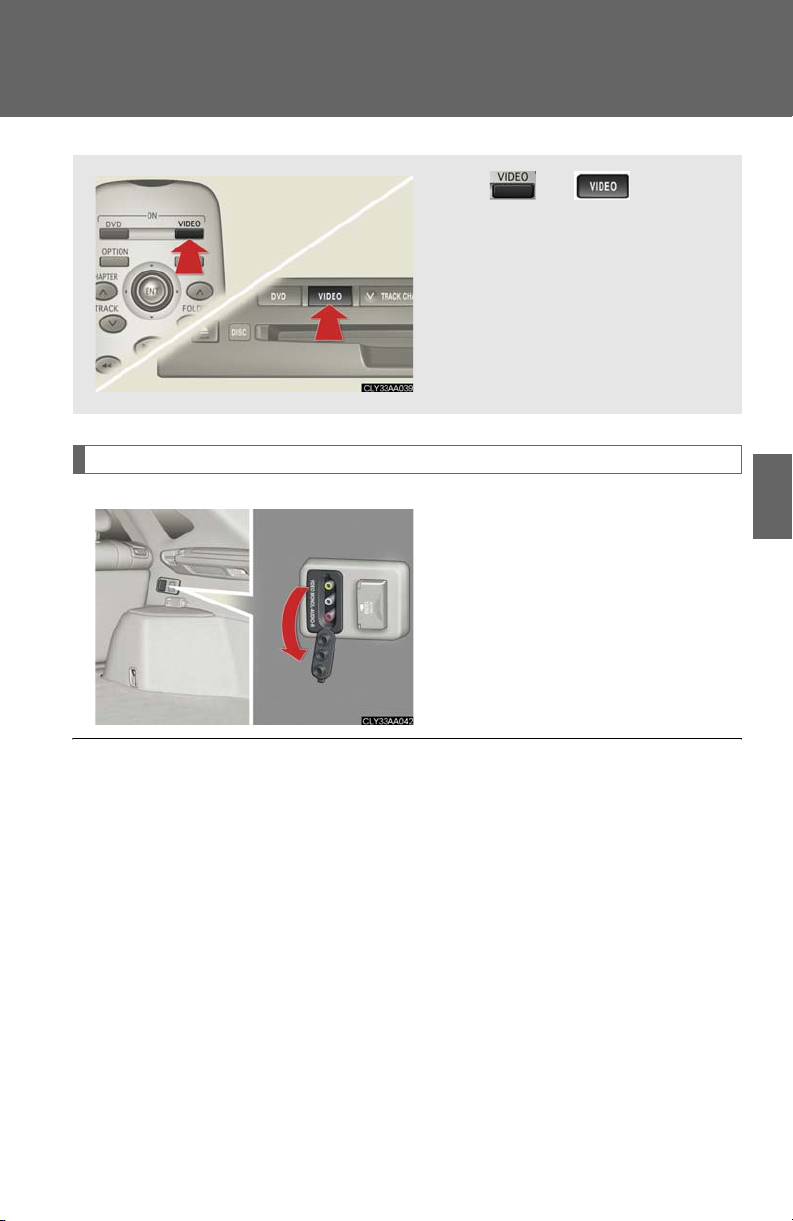
Using the video mode
Using the adapter
Press or to select
the video mode.
Before switching to the video
mode, connect the audio
machine to the input terminal
adapter.
Open the cover.
The A/V input adapter is composed of 3 input adapters.
Yellow: Image input adapter
3
Interior features
White: Audio input adapter
Red: Audio input adapter
n A/V input adapter
The rear seat entertainment system plays videos and sound when audio-video
equipment is connected to the A/V input adapter. For details, refer to the manufacturer's instructions.
n Po wer out let
The power outlet is used to connect the audio device. (→P. 25 2)
227
Page 62
3-3. Using the rear audio system
NOTICE
n When the A/V input adapter is not in use
Keep the A/V input adapter cover closed. Inserting anything other than an appropriate plug may cause electrical failure or short circuit.
228
Page 63
3-3. Using the rear audio system
Changing the initial setting
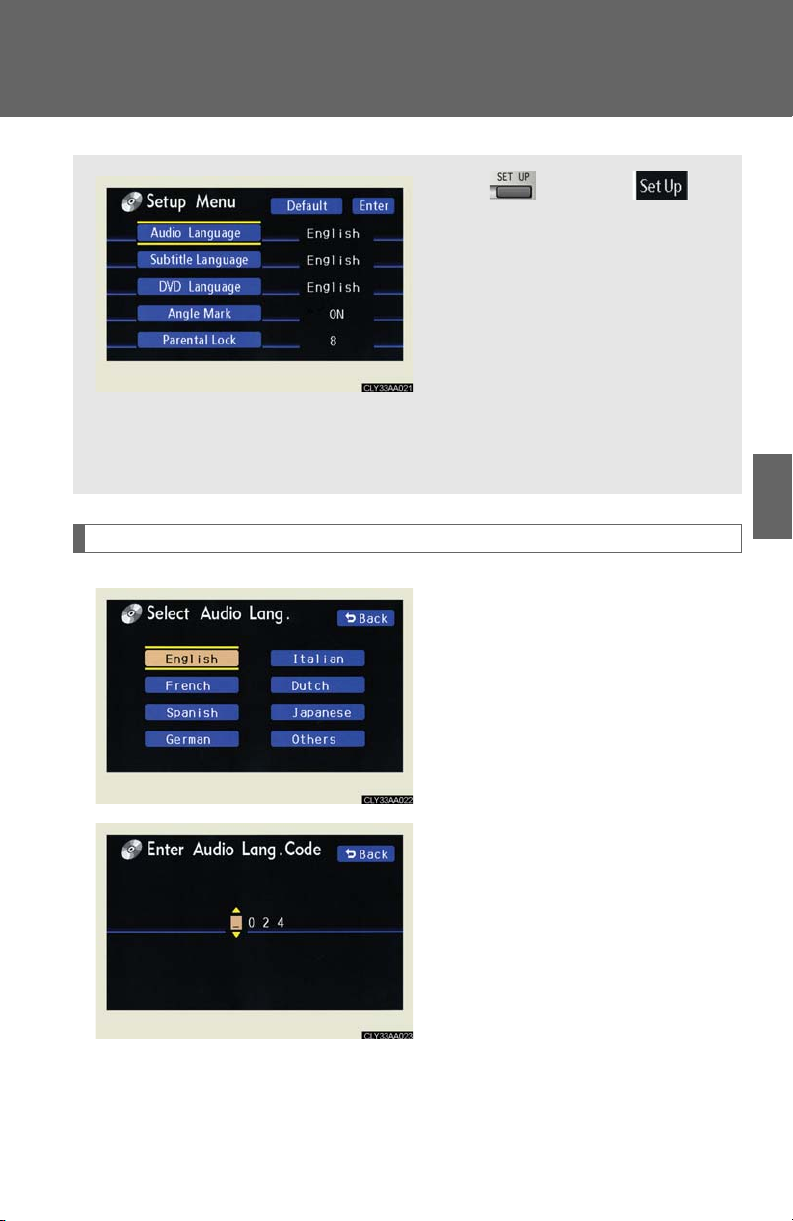
Press or select to
display the initial setting screen.
The following initialization can
be changed here.
Audio language
Subtitle language
DVD language
Angle mark
Parental lock
3
Changing the audio language
Interior features
Select "Audio Language".
Select the language you want to
hear, and press ENT to input it.
Select “Others” if you cannot find
the language you want to hear.
Enter the appropriate 4-digit language code. Select a number, and
press ENT to input it.
Language code list (→P. 2 33)
If a code that is not in the list is
entered, Incorrect Code will
appear on the screen.
229
Page 64
3-3. Using the rear audio system
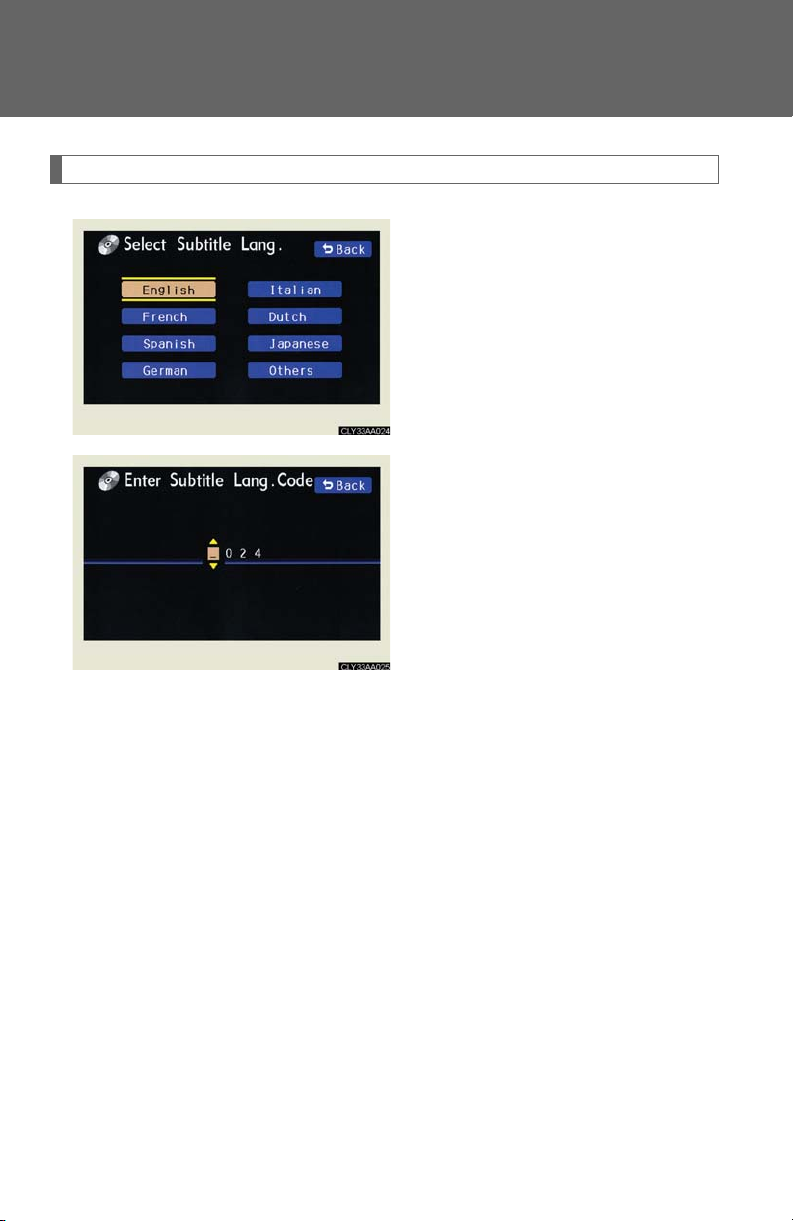
Changing the subtitle language
Select “Subtitle Language”.
Select the language you want to
read, and press ENT to input it.
Select “Others” if you cannot find
the language you want to read.
Enter the appropriate 4-digit language code. Select a number, and
press ENT to input it.
Language code list (→P. 2 33)
If a code that is not in the list is
entered, Incorrect Code will
appear on the screen.
230
Page 65
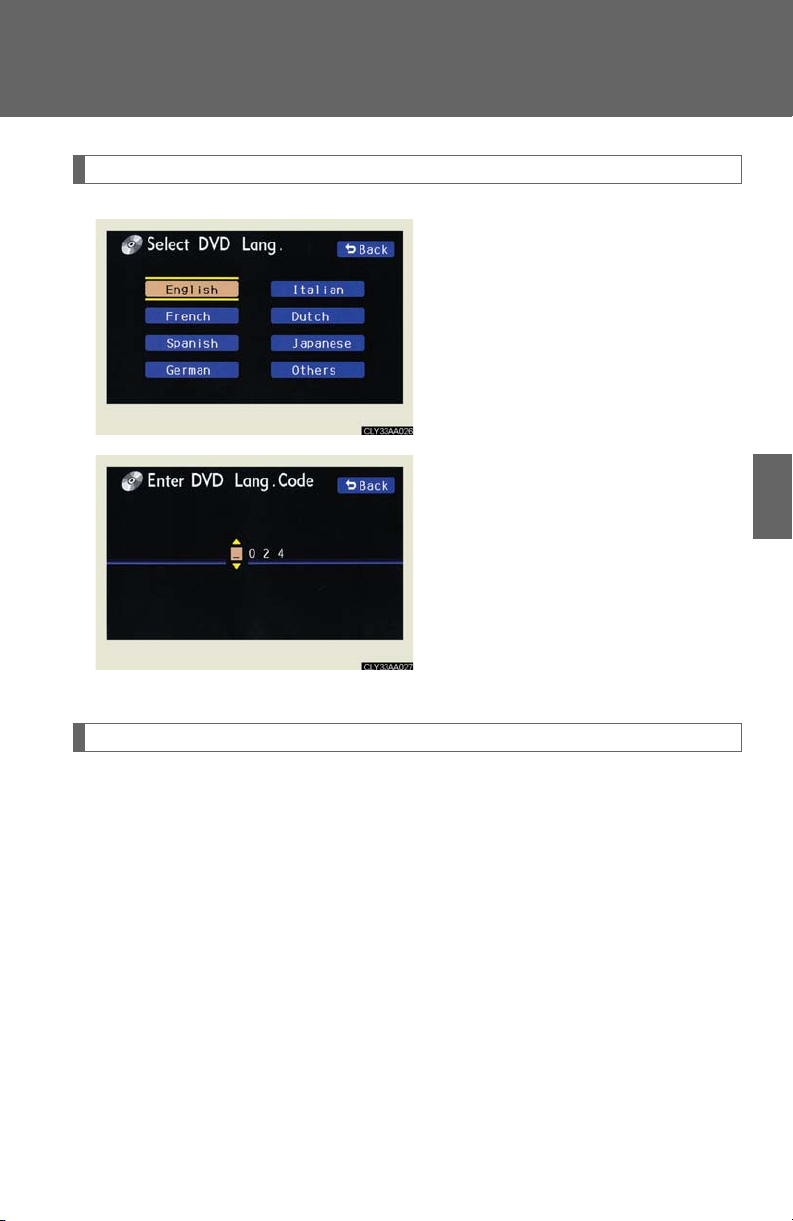
Changing the DVD language
3-3. Using the rear audio system
Select "DVD Language".
Select the language you want to
read and press ENT to input it.
Select “Others” if you cannot find
the language you want to read.
Enter the appropriate 4-digit language code. Select a number, and
press ENT to input it.
Language code list (→P. 2 33)
If a code that is not in the list is
entered, Incorrect Code will
appear on the screen.
3
Interior features
Turning on or off the angle mark
The angle mark can be turned on for discs that are multi-angle compatible.
Each time you press ENT when “Angle Mark” is selected, the angle mark turns on or off alternately.
231
Page 66
3-3. Using the rear audio system
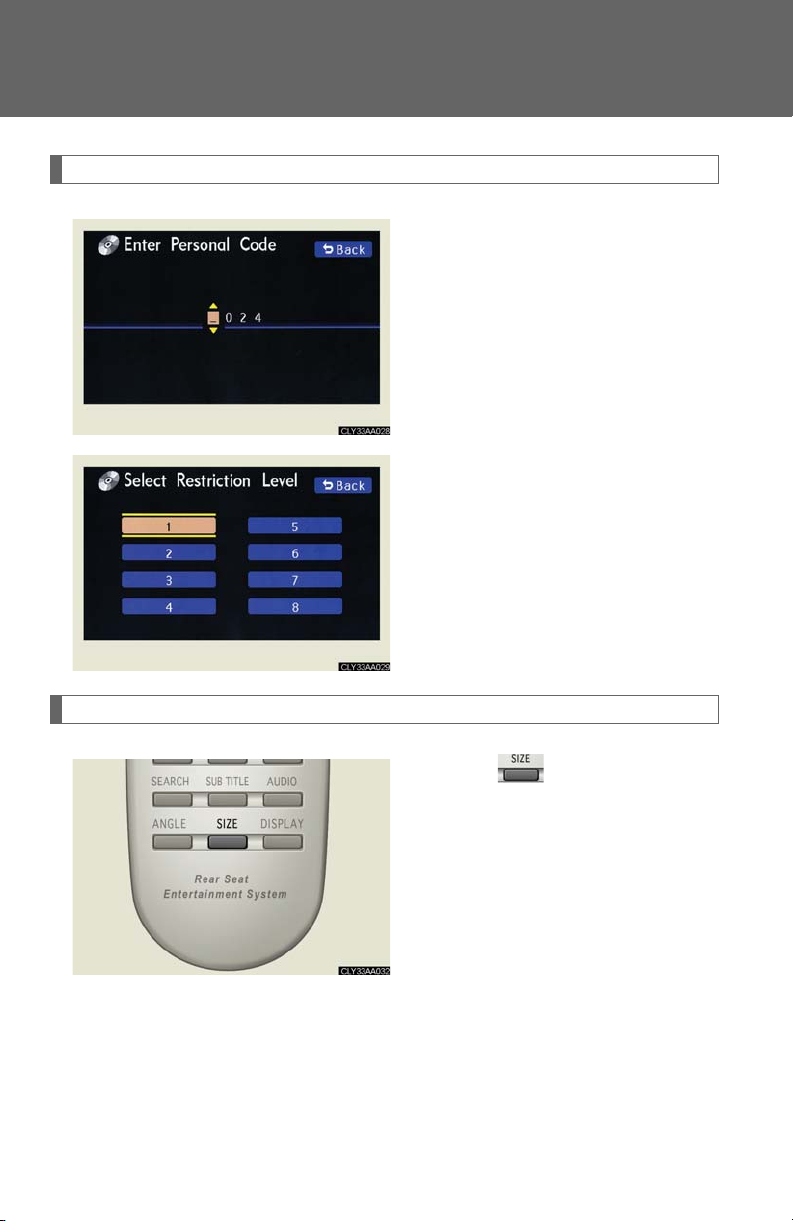
Setting viewer restriction levels
Setting a password allows the
viewer restriction to be effective.
Select "Parental Lock".
Enter the password and press ENT.
The setting cannot be changed
unless the password is entered.
When you forget the password, initialize the password. (→P. 233 )
Select a restriction level (1-8), and
press ENT. The smaller the level
number, the stricter the age limit.
Setting the display mode
232
Pressing changes the display modes sequentially as follows:
Normal→Wide 1 →Wide 2
Page 67
3-3. Using the rear audio system
n Returning to the previous screen
Select , and press ENT.
n To initialize the password
Press on the remote control or unit ten times when the screen to enter the personal code is displayed.
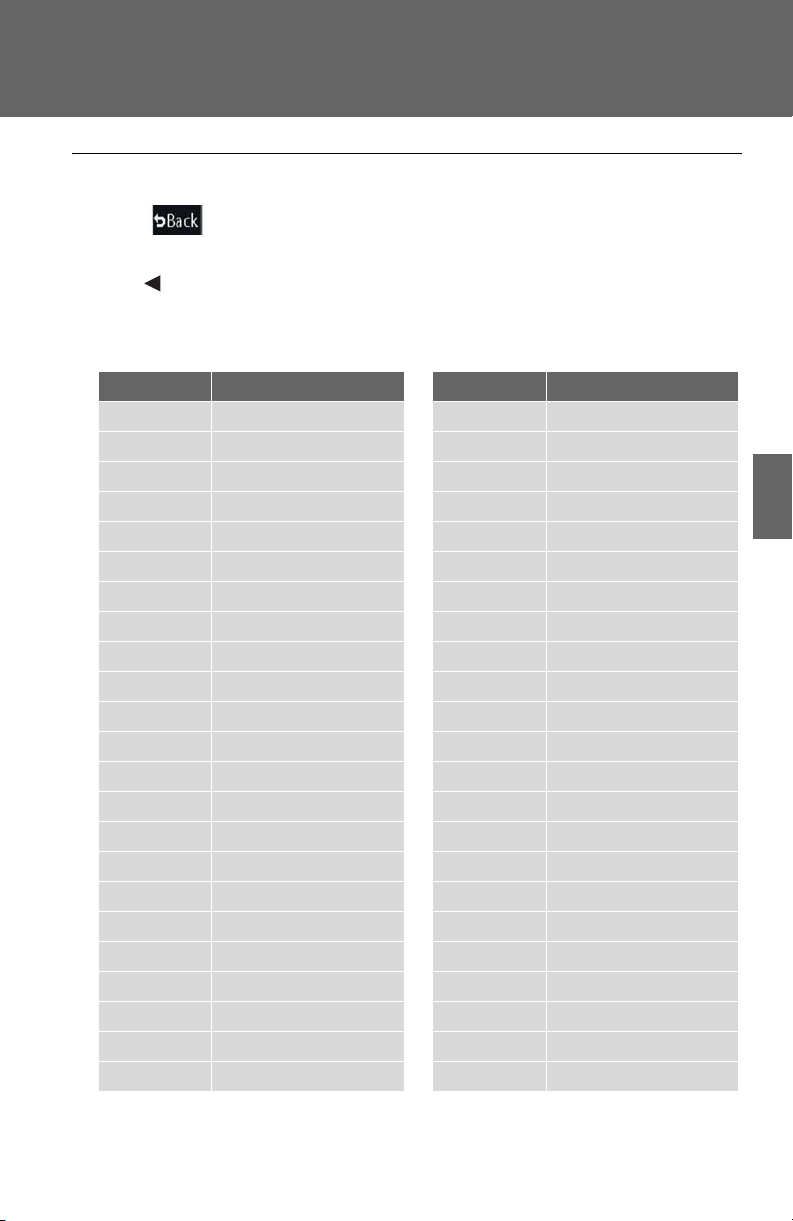
n Language code list
Code Language
1001 Japanese
0514 English
0618 French
0405 German
0920 Italian
0519 Spanish
2608 Chinese
1412 Dutch
1620 Portuguese
1922 Swedish
1821 Russian
1115 Korean
0512 Greek
0101 Afar
0102 Abkhazian
0106 Afrikaans
0113 Amharic
0118 Arabic
0119 Assamese
0125 Aym ar a
0126 Azerbaijani
0201 Bashkir
0205 Byelorussian
Code Language
0207 Bulgarian
0208 Bihari
0209 Bislama
0214 Bengali
0215 Ti b e t a n
0218 Breton
0301 Catalan
0315 Corsican
0319 Czech
0325 We l s h
0401 Danish
0426 Bhutani
0515 Esperanto
0520 Estonian
0521 Basque
0601 Pe rs i an
0609 Finnish
0610 Fiji
0615 Fa roe se
0625 Frisian
0701 Irish
0704 Scots-Gaelic
0712 Galician
3
Interior features
233
Page 68
3-3. Using the rear audio system
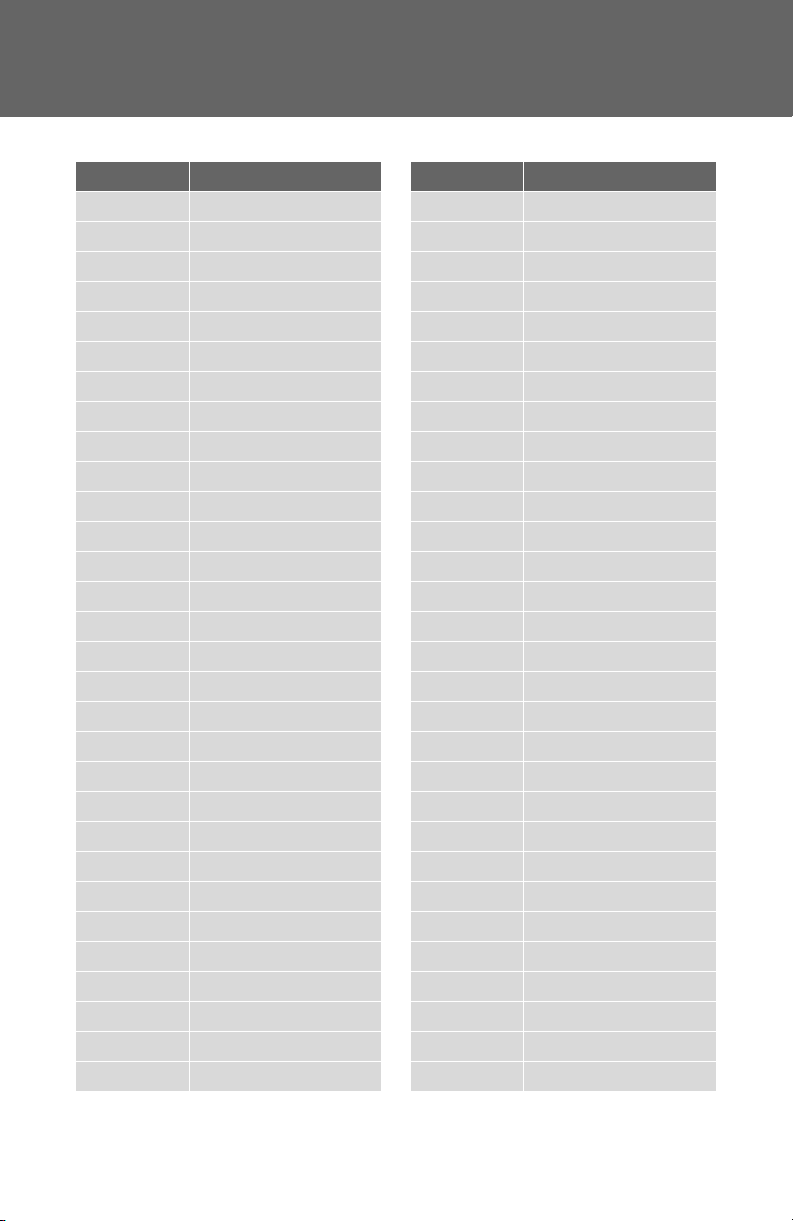
Code Language
0714 Guarani
0721 Gujarati
0801 Hausa
0809 Hindi
0818 Croatian
1821 Hungarian
1825 Armenian
0901 Interlingua
0905 Interlingue
0911 Inupiak
0914 Indonesian
0919 Icelandic
0923 Hebrew
1009 Yiddish
1023 Javanese
1101 Georgian
1111 Kazakh
1112 Greenlandic
1113 Cambodian
1114 Kannada
1119 Kashmiri
1121 Kurdish
1125 Kirghiz
1201 Latin
1214 Lingala
1215 Laothian
1220 Lithuanian
1222 Latvian
1307 Malagasy
1309 Maori
Code Language
1311 Macedonian
1312 Malayalam
1314 Mongolian
1315 Moldavian
1318 Marathi
1319 Malay
1320 Maltese
1325 Burmese
1401 Nauru
1405 Nepali
1415 Norwegian
1503 Occitan
1513 (Afan) Oromo
1518 Oriya
1601 Punjabi
1612 Po li sh
1619 Pashto, Pushto
1721 Quechua
1813 Rhaeto-Romance
1814 Kirundi
1815 Romanian
1823 Kinyarwanda
1901 Sanskrit
1904 Sindhi
1907 Sangho
1908 Serbo-Croatian
1909 Sinhalese
1911 Slovak
1912 Slovenian
1913 Samoan
234
Page 69
3-3. Using the rear audio system
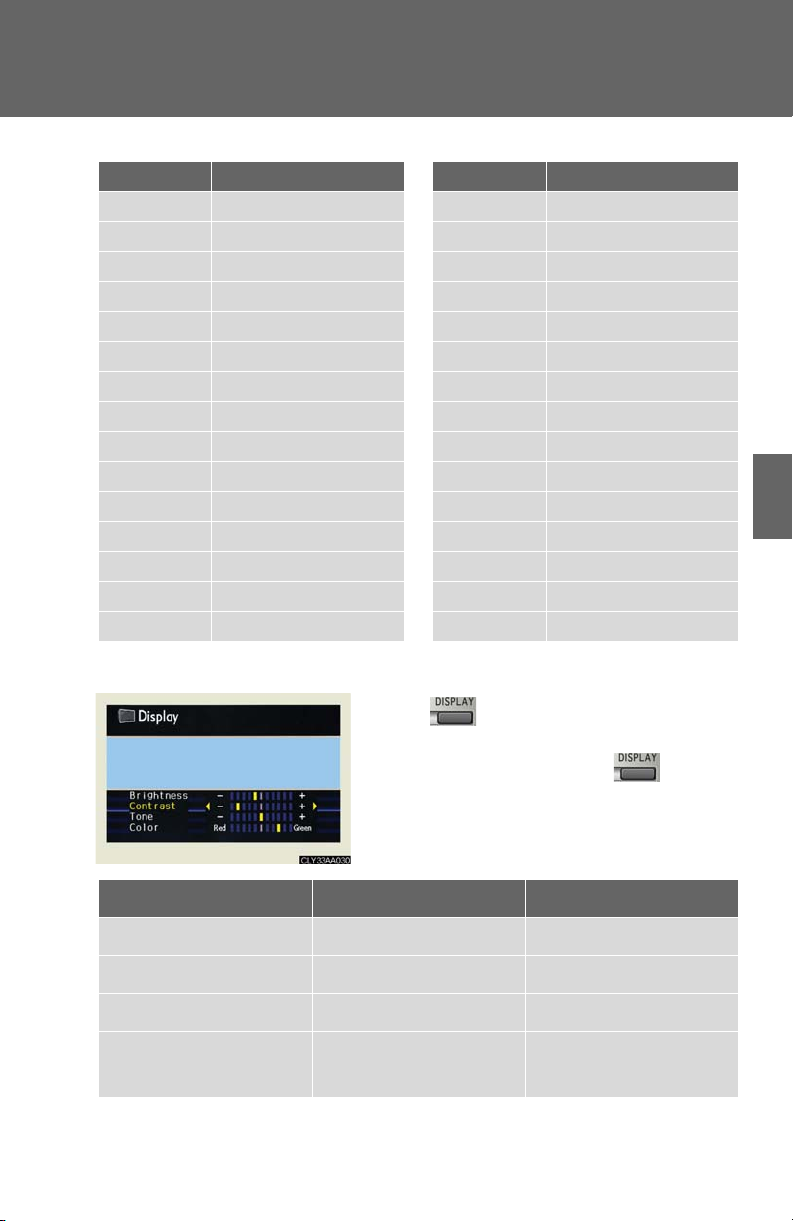
Code Language
1914 Shona
1915 Somali
1917 Albanian
1918 Serbian
1919 Siswati
1920 Sesotho
1921 Sundanese
1923 Swahili
2001 Ta mi l
2005 Te l u g u
2007 Ta j i k
2008 Thai
2009 Ti g r i n y a
2011 Tu r k m e n
2012 Ta g a l o g
n Adjusting the screen
Code Language
2014 Setswana
2015 To n g a
2018 Tu r k i s h
2019 Ts o n g a
2020 Ta t a r
2023 Tw i
2111 Ukrainian
2118 Urdu
2126 Uzbek
2209 Viet name se
2215 Vo l a p ü k
2315 Wo l o f
240 8 Xhosa
2515 Yo r u b a
2621 Zulu
Press .
Select the brightness, contrast, tone or color, and make adjustments. Press or ENT to input it.
3
Interior features
- or Red + or Green
Brightness Darkens Brightens
Contrast Weakens the contrast Strengthens the contrast
To n e Weakens the tone Strengthens the tone
Color
Strengthens the red
color
Strengthens the green
color
235
Page 70
3-2. Using the front audio system
Audio system type (without navigation system)
Owners of models equipped with a navigation system should refer to the “Navigation System Owner's Manual”.
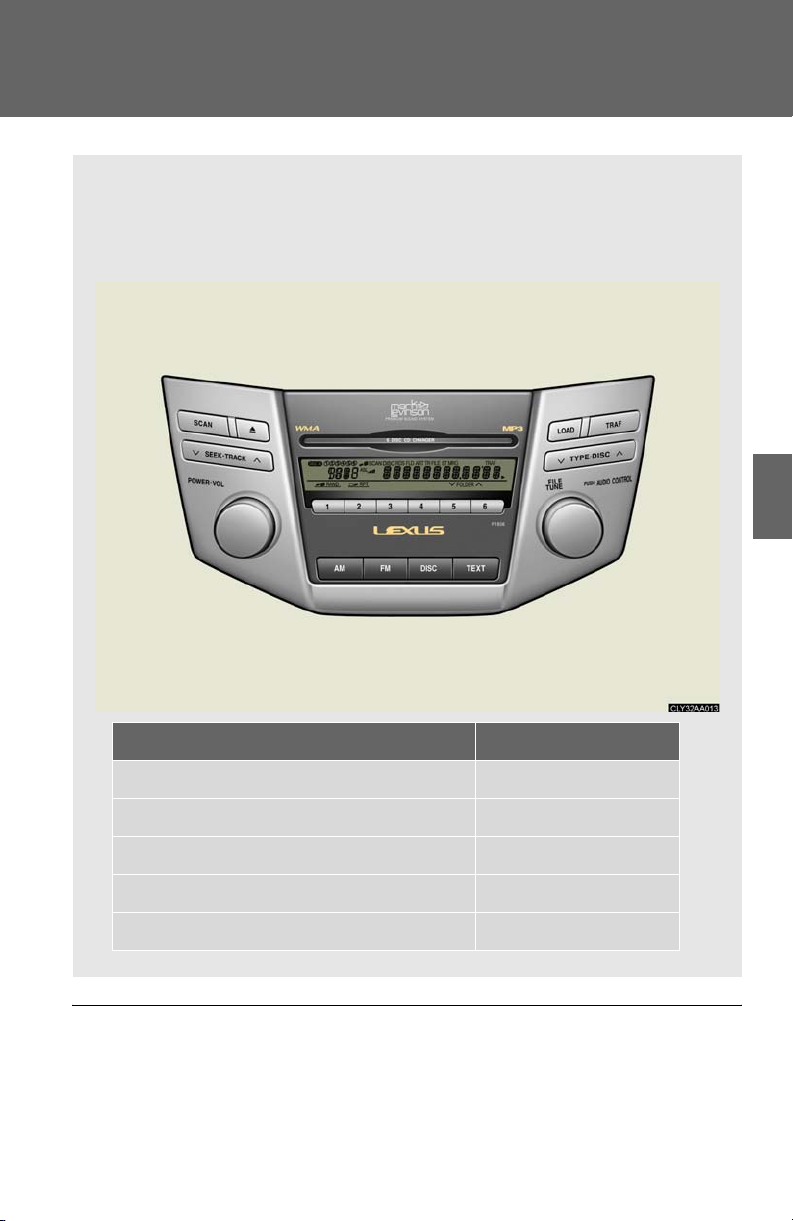
CD player with changer and AM/FM radio
3
Interior features
Ti t l e Pa g e
Using the radio P. 18 3
Using the CD player P. 1 90
Playing back MP3 and WMA discs P. 1 96
Optimal use of the audio system P. 2 04
Using the steering wheel audio switches P. 2 07
n Using cellular phones
Interference may be heard through the audio system’s speakers if a cellular phone is being used inside or close to the vehicle while the audio system is operating.
181
Page 71
3-2. Using the front audio system
CAUTIO N
n For vehicles sold in U.S.A. and Canada
l Par t 15 of the FCC Rules
FCC Warning: Any unauthorized changes or modifications to this equipment will void the user’s authority to operate this device.
l Laser products
• Do not take this unit apart or attempt to make any changes yourself.
This is an intricate unit that uses a laser pickup to retrieve information from the
surface of compact discs. The laser is carefully shielded so that its rays remain
inside the cabinet. Therefore, never try to disassemble the player or alter any of
its parts since you may be exposed to laser rays and dangerous voltages.
• This product utilizes a laser.
Use of controls or adjustments or performance of procedures other than those
specified herein may result in hazardous radiation exposure.
NOTICE
n To prevent battery discharge
Do not leave the audio system on longer than necessary with the engine off.
n To avoid damaging the audio system
Take care not to spill drinks or other fluids over the audio system.
182
Page 72
3-2. Using the front audio system
Using the radio
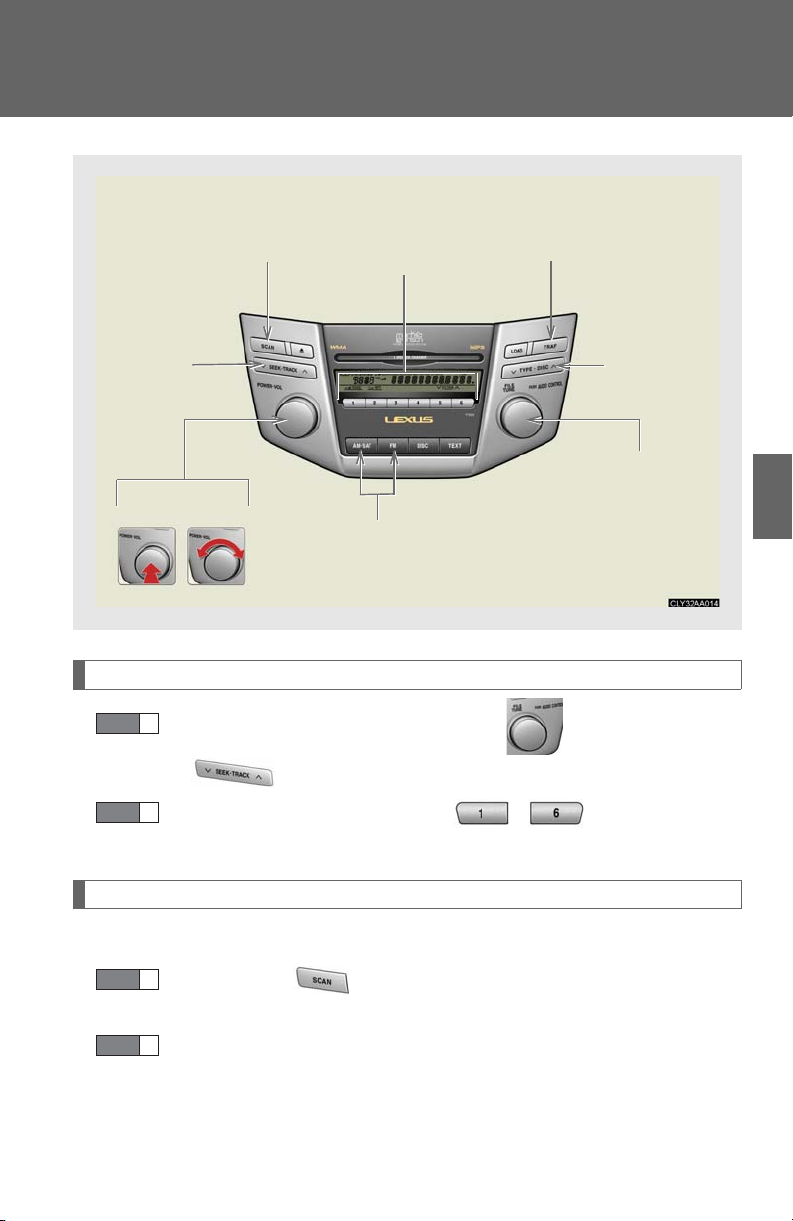
Scan for
receivable stations
Seeking the
frequency
Pow e r Vol u me
Station
selector
AM⋅SAT/FM
mode buttons
Seeking any traffic
program station
Adjusting the frequency
(AM, FM mode) or
channel (SAT mode)
Setting station presets (excluding XM® satellite radio)
STEP 1
Search for desired stations by turning or pressing ∧ or ∨
on .
Changing the
program
types
3
Interior features
STEP 2
Press and hold the button (from to ) the station is to be set to, and you hear a beep.
Scanning radio stations (excluding XM® satellite radio)
n Scanning the preset radio stations
STEP 1
STEP 2
Press and hold until you hear a beep.
Preset stations will be played for 5 seconds each.
When the desired station is reached, press the button once again.
183
Page 73
3-2. Using the front audio system
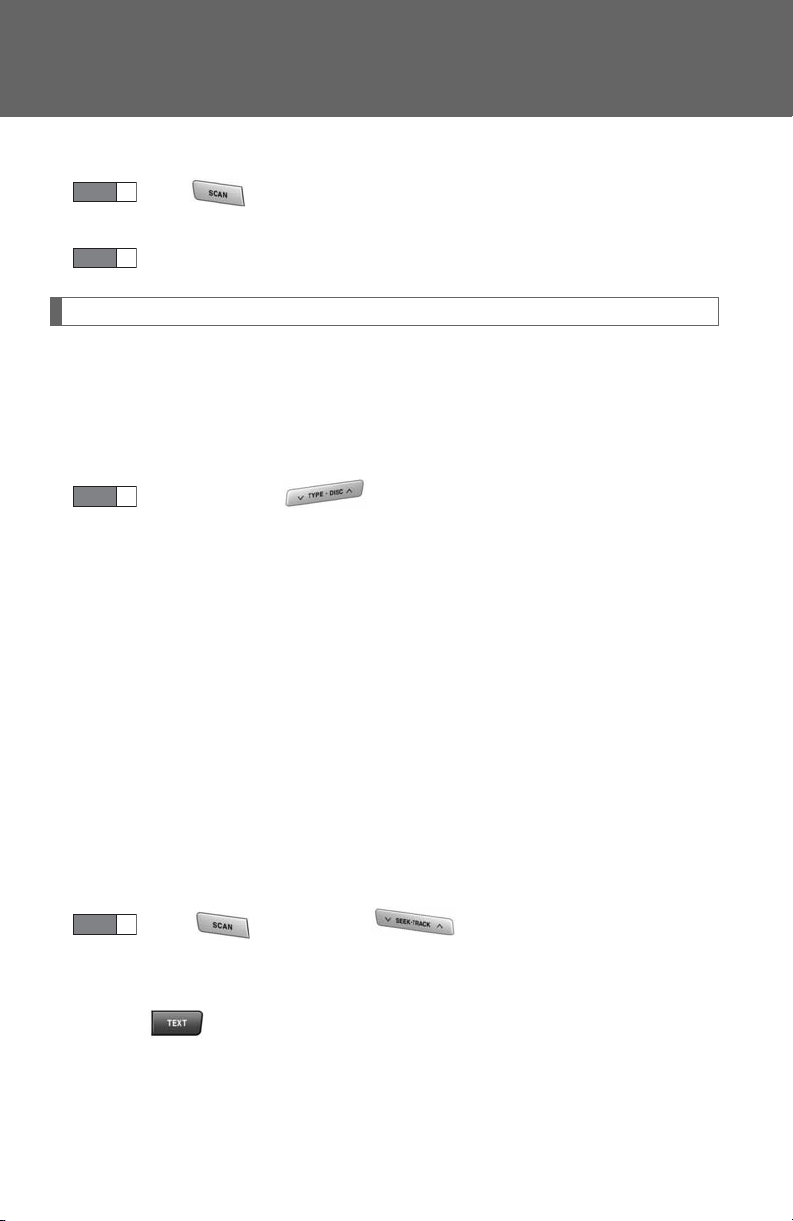
n Scanning all radio stations within range
STEP 1
Press .
All stations with reception will be played for 5 seconds each.
STEP 2
When the desired station is reached, press the button once again.
RDS (Radio Data System)
This feature allows your radio to receive station identification information and program information (classical, jazz, etc.) from radio stations which broadcast this information.
n Receiving RDS broadcasts
STEP 1
Press ∧ or ∨ on during FM reception.
The type of program changes each time the button is pressed.
l ROCK
l EASYLIS (Easy listening)
l CLS/JAZZ (Classical music and Jazz)
l R & B (Rhythm and Blues)
l INFORM (Information)
l RELIGION
l MISC (Miscellaneous)
l ALERT (Emergency messages)
If the system receives no RDS stations, NO PTY appears on the display.
STEP 2
Press , or ∧ or ∨ on .
The radio seeks or scans the station by the relevant program type.
n Displaying radio station names
Press .
184
Page 74
3-2. Using the front audio system
n Displaying radio text messages
Press twice.
If MSG is shown on the display, a text message will be displayed.
If the text continues past the end of the display, is displayed. Press and hold until you hear a beep.
XM® satellite radio (if equipped)
n Receiving XM® satellite radio
STEP 1
Press until SAT is shown on the display.
The display changes as follows each time the button is pressed.
AM → SAT1 → SAT2 → SAT3
STEP 2
Turn to select the desired channel in the all categories or
press ∧ or ∨ on to select the desired channel in the current category.
®
n Setting XM
satellite radio channel presets
Select the desired channel. Press and hold the button (from to
) the channel is to be set to, and you hear a beep.
n Changing the channel category
Press ∧ or ∨ on .
n Scanning XM
®
satellite radio channels
l Scanning channels in the current category
STEP 1
STEP 2
Press .
When the desired channel is reached, press the button
again.
3
Interior features
185
Page 75
3-2. Using the front audio system
l Scanning preset channels
STEP 1
STEP 2
Press and hold until you hear a beep.
When the desired channel is reached, press the button
again.
n Displaying text information
Press .
The display will show up to 10 characters.
The display changes as follows each time the button is pressed.
l CH NAME
l TITLE (SONG/PROGRAM TITLE)
l NAME (ARTIST NAME/FEATURE)
l CH NUMBER
186
Page 76
3-2. Using the front audio system
n When the battery is disconnected
Station presets are erased.
n Radio antenna type
l Detachable antenna
To remove a detachable antenna, carefully turn it counterclockwise.
l Wire antenna
The radio antenna is mounted inside the rear window.
n Reception sensitivity
l Maintaining perfect radio reception at all times is difficult due to the continually
changing position of the antenna, differences in signal strength and surrounding
objects, such as trains, transmitters, etc.
l To maintain clear radio reception, do not attach metallic window tinting or other
metallic objects to the antenna wire mounted inside the rear window.
n Receiving XM
The optional Lexus genuine satellite radio tuner and antenna allows you to receive
and play XM
Hawaii and Alaska.)
®
l XM
For detailed information about XM
the web at www.xmradio.com
l Radio ID
You will need the radio ID when activating XM
®
satellite radio
®
satellite radio broadcasts. (Subscription is required. Not available in
*
subscriptions
®
satellite radio or to subscribe, visit XM® on
or call (800) 967-2346.
®
service or reporting a problem.
3
Interior features
Select "CH000" using , and the receiver's 8-character ID number will
appear.
l Satellite tuner
The tuner supports only Audio Services (Music and Talk) and the accompanying
Tex t I nf or ma tio n of XM
*: Terms and services provided by XM
®
satellite radio.
®
Radio are subject to change without
notice.
187
Page 77
3-2. Using the front audio system
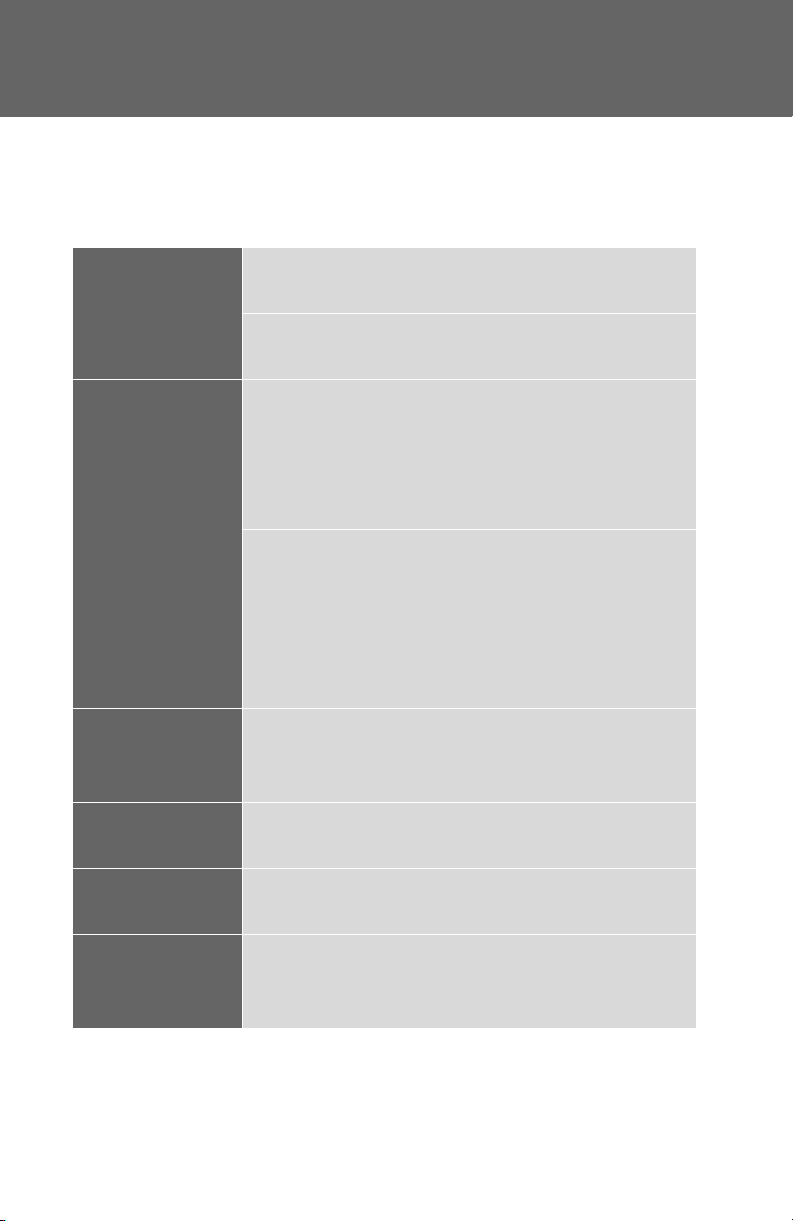
n If the satellite radio does not operate normally
If a problem occurs with the XM
to the table below to identify the problem, and take the suggested corrective action.
®
tuner, a message will appear on the display. Refer
ANTENNA
UPDATING
NO SIGNAL
LOAD ING
The XM® antenna is not connected. Check whether
the XM
®
antenna cable is attached securely.
There is a short-circuit in the antenna or the surrounding antenna cable. See a Lexus certified dealer.
You have not subscribed to the XM® satellite radio.
The radio is being updated with the latest encryption
code. Contact the XM
®
satellite radio for subscription
information. When a contract is canceled, you can
choose the "CH000" and all free-to-air channels.
The premium channel you selected is not authorized.
Wait for about 2 seconds until the radio returns to the
previous channel or "CH001". If it does not change
automatically, select another channel. If you want to listen to the premium channel, contact the XM
®
satellite
radio.
The XM® signal is too weak at the current location.
Wait until your vehicle reaches a location with a stronger signal.
The unit is acquiring audio or program information.
Wait until the unit has received the information.
188
OFF AIR
-----
The channel you selected is not broadcasting any programming. Select another channel.
There is no song/program title or artist name/feature
associated with the channel at that time. No action
needed.
Page 78

3-2. Using the front audio system
The channel you selected is no longer available. Wait
---
for about 2 seconds until the radio returns to the previous channel or "CH001". If it does not change automatically, select another channel.
Contact the XM® Listener Care Center at (800) 967-2346 during the following
hours
*.
Monday - Saturday: 6 a.m. - 2 a.m. Sunday: 8 a.m. - 8 p.m. Eastern Time
*: Subject to change without notice.
n Certifications for the radio tuner
This equipment has been tested and found to comply with the limits for a class B
digital device, pursuant to Part 15 of the FCC Rules. These limits are designed to
provide reasonable protection against harmful interference in a residential installation. This equipment generates, uses and can radiate radio frequency energy and, if
not installed and used in accordance with the instructions, may cause harmful interference to radio communications. However, there is no guarantee that interference
will not occur in a particular installation.
If this equipment does cause harmful interference to radio or television reception,
which can be determined by turning the equipment off and on, the user is encouraged to try to correct the interference by trying one or more of the following:
l Reorienting or relocate the receiving antenna.
l Increasing the separation between the equipment and receiver.
l Connecting the equipment into an outlet on a circuit different from that to which
the receiver is connected.
l Consulting the dealer or an experienced radio/TV technician for help.
3
Interior features
189
Page 79
3-2. Using the front audio system
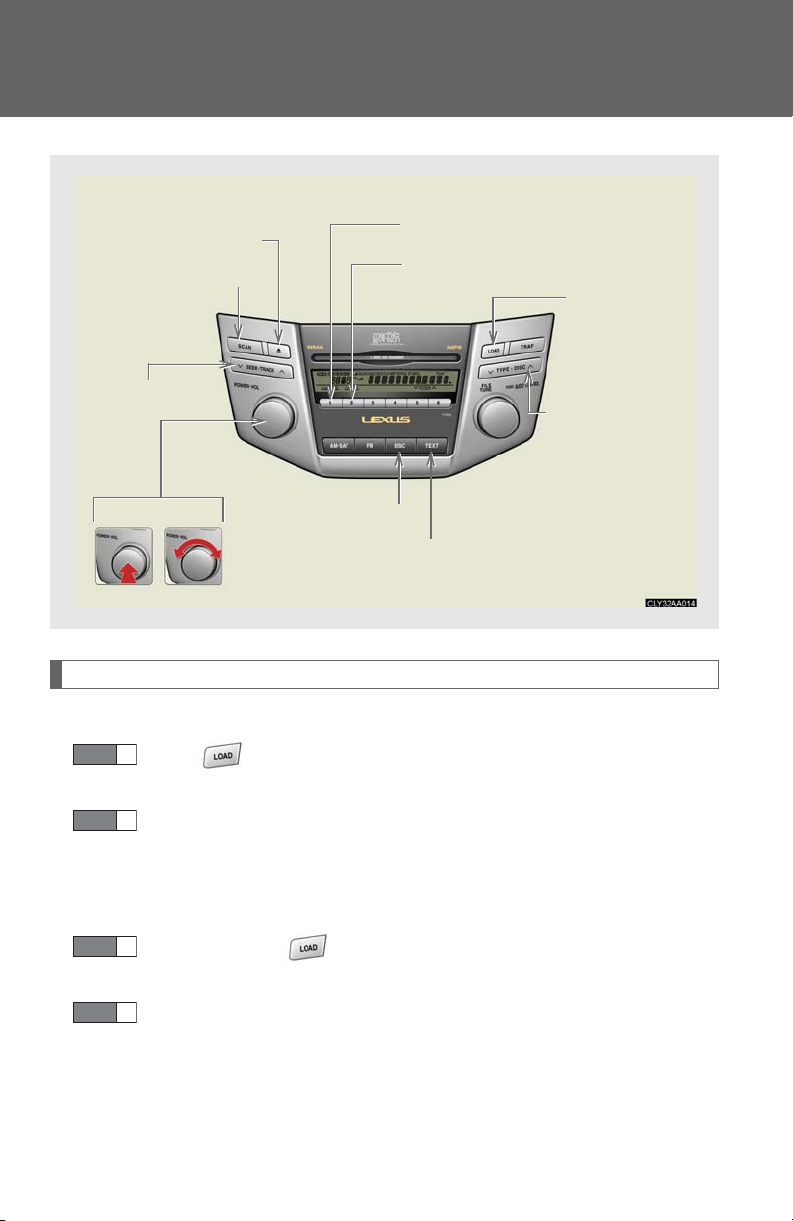
Using the CD player
CD eject
Search playback
Selecting a track
Pow e r Vol u me
Loading CDs
n Loading a CD
STEP 1
Press .
WAIT is shown on the display.
Random playback
Repeat play
CD insert
Selecting a CD
Playback
Displays text message
STEP 2
Insert a CD when the indicator on the slot turns from amber to green.
The display changes from WAIT to LOAD.
n Loading multiple CDs
STEP 1
STEP 2
Press and hold until you hear a beep.
WAIT is shown on the display.
Insert a CD when the indicator on the slot turns from amber to green.
The display changes from WAIT to LOAD.
The indicator on the slot turns to amber when the CD is inserted.
190
Page 80
3-2. Using the front audio system
STEP 3
Insert the next CD when the indicator on the slot turns from amber to green again.
Repeat the procedure for the remaining CDs.
To stop the operation, press .
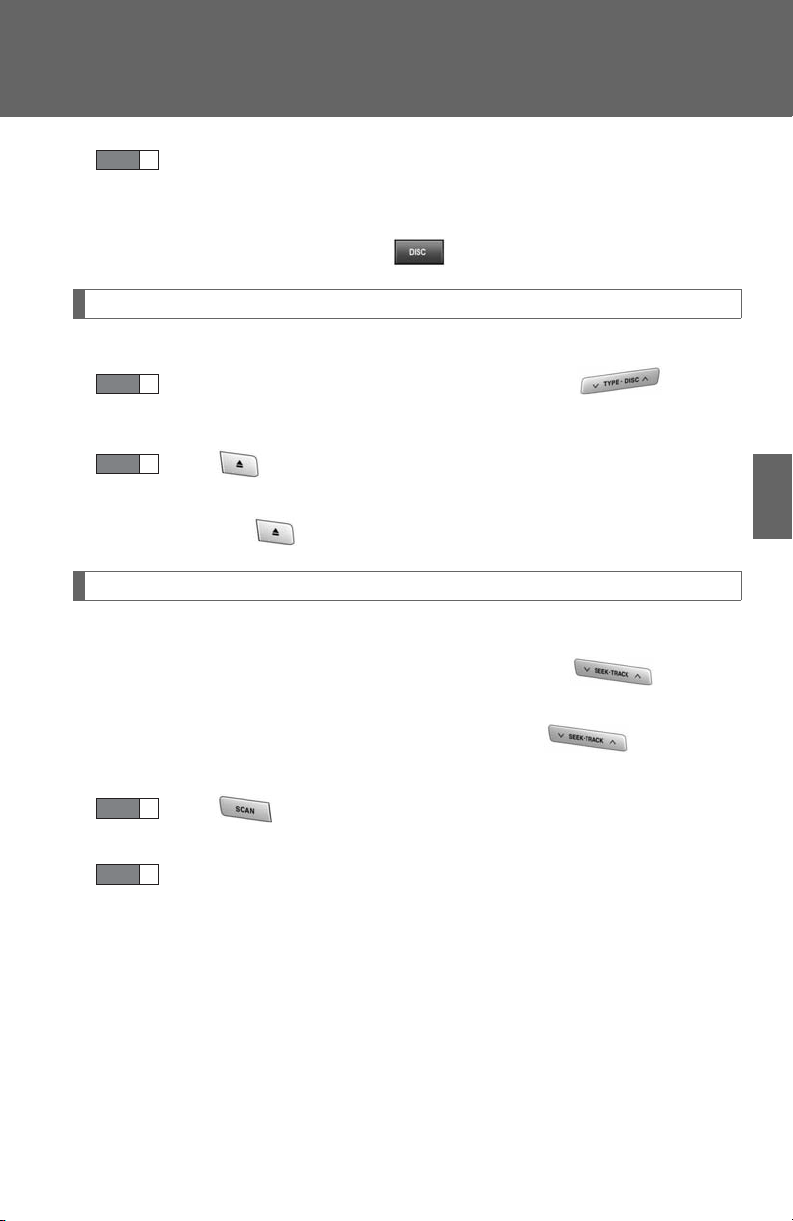
Ejecting CDs
n Ejecting a CD
STEP 1
To select the CD to be ejected, press ∧ or ∨ on .
The number of the CD selected is shown on the display.
STEP 2
Press and remove the CD.
n Ejecting all the CDs
Press and hold until you hear a beep, and then remove the CDs.
Selecting, fast-forwarding, rewind, and scanning tracks
n Selecting a track
Press ∧ to move up and ∨ to move down using until the
desired track number is displayed.
3
Interior features
To fast-forward or rewind, press and hold ∧ or ∨ on .
n Scanning a CD
STEP 1
STEP 2
Press .
The first ten seconds of each track will be played.
Press the switch again when the desired track is reached.
191
Page 81
3-2. Using the front audio system
Selecting a CD
n To select a CD to play
To select the desired CD, press ∧ or ∨ on .
n To scan loaded CDs
STEP 1
Press and hold until you hear a beep.
The first ten seconds of the first track on each CD will be played.
STEP 2
Press the button again when the desired CD is reached.
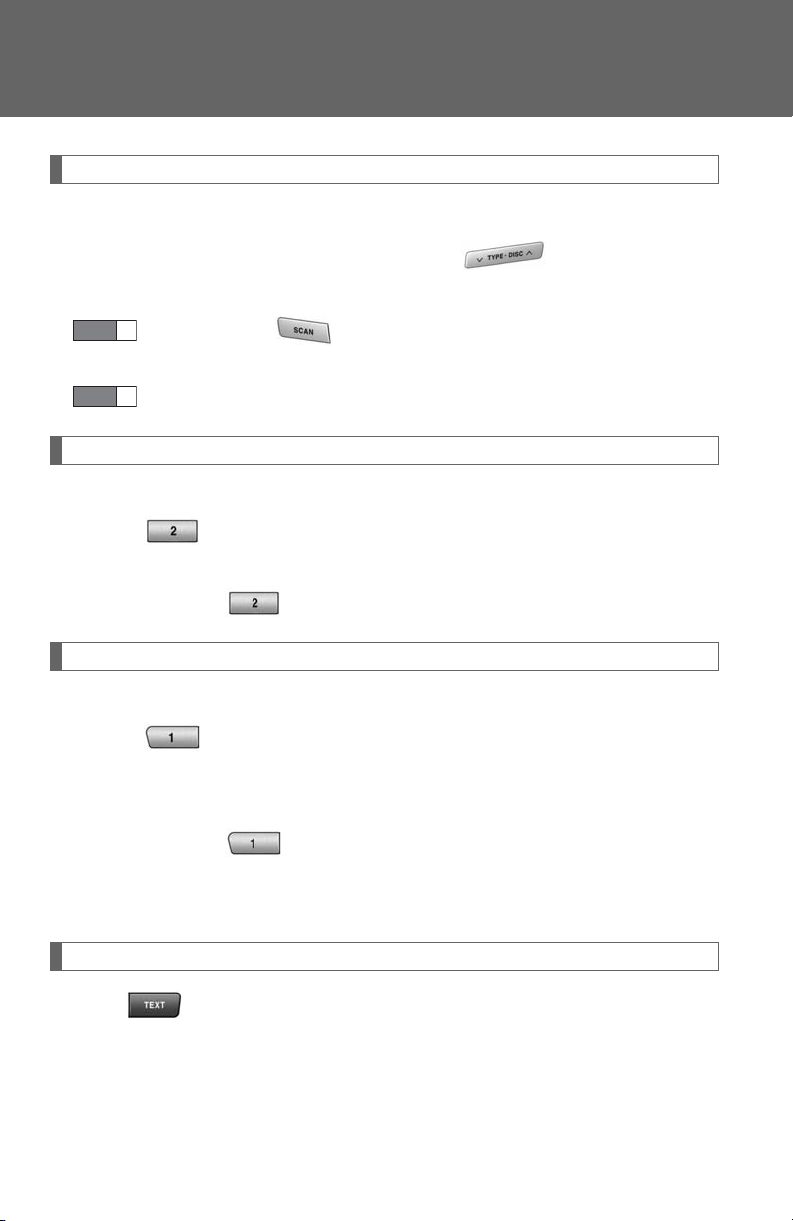
Repeat play
n To repeat a track
Press (RPT).
n To repeat all of the tracks on a CD
Press and hold (RPT) until you hear a beep.
Random playback
n Current CD
Press (RAND).
Tracks are played in random order until random playback is canceled.
n All CDs
Press and hold (RAND) until you hear a beep.
Tracks on all loaded CDs are played in a random order until the button is pressed once more.
Switching the display
Press .
Each time the button is pressed, the display changes in the order of Track no./
Elapsed time → CD title → Tra c k n am e.
192
Page 82
3-2. Using the front audio system
n Canceling random, repeat and scan playback
Press (RAND), (RPT), or again.
n When LOAD, ERROR or WAIT is shown on the display
LOAD: This indicates that the CD player has completed loading the CD.
ERROR: This indicates is a trouble either in the CD or inside the player. The CD
may be dirty, damaged, or inserted up-side down.
WAIT: Operation is stopped due to a high temperature inside the player. Wait for
a while and then press . Contact your Lexus dealer if the CD still
cannot be played back.
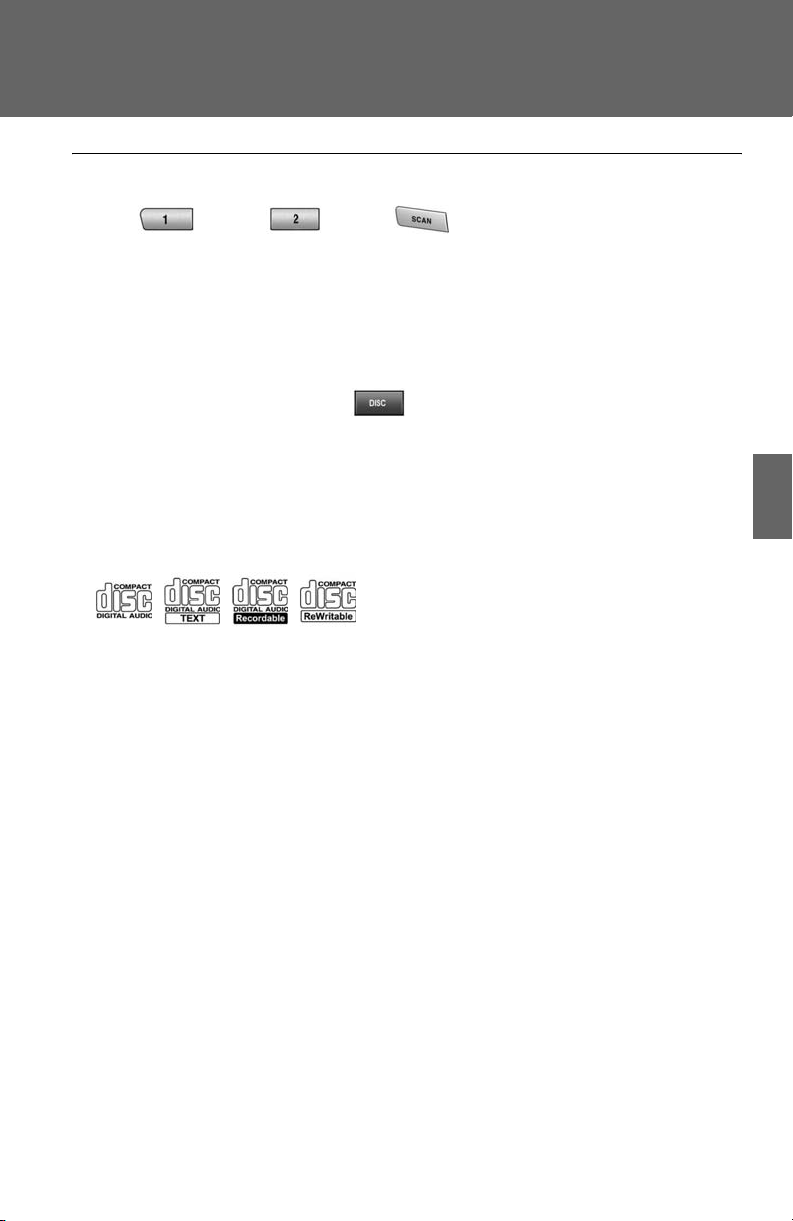
n Discs that can be used
Discs with the marks shown below can be used. Playback may not be possible depending on recording format or disc features, or due to scratches, dirt or deterioration.
3
Interior features
CDs with copy-protect features may not be used.
n CD player protection feature
To protect the internal components, playback is automatically stopped when a problem is detected.
n If CDs are left inside the CD player or in the ejected position for extended peri-
ods
CDs may be damaged and may not play properly.
n Lens cleaners
Do not use lens cleaners. Doing so may damage the CD player.
193
Page 83
3-2. Using the front audio system
NOTICE
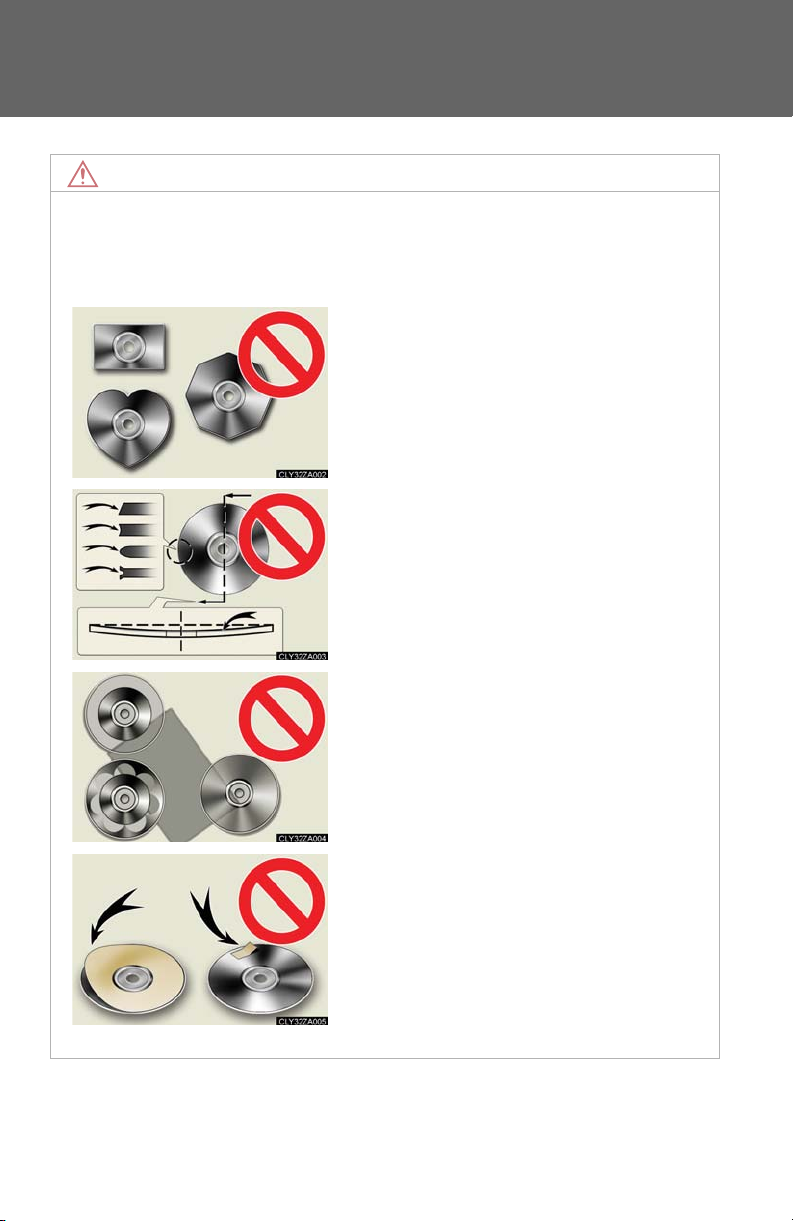
n CDs and adapters that cannot be used
Do not use the following types of CDs or 3 in. (8 cm) CD adapters. Doing so may damage the CD player and/or the CD insert/eject function.
l CDs that have a diameter that is not 4.7 in.
(12 cm).
l Low-quality and deformed CDs.
194
l CDs with a transparent or translucent
recording area.
l CDs that have had tape, stickers or CD-R
labels attached to them, or that have had
the label peeled off.
Page 84
3-2. Using the front audio system
NOTICE
n CD player precautions
Failure to follow the precautions below may result in serious damage to the CDs or the player itself.
l Do not insert anything other than CDs into the CD slot.
l Do not apply oil to the CD player.
l Store CDs away from direct sunlight.
l Never try to disassemble any part of the CD player.
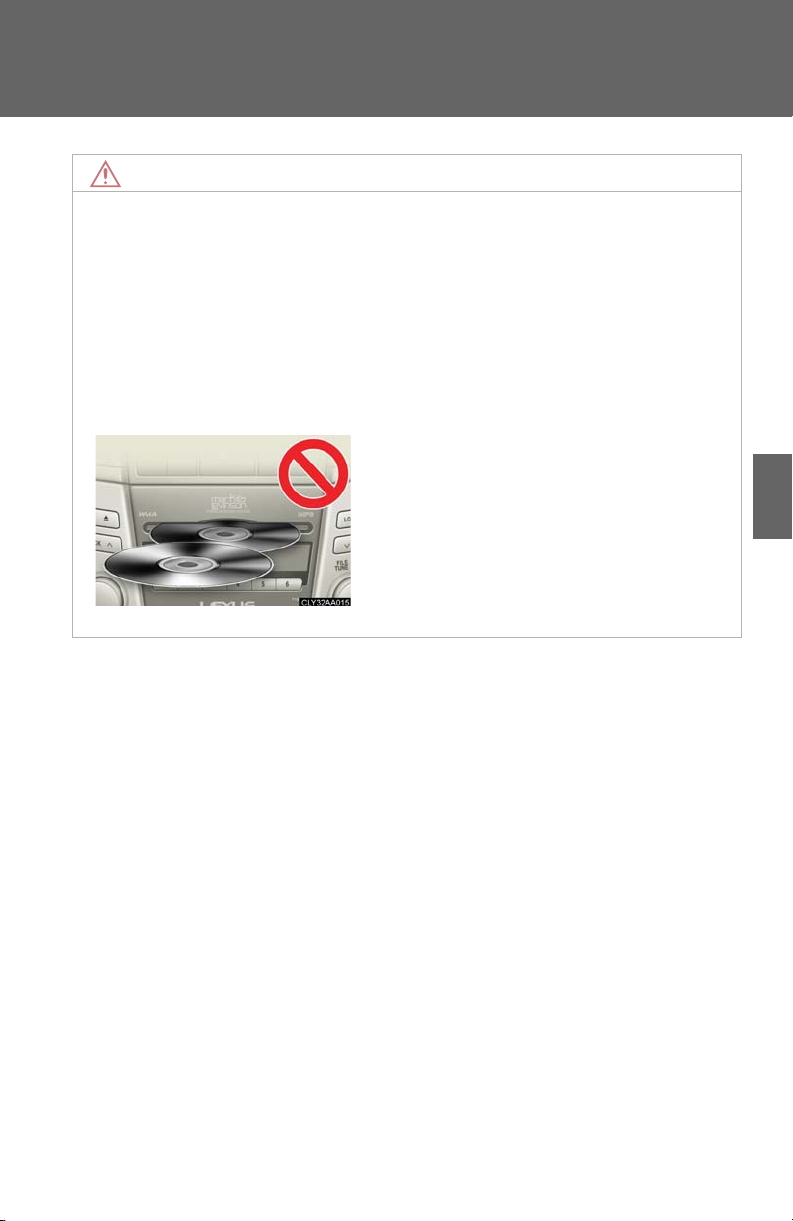
l Do not insert more than one CD at a time.
3
Interior features
195
Page 85
3-2. Using the front audio system
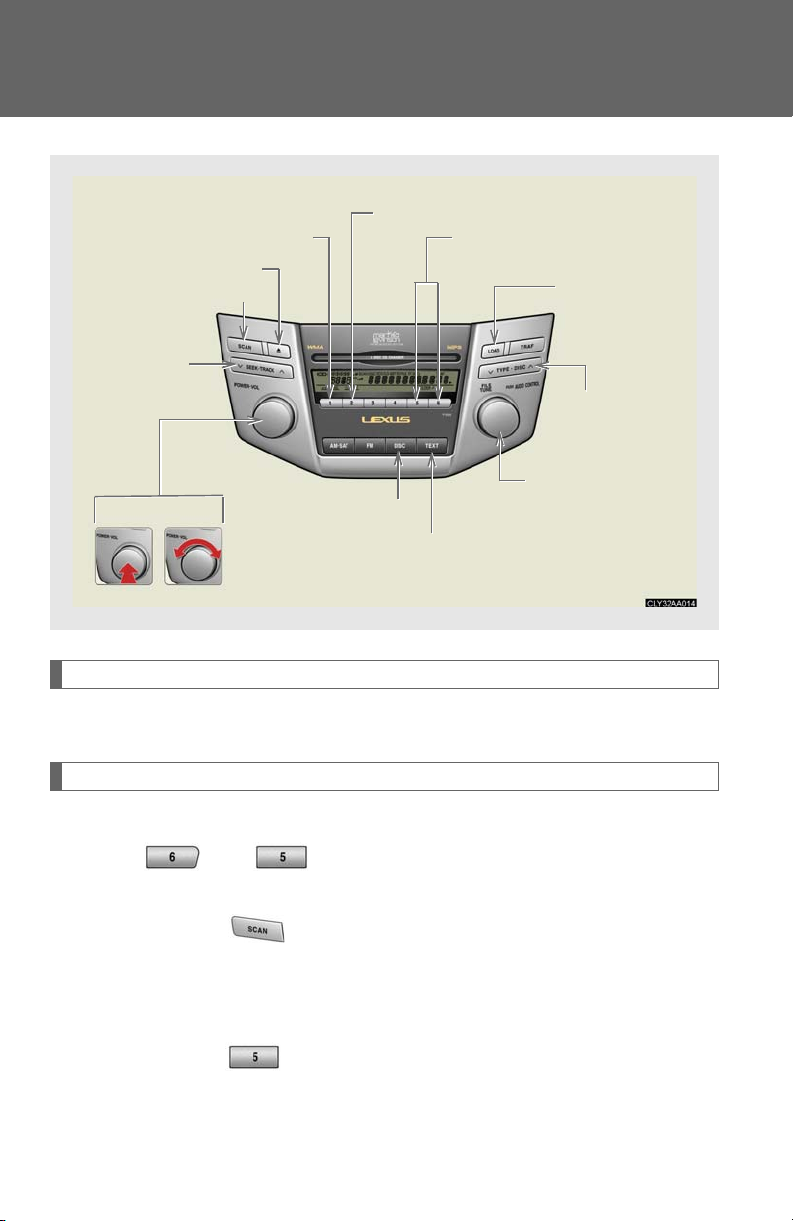
Playing back MP3 and WMA discs
Repeat play
Search playback
Selecting a file
Pow er Vol um e
Random playback
CD eject
Playback
Displays text message
Selecting a folder
CD insert
Selecting a CD
Selecting a file
Loading and ejecting MP3 and WMA discs
→P. 1 90
Selecting a folder
n Selecting folders one at a time
Press (∧) or (∨) to select the desired folder.
n Selecting the desired folder by cueing the first file of each folder
Press and hold until you hear a beep. The first ten seconds of the first file in each folder will be played. When the desired folder is reached, press the button once again.
n Returning to the first folder
Press and hold (∨) until you hear a beep.
196
Page 86
3-2. Using the front audio system
Selecting and scanning files
n Selecting one file at a time
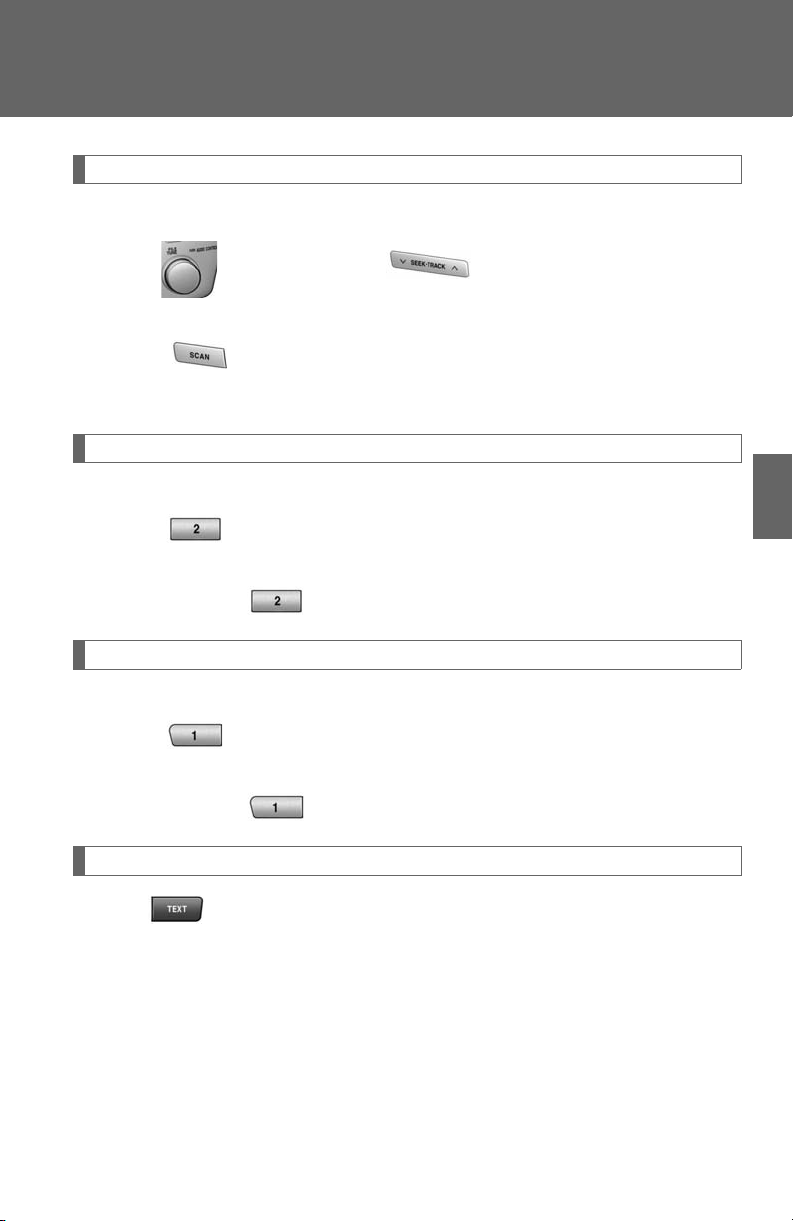
Tu rn o r p re ss ∧ or ∨ on to select the desired file.
n Selecting the desired file by cueing the files in the folder
Press . The first ten seconds of each file will be played.
When the desired file is reached, press the button once again.
Repeat play
n To re pe a t a f il e
Press (RPT).
n To repeat all of the files on a folder
Press and hold (RPT) until you hear a beep.
Random playback
n To play files from a particular folder in random order
Press (RAND).
n To play all of the files on a disc in random order
Press and hold (RAND) until you hear a beep.
Switching the display
Press .
Each time the button is pressed, the display changes in the order of Folder
no./File no./Elapsed time → Folder name → File name → Album title (MP3
only) → Tr ac k t it l e → Artist name.
3
Interior features
197
Page 87
3-2. Using the front audio system
n Canceling random, repeat and scan playback
Press (RAND), (RPT), or
n When LOAD, ERROR or WAIT is shown on the display.
again.
LOAD: This indicates that the CD player has completed loading the CD.
ERROR: This indicates is a trouble either in the CD or inside the player. The CD
may be dirty, damaged, or inserted up-side down.
WAIT: Operation is stopped due to a high temperature inside the player. Wait for
a while and then press . Contact your Lexus dealer if the CD still
cannot be played back.
NO MUSIC: This indicates that the MP3/WMA file is not included in the CD.
n Discs that can be used
Discs with the marks shown below can be used. Playback may not be possible depending on recording format or disc features, or due to scratches, dirt or deterioration.
n CD player protection feature
To protect the internal components, playback is automatically stopped when a problem is detected while the CD player is being used.
n If CDs are left inside the CD player or in the ejected position for extended peri-
ods
CDs may be damaged and may not play properly.
n Lens cleaners
Do not use lens cleaners. Doing so may damage the CD player.
198
Page 88

3-2. Using the front audio system
n MP3 and WMA files
MP3 (MPEG Audio LAYER 3) is a standard audio compression format.
Files can be compressed to approximately 1/10 of their original size by using MP3 compression.
WMA (Windows Media
TM
Audio) is a Microsoft audio compression format.
This format compresses audio data to a size smaller than that of the MP3 format.
There is a limit to the MP3 and WMA file standards and to the media/formats recorded by them that can be used.
l MP3 file compatibility
• Compatible standards
MP3 (MPEG1 LAYER3, MPEG2 LSF LAYER3)
• Compatible sampling frequencies
MPEG1 LAYER3: 32, 44.1, 48 (kHz)
MPEG2 LSF LAYER3: 16, 22.05, 24 (kHz)
• Compatible bit rates
MPEG1 LAYER3: 64, 80, 96, 112, 128, 160, 192, 224, 256, 320 (kbps)
• MPEG2 LSF LAYER3: 64, 80, 96, 112, 128, 144, 160 (kbps)
* Compatible with VBR
• Compatible channel modes: stereo, joint stereo, dual channel and monaural
l WMA file compatibility
• Compatible standards
WMA Ver. 7, 8, 9
• Compatible sampling frequencies
32, 44.1, 48 (kHz)
• Compatible bit rates
Ver . 7, 8: CBR 48, 64, 80, 96, 128, 160, 192 (kbps)
Ver. 9: CBR 48, 64, 80, 96, 128, 160, 192, 256, 320 (kbps)
*Only compatible with 2-channel playback
l Compatible media
Media that can be used for MP3 and WMA playback are CD-Rs and CD-RWs.
Playback in some instances may not be possible, depending on the status of the CD-R or CD-RW. Playback may not be possible or the audio may jump if the disc is scratched or marked with fingerprints.
3
Interior features
199
Page 89

3-2. Using the front audio system
l Compatible disc formats
The following disc formats can be used.
• Disc formats: CD-ROM Mode 1 and Mode 2
CD-ROM XA Mode 2, Form 1 and Form 2
• File formats: ISO9660 level 1, level 2, (Romeo, Joliet)
MP3 and WMA files written in any format other than those listed above may
not play correctly, and their file names and folder names may not be displayed correctly.
Items related to standards and limitations are as follows.
• Maximum directory hierarchy: 8 levels
• Maximum length of folder names/file names: 32 characters
• Maximum number of folders: 192 (including the root)
• Maximum number of files per disc: 255
l File names
The only files that can be recognized as MP3/WMA and played are those with the extension .mp3 or .wma.
l Multi-sessions
As the audio system is compatible with multi-sessions, it is possible to play discs that contain MP3 and WMA files. However, only the first session can be played.
l ID3 and WMA tags
ID3 tags can be added to MP3 files, making it possible to record the track title and artist name, etc.
The system is compatible with ID3 Ver. 1.0, 1.1, and Ver. 2.2, 2.3 ID3 tags. (The number of characters is based on ID3 Ver. 1.0 and 1.1.)
WMA tags can be added to WMA files, making it possible to record the track title and artist name in the same way as with ID3 tags.
200
Page 90

3-2. Using the front audio system
l MP3 and WMA playback
When a disc containing MP3 or WMA files is inserted, all files on the disc are first
checked. Once the file check is finished, the first MP3 or WMA file is played. To
make the file check finish more quickly, we recommend you do not write in any
files other than MP3 or WMA files or create any unnecessary folders.
Discs that contain a mixture of music data and MP3 or WMA format data cannot be played.
l Extensions
If the file extensions .mp3 and .wma are used for files other than MP3 and WMA files, they will be mistakenly recognized and played as MP3 and WMA files. This may result in large amounts of interference and damage to the speakers.
l Playback
• To play MP3 file with steady sound quality, we recommend a fixed bit rate of
128 kbps and a sampling frequency of 44.1 kHz.
• CD-R or CD-RW playback may not be possible in some instances, depending on the characteristics of the disc.
• There is a wide variety of freeware and other encoding software for MP3
and WMA files on the market, and depending on the status of the encoding
and the file format, poor sound quality or noise at the start of playback may
result. In some cases, playback may not be possible at all.
• When files other than MP3 or WMA files are recorded on a disc, it may take
more time to recognize the disc and in some cases, playback may not be
possible at all.
• Microsoft, Windows, and Windows Media are the registered trademarks of
Microsoft Corporation in the U.S.A. and other countries.
3
Interior features
201
Page 91
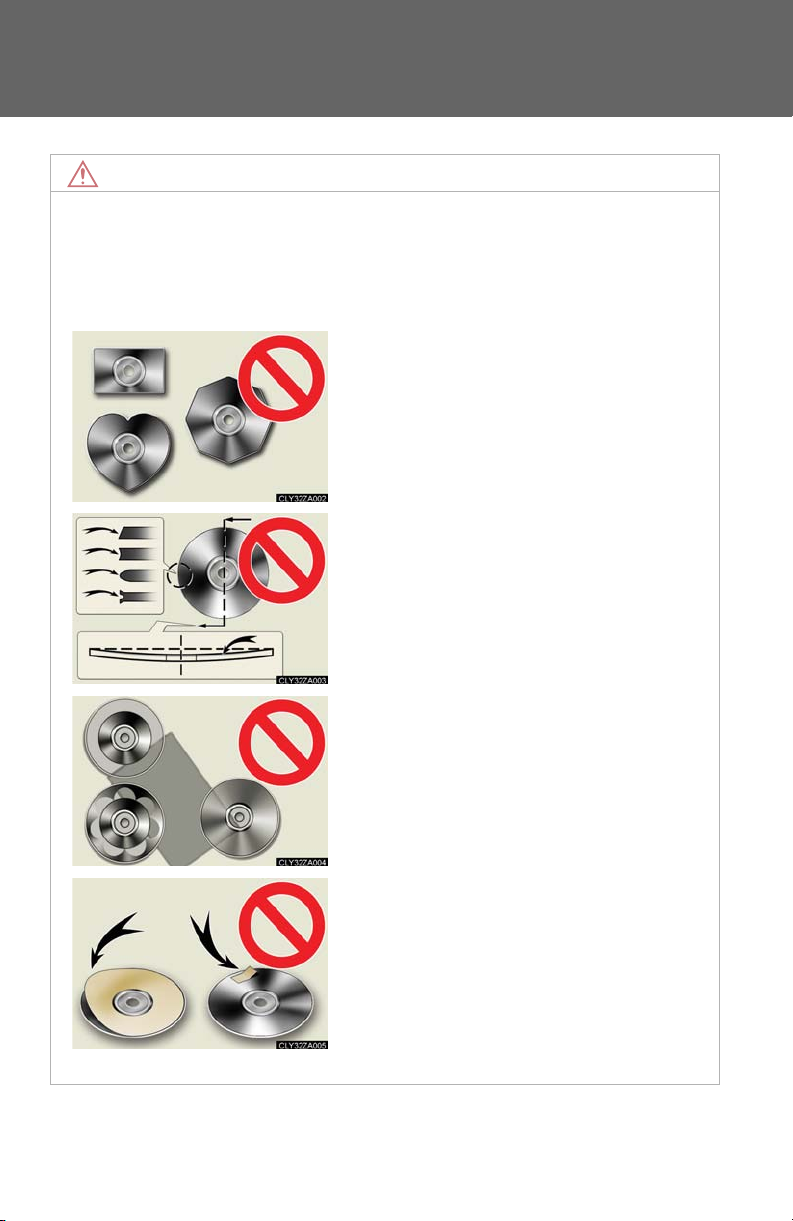
3-2. Using the front audio system
NOTICE
n CDs and adapters that cannot be used
Do not use the following types of CDs or 3 in. (8 cm) CD adapters. Doing so may damage the CD player and render the CD insert/eject function unusable.
l CDs that have a diameter that is not 4.7 in.
(12 cm).
l Low-quality and deformed CDs.
202
l CDs with a transparent or translucent
recording area.
l CDs that have had tape, stickers or CD-R
labels attached to them, or that have had
the label peeled off.
Page 92
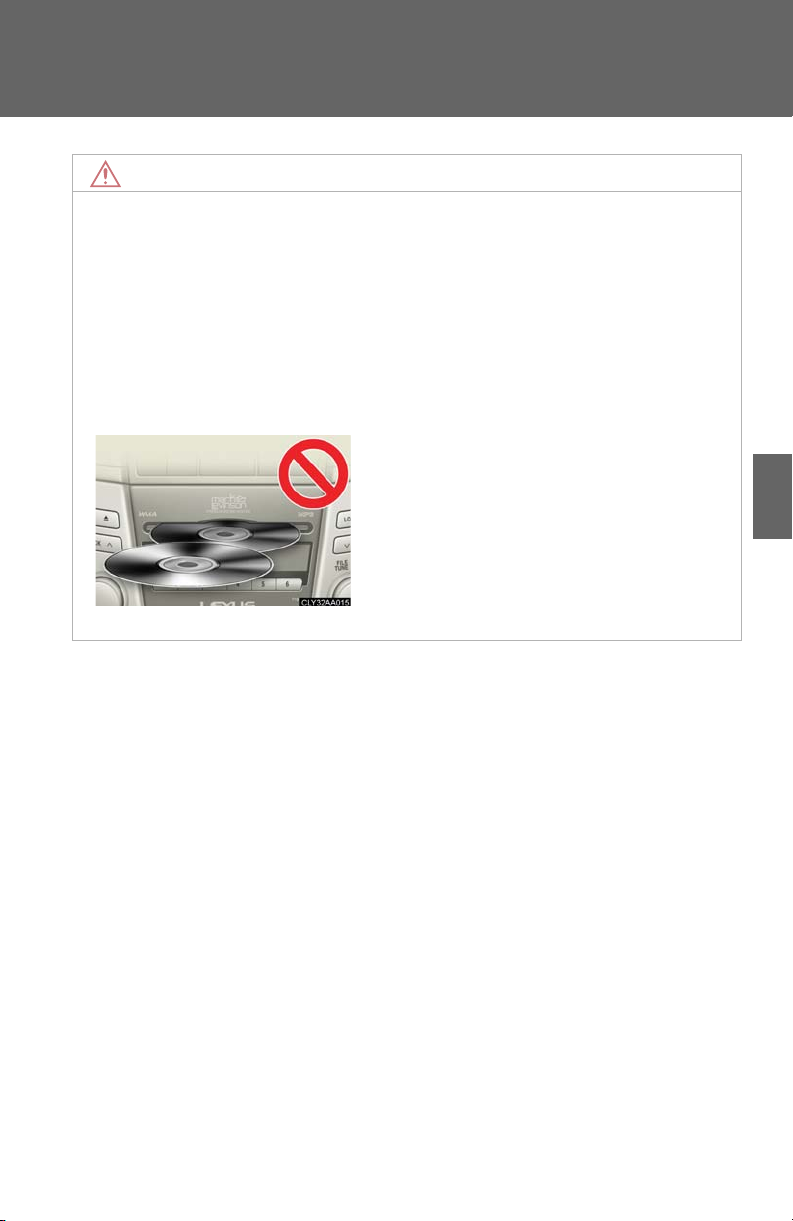
3-2. Using the front audio system
NOTICE
n CD player precautions
Failure to follow the precautions below may result in damage to the CDs or the player itself.
l Do not insert anything other than CDs into the CD slot.
l Do not apply oil to the CD player.
l Store CDs away from direct sunlight.
l Never try to disassemble any part of the CD player.
l Do not insert more than one CD at a time.
3
Interior features
203
Page 93
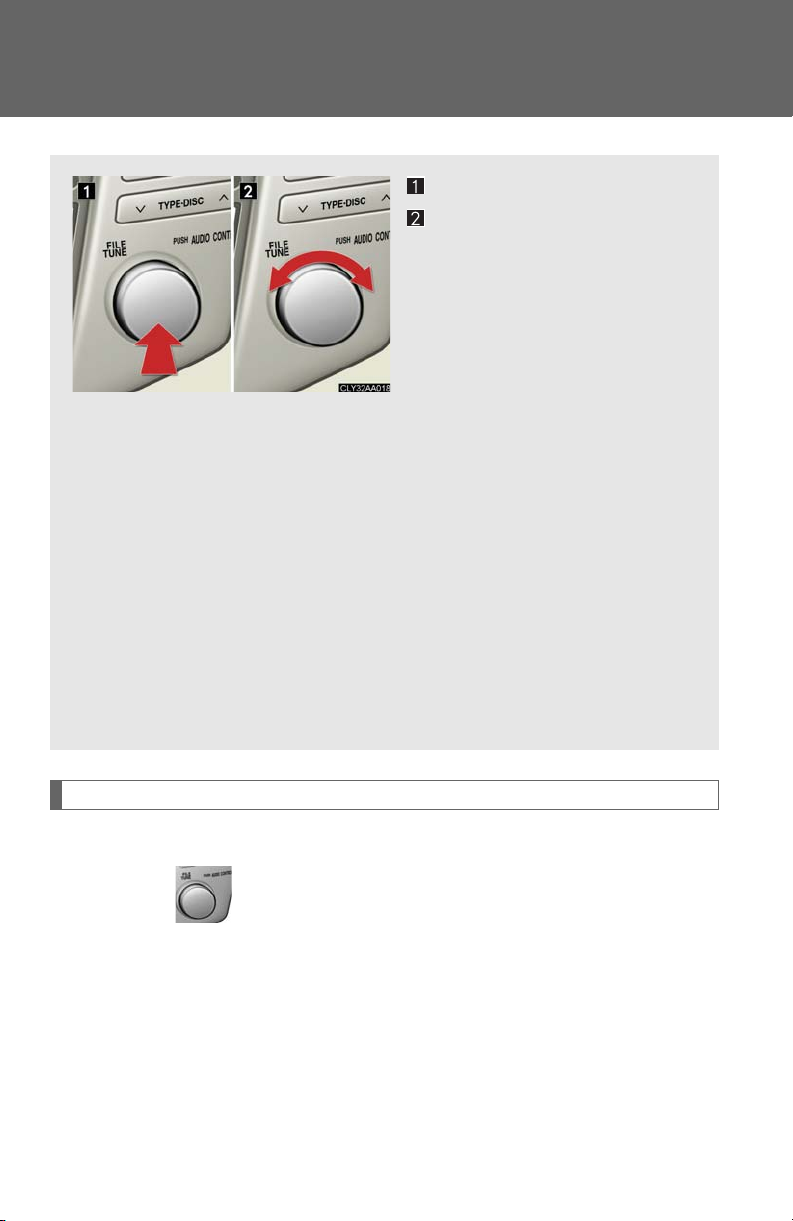
3-2. Using the front audio system
Optimal use of the audio system
Displays the current mode.
Changes the following set-
tings.
• Sound quality and volume
balance (→P. 205)
The sound quality and balance
setting can be changed to produce the best sound.
• Automatic Sound Levelizer
ON/OFF (→P. 205)
• Listening position (→P. 2 06 )
The sound feel setting can be
changed to produce the best
sound for each listening position.
• Rear system lock ON/OFF
of rear seat entertainment
system
(→P. 2 06 )
Using the AUDIO CONTROL function
n Changing modes
Pressing selects the mode to be change in the following order.
BAS→MID→TRE→FA D →BAL→ASL→RSE→POS
204
Page 94
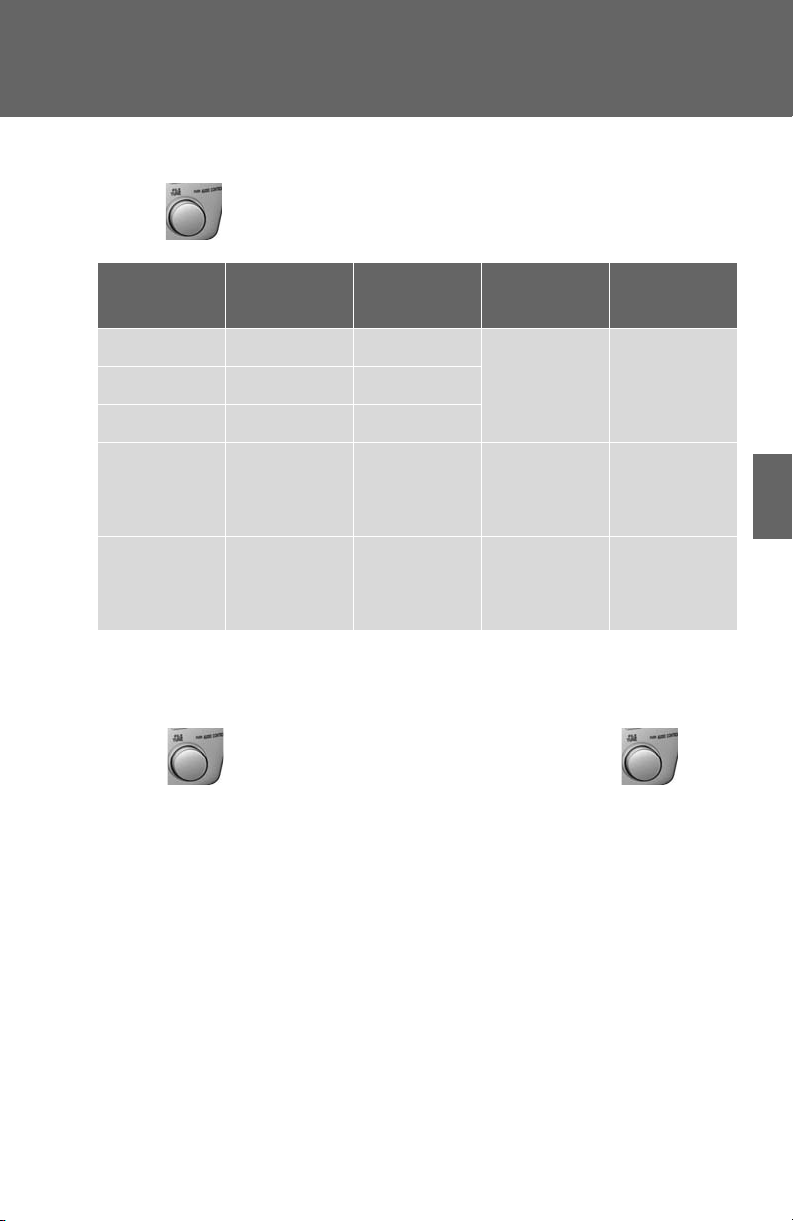
n Adjusting sound quality
Turning adjusts the level.
3-2. Using the front audio system
Sound qual-
ity mode
Bass* BAS -5 to 5
Tr e b l e * TRE -5 to 5
Front/rear
volume
balance
Left/right
volume
balance
Mode
displayed
FA D F7 to R7 Shifts to rear Shifts to front
BAL L7 to R7 Shifts to left Shifts to right
Level
Turn to the
left
Low HighMid-range* MID -5 to 5
Turn to the
right
*: The sound quality level is adjusted individually in each AM⋅SAT⋅FM or CD
mode.
n Adjusting the Automatic Sound Levelizer (ASL)
Turning to the right turns ON the ASL, and turning to the
left turns OFF the ASL.
ASL automatically adjusts the volume and tone quality according to the noise level as you drive your vehicle.
3
Interior features
205
Page 95
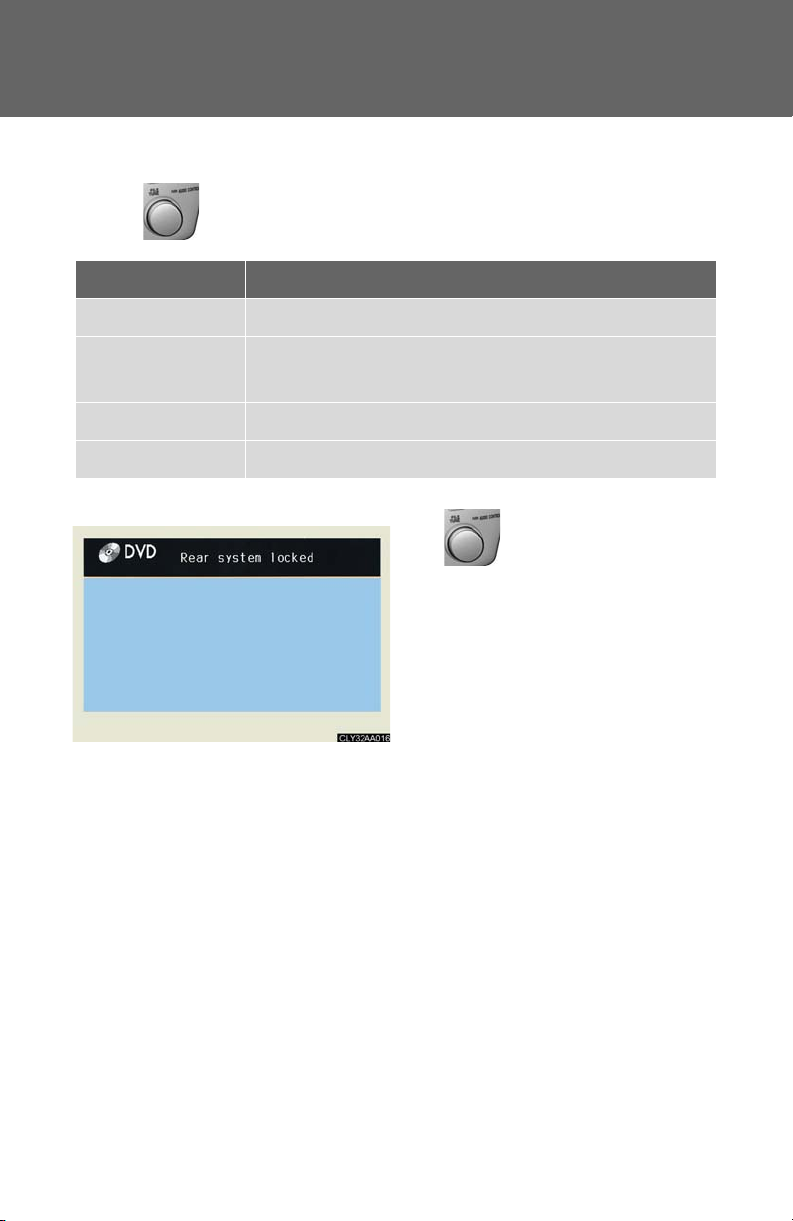
3-2. Using the front audio system
n Changing the listening position
Turning changes the position in the following order.
Display Listening position
DRIVER Position best suited to the driver’s seat
FRONT
Position best suited to the driver’s and front passenger
seats
REAR Position best suited to the rear seats
ALL Position best suited to all seats
n Rear system lock ON/OFF
Turn until ON/OFF is displayed,
and press.
The rear system lock remains on,
even when the ignition switch is
turned off.
206
Page 96
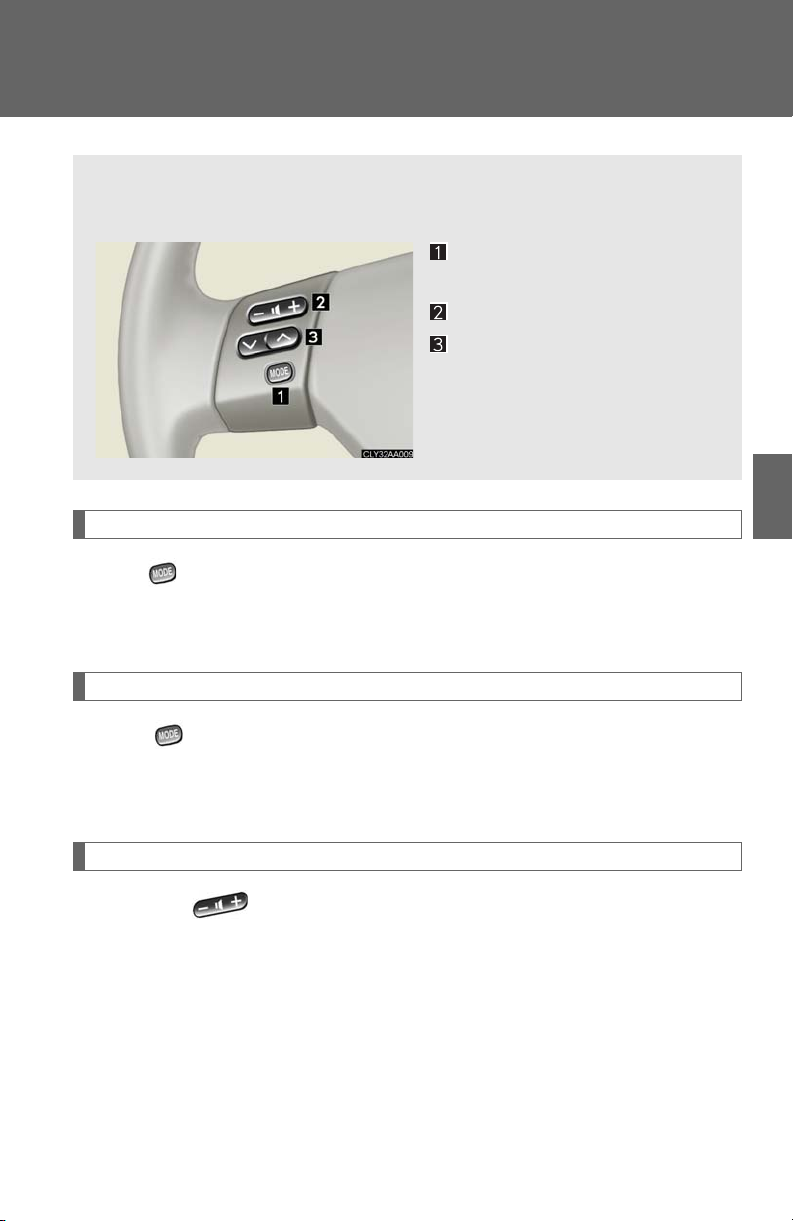
3-2. Using the front audio system
Using the steering wheel audio switches
Some audio features can be controlled using the switches on the steering wheel.
Power on, select audio
source
Vo l u m e
Radio: Select radio stations
CD: Select tracks, files (MP3
and WMA) and discs
Turning on the power
Press when the audio system is turned OFF.
The audio system can be turned off by holding the switch down for a few seconds.
3
Interior features
Changing the audio source
Press when the audio system is turned ON. The audio source changes as follows each time the switch is pressed.
FM1→FM2→CD changer→AM→SAT1→SAT2→SAT3
Adjusting the volume
Press + on to increase the volume and - to decrease the volume.
Hold down the switch to continue increasing or decreasing the volume.
207
Page 97
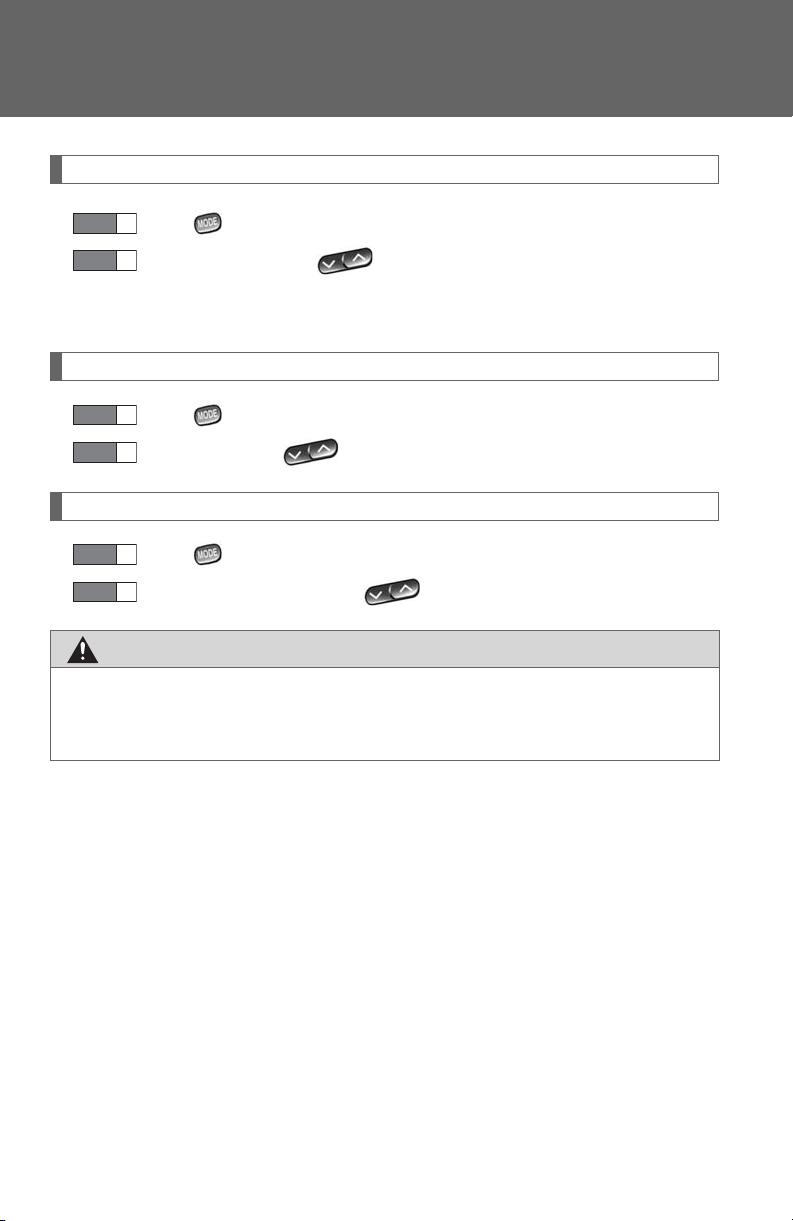
3-2. Using the front audio system
Selecting a radio station
STEP 1
STEP 2
Press to select the radio mode.
Press ∧ or ∨ on the switch to select a radio station.
To scan for receivable stations, press and hold the switch until you hear a beep.
Selecting a track/file
STEP 1
STEP 2
Press to select the CD mode.
Press ∧ or ∨ on to select the desired track/file.
Selecting a disc in the CD player
STEP 1
STEP 2
n To reduce the risk of an accident
Exercise care when operating the audio switches on the steering wheel.
Press to select the CD mode.
Press and hold ∧ or ∨ on until a beep is heard.
CAUTIO N
208
Page 98
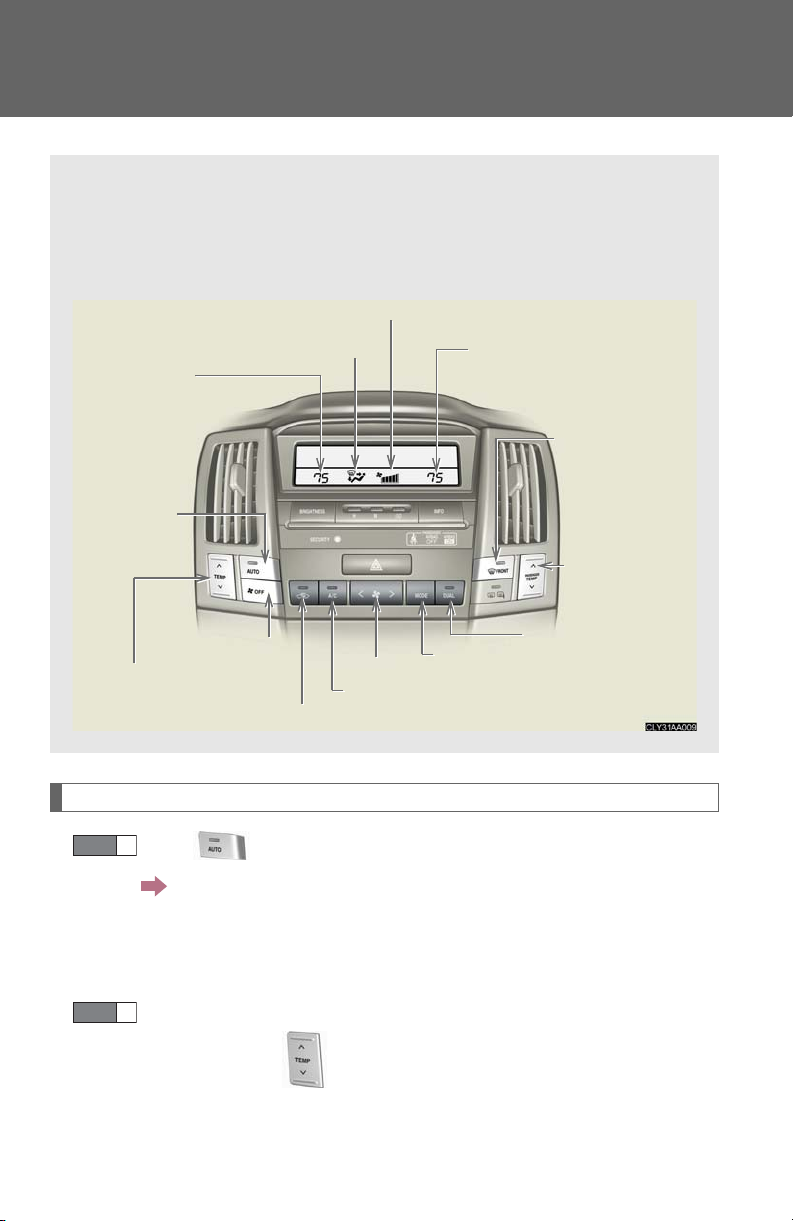
3-1. Using the air conditioning system and defogger
Automatic air conditioning system (without navigation system)
Airflow and outlets are automatically adjusted according to the temperature setting.
Owners of models equipped with a navigation system should refer to the “Navigation System Owner's Manual”.
Fan speed display
Airflow display
Driver’s side
temperature
setting display
Automatic
mode
Passenger’s side temperature
setting display
Front windshield
defogger
Passenger’s side
temperature
control
Off
Driver's side
temperature control
Outside air or recirculated air mode
Using the automatic mode
STEP 1
Press .
The air conditioning system will begin to operate. According
to the temperature setting, air outlets and fan speed are automatically adjusted, and the mode automatically switches
between outside air and recirculated air modes.
STEP 2
Press ∧ to increase the temperature and ∨ to decrease the tem-
perature on the switch.
The temperature for the driver and passenger seats can be set separately.
174
Dual operation switch
Fan speed
Air conditioning ON/OFF switch
Changes the air outlets used
Page 99
3-1. Using the air conditioning system and defogger
Adjusting the settings
n Adjusting the temperature setting
Press ∧ to increase the temperature and ∨ to decrease the tempera-
ture on the switch.
Press ∧ (increase) or ∨ (decrease) on the switch to separately adjust
the temperature for the passenger and driver sides (dual mode). Press
to return the driver and passenger side temperatures to the same set-
ting (simultaneous mode).
The air conditioning system switches between individual and simultaneous modes each time is pressed.
n Adjusting the fan speed
Press > (increase) or < (decrease) on the button.
Press to turn the fan off.
3
Interior features
175
Page 100
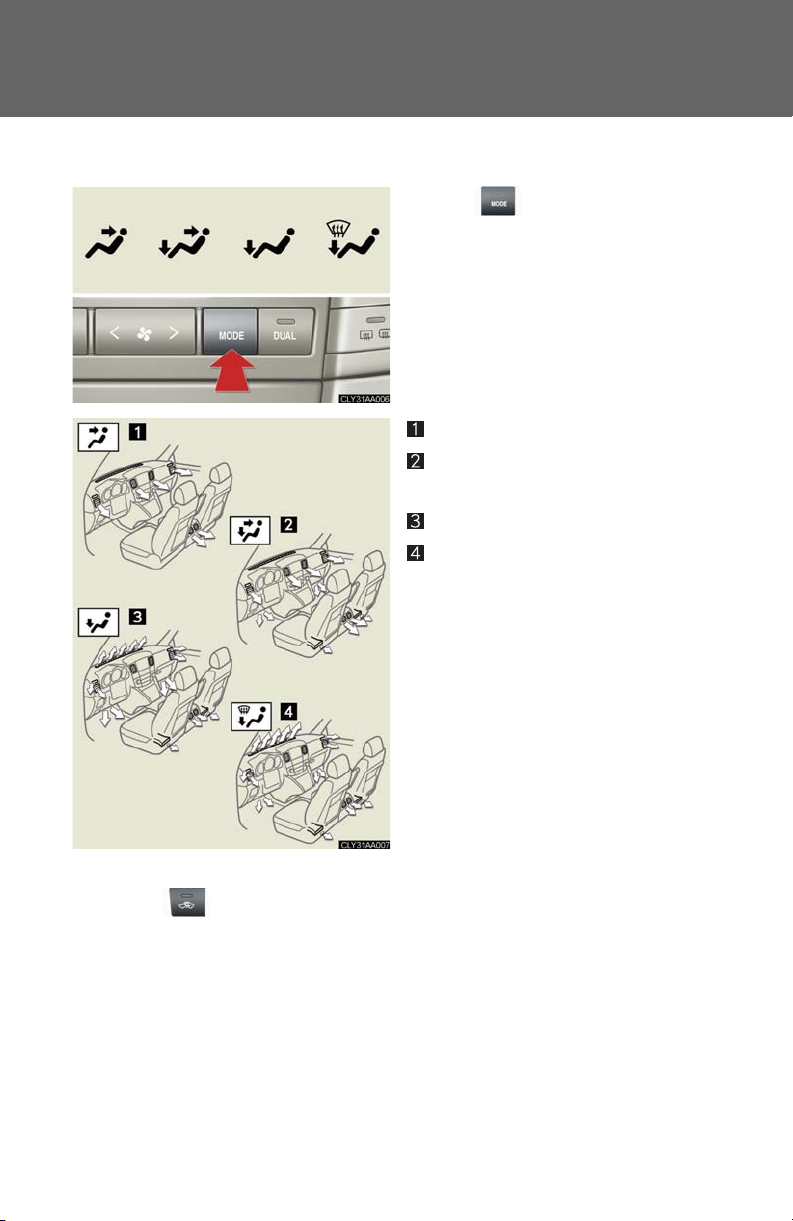
3-1. Using the air conditioning system and defogger
n Changing the air outlets
Press .
The air outlets switch each time the
button is pressed.
Air flows to the upper body.
Air flows to the upper body and
feet.
Air flows to the feet.
Air flows to the feet and the
front windshield defogger operates.
Recirculated air mode will automatically switch to outside air
mode.
n Switching between outside air and recirculated air modes
Press .
The mode switches between outside air mode (indicator OFF) and recirculated air mode (indicator ON) modes each time the button is pressed.
176
 Loading...