


SECTION |
6 ± 3 |
SERVICE PROCEDURES AND |
|
SPECIFICATIONS |
|
Engine |
|
Specifications |
220 |
Checking brake fluid |
223 |
Checking power steering fluid |
224 |
Checking tire pressure |
225 |
Rotating tires |
226 |
Checking and replacing tires |
227 |
Installing snow tires and chains |
229 |
Replacing wheels |
230 |
Aluminum wheel precautions |
231 |
Suspension and chassis |
231 |
219

CHASSIS
SPECIFICATIONS
±TRANSFER
Oil capacity |
1.7 L (1.8 qt., 1.4 Imp.qt.) |
Oil type |
Multipurpose gear oil API GL±4 or GL±5 |
Recommended oil viscosity |
SAE 75W±90 |
|
|
±AUTOMATIC TRANSMISSION |
|
Fluid capacity |
|
Drain and refill |
Up to 2.0 L (2.1 qt., 1.8 Imp.qt.) |
Fluid type |
Automatic transmission fluid D±II or DEXRON ±III |
|
(DEXRON ±II) |
±DIFFERENTIAL |
|
|
|
Oil capacity |
|
Front |
|
With front rear differential lock system |
2.65 L (2.8 qt., 2.3 Imp.qt.) |
Without front and rear differential lock system |
2.80 L (3.0 qt., 2.5 Imp.qt.) |
Rear |
3.25 L (3.4 qt., 2.9 Imp.qt.) |
Oil type |
Hypoid gear oil API GL±5 |
Oil viscosity |
Above ±18°C (0°F): SAE 90 |
|
Below ±18°C (0°F): SAE 80W or SAE 80W±90 |
|
|
220

CHASSIS
±BRAKES
Pedal clearance |
68 mm (2.7 in.) Min. *1 |
Pedal freeplay |
3±6 mm (0.12±0.24 in.) |
Brake pad wear limit |
1.0 mm (0.04 in.) |
Parking brake lining wear limit |
1.0 mm (0.04 in.) |
Parking brake adjustment |
7±9 clicks *2 |
Fluid type |
SAE J1703 or FMVSS No. 116 DOT 3 |
|
|
*1: Minimum pedal clearance when depressed with the pressure of 490 N (50 kgf, 110 lbf.) with the engine running. *2: Parking brake adjustment when depressed with the force of 196 N (20 kgf, 44 lbf.)
±CHASSIS LUBRICATION
Wheel bearings |
Lithium base wheel bearing grease, NLGI No. 2 |
Steering knuckles |
Molybdenum±disulfide lithium base chassis grease, NLGI No. 2 |
Propeller shafts |
Lithium base wheel bearing grease, NLGI No. 2 |
|
|
±STEERING |
|
|
|
Freeplay |
Less than 40 mm (1.6 in.) |
Power steering fluid |
Automatic transmission fluid DEXRON II or III |
221
CHASSIS
±TIRES AND WHEELS
Tire size
Tire inflation pressure
Recommended cold tire inflation pressure Vehicle load up to four occupants
Vehicle loaded up to vehicle capacity weight
Wheel size
Wheel nut torque
P275/70R16114H
Front |
220 kPa (2.2 kgf/cm2 or bar, 32 psi) |
Rear |
220 kPa (2.2 kgf/cm2 or bar, 32 psi) |
Front |
220 kPa (2.2 kgf/cm2 or bar, 32 psi) |
Rear |
220 kPa (2.2 kgf/cm2 or bar, 32 psi) |
For sustained high speeds above 160 km/h (100 mph), in countries where such speeds are permitted by law, add 80 kPa (0.9 kgf/cm2, 0.8 bar, 12 psi) to the front tires and rear tires, but never exceed the maximum cold tire pressure molded on the tire sidewall.
16 x 8 JJ
103 N m (10.5 kgf m, 76 ft lbf.)
222
CHASSIS
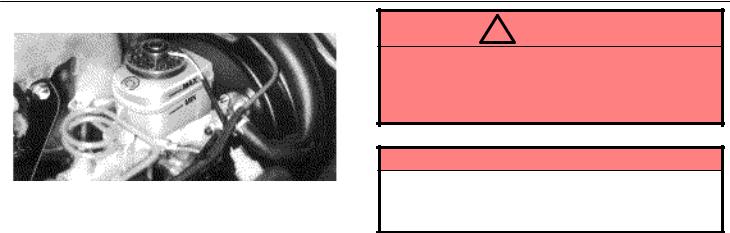
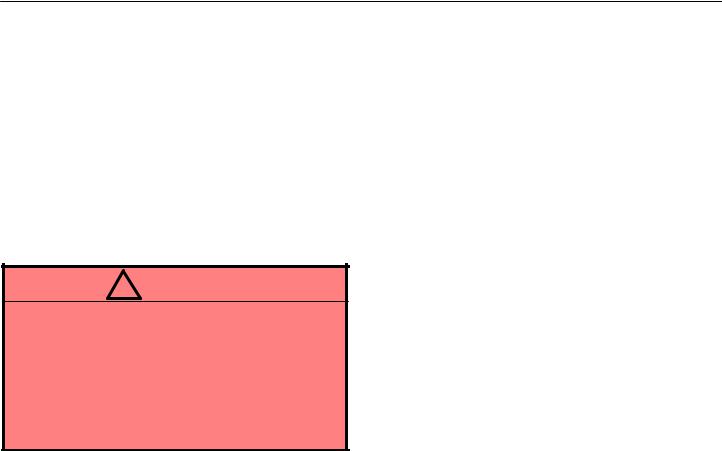
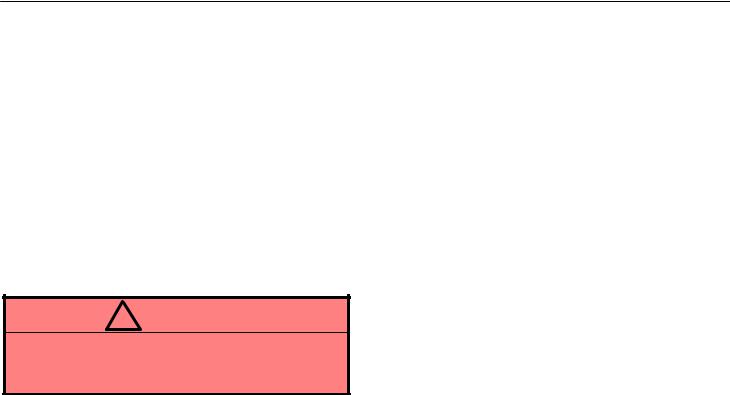
CHECKING BRAKE FLUID
To check the fluid level, simply look at the see±through reservoir. The level should be between the ªMAXº and ªMINº lines on the tank.
It is normal for the brake fluid level to go down slightly as the brake pads wear. So be sure to keep the reservoir filled.
If the reservoir needs frequent refilling, it may indicate a serious mechanical problem.
If the level is low, add FMVSS No. 116 DOT 3 or SAE J1703 brake fluid to the brake reservoir.
Remove and replace the reservoir cover by hand. Add brake fluid up to the ªMAXº line.
Use only newly opened brake fluid. Once opened, brake fluid absorbs moisture from the air, and excess moisture can cause a dangerous loss of braking efficiency.
!CAUTION
Take care when filling the reservoir because brake fluid can harm your eyes and damage painted surfaces. If fluid gets in your eyes, flush your eyes with clean water.
NOTICE
If you spill some of the fluid, be sure to wash it off with water to prevent it from damaging the parts or paintwork.
223
CHASSIS
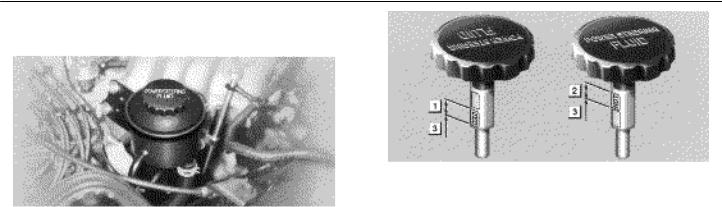
CHECKING POWER STEERING
FLUID
Check the fluid level on the dipstick. If necessary, add automatic transmission fluid DEXRON II or III.
If the vehicle has been driven around 80 km/h (50 mph) for 20 minutes (a little more in frigid temperatures), the fluid is hot (60°C±80°C or 140°F±175°F). You may also check the level when the fluid is cold (about room temperature, 10°C±30°C or 50°F±85°F) if the engine has not been run for about five hours.
If cold O.K. If hot O.K. Add fluid
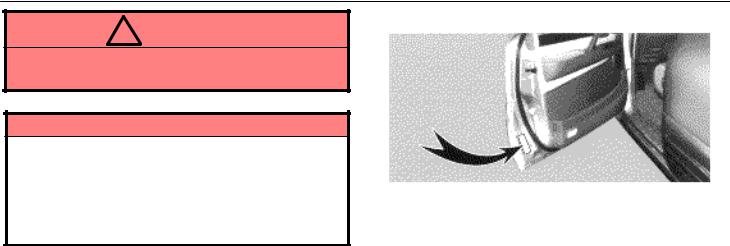
1.Clean all the dirt off the reservoir.
2.Remove the filler cap by turning it counterclockwise and wipe the dipstick clean.
3.Reinstall the filler cap.
4.Remove the filler cap again and look at the fluid level. If the fluid is cold, the level should be in the ªCOLDº range on the dipstick. Similarly, if it is hot, the fluid level should be in
the ªHOTº range. If the level is at the low side of either range, add automatic transmission fluid DEXRON II or III to bring the level within the range.
5.After replacing the filler cap, visually check the steering box case, vane pump and hose connections for leaks or damage.
224
CHASSIS
!CAUTION
The reservoir may be hot so be careful not to burn yourself.
NOTICE
Avoid overfilling, or the power steering could be damaged.
When adding the power steering fluid, avoid spilling it. The generator under the power steering reservoir could be damaged if fluid is spilled on it.
CHECKING TIRE PRESSURE
The recommended cold tire pressure, tire size and the vehicle capacity weight are given on the label.
You should check the tire pressures every two weeks, or at least once a month. And don't forget the spare! The pressure for the spare tire should be 220 kPa (2.2 kgf/cm2 or bar, 32 psi). Incorrect tire pressure can reduce tire life and make your vehicle less safe to drive.
Low tire pressure results in excessive wear, poor handling, reduced fuel economy, and the possibility of blowouts from overheated tires. Also, low tire pressure can cause poor sealing of the tire bead. If the tire pressure is excessively low, there is the possibility of wheel deformation and/or tire separation. So keep your tire pressures at the proper level. If a tire needs frequent refilling, have it checked by your Lexus dealer.
225
CHASSIS
High tire pressure produces a harsh ride, handling problems, |
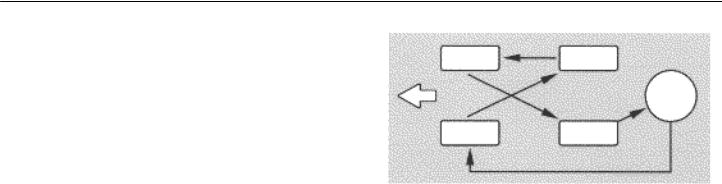
ROTATING TIRES |
|
excessive wear at the center of the tire tread, and a greater |
|
|
possibility of tire damage from road hazards. |
|
|
The following instructions for checking tire pressure should |
|
|
be observed: |
|
|
The pressure should be checked only when the tires |
|
|
are cold. If your vehicle has been parked for at least 3 |
|
|
hours and has not been driven for more than 1.5 km or 1 |
|
|
mile since, you will get an accurate cold tire pressure |
|
|
reading. |
|
|
Always use a tire pressure gauge. The appearance of |
|
|
the tire can be misleading. Besides, tire pressures that are |
To equalize tire wear and help extend tire life, Lexus |
|
even just a few pounds off can degrade handling and ride. |
recommends that you rotate your tires approximately |
|
Do not bleed or reduce tire pressure after driving. It is |
every 12000 km (7500 miles). However, the most |
|
normal for the tire pressure to be higher after driving. |
appropriate timing for tire rotation may vary according |
|
to your driving habits and road surface conditions. |
||
Never exceed the vehicle capacity weight. The |
||
The wheel assemblies must be rotated as illustrated above. |
||
passengers and luggage weight should be located so that |
||
When rotating tires, check for uneven wear and damage. |
||
the vehicle is balanced. |
||
Be sure to reinstall the tire valve caps. Without the valve |
Abnormal wear is usually caused by incorrect tire pressure, |
|
improper wheel alignment, out±of±balance wheels, or |
||
caps, dirt or moisture could get into the valve core and |
||
severe braking. |
||
cause air leakage. If the caps have been lost, have new |
||
Before storing radial, snow or studded tires, mark the |
||
ones put on as soon as possible. |
||
|
direction of rotation and be sure to install them in the same |
|
|
direction when using them again. Tires should be stored in |
|
|
a cool dry place. |
226
CHASSIS
CHECKING AND REPLACING TIRES
When to replace your tires
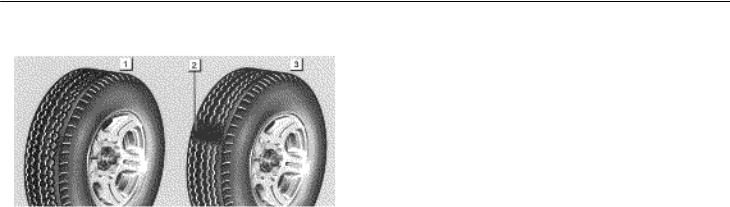
New tread Tread wear indicatorWorn tread
Replace your tires when the tread wear indicators show. The location of the tread wear indicators is shown by the marks molded on the sidewall of each tire.
The tires on your Lexus have built±in tread wear indicators to help you know when the tires need replacement. When the tread depth wears to 1.6 mm (0.06 in.) or less, the indicators will appear. If you can see the indicators in two or more adjacent grooves, the tire should be replaced.
The effectiveness of snow tires is lost if the tread wears down below 4 mm (0.16 in.).
If you have tire damage such as cuts, splits, cracks deep enough to expose the fabric, or bulges indicating internal damage, the tire should be replaced.
If a tire often goes flat or cannot be properly repaired due to the size or location of a cut or other damage, it should be replaced. If you are not sure, consult with your Lexus dealer.
If an air loss occurs while driving, do not continue driving with a deflated tire. Driving even a short distance can damage a tire beyond repair.
Any tires which are over 6 years old must be checked by a qualified technician even if damage is not obvious.
Tires deteriorate with age even if they have never or seldom been used.
This also applies to the spare tire and tires stored for future use.
227

CHASSIS
Uniform tire quality grading |
Warning: The traction grade assigned to this tire is based on |
|
This information has been prepared in accordance with |
braking (straight ahead) traction tests and does not include |
|
cornering (turning) traction. |
||
regulations issued by the National Highway Traffic Safety |
||
Temperature A, B, C ± The temperature grades are A (the |
||
Administration of the U.S. Department of Transportation. |
||
It provides the purchasers and/or prospective purchasers |
highest), B, and C, representing the tire's resistance to the |
|
of Lexus vehicles with information on uniform tire quality |
generation of heat and its ability to dissipate heat when |
|
grading. |
tested under controlled conditions on a specified indoor |
|
You Lexus dealer will help answer any questions you |
laboratory test wheel. Sustained high temperature can |
|
may have as you read this information. |
cause the material of the tire to degenerate and reduce tire |
|
DOT quality grades ± All passenger vehicle tires must |
life, and excessive temperature can lead to sudden tire |
|
failure. The grade C corresponds to a level of performance |
||
conform to Federal Safety Requirements in addition to |
||
these grades. These quality grades are molded on the |
which all passenger car tires must meet under the Federal |
|
sidewall. |
Motor Vehicle Safety Standards No. 109. Grades B and A |
|
Treadwear ± The treadwear grade is a comparative rating |
represent higher levels of performance on the laboratory test |
|
wheel than the minimum required by law. |
||
based on the wear rate of the tire when tested under controlled |
||
conditions on a specified government test course. For |
Warning: The temperature grade of this tire is established |
|
example, a tire graded 150 would wear one and a half (1±1/2) |
for a tire that is properly inflated and not overloaded. |
|
times as well on the government course as a tire graded 100. |
Excessive speed, underinflation, or excessive loading, |
|
The relative performance of tires depends upon the actual |
either separately or in combination, can cause heat buildup |
|
conditions of their use, however, and may depart significantly |
||
and possible tire failure. |
||
from the norm due to variations in driving habits, service |
||
|
||
practices and differences in road characteristics and climate. |
|
|
Traction A, B, C ± The traction grades from highest to |
|
|
lowest, are A, B and C, and they represent the tire's ability |
|
|
to stop on wet pavement as measured under controlled |
|
|
conditions on specified government test surfaces of asphalt |
|
|
and concrete. A tire marked C may have poor traction |
|
|
performance. |
|
228
CHASSIS
Tire selection
When replacing a tire, use only the same size and construction as originally installed and with the same or greater load capacity.
Using any other size or type of tire may seriously affect handling, ride, speedometer/odometer calibration, ground clearance, and clearance between the body and tires or snow chains.
Do not mix radial, belted, or conventional tires on your vehicle.
Do not use tires or wheels other than the manufacturer's recommended size.
It can cause dangerous handling characteristics, resulting in loss of control. If you need to change from conventional tires to radial tires or vice versa, replace them as a set.
INSTALLING SNOW TIRES AND
CHAINS
When to use snow tires or chains
Snow tires or chains are recommended when driving on snow or ice.
On wet or dry roads, conventional or radial tires provide better traction than snow or studded tires.
Snow tire selection
If you need snow tires, select the same size, construction and load capacity as the original tires on your Lexus.
Do not use tires other than stated above. Since your vehicle has radial tires as original equipment, make sure your snow tires also have radial construction. Do not install studded tires without first checking local regulations for possible restrictions.
Snow tire installation
Snow tires should be installed on all wheels.
Installing snow tires on the rear wheels only can lead to an excessive difference in road grip capability between the front and rear tires which could cause loss of vehicle control.
!CAUTION
Do not drive with the snow tires incorrectly inflated.
Never drive over 105 km/h (65 mph) with any type of snow tires.
229
CHASSIS
Tire chain selection
Regulations regarding the use of tire chains vary according to location or type of road. Always check the local regulations before installing chains.
Use SAE Class ªSº type radial tire chains, with the exception of radial cable chains or V±bar type chains.
Chain installation
Install the chains on the rear tires as tightly as possible. Do not use tire chains on the front tires. Retighten chains after driving 0.5 ± 1.0 km (1/4 ± 1/2 mile).
When installing chains on your tires, carefully follow the instructions of the chain manufacturer.
If wheel covers are used, they will be scratched by the chain band, so remove the covers before putting on the chains.
!CAUTION
Do not exceed 50 km/h (30 mph) or the chain manufacturer's recommended speed limit, whichever is lower.
Drive carefully avoiding bumps, holes, and sharp turns, which may cause the vehicle to bounce.
Avoid sharp turns or locked±wheel braking, as use of chains may adversely affect vehicle handling.
REPLACING WHEELS
When to replace your wheels
If you have wheel damage such as bends, cracks or heavy corrosion, the wheel should be replaced.
If you fail to replace damaged wheels, a tire may slip off a wheel or they may cause loss of handling control.
Replacement with used wheels is not recommended as they may have been subjected to rough treatment or high mileage and could fail without warning. Also, bent wheels which have been straightened may have hidden structural damage and therefore should not be used. Never use an inner tube in a leaking wheel which is designed for a tubeless tire.
Wheel selection
When replacing wheels, care should be taken to ensure that they are equivalent to those removed in load capacity, diameter, rim width, and offset.
Correct replacement wheels are available at your Lexus dealer.
A wheel of a different size or type may adversely affect handling, wheel and bearing life, brake cooling, speedometer/odometer calibration, stopping ability, headlight aim, bumper height, vehicle ground clearance, and tire or snow chain clearance to the body and chassis.
230
CHASSIS
ALUMINUM WHEEL PRECAUTIONS
After driving your vehicle the first 1600 km (1000 miles), check that the wheel nuts are tight.
If you have rotated, repaired, or changed your tires, check that the wheel nuts are still tight after driving 1600 km (1000 miles).
When using tire chains, be careful not to damage the aluminum wheels.
Use only the Lexus wheel nuts and wrench designed for your aluminum wheels.
When balancing your wheels, use only Lexus balance weights or equivalent and a plastic or rubber hammer.
As with any wheel, periodically check your aluminum wheels for damage. If damaged, replace immediately.
SUSPENSION AND CHASSIS
!CAUTION
Do not modify the suspension/chassis with lift kits, spacers, springs, etc. It can cause dangerous handling characteristics, resulting in loss of control.
231

CHASSIS
232

SECTION |
6 ± 5 |
SERVICE PROCEDURES AND |
|
SPECIFICATIONS |
|
Body |
|
Specifications |
252 |
Protecting your vehicle from corrosion |
253 |
Washing and waxing |
254 |
Cleaning the interior |
255 |
251

BODY
SPECIFICATIONS
±DIMENSIONS AND WEIGHT
Overall length |
4820 mm (189.8 in.) |
|
Overall width |
1930 mm (76.0 in.) |
|
Overall height |
1870 mm (73.6 in.)* |
|
Wheelbase |
|
2850 mm (112.2 in.) |
Tread |
± Front |
1595 mm (62.8 in.) |
|
± Rear |
1600 mm (63.0 in.) |
Vehicle capacity weight (occupants + luggage) |
524 kg (1155 lb.) |
|
|
|
|
*: Unladen vehicle |
|
|
±FUEL TANK |
|
|
Capacity |
|
95 L (25.1 gal., 20.9 Imp.gal.) |
|
|
|
252

BODY
PROTECTING YOUR VEHICLE
FROM CORROSION
Proper care of your Lexus can help ensure long±term corrosion prevention
The most common causes of corrosion to your vehicle are:
The accumulation of road salt, dirt and moisture in hard±to±reach areas under the vehicle.
Chipping of paint or undercoating caused by minor accidents or by stones and gravel.
The following conditions will cause or accelerate corrosion of your vehicle, so it is important to keep your vehicle, particularly the underside, as clean as possible and to repair any damage to paint or protective coatings as soon as possible.
The presence of road salt or dust control chemicals, salt in the air near the sea coast, industrial air pollution.
High humidity, especially at temperatures just above freezing point.
Certain parts of your vehicle are wet or damp for an extended period of time, even though other parts of the vehicle are dry.
Components of the vehicle which are prevented from quick±drying due to lack of proper ventilation are exposed to high temperature.
To help prevent corrosion on your Lexus, follow these guidelines:
Keep your vehicle clean by regular washing. In addition, observe the following points.
If you drive on salted roads in the winter or if you live near the ocean, you should hose off the undercarriage at least once a month to minimize corrosion.
High pressure water or steam is effective for cleaning the vehicle's underside and wheel housings. Pay particular attention to these areas as it is difficult to see all the mud and dirt. It will do more harm than good to simply wet the mud and debris without removing them. The lower edge of doors, rocker panels and frame members have drain holes which should not be allowed to clog with dirt as trapped water in these areas can cause corrosion.
Wash the underside of the vehicle thoroughly when winter is over.
See ªWashing and waxingº for more tips.
Check the condition of your vehicle's paint and trim. If you find any chips or scratches in the paint, touch them up immediately to prevent corrosion from starting. If the chips or scratches have gone through the bare metal, have a qualified body shop make the repair.
253

BODY
Check the interior of your vehicle. Water and dirt can |
WASHING AND WAXING |
|
accumulate under the floor mats and could cause corrosion. |
Washing your Lexus by hand |
|
Occasionally check under the mats to make sure the area is |
||
dry. Be particularly careful when transporting chemicals, |
Work in the shade and wait until the vehicle body is not |
|
cleansers, fertilizers, salt, etc. These should be transported |
hot to the touch. |
|
in proper containers. If a spill or leak should occur, |
1. Rinse off loose dirt with a hose. Remove any mud or road |
|
immediately clean and dry the area. |
||
salt from the underside of the vehicle or in the wheel wells. |
||
Use mud shields on your wheels. If you drive on salted or |
||
2. Wash with a mild car±wash soap, mixed according to the |
||
gravel roads, mud shields help protect your vehicle. Full size |
||
manufacturer's instructions. Use a soft cotton mitt and keep |
||
shields, which come near to the ground as possible, are the |
||
it wet by dipping it frequently into the wash water. Do not rub |
||
best. We recommend that the fittings and the area where the |
||
hard ± let the soap and water remove the dirt. |
||
shields are installed be treated to resist corrosion. Your |
||
Aluminum wheels: Use only a mild soap or neutral |
||
Lexus dealer will be happy to assist in supplying and |
||
detergent. |
||
installing the shields if they are recommended for your area. |
||
Urethane bumpers and side moldings: Wash carefully. |
||
Do not park your vehicle in a damp, poorly ventilated |
||
Do not scrub with abrasive cleaners. The bumper and side |
||
garage. If you wash your vehicle in the garage, or if you drive |
||
molding faces are soft. |
||
it in covered with water or snow, your garage may be so |
||
Road tar: Remove with turpentine or cleaners that are |
||
damp it will cause corrosion. Even if your garage is heated, |
||
a wet vehicle can corrode if the ventilation is poor. |
marked safe for painted surfaces. |
|
|
|
|
|
NOTICE |
|
|
Do not use gasoline or strong solvents, which may |
|
|
be toxic or cause damage. |
|
|
3. Rinse thoroughly ± dried soap can cause streaking. In |
|
|
hot weather you may need to rinse each section right after |
|
|
you wash it. |
254
BODY
4. To prevent water spots, dry the vehicle using a clean soft cotton towel. Do not rub or press hard ± you might scratch the paint.
Automatic car wash
NOTICE
To prevent damage to the antenna, make sure it is retracted before driving your vehicle through an automatic car wash.
Your vehicle may be washed in an automatic car wash, but remember that the paint can be scratched by some type of brushes, unfiltered washing water, or the washing process itself. Scratching reduces paint durability and gloss, especially on darker colors. The manager of the car wash should be able to advise you whether the process is safe for the paint on your vehicle.
Waxing your Lexus
Polishing and waxing is recommended to maintain the original beauty of your Lexus' finish.
1.Always wash and dry the vehicle before you begin waxing, even if you are using a combined cleaner and wax.
2.Use a good quality polish and wax. If the finish has become extremely weathered, use a car±cleaning polish, followed by a separate wax. Carefully follow the manufacturer's instructions and precautions. Be sure to polish and was the chrome trim as well as the paint.
3. Wax the vehicle again when water does not bead but remains on the surface in large patches.
CLEANING THE INTERIOR
!CAUTION
Do not wash the vehicle floor with water, or allow water to get onto the floor when cleaning the vehicle interior or exterior. Water may get into audio components or other electrical components above or under the floor carpet (or mat) and cause a malfunction; and it may cause body corrosion.
Leather Interior
Remove dirt using a soft cloth dampened with 5% solution of neutral detergent for wool. Then thoroughly wipe off all traces of detergent with a clean damp cloth.
After cleaning or whenever any part of the leather gets wet, dry with a soft clean cloth. Allow the leather to dry in a ventilated shaded area.
255

BODY
NOTICE |
|
Synthetic Leather Areas |
|
|
(Part of door panels) |
||
If a stain should fail to come out with a neutral |
|
||
|
The synthetic leather areas may be easily cleaned with |
||
detergent, apply a cleaner that does not contain an |
|
||
organic solvent. |
|
a mild soap or detergent and water. |
|
Never use organic substances such as benzine, |
|
First vacuum over the upholstery to remove loose dirt. Then, |
|
alcohol or gasoline, or alkaline or acid solutions |
|
using a sponge or soft cloth, apply the soap solution to the |
|
for cleaning the leather as these could cause |
|
synthetic leather. After allowing it to soak in for a few minutes |
|
discoloring. |
|
to loosen the dirt, remove the dirt and wipe off the soap with |
|
Use of a nylon brush or synthetic fiber cloth, etc. |
|
a clean damp cloth. If all the dirt does not come off, repeat |
|
|
the procedure. Commercial foaming±type cleaners are also |
||
may scratch the fine grained surface of the leather. |
|
||
|
available which work well. Follow the manufacturer's |
||
Mildew may develop on soiled leather upholstery. |
|
||
|
instructions. |
||
Be especially careful to avoid oil spots. try to keep |
|
||
|
|
|
|
your upholstery always clean. |
|
NOTICE |
|
Long exposure to direct sunlight may cause the |
|
Do not use solvent, thinner, gasoline or window |
|
leather surface to harden and shrink. Keep your |
|
cleaner on the interior. |
|
vehicle in a shaded area, especially in the summer. |
|
|
|
|
|
|
|
The interior of your vehicle is apt to heat up on hot |
|
|
|
summer days, so avoid placing on the upholstery |
|
|
|
items made of vinyl or plastic or containing was as |
|
|
|
these tend to stick to leather when warm. |
|
|
|
Improper cleaning of the leather upholstery could |
|
|
|
result in discoloration or staining. |
|
|
|
|
|
|
|
256
BODY
Carpets, Windows and Seat Belts
Begin by vacuuming thoroughly to remove as much dirt as possible. Several types of foam cleaners are available; some are in aerosol cans and others are powders or liquids which you mix with water to produce a foam. To shampoo the carpets, use a sponge or brush to apply the foam. Rub in overlapping circles. Do not apply water ± the best results are obtained by keeping the carpet as dry as possible. Read the shampoo instructions and follow them closely.
The seat belts may be cleaned with mild soap and water or with lukewarm water.
Use a cloth or sponge. As you are cleaning, check the belts for excessive wear, fraying or cuts.
NOTICE
Use a good foam±type shampoo to clean the carpets.
Do not use dye or bleach on the belts±it may weaken them.
The windows may be cleaned with any household window cleaner.
When cleaning the inside of the rear window, be careful not to scratch or damage the heater wires.
Air Conditioning Control Panel, Car Audio,
Instrument Panel, Console Panel, and
Switches
Use a soft damp cloth for cleaning.
Soak a clean soft cloth in water or lukewarm water then lightly wipe off any dirt.
NOTICE
Do not use organic substances (solvents, kerosene, alcohol, gasoline, etc.) or alkaline or acidic solutions. These chemicals can cause discoloring, staining or peeling of the surface.
If you use cleaners or polishing agents, make sure their ingredients do not include the substances mentioned above.
If you use a liquid car freshener, do not spill the liquid onto the vehicle's interior surfaces. It may contain the ingredients mentioned above. Immediately clean any spill using the method mentioned above.
If you have any questions about the cleaning of your Lexus, your local Lexus dealer will be pleased to answer them.
257

BODY
258

SECTION 7
REPORTING SAFETY DEFECTS FOR U.S. OWNERS
Reporting safety defects for U.S. owners |
260 |
259

REPORTING SAFETY DEFECTS FOR U.S. OWNERS
REPORTING SAFETY DEFECTS FOR
U.S. OWNERS
If you believe that your vehicle has a defect which could cause a crash or could cause injury or death, you should immediately inform the National Highway Traffic Safety Administration (NHTSA) in addition to notifying Toyota Motor Sales, U.S.A., Inc. (Toll±free: 1±800±25±LEXUS).
If NHTSA receives similar complaints, it may open an investigation, and if it feels that a safety defect exists in a group of vehicles, it may order a recall and remedy campaign. However, NHTSA cannot become involved in individual problems between you, your dealer, or Toyota Motor Sales, U.S.A.,
Inc.
To contact NHTSA, you may either call the Auto
Safety Hotline toll±free at 1±800±424±9393 (or
366±0123 in Washington, D.C., area) or write to: NHTSA, U.S. Department of Transportation, Washington, D.C. 29590. You can also obtain other information about motor vehicle safety from the Hotline.
260

SECTION |
6 ± 4 |
SERVICE PROCEDURES AND |
|
SPECIFICATIONS |
|
Electrical components |
|
Specifications |
234 |
Checking battery operation |
237 |
Battery recharging precautions |
241 |
Checking and replacing the blade type fuses |
242 |
Checking the cartridge type fuses |
243 |
Checking the fusible links |
243 |
Adding washer fluid |
245 |
Checking the headlight aim |
246 |
Replacing light bulbs |
247 |
233

ELECTRICAL COMPONENTS
SPECIFICATIONS |
± FUSES |
± FUSE LOCATIONS |
|
|
|
" Driver's side instrument panel
" Engine compartment
"Engine compartment
Driver's side instrument panel
234

ELECTRICAL COMPONENTS
No. |
FUSE |
AMPERE |
CIRCUIT |
|
|
|
|
|
|
|
|
|
Cigarette lighter, Power rear view |
|
|
|
|
mirrors, Digital clock display, |
|
1 |
CIG |
15 |
Radio, Cassette tape player, |
|
Power antenna, Automatic |
||||
|
|
|
||
|
|
|
transmission shift lock system, |
|
|
|
|
SRS airbag system |
|
|
|
|
|
|
|
|
|
Tail lights, License plate lights, |
|
2 |
TAIL |
15 |
Parking and front side marker |
|
lights, Instrument panel lights, |
||||
|
|
|
||
|
|
|
Clock, Glovebox light |
|
|
|
|
|
|
3 |
OBD |
15 |
On±board diagnosis system |
|
|
|
|
|
|
|
|
|
Stop lights, Multiport fuel injection |
|
|
|
|
system/sequential multiport fuel |
|
4 |
STOP |
10 |
injection system, Cruise control |
|
cancel device, Automatic |
||||
|
|
|
||
|
|
|
transmission shift |
|
|
|
|
lock system |
|
|
|
|
|
|
5 |
DEFOG |
20 |
Rear window defogger |
|
|
|
|
|
|
6 |
WIPER |
20 |
Windshield wipers and washer, |
|
Rear window wiper and washer |
||||
|
|
|
||
|
|
|
|
|
|
|
|
Gauges and meters, Service |
|
7 |
GAUGE |
10 |
reminder indicators and warning |
|
buzzers (except discharge and |
||||
|
|
|
open door warning lights), |
|
|
|
|
Back±up lights |
|
|
|
|
|
|
8 |
TURN |
7.5 |
Turn signal lights |
|
|
|
|
|
|
9 |
ECU±IG |
10 |
Cruise control system |
|
|
|
|
|
|
10 |
ECU±B |
10 |
SRS airbag system |
|
|
|
|
|
No. |
FUSE |
AMPERE |
CIRCUIT |
|
|
|
|
|
|
11 |
REAR± |
20 |
Air conditioning system |
|
HTR |
||||
|
|
|||
|
|
|
|
|
|
|
|
Multiport fuel injection |
|
12 |
IGN |
7.5 |
system/sequential multiport fuel |
|
injection system, Emission control |
||||
|
|
|
||
|
|
|
system, SRS airbag system |
|
|
|
|
|
|
13 |
A.C |
10 |
Air conditioning system |
|
|
|
|
|
|
14 |
DIFF |
30 |
Differential lock system |
|
|
|
|
|
|
|
|
|
Vehicle sold in Canada |
|
15 |
EFI |
15 |
Multiport fuel injection |
|
system/sequential multiport fuel |
||||
|
|
|
||
|
|
|
injection system |
|
|
|
|
|
|
|
CHARGE |
7.5 |
Vehicles sold in U.S.A. |
|
|
Charging system, Discharge |
|||
16 |
|
|
warning light |
|
|
|
|
||
|
DRL |
7.5 |
Vehicles sold in Canada |
|
|
Daytime Running Light System |
|||
|
|
|
||
|
|
|
|
|
|
|
|
Vehicles sold in U.S.A. |
|
|
EFI |
15 |
Multiport fuel injection |
|
|
system/sequential multiport fuel |
|||
17 |
|
|
||
|
|
injection system |
||
|
|
|
|
|
|
RADIO |
20 |
Vehicles sold in Canada |
|
|
Audio system |
|||
|
|
|
||
|
|
|
|
|
18 |
TEL |
15 |
Vehicles sold in Canada |
|
Telephone |
||||
|
|
|
||
|
|
|
|
235

ELECTRICAL COMPONENTS
No. |
FUSE |
AMPERE |
CIRCUIT |
|
|
No. |
FUSE |
AMPERE |
CIRCUIT |
|
|
|
|
|
|
|
|
|
|
|
|
|
HEAD |
15 |
Vehicles sold in U.S.A. |
|
|
|
|
|
Interior lights, Personal light, |
|
|
(RH) |
Right±hand headlights |
|
|
|
|
|
Luggage compartment light, |
|
|
|
|
|
|
|
|
|
|
|||
19 |
|
|
|
|
|
24 |
DOME |
10 |
Ignition switch light, Open door |
|
HEAD |
|
Vehicles sold in Canada |
|
|
warning light, Clock, Radio, |
|
||||
|
15 |
|
|
|
|
|
Cassette tape player, Power |
|
||
|
(RH±UPR) |
Right±hand headlights |
|
|
|
|
|
|
||
|
|
(High beam) |
|
|
|
|
|
antenna, Vanity lights |
|
|
|
|
|
|
|
|
|
|
|
|
|
|
|
|
|
|
|
|
FL |
|
|
|
|
HEAD |
15 |
Vehicles sold in U.S.A. |
|
|
25 |
40 |
Air conditioning system |
|
|
|
(LH) |
Left±hand headlights |
|
HEATER |
|
|||||
20 |
|
|
|
|
|
|
|
|||
|
|
|
|
|
|
|
|
Power windows, |
|
|
HEAD |
|
Vehicles sold in Canada |
|
|
26 |
FL |
30 |
|
||
|
15 |
|
|
Power door lock system, |
|
|||||
|
(LH±UPR) |
Left±hand headlights |
|
POWER |
|
|||||
|
|
(High beam) |
|
|
|
|
Electric moon roof |
|
||
|
|
|
|
|
|
|
|
|
|
|
|
|
|
|
|
|
|
|
|
All components in ªCIGº, |
|
|
RADIO |
20 |
Vehicles sold in U.S.A. |
|
|
|
|
|
|
|
|
Audio system |
|
|
27 |
AM 1 |
50 |
ªWIPERº, ªGAUGEº, ªTURNº, |
|
||
21 |
|
|
|
ªEGU±IGº, ªREAR±HTRº, ªIGNº, |
|
|||||
|
|
Vehicles sold in Canada |
|
|
|
|
|
|
||
HEAD |
15 |
|
|
|
|
|
ªDIFFº and ªFL POWERº circuits |
|
||
|
Right±hand headlights |
|
|
|
|
|
|
|||
|
(RH±UWR) |
|
|
28 |
ABS |
60 |
Anti±lock brake system |
|
||
|
|
(Low beam) |
|
|
||||||
|
|
|
|
|
|
|
|
|
|
|
|
TEL |
15 |
Vehicles sold in U.S.A. |
|
|
|
|
|
|
|
|
Telephone |
|
|
|
|
|
|
|
||
|
|
|
|
|
|
|
|
|
|
|
22 |
|
|
|
|
|
|
|
|
|
|
HEAD |
15 |
Vehicles sold in Canada |
|
|
|
|
|
|
|
|
|
Left±hand headlights |
|
|
|
|
|
|
|
||
|
(LH±UWR) |
|
|
|
|
|
|
|
||
|
|
(Low beam) |
|
|
|
|
|
|
|
|
|
|
|
|
|
|
|
|
|
|
|
23 |
HAZ± |
15 |
Emergency flashers, Horns |
|
|
|
|
|
|
|
HORN |
|
|
|
|
|
|
|
|||
|
|
|
|
|
|
|
|
|
|
|
|
|
|
|
|
|
|
|
|
|
|
236
ELECTRICAL COMPONENTS
CHECKING BATTERY CONDITION
Precautions
!CAUTION
BATTERY PRECAUTIONS
The battery produces flammable and explosive hydrogen gas.
Do not cause a spark by contacting the battery terminals with tools.
Do not smoke or light a match near the battery.
The electrolyte contains poisonous and corrosive sulfuric acid.
Avoid contact with eyes, skin or clothes.
Never inhale or swallow electrolyte.
Wear protective safety glasses when working near the battery.
Keep children away from the battery. EMERGENCY MEASURES
If electrolyte gets in your eyes, flush your eyes with clean water for at least 15 minutes and get immediate medical attention. If possible, continue to apply water with a sponge or cloth while traveling to the medical office.
If electrolyte gets in your skin, thoroughly wash the contacted area. If you feel a pain or burn, get medical attention immediately.
If electrolyte gets on your clothes, there is a possibility of its soaking through to your skin, so immediately take off the exposed clothing and follow the procedure above, if necessary.
If you happen to swallow electrolyte, drink a large quantity of water or milk. Follow with milk of magnesia, beaten raw egg or vegetable oil. Then go immediately for emergency help.
237
ELECTRICAL COMPONENTS |
|
|
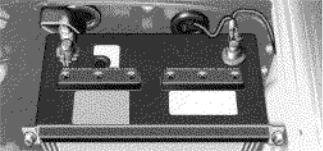
Checking battery exterior |
|
|
NOTICE |
||
|
||
|
Make sure the engine and all accessories are |
|
|
turned off before performing maintenance. |
|
|
When checking the battery, remove the ground |
|
|
cable first and reinstall it last. |
|
|
Be careful not to cause a short circuit with tools. |
|
|
Take care no solution gets into the battery when |
|
|
washing it. |
|
|
|
" Terminals Hold±down clamp
Check the battery for corroded or loose connections, cracks, or loose hold±down clamps.
1.If the battery is corroded, wash it off with a solution of warm water and baking soda. Coat the terminals with grease to prevent further corrosion.
2.If the connections are loose, tighten the clamp bolts ± but do not overtighten.
3.Tighten the hold±down clamp only enough to keep the battery firmly in place. Overtightening may damage the battery case.
238
 Loading...