


HR-J282EU
Table of contents
 Loading...
JVC HR-J282EU, HR-J283EU, HR-J290EU, HR-J295EK, HR-J295MS User Manual
...
ENGLISH
VIDEO CASSETTE RECORDER
HR-J590/J593/J599EU
HR-J290/J293EU
INSTRUCTIONS
LPT0667-001B Printed in Indonesia
COPYRIGHT © 2002 VICTOR COMPANY OF JAPAN, LTD. 0202 MNVfIDfOT
SAFETY FIRST............................................................................... 1
Buttons, Connectors and Indicators ................................................ 3
Front Panel ............................................................................. 3
Rear Panel .............................................................................. 3
Remote control....................................................................... 3
On-screen display .................................................................. 4
Main Menu ............................................................................ 4
Basic Connections.......................................................................... 5
Initial Settings.............................................................................. 6
Video Channel Set.................................................................. 6
Language Set .......................................................................... 7
Clock Set................................................................................ 7
Tuner Set ................................................................................ 7
Playback .................................................................................... 10
Recording................................................................................... 11
Timer Recording.......................................................................... 12
S
HOWVIEW
Timer Programming .............................................................. 13
Checking, canceling or changing programme settings........... 13
®
Timer Programming........................................... 12
Editing ....................................................................................... 14
Editing with another video recorder or a camcorder ............. 14
System Connections .................................................................... 15
Connecting to a satellite receiver.......................................... 15
Connecting/Using a decoder ................................................ 15
Connecting/Using a stereo system
(HR-J590/J593/J599EU only) ................................................. 15
Subsidiary Settings..................................................................... 15
Child Lock............................................................................ 15
Specifications.............................................................................. 16
SAFETY FIRST
Safety Precautions
The rating plate and the safety caution are on the rear of the unit.
WARNING: DANGEROUS VOLTAGE INSIDE
WARNING: TO PREVENT FIRE OR SHOCK HAZARD, DO NOT
CAUTION
䡲 When you are not using the recorder for a long period of
time, it is recommended that you disconnect the power cord
from the mains outlet.
䡲 Dangerous voltage inside. Refer internal servicing to qualified
service personnel. To prevent electric shock or fire hazard,
remove the power cord from the mains outlet prior to
connecting or disconnecting any signal lead or aerial.
WAR NIN G
There are two different types of SECAM colour systems:
SECAM-L, used in FRANCE (also called SECAM-West), and
SECAM-B, used in Eastern European countries (also called
SECAM-East).
1. This recorder can also receive SECAM-B colour television
2. Recordings made of SECAM-B television signals produce
3. SECAM-L prerecorded cassettes or recordings made with a
4. This recorder cannot be used for the SECAM-L standard. Use
EXPOSE THIS UNIT TO RAIN OR MOISTURE.
signals for recording and playback.
monochrome pictures if played back on a video recorder of
SECAM-L standard, or do not produce normal colour
pictures if played back on a PAL video recorder with
SECAM-B system incorporated (even if the TV set is SECAMcompatible).
SECAM-L video recorder produce monochrome pictures
when played back with this recorder.
a SECAM-L recorder to record SECAM-L signals.
IMPORTANT
䡲 Please read the various precautions on page 1 and 2 before
installing or operating the recorder.
䡲 It should be noted that it may be unlawful to re-record pre-
recorded tapes, records, or discs without the consent of the
owner of copyright in the sound or video recording, broadcast
or cable programme and in any literary, dramatic, musical, or
artistic work embodied therein.
● Cassettes marked “VHS” (or “S-VHS”) can be used with this
video cassette recorder, however, only VHS signals can be
played back and recorded.
● HQ VHS is compatible with existing VHS equipment.
● S
HOWVIEW
Corporation. The S
licence from Gemstar Development Corporation.
—1—
is a registered trademark of Gemstar Development
HOWVIEW
system is manufactured under
For Italy:
A
“It is declared that this product, brand JVC, conforms to the
Ministry Decree n. 548 of 28 Aug.’95 published in the Official
Gazette of the Italian Republic n. 301 of 28 Dec.’95”
The STANDBY/ON 1 button does not completely shut off
mains power from the unit, but switches operating current on
and off. “`” shows electrical power standby and “ ! ” shows
ON.
For HR-J590/J593/J599EU owners:
Video tapes recorded with this video recorder in the LP (Long
Play) mode cannot be played back on a single-speed video
recorder.
For HR-J290/J293EU owners:
Video tapes recorded with another recorder in the LP (Long
Play) mode cannot be played back on this video recorder.
When the equipment is installed in a cabinet or a shelf, make sure
that it has sufficient space on all sides to allow for ventilation
(10 cm or more on both sides, on top and at the rear).
When discarding batteries, environmental problems must be
considered and the local rules or laws governing the disposal of
these batteries must be followed strictly.
Failure to heed the following precautions may result in damage to
the recorder, remote control or video cassette.
1. DO NOT
… in an environment prone to extreme temperatures or
… in direct sunlight.
… in a dusty environment.
… in an environment where strong magnetic fields are
… on a surface that is unstable or subject to vibration.
2. DO NOT
(If the ventilation openings or holes are blocked by a
newspaper or cloth, etc., the heat may not be able to get out.)
3. DO NOT
control.
4. DO NOT
recorder or remote control.
(If water or liquid is allowed to enter this equipment, fire or
electric shock may be caused.)
5. DO NOT
6. DO NOT
water. Also DO NOT place any containers filled with water or
liquids (such as cosmetics or medicines, flower vases, potted
plants, cups, etc.) on top of this unit.
7. DO NOT
candles, on the apparatus.
8. AVOID
place the recorder …
humidity.
generated.
block the recorder’s ventilation openings or holes.
place heavy objects on the recorder or remote
place anything which might spill on top of the
expose the apparatus to dripping or splashing.
use this equipment in a bathroom or places with
place any naked flame sources, such as lighted
violent shocks to the recorder during transport.
MOISTURE CONDENSATION
Moisture in the air will condense on the recorder when you move
it from a cold place to a warm place, or under extremely humid
conditions—just as water droplets form on the surface of a glass
filled with cold liquid. Moisture condensation on the head drum
will cause damage to the tape. In conditions where condensation
may occur, keep the recorder’s power turned on for a few hours to
let the moisture dry.
How to use the remote control
Before use, insert the batteries in the correct directions as
indicated under the battery cover. The remote control can operate
most of your recorder’s functions, as well as basic functions of JVC
TV sets.
● Point the remote control toward the receiving window on the
recorder.
● The maximum operating distance of the remote control is about
7.5 m.
● To operate your JVC TV, press the corresponding button: TV 1,
TV AV, TV PR +/–, TV %+/– (TV Volume).
NOTE:
If the remote control does not work properly, remove its batteries,
wait for a few seconds, replace the batteries and then try again.
Video heads cleaning
Accumulation of dirt and other particles on the video heads may
cause the playback picture to become blurred or interrupted. Be
sure to contact your nearest JVC dealer if such troubles occur.
Usable cassettes
● Compact VHS camcorder recordings can
be played on this recorder. Simply place
the recorded cassette into a VHS Cassette
Adapter and it can be used just like any
full-sized VHS cassette.
● This recorder can record on regular VHS and Super VHS
cassettes. However, it will record and play back regular VHS
signals only. It is not possible to play back a recorded Super VHS
cassette.
TTENTION:
To mobile phone users:
Using a mobile phone in the vicinity of the recorder may cause
picture vibration on the TV screen or change the screen to a
blue back display.
On placing the recorder:
Some TVs or other appliances generates strong magnetic fields.
Do not place such appliance on top of the recorder as it may
cause picture disturbance.
—2—
Buttons, Connectors and
A
Indicators
Remote control
See “NOTE”
below.
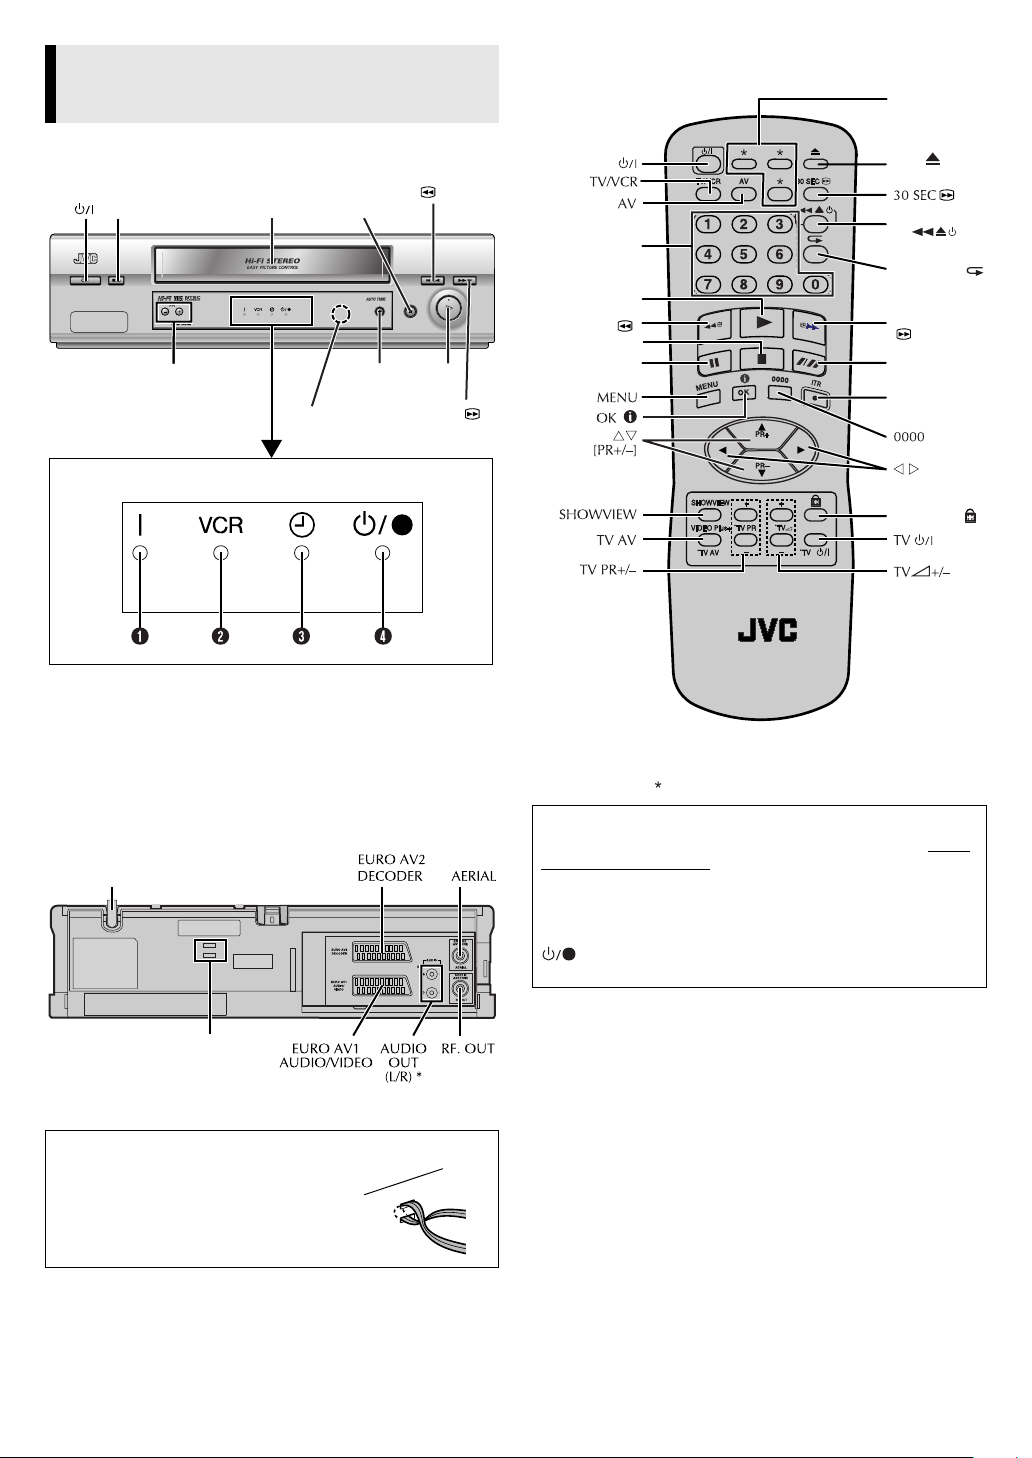
Front Panel
Cassette
Stop/Eject
0
PR +/–
loading slot
Infrared beam
receiving window
Display panel
A Power Indicator
B VCR Indicator
C Timer Indicator
D Standby/Record Indicator*
* Standby/Record Indicator lights when the recorder is in standby mode
or during recording.
Pa us e
Record
Rewind
9
7
Fast
Forward
Play
5
3
4
Number keys
Play
4
Rewind
3
Stop
8
Pa us e
9
NOTE:
The buttons with do not function with this recorder.
Eject
Easy Power
off
Easy Repeat
Fast Forward
5
SP/LP (p)
Record
7
[ITR]
Child Lock
Rear Panel
Mains power cord
See “ATTENTION”
below.
* HR-J590/J593/J599EU only
TTENTION:
Do not drop the tying band for fixing the
main power cord into the inside of the
recorder. It may cause a malfunction.
About 1 Button
When you press 1 on the recorder and remote control while
the recorder is turned on, each button works differently.
On the recorder
When you press 1, the recorder is turned off completely.
On the remote control
When you press 1, the recorder enters the standby mode.
lights on the display panel. To turn off the recorder
completely, press 1 on the recorder.
—3—
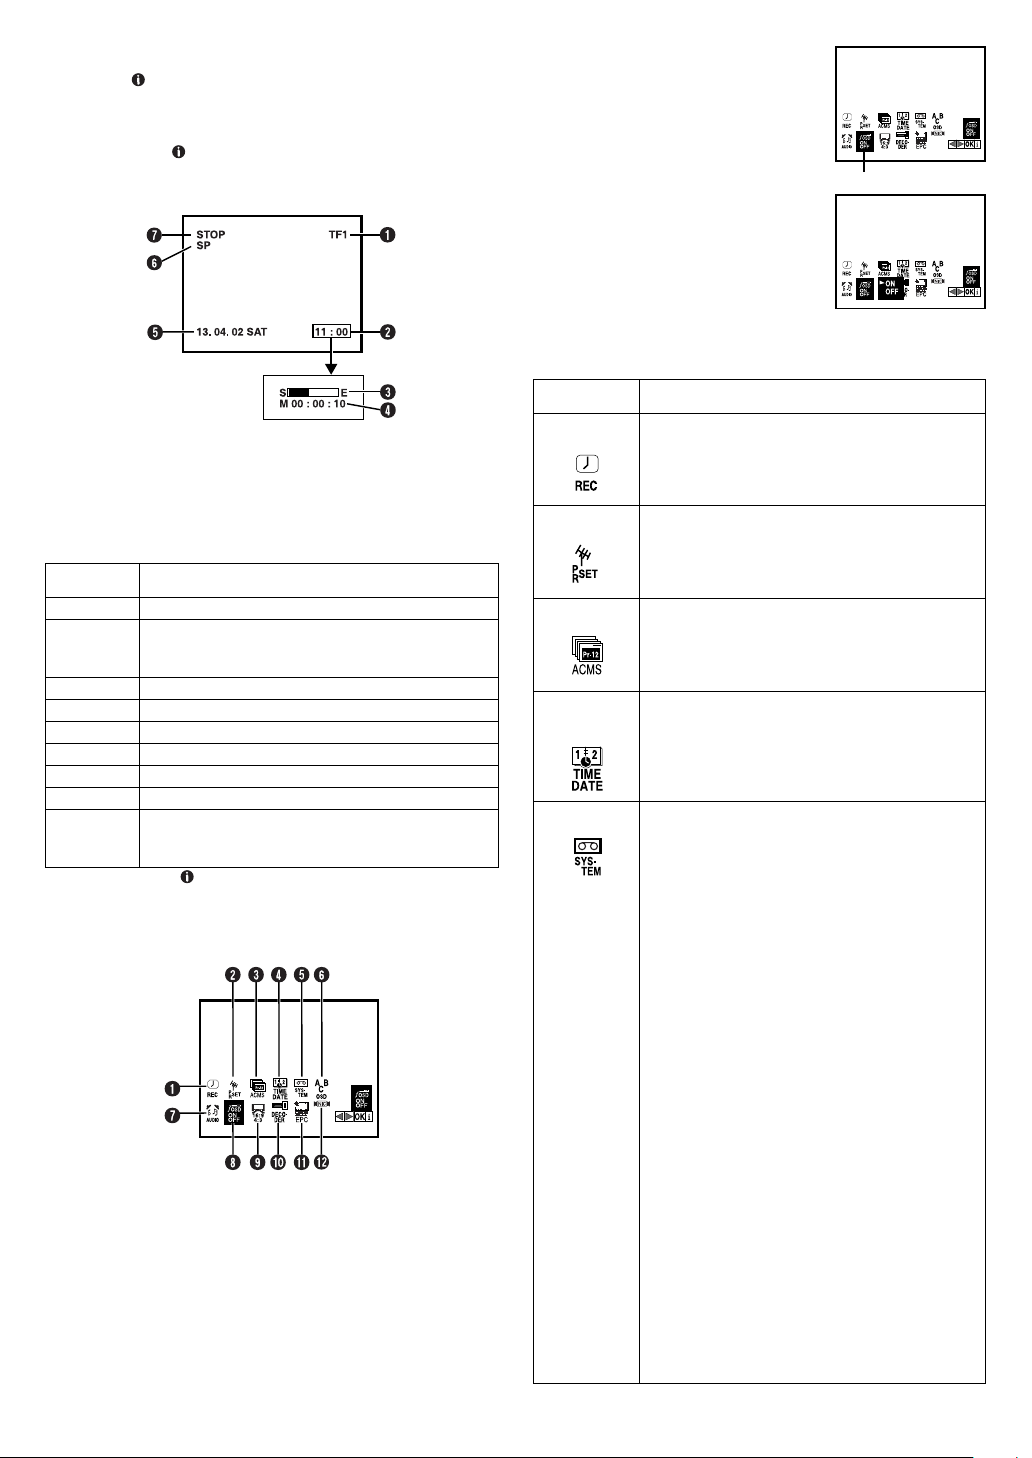
On-screen display
If you press (OK) on the remote control when “OSD” is set to
“ON” (
screen. The indications except the clock or time counter
disappears in about 5 seconds. To clear the on-screen display
completely, press (OK) again.
The indications are not recorded even if the recorder is in the
recording mode.
5), you can see the current recorder status on the
墌
A
Access Main Menu screen
Press MENU. Press w e to select the icon
“OSD”, then press OK.
●
If you select the icon A to D, follow the
each setting procedure.
●
If you select the icon E to L, go to
step
2222
.
B
Change setting
Press rt to set to “ON”, then press w or
e.
C
Return to normal screen
Press MENU.
*The default setting is bold in the following table.
Icon Description
OSD
A Channel and auxiliary input
B Clock*
C Tape position*
D Time counter*
E Current day/month/year
F Tape speed
G Recorder operation mode
On-screen
display
PLAY appears when you playback.
REW
FF appears during fast-forwarding.
EZ REPEAT appears during Ez repeat playback. (
EJECT appears when you eject the cassette.
STOP appears when you stop playback or recording.
RECORD appears during recording.
RECP appears in the record pause mode.
SAFE
* Each time you press (OK), the display shows clock or tape position and
time counter alternatively.
appears during rewinding, or blinks during
rewinding with Rewind Power Off function.
10)
(
墌
appears when the recorder enters in child lock
mode, or any buttons on the recorder are pressed
during child lock mode. (
Description
墌
15)
墌
10)
Main Menu
You can perform various operations or change various mode
settings on the Main Menu Screen.
●
Turn on the recorder and the TV, and set your TV to its AV mode
or video channel.
●
The procedure shows how to set “OSD” to “ON”.
A
B
C
D
REC
PR SET
ACMS
TIME
Select this icon to timer-record the programme.
(
13)
墌
Select this icon to perform Manual Channel Set.
(
8, 9)
墌
Select this icon to perform Auto Channel Set.
(
7) Auto Channel Set automatically assigns
墌
all receivable stations in your area.
Select this icon to set clock manually. (墌7)
DATE
E
SYSTEM AUTO / PAL / MESECAM
You can play back PAL, NTSC and MESECAM
tapes, or record PAL and SECAM* signals on this
recorder. Select the appropriate colour system.
* SECAM signals will be recorded as MESECAM on
this recorder; MESECAM is the designation for tapes
with SECAM signals that have been recorded on a
MESECAM-compatible PAL video cassette recorder.
: Normally select this. The appropriate
AUTO
colour system is selected automatically
depending on the playback or recording signals.
If “AUTO” does not work correctly, set the
following mode manually.
: To record PAL signals, or playback a PAL.
PAL
MESECAM
back a MESECAM tape.
: To record SECAM signals, or play
NOTES:
About NTSC Playback
●
Some TVs shrink the picture vertically and
place black bars at the top and bottom of the
screen, or cut off the top and bottom portions
of superimposed displays. This is not a
malfunction.
●
The picture may roll up and down. This can
be corrected if your TV has the V-HOLD
control function.
●
The counter and tape remaining time readings
will be incorrect.
●
During search, still, or frame-by-frame
playback, the picture will be distorted, and
there may be a loss of colour.
—4—

Icon Description
F
ABC OSD
G
AUDIO STEREO / LEFT / RIGHT / MONO
Select this icon to set the language. You can
select among 6 languages. (
(HR-J590/J593/J599EU only)
Your recorder is capable of recording four
soundtracks (STEREO, LEFT, RIGHT and
MONO) and plays back the one you select.
: For Hi-Fi stereo tapes
STEREO
: For main audio of Bilingual tapes
LEFT
: For sub audio of Bilingual tapes
RIGHT
: For audio-dubbed tapes
MONO
H
OSD ON / OFF
When this function is set to “ON”, various
recorder status information (on-screen display)
appears on the screen.
NOTE:
When you use the recorder as the source player
for editing a tape, be sure to set this function to
“OFF”. Otherwise, the recorder status
information will be recorded on the edited tape.
I
16:9/4:3 AUTO / 16:9 / 4:3
You can select the aspect ratio of your TV.
: Normally select this. You can play back
AUTO
the 16:9 and 4:3 screen-programme as they are.
: You can play back the programme with the
16:9
16:9 screen format.
: You can play back the programme with the
4:3
4:3 screen format.
NOTE:
Set your TV to its AV mode if the picture is cut
off on the screen when you play back the
programme with the 16:9 screen format.
墌
Basic Connections
7)
A
Check contents
Make sure the package contains all of the accessories listed in
“Specifications” (
B
Situate recorder
Place the recorder on a stable, horizontal surface.
C
Connect recorder to TV
Aerial connector
21-pin SCART cable
(not provided)
Mains power cord
墌
Back of TV
21-pin SCART
connector
16).
RF cable
(provided)
TV aerial cable
AERIAL
J
DECODER ON / OFF
K
EPC OFF / SOFT / SHARP
Set “DECODER” to “ON” when you use a
decoder connected to the EURO AV2
DECODER connector.
This function helps you to adjust the playback
picture quality according to your preference.
: Picture quality is not adjusted.
OFF
: Reduces image coarseness when viewing
SOFT
overplayed tapes containing much noise.
: Clearer, sharper-edged picture when
SHARP
viewing images with much flat, same-coloured
surfaces such as cartoons.
NOTE:
You can perform EPC setting only during
playback.
L
NIC AUTO / OFF
(HR-J590/J593/J599EU only)
Select the appropriate mode. Refer to page 11.
: The recorder detect NICAM broadcasts
AUTO
automatically.
: The recorder does not detect NICAM
OFF
broadcasts.
Back of recorder
Mains outlet
EURO AV1
AUDIO/VIDEO
RF. OUT
RF Connection
Disconnect the TV aerial cable from the TV.
A
Connect the TV aerial cable to the AERIAL connector on the
B
rear of the recorder.
Connect the provided RF cable between the RF. OUT
C
connector on the rear of the recorder and the TV’s aerial
connector.
AV Connection
If your TV is equipped with a 21-pin SCART connector, perform
AV connection to improve picture quality during tape playback.
Connect the aerial, recorder and TV as shown in the
A
illustration.
Connect an optional 21-pin SCART cable between the EURO
B
AV1 AUDIO/VIDEO connector on the rear of the recorder and the
TV’s 21-pin SCART connector.
—5—
Loading...