


WIL 85

Instructions for use
WASHING MACHINE
GB
English,1
WIL 85
Contents
GB
Installation, 2-3
Unpacking and levelling
Electric and water connections
The first wash cycle
Technical details
Washing machine description, 4-5
Control panel
Leds
Starting and Programmes, 6
Briefly: how to start a programme
Programme table
Personalisations, 7
Setting the temperature
Setting the spin speed
Functions
Detergents and laundry, 8
Detergent dispenser
Bleach cycle
Preparing your laundry
Special items
Precautions and advice, 9
General safety
Disposal
Saving energy and respecting the environment
Care and maintenance, 10
Cutting off the water or electricity supply
Cleaning your appliance
Cleaning the detergent dispenser
Caring for your appliance door and drum
Cleaning the pump
Checking the water inlet hose
Troubleshooting, 11
Service, 12
Before calling for Assistance
1
Installation
GB
Keep this instruction manual in a safe place for
future reference. Should the appliance be sold,
transferred or moved, make sure the instruction
manual accompanies the washing machine to inform
the new owner as to its operation and features.
Read these instructions carefully: they contain vital
information on installation, use and safety.
Unpacking and levelling
Unpacking
1. Unpack the washing machine.
2. Check whether the washing machine has been
damaged during transport. If this is the case, do not
install it and contact your retailer.
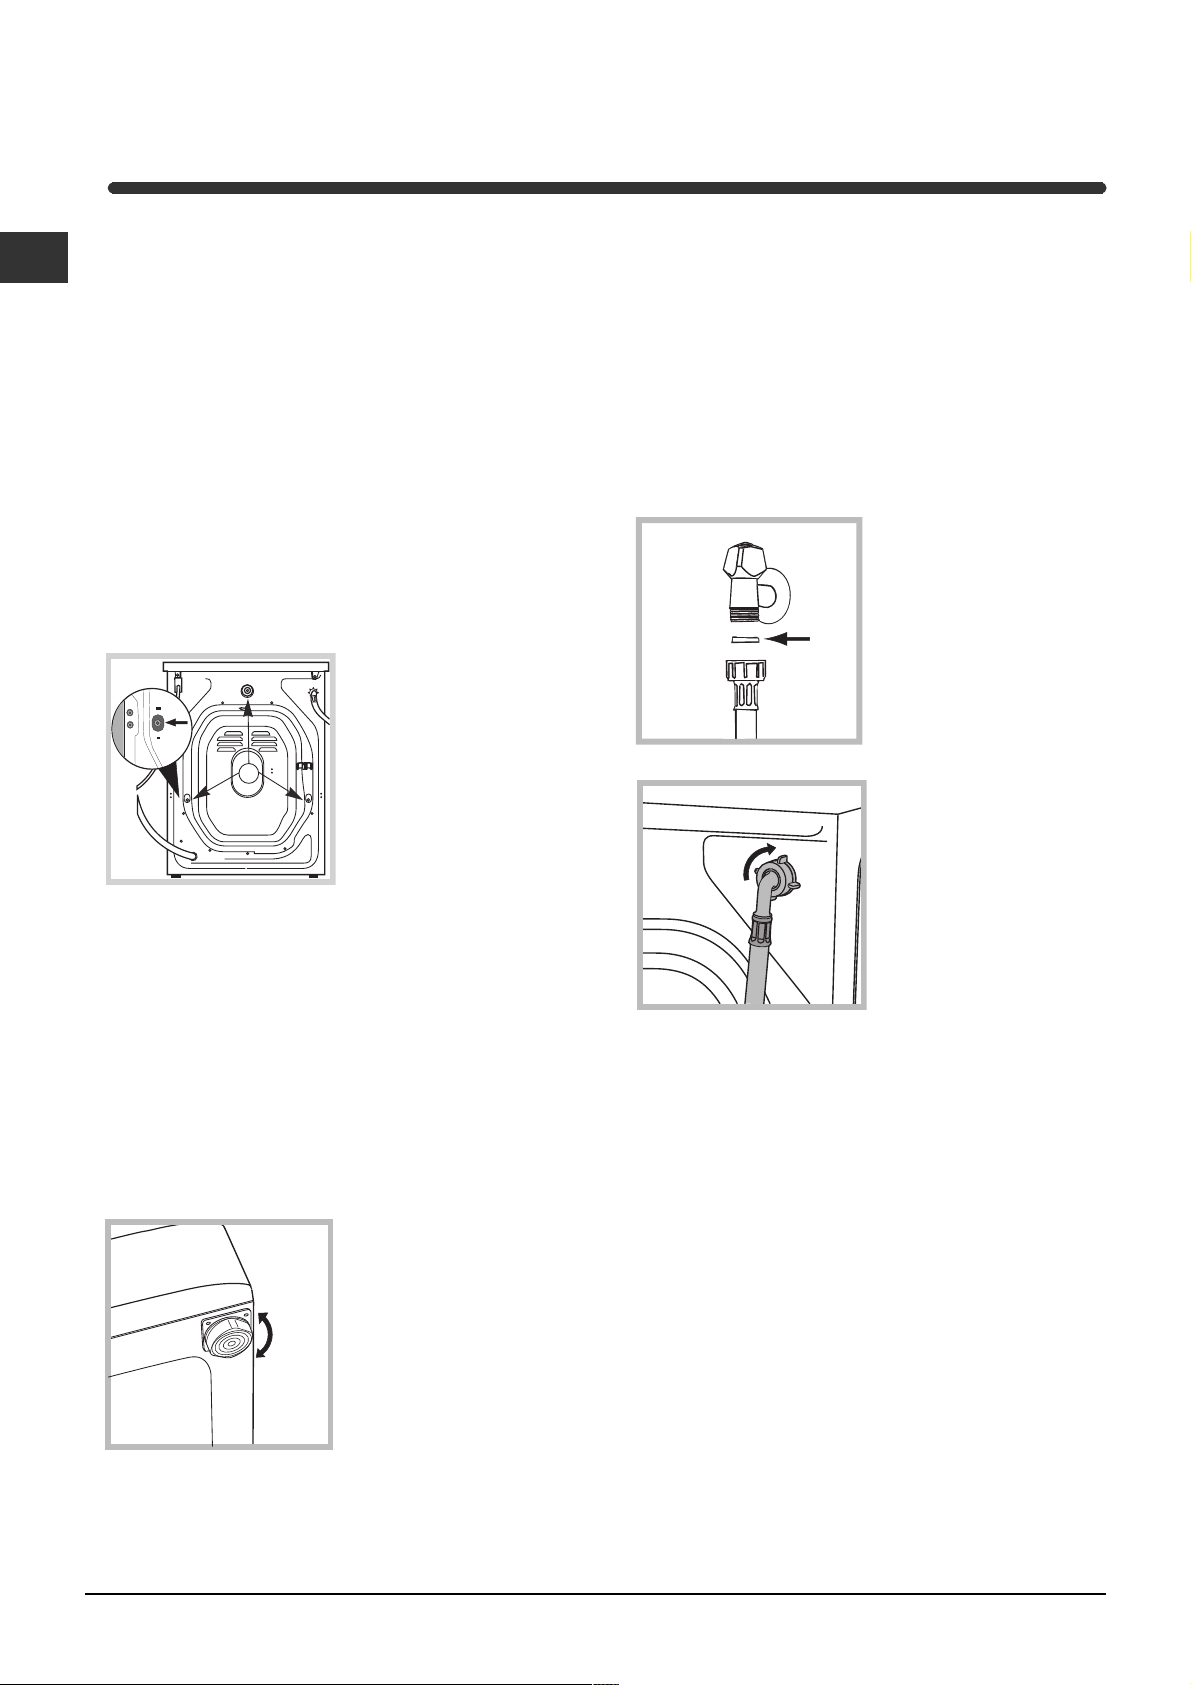
3. Remove the 3
protective screws and
the rubber washer with
the respective spacer,
situated on the rear of
the appliance (see
figure).
4. Seal the gaps using the plastic plugs provided.
5. Keep all the parts: you will need them again if the
washing machine needs to be moved to another
location.
Levelling your appliance correctly will provide it with
stability and avoid any vibrations, noise and shifting
during operation. If it is placed on a fitted or loose
carpet, adjust the feet in such a way as to allow
enough room for ventilation beneath the washing
machine.
Electric and water connections
Connecting the water inlet hose
1. Insert seal A into the
end of the inlet hose
and screw the latter
onto a cold water tap
A
with a 3/4 gas threaded
mouth (see figure).
Before making the
connection, allow the
water to run freely until
it is perfectly clear.
2. Connect the other end
of the water inlet hose to
the washing machine,
screwing it onto the
appliance's cold water
inlet, situated on the top
right-hand side on the
rear of the appliance
(see figure).
Packaging materials are not children's toys.
Levelling
1. Install the washing machine on a flat sturdy floor,
without resting it up against walls, furniture cabinets
or other.
2. If the floor is not
perfectly level, compensate for any unevenness
by tightening or
loosening the adjustable
front feet (see figure);
the angle of inclination,
measured according to
the worktop, must not
exceed 2°.
2
3. Make sure there are no kinks or bends in the
hose.
The water pressure at the tap must be within the
values indicated in the Technical details table
(on the next page).
If the water inlet hose is not long enough, contact
a specialist store or an authorised serviceman.
Never use hoses that have already been used.
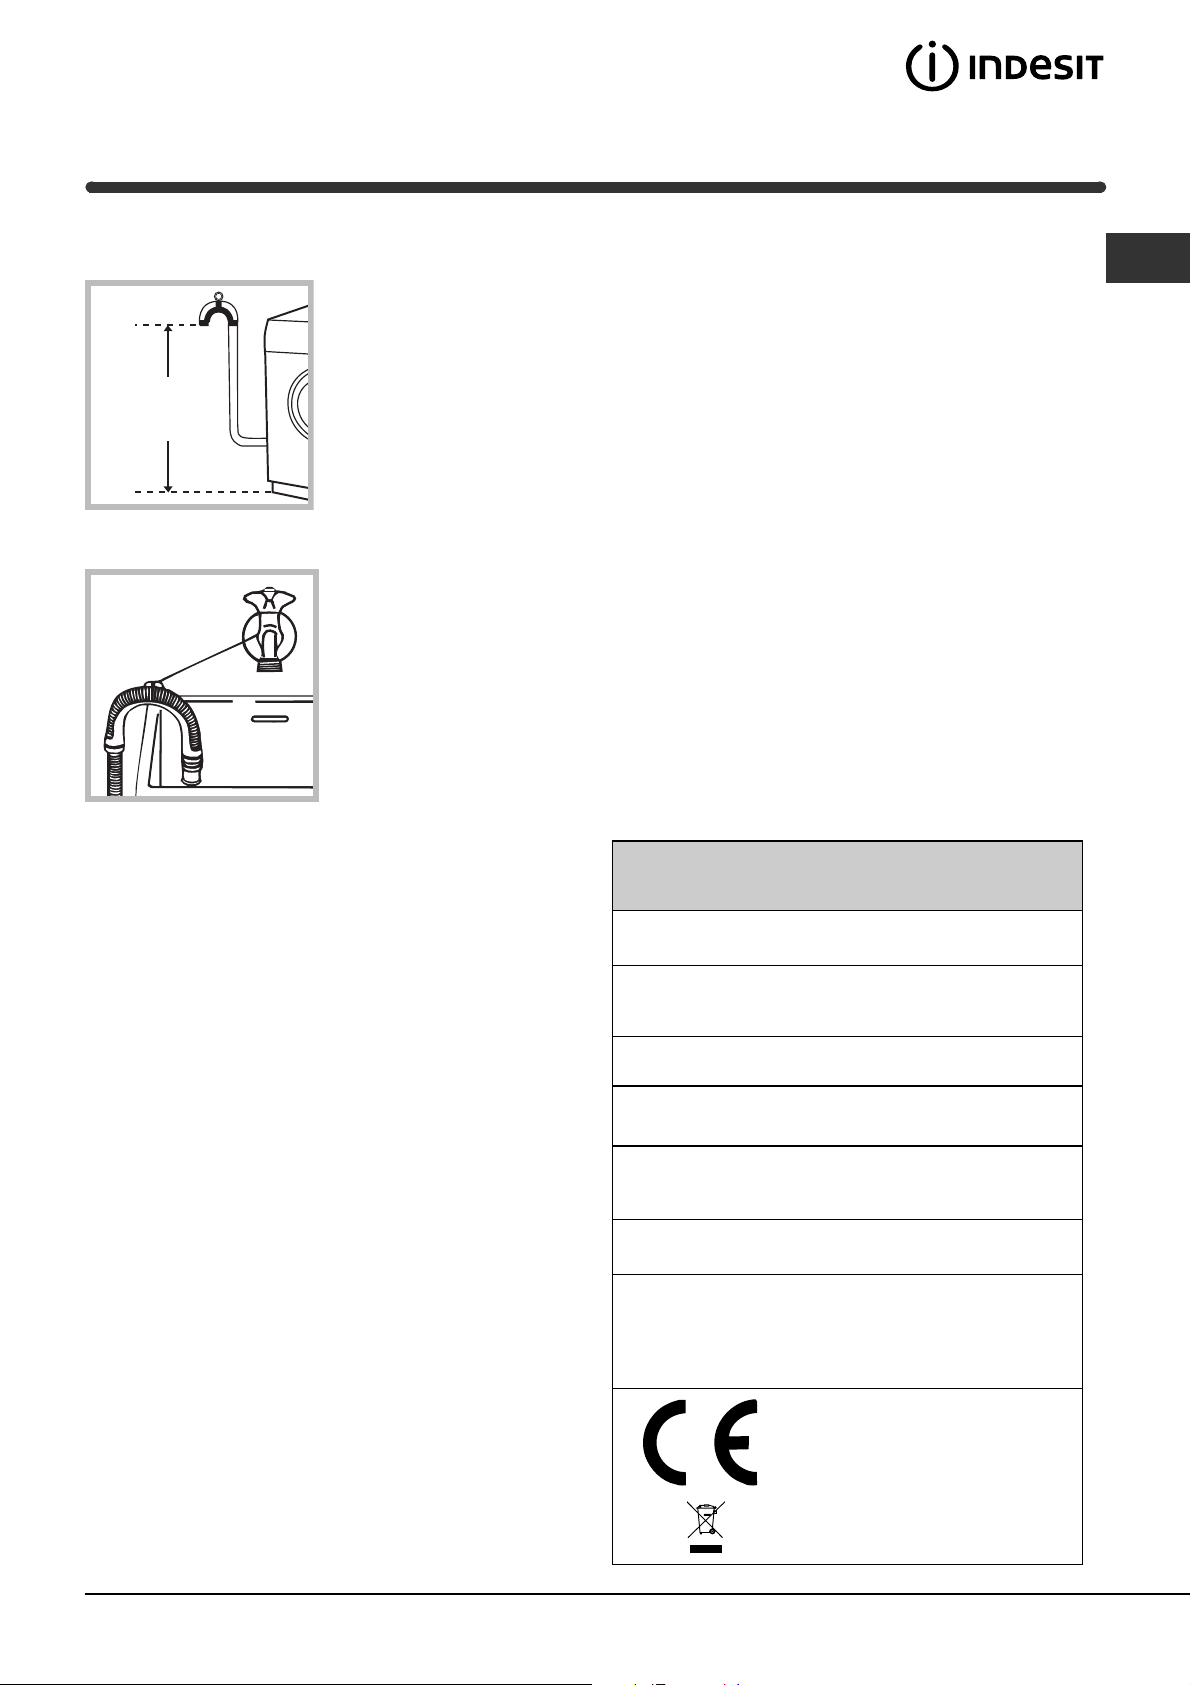
Connecting the drain hose
65 - 100 cm
Connect the drain hose,
without bending it, to a
draining duct or a wall
drain situated between
65 and 100 cm from
the floor;
Do not use extensions or multiple sockets.
GB
The power supply cable must never be bent or
dangerously compressed.
The power supply cable must only be replaced by
an authorised serviceman.
Warning! The company denies all liability if and when
these norms are not respected.
The first wash cycle
alternatively, place it
over the edge of a
basin, sink or tub,
fastening the duct
supplied to the tap (see
figure). The free end of
the hose should not be
underwater.
We advise against the use of hose extensions; in
case of absolute need, the extension must have the
same diameter as the original hose and must not
exceed 150 cm in length.
Electric connection
Before plugging the appliance into the mains
socket, make sure that:
the socket is earthed and in compliance with the
applicable law;
the socket is able to sustain the appliance's
maximum power load indicated in the Technical
details table (on the right);
the supply voltage is included within the values i
ndicated on the Technical details table
(on the right);
the socket is compatible with the washing
machine's plug. If this is not the case, replace
the socket or the plug.
The washing machine should not be installed in an
outdoor environment, not even when the area is
sheltered, because it may be very dangerous to
leave it exposed to rain and thunderstorms.
When the washing machine is installed, the mains
socket must be within easy reach.
Once the appliance has been installed, and before
you use it for the first time, run a wash cycle with
detergent and no laundry, setting the 90°C
programme without a pre-wash cycle.
Technical details
Model
Dimensions
Capacity
Electric
connections
Wat er
connections
Spin speed
Control
programmes
according to
EN 60456
directive
WIL 85
59.5 cm wide
85 cm high
52.5 cm deep
from 1 to 5 kg
please refer to the technical data plate
fixed to the machine
maximum pressure 1 MPa (10 bar)
minimum pressure 0.05 MPa (0.5 bar)
drum capacity 46 litres
up to 800 rpm
programme 2; temperature 60°C;
run with a load of 5 kg.
This appliance is compliant with the
following European Community
Directives:
- 89/336/CEE of 03/05/89
(Electromagnetic Compatibility) and
subsequent amendments
- 2002/96/CE
- 2006/95/CE (Low Voltage)
3
Washing machine description
GB
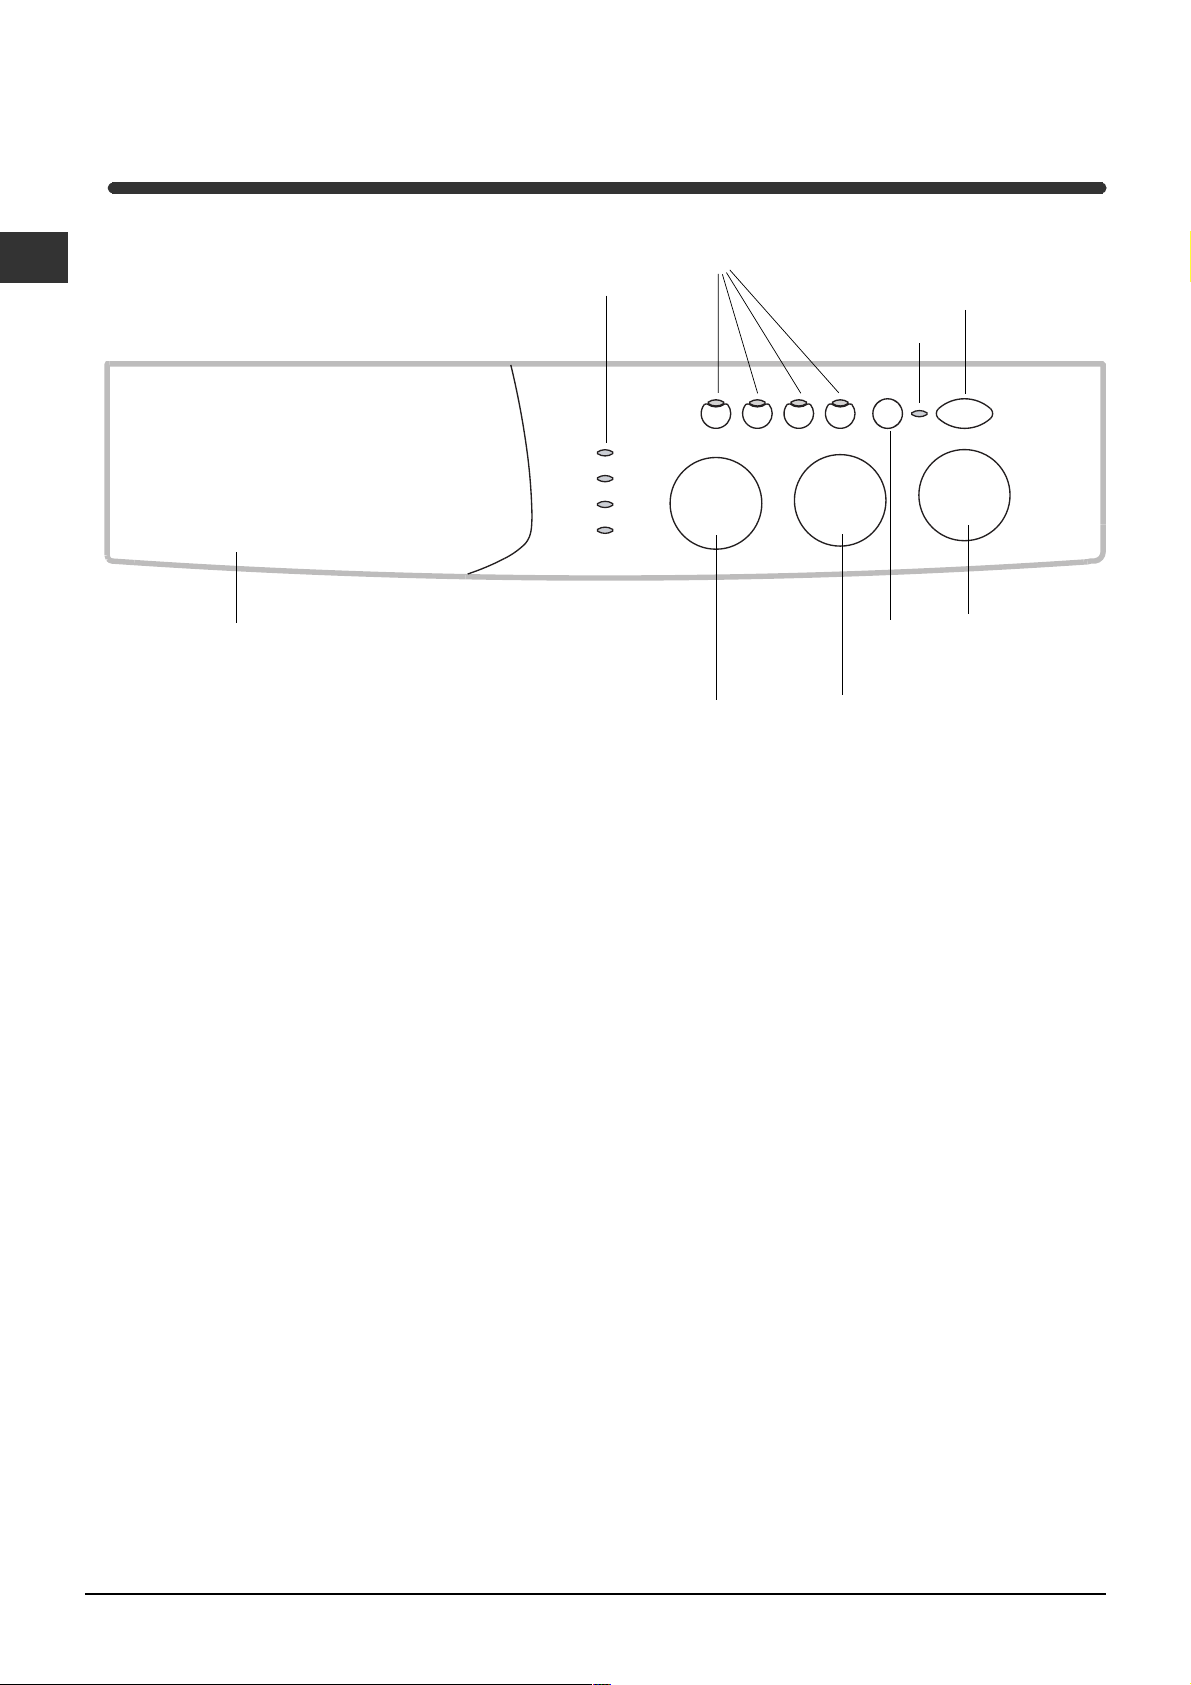
Control panel
Detergent dispenser
Detergent dispenser: to add detergent and fabric
softener (see page 8).
FUNCTION
Buttons
Leds
SPIN SPEED
Knob
TEMPERATURE knob: to set the temperature or
the cold wash cycle (see page 7).
ON-OFF/
DOOR
LOCK
Led
START/RESET
Button
TEMPERATURE
Knob
ON-OFF
Button
PROGRAMME
Knob
LEDS: to find out which wash cycle phase is under
way.
If the Delay Timer function has been set, the time
left until the programme starts will be indicated (see
page 5).
SPIN SPEED knob: to set the spin speed or exclude
the spin cycle completely (see page 7).
FUNCTION buttons: to select the functions
available. The button corresponding to the function
selected will remain on.
START/RESET button: to start the programmes or
cancel any incorrect settings.
ON-OFF/DOOR LOCK Led: to find out whether the
washing machine is on and if the appliance door can
be opened (see page 5).
ON/OFF button: to turn the washing machine on
and off.
PROGRAMME knob: to select the wash
programmes. The knob stays still during the cycle.
4
 Loading...