

Page 1

Instructions for use
WASHER-DRYER
GB
English,1
WIDL 102
AR
,15
Contents
GB
Installation, 2-3-4-5
Unpacking and levelling, 2
Electric and water connections, 2-3
The first wash cycle, 4
Technical details, 5
Washer-dryer description, 6-7
Control panel, 6
Leds, 7
Starting and Programmes, 8
Briefly: how to start a programme, 8
Programme table, 8
Personalisations, 9
Setting the temperature, 9
Setting the drying cycle, 9
Functions, 9
Detergents and laundry, 10
Detergent dispenser, 10
Bleach cycle, 10
Preparing your laundry, 10
Special items, 10
Precautions and advice, 11
General safety, 11
Disposal, 11
Saving energy and respecting the environment, 11
Care and maintenance, 12
Cutting off the water or electricity supply, 12
Cleaning your appliance, 12
Cleaning the detergent dispenser, 12
Caring for your appliance door and drum, 12
Cleaning the pump, 12
Checking the water inlet hose, 12
Troubleshooting, 13
Service, 14
Before calling for Assistance, 14
1
Page 2

Installation
GB
Keep this instruction manual in a safe place for
future reference. Should the appliance be sold,
transferred or moved, make sure the instruction
manual accompanies the washer-dryer to inform the
new owner as to its operation and features.
Read these instructions carefully: they contain vital
information on installation, use and safety.
Unpacking and levelling
Unpacking
1. Unpack the washer-dryer.
2. Check whether the washer-dryer has been
damaged during transport. If this is the case, do not
install it and contact your retailer.
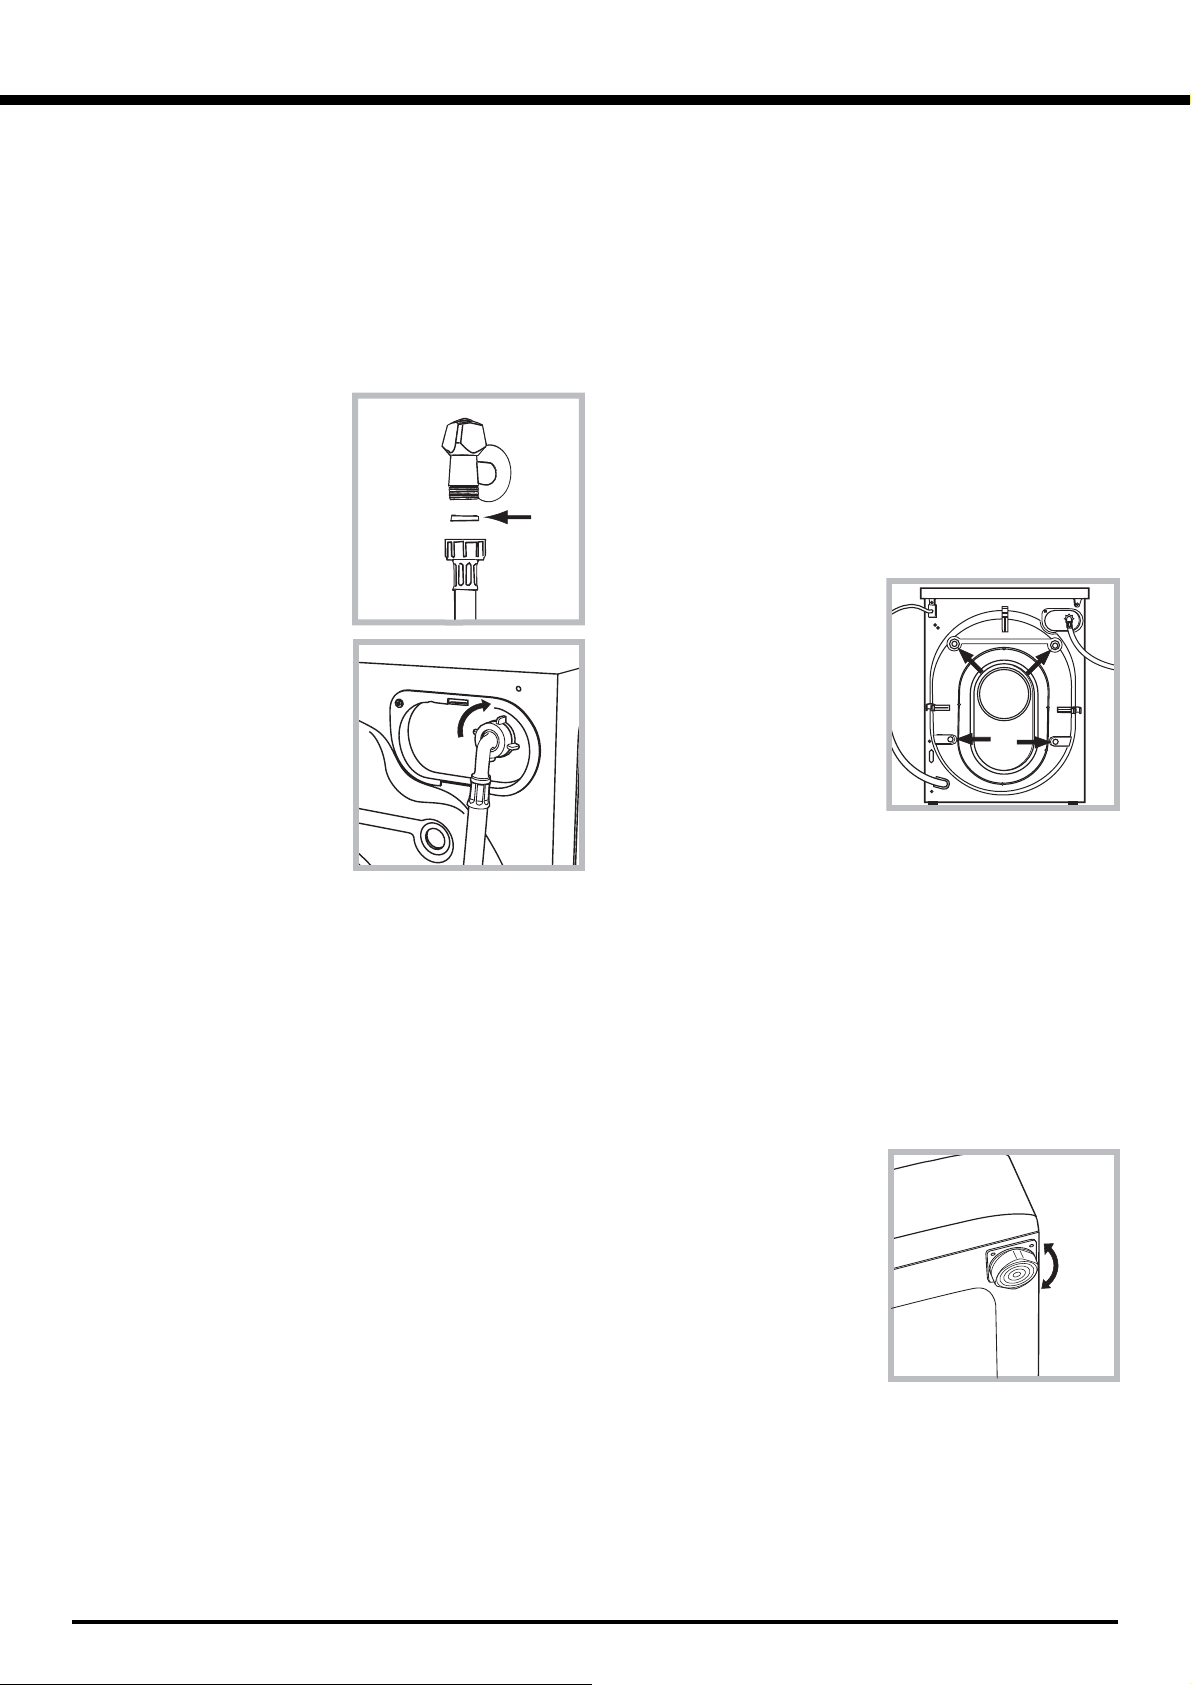
3. Remove the four
protective screws and
the rubber bush with the
respective spacer,
situated on the rear of
the appliance (see also
the installation leaflet).
NB:The plastic spacers
may fall down inside the
machine once the bolt
has been removed, and will not interfere with the
operation of the machine.
4. Seal the gaps using the plastic plugs provided.
5. Keep all the parts: you will need them again if the
washing machine needs to be moved to another
location.
Levelling your appliance correctly will provide it with
stability and avoid any vibrations, noise and shifting
during operation. If it is placed on a fitted or loose
carpet, adjust the feet in such a way as to allow
enough room for ventilation beneath the washerdryer.
Electric and water connections
Connecting the water inlet hose
1. Insert seal A into the
end of the inlet hose
and screw the latter
onto a cold water tap
A
3. Make sure there are no kinks or bends in the hose.
with a 3/4 gas threaded
mouth (see figure).
Before making the
connection, allow the
water to run freely until
it is perfectly clear.
2. Connect the other end
of the water inlet hose to
the washer-dryer,
screwing it onto the
appliance's cold water
inlet, situated on the top
right-hand side on the
rear of the appliance
(see figure).
Packaging materials are not children's toys.
Levelling
1. Install the washer-dryer on a flat sturdy floor,
without resting it up against walls, furniture cabinets
or other.
2. If the floor is not
perfectly level, compensate for any unevenness
by tightening or
loosening the adjustable
front feet (see figure);
the angle of inclination,
measured according to
the worktop, must not
exceed 2°.
2
The water pressure at the tap must be within the
values indicated in the Technical details table
(on the next page).
If the water inlet hose is not long enough, contact
a specialist store or an authorised serviceman.
Ensure that the supply taps are allowing water
through. Old taps may seize in the closed position
and thus prevent water reaching the machine.
Page 3

Connecting the drain hose
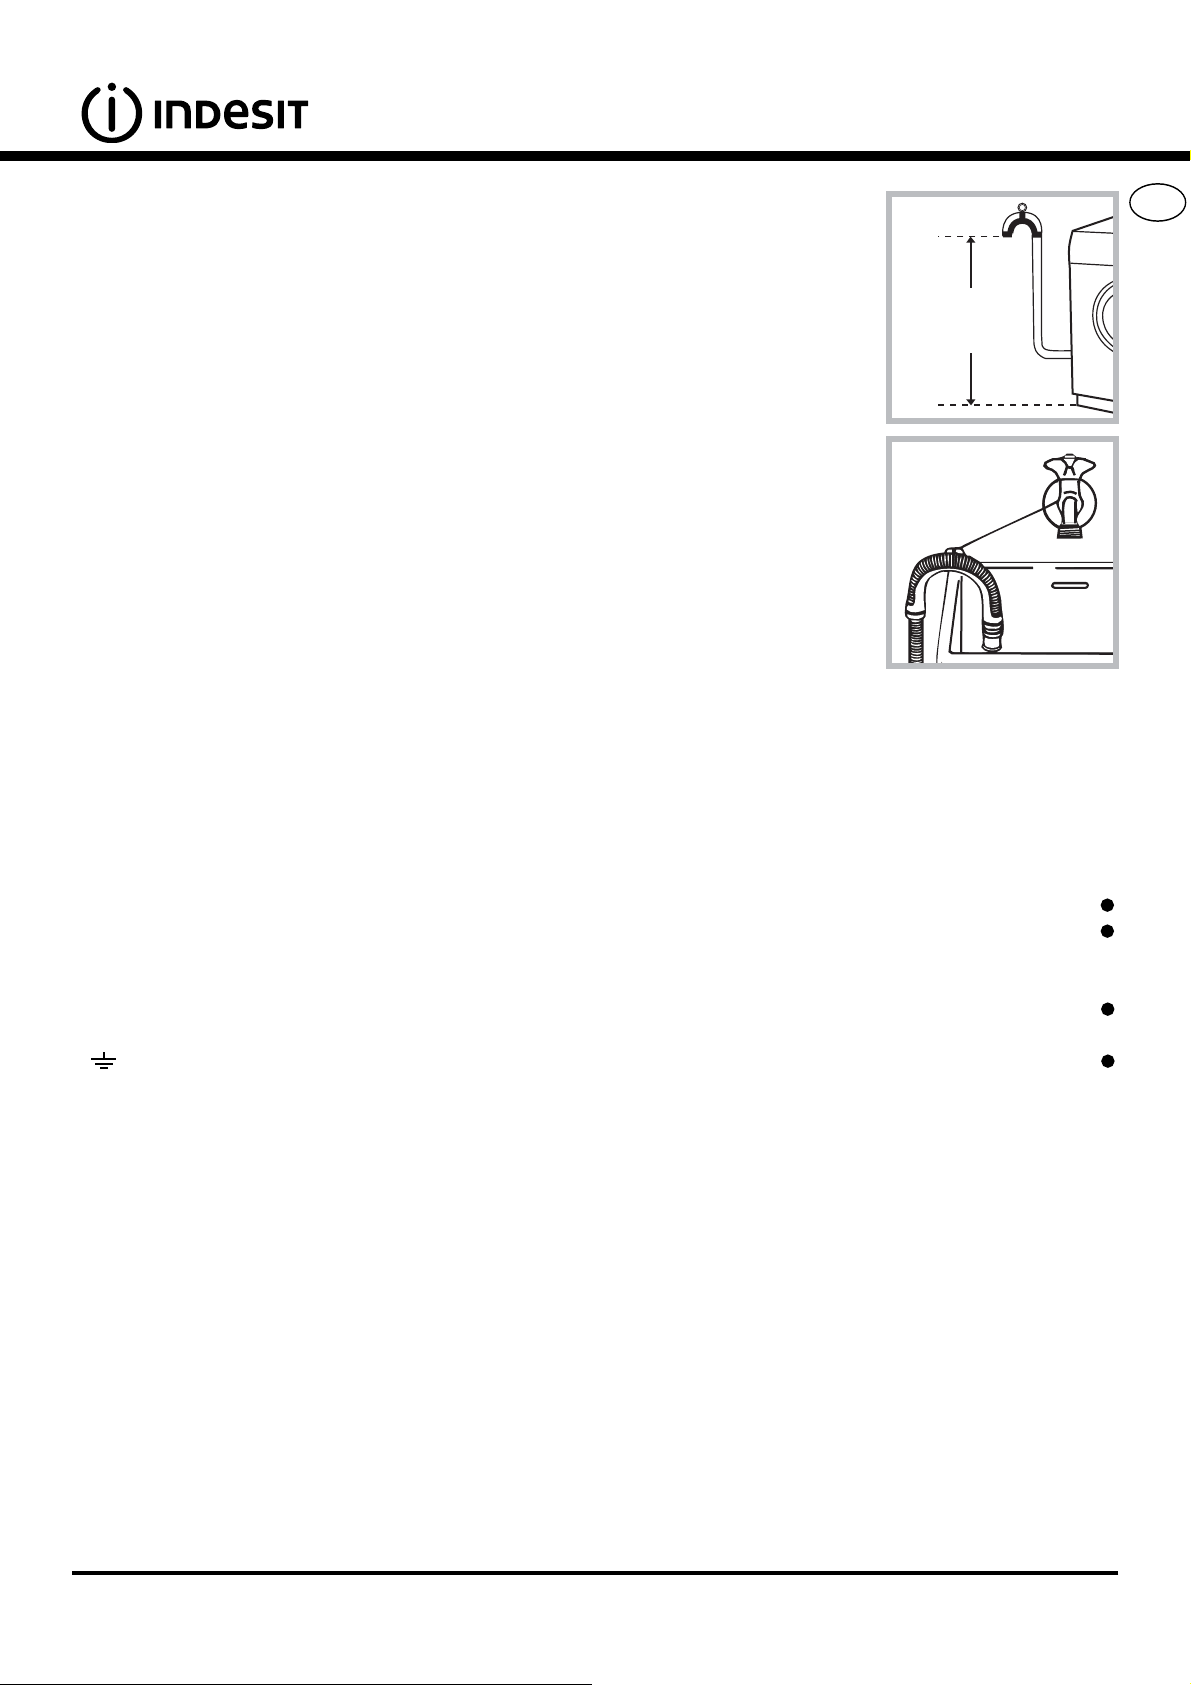
65 - 100 cm
Connect the drain hose,
without bending it, to a
draining duct or a wall
drain situated between
65 and 100 cm from
the floor;
the supply voltage is included within the values
indicated on the Technical details table
(see page 5);
the socket is compatible with the washer-dryer's
plug. If this is not the case, replace
the socket or the plug.
Your appliance is now supplied with a 13 amp fused
plug it can be plugged into a 13 amp socket for
immediate use. Before using the appliance please
read the instructions below.
GB
The drain hose may be
connected to an
under-sink trap. Before
connecting the drain
hose from the machine
ensure that any blanks
Where it connects
to the waste water
pipe cut end off
spigot or remove the
blanking cap
or removable ends
have been taken off
the spigot.
If it is place over the
edge of a basin or sink
be sure the free end of
the hose should not be
underwater.
We advise against the use of hose extensions; in
case of absolute need, the extension must have the
same diameter as the original hose and must not
exceed 150 cm in length.
Ensure that if the drain hose is pushed into a
standpipe, that the end does not go down more
than 15cms (6 inches). If the hose is pushed down
too far, this may cause the machine to self -syphon
ie. continuously empty as it is filling.
Electric connection
Before plugging the appliance into the mains
socket, make sure that:
the socket is earthed and in compliance with the
applicable law;
the socket is able to sustain the appliance's
maximum power load indicated in the Technical
details table (see page 5);
WARNING - THIS APPLIANCE MUST BE EARTHED.
THE FOLLOWING OPERATIONS SHOULD BE
CARRIED OUT BY A QUALIFIED ELECTRICIAN.
Replacing the fuse:
When replacing a faulty fuse, a 13 amp ASTA
approved fuse to BS 1362 should always be used,
and the fuse cover re-fitted. If the fuse cover is lost,
the plug must not be used until a replacement is
obtained.
Replacement fuse covers:
If a replacement fuse cover is fitted, it must be of
the correct colour as indicated by the coloured
marking or the colour that is embossed in words on
the base of the plug. Replacements can be obtained
directly from your nearest Service Depot.
Removing the plug:
If your appliance has a non-rewireable moulded plug
and you should wish to re-route the mains cable
through partitions, units etc., please ensure that
either:
the plug is replaced by a fused 13 ampere rewearable plug bearing the BSI mark of approval.
or:
the mains cable is wired directly into a 13 amp cable
outlet, controlled by a switch, (in compliance with
BS 5733) which is accessible without moving the
appliance.
Disposing of the plug:
Ensure that before disposing of the plug itself, you
make the pins unusable so that it cannot be
accidentally inserted into a socket.
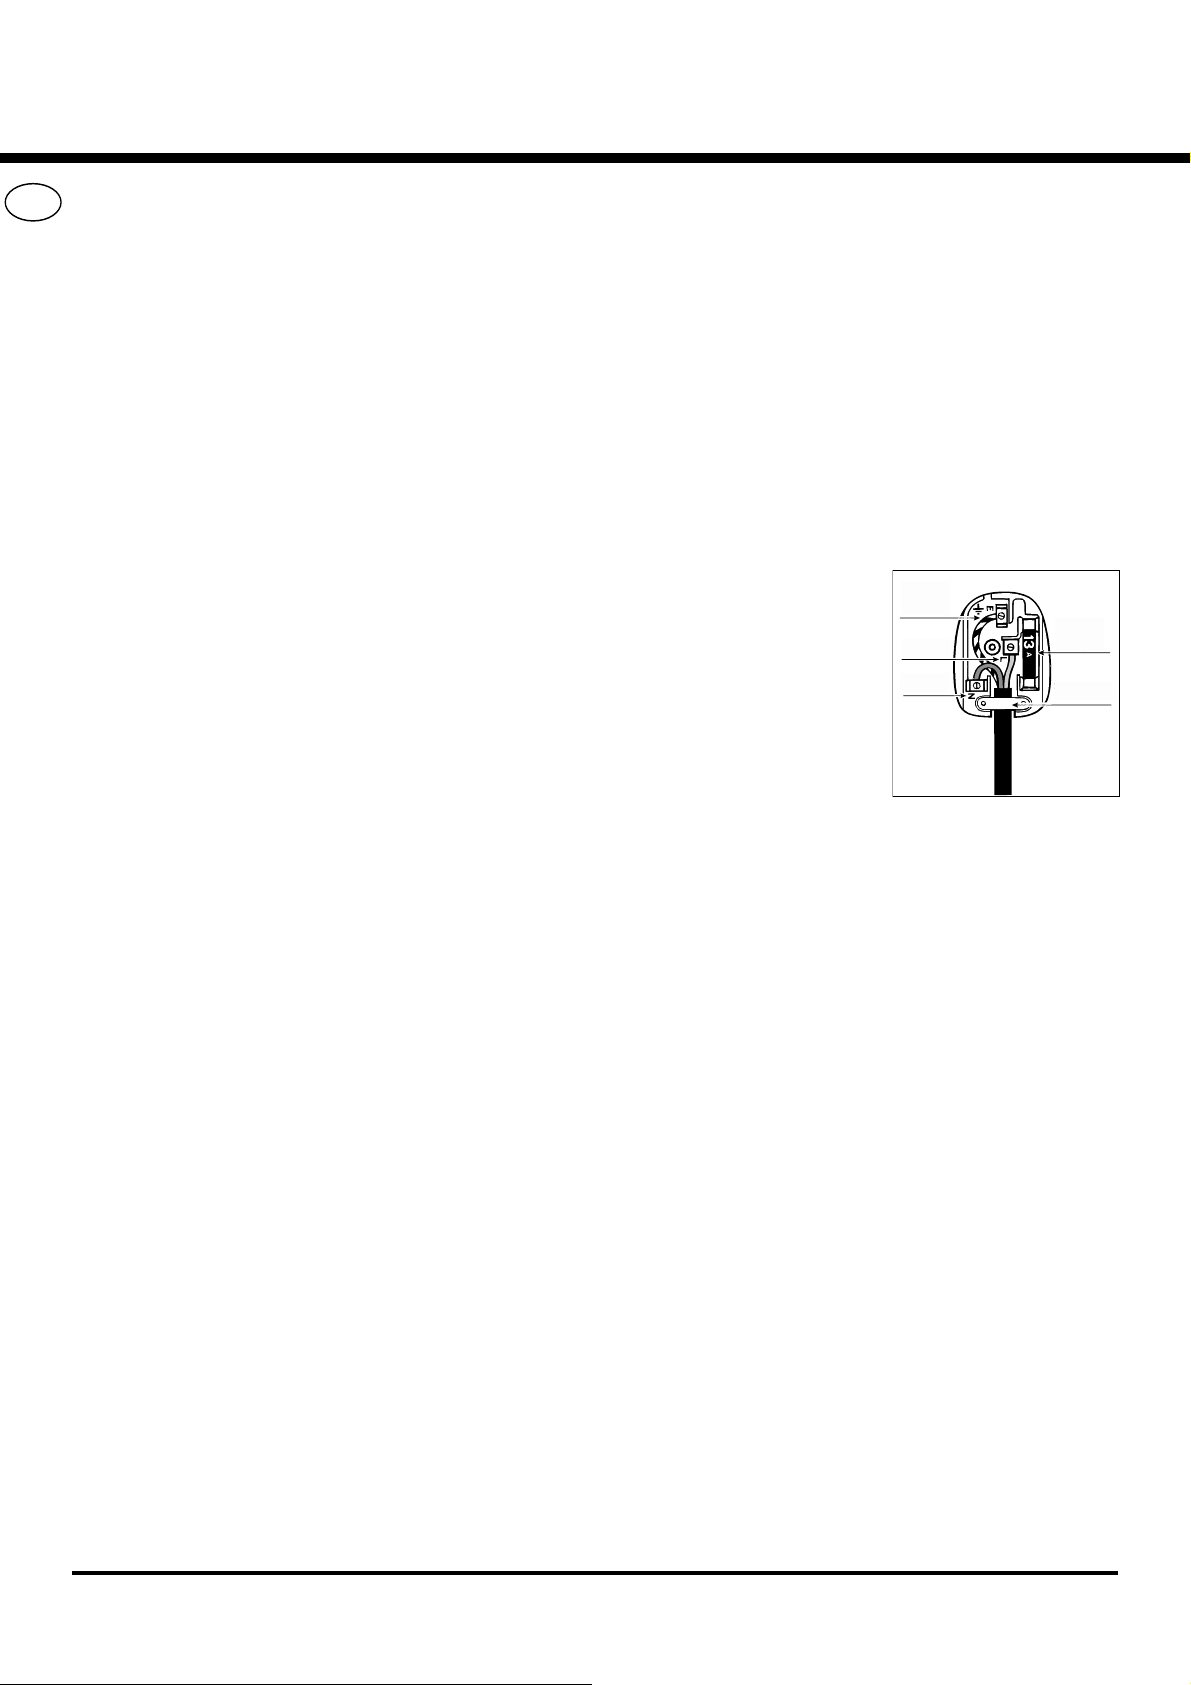
Instructions for connecting cable to an alternative plug:
Important: the wires in the mains lead are coloured
in accordance with the following code:
Green & Yellow Earth
Blue Neutral
Brown Live
ServiceTroubleshootingPrecautions CareProgrammes DetergentsInstallation Description
3
Page 4

GB
As the colours of the wires in the lead may not
correspond with the coloured markings identifyng
the terminals in your plug, proceed as follows:
Connect Green & Yellow wire to terminal marked E
or coloured Green or Green & Yellow.
or
Connect Brown wire to terminal marked L or
coloured Red.
Connect Blue wire to terminal marked N or coloured
Black.
If a 13 amp plug (BS 1363) is used it must be fitted
with a
13 amp fuse, either in the plug or adaptor or at the
distribution board.
If you are in any doubt the electrical supply to your
machine, consult a qualified electrician before use.
How to connect an alternative plug:
The wires in this mains lead are coloured in
accordance with the following code:
BLUE NEUTRAL (N)
BROWN LIVE (L)
GREEN & YELLOW EARTH (E)
Disposing of the appliance:
When disposing of the appliance please remove the
plug by cutting the mains cable as close as possible
to the plug body and dispose of it as described
above.
Warning! The company denies all liability if and when
these norms are not respected.
The first wash cycle
Once the appliance has been installed, and before
you use it for the first time, run a wash cycle with
detergent and no laundry, setting the 90°C
programme without a pre-wash cycle.
GREEN &
YELLOW
BROWN
BLUE
13 ampere fuse
CROSS-BAR
CORD GRIP
The washing machine should not be installed in an
outdoor environment, not even when the area is
sheltered, because it may be very dangerous to
leave it exposed to rain and thunderstorms.
When the washing machine is installed, the mains
socket must be within easy reach.
Do not use extensions or multiple sockets.
The power supply cable must never be bent or
dangerously compressed.
The power supply cable must only be replaced by
an authorised serviceman.
4
Page 5

Technical details
GB
Model
Dimensions
Capacity
Electric
connections
Wat er
connections
Spin speed
Control
programmes
according to
IEC456 directive
WIDL 102
59.5 cm wide
85 cm high
53.5 cm deep
from 1 to 5 kg for the wash programme;
from 1 to 4 kg for the drying programme
voltage 230/240 Volts 50 Hz
maximum absorbed power 2050 W
maximum pressure 1 MPa (10 bar)
minimum pressure 0.05 MPa (0.5 bar)
drum capacity 46 litres
up to 1000 rpm
Wash: programme 2; temperature 60°C;
run with a load of 5 kg.
Drying: first drying cycle performed with
a 1 kg load, by selecting a drying time
of 40 min;
Second drying cycle performed with a 4
kg load and the DRYING knob on the
setting.
This appliance is compliant with the
following European Community
Directives:
- 73/23/CEE of 19/02/73 (Low
Voltage) and subsequent amendments
- 89/336/CEE of 03/05/89
(Electromagnetic Compatibility) and
subsequent amendments
- 2002/96/CE
ServiceTroubleshootingPrecautions CareProgrammes DetergentsDescriptionInstallation
5
Page 6

Washer-dryer description
GB
Control panel
Detergent dispenser
Detergent dispenser: to add detergent and fabric
softener (see page 10).
FUNCTION
Buttons
Leds
DRYING
Knob
START/RESET button: to start the programmes or
cancel any incorrect settings.
ON-OFF/
DOOR
LOCK
Led
START/RESET
Button
TEMPERATURE
Knob
ON-OFF
Button
PROGRAMME
Knob
LEDS: to find out the wash cycle progress.
DRYING knob: to set the desired drying cycle
(see page 9).
FUNCTION buttons: to select the functions
available. The button corresponding to the function
selected will remain on.
TEMPERATURE knob: to set the temperature or
the cold wash cycle (see page 9).
ON-OFF/DOOR LOCK Led: to find out whether the
Washer-dryer is on and if the appliance door can be
opened (see page 7).
ON/OFF button: to turn the Washer-dryer on and off.
PROGRAMME knob: to select the wash
programmes. The knob stays still during the cycle.
6
Page 7

Leds
The LEDS provide important information.
This is what they can tell you:
Cycle progress:
During the wash cycle, the LEDs gradually illuminate
on to indicate the cycle progress:
Prewash / Wash
Rinse
Spin cycle
Drying
Note:
- during draining, the LED corresponding to the Spin
cycle phase will be turned on.
- when the drying cycle is complete, the indicator light
relative to phase
DRYING knob needs to be set back to the 0 setting.
will flash, to indicate that the
GB
Function buttons
The FUNCTION BUTTONS also act like LEDS.
When a function is selected, the corresponding
button is illuminated.
If the function selected is incompatible with the
programme set, the button will flash and the
function will not be enabled.
If you set a function that is incompatible with
another function you selected previously, only the
last one selected will be enabled.
ON-OFF/DOOR LOCK led:
If this LED is on, the appliance door is locked to prevent it from being opened accidentally; to avoid any
damages, wait for the LED to flash before you open the appliance door.
The rapid flashing of the ON-OFF/DOOR LOCK Led together with the flashing of at least one other LED
indicates there is an abnormality. Call for Technical Assistance.
ServiceTroubleshootingPrecautions CareProgrammes DetergentsInstallation Description
7
Page 8

Starting and Programmes
GB
Briefly: starting a programme
1. Switch the Washer-dryer on by pressing button .
All the LEDS will light up for a few seconds and
the ON-OFF/DOOR LOCK Led will begin to flash.
2. Load your laundry into the washing machine and
shut the appliance door.
3. Set the PROGRAMME knob to the programme
required.
4. Set the wash temperature (see page 9).
5. Set the drying cycle if necessary (see page 9).
6. Add the detergent and any fabric softener (see page 10).
Programme table
0°C
Detergent
pre-
wash
Fabric
softener
wash
De licate
Type of fabric and
degree of soil
Standar d
Extremely soiled whites
(sheets, tablecloths, etc.)
Extremely soiled whites
(sheets, tablecloths, etc.)
Heavily soiled whites and fast
colours
Heavily soiled whites and
delicate colou rs
Slig h tly s oiled w h ites and
delicate colours (shirts,
jumpers, etc.)
Heavily soiled fas t colou rs
(baby linen, etc.)
Heavily soiled fas t colou rs
(baby linen, etc.)
Wool
Very delicate fabrics
(cu rtains, silk, vis cose, etc.)
Drying cotton
Progr,
1
2
2
2
3
4
4
5
6
7
Te m p e rature
90°C
90°C
60°C
40°C
40°C
5
40°C Delicate
40°C
30°C
7. Start the programme by pressing the START/RESET
button for one second. Once the programme has
been accepted all of the option and status LED's
will illuminate momentarily, the Door Lock LED
will be lit and the relevant wash cycle progress
LED will also be lit.
To cancel it, keep the START/RESET button pressed
for at least 2 seconds.
8. When the programme is finished, the ON-OFF/
DOOR LOCK Led will flash to indicate that the
appliance door can be opened. Take out your
laundry and leave the appliance door ajar to allow
the drum to dry thoroughly. Turn the Washer-dryer
off by pressing button
Stain removal
option/b leac h
De licate/
Traditional
De licate/
Traditional
De licate/
Traditional
De licate/
Traditional
Cycle
length
(m inu te s)
135 Max.
125 Max.
110 Max.
105 Max.
70 Max.
75 800
60 800
50 600
45 no
Max.
Spin
Speeds
(r.p.m .)
.
Description of wash cycle
Pre-wash, wash cycle, rinse cycles,
intermediate and final spin cycles
Wash cycle, rinse cycles,
interme diate and final spin cycles
Wash cycle, rinse cycles,
interme diate and final spin cycles
Wash cycle, rinse cycles,
interme diate and final spin cycles
Wash cycle, rinse cycles,
interme diate and final spin cycles
Wash cycle, rinse cycles, anticreas e or delicate s pin cycle
Wash cycle, rinse cycles, anticreas e or delicate s pin cycle
Wash cycle, rinse cycles anticrease
Wash cycle, rinse cycles, anticrease or draining cycle
Max.
delicate spin cycle
or
Drying delicates
Tim e 4 yo u
Heavily soiled whites and fast
colours
Delicate colours (all types of
slightly s oiled garmen ts )
Delicate colours (all types of
slightly s oiled garmen ts )
Sport
Sports shoes
Fabrics for sportswear
(Tracksu its, sh orts, etc.)
PARTIAL PROGRAMMES
Rinse
Sp in cycle
Drain
(MAX. 2 pairs)
8
9
60°C
10
11
12
13
°C
40
30°C 30
°C
30
30°C 60
50
De licate/
Traditional
no
65 Max.
45 800
800
800
600
800
800
no
Wash cycle, rinse cycles,
interme diate and final spin cycles
Wash cycle, rinse cycles,
delicate sp in cycle
Wash cycle, rinse cycles and
delicate spin cycle
Cold wash (without detergents),
wash cycle, rinse cycles, and
delicate s pin cycle
Wash cycle, rinse cycles,
interme diate and final spin cycles
Rinse cycles and spin cycle
Draining and spin cycle
Drain
Notes
-For programme 9, we advise against exceeding a wash load of 3.5 kg.
-For programme 13 we advise against exceeding a wash load of 2 kg.
-For the anti-crease function: see Easy iron, opposite page. The information contained in the table is purely indicative.
Special programme
Daily (programme 11 for Synthetics) is designed to wash lightly soiled garments in a short amount of time: it only lasts
30 minutes and allows you to save on both time and energy. By setting this programme (11 at 30°C), you can wash
different fabrics together (except for woollen and silk items), with a maximum load of 3 kg.
We recommend the use of liquid detergent.
8
Page 9

Personalisations
C
Setting the temperature
Turn the TEMPERATURE knob to set the wash temperature (see Programme table on page 8).
The temperature can be lowered, or even set to a cold wash (
Set the drying cycle
Turn the DRYING knob to set the desired drying type.
Two options are available:
A - Based on time: From 40 minutes to 150.
B - Based on the damp level of the dry clothes:
Iron
Hanger
Cupboard
and bathrobes.
A cooling stage is foreseen at the end of the drying cycle.
: slightly damp clothes, easy to iron.
: dry clothes to put away.
: very dry clothes, recommended for towelling
).
Table of drying times
Fabric
type
Cotton,
Linen
Cotton Terry towels
Ter i t al ,
Cotton
Acrylics Pyjamas, socks, etc.
Load type Max.
Clothing of different sizes
Sheets, Shirts
The data contained in the
table are purely indicative.
load
(kg) Cup-
4 130 120 110
4 130 120 110
2,5 90 80 70
165 6060
board
Hanger Iron
GB
If your laundry load to wash and dry is exceptionally in excess
Nylon Slips, tights, stockings, etc.
165 6060
of the maximum load foreseen (see table opposite), perform
the wash cycle, and when the programme is complete, divide up the garments and put part of them back in the
drum. Now follow the instructions provided for a dry only cycle. Repeat this procedure for the remainder of the load.
Dry only
Turn the PROGRAMME knob to one of the drying settings (7-8) depending on the type of fabric, then select the
desired drying type using the DRYING knob.
Important: - A spin cycle is carried out during the drying if you have set a cotton programme and a level of
dryness (Cupboard
, Hanger , Iron ).
- For cotton loads of less than 1 Kg, use the drying programme designed for delicate fabrics.
Functions
To enable a function:
1. press the button corresponding to the desired function, according to the table below;
2. the function is enabled when the corresponding button is illuminated.
Note: The rapid flashing of the button indicates that the corresponding function cannot be selected for the
programme set.
Function Effect Comments
Stai n
re m o val
Bleaching cycle
designed to
remove the
toughest stains.
Please remember to pour the bleach into extra compartment 4
(see page 10).
This function is incompatible with the EASY IRON function.
Enabled with
programmes:
2, 3, 4,
Rinse cycle.
Ea s y ir o n
Ex t r a R i n s e
1000-500
This option
reduces the
amount of
creasing on
fabrics, making
them easier to
iron.
Increases the
efficiency of the
rinse.
Reduces the
spin speed.
When this function is set, programmes 4, 5, 6 will end with the
laundry left to soak (Anti-crease) and the Rinse cycle phase
LED will flash.
- to conclude the cycle, press the START/RESET button;
- to run the draining cycle alone, set the knob to the relative
symbol and press the START/RESET button.
This function is incompatible with the STAIN REMOVAL function.
Recommended when the appliance has a full load or with large
quantities of detergent.
3, 4, 5, 6,
9, 10,
Rinse cycle.
1, 2, 3, 4, 9,
10, 12, 13,
Rinse cycle.
All
programmes
except for 6
and draining.
ServiceTroubleshootingPrecautions CareProgrammes DetergentsInstallation Description
The machine has an intelligent built in check for out of balance loads. To let protect your machine it may reduce the final spin
speed if an unbalanced load is detected.
9
Page 10

Detergents and laundry
GB
Detergent dispenser
Good washing results also depend on the correct
dose of detergent: adding too much detergent won't
necessarily make for a more efficient wash, and may
in fact cause build up on the interior of your
appliance and even pollute the environment.
Open up the detergent
4
dispenser and pour in
the detergent and fabric
softener, as follows.
3
2
1
compartment 1: Detergent for pre-wash
(powder)
Before pouring in the detergent, make sure that
extra compartment 4 has been removed.
compartment 2: Detergent for the wash cycle
(powder or liquid)
Liquid detergent should only be poured in
immediately prior to the wash cycle start.
compartment 3: Additives (fabric softeners, etc.)
The fabric softener should not overflow from the grid.
extra compartment 4: Bleach
Do not use hand wash detergent because it may
form too much foam.
Bleach cycle
Preparing your laundry
Divide your laundry according to:
- the type of fabric/the symbol on the label.
- the colours: separate coloured garments from
whites.
Empty all pockets and check for loose buttons.
Do not exceed the weight limits stated below,
which refer to the weight when dry:
Sturdy fabrics: max 5 kg
Synthetic fabrics: max 2.5 kg
Delicate fabrics: max 2 kg
Wool: max 1 kg
How much does your laundry weigh?
1 sheet 400-500 g
1 pillow case 150-200 g
1 tablecloth 400-500 g
1 bathrobe 900-1,200 g
1 towel 150-250 g
Special items
Curtains: fold curtains and place them in a pillow
case or mesh bag. Wash them separately without
exceeding half the appliance load. Use programme 6
which excludes the spin cycle automatically.
Quilted coats and windbreakers: if they are
padded with goose or duck down, they can be
machine-washed. Turn the garments inside out and
load a maximum of 2-3 kg, repeating the rinse cycle
once or twice and using the delicate spin cycle.
Wool: for best results, use a specific detergent,
taking care not to exceed a load of 1 kg.
Traditional bleach should be used on sturdy
white fabrics, and delicate bleach for coloured
fabrics, synthetics and for wool.
Place extra
compartment 4,
provided, into
compartment 1.
When pouring in the
bleach, be careful not to
exceed the "max" level
indicated on the central
pivot (see figure).
To run the bleach cycle alone, pour the bleach into
extra compartment 4, set the Rinse programme
and enable the Stain removal option (see page 9).
To bleach during a wash cycle, pour in the detergent
and fabric softener, set the desired programme and
enable the Stain removal option (see page 9).
The use of extra compartment 4 excludes the
possibility of using the pre-wash cycle.
10
Page 11
Precautions and advice
The Washer-dryer was designed and built in
compliance with the applicable international safety
regulations. The following information is provided for
your safety and should consequently be read carefully.
General safety
This appliance has been designed for non-
professional, household use and its functions must
not be changed.
This washing machine should only be used by
adults and in accordance with the instructions
provided in this manual.
Never touch the washing machine when barefoot
or with wet or damp hands or feet.
Do not pull on the power supply cable to unplug
the appliance from the electricity socket. Pull the
plug out yourself.
Do not open the detergent dispenser while the
appliance is in operation.
Do not touch the drain water as it could reach
very high temperatures.
Never force the washing machine door: this could
damage the safety lock mechanism designed to
prevent any accidental openings.
In the event of a malfunction, do not under any
circumstances touch internal parts in order to
attempt repairs.
Always keep children well away from the
appliance while in operation.
The appliance door tends to get quite hot during
the wash cycle.
Should it have to be moved, proceed with the
help of two or three people and handle it with the
utmost care. Never try to do this alone, because
the appliance is very heavy.
Before loading your laundry into the washing
machine, make sure the drum is empty.
During the drying phase, the door tends to get
quite hot.
Do not use the appliance to dry clothes that have
been washed with flammable solvents (e.g.
trichlorethylene).
Do not use the appliance to dry foam rubber or
similar elastomers.
Make sure that the water tap is turned on during
the drying cycles.
This washer-dryer can only be used to dry clothes
which have been pre-washed in water.
Disposal
Disposing of the packaging material:
observe local regulations, so the packaging can
be re-used.
The European Directive 2002/96/EC on Waste
Electrical and Electronic Equipment, requires that
old household electrical appliances must not be
disposed of in the normal unsorted municipal
waste stream. Old appliances must be collected
separately in order to optimise the recovery and
recycling of the materials they contain and reduce
the impact on human health and the
environment. The crossed out "wheeled bin"
symbol on the product reminds you of your
obligation, that when you dispose of the appliance
it must be separately collected.
Consumers should contact their local authority or
retailer for information concerning the correct
disposal of their old appliance.
Saving energy and respecting the
environment
Environmentally-friendly technology
If you only see a little water through your appliance
door, this is because thanks to the latest Ariston
technology, your washing machine only needs less
than half the amount of water to get the best results:
an objective reached to respect the environment.
Saving on detergent, water, energy and time
To avoid wasting resources, the Washer-dryer
should be used with a full load. A full load instead
of two half loads allows you to save up to 50% on
energy.
The pre-wash cycle is only necessary on
extremely soiled garments. Avoiding it will save on
detergent, time, water and between 5 and 15%
energy.
Treating stains with a stain remover or leaving
them to soak before washing will cut down the
need to wash them at high temperatures. A
programme at 60°C instead of 90°C or one at
40°C instead of 60°C will save up to 50% on
energy.
Use the correct quantity of detergent depending
on the water hardness, how soiled the garments
are and the amount of laundry you have, to avoid
wastage and to protect the environment: despite
being biodegradable, detergents do contain
ingredients that alter the natural balance of the
environment. In addition, avoid using fabric
softener as much as possible.
If you use your washing machine from late in the
afternoon until the early hours of the morning, you
will help reduce the electricity board's peak load.
If your laundry has to be dried in a tumble dryer,
select a high spin speed. Having the least water
possible in your laundry will save you time and
energy in the drying process.
GB
ServiceTroubleshootingPrecautions CareProgrammes DetergentsInstallation Description
11
Page 12
Care and maintenance
GB
Cutting off the water or electricity
supply
Turn off the water tap after every wash. This will
limit the wear of your appliance's water system
and also prevent leaks.
Unplug your appliance when cleaning it and
during all maintenance operations.
Cleaning your appliance
The exterior and rubber parts of your appliance can
be cleaned with a soft cloth soaked in lukewarm
soapy water. Do not use solvents or abrasives.
Cleaning the detergent dispenser
Remove the dispenser
by raising it and pulling it
out (see figure).
Wash it under running
water; this operation
should be repeated
frequently.
Cleaning the pump
The Washer-dryer is fitted with a self-cleaning pump
that does not require any maintenance. Sometimes,
small items (such as coins or buttons) may fall into
the pre-chamber that protects the pump, situated in
the lower part of the same.
Make sure the wash cycle has ended and unplug
the appliance.
To access the pre-chamber:
1. using a screwdriver,
remove the cover panel
on the lower front of the
Washer-dryer (see
figure);
2. unscrew the lid
rotating it anticlockwise (see figure): a
little water may trickle
out. This is perfectly
normal;
Caring for your appliance door and
drum
Always leave the appliance door ajar to prevent
unpleasant odours from forming.
3. clean the interior thoroughly;
4. screw the lid back on;
5. reposition the panel, making sure the hooks are
securely in place before you push it onto the
appliance.
Checking the water inlet hose
Check the water inlet hose at least once a year. If
you see any cracks, replace it immediately: during
the wash cycles, water pressure is very strong and
a cracked hose could easily split open.
Never use hoses that have already been used.
12
Page 13
Troubleshooting
Your washer-dryer could fail to work. Before calling for Assistance (see page 14), make sure the problem can't
easily be solved by consulting the following list.
Problem
The washer-dryer won't start.
The washer-dryer does not fill
with water.
The machine continuously fills
and empties with water.
The washer-dryer does not
drain or spin.
Possible causes/Solution:
The appliance is not plugged into the socket, or not enough to make contact.
There has been a power failure.
The appliance door is not shut properly.
The
The START/RESET button has not been pressed.
NB: It should be held minimum one second.
The water tap is not turned on.
The water inlet hose is not connected to the tap.
The hose is bent.
The water tap is not turned on.
There is a water shortage.
The water pressure is insufficient.
The START/RESET button has not been pressed.
The drain hose is too low or too far in to the stand pipe (see page 3)
for correct installation.
The wall drainage system doesn't have a standard pipe (min. 38 mm).
Some programs have a slower final spin to taked best care of the
fabrics. See page 8 for details of the final spin speed for each program.
The programme does not foresee the draining: some programmes
require enabling the draining manually (see page 8).
The Easy iron option is enabled: to complete the programme, press
the START/RESET button (see page 9).
The drain hose is bent (see page 3).
Remove the drain hose from the standpipe or under-sink trap and
check for blockages, ensuring that the water can drain freely away
from the machine.
button has not been pressed.
GB
The washer-dryer vibrates too
much during the spin cycle.
The washer-dryer leaks.
The ON-OFF/DOOR LOCK Led
flashes rapidly at the same
time as at least one other LED.
There is too much foam.
The washer-dryer does not dry.
Check that the transit bolts were removed correctly during installation
(carefully read pages 2 and 3).
The washer-dryer is not level (see page 2).
The washer-dryer is closed in between furniture cabinets and
the wall (see page 2).
The water inlet hose is not screwed on correctly (see page 2).
The detergent dispenser is obstructed (to clean it, see page 12).
The drain hose is not secured properly (see page 3).
Call for Assistance because this means there is an abnormality.
The detergent is not suitable for machine washing (it should bear the
definition "for washing machines" or "hand and machine wash", or the like).
You used too much detergent.
ServiceTroubleshootingPrecautions CareProgrammes DetergentsInstallation Description
The appliance is not plugged into the socket, or not enough to make contact.
There has been a power failure.
The appliance door is not shut properly.
the DRYING knob is on the 0 setting.
13
Page 14
Service
GB
Before calling for Assistance:
Check whether you can solve the problem on your own (see page 13);
Restart the programme to check whether the problem has been solved;
If this is not the case, contact an authorised Technical Service Centre on the telephone number
provided on the guarantee certificate.
Always request the assistance of authorised servicemen.
Notify the operator of:
the type of problem;
the appliance model (Mod.);
the serial number (S/N).
This information can be found on the data plate situated on the rear of the washer-dryer.
Service
14
Page 15
ﺲﺑ ﻼﻣ ﺔﻓﺎﺸﻧ ﺔﻟﺎﺴﻏ
لﺎﻤﻌﺘﺳ ﻻا ﻞﺟأ ﻦﻣ تﺎﻤﻴﻠﻌﺗ
ﻲﺑﺮﻋ
اﻟﻔﻬﺮس
اﻟﺘﺮآﻴﺐ 61 - 71 - 81 - 91
اﺧﺮاج اﻟﺠﻬﺎز ﻣﻦ ﺗﻐﻠﻴﻔﻪ و ﺗﺴﻮﻳﺔ اﻟﺠﻬﺎز، 61
ﺗﻮﺻﻴﻼ ت اﻟﻤﺎء واﻟﻬﺮﺑﺎء، 61 - 71
أول دورة ﻏﺴﻴﻞ، 81
ﻣﻮاﺻﻔﺎت ﻓﻨﻴﺔ، 91
وﺻﻒ ﻏﺴﺎﻟﺔ ﻧﺸﺎﻓﺔ اﻟﻤﻼ ﺑﺲ 12-02
ﻟﻮﺣﺔ اﻟﻘﻴﺎدة، 02
ﺻﺎﺑﻴﺢ اﻧﺬار، 12
اﻟﺘﺸﻐﻴﻞ و اﻟﺒﺮﻣﺠﺔ، 22
ﺑﺒﺴﺎﻃﺔ: ﺗﺸﻐﻴﻞ ﺑﺮﻧﺎﻣﺞ، 22
ﻟﻮﺣﺔ اﻟﺒﺮاﻣﺞ، 22
ﻲﺑﺮﻋ
ﺗﺸﺨﻴﺺ، 32
وﺿﻊ درﺟﺔ اﻟﺤﺮارة؛ 32
وﺿﻊ ﻋﻤﻠﻴﺔ اﻟﺘﻨﺸﻴﻒ، 32
وﻇﺎﺋﻒ، 32
ﻣﺴﺎﺣﻴﻖ ﻏﺴﻴﻞ و ﻣﻼ ﺑﺲ، 42
ﺣﻮض ﻣﺴﺎﺣﻴﻖ اﻟﻐﺴﻴﻞ، 42
دورة اﻟﺘﺒﻴﺾ، 42
ﺗﺤﻀﻴﺮ اﻟﻤﻼ ﺑﺲ ﻟﻠﻐﺴﻴﻞ، 42
أﻗﻤﺸﺔ ﺧﺎﺻﺔ، 42
WIDL 102
ﺣﺬر وﻧﺼﺎﺋﺢ، 52
أﻣﻦ ﻋﺎم، 52
اﻟﺘﺨﻠﺺ ﻣﻦ اﻟﻨﻔﺎﻳﺎت، 52
اﻻ ﻗﺘﺼﺎد و واﺣﺘﺮام اﻟﺒﻴﺌﺔ، 52
ﺻﻴﺎﻧﺔ و ﺣﻤﺎﻳﺔ، 62
اﻏﻼ ق اﻟﻤﺎء و اﻟﺘﻴﺎر اﻟﻜﻬﺮﺑﺎﺋﻲ، 62
ﺗﻨﻈﻴﻒ ﻏﺴﺎﻟﺔ ﻧﺸﺎﻓﺔ اﻟﻤﻼ ﺑﺲ، 62
ﺗﻨﻈﻴﻒ ﺣﻮض ﻣﺴﺎﺣﻴﻖ اﻟﻐﺴﻴﻞ، 62
ﺣﻤﺎﻳﺔ ﺑﺎب اﻟﻐﺴﺎﻟﺔ ﻧﺸﺎﻓﺔ و ﺣﻮض ﻏﺴﻴﻞ اﻟﻐﺴﺎﻟﺔ، 62
ﺗﻨﻈﻴﻒ ﻣﻀﺨﺔ ﺗﻔﺮﻳﻎ اﻟﻐﺴﺎﻟﺔ ﻧﺸﺎﻓﺔ ﻣﻦ اﻟﻤﺎء، 62
ﻓﺤﺺ ﺧﺮﻃﻮم ﺗﻐﺬﻳﺔ اﻟﻐﺴﺎﻟﺔ ﻧﺸﺎﻓﺔ ﺑﺎﻟﻤﺎء، 62
ﺣﺼﻮل ﺑﻌﺾ اﻟﻤﺸﺎآﻞ وﺣﻠﻮل ﻟﻬﺎ، 72
اﻟﺼﻴﺎﻧﺔ اﻟﻔﻨﻴﺔ، 82
51
Page 16
لﺎﻤﻌﺘﺳ ﻻا ﻞﺟأ ﻦﻣ تﺎﻤﻴﻠﻌﺗ
وﺿـﻊ اﻟـﺠـﻬـﺎز ﺑـﺸـﻜـﻞ ﻣـﺴـﺘـﻮي ﺗـﻌـﻤـﻞ ﻋـﻠـﻰ ﺛـﺒـﺎت اﻟـﺠـﻬـﺎز ﺑـﻤـﻜـﺎﻧـﻪ وﻋـﺪم ذﺑـﺬﺑـﺘـﻪ، وﻋـﺪم
ﺳﻤﺎع اﺻﻮات ﻣﺰﻋﺠﺔ ﺧﻼ ل ﻋﻤﻞ اﻟﺠﻬﺎزأو ﺗﺤﺮك اﻟﺠﻬﺎز ﻣﻦ ﻣﻜﺎﻧﻪ ﺧﻼ ل ﻋﻤﻞ
اﻟﺠﻬﺎز، ﻓﻲ ﺣﺎﻟﺔ وﺟﻮد ﻣﻜﻴﺖ أو ﺳﺠﺎد ﻋﻠﻰ اﻷ رﺿﻴﺔ ﺗﺤﺖ اﻟﺠﻬﺎز ﻋﻴﺮوا اﻷ رﺟﻞ
ﺗـﺤـﺖ اﻟـﺠـﻬـﺎز ﺑـﺤـﻴـﺖ ﻳـﺘـﻢ ﺗـﺮك ﻣـﺴـﺎﻓـﺔ ﺑـﻴـﻦ اﺟـﻬـﺎز واﻷ رﺿـﻴـﺔ ﺗـﺤـﺘـﻪ وذﻟـﻚ ﻟـﺘـﺮك ﺣـﻴـﺰ
ﻟﺪﺧﻮل اﻟﻬﻮاء ﻣﻦ أﺟﻞ اﻟﺘﻬﻮﻳﺔ.
ﺗﻮﺻﻴﻞ اﻟﻤﺎء واﻟﻜﻬﺮﺑﺎء ﺑﺎﻟﺠﻬﺎز
ﺗﻮﺻﻴﻞ ﺧﺮﻃﻮم ﺗﻐﺬﻳﺔ اﻟﺠﻬﺎز ﺑﺎﻟﻤﺎء
! ﻣﻦ اﻟﻤﻬﻢ اﻟﺤﻔﺎظ ﻋﻠﻰ هﺬا اﻟﻜﺘﻴﺐ ﻟﻴﻤﻜﻨﻜﻢ اﻟﻌﻮدة اﻟﻴﻪ ﻋﻨﺪ اﻟﺤﺎﺟﺔ اﻟﻰ اﻟﺘﻌﺮف
ﻋﻠﻰ ﻣﻌﻠﻮﻣﺎت ﻋﻦ اﻟﺠﻬﺎز ﻓﻲ أي ﻟﺤﻈﺔ، ﻓﻲ ﺣﺎﻟﺔ ﺑﻴﻊ اﻟﺠﻬﺎز أو اﻋﻄﺎءه آﻬﺪﻳﺔ أو
ﻋﻨﺪ ﻧﻘﻞ اﻟﺠﻬﺎز ﻣﻦ ﻣﻜﺎن ﻻ ﺧﺮ، ﺗﺄآﺪوا ﻣﻦ أن ﻳﺒﻘﻰ هﺬا اﻟﻜﺘﻴﺐ ﻧﻊ اﻟﺠﻬﺎز وذﻟﻚ
ﻟـﺘـﻘـﺪﻳـﻢ ﻣـﻌـﻠـﻮﻣـﺎت ﺗـﺘـﻌـﻠـﻖ ﺑـﺘـﺸـﻌـﻴـﻞ وﺑـﺮﻣـﺠـﺔ اﻟـﺠـﻬـﺎز ﺑـﺎﻻ ﺿـﺎﻓـﺔ اﻟـﻰ اﻟـﻨـﺼـﺎﺋـﺢ واﻟـﺘـﺤـﺬﻳـﺮ
ﻟﻠﻤﺎﻟﻚ اﻟﺠﺪﻳﺪ ﻟﻠﺠﻬﺎز.
! أﻗ
ـ
ﺮؤوا ﺑـﺘـﻤـﻌـﻦ اﻟـﺘـﻌـﻠـﻴـﻤـﺎت: ﻓـﻲ داﺧـﻞ هـﺬا اﻟـﻜـﺘـﻴـﺐ ﻣـﻮﺟـﻮد ﻣـﻌـﻠـﻮﻣـﺎت هـﺎﻣـﺔ ﺗـﺘـﻌـﻠـﻖ
ﺑﺎﻟﺘﺮآﻴﺐ، اﻻ ﺳﺘﻌﻤﺎل، وأﻣﻦ اﻟﺠﻬﺎز.
اﺧﺮاج اﻟﺠﻬﺎز ﻣﻦ ﺗﻐﻠﻴﻔﻪ وﺗﺴﻮﻳﺔ اﻟﺠﻬﺎز
1. أدﺧﻠﻮا ﺣﻠﻘﺔ ﻋﺪم ﺗﺴﺮب اﻟﻤﺎء اﻟﻤﺸﺎر
ﻟﻬﺎ ﺑﺎﻟﺤﺮف A ﻓﻲ ﻧﻬﺎﻳﺔ ﺧﺮﻃﻮم وارﺑﻄﻮه
ﺑﻨﺤﺒﺲ ﻣﺎء ﺑﺎرد ﺑﻔﺘﺤﺔ ﻣﺴﻨﻨﻪ ﺑﺴﻦ 3/4
ﻏﺎز )اﻧﻈﺮ اﻟﻰ اﻟﺸﻜﻞ(
ﻗﺒﻞ وﺻﻠﻪ ﺑﺎﻟﺠﻬﺎز اﺗﺮآﻮا اﻟﻤﺎء ﻳﺨﺮج
ﻣﻦ اﻟﻤﺤﺒﺲ ﺣﺘﻰ ﺧﺮوج ﻣﺎء ﺻﺎﻓﻴﺔ ﻣﻦ
اﻟﻤﺤﺒﺲ.
2. اﺷﺒﻜﻮا اﻟﺨﺮﻃﻮم اﻟﺬي ﻳﻐﺬي اﻟﻐﺴﺎﻟﺔ
اﻟﻨﺸﺎﻓﺔ ﺑﺎﻟﻤﺎء وذﻟﻚ ﺑﺮﺑﻄﻪ ﺑﻤﺪﺧﻞ اﻟﻤﺎء
ـﻤـﻮﺟـ
ﻮد ﻓـﻲ ﻇـﻬـﺮ اﻟـﻐـﺴـﺎﻟـﺔ ﻣـﻦ اﻟـﺨـﻠـﻒ
اﻟ
ﻓ
ـ
ﻲ اﻟـﻤـﻨـﻄـﻘـﺔ اﻟـﻌـﻠـﻴـﺎ ﻋـﻠـﻰ اﻟـﻴـﻤـﻴـﻦ.)اﻧـﻈـﺮ
اﻟﻰ اﻟﺸﻜﻞ(
A
3. اﺧـﻠـﻌـﻮا اﻷ رﺑـﻊ ﺑـﺮاﻏـﻲ اﻟـﺘـﻲ ﺗـﺤـﻤـﻲ
اﻟﺠﻬﺎز ﺧﻼ ل ﻋﻤﻠﻴﺔ اﻟﻨﻘﻞ، وآﺬﻟﻚ اﺧﻠﻌﻮا
اﻟ
ـﻘـﻄـ
ﻊ اﻟـﻤـﻄـﺎﻃـﻴـﺔ وﻣـﺒـﺎﻋـﺪ آـﻞ واﺣـﺪة ﻣـﻦ
ـ
ﺬه، اﻟـﺘـﻲ ﺗـﻜـﻮن ﻣـﻮﺟـﻮدة ﻓـﻲ اﻟـﻤـﻨـﻄـﻘـﺔ
ه
اﻟﺨﻠﻔﻴﺔ ﻣﻦ اﻟﺠﻬﺎز )اﻧﻈﺮ اﻟﻰ اﻟﺸﻜﻞ(
3. ﺧـﺬوا ﺣـﺬرآـﻢ ﻣـﻦ ﻻ ﻳـﻜـﻮن اﻟـﺨـﺮﻃـﻮم ﻣـﻄـﻮي أو ﻣـﺨـﻨـﻮق ﻓـﻲ ﻣـﻜـﺎن ﻣـﺎ ﻋـﻠـﺔ
ﻃﻮل اﻣﺘﺪاده.
اﺧﺮاج اﻟﺠﻬﺎز ﻣﻦ ﺗﻐﻠﻴﻔﻪ
1. اﺧﺮﺟﻮا اﻟﻐﺴﺎﻟﺔ اﻟﻨﺸﺎﻓﺔ ﻣﻦ ﺗﻐﻠﻴﻔﻬﺎ
2. ﺗﺄآﺪوا ﻣﻦ اﻟﻐﺴﺎﻟﺔ اﻟﻨﺸﺎﻓﺔ ﻟﻢ ﻳﺤﺪث ﻟﻬﺎ أﺿﺮار ﺧﻼ ل ﺷﺤﻨﻬﺎ وﻧﻘﻠﻬﺎ ﻣﻦ ﻣﻜﺎن
ﻻ ﺧﺮ، اذا آﺎن اﻟﺠﻬﺎز ﻣﻀﺮر أو ﻣﻀﺮوب ﻓﻲ ﻣﻜﺎن ﻣﺎ ﻻ ﺗﻘﻮﻣﻮا ﺑﻌﻤﻠﻴﺔ ﺗﻮﺻﻴﻠﻪ
أو ﺗﺮآﻴﺒﻪ، واﺗﺼﻠﻮا ﺑﺎﻟﺒﺎﺋﻊ.
4. اﻏﻠﻘﻮا اﻟﺜﻘﻮب ﺑﻮاﺳﻄﺔ اﻷ ﻏﻄﻴﺔ اﻟﺒﻼ ﺳﺘﻴﻜﻴﺔ اﻟﺘﻲ ﺗﻜﻮن ﻣﺰودة ﻣﻊ اﻟﺠﻬﺎز.
5. أﻏـﻠـﻘـﻮا ﺑـﺎﻷ ﻏـﻄـﻴـﺔ اﻟـﺘـﻲ ﺗـﻜـﻮن ﻣـﺰودة ﻣـﻊ اﻟـﺠـﻬـﺎز اﻟـﺜـﻼ ث ﺛـﻘـﻮب ﺣـﻴـﺚ ﻳـﻜـﻮن
ﻣـﻮﺿـﻮع ﻗـﺎﺑـﺲ اﻟـﺘـﻴـﺎر اﻟـﻜـﻬـﺮﺑـﺎﺋـﻲ )اﻟـﺬآـﺮ( اﻟـﺬي ﻳـﻜـﻮن ﻣـﻮﺟـﻮد ﻓـﻲ ﺧـﻠـﻒ اﻟـﺠـﻬـﺎز
ﻣﻦ اﻷ ﺳﻔﻞ ﻋﻠﻰ اﻟﻴﻤﻴﻦ.
6. ﺣﺎﻓﻈﻮا ﻋﻠﻰ ﺟﻤﻴﻊ اﻟﻘﻄﻊ اﻟﺘﻲ ﺗﻢ ﻓﻜﻬﺎ: ﻋﻨﺪ ﻧﻘﻞ اﻟﺠﻬﺎز ﻣﻦ ﻣﻜﺎن ﻻ ﺧﺮ ﻳﺠﺐ
ﺗﺮآﻴﺐ هﺬه اﻟﻘﻄﻊ ﻣﻜﺎﻧﻬﺎ ﻣﻦ ﺟﺪﻳﺪ.
! ﺿﻐﻂ ﺷﺒﻜﺔ اﻟﻤﺎء ﻳﺠﺐ أن ﺗﻜﻮن ﺑﺎﻟﻘﻴﻢ اﻟﺘﻲ ﺗﻜﻮن ﻣﻌﻄﻴﺔ وﻣﻜﺘﻮﺑﺔ ﻻ ﺋﺤﺔ اﻟﺨﺼﺎﺋﺺ
اﻟﻔﻨﻴﺔ ﻟﻠﺠﻬﺎز)اﻧﻈﺮ اﻟﻰ اﻟﺼﻔﺤﺔ اﻟﺠﺎﻧﺒﻴﺔ(
! ﻳﺠﺐ ﻋﺪم ﺗﺮك اﻷ ﻃﻔﺎل اﻟﻠﻌﺐ ﺑﺘﻐﻠﻴﻒ اﻟﺠﻬﺎز.
! اذا آﺎن ﻃﻮل ﺧﺮﻃﻮم ﺗﻐﺬﻳﺔ اﻟﻐﺴﺎﻟﺔ اﻟﻨﺸﺎﻓﺔ ﺑﺎﻟﻤﺎء ﻏﻴﺮ آﺎﻓﻲ اﺳﺘﻌﻴﻨﻮا ﺑﻘﺴﻢ اﻟﺼﻴﺎﻧﺔ
اﻟﻔﻨﻴﺔ أو اﻟﻤﺤﻼ ت اﻟﻤﺨﺘﺼﺔ أو ﻓﻨﻲ ﻣﺆهﻞ ﺑﺎﻟﻘﻴﺎم ﺑﻌﻤﻠﻴﺎت اﻟﺼﻴﺎﻧﺔ اﻟﻔﻨﻴﺔ.
2. اذا آـﺎﻧـﺖ اﻷ رﺿـﻴـﺔ ﻏـﻴـﺮ ﻣـﺴـﺘـﻮﻳـﺔ،
ﻳـﻤـﻜـﻨـﻜـﻢ اﻻ ﺳـﺘـﻌـﺎﻧـﺔ ﺑـﺎﻷ رﺟـﻞ اﻷ ﻣـﺎﻣـﻴـﺔ
اﻟﻤﺘﺤﺮآﺔ واﻟﺘﻲ ﻗﺎﺑﻠﺔ اﻟﺘﻌﺪﻳﻞ ﻓﻲ ارﺗﻔﺎﻋﻬﺎ
وذﻟﻚ ﻻ زاﻟﺔ ﻋﺪم اﺳﺘﻮاء اﻷ رﺿﻴﺔ )اﻇﺮ
اﻟﻰ اﻟﺸﻜﻞ(. زاوﻳﺔ اﻟﻤﻴﻼ ن اﻟﺘﻲ ﻳﻤﻜﻨﻜﻢ
ﻗﻴﺎﺳﺘﻬﺎ ﻋﻠﻰ اﻟﺴﻄﺢ اﻟﻌﻠﻮي ﻟﻠﺠﻬﺎز ﻳﺠﺐ
أن ﻻ ﻳﺰﻳﺪ ﻋﻦ 2 درﺟﺔ.
ﺗﺴﻮﻳﺔ اﻟﺠﻬﺎز
1. رآﺒﻮا ﻏﺴﺎﻟﺔ ﻧﺸﺎﻓﺔ اﻟﻤﻼ ﺑﺲ ﻋﻠﻰ أرﺿﻴﺔ ﻣﺴﺘﻮﻳﺔ وﺻﻠﺒﺔ ﺑﺪون أرﺗﻜﺎزهﺎ ﻋﻠﻰ
ﺣﺎﺋﻂ أو ﻗﻄﻊ أﺛﺎث أو أي ﺷﻲء اﺧﺮ.
61
Page 17
ﺗﻐﻴﻴﺮ اﻟﻤﻨﺼﻬﺮة )اﻟﻔﻴﻮز(
ﻋـﻨـﺪ ﺗـﻐـﻴـﻴـﺮ اﻟـﻤـﻨـﺼـﻬـﺮة )اﻟـﻔـﻴـﻮز( اﻟـﻤـﻌـﻄـﻮب، اﺳـﺘـﺨـﺪﻣـﻮا داﺋـﻤـﺎ ﻣـﻨـﺼـﻬـﺮة 31 اﻣـﺒـﻴـﺮ
ATSA ﺧﺎﺿﻌﺔ ﻟﻠﻤﻘﻴﺎس 2631 SB وأﻋﻴﺪوا ﻏﻄﺎء اﻟﻤﻨﺼﻬﺮة اﻟﻰ ﻣﻜﺎﻧﻪ اﻟﺬي
آـﺎن ﻓـﻴـﻪ، ﻓـﻲ ﺣـﺎﻟـﺔ ﻓـﻘـﺪان هـﺬا اﻟـﻐـﻄـﺎء ﻻ ﺗـﺴـﺘـﺨـﺪﻣـﻮا اﻟـﻘـﺎﺑـﺲ ﺣـﺘـﻰ اﻟـﺤـﺼـﻮل ﻋـﻠـﻰ
هﺬا اﻟﻐﻄﺎء وﺗﺮآﻴﺒﻪ ﻓﻲ ﻣﻜﺎﻧﻪ.
ﺗﻐﻴﻴﺮ ﻏﻄﺎء اﻟﻤﻨﺼﻬﺮات )اﻟﻔﻴﻮزات(:
اذا ﺗﻢ ﺗﻐﻴﻴﺮ ﻏﻄﺎء اﻟﻔﻴﻮزات ﺗﺎآﺪوا ﻣﻦ أن ﻟﻮﻧﻪ هﻮ اﻟﻠﻮن اﻟﺼﺤﻴﺢ واﻟﻤﺸﺎر ﻟﻪ
ﺑﻮاﺳﻄﺔ اﻟﺮﻗﻢ أو اﻟﻜﺘﺎﺑﺔ اﻟﻤﻠﻮﻧﺔ اﻟﻤﻮﺟﻮدة ﻋﻠﻰ ﻗﺎﻋﺪة اﻟﻘﺎﺑﺲ، ﻟﻘﻄﻊ اﻟﻐﻴﺎر، اﺳﺘﻌﻴﻨﻮا
ﻣﺒﺎﺷﺮة ﺑﻘﺴﻢ اﻟﺼﻴﺎﻧﺔ اﻟﻔﻨﻴﺔ اﻟﻘﺮﻳﺐ ﻋﻠﻴﻜﻢ.
ﻓﻚ اﻟﻘﺎﺑﺲ )اﻟﺬآﺮ(:
ﻓﻲ ﺣﺎﻟﺔ أن ﻳﻜﻮن اﻟﺠﻬﺎز ﻣﺰود ﺑﻘﺎﺑﺲ )اﻟﺬآﺮ( ﻻ ﻳﻤﻜﻦ ﻓﻜﻪ ﻷ ﻧﻪ ﻣﺼﻬﻮر وﺗﺮﻳﺪون
ﺗﻤﺮﻳﺮ ﺳﻠﻚ اﻟﺘﻐﺬﻳﺔ اﻟﻜﻬﺮﺑﺎﺋﻴﺔ ﻣﻦ ﺧﻼ ل ﺛﻘﻮب أو ﻓﺘﺤﺎت ﺻﻐﻴﺮة ﻻ ﻳﻤﺮ ﻣﻦ ﺧﻼ ﻟﻬﺎ
اﻟﻘﺎﺑﺲ ﻗﻮﻣﻮا ﺑﺘﻐﻴﻴﺮ اﻟﻘﺎﺑﺲ اﻟﻤﺼﻬﻮر ﺑﻘﺎﺑﺲ ﻳﻤﻜﻦ ﻓﻜﻪ وﺗﺮآﻴﺒﻪ وﻗﺎدر ﻋﻠﻰ ﺗﺤﻤﻞ
31 أﻣﺒﻴﺮ وﻳﺤﻤﻞ اﻟﺸﻌﺎر ISB.
أو
وﺻـﻞ ﺳـﻠـﻚ اﻟـﺘـﻐـﺬﻳـﺔ اﻟـﻜـﻬـﺮﺑـﺎﺋـﻴـﺔ ﺑـﻤـﻨـﺒـﻊ اﻟـﺘـﻴـﺎر اﻟـﻜـﻬـﺮﺑـﺎﺋـﻲ ﺑـﻮاﺳـﻄـﺔ ﻣـﻔـﺘـﺎح ﻗـﺎدر ﻋـﻠـﻰ
ﺗـﺤـﻤـﻞ 31 أﻣـﺒـﻴـﺮ )وﺧـﺎﺿـﻊ ﻟـﻠـﻤـﻘـﻴـﺎس 3375 SB ( ﻳـﻤـﻜـﻦ اﻟـﻮﺻـﻮل اﻟـﻴـﻪ ﺑـﺪون
ﺗﺤﺮﻳﻚ اﻟﺠﻬﺎز ﻣﻦ ﻣﻜﺎﻧﻪ.
ازاﻟﺔ اﻟﻘﺎﺑﺲ )اﻟﺬآﺮ(:
ﻗﺒﻞ رﻣﻲ اﻟﻘﺎﺑﺲ اﺟﻌﻠﻮة ﻏﻴﺮ ﻗﺎﺑﻞ ﻟﻼ ﺳﺘﻌﻤﺎل وذﻟﻚ ﺑﻜﺴﺮ رؤوﺳﻪ ﺑﺤﻴﺚ ﻻ ﻳﻤﻜﻦ
ادﺧﺎﻟﻪ داﺧﻞ ﺛﻘﻮب ﻣﻘﺒﺲ )اﻻ ﻧﺜﻰ( ﺑﺸﻜﻞ ﻋﻔﻮي.
ﺗﻌﻠﻴﻤﺎت ﻣﻦ أﺟﻞ ﺗﻮﺻﻴﻞ ﺳﻠﻚ اﻟﺘﻐﺬﻳﺔ اﻟﻜﻬﺮﺑﺎﺋﻴﺔ ﺑﻘﺎﺑﺲ )اﻟﺬآﺮ(:
ﻣﻬﻢ: أﻟﻮان اﻷ ﺳﻼ ك اﻟﺘﻐﺬﻳﻪ اﻟﻜﻬﺮﺑﺎﺋﻴﺔ ﺗﺸﻴﺮ اﻟﻰ اﻟﺘﺎﻟﻲ:
أﺻﻔﺮ/أﺧﻀﺮ ﺧﻂ أرض
ازرق ﻣﺤﺎﻳﺪ )ﻧﻴﻮﺗﺮل(
ﺑﻨﻲ ﺗﻐﺬﻳﺔ
وﻷ ن أﻟـﻮان ﺳـﻠـﻚ اﻟـﺘـﻐـﺬﻳـﺔ اﻟـﻜـﻬـﺮﺑـﺎﺋـﻴـﺔ ﻳـﻤـﻜـﻦ أن ﻻ ﻳـﻄـﺎﺑـﻘـﻮا اﻻ ﺷـﺎرات اﻟـﻤـﻠـﻮﻧـﺔ اﻟـﺘـﻲ
ﺗﻌﺮف ﻣﺮاﺑﻂ اﻟﻘﺎﺑﺲ، اﺗﺒﻌﻮا اﻟﺨﻄﻮات اﻟﺘﺎﻟﻴﺔ:
أوﺻﻠﻮا اﻟﺴﻠﻚ اﻷ ﺻﻔﺮ/اﻷ ﺧﻀﺮ ﺑﺎﻟﻤﺮﺑﻂ اﻟﻤﺸﺎر ﻟﻪ ﺑﺎﻟﺤﺮف E أو ﺑﺎﻟﺸﻌﺎر أو
اﻟﻠﻮن اﻷ ﺧﻀﺮ أو اﻷ ﺻﻔﺮ/اﻷ ﺧﻀﺮ
أوﺻﻠﻮا اﻟﺴﻠﻚ اﻟﺒﻨﻲ ﺑﺎﻟﻤﺮﺑﻂ اﻟﻤﺸﺎر ﻟﻪ ﺑﺎﻟﺤﺮف L أو ﺑﺎﻟﻠﻮن اﻷ ﺣﻤﺮ.
أوﺻﻠﻮا اﻟﺴﻠﻚ اﻷ زرق ﺑﺎﻟﻤﺮﺑﻂ اﻟﻤﺸﺎر ﻟﻪ ﺑﺎﻟﺤﺮف N أو ﺑﺎﻟﻠﻮن اﻷ ﺳﻮد.
اذا اﺳﺘﺨﺪﻣﺘﻢ ﻗﺎﺑﺲ )اﻟﺬآﺮ( 31 أﻣﺒﻴﺮ )3631 SB( رآﺒﻮا ﻣﻨﺼﻬﺮة )ﻓﻴﻮز( 31
أﻣﺒﻴﺮ ﻓﻲ اﻟﻤﻘﺒﺲ أو ﻓﻲ اﻟﻤﻬﺎيْ أو ﻋﻠﻰ ﻟﻮﺣﺔ اﻟﺘﻮزﻳﻊ.
اوﺻﻠﻮا ﺧﺮﻃﻮم ﺗﻔﺮﻳﻎ اﻟﻤﺎء ﻣﻦ ﺣﻮض
ﻏـﺴـﻴـﻞ اﻟـﻐـﺴـﺎﻟـﺔ ﺑـﺪون ﻃـﻮﻳـﻪ، ﺑـﻤـﺎﺳـﻮرة
ﺻـﺮف ﻟـﻠـﻤـﺎء، أو ﺑـﻤـﺼـﺮف ﻣـﻮﺟـﻮد ﻓـﻲ
اﻟﺤﺎﺋﻂ ﻋﻠﻰ أن ﻳﻜﻮن ارﺗﻔﺎﻋﻪ ﻣﺎ ﺑﻴﻦ 56
و 001 ﺳﻨﺘﻤﺘﺮ ﻋﻦ ﺳﻄﺢ اﻷ رض
أو ﻗـﻮﻣـﻮا ﺑـﻮﺿـﻌـﻪ ﻋـﻠـﻰ ﺣـﺎﻓـﺔ ﻣـﻐـﺴـﻠـﺔ
أو ﺣـﻮض ﺣـﻤـﺎم، ارﺑـﻄـﻮا اﻟـﺨـﺮﻃـﻮم
ﺑـﺤـﺎﻣـﻞ اﻟـﺨـﺮﻃـﻮم اﻟـﺬي ﻳـﻜـﻮن ﻣـﺰود ﻣـﻊ
اﻟﺠﻬﺎزﺑﻤﺤﺒﺲ اﻟﻤﺎء )اﻧﻈﺮ اﻟﻰ اﻟﺸﻜﻞ(
اﻟﻄﺮف اﻟﺤﺮ ﻣﻦ اﻟﺨﺮﻃﻮم ﻳﺠﺐ أن ﻻ
ﻳﻜﻮن ﻣﻐﻤﻮر ﻓﻲ اﻟﻤﺎء.
65 - 100 cm
ﻞ ﻳـﺠـﺐ أن ﻳـﻜـﻮن ﻗـﻄـﺮ هـﺬا اﻟـﺨـﺮﻃـﻮم ﻧـﻔـﺲ ﻗـﻄـﺮ اﻟـﺨـﺮﻃـﻮم اﻟـﺮﺋـﻴـﺴـﻲ وﻳـﺠـﺐ
ـﻤـﻤـﺘـﺼـ
ﺔ ﻣـﻦ ﻗـﺒـﻞ اﻟـﺠـﻬـﺎزوﻳـﻜـﻮن ﻣـﺸـﺎر ﻟـﻬـﺎ ﻓـﻲ ﻻ ﺋـﺤـﺔ اﻟـﺨـﺼـﺎﺋـﺺ اﻟـﻔـﻨـﻴـﺔ ﻟـﻠـﺠـﻬـﺎز
ﻲﺑﺮﻋ
ﻏﻴﺮ ﻣﻨﺼﻮح اﺳﺘﺨﺪام ﺧﺮاﻃﻴﻢ ﺗﻄﻮﻳﻞ ، اذا آﺎن ﻣﻦ اﻟﻀﺮوري اﺳﺘﺨﺪام ﺧﺮاﻃﻴﻢ
ـﺘـﻄـﻮﻳـ
اﻟ
أن ﻻ ﻳﺰﻳﺪ ﻃﻮﻟﻪ ﻋﻦ 051 ﺳﻨﺘﻤﺘﺮ.
اﻟﺘﻮﺻﻴﻞ ﺑﺸﺒﻜﺔ اﻟﺘﻴﺎر اﻟﻜﻬﺮﺑﺎﺋﻲ
ﻗﺒﻞ ادﺧﺎل ﻗﺎﺑﺲ اﻟﺘﻴﺎر اﻟﻜﻬﺮﺑﺎﺋﻲ )اﻟﺬآﺮ( ﺑﻤﻘﺒﺲ اﻟﺘﻴﺎر اﻟﻜﻬﺮﺑﺎﺋﻲ )اﻷ ﻧﺜﻰ( ﺗﺄآﺪوا
ﻣﻦ أن:
ﻣﻘﺒﺲ اﻟﺘﻴﺎر اﻟﻜﻬﺮﺑﺎﺋﻲ )اﻷ ﻧﺜﻰ( ﻟﻬﺎ ﺧﻂ أرض ﻓﻌﺎل وﺧﺎﺿﻊ اﻟﻰ اﻟﻘﻮاﻧﻴﻦ
ﻣـﻘـﺒـﺲ اﻟـﺘـﻴـﺎر اﻟـﻜـﻬـﺮﺑـﺎﺋـﻲ )اﻷ ﻧـﺜـﻰ( ﻗـﺎدر ﻋـﻠـﻰ ﺗـﺤـﻤـﻞ اﻟـﻘـﺪرة اﻟـﻜـﻬـﺮﺑـﺎﺋـﻴـﺔ اﻟـﻘـﺼـﻮى
اﻟ
)اﻧﻈﺮﺻﻔﺤﺔ 91(.
ﻓﺮق ﺟﻬﺪ ﺷﺒﻜﺔ اﻟﻜﻬﺮﺑﺎء ﻳﺠﺐ أن ﺗﻜﻮن ﻓﻲ اﻟﻘﻴﻢ اﻟﺘﻲ ﺗﻜﻮن ﻣﻮﺟﻮدة واﻟﻤﺸﺎر ﻟﻬﺎ
ﻓﻲ ﻻ ﺋﺤﺔ اﻟﺨﺼﺎﺋﺺ اﻟﻔﻨﻴﺔ ﻟﻠﺠﻬﺎز)اﻧﻈﺮﺻﻔﺤﺔ 91(.
ﻣﻘﺒﺲ اﻟﺘﻴﺎر اﻟﻜﻬﺮﺑﺎﺋﻲ )اﻷ ﻧﺜﻰ( ﻣﻼ ﺋﻢ ﻟﻘﺎﺑﺲ اﻟﺘﻴﺎر اﻟﻜﻬﺮﺑﺎﺋﻲ )اﻟﺬآﺮ( اﻟﻤﺰود ﻣﻊ
اﻟﻐﺴﺎﻟﺔ ﻓﻲ ﺣﺎﻟﺔ ﻋﺪم ﺗﻮاﻓﻘﻬﻢ ﻗﻮﻣﻮا ﺑﻌﻤﻠﻴﺔ ﺗﻐﻴﻴﺮ اﺣﺪاهﻤﺎ.
ﺟ
ـﻬـ
ﺎزآـﻢ اﻟـﻜـﻬـﺮﺑـﺎﺋـﻲ ﻣـﺰود ﺑـﻘـﺎﺑـﺲ )اﻟـﺬآـﺮ( ﻣـﺼـﻬـﻮر وﻗـﺎدرﻋـﻠـﻰ ﺗـﺤـﻤـﻞ ﺗـﻴـﺎر آـﻬـﺮﺑـﺎﺋـﻲ
31 أﻣﺒﻴﺮ وﻳﻤﻜﻨﻜﻢ ادﺧﺎل هﺬا اﻟﻘﺎﺑﺲ ﺑﻤﻘﺒﺲ )اﻻ ﻧﺜﻰ( ﻳﺘﻮاﻓﻖ ﻣﻌﺔ ﻟﻼ ﺳﺘﺨﺪام اﻟﻤﺒﺎﺷﺮ،
اﻗﺮؤوا اﻟﺘﻌﻠﻴﻤﺎت اﻟﺘﺎﻟﻴﺔ ﻗﺒﻞ اﺳﺘﺨﺪام اﻟﺠﻬﺎز اﻟﻜﻬﺮﺑﺎﺋﻲ.
اﻧـﺘـﺒـﺎه: اﻟـﺠـﻬـﺎز اﻟـﻜـﻬـﺮﺑـﺎﺋـﻲ ﻳـﺠـﺐ أن ﻳـﻜـﻮن ﻣـﻮﺻـﻮل ﺑـﺨـﻂ أرض ﻓـﻌـﺎل، اﻟـﻌـﻤـﻠـﻴـﺎت
اﻟﻤﺸﺮوﺣﺔ أدﻧﺎه هﻲ ﺗﻌﻠﻴﻤﺎت ﻣﻮﺟﻪ اﻟﻰ ﻓﻨﻲ آﻬﺮﺑﺎﺋﻲ ﻣﺨﺘﺺ.
71
Page 18
ﻲﺑﺮﻋ
أول دورة ﻏﺴﻴﻞ
ﻓـﻲ ﺣـﺎﻟـﺔ اﻟـﺸـﻚ ﺑـﺎﻟـﺘـﻐـﺬﻳـﺔ اﻟـﻜـﻬـﺮﺑـﺎﺋـﻴـﺔ ﻟـﺠـﻬـﺎزآـﻢ اﺳـﺘـﺪﻋـﻮا ﻓـﻨـﻲ آـﻬـﺮﺑـﺎﺋـﻲ ﻣـﺨـﺘـﺺ ﻗـﺒـﻞ
وﺻﻞ اﻟﺠﻬﺎز ﺑﻤﻨﺒﻊ اﻟﺘﻴﺎر اﻟﻜﻬﺮﺑﺎﺋﻲ.
ﺑﻌﺪ اﻻ ﻧﺘﻬﺎء ﻣﻦ ﻋﻤﻠﻴﺔ ﺗﺮآﻴﺐ اﻟﺠﻬﺎز، وﻗﺒﻞ اﺳﺘﺨﺪاﻣﻪ، ﻗﻮﻣﻮا ﺑﻌﻤﻠﻴﺔ ﻏﺴﻴﻞ ﻣﺴﺘﺨﺪﻣﻴﻦ
ﻣﺴﺤﻮق ﻏﺴﻴﻞ وﺑﺪون ﻣﻼ ﺑﺲ داﺧﻞ اﻟﻐﺴﺎﻟﺔ، ﻣﺴﺘﺨﺪﻣﻴﻦ ﺑﺮﻧﺎﻣﺞ اﻟﻐﺴﻴﻞ ﻋﻠﻰ 09
درﺟﺔ ﻣﺌﻮﻳﺔ ﺑﺪون ﻋﻤﻠﻴﺔ ﻏﺴﻴﻞ ﺑﺪاﺋﻴﺔ.
وﺻﻞ ﻗﺎﺑﺲ )اﻟﺬآﺮ( ﺑﺪﻳﻞ:
أﻟﻮان اﻷ ﺳﻼ ك اﻟﺘﻐﺬﻳﻪ اﻟﻜﻬﺮﺑﺎﺋﻴﺔ ﺗﺸﻴﺮ اﻟﻰ اﻟﺘﺎﻟﻲ:
ازرق ﻣﺤﺎﻳﺪ )ﻧﻴﻮﺗﺮل( )N(
ﺑﻨﻲ ﺗﻐﺬﻳﺔ )L(
أﺻﻔﺮ/أﺧﻀﺮ ﺧﻂ أرض )E(
ازاﻟﺔ اﻟﺠﻬﺎز اﻟﻜﻬﺮﺑﺎﺋﻲ اﻟﺒﻴﺘﻲ:
ﻋﻨﺪ رﻣﻲ ﺟﻬﺎز آﻬﺮﺑﺎﺋﻲ ﺑﻴﺘﻲ، ﻳﺠﺐ ازاﻟﺔ ﻗﺎﺑﺲ اﻟﺘﻴﺎر اﻟﻜﻬﺮﺑﺎﺋﻲ )اﻟﺬآﺮ( وذﻟﻚ
ﺑـﻘـﺺ ﺳـﻠـﻚ اﻟـﺘـﻐـﺬﻳـﺔ اﻟـﻜـﻬـﺮﺑـﺎﺋـﻴـﺔ ﺑـﺄﻗـﺮب ﻧـﻘـﻄـﺔ ﻣـﻤـﻜـﻨـﺔ ﻣـﻦ اﻟـﻘـﺎﺑـﺲ وﻗـﻮﻣـﻮا ﺑـﺘـﺤـﻄـﻴـﻢ
رؤوس اﻟﻘﺎﺑﺲ آﻤﺎ ذآﺮ ﺳﺎﺑﻘﺎ.
أﺧﻀﺮ
VERDE &
أﺻﻔﺮ
GIALLO
ﺑﻨﻲ
MARRONE
أزرق
BLU
fusibile
أﻣﺒﻴﺮ
13 ampere
SERRAFILO
CROSSBAR
ﻣـﻨـﺼـﻬـﺮة 31
ﻣﺮﺑﻂ ﺳﻠﻚ
!اﻟﻐﺴﺎﻟﺔ ﻻ ﺗﻮﺿﻊ ﻓﻲ اﻟﺨﺎرج ﺣﺘﻰ ﻟﻮ آﺎن اﻟﻤﻜﺎن ﻣﻐﻄﻰ وذﻟﻚ ﻷ ﻧﻪ ﻣﻦ اﻟﺨﻄﺮ ﺗﺮك
اﻟﺠﻬﺎز ﺗﺤﺖ ﻋﻮاﻣﻞ اﻟﻄﻘﺺ ﻣﺜﻞ اﻟﻤﻄﺮ ﺑﺮق رﻋﺪ اﻟﻰ اﺧﺮه.
! ﺑ
ـﻌـ
ﺪ اﻻ ﻧـﻬـﺎء ﻣـﻦ ﺗـﺮآـﻴـﺐ اﻟـﺠـﻬـﺎز ﻳـﺠـﺐ أن ﻳـﻜـﻮن ﻣـﻦ اﻟـﺴـﻬـﻞ اﻟـﻮﺻـﻮل اﻟـﻰ ﻣـﻘـﺒـﺲ
اﻟﺘﻴﺎر اﻟﻜﻬﺮﺑﺎﺋﻲ )اﻷ ﻧﺜﻰ(.
! ﻻ ﺗﺴﺘﺨﺪﻣﻮا ﻣﻬﺎﻳﺌﺎت او ﻣﻘﺒﺲ ﻣﺘﻌﺪد اﻟﺜﻘﻮب أو اﺳﻼ ك ﺗﻄﻮﻳﻞ.
! ﺳﻠﻚ اﻟﺘﻐﺬﻳﺔ اﻟﻜﻬﺮﺑﺎﺋﻴﺔ ﻳﺠﺐ أن ﻻ ﻳﻜﻮن ﻣﻄﻮي أو ﻣﺤﺸﻮر ﺑﻴﻦ اﻷ ﺛﺎث.
!ﺳ
ـﻠـ
ﻚ اﻟـﺘـﻐـﺬﻳـﺔ اﻟـﻜـﻬـﺮﺑـﺎﺋـﻴـﺔ ﻳـﺠـﺐ أن ﻳـﺘـﻢ ﺗـﺒـﺪﻳـﻠـﻪ وﻗـﺖ اﻟـﺤـﺎﺟـﺔ ﻓـﻘـﻂ ﻣـﻦ ﻗـﺒـﻞ ﻓـﻨـﻲ ﻣـﺨـﺘـﺺ
وﻣﺆهﻞ ﻟﻠﻘﻴﺎم ﺑﻬﺬا.
اﻧﺘﺒﺎه: اﻟﺸﺮآﺔ اﻟﺼﺎﻧﻌﺔ ﺗﺴﻘﻂ ﻋﻦ ﻧﻔﺴﻬﺎ أي ﻣﺴﺆوﻟﻴﺔ ﻋﻦ أﺿﺮار ﻗﺪ ﺗﺤﺼﻞ ﻣﻦ
ﻋﺪم اﺗﺒﺎع واﺣﺘﺮام هﺬه ﻗﻮاﻋﺪ اﻷ ﻣﻦ.
81
Page 19
ﻣﻮاﺻﻔﺎت ﻓﻨﻴﺔ
201 LDIW
اﻟﻌﺮض 5.95 ﺳﻨﺘﻤﺘﺮ
اﻻ رﺗﻔﺎع 58 ﺳﻨﺘﻤﺘﺮ
اﻟﻌﻤﻖ 5.35 ﺳﻨﺘﻤﺘﺮ
ﻣﻦ 1 اﻟﻰ 5 آﻐﻢ ﻓﻲ ﻋﻤﻠﻴﺔ اﻟﻐﺴﻴﻞ
ﻣﻦ 1 اﻟﻰ 4 آﻐﻢ ﻓﻲ ﻋﻤﻠﻴﺔ اﻟﺘﻨﺸﻴﻒ
ﻓﺮق ﺟﻬﺪ 032/042 ﻓﻮﻟﺖ 05 هﻴﺮﺗﺰ
اﻟﻘﺪرة اﻟﻘﺼﻮى اﻟﻤﻤﺘﺼﺔ ﻣﻦ ﻗﺒﻞ اﻟﺠﻬﺎز 0502 واط
اﻟﻀﻐﻂ اﻟﻘﺼﻮى 1 ﻣﻠﺒﺴﻜﺎل )01 ﺑﺎر(
اﻟﻀﻐﻂ اﻟﺪﻧﻴﺎ 50.0 ﻣﻴﻠﻴﺒﺴﻜﺎل )5.0 ﺑﺎر(
ﻗﺪرة ﺣﻮض اﻟﻐﺴﻴﻞ 64 ﻟﺘﺮ
ﺣﺘﻰ 0001 دورة ﻓﻲ اﻟﺪﻗﻴﻘﺔ
اﻟﻐﺴﻴﻞ: ﺑﺮﻧﺎﻣﺞ 2، درﺟﺔ ﺣﺮارة 06 درﺟﺔ ﻣﺌﻮﻳﺔ، ﺗﻤﺖ
اﻟﺘﺠﺮﺑﺔ ﺑﺤﻤﻞ ﻏﺴﻴﻞ 5 آﻐﻢ
اﻟ
ـﺘـﻨـﺸـﻴـ
ﻒ: اﻟـﺘـﺸـﻴـﻒ اﻷ ول ﺗـﻢ ﺑـﺤـﻤـﻞ 1 آـﻐـﻢ وﺑـﺎﺧـﺘـﻴـﺎر زﻣـﻦ
ﺗﻨﺸﻴﻒ 04 دﻗﻴﻘﺔ، اﻟﺘﻨﺸﻴﻒ اﻟﺜﺎﻧﻲ ﺗﻢ ﺑﺤﻤﻞ 4 آﻐﻢ وﺑﻮﺿﻊ
ﻣﻘﺒﺾ اﻟﺘﻨﺸﻴﻒ ﻋﻠﻰ اﻟﻮﺿﻊ
هﺬا اﻟﺠﻬﺎز ﻳﻄﺎﺑﻖ اﻟﻤﻮاﺻﻔﺎت اﻟﻤﻄﻠﻮﺑﺔ ﻣﻦ ﺳﻮق اﻟﺪول
اﻷ ورﺑﻴﺔ اﻟﻤﺸﺘﺮآﺔ:
- ﺑﻤﺎ ﻳﺘﻌﻠﻖ ﺑﻔﺮق ﺟﻬﺪ ﻣﻨﺨﻔﺾ
- ﺑﻤﺎ ﻳﺘﻌﻠﻖ اﻟﺘﻮاﻓﻖ اﻟﻜﻬﺮوﻣﻐﻨﺎﻃﻴﺴﻲ
اﻟﻤﺪﻳﻞ
اﻷ ﺑﻌﺎد
اﻟﻘﺪرة
اﻟﺘﻮﺻﻴﻼ ت اﻟﻜﻬﺮﺑﺎﺋﻴﺔ
اﻟﺘﻮﺻﻴﻼ ت اﻟﻬﻴﺪروﻟﻴﻜﻴﺔ
ﺳﺮﻋﺔ اﻟﻌﺼﺮ اﻟﺪوراﻧﻴﺔ
ﺑﺮاﻣﺞ ﺗﺠﺮﺑﺔ اﻟﺠﻬﺎز ﺣﺴﺐ
اﻟﻘﻮاﻋﺪ 654CEI
91
Page 20
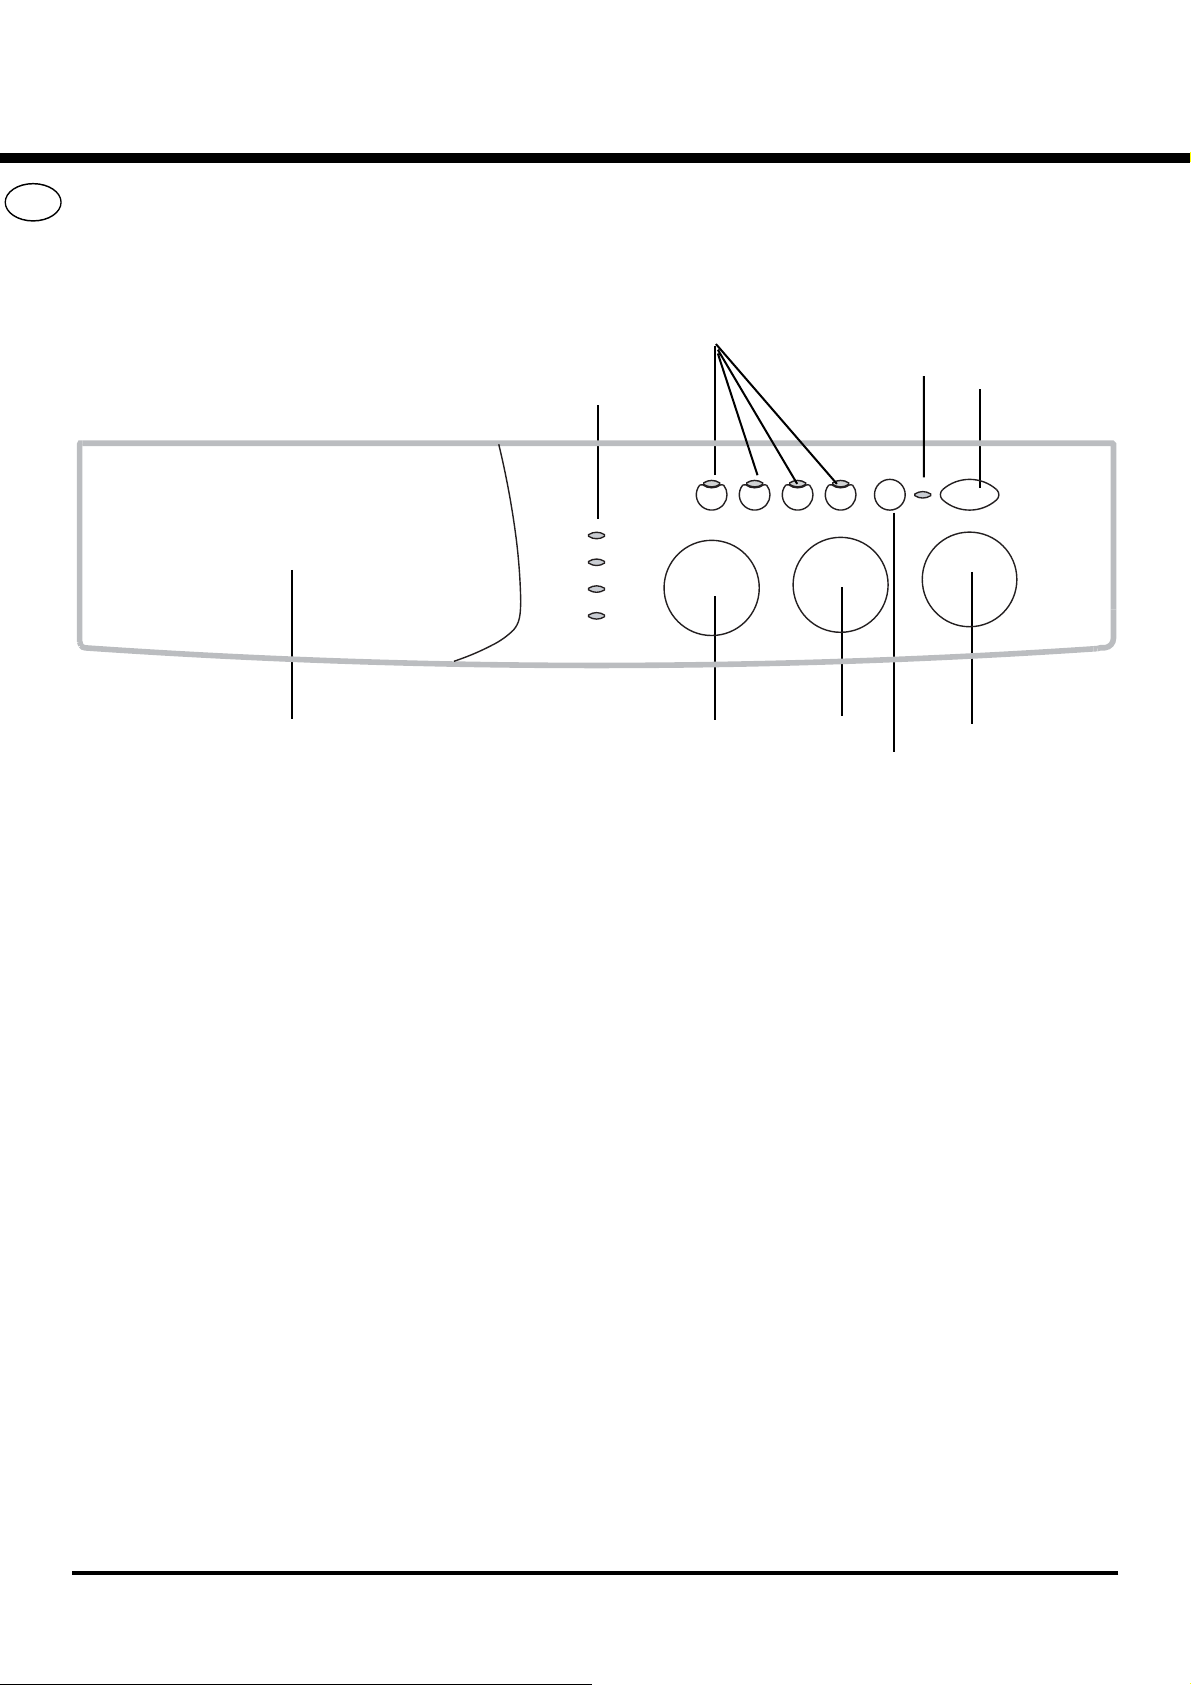
ﺲﺑ ﻼﻤﻟا ﺔﻓﺎﺸﻧ ﺔﻟﺎﺴﻏ ﻒﺻو
ﻲﺑﺮﻋ
ﻟـﻮﺣ
ـ
ﺔ اﻟـﻘـﻴـﺎدة
زر
وﻇﺎﺋﻒ
ﻣﺼﺎﺑﻴﺢ اﻧﺬار
ﺣﻮض ﻣﺴﺎﺣﻴﻖ اﻟﻐﺴﻴﻞ
ﻣﻘﺒﺾ
اﻟﺘﻨﺸﻴﻒ
ﻣﻘﺒﺾ
درﺟﺔ اﻟﺤﺮارة
ﻣﺼﺒﺎح اﻧﺬار
اﺷـﺘـﻐـﺎل/ﺑـﺎب
اﻟﻐﺴﺎﻟﺔ ﻣﻘﻔﻞ
زر
ﺗﺸﻐﻴﻞ/ اﻃﻔﺎء
ﻣﻘﺒﺾ
اﻟﺒﺮاﻣﺠﺔ
زر
ﺑﺪء/ﺷﻄﺐ اﻟﺒﺮﻧﺎﻣﺞ
ﻣﻘﺒﺾ درﺟﺔ اﻟﺤﺮارة ﻟﻮﺿﻊ درﺟﺔ ﺣﺮارة اﻟﻐﺴﻴﻞ أو اﻟﻘﻴﺎم ﺑﻌﻤﻠﻴﺔ اﻟﻐﺴﻴﻞ ﺑﻤﺎء
ﺑﺎرد )اﻧﻈﺮ اﻟﻰ ﺻﻔﺤﺔ 32(
زر ﺑﺪء/ﺷﻄﺐ اﻟﺒﺮﻧﺎﻣﺞ TESER/TRATS ﻟﺘﺸﻐﻴﻞ اﻟﺒﺮاﻣﺞ أو اﻟﻐﺎﺋﻬﺎ ﻋﻨﺪﻣﺎ
ﻳﻘﻊ ﺧﻄﺄ ﻓﻲ اﻟﺒﺮﻣﺠﺔ
ﻣﺼﺒﺎح اﻧﺬاراﺷﺘﻐﺎل/ﺑﺎب اﻟﻐﺴﺎﻟﺔ اﻟﻨﺸﺎﻓﺔ ﻣﻘﻔﻞ ﻟﻔﻬﻢ اذا ﻣﺎ آﺎﻧﺖ ﻏﺴﺎﻟﺔ ﻧﺸﺎﻓﺔ اﻟﻤﻼ ﺑﺲ
ﺗﺸﺘﻐﻞ واذا آﺎن ﻣﻦ اﻟﻤﻤﻜﻦ ﻓﺘﺢ ﺑﺎب اﻟﻐﺴﺎﻟﺔ اﻟﻨﺸﺎﻓﺔ )اﻧﻈﺮ اﻟﻰ ﺻﻔﺤﺔ 12(
زر ﺗﺸﻐﻴﻞ/اﻃﻔﺎء ﻟﺘﺸﻐﻴﻞ واﻃﻔﺎء اﻟﻐﺴﺎﻟﺔ اﻟﻨﺸﺎﻓﺔ.
ﻣﻘﺒﺾ اﻟﺒﺮﻣﺠﺔ ﻟﻮﺿﻊ اﻟﺒﺮاﻣﺞ )اﻧﻈﺮ اﻟﻰ ﺻﻔﺤﺔ 22(،
ﺧﻼ ل اﻟﺒﺮﻧﺎﻣﺞ ﻳﺒﻘﻰ اﻟﻤﻘﺒﺾ ﺛﺎﺑﺖ ﻓﻲ ﻣﻜﺎﻧﻪ.
ﺣـﻮض ﻣـﺴـﺎﺣـﻴـﻖ اﻟـﻐـﺴـﻴـﻞ ﻟـﻮﺿـﻊ ﻣـﺴـﺎﺣـﻴـﻖ اﻟـﻐـﺴـﻴـﻞ واﻟـﻤـﺴـﺎﺣـﻴـﻖ اﻻ ﺿـﺎﻓـﻴـﺔ )اﻧـﻈـﺮ
ﺻﻔﺤﺔ رﻗﻢ 42(
ﻣﺼﺎﺑﻴﺢ اﻻ ﻧﺬار ﻟﻤﺮاﻗﺒﺔ ﺣﺎﻟﺔ ﺗﻘﺪم ﺑﺮﻧﺎﻣﺞ اﻟﻐﺴﻴﻞ ﺧﻼ ل ﻋﻤﻠﻪ
ﻣـﻘـﺒـﺾ اﻟـﺘـﻨـﺸـﻴـﻒ ﻟـﻮﺿـﻊ وﺑـﺮﻣـﺠـﺔ ﻋـﻤـﻠـﻴـﺔ اﻟـﺘـﻨـﺸـﻴـﻒ اﻟـﺘـﻲ ﺗـﺮﻏـﺒـﻮن اﺳـﺘـﺨـﺪاﻣـﻬـﺎ )اﻧـﻈـﺮ
ﺻﻔﺤﺔ 32(
أزرار اﻟﻮﻇﺎﺋﻒ ﻻ ﺧﺘﻴﺎر اﻟﻮﻇﺎﺋﻒ اﻟﺘﻲ ﺗﻜﻮن ﻣﺰودة ﺑﻬﺎ ﻏﺴﺎﻟﺔ ﻧﺸﺎﻓﺔ اﻟﻤﻼ ﺑﺲ، اﻟﺰر
اﻟﺬي ﻳﻘﻮم ﺑﺘﺸﻐﻴﻞ اﺣﺪي اﻟﻮﻇﺎﺋﻒ ﻳﻜﻮن ﻣﻀﻲء ﻋﻨﺪ اﺧﺘﻴﺎره.
02
Page 21
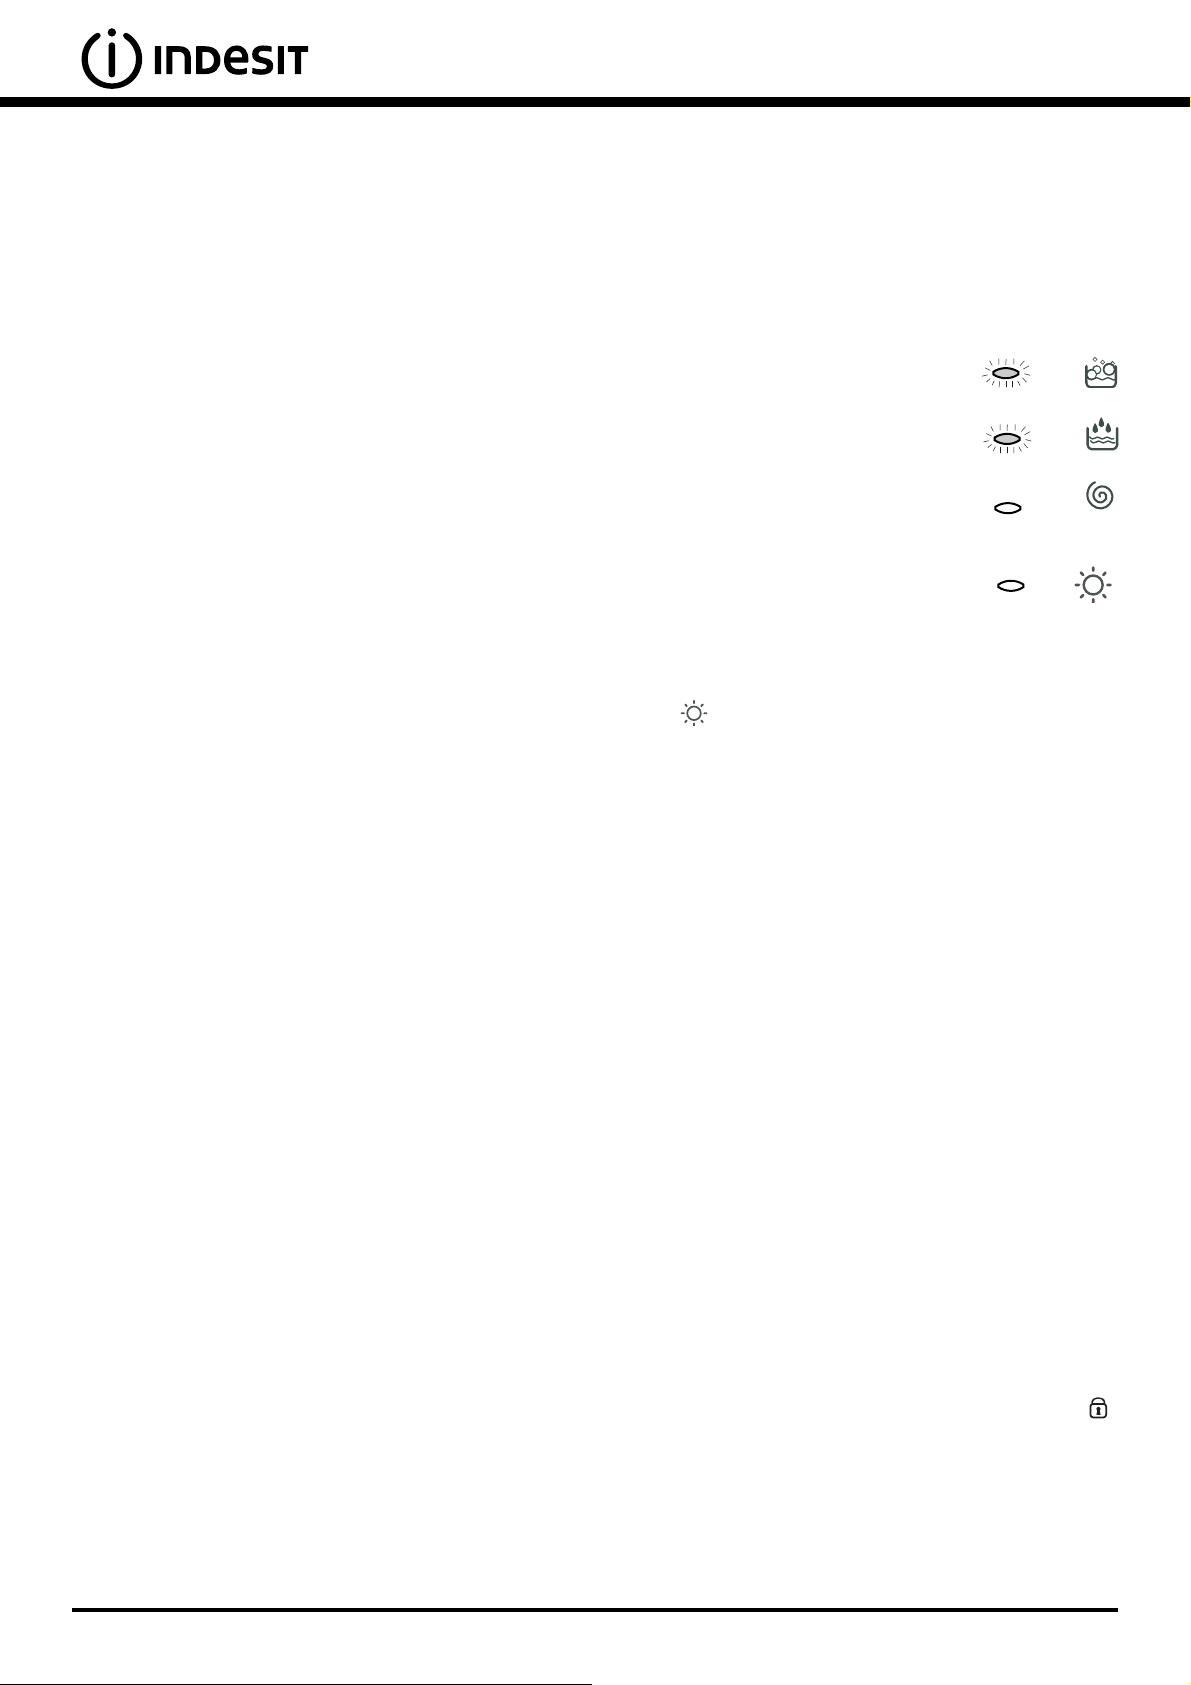
ﻣﺼﺎﺑﻴﺢ اﻻ ﻧﺬار
ﻣﺼﺎﺑﻴﺢ اﻻ ﻧﺬار ﻳﻘﺪﻣﻮن ﻣﻌﻠﻮﻣﺎت هﺎﻣﺔ.
هﺎ هﻮ ﻣﺎ ﻳﻘﺪﻣﻮن ﻣﻦ ﻣﻌﻠﻮﻣﺎت:
ﻣﺮﺣﻠﺔ ﺑﺎﻟﻌﻤﻞ
ﺧﻼ ل دورة اﻟﻐﺴﻴﻞ ﻣﺼﺎﺑﻴﺢ اﻻ ﻧﺬار ﺗﻀﻲء واﺣﺪ ﺗﻠﻮ اﻻ ﺧﺮ ﻟﻴﺸﻴﺮآﻞ واﺣﺪ ﻣﻦ هﺬه
اﻟﻤﺼﺎﺑﻴﺢ اﻟﻰ ﺗﻘﺪم ﺑﺮﻧﺎﻣﺞ اﻟﻐﺴﻴﻞ:
اﻟﻐﺴﻴﻞ اﻟﺒﺪاﺋﻲ/ اﻟﻐﺴﻴﻞ اﻟﻌﺎدي
اﻟﻔﻀﻔﻀﺔ
ﻋﻤﻠﻴﺔ اﻟﻌﺼﺮ اﻟﺪوراﻧﻴﺔ
ﻳﺒﺪأ
ﻋﻤﻠﻴﺔ اﻟﺘﻨﺸﻴﻒ
ﻣﻼ ﺣﻈﺔ:
- ﺧﻼ ل ﻋﻤﻠﻴﺔ ﺗﻔﺮﻳﻎ اﻟﻤﺎء ﻣﻦ ﺣﻮض ﻏﺴﻴﻞ اﻟﻐﺴﺎﻟﺔ اﻟﻨﺸﺎﻓﺔ ﻳﻀﻲء اﻟﻤﺼﺒﺎح
اﻟﺨﺎص ﺑﻌﻤﻠﻴﺔ اﻟﻌﺼﺮ اﻟﺪوراﻧﻴﺔ.
- ﻋﻨﺪ اﻧﺘﻬﺎء دورة اﻟﺘﻨﺸﻴﻒ، اﻟﻤﺼﺒﺎح اﻟﺬي ﻳﺸﻴﺮ اﻟﻰ هﺬه اﻟﻤﺮﺣﻠﺔ
ﺑﺎﻻ ﺿﺎءة واﻧﻄﻔﺎء ﺑﺸﻜﻞ ﻣﺘﺮدد ﻟﻴﺸﻴﺮ اﻟﻰ اﻧﻪ ﻳﺠﺐ اﻋﺎدة وﺿﻊ ﻣﻘﺒﺾ اﻟﺘﻨﺸﻴﻒ
اﻟﻰ اﻟﻮﺿﻊ 0 .
ازرار وﻇﺎﺋﻒ
ازرار اﻟﻮﻇﺎﺋﻒ ﻟﻬﻢ أﻳﻀﺎ وﻇﻴﻔﺔ ﻣﺼﺒﺎح اﻧﺬار.
ﻋﻨﺪ اﺧﺘﻴﺎر اﺣﺪ اﻟﻮﻇﺎﺋﻒ ﻳﻀﻲء اﻟﺰر اﻟﺨﺎص ﺑﻬﺬه اﻟﻮﻇﻴﻔﺔ.
اذا آﺎﻧﺖ اﻟﻮﻇﻴﻔﺔ اﻟﻤﺨﺘﺎرة ﻻ ﺗﺘﻮاﻓﻖ ﻣﻊ ﺑﺮﻧﺎﻣﺞ اﻟﻐﺴﻴﻞ اﻟﻤﺨﺘﺎر ﻳﺒﺪأ هﺬا اﻟﺰر
ﺑﻼ ﺿﺎءة واﻻ ﻧﻄﻔﺎء اﻟﻤﺘﺮدد وهﺬه اﻟﻮﻇﻴﻔﺔ ﻻ ﻳﺘﻢ ﺗﺸﻐﻴﻠﻬﺎ.
ﻓﻲ ﺣﺎﻟﺔ ﻋﺪم ﺗﻮاﻓﻖ اﻟﻮﻇﻴﻔﺔ اﻟﻤﺨﺘﺎرة ﻣﻊ اﻟﻮﻇﻴﻔﺔ اﻟﺘﻲ ﺗﻢ اﺧﺘﻴﺎرهﺎ ﻣﺴﺒﻘﺎ ﺗﺒﻘﻰ
ﺗﻌﻤﻞ ﻓﻘﻂ آﺧﺮ وﻇﻴﻔﺔ ﻣﺨﺘﺎرة
ﻣﺼﺒﺎح اﻻ ﻧﺬار اﻟﺬي ﻳﺸﻴﺮ ﺑﺘﺸﻐﻴﻞ اﻟﻐﺴﺎﻟﺔ اﻟﻨﺸﺎﻓﺔ/اﻟﺒﺎب ﻣﻘﻔﻞ
ﻋﻨﺪﻣﺎ ﻳﻜﻮن ﻣﺼﺒﺎح اﻻ ﻧﺬا ﻣﻀﻲء ﻳﺸﻴﺮ اﻟﻰ أن ﺑﺎب اﻟﻐﺴﺎﻟﺔ اﻟﻨﺸﺎﻓﺔ ﻣﻘﻔﻞ وذﻟﻚ ﻟﺘﺠﻨﺐ ﻓﺘﺢ ﺑﺎب اﻟﻐﺴﺎﻟﺔ اﻟﻨﺸﺎﻓﺔ ﺑﺸﻜﻞ ﻋﺮﺿﻲ، ﻟﺘﺠﻨﺐ ﺣﺪوث أﺿﺮار ﻟﺒﺎب اﻟﻐﺴﺎﻟﺔ اﻟﻨﺸﺎﻓﺔ
ﻣﻦ اﻟﻀﺮوري اﻻ ﻧﺘﻈﺎر ﺣﺘﻰ ﻳﺒﺪأ هﺬا اﻟﻤﺼﺒﺎح ﺑﺎﻻ ﺿﺎءة واﻧﻄﻔﺎء اﻟﻤﺘﺮدد ﻗﺒﻞ اﻟﻘﻴﺎم ﺑﻌﻤﻠﻴﺔ ﻓﺘﺢ ﺑﺎب اﻟﻐﺴﺎﻟﺔ اﻟﻨﺸﺎﻓﺔ.
! اﻻ ﺿ
ـ
ﺎءة واﻻ ﻧـﻄـﻔـﺎء اﻟـﻤـﺘـﺮدد اﻟـﺴـﺮﻳـﻊ ﻟـﻤـﺼـﺒـﺎح اﻻ ﻧـﺬار اﻟـﺬي ﻳـﺸـﻴـﺮ اﻟـﻰ ﻋـﻤـﻞ اﻟـﻐـﺴـﺎﻟـﺔ اﻟـﻨـﺸـﺎﻓـﺔ/ﺑـﺎب اﻟـﻐـﺴـﺎﻟـﺔ اﻟـﻨـﺸـﺎﻓـﺔ ﻣـﻘـﻔـﻞ ﻣـﻊ اي ﻣـﺼـﺒـﺎح اﺧـﺮ ﻳـﺸـﻴـﺮ اﻟـﻰ وﺟـﻮد ﻋـﻄـﺐ
ﻓﻲ اﻟﻐﺴﺎﻟﺔ اﻟﻨﺸﺎﻓﺔ وﻟﻬﺬا ﻳﺠﺐ اﺳﺘﺪﻋﺎء ﻗﺴﻢ اﻟﺼﻴﺎﻧﺔ اﻟﻔﻨﻴﺔ.
12
Page 22
ﺗﺸﻐﻴﻞ اﻟﺒﺮاﻣﺞ
5. ﺿﻌﻮا ﻋﻤﻠﻴﺔ اﻟﺘﻨﺸﻴﻒ اذا آﺎن ﻣﻦ اﻟﻀﺮوري )اﻧﻈﺮ اﻟﻰ ﺻﻔﺤﺔ رﻗﻢ 32(
6. ﺻﺐ ﻣﺴﺤﻮق اﻟﻐﺴﻴﻞ واﻟﻤﺴﺎﺣﻴﻖ اﻻ ﺿﺎﻓﻴﺔ )اﻧﻈﺮ ﺻﻔﺤﺔ 42(
7. ﺷﻐﻞ اﻟﺒﺮﻧﺎﻣﺞ ﺑﺎﻟﻀﻐﻂ ﻋﻠﻰ اﻟﺰر ﺑﺪء/ﺷﻄﺐ TESER/TRATS
ﻟﺸﻄﺐ اﻟﺒﺮﻧﺎﻣﺞ اﻟﻤﺨﺘﺎر اﺿﻐﻂ ﻋﻠﻰ اﻟﺰر ﺑﺪء/ﺷﻄﺐ TESER/TRATS ﻟﻤﺪة 2 ﺛﺎﻧﻴﺔ ﻋﻠﻰ اﻷ ﻗﻞ
8. ﻋﻨﺪ اﻧﺘﻬﺎء ﺑﺮﻧﺎﻣﺞ اﻟﻐﺴﻴﻞ اﻟﻤﺼﺒﺎح اﻟﺬي ﻳﺸﻴﺮ اﻟﻰ ﻋﻤﻞ اﻟﻐﺴﺎﻟﺔ/ﺑﺎب اﻟﻐﺴﺎﻟﺔ اﻟﻨﺸﺎﻓﺔ ﻣﻘﻔﻞ ﻳﺒﺪأ ﺑﻼ ﺿﺎءة
واﻻ ﻧﻄﻔﺎء ﺑﺸﻜﻞ ﻣﺘﺮدد ﻟﻴﺸﻴﺮ اﻟﻰ اﻧﻪ ﻣﻦ اﻟﻤﻤﻜﻦ اﻵ ن ﻓﺘﺢ ﺑﺎب اﻟﻐﺴﺎﻟﺔ اﻟﻨﺸﺎﻓﺔ، اﺧﺮج اﻟﻤﻼ ﺑﺲ ﻣﻦ
اﻟﻐﺴﺎﻟﺔ اﻟﻨﺸﺎﻓﺔ واﺗﺮك ﺑﺎب اﻟﻐﺴﺎﻟﺔ اﻟﻨﺸﺎﻓﺔ ﻣﻔﺘﻮح ﻧﺼﻒ ﻓﺘﺤﺔ ﻟﻴﻨﺸﻒ ﺣﻮض اﻟﻐﺴﻴﻞ.
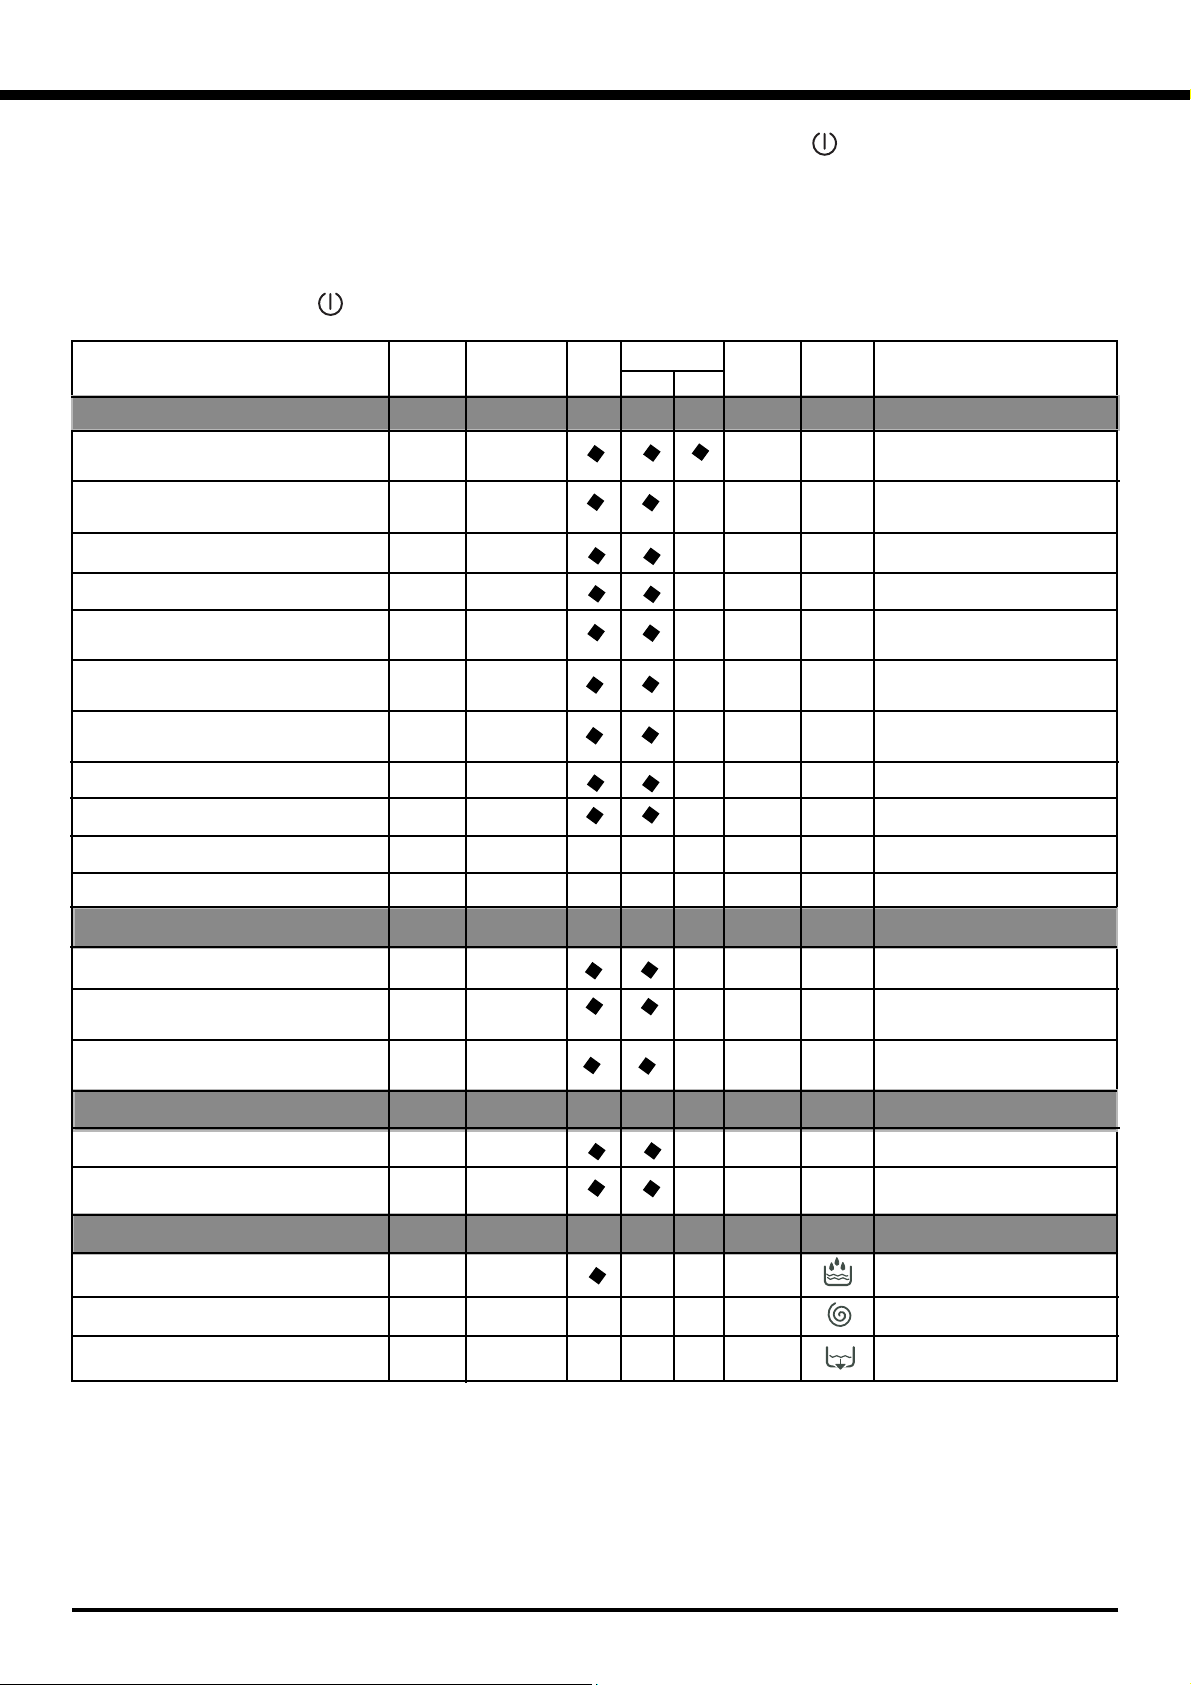
وﺻﻒ دورة اﻟﻐﺴﻴ ﺮﻧﺎﻣﺞ
ﻣﺪة اﻟﺒﺮﻧﺎﻣﺞ
)دﻗﺎﺋﻖ(
اﻃﻔﻰْ اﻟﻐﺴﺎﻟﺔ اﻟﻨﺸﺎﻓﺔ وذﻟﻚ ﺑﺎﻟﻀﻐﻂ ﻋﻠﻰ اﻟﺰر
ﻣﺒﻴﻀﺎت
ﺿﺪ اﻟﺒﻘﻊ
ﻣﻨﻌﻤﺎت
ﻣﺴﺤﻮق
ﻋﺎدي
ﺑﺪاﺋﻲ
ﺣﺮارة
ﺑﺒﺴﺎﻃﺔ: ﺗﺸﻐﻴﻞ ﺑﺮﻧﺎﻣﺞ
1. ﺷﻐﻞ ﻏﺴﺎﻟﺔ ﻧﺸﺎﻓﺔ اﻟﻤﻼ ﺑﺲ وذﻟﻚ ﺑﺎﻟﻀﻐﻂ ﻋﻠﻰ اﻟﺰر
ﺟﻤﻴﻊ ﻣﺼﺎﺑﻴﺢ اﻻ ﻧﺬار ﺗﻀﻲء ﻟﺒﻌﺾ اﻟﺜﻮاﻧﻲ وﻣﻦ ﺛﻢ ﻳﻨﻄﻔﺆون، وﻳﺒﺪأ اﻟﻤﺼﺒﺎح اﻟﺬي ﻳﺸﻴﺮ اﻟﻰ ﻋﻤﻞ
اﻟﻐﺴﺎﻟﺔ اﻟﻨﺸﺎﻓﺔ /ﺑﺎب اﻟﻐﺴﺎﻟﺔ اﻟﻨﺸﺎﻓﺔ ﻣﻘﻔﻞ ﻳﺒﺪأ ﺑﺎﻻ ﺿﺎءة واﻻ ﻧﻄﻔﺎء اﻟﻤﺘﺮدد.
2. اﻣﻠﻲء اﻟﻐﺴﺎﻟﺔ اﻟﻨﺸﺎﻓﺔ ﺑﺎﻟﻤﻼ ﺑﺲ اﻟﻤﺮاد ﻏﺴﻠﻬﺎ واﻏﻠﻖ ﺑﺎب اﻟﻐﺴﺎﻟﺔ اﻟﻨﺸﺎﻓﺔ
3. اﺧﺘﺎر ﺑﻮاﺳﻄﺔ ﻣﻘﺒﺾ اﻟﺒﺮاﻣﺞ اﻟﺒﺮﻧﺎﻣﺞ اﻟﺬي ﺗﻮدون اﺳﺘﺨﺪاﻣﻪ،
4. ﺿﻌﻮا درﺟﺔ ﺣﺮارة اﻟﻐﺴﻴﻞ )اﻧﻈﺮ اﻟﻰ ﺻﻔﺤﺔ رﻗﻢ 32(
ﻻ ﺋﺤﺔ اﻟﺒﺮاﻣﺞ
ﻃﺒﻴﻌﺔ اﻷ ﻧﺴﺠﺔ ودرﺟﺔ وﺳﺎﺧﺘﻬﺎ
أﻧﺴﺠﺔ ﻋﺎدﻳﺔ
531ﻏـﺴـﻴـﻞ ﺑـﺪاﺋـﻲ، ﻏـﺴـﻴـﻞ ﻋـﺎدي، ﻋـﻤـﻠـﻴـﺔ ﻓـﻀـﻔـﻀـﺔ، ﻋـﻤـﻠـﻴـﺔ ﻋـﺼـﺮ
وأﺧﺮي ﻧﻬﺎﺋﻴﺔ
ـﻴـ
ﺔ ﻣـﺘـﻮﺳـﻄـﺔ
دوراﻧ
ﻏﺴﻴﻞ ﻋﺎدي، ﻋﻤﻠﻴﺔ ﻓﻀﻔﻀﺔ، ﻋﻤﻠﻴﺔ ﻋﺼﺮ دوراﻧﻴﺔ ﻣﺘﻮﺳﻄﺔ
وأﺧﺮي ﻧﻬﺎﺋﻴﺔ
ﻏﺴﻴﻞ ﻋﺎدي، ﻋﻤﻠﻴﺔ ﻓﻀﻔﻀﺔ، ﻋﻤﻠﻴﺔ ﻋﺼﺮ دوراﻧﻴﺔ ﻣﺘﻮﺳﻄﺔ
ﻏﺴﻴﻞ ﻋﺎدي، ﻋﻤﻠﻴﺔ ﻓﻀﻔﻀﺔ، ﻋﻤﻠﻴﺔ ﻋﺼﺮ دوراﻧﻴﺔ ﻣﺘﻮﺳﻄﺔ
وأﺧﺮي ﻧﻬﺎﺋﻴﺔ
ﻏﺴﻴﻞ ﻋﺎدي، ﻋﻤﻠﻴﺔ ﻓﻀﻔﻀﺔ، ﻋﻤﻠﻴﺔ ﻋﺼﺮ دوراﻧﻴﺔ ﻣﺘﻮﺳﻄﺔ
وأﺧﺮي ﻧﻬﺎﺋﻴﺔ
57ﻏﺴﻴﻞ ﻋﺎدي، ﻋﻤﻠﻴﺔ ﻓﻀﻔﻀﺔ، ﻋﻤﻠﻴﺔ ﻋﺼﺮ دوراﻧﻴﺔ ﻣﺘﻮﺳﻄﺔ
وأﺧﺮي ﻧﻬﺎﺋﻴﺔ
06ﻏﺴﻴﻞ ﻋﺎدي، ﻋﻤﻠﻴﺔ ﻓﻀﻔﻀﺔ، ﻋﻤﻠﻴﺔ ﻋﺼﺮ دوراﻧﻴﺔ ﻣﺘﻮﺳﻄﺔ
وأﺧﺮي ﻧﻬﺎﺋﻴﺔ
ﻏﺴﻴﻞ ﻋﺎدي، ﻋﻤﻠﻴﺔ ﻓﻀﻔﻀﺔ، ﻋﻤﻠﻴﺔ ﻋﺼﺮ دوراﻧﻴﺔ ﻣﺘﻮﺳﻄﺔ
وأﺧﺮي ﻧﻬﺎﺋﻴﺔ
ﻏﺴﻴﻞ ﻋﺎدي، ﻋﻤﻠﻴﺔ ﻓﻀﻔﻀﺔ، ﺿﺪ اﻟﺠﻌﻠﻜﺔ، ﻋﺼﺮ
دوراﻧﻲ ﺣﺴﺎس
وأﺧﺮي ﻧﻬﺎﺋﻴﺔ
ﺣﺴﺎﺳﺔ ﻋﺎدﻳﺔ
ﺣﺴﺎﺳﺔ ﻋﺎدﻳﺔ
ﺣﺴﺎﺳﺔ ﻋﺎدﻳﺔ
ﺣﺴﺎﺳﺔ ﻋﺎدﻳﺔ
ﺣﺴﺎﺳﺔ
ﺣﺴﺎﺳﺔ
04 درﺟﺔ
1
09 درﺟﺔ
2
09 درﺟﺔ 521
2
06 درﺟﺔ 011
2
04 درﺟﺔ 501
3
04 درﺟﺔ 07
4
05 درﺟﺔ
4
5
04 درﺟﺔ 05
603 درﺟﺔ 54
7
ﺑﻴﻀﺎء آﺜﻴﺮة اﻟﻮﺳﺦ )ﺷﺮاﺷﻒ ﺗﺨﻮت، ﺷﺮاﺷﻒ
ﻃﺎوﻻ ت، اﻟﻰ آﺧﺮه. (
ﺑـﻴـﻀـﺎء آـﺜـﻴـﺮة اﻟـﻮﺳـﺦ )ﺷـﺮاﺷـﻒ ﺗـﺨـﻮت،
ﺷﺮاﺷﻒ ﻃﺎوﻻ ت، اﻟﻰ آﺧﺮه.(
ﺑﻴﻀﺎء وﻣﻠﻮﻧﺔ ﺑﺄﻟﻮان ﺛﺎﺑﺘﺔ آﺜﻴﺮة اﻟﻮﺳﺦ
ﺑﻴﻀﺎء وﻣﻠﻮﻧﺔ ﺣﺴﺎﺳﺔ آﺜﻴﺮة اﻟﻮﺳﺦ
ﺑ
ـﻴـﻀـ
ﺎء ﻗـﻠـﻴـﻠـﺔ اﻟـﻮﺳـﺦ وﻣـﻠـﻮﻧـﺔ ﺑـﺄﻟـﻮان ﺣـﺴـﺎﺳـﺔ
)ﻗﻤﺼﺎن، ﺑﻼ ﻳﺰ، اﻟﻰ آﺧﺮه(
أﻟـﻮان ﺛـﺎﺑـﺘـﺔ آـﺜـﻴـﺮة اﻟـﻮﺳـﺦ )ﻣـﻼ ﺑـﺲ اﻃـﻔـﺎل
رﺿﻊ، اﻟﻰ اﺧﺮه(
أﻟـﻮان ﺛـﺎﺑـﺘـﺔ آـﺜـﻴـﺮة اﻟـﻮﺳـﺦ )ﻣـﻼ ﺑـﺲ اﻃـﻔـﺎل
رﺿﻊ، اﻟﻰ اﺧﺮه(
ﺻﻮف
اﻧﺴﺠﺔ ﺣﺴﺎﺳﺔ ﺟﺪا )ﺑﺮادي، ﺣﺮﻳﺮ،اﻟﺦ(
ﺗﻨﺸﻴﻒ اﻧﺴﺠﺔ ﻗﻄﻨﻴﺔ
8
ﺗﻨﺸﻴﻒ اﻧﺴﺠﺔ ﺣﺴﺎﺳﺔ
اﻟﻮﻗﺖ ﻟﻚ uoy 4 emiT
ﻏﺴﻴﻞ ﻋﺎدي، ﻋﻤﻠﻴﺔ ﻓﻀﻔﻀﺔ، ﻋﻤﻠﻴﺔ ﻋﺼﺮ دوراﻧﻴﺔ ﻣﺘﻮﺳﻄﺔ
56
وأﺧﺮي ﻧﻬﺎﺋﻴﺔ
54
ﻏﺴﻴﻞ ﻋﺎدي، ﻋﻤﻠﻴﺔ ﻓﻀﻔﻀﺔ، ﻋﻤﻠﻴﺔ ﻋﺼﺮ دوراﻧﻴﺔ ﺣﺴﺎﺳﺔ
ﻏﺴﻴﻞ ﻋﺎدي، ﻋﻤﻠﻴﺔ ﻓﻀﻔﻀﺔ، ﻋﻤﻠﻴﺔ ﻋﺼﺮ دوراﻧﻴﺔ ﺣﺴﺎﺳﺔ
03
06 درﺟﺔ
9
04 درﺟﺔ
01
03 درﺟﺔ
11
ﺑﻴﻀﺎء وﻣﻠﻮﻧﺔ ﺛﺎﺑﺘﺔ آﺜﻴﺮة اﻟﻮﺳﺦ
ـ
ﻮان ﺣـﺴـﺎﺳـﺔ )ﻣـﻼ ﺑـﺲ ﺑـﻤـﺨـﺘـﻠـﻒ اﻻ ﻧـﻮاع
اﻟ
ﻗﻠﻴﻠﺔ اﻟﻮﺳﺦ(.
اﻟـﻮان ﺣـﺴـﺎﺳـﺔ )ﻣـﻼ ﺑـﺲ ﺑـﻤـﺨـﺘـﻠـﻒ اﻻ ﻧـﻮاع
ﻗﻠﻴﻠﺔ اﻟﻮﺳﺦ(.
رﻳﺎﺿﺔ tropS
ﻓﻀﻔﻀﺔ و ﻋﻤﻠﻴﺔ ﻋﺼﺮ دوراﻧﻴﺔ
05
ﻓﻀﻔﻀﺔ، ﺿﺪ اﻟﺠﻌﻠﻜﺔ أو ﺗﻔﺮﻳﻎ اﻟﻤﺎء ﻣﻦ اﻟﻐﺴﺎﻟﺔ
06
03 درﺟﺔ
21
3103 درﺟﺔ
ﺑﻮات رﻳﺎﺿﺔ )2 زوج ﻋﻠﻰ اﻷ ﻗﺼﻰ(
اﻧـﺴـﺠـﺔ ﻟـﻤـﻼ ﺑـﺲ رﻳـﺎﺿـﻴـﺔ )ﺑـﺪﻟـﺔ رﻳـﺎﺿـﺔ،
ﺷﺮﻃﺎت، اﻟﺦ(
ﺑﺮاﻣﺞ ﺟﺰﺋﻴﺔ
ﺗﻔﺮﻳﻎ اﻟﻤﺎء ﻣﻦ اﻟﻐﺴﺎﻟﺔ وﻋﻤﻠﻴﺔ ﻋﺼﺮ دوراﻧﻴﺔ ﻗﻮﻳﺔ
ﺗﻔﺮﻳﻎ اﻟﻤﺎء ﻣﻦ اﻟﻐﺴﺎﻟﺔ وﻋﻤﻠﻴﺔ ﻋﺼﺮ دوراﻧﻴﺔ
ﺗﻔﺮﻳﻎ اﻟﻤﺎء ﻣﻦ اﻟﻐﺴﺎﻟﺔ
ﺣﺴﺎﺳﺔ ﻋﺎدﻳﺔ
ﻋﻤﻠﻴﺔ ﻋﺼﺮ دوراﻧﻴﺔ
ﻋﻤﻠﻴﺔ ﻋﺼﺮ دوراﻧﻴﺔ
ﻋﻤﻠﻴﺔ ﺗﻔﺮﻳﻎ اﻟﻤﺎء ﻣﻦ اﻟﻐﺴﺎﻟﺔ
ﻣﻼ ﺣﻈﺔ
- ﻓﻲ اﻟﺒﺮﻧﺎﻣﺞ 9 ﻳﻨﺼﺢ ان ﻻ ﻳﺰﻳﺪ وزن اﻟﻤﻼ ﺑﺲ اﻟﻤﺮاد ﻏﺴﻠﻬﺎ ﻋﻦ 5.3 آﻴﻠﻮﻏﺮام.
- ﻓﻲ اﻟﺒﺮﻧﺎﻣﺞ 31 ﻳﻨﺼﺢ ان ﻻ ﻳﺰﻳﺪ وزن اﻟﻤﻼ ﺑﺲ اﻟﻤﺮاد ﻏﺴﻠﻬﺎ ﻋﻦ 2 آﻴﻠﻮﻏﺮام.
- ﻟﻮﺻﻒ ﺿﺪ اﻟﺠﻌﻠﻜﺔ: اﻧﻈﺮ اآﻮي أﻗﻞ ﻓﻲ اﻟﺼﻔﺤﺔ اﻟﺠﺎﻧﺒﻴﺔ، اﻟﻤﻌﻠﻮﻣﺎت اﻟﻤﻘﺪﻣﺔ ﻓﻲ اﻟﻼ ﺋﺤﺔ هﻲ أرﻗﺎم ﺗﻘﺮﻳﺒﻴﺔ.
ﺑﺮﻧﺎﻣﺞ ﺧﺎص
ﻏ
ـﺴـﻴـ
ﻞ ﻳـﻮﻣـﻲ 03 دﻗـﻴـﻘـﺔ)ﺑـﺮﻧـﺎﻣـﺞ 11 ﻟـﻸ ﻧـﺴـﺠـﺔ اﻟـﻤـﺴـﺘـﺨـﺮﺟـﺔ( ﻣـﺪروس ﻟـﻐـﺴـﻴـﻞ اﻟـﻤـﻼ ﺑـﺲ ﻗـﻠـﻴـﻠـﺔ اﻻ ﺗـﺴـﺎخ ﺑـﻤـﺪة ﻗـﺼـﻴـﺮة ﻣـﻦ اﻟـﺰﻣـﻦ، ﻳـﺪوم 03 دﻗـﻴـﻘـﺔ ﺗـﻘـﺮﻳـﺒـﺎ ﻳـﺴـﻤـﺢ ﻟـﻜـﻢ
ﺗـﻮﻓـﻴـﺮ اﻟـﺰﻣـﻦ وﺗـﻮﻓـﻴـﺮ اﻟـﻄـﺎﻗـﺔ ، ﺑـﻮﺿـﻊ اﻟـﺒـﺮﻧـﺎﻣـﺞ )11 ﻋـﻠـﻰ 03 درﺟـﺔ ﻣـﺌـﻮﻳـﺔ( ﻳـﻤـﻜـﻦ ﻏـﺴـﻞ ﻣـﻼ ﺑـﺲ ﻣـﻦ اﻧـﺴـﺠـﺔ ﻣـﺨـﺘـﻠـﻔـﺔ، )ﻣـﺎ ﻋـﺪى اﻟـﺤـﺮﻳـﺮ( ﺑـﺄﻗـﺼـﻰ ﺣـﻤـﻞ ﻏـﺴـﻴـﻞ 3
آﻐﻢ. ﻧﻨﺼﺤﻜﻢ اﺳﺘﺨﺪام ﻣﻨﻈﻔﺎت اﻟﻐﺴﻴﻞ اﻟﺴﺎﺋﻠﺔ.
22
Page 23
C
ﺗﺸﺨﻴﺺ اﻟﺒﺮاﻣﺞ
وﺿﻊ درﺟﺔ اﻟﺤﺮارة
ﻲﺑﺮﻋ
ﺑﺘﺪوﻳﺮ ﻣﻘﺒﺾ ﻣﻨﻈﻢ درﺟﺔ اﻟﺤﺮارة ﻳﺘﻢ وﺿﻊ درﺟﺔ ﺣﺮارة اﻟﻐﺴﻴﻞ )اﻧﻈﺮ اﻟﻰ ﻟﻮﺣﺔ اﻟﺒﺮاﻣﺞ ﻓﻲ ﺻﻔﺤﺔ 22( ﻳﻤﻜﻦ ﺗﺨﻔﻴﺾ درﺟﺔ ﺣﺮارة اﻟﻐﺴﻴﻞ ﺣﺘﻰ اﻟﻮﺻﻮل اﻟﻰ
اﻟﻐﺴﻴﻞ ﺑﻤﺎء ﺑﺎرد .
وﺿﻊ ﻋﻤﻠﻴﺔ اﻟﺘﻨﺸﻴﻒ
اﻗﺼﻰ ﺣﻤﻞ
ﻟﻠﻜﻮي
011
ﻟﻠﺨﺰاﻧﺔ
021
آﺜﻴﺮة
اﻟﺠﻔﺎف
031
آﻐﻢ
4
ﻣﻼ ﺑﺲ ﺑﻤﺨﺘﻠﻒ
اﻟﻤﻘﺎﺳﺎت
011
07
021
08
031
09
4
5.2
ﺑﺸﺎآﻴﺮ وﻣﻨﺎﺷﻒ
ﺷﺮاﺷﻒ ﺗﺨﻮت،
ﻗﻤﺼﺎن
06
06
56
1
ﺑﺠﻤﺎت، ﺟﻮارب،
اﻟﻰ آﺧﺮه
06
06
56
1
ﺷﻠﺤﺎت، آﻠﺴﺎت،
ﻧﻮع اﻻ ﻧﺴﺠﺔﻧﻮع اﻟﺤﻤﻞ
ﺑﺘﺪوﻳﺮ ﻣﻘﺒﺾ ﻋﻤﻠﻴﺔ اﻟﺘﻨﺸﻴﻒ ﻳﺘﻢ وﺿﻊ ﻧﻮع ﻋﻤﻠﻴﺔ اﻟﺘﻨﺸﻴﻒ اﻟﺘﻲ ﺗﺮﻏﺒﻮﻧﻬﺎ، ﻳﻤﻜﻦ
اﺧﺘﻴﺎر اﺣﺪى اﻟﻄﺮﻳﻘﺘﻴﻦ:
A - اﻋﺘﻤﺎدا ﻋﻠﻰ اﻟﺰﻣﻦ: ﻣﻦ 04 اﻟﻰ 051 دﻗﻴﻘﺔ.
ﻗﻄﻦ، آﺘﺎن
B - اﻋﺘﻤﺎدا ﻋﻠﻰ درﺟﺔ رﻃﻮﺑﺔ اﻟﻤﻼ ﺑﺲ اﻟﻤﺮاد ﺗﻨﺸﻴﻔﻬﺎ:
ﻟﻠﻜﻮي : ﻣﻼ ﺑﺲ ﻗﻠﻴﻼ رﻃﺒﺔ، ﺳﻬﻠﺔ اﻟﻜﻮي.
ﻗﻄﻦ
: ﻣﻼ ﺑﺲ ﻧﺎﺷﻔﺔ ﻳﻤﻜﻦ وﺿﻌﻬﺎ ﻣﺒﺎﺷﺮة ﻓﻲ اﻟﺨﺰاﻧﺔ.
ﺗﺮﻳﺘﺎل، ﻗﻄﻦ
ﻟﻠﺨﺰاﻧﺔ
آﺜﻴﺮة اﻟﺠﻔﺎف : ﻣﻼ ﺑﺶ آﺜﻴﺮة اﻟﺠﻔﺎف، ﻳﻨﺼﺢ ﻟﻠﺒﺸﺎآﻴﺮ وﺟﻜﻴﺘﺎت اﻟﺤﻤﺎم.
ﻋﻨﺪ اﻧﺘﻬﺎء ﻋﻤﻠﻴﺔ اﻟﺘﺠﻔﻴﻒ ﻳﺘﺒﻌﻬﺎ ﻓﺘﺮة ﺗﺒﺮﻳﺪ.
اآﺮﻳﻠﻚ
اذا آﺎﻧﺖ آﻤﻴﺔ اﻟﻤﻼ ﺑﺲ اﻟﻤﺮاد ﻏﺴﻠﻬﺎ وﺗﻨﺸﻴﻔﻬﺎ ﻳﺰﻳﺪ ﻋﻦ اﻟﻜﻤﻴﺔ اﻟﻘﺼﻮى اﻟﻤﻨﺼﻮح
اﺳﺘﺨﺪاﻣﻬﺎ ﻓﻲ دورة اﻟﺘﻨﺸﻴﻒ )اﻧﻈﺮ اﻟﻰ اﻟﻠﻮﺣﺔ اﻟﻤﻮﺟﻮدة ﻋﻠﻰ اﻟﺠﺎﻧﺐ(، ﻗﻮﻣﻮا ﺑﻌﻤﻠﻴﺔ
ﻧﺎﻳﻠﻮن
ﻏﺴﻞ ﺟﻤﻴﻊ هﺬه اﻟﻤﻼ ﺑﺲ وﻋﻨﺪ اﻧﺘﻬﺎء دورة اﻟﻐﺴﻴﻞ، اﻗﺴﻤﻮا ﺣﻤﻞ اﻟﻐﺴﻴﻞ اﻟﻰ ﻗﺴﻤﻴﻦ ،
ﺿﻌﻮا اﻟﻘﺴﻢ اﻷ ول ﻓﻲ اﻟﻐﺴﺎﻟﺔ اﻟﻨﺸﺎﻓﺔ ﻟﻠﻘﻴﺎم ﺑﻌﻤﻠﻴﺔ اﻟﺘﻨﺸﻴﻒ ﻣﺘﺒﻌﻴﻦ اﻟﺘﻌﻠﻴﻤﺎت اﻟﺨﺎﺻﺔ
ﻓﻘﻂ ﺑﻌﻤﻠﻴﺔ اﻟﺘﻨﺸﻴﻒ وﻋﻨﺪ اﻧﺘﻬﺎء هﺬه اﻟﻌﻤﻠﻴﺔ ﺿﻌﻮا اﻟﻨﺼﻒ اﻟﺜﺎﻧﻲ وأﻋﻴﺪوا ﻋﻤﻠﻴﺔ
اﻟﺘﻨﺸﻴﻒ ﻣﻦ ﺟﺪﻳﺪ ﻟﻠﻘﺴﻢ اﻟﻤﺘﺒﻘﻲ.
ﻓﻘﻂ ﺗﻨﺸﻴﻒ
ﻗﻮﻣﻮا ﺑﻌﻤﻠﻴﺔ ﺗﺪوﻳﺮ ﻣﻘﺒﺾ اﻟﺒﺮﻣﺠﺔ ﺣﺘﻰ اﻟﻮﺻﻞ اﻟﻰ وﺿﻊ اﻟﺘﻨﺸﻴﻒ ﺣﺴﺐ ﻧﻮع اﻻ ﻧﺴﺠﺔ اﻟﻤﺮاد ﺗﻨﺸﻴﻔﻬﺎ، وﻣﻦ ﺛﻢ اﺧﺘﺎروا ﻃﺮﻳﻘﺔ اﻟﺘﻨﺸﻴﻒ اﻟﺘﻲ ﺗﻮدوﻧﻬﺎ وذﻟﻚ ﺑﻮاﺳﻄﺔ
ﻣﻘﺒﺾ اﻟﺘﻨﺸﻴﻒ.
،
ﻟﻠﺨﺰاﻧﺔ
آﺜﻴﺮة اﻟﺠﻔﺎف ،
ﻣﻬﻢ:ﺧﻼ ل ﻋﻤﻠﻴﺔ اﻟﺘﻨﺸﻴﻒ اﻟﺠﻬﺎز ﻳﻘﻮم ﺑﺎﻟﻘﻴﺎم ﺑﻌﻤﻠﻴﺔ ﻋﺼﺮ دوراﻧﻴﺔ اذا ﺗﻢ اﺧﺘﻴﺎر اﺣﺪ ﺑﺮاﻣﺞ اﻟﻘﻄﻦ و أﺣﺪ درﺟﺎت اﻟﺘﻨﺸﻴﻒ )
ﻟﻠﻜﻮي (
- ﻟﺘﻨﺸﻴﻒ اﻟﻤﻼ ﺑﺲ اﻟﺼﻮﻓﻴﺔ ﻳﺠﺐ أن ﺗﺘﻢ ﻓﻘﻂ ﺑﺎﺧﺘﻴﺎر زﻣﻦ اﻟﺘﻨﺸﻴﻒ )051 - 001 - 06 - 04 دﻗﻴﻘﺔ( ﻟﺤﻤﻞ 1 آﻴﻠﻮﻏﺮام ﻳﻨﺼﺢ اﺳﺘﺨﺪام زﻣﻦ ﺗﻨﺸﻴﻒ 06 دﻗﻴﻘﺔ.
ﻟﻠﻜﻮي ( اﻟﺠﻬﺎز ﻳﻘﻮم ﺑﻌﻤﻠﻴﺔ ﺗﺠﻔﻴﻒ ﻣﺴﺘﺨﺪﻣﺔ أﻗﺼﻰ زﻣﻦ ﻟﻠﺘﺘﻨﺸﻴﻒ وهﻮ
،
ﻟﻠﺨﺰاﻧﺔ
آﺜﻴﺮة اﻟﺠﻔﺎف ،
اذا ﺗﻢ ﺑﺎﻟﺨﻄﺄ اﺳﺘﺨﺪام اﺣﺪ درﺟﺎت اﻟﺘﻨﺸﻴﻒ )
)051 دﻗﻴﻘﺔ(
- ﻟﺤﻤﻞ اﻧﺴﺠﺔ ﻗﻄﻨﻴﺔ وزﻧﻬﺎ أﻗﻞ ﻣﻦ 1 آﻴﻠﻮﻏﺮام اﺳﺘﺨﺪﻣﻮا اﻟﺒﺮﻧﺎﻣﺞ اﻟﺨﺎص ﺑﺘﻨﺸﻴﻒ اﻻ ﻧﺴﺠﺔ اﻟﻤﺴﺘﺨﺮﺟﺔ.
اﻟﻮﻇﺎﺋﻒ
اﻟﻮﻇﺎﺋﻒ اﻟﻤﺨﺘﻠﻔﺔ اﻟﺘﻲ ﻣﻦ اﻟﻤﻤﻜﻦ اﺳﺘﺨﺪاﻣﻬﺎ ﻋﻨﺪ ﻋﻤﻠﻴﺔ اﻟﻐﺴﻴﻞ وﻣﻮﻓﺮة ﻣﻦ ﻗﺒﻞ اﻟﻐﺴﺎﻟﺔ اﻟﻨﺸﺎﻓﺔ ﺗﺴﺎﻋﺪ ﻋﻠﻰ اﻟﺤﺼﻮل ﻋﻠﻰ ﻏﺴﻴﻞ أﻧﻈﻒ وﺑﻴﺎض ﻧﺎﺻﻊ ﻣﺜﻞ رﻏﺒﺘﻜﻢ،
ﻻ ﺧﺘﻴﺎر اﻟﻮﻇﺎﺋﻒ اﻟﻤﺨﺘﻠﻔﺔ ﻳﺘﻢ اﺗﺒﺎع ﻧﻔﺲ اﻟﺨﻄﻮات وهﻲ آﻤﺎ ﻳﻠﻲ:
1. اﺿﻐﻂ ﻋﻠﻰ اﻟﺰر اﻟﺨﺎص ﺑﺎﻟﻮﻇﻴﻔﺔ اﻟﺘﻲ ﺗﻮد اﺳﺘﺨﺪاﻣﻬﺎ ﺣﺴﺐ اﻟﻠﻮﺣﺔ اﻟﻤﻮﺟﻮدة ﻓﻲ اﻻ ﺳﻔﻞ.
2. اﺿﺎءة زر اﻟﻮﻇﻴﻔﺔ اﻟﻤﺨﺘﺎرة ﻳﺪل ﻋﻠﻰ ﻋﻤﻞ هﺬه اﻟﻮﻇﻴﻔﺔ.
ﻣﻼ ﺣﻈﺔ: اﺿﺎءة واﻧﻄﻔﺎء زر أي وﻇﻴﻔﺔ ﻣﻦ اﻟﻮﻇﺎﺋﻒ ﺑﺸﻜﻞ ﻣﺘﺮدد ﻳﺸﻴﺮ اﻟﻰ أن هﺬه اﻟﻮﻇﻴﻔﺔ ﻻ ﻳﻤﻜﻦ اﺧﺘﻴﺎرهﺎ واﺳﺘﺨﺪاﻣﻬﺎ ﻣﻊ اﻟﺒﺮﻧﺎﻣﺞ اﻟﻤﺨﺘﺎر.
ﺗﻌﻤﻞ ﻣﻊ اﻟﺒﺮﻧﺎﻣﺞ
2 - 3 - 4 -
ﻓﻀﻔﻀﺔ
3 - 4 - 5 - 6 - 9 01 - ﻓﻀﻔﻀﺔ
وﻣﻦ ﺑﻌﺪهﺎ اﺿﻐﻂ ﻋﻠﻰ اﻟﺰر ﺑﺪء/ﺷﻄﺐ TESER/TRATS
1 - 2 - 3 - 4 - 9
- 01 - 21 - 31 -
ﻓﻀﻔﻀﺔ
ـﻤـﻴـ
ﻊ اﻟـﺒـﺮاﻣـﺞ ﻣـﺎ
ﺟ
ﻋﺪى 6 و ﺗﻔﺮﻳﻎ
اﻟﻤﺎء
ﻳﺒﺪأ ﺑﺎﻻ ﺿﺎءة واﻻ ﻧﻄﻔﺎء ﺑﺘﺮدد
ﻣﻼ ﺣﻈﺔ ﻟﻼ ﺳﺘﻌﻤﺎل
ﺗﺬآﺮوا ﺻﺐ اﻟﺴﺎﺋﻞ اﻟﻤﺒﻴﺾ ﻓﻲ اﻟﺤﻮض اﻻ ﺿﺎﻓﻲ اﻟﻤﺸﺎر ﻟﻪ ﺑﺎﻟﺮﻗﻢ 4 )اﻧﻈﺮ ﺻﻔﺤﺔ 42(
ﻻ ﻳﺘﻤﺎﺷﻰ ﻣﻊ اﻻ ﺿﺎﻓﺔ اآﻮي أﻗﻞ .
وﺿﻊ هﺬه اﻻ ﺿﺎﻓﺔ، اﻟﺒﺮاﻣﺞ 6-5-4- - واﻟﻔﻀﻔﻀﺔ اﻟﺤﺴﺎﺳﺔ ﻳﺘﻢ ﺗﻮﻗﻒ ﺑﺮﻧﺎﻣﺞ اﻟﻐﺴﻴﻞ ﺑﻮﺿﻊ اﻟﻤﻼ ﺑﺲ اﻟﻤﻐﺴﻮﻟﺔ ﺗﺤﺖ اﻟﻨﻘﻊ )ﺿﺪ
اﻟﺠﻌﻠﻜﺔ( وﻣﺼﺒﺎح دورة اﻟﻔﻀﻔﻀﺔ
- ﻻ ﻧﻬﺎء دورة اﻟﻐﺴﻴﻞ اﺿﻐﻂ ﻋﻠﻰ اﻟﺰر ﺑﺪء/ﺷﻄﺐ TESER/TRATS
-ﻻ ﺗﻤﺎم اﻟﺒﺮﻧﺎﻣﺞ ﺑﻌﻤﻠﻴﺔ اﻓﺮاغ اﻟﻤﺎء ﺿﻊ اﻟﻤﻘﺒﺾ ﻋﻠﻰ اﻟﺸﻌﺎر
ﻻ ﺗﺘﻮاﻓﻖ ﻣﻊ اﻻ ﺿﺎﻓﺔ ﺿﺪ اﻟﺒﻘﻊ
ﻳﻨﺼﺢ اﺳﺘﺨﺪاﻣﻬﺎ ﻟﻠﺤﻤﻞ اﻟﻜﺒﻴﺮ أو ﻋﻨﺪ اﺳﺘﺨﺪام آﻤﻴﺎت آﺒﻴﺮة ﻣﻦ ﻣﺴﺤﻮق اﻟﻐﺴﻴﻞ
ﺗﺄﺛﻴﺮهﺎ
دورة ﺗﺒﻴﺾ اﻟﻐﺴﻴﻞ ﺗﻌﻤﻞ ﻋﻠﻰ
ازاﻟﺔ اﻟﺒﻘﻊ اﻟﺼﻌﺒﺔ
ﻳﻘﻠﻞ ﺗﺠﻌﻠﻚ اﻻ ﻧﺴﺠﺔ، وﺳﻬﻞ ﻓﻲ
ﻋﻤﻠﻴﺔ اﻟﻜﻮي
ﺗﺰﻳﺪ ﻣﻦ ﻗﺪرة ﻋﻤﻠﻴﺔ اﻟﻔﻀﻔﻀﺔ
ﻳ
ـﻘـﻠـ
ﻞ ﻣـﻦ ﺳـﺮﻋـﺔ ﻋـﻤـﻠـﻴـﺔ اﻟـﻌـﺼـﺮ
اﻟﺪوراﻧﻴﺔ
اﻻ ﺿﺎﻓﺔ
ﺿﺪ اﻟﺒﻘﻊ
اآﻮي أﻗﻞ
ﻓﻀﻔﻀﺔ اﺿﺎﻓﻴﺔ
0001 - 005
32
Page 24
اﻟﻤﺴﺎﺣﻴﻖ واﻟﻤﻼ ﺑﺲ
ﻲﺑﺮﻋ
ﺗﺤﻀﻴﺮ اﻟﻤﻼ ﺑﺲ ﻟﻠﻐﺴﻴﻞ
اﻓﺼﻠﻮا اﻟﻤﻼ ﺑﺲ اﻟﻤﺮاد ﻏﺴﻠﻬﺎ ﺣﺴﺐ:
- ﻧﻮع اﻷ ﻧﺴﺠﺔ/ اﻟﺸﻌﺎر ﻣﻮﺟﻮد ﻋﻠﻰ اﻟﻠﻮﺣﺔ اﻟﻤﺜﺒﺘﺔ ﻋﻠﻰ اﻟﻤﻼ ﺑﺲ
- اﻷ ﻟﻮان: اﻓﺼﻠﻮا اﻟﻤﻼ ﺑﺲ اﻟﻤﻠﻮﻧﺔ ﻋﻦ اﻟﻤﻼ ﺑﺲ اﻟﺒﻴﻀﺎء
ﻓﺮﻏﻮا اﻟﺠﻴﻮب ﻣﻦ ﻣﺤﺘﻮاﻳﺎﺗﻬﺎ وﺗﺄآﺪوا ﻣﻦ ﺛﺒﺎت اﻻ زرار
ﻻ ﺗﺘﻌﺪوا اﻟﻘﻴﻢ اﻟﻤﺸﺎر ﻟﻬﺎ، اﻟﺘﻲ ﺗﺘﻌﻠﻖ ﺑﻮزن اﻟﻤﻼ ﺑﺲ اﻟﻤﺮاد ﻏﺴﻠﻬﺎ وهﻲ ﺟﺎﻓﺔ:
اﻧﺴﺠﺔ ﻗﻮﻳﺔ : اﻗﺼﻰ ﺣﻤﻞ ﻟﻠﻐﺴﺎﻟﺔ 5 آﻐﻢ
اﻧﺴﺠﺔ ﻣﺴﺘﺨﺮﺟﺔ: اﻗﺼﻰ ﺣﻤﻞ ﻟﻠﻐﺴﺎﻟﺔ 5.2 آﻐﻢ
أﻧﺴﺠﺔ ﺣﺴﺎﺳﺔ: اﻗﺼﻰ ﺣﻤﻞ ﻟﻠﻐﺴﺎﻟﺔ 2 آﻐﻢ
ﺻﻮف: اﻗﺼﻰ ﺣﻤﻞ ﻟﻠﻐﺴﺎﻟﺔ 1 آﻐﻢ
اﺧﺮج ﺣﻮض ﻣﺴﺎﺣﻴﻖ اﻟﻐﺴﻴﻞ ﻣﻦ
ﻣﻜﺎﻧﻪ وﺿﻊ ﻣﺴﺤﻮق اﻟﻐﺴﻴﻞ
واﻟﻤﺴﺎﺣﻴﻖ اﻻ ﺿﺎﻓﻴﺔ اﻟﺘﻲ ﺗﻮدون
اﺳﺘﺨﺪاﻣﻬﺎ ﺑﺎﻟﺸﻜﻞ اﻟﺘﺎﻟﻲ
4
3
ﺣﻮض ﻣﺴﺎﺣﻴﻖ اﻟﻐﺴﻴﻞ
اﻟﻨﺘﺎﺋﺞ اﻟﺠﻴﺪة ﻟﻌﻤﻠﻴﺔ اﻟﻐﺴﻴﻞ ﺗﻌﺘﻤﺪ أﻳﻀﺎ ﻋﻠﻰ آﻤﻴﺔ ﻣﺴﺤﻮق اﻟﻐﺴﻴﻞ اﻟﺼﺤﻴﺤﺔ،
ﻋﻨﺪ وﺿﻊ آﻤﻴﺔ أآﺜﺮ ﻣﻦ اﻟﺤﺎﺟﺔ ﻣﻦ ﻣﺴﺤﻮق اﻟﻐﺴﻴﻞ ﻻ ﺗﺘﻢ ﻋﻤﻠﻴﺔ اﻟﻐﺴﻴﻞ ﺑﺸﻜﻞ
ﻓﻌﺎل و ﺗﺴﺎﻋﺪ ﻋﻠﻰ ﺗﻜﻮن ﺗﺮﺳﺒﺎت داخ اﻟﻤﻨﺎﻃﻖ اﻟﺪاﺧﻠﻴﺔ ﻣﻦ اﻟﻐﺴﺎﻟﺔ ﺑﺎﻻ ﺿﺎﻓﺔ
اﻟﻰ ﺗﻠﻮث اﻟﺒﻴﺌﺔ.
2
1
آﻢ ﺗﺰن اﻟﻤﻼ ﺑﺲ؟
1 ﺷﺮﺷﻒ ﺗﺨﺖ 004-005 ﻏﺮام
1 ﻏﻄﺎء وﺳﺎدة 051-002 ﻏﺮام
1 ﺷﺮﺷﻒ ﻃﺎوﻟﺔ أآﻞ 004-005 ﻏﺮام
1 روب ﺣﻤﺎم 009-0021 ﻏﺮام
1 ﺑﺸﻜﻴﺮ 051-052 ﻏﺮام
اﻧﺴﺠﺔ ﺧﺎﺻﺔ
ﺑﺮادي: اﻃﻮي اﻟﺒﺮداﻳﺔ وﺿﻌﻬﺎ داﺧﻞ ﻏﺴﺎء وﺳﺎدة أو آﻴﺲ ﺷﺒﻜﺔ، اﻏﺴﻠﻮهﺎ ﻟﻮﺣﺪهﺎ
دون ﺗﻌﺪي وزن ﻧﺼﻒ ﺣﻤﻞ اﻟﻐﺴﺎﻟﺔ، اﺳﺘﺨﺪﻣﻮا ﺑﺮﻧﺎﻣﺞ رﻗﻢ 6 اﻟﺬي ﻳﻔﺼﻞ ﺑﺸﻜﻞ
اوﺗﻮﻣﺎﺗﻴﻜﻲ ﻋﻤﻠﻴﺔ اﻟﻌﺼﺮ اﻟﺪوراﻧﻴﺔ.
ﻟﺤﻒ و ﺟﻜﻴﺘﺎت ﺿﺪ اﻟﻬﻮاء: اذا آﺎﻧﺖ ﺣﺸﻮة هﺬه رﻳﺶ ﺑﻂ أو ﺣﺒﺶ ﻳﻤﻜﻦ اﻟﻘﻴﺎم
ﺑﻌﻤﻠﻴﺔ ﻏﺴﻠﻬﺎ داﺧﻞ اﻟﻐﺴﺎﻟﺔ، اﻗﻠﺒﻮا هﺬه اﻟﻤﻼ ﺑﺲ وﻟﻴﻜﻮن اﻟﺤﻤﻞ اﻷ ﻗﺼﻰ ﻟﻠﻐﺴﺎﻟﺔ
ﻻ ﻳﺰﻳﺪ ﻋﻦ 2-3 آﻐﻢ ، اﻋﻴﺪوا دورة اﻟﻔﻀﻔﻀﺔ ﻣﺮة أو ﻣﺮﺗﻴﻦ ﻣﺴﺘﺨﺪﻣﻴﻦ ﻋﻤﻠﻴﺔ
اﻟﻌﺼﺮ اﻟﺤﺴﺎﺳﺔ.
ﺻﻮف: ﻟﻠﺤﺼﻮل ﻋﻠﻰ أﻓﻀﻞ ﻧﺘﺎﺋﺞ ﻏﺴﻴﻞ اﻟﺼﻮف اﺳﺘﺨﺪﻣﻮا ﺳﻮاﺋﻞ أو ﻣﺴﺎﺧﻴﻖ
ﻏﺴﻴﻞ ﺧﺎص ﻟﻐﺴﻞ اﻟﺼﻮف وزن ﺣﻤﻞ اﻟﻐﺴﺎﻟﺔ ﻳﺠﺐ أن ﻻ ﻳﺘﻌﺪى 1 آﻐﻢ
ادﺧﻞ اﻟﺤﻮض اﻻ ﺿﺎﻓﻲ رﻗﻢ 4
اﻟﺘﻲ ﺗﻜﻮن ﻣﺰودة ﻣﻊ اﻟﺠﻬﺎز ﻓﻲ
اﻟﺤﻮض رﻗﻢ 1، ﻋﻨﺪ ﺻﺐ اﻟﺴﺎﺋﻞ
اﻟﻤﺒﻴﺾ ﻻ ﺗﺘﻌﺪوا اﻟﺤﺪ xam اﻟﻤﺸﺎر
ﻟﻪ ﻋﻠﻰ اﻟﻌﻤﻮد اﻟﻤﻮﺟﻮد ﻓﻲ وﺳﻂ
اﻟﺤﻮض)اﻧﻈﺮ اﻟﻰ اﻟﺸﻜﻞ(
اﻟﺤﻮض 1: ﻣﺴﺎﺣﻴﻖ اﻟﻐﺴﻴﻞ ﻟﻼ ﺿﺎﻓﻲ )ﺑﻮدرة(
ﻗﺒﻞ ﺻﺐ ﻣﺴﺤﻮق اﻟﻐﺴﻴﻞ ﺗﺄآﺪ ﻣﻦ أن اﻟﺤﻮض اﻻ ﺿﺎﻓﻲ رﻗﻢ 4 ﻟﻴﺲ ﻣﻮﺟﻮد هﻨﺎك.
اﻟﺤﻮض 2: ﻣﺴﺎﺣﻴﻖ اﻟﻐﺴﻴﻞ اﻟﻌﺎدي )ﺑﻮدرة او ﺳﺎﺋﻞ(
اﻟﻤﻨﻈﻒ اﻟﺴﺎﺋﻞ ﻳﺘﻢ ﺻﺒﻪ ﻓﻘﻂ ﻗﺒﻞ ﺗﺸﻐﻴﻞ اﻟﻐﺴﺎﻟﺔ.
اﻟﺤﻮض 3: ﻣﺴﺎﺣﻴﻖ اﺿﺎﻓﻴﺔ )ﻣﻨﻌﻤﺎت، اﻟﻰ اﺧﺮه(
اﻟﺴﺎﺋﻞ اﻟﻤﻨﻌﻢ ﻳﺠﺐ أن ﻻ ﻳﺨﺮج ﺧﺎرج اﻟﺸﺒﻜﺔ
اﻟﺤﻮض اﻻ ﺿﺎﻓﻲ 4: ﻟﻠﺘﺒﻴﺾ
! ﻻ ﺗﺴﺘﺨﺪﻣﻮا ﻣﺴﺎﺣﻴﻖ ﻏﺴﻴﻞ ﺧﺎﺻﺔ ﺑﺎﻟﻐﺴﻴﻞ ﻋﻠﻰ اﻟﻴﺪ ﻻ ﻧﻬﺎ ﺗﻜﻮن رﻏﻮة آﺜﻴﺮة.
دورة اﻟﺘﺒﻴﺾ
اﻟﻤﺒﻴﻀﺎت اﻟﻌﺎدﻳﺔ ﺗﺴﺘﺨﺪم ﻟﺘﺒﻴﺾ اﻻ ﻧﺴﺠﺔ اﻟﻘﻮﻳﺔ اﻟﺒﻴﻀﺎء، واﻟﻤﺒﻴﻀﺎت اﻟﺤﺴﺎﺳﺔ
ﺗﺴﺘﻌﻤﻞ ﻟﺘﺒﻴﺾ اﻻ ﻧﺴﺠﺔ اﻟﻤﺴﺘﺨﺮﺟﺔ واﻟﺼﻮف.
اذا أردﺗﻢ اﺳﺘﺨﺪام دورة اﻟﺘﺒﻴﺾ ﻓﻘﻂ ﻗﻮﻣﻮا ﺑﻌﻤﻠﻴﺔ ﺻﺐ اﻟﺴﺎﺋﻞ اﻟﻤﺒﻴﺾ ﻓﻲ اﻟﺤﻮض
اﻻ ﺿﺎﻓﻲ رﻗﻢ 4 وﺿﻌﻮا ﺑﺮﻧﺎﻣﺞ اﻟﻔﻀﻔﻀﺔ
.ﻟﻠﻘﻴﺎم ﺑﻌﻤﻠﻴﺔ اﻟﺘﺒﻴﺾ ﺧﻼ ل دورة اﻟﻐﺴﻴﻞ ﻗﻮﻣﻮا ﺑﻌﻤﻠﻴﺔ ﺻﺐ ﻣﺴﺤﻮق اﻟﻐﺴﻴﻞ اﻟﻌﺎدي
و اﻟﻤﺴﺎﺣﻴﻖ اﻻ ﺿﺎﻓﻴﺔ، ﺿﻌﻮا اﻟﺒﺮﻧﺎﻣﺞ اﻟﺬي ﺗﻮدون اﺳﺘﺨﺪاﻣﻪ و ﺷﻐﻠﻮا اﻟﻮﻇﻴﻔﺔ
اﻻ ﺿﺎﻓﻴﺔ اﻟﺘﺒﻴﺾ )اﻧﻈﺮ ﺻﻔﺤﺔ رﻗﻢ 32(
اﺳﺘﺨﺪام اﻟﺤﻮض اﻻ ﺿﺎﻓﻲ رﻗﻢ 4 ﻳﻠﻐﻲ ﻋﻤﻠﻴﺔ اﻟﻐﺴﻴﻞ اﻻ ﺿﺎﻓﻲ
42
Page 25
ﺗﺤﺬﻳﺮات وﻧﺼﺎﺋﺢ
اﻟﺘﺨﻠﺺ ﻣﻦ اﻟﻨﻔﺎﻳﺎت
اﻟﺘﺨﻠﺺ ﻣﻦ ﻣﻮاد اﻟﺘﻐﻠﻴﻒ :
اﺣﺘﺮم اﻟﻘﻮاﻧﻴﻦ اﻟﻤﺤﻠﻴﺔ، ﻷ ﻧﻪ ﻣﻦ اﻟﻤﻤﻜﻦ اﻻ ﺳﺘﻔﺎدة ﻣﻦ اﻟﺘﻐﻠﻴﻒ واﻋﺎدة ﺗﺼﻨﻴﻌﻪ
ﻲﺑﺮﻋ
ﻏﺴﺎﻟﺔ ﻧﺸﺎﻓﺔ اﻟﻤﻼ ﺑﺲ ﺗﻢ ﺗﺼﻤﻴﻤﻬﺎ وﺗﺼﻨﻴﻌﻬﺎ ﻟﺘﻜﻮن ﺧﺎﺿﻌﺔ ﻟﺠﻤﻴﻊ ﻗﻮاﻋﺪ اﻷ ﻣﻦ
اﻟﻤﺘﻌﺎرف ﻋﻠﻴﻬﺎ دوﻟﻴﺎ، هﺬه اﻟﺘﺤﺬﻳﺮات ﻣﻘﺪﻣﺔ ﻷ ﺳﺒﺎب أﻣﻨﻴﺔ وﻳﺠﺐ ﻗﺮاﺋﺘﻬﺎ ﺑﺘﻤﻌﻦ.
أﻣﻦ ﻋﺎم
اﻟﺘﺨﻠﺺ ﻣﻦ اﻟﻐﺴﺎﻟﺔ اﻟﻨﺸﺎﻓﺔ اﻟﻘﺪﻳﻤﺔ :
ﻗـﺒـﻞ اﻟـﺘـﺨـﻠـﺺ ﻣـﻨـﻬـﺎ اﺟـﻌـﻠـﻬـﺎ ﻏـﻴـﺮ ﺻـﺎﻟـﺤـﺔ اﻻ ﺳـﺘـﻌـﻤـﺎل وذﻟـﻚ ﺑـﻘـﻄـﻊ ﺳـﻠـﻚ اﻟـﺘـﻐـﺬﻳـﺔ اﻟـﻜـﻬـﺮﺑـﺎﺋـﻴـﺔ
وﺑﺨﻠﻊ ﺑﺎب اﻟﻐﺴﺎﻟﺔ اﻟﻨﺸﺎﻓﺔ.
اﻻ ﻗﺘﺼﺎد واﺣﺘﺮام اﻟﺒﻴﺌﺔ
اﻟﺘﻜﻨﻮﻟﻮﺟﻴﺎ ﻓﻲ ﺧﺪﻣﺔ اﻟﺒﻴﺌﺔ
اذا رأﻳـﺘـﻢ ﻣـﻦ ﺧـﻼ ل ﺑـﺎب اﻟـﻐـﺴـﺎﻟـﺔ اﻟـﻨـﺸـﺎﻓـﺔ ﻣـﺎء ﻗـﻠـﻴـﻞ ذﻟـﻚ ﻷ ن اﻟـﺘـﻜـﻨـﻮﻟـﻮﺟـﻴـﺎ اﻟـﺠـﺪﻳـﺪة
اﻟﻤﺼﻤﻤﺔ ﻣﻦ ﻗﺒﻞ ﺷﺮآﺔ ارﺳﺘﻦ ﻳﻜﻔﻲ أﻗﻞ ﻣﻦ ﻧﺼﻒ آﻤﻴﺔ اﻟﻤﺎء ﻟﻠﺤﺼﻮل ﻋﻠﻰ أﻓﻀﻞ
ﻧﺘﺎﺋﺞ اﻟﻐﺴﻴﻞ: هﺪف ﻣﻦ اﻷ هﺪاف ﻟﺤﻤﺎﻳﺔ واﺣﺘﺮام اﻟﺒﻴﺌﺔ.
اﻟﺘﻮﻓﻴﺮ ﻓﻲ ﻣﺴﺤﻮق اﻟﻐﺴﻴﻞ، اﻟﻤﺎء، اﻟﻄﺎﻗﺔ اﻟﻜﻬﺮﺑﺎﺋﻴﺔ، واﻟﺰﻣﻦ
ﻟـﻌـﺪم اﻟـﺘـﺒـﺬﻳـﺮ واﻻ ﺳـﺮاف ﻓـﻲ اﻟـﺪﺧـﻞ اﺳـﺘـﺨـﺪﻣـﻮا اﻟـﻐـﺴـﺎﻟـﺔ اﻟـﻨـﺸـﺎﻓـﺔ ﻋـﻨـﺪﻣـﺎ ﻳـﺘـﻮﻓـﺮ ﺣـﻤـﻠـﻬـﺎ
اﻟـﻜـﺎﻣـﻞ، ﺣـﻤـﻞ آـﺎﻣـﻞ ﻟـﻠـﻐـﺴـﺎﻟـﺔ اﻟـﻨـﺸـﺎﻓـﺔ ﻣـﻜـﺎن ﺣـﻤـﻠـﻴـﻦ ﺑـﻨـﺼـﻒ اﻟـﻜـﻤـﻴـﺔ ﻳـﻮﻓـﺮ 05% ﻣـﻦ
اﻟﻄﺎﻗﺔ.
ﻋـﻤـﻠـﻴـﺔ اﻟـﻐـﺴـﻴـﻞ اﻟـﺒـﺪاﺋـﻲ ﺿـﺮوري ﻓـﻘـﻂ ﻋـﻨـﺪﻣـﺎ ﺗـﻜـﺰن اﻟـﻤـﻼ ﺑـﺲ آـﺜـﻴـﺮة اﻟـﻮﺳـﺦ، ﺗـﺠـﻨـﺐ
ﻋﻤﻠﻴﺔ اﻟﻐﺴﻴﻞ اﻟﺒﺪاﺋﻲ ﻳﻮﻓﺮ ﻓﻲ ﻣﺴﺤﻮق اﻟﻐﺴﻴﻞ، اﻟﺰﻣﻦ، ﻣﺎء وﻣﺎ ﺑﻴﻦ 5 اﻟﻰ 51%
ﻣﻦ اﻟﻄﺎﻗﺔ اﻟﻤﺴﺘﻬﻠﻜﺔ.
هﺬا اﻟﺠﻬﺎز درس وﺻﻤﻢ ﻟﻜﻲ ﻳﻜﻮن ﺟﻬﺎز ﻟﻼ ﺳﺘﻌﻤﺎل اﻟﺒﻴﺘﻲ.
ﻳﺠﺐ اﺳﺘﺨﺪام اﻟﻐﺴﺎﻟﺔ اﻟﻨﺸﺎﻓﺔ اﻟﻜﻬﺮﺑﺎﺋﻴﺔ ﻣﻦ ﻗﺒﻞ أﺷﺨﺎص ﺑﺎﻟﻐﻴﻦ وﺑﺤﺴﺐ اﻟﺘﻌﻠﻴﻤﺎت
اﻟﻤﻮﺟﻮدة ﻓﻲ هﺬا اﻟﻜﺘﻴﺐ.
ﻻ ﺗﻠﻤﺴﻮا اﻟﺠﻬﺎز واﻷ رﺟﻞ ﻋﺎرﻳﺔ أو اﻷ ﻳﺪي أو اﻷ رﺟﻞ ﻣﺒﻠﻮﻟﺔ أو رﻃﺒﺔ.
ﻻ ﺗـﻔـﺼـﻠـﻮا اﻟـﺠـﻬـﺎز ﻣـﻦ ﻣـﻨـﺒـﻊ اﻟـﺘـﻴـﺎر اﻟـﻜـﻬـﺮﺑـﺎﺋـﻲ وذﻟـﻚ ﺑـﺸـﺪ ﺳـﻠـﻚ اﻟـﺘـﻐـﺬﻳـﺔ اﻟـﻜـﻬـﺮﺑـﺎﺋـﻴـﺔ ﺑـﻞ
ﻗﻮﻣﻮا ﺑﺴﺤﺐ ﻗﺎﺑﺲ اﻟﺘﻴﺎر اﻟﻜﻬﺮﺑﺎﺋﻲ )اﻟﺬآﺮ( ﻣﻦ ﻣﻨﺒﻊ اﻟﻜﻬﺮﺑﺎء.
ﻻ ﺗﻔﺘﺤﻮا ﺣﻮض ﻣﺴﺎﺣﻴﻖ اﻟﻐﺴﻴﻞ ﺧﻼ ل ﻋﻤﻞ اﻟﺠﻬﺎز.
ﻻ ﺗـﻠـﻤـﺴـﻮا اﻟـﻤـﺎء اﻟـﺬي ﻳـﻔـﺮغ ﻣـﻦ اﻟـﻐـﺴـﺎﻟـﺔ اﻟـﻨـﺸـﺎﻓـﺔ ﻷ ﻧـﺔ ﻗـﺪ ﻳـﺼـﻞ اﻟـﻰ درﺟـﺎت ﺣـﺮارة
ﻋﺎﻟﻴﺔ.
ﻻ ﺗﺸﺪوا ﺑﻘﻮة ﺑﺄي ﺣﺎل ﻣﻦ اﻷ ﺣﻮال ﺑﺎب اﻟﻐﺴﺎﻟﺔ اﻟﻨﺸﺎﻓﺔ وهﻮ ﻣﺎ زال ﻣﻘﻔﻞ، ﻷ ﻧﻪ ﻣﻦ
اﻟـﻤـﻤـﻜـﻦ اﺗـﻼ ف ﺟـﻬـﺎز اﻷ ﻣـﻦ اﻟـﺬي ﻳـﻤـﻨـﻊ ﻓـﺘـﺢ ﺑـﺎب اﻟـﻐـﺴـﺎﻟـﺔ اﻟـﻨـﺸـﺎﻓـﺔ ﺑـﺸـﻜـﻞ ﻋـﻔـﻮي ﺧـﻼ ل
ﻋﻤﻞ اﻟﺠﻬﺎز.
ﻓـﻲ ﺣـﺎل ﺣـﺪوث ﺧـﻠـﻞ ﻓـﻲ اﻟـﺠـﻬـﺎز ﻻ ﺗـﺤـﺎول اﻟـﻮﺻـﻮل اﻟـﻰ اﻷ ﺟـﻬـﺰة اﻟـﺪاﺧـﻠـﻴـﺔ ﻟـﻤـﺤـﺎوﻟـﺔ
ﺗﺼﻠﻴﺢ اﻟﺠﻬﺎز.
اﺳـﺘـﺨـﺪام ﻣـﺰﻳـﻞ ﻟـﻠـﺒـﻘـﻊ أو ﺗـﺮك اﻟـﻤـﻼ ﺑـﺲ ﻓـﻲ اﻟـﻨـﻘـﻊ ﻗـﺒـﻞ اﻟـﻘـﻴـﺎم ﺑـﻌـﻤـﻠـﻴـﺔ اﻟـﻐـﺴـﻴـﻞ ﺗـﻘـﻠـﻞ ﻣـﻦ
ﺿـﺮورة اﻟـﻘـﻴـﺎم ﺑـﻌـﻤـﻠـﻴـﺔ اﻟـﻐـﺴـﻴـﻞ ﻋـﻠـﻰ درﺟـﺎت ﺣـﺮارة ﻋـﺎﻟـﻴـﺔ، ﺑـﺮﻧـﺎﻣـﺞ ﻋـﻠـﻰ 06 درﺟـﺔ
ﻣـﺌـﻮﻳـﺔ ﺑـﺪل ﻣـﻦ 09 درﺟـﺔ ﻣـﺌـﻮﻳـﺔ أو دورة ﻏـﺴـﻴـﻞ ﻋـﻠـﻰ 04 درﺟـﺔ ﻣـﺌـﻮﻳـﺔ ﺑـﺪل ﻣـﻦ 06
درﺟﺔ ﻣﺌﻮﻳﺔ ﺗﻮﻓﺮ ﺣﺘﻰ 05% ﻣﻦ اﻟﻄﺎﻗﺔ اﻟﻜﻬﺮﺑﺎﺋﻴﺔ .
اﺳـﺘـﺨـﺪم آـﻤـﻴـﺔ ﻣـﺴـﺤـﻮق اﻟـﻐـﺴـﻴـﻞ ﺑـﺎﻟـﺘـﻨـﺎﺳـﺐ ﻣـﻊ ﻗـﺴـﺎوة اﻟـﻤـﺎء اﻟـﻤـﺴـﺘـﺨـﺪم ﻓـﻲ ﻋـﻤـﻠـﻴـﺔ
اﻟـﻐـﺴـﻴـﻞ، وﻣـﻊ درﺟـﺔ وﺳـﺎﺧـﺔ اﻟـﻤـﻼ ﺑـﺲ وﻣـﻊ آـﻤـﻴـﺔ اﻟـﻤـﻼ ﺑـﺲ اﻟـﻤـﺮاد ﻏـﺴـﻠـﻬـﺎ، ﺗـﺠـﻨـﺐ
اﻻ ﺳـﺮاف واﺣـﻤـﻲ اﻟـﺒـﻴـﺌـﺔ، ﺣـﺘـﻰ ﻟـﻮ آـﺎن ﻣـﺴـﺤـﻮق اﻟـﻐـﺴـﻴـﻞ ﻗـﺎﺑـﻞ ﻟـﻠـﺘـﺤـﻠـﻞ، ﻻ اﻧـﺔ ﻳـﺤـﺘـﻮي
ﻋﻠﻰ ﻣﻮاد آﻴﻤﺎوﻳﺔ اﻟﺘﻲ ﺗﺘﻠﻒ اﻟﺘﻮازن اﻟﺒﺌﻲ، واﻳﻀﺎ ﺗﺠﻨﺒﻮا اﺳﺘﺨﺪام اﻟﻤﻨﻌﻤﺎت.
اﻟـﻘـﻴـﺎم ﺑـﻌـﻠـﻴـﺔ اﻟـﻐـﺴـﻴـﻞ ﺑـﻮاﺳـﻄـﺔ اﻟـﻐـﺴـﺎﻟـﺔ اﻟـﻨـﺸـﺎﻓـﺔ اﻟـﻜـﻬـﺮﺑـﺎﺋـﻴـﺔ ﻓـﻲ اﻟـﻤـﺴـﺎء ﺣـﺘـﻰ ﺳـﺎﻋـﺎت
اﻟﺼﺒﺎح اﻟﻤﺒﻜﺮ ﺗﺨﻔﻒ ﺣﻤﻞ اﻣﻨﺼﺎص اﻟﺘﻴﺎر اﻟﻜﻬﺮﺑﺎﺋﻲ ﻋﻠﻰ ﺷﺮآﺔ اﻟﻜﻬﺮﺑﺎء ﺣﻴﺚ
ﺗﻜﻮن ﺗﻌﻤﻞ اﻟﻤﺼﺎﻧﻊ واﻟﺸﺮآﺎت.
اذا آـﺎن اﻟـﻐـﺴـﻴـﻞ ﻳـﺠـﺐ أن ﺗـﺘـﻢ ﻋـﻤـﻠـﻴـﺔ ﺗـﺠـﻔـﻴـﻔـﺔ ﺑـﻮاﺳـﻄـﺔ ﻣـﺠـﻔـﻔـﺔ آـﻬـﺮﺑـﺎﺋـﻴـﺔ، اﺳـﺘـﺨـﺪﻣـﻮا
ـﺼـ
ﻰ ﺳـﺮﻋـﺔ ﻋـﺼـﺮ دوراﻧـﻴـﺔ، ﻗـﻠـﺔ اﻟـﻤـﺎء اﻟـﻤـﻮﺟـﻮد ﻓـﻲ اﻟـﻤـﻼ ﺑـﺲ اﻟـﻤـﺮاد ﺗـﺠـﻔـﻴـﻔـﻬـﺎ ﺗـﻮﻓـﺮ
أﻗ
ﻋﻠﻴﻜﻢ زﻣﻦ وﻃﺎﻗﺔ ﻓﻲ ﺑﺮﻧﺎﻣﺞ اﻟﺘﻨﺸﻴﻒ.
ﺗﺄآﺪوا داﺋﻤﺎ ﻣﻦ ﻋﺪم ﺗﻘﺮب اﻷ ﻃﻔﺎل ﻣﻦ اﻟﺠﻬﺎز ﺧﻼ ل ﻋﻤﻠﻪ.
ﺧﻼ ل ﻋﻤﻠﻴﺔ اﻟﻐﺴﻴﻞ ﺑﺎب اﻟﻐﺴﺎﻟﺔ اﻟﻨﺸﺎﻓﺔ ﻗﺪ ﺗﺮﺗﻔﻊ درﺟﺔ ﺣﺮاﺗﻪ وﻳﺼﺒﺢ ﺳﺎﺧﻦ.
اذا أردﺗﻢ ﺗﺤﺮﻳﻚ أو ﻧﻘﻞ اﻟﺠﻬﺎز ﻣﻦ ﻣﻜﺎﻧﻪ اﺳﺘﻌﻦ ﺑﺸﺨﺺ أو ﺑﺸﺨﺼﻴﻦ وﺧﺬوا ﻓﺎﺋﻖ
اﻟﺤﺬر ﻷ ن اﻟﺠﻬﺰ ﺛﻘﻴﻞ وﻻ ﺗﺤﺎول اﻟﻘﻴﺎم ﺑﻬﺬا ﻟﻮﺣﺪك.
ﻗـﺒـﻞ ادﺧـﺎل اﻟـﻤـﻼ ﺑـﺲ داﺧـﻞ ﺣـﻮض ﻏـﺴـﻴـﻞ اﻟـﻐـﺴـﺎﻟـﺔ اﻟـﻨـﺸـﺎﻓـﺔ ﺗـﺄآـﺪ ﻣـﻦ ﺣـﻮض اﻟـﻐـﺴـﻴـﻞ
ﻓﺎرغ.
ﺧﻼ ل ﻋﻤﻠﻴﺔ اﻟﺘﻨﺸﻴﻒ ﻳﻜﻮن ﺑﺎب اﻟﻐﺴﺎﻟﺔ اﻟﻨﺸﺎﻓﺔ ﺳﺎﺧﻦ
ﻻ ﺗﻘﻮﻣﻮا ﺑﻌﻤﻠﻴﺔ ﺗﻨﺸﻴﻒ ﻣﻼ ﺑﺲ ﺗﻢ ﻏﺴﻠﻬﺎ ﺑﻤﻮاد ﻗﺎﺑﻠﺔ ﻟﻼ ﺷﺘﻌﺎل )ﻣﺜﻞ اﻟﻜﺤﻮل(
ﻻ ﺗﻘﻮﻣﻮا ﺑﺘﻨﺸﻴﻒ اﻻ ﺳﻔﻨﺞ أو ﻣﻼ ﺑﺲ ﻣﺼﻨﻮﻋﺔ ﻣﻦ ﻣﻮاد ﺑﻼ ﺳﺘﻴﻜﻴﺔ أو ﻣﺎ ﻳﺸﺎﺑﻬﻬﺎ.
ﺗﺄآﺪوا ﻣﻦ أن ﻣﺤﺒﺲ اﻟﻤﺎء ﻳﻜﻮن ﻣﻔﺘﻮح ﺧﻼ ل ﻋﻤﻠﻴﺔ اﻟﺘﻨﺸﻴﻒ
هﺬه اﻟﻐﺴﺎﻟﺔ اﻟﻨﺸﺎﻓﺔ ﻳﻤﻜﻦ اﺳﺘﺨﺪاﻣﻬﺎ ﻓﻘﻂ ﻟﻨﺸﻴﻒ ﻣﻼ ﺑﺲ ﺗﻢ ﻏﺴﻠﻬﺎ ﺑﻤﺎ
52
Page 26
ﺻﻴﺎﻧﺔ وﺣﻤﺎﻳﺔ
ﺗﻨﻈﻴﻒ ﻣﻀﺨﺔ ﺗﻔﺮﻳﻎ اﻟﻤﺎء ﻣﻦ اﻟﻐﺴﺎﻟﺔ اﻟﻨﺸﺎﻓﺔ
اﻟـﻐـﺴـﺎﻟـﺔ اﻟـﻨـﺸـﺎﻓـﺔ ﻣـﺰودة ﺑـﻤـﻀـﺨـﺔ ﺗـﻔـﺮﻳـﻎ اﻟـﻤـﺎء ﻣـﻦ اﻟـﻐـﺴـﺎﻟـﺔ اﻟـﻨـﺸـﺎﻓـﺔ ﻗـﺎدرة ﻋـﻠـﻰ ﺗـﻨـﻈـﻴـﻒ
ﻧﻔﺴﻬﺎ ﺑﻨﻔﺴﻬﺎ وﻟﻴﺴﺖ ﺑﺤﺎﺟﺔ اﻟﻰ أﻳﻪ ﻋﻤﻠﻴﺔ ﺗﻨﻈﻴﻒ أو ﺻﻴﺎن‘، وﻟﻜﻦ ﻣﻦ اﻟﻤﻤﻜﻦ أن
ﻳﺤﺪث أن أﺷﻴﺎء ﺻﻐﻴﺮة ﻣﺜﻞ)ﻗﻄﻊ ﻣﻌﺪﻧﻴﺔ أو أزرار( ﻗﺪ ﺗﻘﻊ داﺧﻞ اﻟﺤﺠﺮة اﻷ ﻣﺎﻣﻴﺔ
ﻟـﻠـﻤـﻀـﺨـﺔ هـﺬه اﻟـﺤـﺠـﺮة ﺗـﺤـﻔـﻆ اﻟـﻤـﻀـﺨـﺔ ﻣـﻦ اﻟـﺘـﻠـﻒ وﺗـﻜـﻮن ﻣـﻮﺟـﻮدة ﻓـﻲ اﻟـﻤـﻨـﻄـﺔ اﻟـﺴـﻔـﻠـﻴـﺔ
ﻣﻨﻬﺎ.
اﻓﺼﻠﻮا اﻟﻤﺎء واﻟﻄﺎﻗﺔ اﻟﻜﻬﺮﺑﺎﺋﻴﺔ
أﻏـﻠـﻘـﻮا ﻣـﺤـﺒـﺲ اﻟـﻤـﺎء ﺑـﻌـﺪ آـﻞ ﻋـﻤـﻠـﻴـﺔ ﻏـﺴـﻴـﻞ، ﺑـﻬـﺬا اﻟـﺸـﻜـﻞ ﻳـﺘـﻢ اﻟـﺘـﻘـﻠـﻴـﻞ ﻣـﻦ اﺳـﺘـﻬـﻼ ك
اﻟ
ـﺸـﺒـﻜـ
ﻪ اﻟـﻬـﺪﻳـﻮروﻟـﻴـﻜـﻲ ﻟـﻐـﺴـﺎﻟـﺔ اﻟـﻨـﺸـﺎﻓـﺔ اﻟـﻤـﻼ ﺑـﺲ وﻳـﺘـﻢ ازاﻟـﺔ ﺧـﻄـﺮ ﺗـﺴـﺮب اﻟـﻤـﺎء ﻣـﻦ
اﻟﺨﺮﻃﻮم.
اﻓـﺼـﻞ ﻗـﺎﺑـﺲ اﻟـﺘـﻴـﺎر اﻟـﻜـﻬـﺮﺑـﺎﺋـﻲ )اﻟـﺬآـﺮ( ﻣـﻦ ﻣـﻨـﺒـﻊ اﻟـﺘـﻴـﺎر اﻟـﻜـﻬـﺮﺑـﺎﺋـﻲ ﻋـﻨـﺪ اﻟـﻘـﻴـﺎم ﺑـﻌـﻤـﻠـﻴـﺔ
ﺗﻨﻈﻴﻒ اﻟﺠﻬﺎز وﺧﻼ ل ﻋﻤﻠﻴﺎت اﻟﺼﻴﺎﻧﺔ ﻟﻐﺴﺎﻟﺔ اﻟﻨﺸﺎﻓﺔ اﻟﻤﻼ ﺑﺲ.
! ﺗﺄآﺪ ﻣﻦ اﻧﺘﻬﺎء ﺑﺮﻧﺎﻣﺞ اﻟﻐﺴﻴﻞ واﻓﺼﻞ اﻟﺠﻬﺎز ﻣﻦ ﻣﻨﺒﻊ اﻟﺘﻴﺎر اﻟﻜﻬﺮﺑﺎﺋﻲ.
ﻟﻠﻮﺻﻮل اﻟﻰ اﻟﺤﺠﺮة اﻷ ﻣﺎﻣﻴﺔ ﻣﻦ اﻟﻤﻀﺨﺔ:
1. اﺧﻠﻊ اﻟﻐﻄﺎء اﻟﺬي ﻳﻐﻄﻲ اﻟﺠﻬﺎز
ﻣﻦ أﻻ ﻣﺎم وذﻟﻚ ﺑﺎﺳﺘﺨﺪام ﻣﻔﻚ )اﻧﻈﺮ
اﻟﻰ اﻟﺸﻜﻞ(
اﺧﺮج اﻟﺠﺎرور ﻣﻦ ﻣﻜﺎﻧﻪ وذﻟﻚ ﺑﺮﻓﻌﻪ
ﻗﻠﻴﻼ اﻟﻰ اﻷ ﻋﻠﻰ وﺑﺸﺪه اﻟﻰ اﻟﺨﺎرج
)اﻧﻈﺮ اﻟﺸﻜﻞ(.
اﻏﺴﻠﻪ ﺗﺤﺖ ﻣﺠﺮى ﻣﺎء، هﺬه ﻋﻤﻠﻴﺔ
2. ﻓﻚ اﻟﻐﻄﺎء وذﻟﻚ ﺑﺘﺪوﻳﺮه ﺑﻌﻜﺲ
اﺗﺠﺎه دوران ﻋﻘﺎرب اﻟﺴﺎﻋﺔ)اﻧﻈﺮ
اﻟﺸﻜﻞ( ﻣﻦ اﻟﻄﺒﻴﻌﻲ ﺧﺮوج ﻗﻠﻴﻼ ﻣﻦ
اﻟﻤﺎء ﻋﻨﺪ ﻓﺘﺢ اﻟﻐﻄﺎء.
اﻟﺘﻨﻈﻴﻒ ﻳﺠﺐ ﻋﻤﻠﻬﺎ ﺑﺎﺳﺘﻤﺮار
ﺗﻨﻈﻴﻒ ﻏﺴﺎﻟﺔ ﻧﺸﺎﻓﺔ اﻟﻤﻼ ﺑﺲ
اﻟﻤﻨﻄﻘﺔ اﻟﺨﺎرﺟﻴﺔ واﻟﻤﻨﺎﻃﻖ اﻟﻤﺼﻨﻮﻋﺔ ﻣﻦ اﻟﻜﻮﺷﻚ ﻳﻤﻜﻦ ﺗﻨﻈﻴﻔﻬﺎ ﺑﻮاﺳﻄﺔ ﻗﻄﻌﺔ
ﻗﻤﺎش ﻣﺒﻠﻮﻟﺔ ﺑﻤﺎء ﻓﺎﺗﺮ وﺻﺎﺑﻮن، ﻻ ﺗﺴﺘﺨﺪﻣﻮا ﻣﻮاد ﻣﺤﻠﻠﺔ أو ﺧﺎدﺷﺔ.
ﺗﻨﻈﻴﻒ ﺣﻮض ﻣﺴﺎﺣﻴﻖ اﻟﻐﺴﻴﻞ
اﻟﺤﻔﺎظ ﻋﻠﻰ ﺑﺎب اﻟﻐﺴﺎﻟﺔ اﻟﻨﺸﺎﻓﺔ و ﺣﻮض ﻏﺴﻴﻞ اﻟﻐﺴﺎﻟﺔ اﻟﻨﺸﺎﻓﺔ
3. ﻧﻈﻔﻮا داﺧﻞ اﻟﺤﺠﺮة ﺟﻴﺪأ
4. رآﺐ اﻟﻐﻄﺎء ﻣﻦ ﺟﺪﻳﺪ
5. رآﺐ اﻟﻐﻄﺎء اﻟﺨﺎرﺟﻲ ﻟﻠﺠﻬﺎز وﺗﺄآﺪ ﻗﺒﻞ ﺿﻐﻄﺔ ﺑﺎﺗﺠﺎه اﻟﺠﻬﺎز ﻣﻦ دﺧﻮل
اﻷ ﻟﺴﻨﺔ ﻓﻲ اﻟﻔﺘﺤﺔ اﻟﺨﺎﺻﺔ ﺑﻬﻢ.
اﺗـﺮك داﺋـﻤـﺎ ﺑـﺎب اﻟـﻐـﺴـﺎﻟـﺔ اﻟـﻨـﺸـﺎﻓـﺔ ﻧـﺼـﻒ ﻣـﻔـﺘـﻮح وذﻟـﻚ ﻟـﺘـﺠـﻨـﺐ ﺗـﻜـﻮن رواﺋـﺢ آـﺮﻳـﻬـﺔ
داﺧﻞ ﺣﻮض ﻏﺴﻴﻞ اﻟﻐﺴﺎﻟﺔ اﻟﻨﺸﺎﻓﺔ.
اﻓﺤﺺ ﺧﺮﻃﻮم ﺗﻐﺬﻳﺔ اﻟﺠﻬﺎز ﺑﺎﻟﻤﺎء
اﻓﺤﺺ اﻟﺨﺮﻃﻮم اﻟﺬي ﻳﻐﺬي اﻟﺠﻬﺎز ﺑﺎﻟﻤﺎء ﻣﺮة ﻓﻲ اﻟﺴﻨﺔ ﻋﻠﻰ اﻷ ﻗﻞ، اذا آﺎن ﻇﺎهﺮا
ﻋﻠﻴﺔ ﺷﻘﻮق او أﻣﺎآﻦ ﺗﺎﻟﻔﺔ ﻳﺠﺐ اﻟﻘﻴﺎم ﺑﻌﻤﻠﻴﺔ ﺗﺒﺪﻳﻠﻪ، ﺧﻼ ل ﻋﻤﻠﻴﺔ اﻟﻐﺴﻴﻞ ﺿﻐﻂ اﻟﻤﺎء
اﻟﻌﺎﻟﻲ ﻣﻦ اﻟﻤﻤﻜﻦ أن ﻳﺴﻄﺢ هﺬا اﻟﺨﺮﻃﻮم.
! ﻻ ﺗﺴﺘﺨﺪﻣﻮا أﺑﺪا ﺧﺮاﻃﻴﻢ ﻣﺴﺘﻌﻤﻠﺔ .
62
Page 27
ﻣﺸﺎآﻞ وﺣﻠﻮﻟﻬﺎ
ﻣﻦ اﻟﻤﻤﻜﻦ أن ﻏﺴﺎﻟﺔ اﻟﻤﻼ ﺑﺲ ﻻ ﺗﺸﺘﻐﻞ، ﻗﺒﻞ اﻻ ﺗﺼﺎل ﺑﻘﺴﻢ اﻟﺼﻴﺎﻧﺔ اﻟﻔﻨﻴﺔ )اﻧﻈﺮ ﺻﻔﺤﺔ 82( ﺗﺄآﺪ ﻣﻦ أﻧﻬﺎ ﻟﻴﺴﺖ ﻣﺸﻜﻠﺔ ﺳﻬﻠﺔ اﻟﺤﻞ، ﻟﻨﺴﺘﻌﻴﻦ ﺑﻬﺬه اﻟﻠﻼ ﺋﺤﺔ.
ﻲﺑﺮﻋ
اﻷ ﺳﺒﺎب اﻟﻤﻤﻜﻨﺔ/ﺣﻠﻮل
ﻗﺎﺑﺲ اﻟﺘﻴﺎر اﻟﻜﻬﺮﺑﺎﺋﻲ )اﻟﺬآﺮ( ﻟﻴﺲ ﻣﻮﺿﻮع ﻓﻲ ﻣﻨﺒﻊ اﻟﺘﻴﺎر اﻟﻜﻬﺮﺑﺎﺋﻲ، أو ﻟﻴﺲ ﻣﺪﺧﻞ ﺑﺎﻟﻜﻤﻴﺔ اﻟﻜﺎﻓﻴﺔ ﺣﺘﻰ ﻳﺘﻢ اﻟﺘﻮﺻﻴﻞ.
ﻓﻲ اﻟﺒﻴﺖ ﻻ ﻳﻮﺟﺪ ﺗﻴﺎر آﻬﺮﺑﺎﺋﻲ
ﺑﺎب اﻟﻐﺴﺎﻟﺔ اﻟﻨﺸﺎﻓﺔ ﻏﻴﺮ ﻣﻐﻠﻖ ﺑﺸﻜﻞ آﺎﻣﻞ
اﻟﺰر ﻟﻴﺲ ﻣﻀﻐﻮط
اﻟﺰر TESER/TRATS ﻏﻴﺮ ﻣﻀﻐﻮط
ﻣﺤﺒﺲ اﻟﻤﺎء ﻏﻴﺮ ﻣﻔﺘﻮح
ﺧﺮﻃﻮم ﺗﻐﺬﻳﺔ اﻟﺠﻬﺎز ﺑﺎﻟﻤﺎء ﻏﻴﺮ ﻣﺮﺑﻮط ﺑﻤﺤﺒﺲ اﻟﻤﺎء
ﺧﺮﻃﻮم اﻟﻤﺎء ﻣﻄﻮي
ﻣﺤﺒﺲ اﻟﻤﺎء ﻏﻴﺮ ﻣﻔﺘﻮح
ﻓﻲ اﻟﺒﻴﺖ ﻻ ﻳﻮﺟﺪ ﻣﺎء
ﺿﻐﻂ ﺷﺒﻜﺔ اﻟﻤﺎء ﻏﻴﺮ آﺎﻓﻲ
اﻟﺰر TESER/TRATS ﻏﻴﺮ ﻣﻀﻐﻮط
ﺧﺮﻃﻮم ﺗﻔﺮﻳﻎ اﻟﻐﺴﺎﻟﺔ اﻟﻨﺸﺎﻓﺔ ﻣﻦ اﻟﻤﺎء ﻏﻴﺮ ﻣﻮﺿﻮع ﻋﻠﻰ ارﺗﻔﺎع ﻣﺎ ﺑﻴﻦ 56 و 001 ﺳﻨﺘﻤﺘﺮ ﻋﻦ ﺳﻄﺢ اﻷ رض )اﻧﻈﺮ ﺻﻔﺤﺔ 71(
ﺣﺮف ﺧﺮﻃﻮم اﺧﺮاج اﻟﻤﺎء ﻣﻦ اﻟﻐﺴﺎﻟﺔ اﻟﻨﺸﺎﻓﺔ ﻣﻐﻤﻮر ﻓﻲ اﻟﻤﺎء )اﻧﻈﺮ ﺻﻔﺤﺔ 71(
ﻣﺼﺮف اﻟﻤﺎء اﻟﻤﻮﺟﻮد ﻓﻲ اﻟﺤﺎﺋﻂ ﻻ ﻳﻮﺟﺪ ﻟﻪ ﻣﻨﻔﺲ ﻟﻬﻮاء
اذا ﺑ
ـﻌـ
ﺪ آـﻞ هـﺬه اﻟـﻔـﺤـﻮﺻـﺎت اﻟـﻤـﺸـﻜـﻠـﺔ ﻟـﻢ ﺗـﺤـﻞ، اﻏـﻠـﻖ ﻣـﺤـﺒـﺲ اﻟـﻤـﺎء، اﻃـﻔـﻰء اﻟـﺠـﻬـﺎز، واﺳـﺘـﺪﻋـﻲ ﻗـﺴـﻢ اﻟـﺼـﻴـﺎﻧـﺔ اﻟـﻔـﻨـﻴـﺔ، اذا آـﺎﻧـﺖ اﻟـﺸـﻘـﺔ ﻣـﻮﺟـﻮدة ﻓـﻲ اﺧـﺮ
ﻃﻮاﺑﻖ اﻟﺒﻨﺎء ﻣﻦ اﻟﻤﻤﻜﻦ ﺣﺪوث ﻇﺎهﺮة ﺷﻔﻂ ﻟﻠﻤﺎء اﻟﻤﻮﺟﻮد داﺧﻞ اﻟﻐﺴﺎﻟﺔ اﻟﻨﺸﺎﻓﺔ ﻋﻦ ﻃﺮﻳﻖ اﻟﻤﺼﺮف اﻟﻤﻮﺟﻮد ﻓﻲ اﻟﺤﺎﺋﻂ، وﻟﻬﺬا اﻟﻐﺴﺎﻟﺔ اﻟﻨﺸﺎﻓﺔ
ﺗﺄﺧﺬ اﻟﻤﺎء واﻟﻤﺼﺮف ﻳﻔﺮﻏﻪ ﻣﻨﻬﺎ، ﻟﺤﻞ هﺬه اﻟﻤﺸﻜﻠﺔ ﻣﻮﺟﻮد ﻓﻲ اﻷ ﺳﻮاق ﺻﻤﺎﻣﺎت ﺿﺪ ﺷﻔﻂ اﻟﻤﺼﺮف.
ﺷﺬوذ ﻓﻲ ﻋﻤﻞ اﻟﺠﻬﺎز
اﻟﻐﺴﺎﻟﺔ اﻟﻨﺸﺎﻓﺔ ﻻ ﺗﺸﺘﻐﻞ
دورة اﻟﻐﺴﻴﻞ ﻻ ﺗﺒﺪأ
اﻟﻐﺴﺎﻟﺔ اﻟﻨﺸﺎﻓﺔ ﻻ ﺗﺄﺧﺬ ﻣﺎء
اﻟﻐﺴﺎﻟﺔ اﻟﻨﺸﺎﻓﺔ ﺗﺄﺧﺬ اﻟﻤﺎء وﺗﻔﺮﻏﻪ ﺑﺎﺳﺘﻤﺮار
اﻟﺒﺮﻧﺎﻣﺞ ﻻ ﻳﻘﻮم ﺑﻌﻤﻠﻴﺔ ﺗﻔﺮﻳﻎ اﻟﻤﺎء، ﻓﻲ ﺑﻌﺾ اﻟﺒﺮاﻣﺞ ﻳﺠﺐ ﺗﺸﻐﻴﻞ اﻟﺘﻔﺮﻳﻎ وﻋﻤﻠﻴﺔ اﻟﻌﺼﺮ ﻳﺪوﻳﺎ.)اﻧﻈﺮ اﻟﻰ ﺻﻔﺤﺔ 22(
ﻣﻮﺿﻊ اﻟﻮﻇﻴﻔﺔ اﻻ ﺿﺎﻓﻴﺔ اﻟﻜﻲ اﻟﻘﻠﻴﻞ: ﻟﺘﻜﻤﻠﺔ اﻟﺒﺮﻧﺎﻣﺞ اﺿﻐﻂ ﻋﻠﻰ اﻟﺰر TESER/TRATS )اﻧﻈﺮ ﺻﻔﺤﺔ 32(
ﺧﺮﻃﻮم ﺗﻔﺮﻳﻎ اﻟﻤﺎء ﻣﻦ اﻟﻐﺴﺎﻟﺔ اﻟﻨﺸﺎﻓﺔ ﻣﻄﻮي )اﻧﻈﺮ ﺻﻔﺤﺔ 71(
ﻣﺎﺳﻮرة ﻣﺼﺮف اﻟﻤﺎء ﻣﺴﺪودة.
ﺣﻮض اﻟﻐﺴﻴﻞ ﻟﻢ ﻳﺘﻢ ﺗﺤﺮﻳﺮه ﻋﻨﺪ ﻋﻤﻠﻴﺔ ﺗﺮآﻴﺐ اﻟﺠﻬﺎز)اﻧﻈﺮ اﻟﻰ ﺻﻔﺤﺔ رﻗﻢ 61(
ﻏﺴﺎﻟﺔ اﻟﻨﺸﺎﻓﺔ اﻟﻤﻼ ﺑﺲ ﻟﻴﺴﺖ ﻣﻮﺿﻮﻋﺔ ﻓﻲ ﻣﻜﺎن ﻣﺴﺘﻮي )اﻧﻈﺮ اﻟﻰ ﺻﻔﺤﺔ رﻗﻢ 61(
اﻟﻐﺴﺎﻟﺔ اﻟﻨﺸﺎﻓﺔ ﻣﺤﺸﻮرة ﺑﻴﻦ اﻷ ﺛﺎث واﻟﺤﺎﺋﻂ )اﻧﻈﺮ اﻟﻰ ﺻﻔﺤﺔ رﻗﻢ 61(
ﺧﺮﻃﻮم ﺗﻐﺬﻳﺔ اﻟﻐﺴﺎﻟﺔ اﻟﻨﺸﺎﻓﺔ ﺑﺎﻟﻤﺎء ﻟﻴﺲ ﻣﺸﺪود ﺑﺎﻟﺸﻜﻞ اﻟﻜﺎﻓﻲ )اﻧﻈﺮ اﻟﻰ ﺻﻔﺤﺔ رﻗﻢ 61(
ﺣﻮض ﻣﺴﺎﺣﻴﻖ اﻟﻐﺴﻴﻞ ﻣﺴﺪود ﻣﻦ ﺑﻘﺎﻳﺎ ﻣﺴﺎﺣﻴﻖ اﻟﻐﺴﻴﻞ )ﻟﻠﻘﻴﺎم ﺑﻌﻤﻠﻴﺔ ﺗﻨﻈﻴﻔﻪ اﻧﻈﺮ ﺻﻔﺤﺔ 62(
ﺧﺮﻃﻮم ﺗﻔﺮﻳﻎ اﻟﻤﺎء ﻣﻦ اﻟﻐﺴﺎﻟﺔ اﻟﻨﺸﺎﻓﺔ ﻟﻴﺲ ﻣﺜﺒﺖ ﺟﻴﺪأ )اﻧﻈﺮ اﻟﻰ ﺻﻔﺤﺔ رﻗﻢ 71(
اﺳﺘﺪﻋﻮا ﻗﺴﻢ اﻟﺼﻴﺎﻧﺔ اﻟﻔﻨﻴﺔ ﻷ ﻧﻪ ﻳﺸﻴﺮ اﻟﻰ وﺟﻮد ﻋﻄﺐ ﻓﻲ اﻟﺠﻬﺎز
ﻣـﺴـﺤـﻮق اﻟـﻐـﺴـﻴـﻞ ﻏـﻴـﺮ ﺧـﺎص ﻟـﻐـﺴـﻴـﻞ ﺑـﻐـﺴـﺎﻟـﺔ آـﻬـﺮﺑـﺎﺋـﻴـﺔ )ﻳـﺠـﺐ أن ﻳـﻜـﻮن ﻣـﻜـﺘـﻮب ﻋـﻠـﻴـﺔ ﺧـﺎص ﺑـﻐـﺴـﺎﻟـﺔ آـﻬـﺮﺑـﺎﺋـﻴـﺔ أو ﻋـﻠـﻰ اﻟـﻴـﺪ وﻓـﻲ ﻏـﺴـﺎﻟـﺔ أو اي ﺷـﻲ
ﻳﺸﻴﺮ اﻟﻰ اﻣﻜﺎﻧﻴﺔ اﺳﺘﺨﺪاﻣﻪ ﻟﻠﻐﺴﺎﻟﺔ(
اﻟﻜﻤﻴﺔ اﻟﻤﺴﺘﺨﺪﻣﺔ آﺒﻴﺮة
ﻗﺎﺑﺲ اﻟﺘﻴﺎر اﻟﻜﻬﺮﺑﺎﺋﻲ )اﻟﺬآﺮ( ﻟﻴﺲ ﻣﻮﺿﻮع ﻓﻲ ﻣﻨﺒﻊ اﻟﺘﻴﺎر اﻟﻜﻬﺮﺑﺎﺋﻲ، أو ﻟﻴﺲ ﻣﺪﺧﻞ ﺑﺎﻟﻜﻤﻴﺔ اﻟﻜﺎﻓﻴﺔ ﺣﺘﻰ ﻳﺘﻢ اﻟﺘﻮﺻﻴﻞ.
ﻓﻲ اﻟﺒﻴﺖ ﻻ ﻳﻮﺟﺪ ﺗﻴﺎر آﻬﺮﺑﺎﺋﻲ
ﺑﺎب اﻟﻐﺴﺎﻟﺔ اﻟﻨﺸﺎﻓﺔ ﻏﻴﺮ ﻣﻐﻠﻖ ﺑﺸﻜﻞ آﺎﻣﻞ
ﻣﻘﺒﺾ اﻟﺘﻨﺸﻴﻒ ﻣﻮﺿﻮع ﻓﻲ اﻟﻮﺿﻊ 0
اﻟﻐﺴﺎﻟﺔ اﻟﻨﺸﺎﻓﺔ ﻻ ﺗﻔﺮغ اﻟﻤﺎء وﻻ ﺗﻘﻮم ﺑﻌﻤﻠﻴﺔ اﻟﻌﺼﺮ اﻟﺪوراﻧﻴﺔ
ﻏﺴﺎﻟﺔ اﻟﻨﺸﺎﻓﺔ اﻟﻤﻼ ﺑﺲ ﺗﻬﺘﺰ آﺜﻴﺮا ﺧﻼ ل ﻋﻤﻠﻴﺔ اﻟﻌﺼﺮ اﻟﺪوراﻧﻴﺔ
اﻟﻐﺴﺎﻟﺔ اﻟﻨﺸﺎﻓﺔ ﺗﻔﻘﺪ ﻣﺎء
ﻣﺼﺒﺎح اﻟﺘﺸﻐﻴﻞ/ﺑﺎب ﻣﻘﻔﻞ ﻳﻀﻲء وﻳﻨﻄﻔﻲء ﺑﺴﺮﻋﺔ ﺑﺸﻜﻞ ﻣﺘﺮدد
ﻣﻊ ﻋﻠﻰ اﻻ ﻗﻞ ﻣﺼﺒﺎح اﺧﺮ
ﻳﺘﻜﻮن آﻤﻴﺔ آﺒﻴﺮة ﻣﻦ اﻟﺮﻏﻮة
اﻟﻐﺴﻠﺔ اﻟﻨﺸﺎﻓﺔ ﻻ ﺗﻨﺸﻒ
72
Page 28
اﻟﺼﻴﺎﻧﺔ اﻟﻔﻨﻴﺔ
ﻲﺑﺮﻋ
ﻗﺒﻞ اﺳﺘﺪﻋﺎء اﻟﺼﻴﺎﻧﺔ اﻟﻔﻨﻴﺔ:
ﺗﺄآﺪ ﻣﻦ اﻟﺨﺮاب أو اﻟﻌﻄﺐ ﻳﻤﻜﻦ ﺣﻞ هﺬة اﻟﻤﺸﻜﻠﺔ ﻟﻮﺣﺪآﻢ )اﻧﻈﺮ ﺻﻔﺤﺔ رﻗﻢ 72(
أﻋﺪ ﺗﺸﻐﻴﻞ اﻟﻐﺴﺎﻟﺔ ﻟﺘﺄآﺪ ﻣﻦ اﻟﻌﻄﺐ ﺗﻢ ﺣﻠﻪ واﻟﻐﺴﺎﻟﺔ اﺷﺘﻐﻠﺖ ﺑﺎﻟﺸﻜﻞ اﻟﺼﺤﻴﺢ.
ﻓﻲ ﺣﺎﻟﺔ اﻟﻌﻜﺲ، اﺳﺘﺪﻋﻮا ﻗﺴﻢ اﻟﺼﻴﺎﻧﺔ اﻟﻔﻨﻴﺔ اﻟﻤﺨﻮﻟﺔ ﻣﻦ ﻗﺒﻞ اﻟﺸﺮآﺔ اﻟﺼﺎﻧﻌﺔ .
! ﻻ ﺗﺴﺘﻌﻴﻨﻮا أﺑﺪا ﺑﻔﻨﻴﻴﻦ ﻏﻴﺮ ﻣﺨﻮﻟﻴﻦ ﻣﻦ ﻗﺒﻞ اﻟﺸﺮآﺔ اﻟﺼﺎﻧﻌﺔ ﺑﺎﻟﻘﻴﺎم ﺑﻌﻤﻠﻴﺔ اﻟﺼﻴﺎﻧﺔ.
أﻋﻄﻮا اﻟﻤﻌﻠﻮﻣﺎت اﻟﺘﺎﻟﻴﺔ:
ﻧﻮع اﻟﺨﺮاب
ﻣﺪﻳﻞ اﻟﺠﻬﺎز )doM(
رﻗﻢ اﻟﺘﺴﻠﺴﻠﻲ ﻟﻠﺠﻬﺎز )N/S(
هﺬه اﻟﻤﻌﻠﻮﻣﺎت ﺗﻜﻮن ﻣﻮﺟﻮدة ﻋﻠﻰ ﻟﻮﺣﺔ اﻟﻤﻮاﺻﻔﺎت اﻟﻔﻨﻴﺔ اﻟﻤﻠﺼﻘﺔ ﻋﻠﻰ اﻟﻤﻨﻄﻘﺔ اﻟﺨﻠﻔﻴﺔ ﻣﻦ ﻏﺴﺎﻟﺔ اﻟﻨﺸﺎﻓﺔ اﻟﻤﻼ ﺑﺲ.
82
Page 29

'
Page 30

!!!
Page 31

Page 32

195042968.02
04/2005 - Xerox Business Services
 Loading...