


 Loading...
HP Media Center PC
Getting Started Guide
The only warranties for Hewlett-Packard products and services are set forth in the express statements accompanying such products and services. Nothing herein should be construed as constituting an additional warranty. HP shall not be liable for technical or editorial errors or omissions contained herein.
HP assumes no responsibility for the use or reliability of its software on equipment that is not furnished by HP.
This document contains proprietary information that is protected by copyright. No part of this document may be photocopied, reproduced, or translated to another language without the prior written consent of HP.
Hewlett-Packard Company
P.O. Box 4010
Cupertino, CA 95015–4010
USA
Copyright © 2000–2006 Hewlett-Packard Development Company, L.P.
May be licensed in the United States by one or both of U.S. Patents Nos. 4,930,158 and 4,930,160 until August 28, 2008.
Microsoft and Windows are U.S. registered trademarks of Microsoft Corporation.
HP supports lawful use of technology and does not endorse or encourage the use of our products for purposes other than those permitted by copyright law.
The information in this document is subject to change without notice.
Table of Contents
Before Getting Started.................................. |
1 |
PC Setup Tips....................................................................... |
1 |
Choosing a PC setup location ................................................ |
1 |
Choosing a display .............................................................. |
1 |
Using additional video cables ................................................ |
1 |
Using additional sound cables ............................................... |
1 |
Using a video game console.................................................. |
1 |
Important Safety Information About Your HP Media |
|
Center PC ....................................................................... |
2 |
Finding Guides on Your PC and on the Web ........................... |
2 |
Onscreen guides .................................................................. |
2 |
Online guides ...................................................................... |
2 |
Using the PC with Safety and Comfort..................................... |
3 |
Using PC Help & Tools .......................................................... |
3 |
Connecting to the Internet...................................................... |
3 |
Connecting to the Internet requirements ................................... |
3 |
Configuring and Registering Norton Internet Security |
|
Software ......................................................................... |
4 |
Signing Up for Software Updates ........................................... |
5 |
Updates from HP .................................................................. |
5 |
Automatic Updates ............................................................... |
5 |
Getting messages ................................................................. |
6 |
Turning off messages ............................................................ |
6 |
Setting Up Accounts on Your New PC..................................... |
7 |
Creating user accounts.......................................................... |
7 |
Creating passwords.............................................................. |
8 |
Installing Software and Hardware Devices............................... |
8 |
Transferring Files and Settings from Your Old PC to |
|
Your New PC .................................................................. |
9 |
HP Products Work Better Together .......................................... |
9 |
Protecting the PC .................................................................. |
9 |
Installing Software .............................................................. |
10 |
Getting Help ...................................................................... |
10 |
Setting Up the PC ....................................... |
11 |
HP Media Center PC Front Connectors.................................. |
11 |
HP Media Center PC Rear Connectors .................................. |
12 |
Connecting a Digital Video Camera to the PC ....................... |
15 |
Connecting to Other Devices ............................................... |
16 |
Connecting the Television Signal ................. |
17 |
Using TV Cables ................................................................. |
17 |
Audio and Video Cables ..................................................... |
17 |
Connecting the TV Signal Source .......................................... |
19 |
Connecting a dual tuner ...................................................... |
20 |
Connecting the Remote Sensor ............................................. |
21 |
Connecting the TV Signal Source When You Have an |
|
Existing Setup ................................................................ |
22 |
Wall to VCR to TV using coaxial cable .................................. |
22 |
Wall to cable TV set-top box or satellite box to VCR to TV |
|
using coaxial cable ........................................................ |
23 |
Wall to cable TV set-top box or satellite box to VCR and TV |
|
using S-video cable or composite video cable between |
|
the box and the VCR or TV .............................................. |
24 |
Using the TV as a Monitor ................................................... |
26 |
Cables for connecting the PC to a TV .................................... |
26 |
Viewing the PC Image on Your TV Screen.............................. |
26 |
Adjusting the Screen Resolution ............................................ |
26 |
Connecting the PC to a TV ................................................... |
27 |
Using the Media Center Setup Wizard for Optional Setup |
|
of Your TV Display ......................................................... |
28 |
Changing the Display for a GeForce Graphics Card............... |
29 |
Changing the Display for an ATI Graphics Card..................... |
29 |
Changing the Display for an ATI Catalyst Control Center |
|
Graphics Card............................................................... |
30 |
Viewing the PC image on the TV .......................................... |
30 |
Viewing the PC image on the TV using the GeForce graphics |
|
card ............................................................................. |
31 |
Viewing the PC image on the TV using the ATI graphics |
|
card ............................................................................. |
31 |
Enabling and disabling the TV option using the GeForce |
|
graphics card ................................................................ |
32 |
Enabling and disabling the TV option using the ATI Displays |
|
graphics card ................................................................ |
32 |
Enabling and disabling the TV option with ATI Catalyst |
|
Control Center ............................................................... |
33 |
Disconnecting the TV........................................................... |
33 |
Changing Your Display Using Windows XP ........................... |
34 |
Table of Contents iii
Configuring Speaker and Sound Options.... |
35 |
Sound Connector Types....................................................... |
35 |
Speaker Configurations ....................................................... |
37 |
Speaker types .................................................................... |
38 |
Connecting 2/2.1 (2 Speakers and a Subwoofer) |
|
Audio Speakers ............................................................. |
39 |
Connecting 4.1 (4 Speakers and a Subwoofer) |
|
Audio Speakers ............................................................. |
40 |
Connecting 5.1 (5 Speakers and a Subwoofer) |
|
Audio Speakers ............................................................. |
41 |
Connecting 7.1 (7 Speakers and a Subwoofer) |
|
Audio Speakers ............................................................. |
42 |
Connecting the PC to a Home Audio System .......................... |
43 |
Y adapter cables ................................................................ |
44 |
2.1 home stereo installation ................................................. |
44 |
5.1 home audio installation ................................................. |
45 |
5.1 home audio installation procedure .................................. |
46 |
Connecting Digital Audio .................................................... |
47 |
Configuring Audio Output ................................................... |
48 |
Configuring Audio Output with Multi-channel |
|
Sound Manager............................................................. |
48 |
Enabling digital audio output with Multi-channel |
|
Sound Manager (optional) .............................................. |
49 |
Configuring Audio Output with Sound Effect Manager ............ |
50 |
The Sound Effect Manager control screens ............................. |
50 |
Using the Audio Wizard in the Sound Effect Manager |
|
(type 6 connectors)......................................................... |
51 |
Retasking front-panel connectors ........................................... |
52 |
Disabling digital audio output with Sound Effect Manager |
|
(optional) ...................................................................... |
52 |
Configuring Audio Output with a Sound Card........................ |
53 |
Enabling digital audio output with a sound card |
|
(optional) ...................................................................... |
53 |
Disabling digital audio output with Sound Effect |
|
Manager (optional) ........................................................ |
54 |
Configuring Audio Output with Realtek HD Sound Effect |
|
Manager....................................................................... |
54 |
The Realtek HD Sound Effect Manager control screens ............ |
55 |
Configuring the Realtek HD Sound Effect Manager ................. |
55 |
Configuring sound for recording with the Realtek HD |
|
Sound Effect Manager .................................................... |
56 |
Retasking front panel audio connectors.................................. |
56 |
Configuring Multi-streaming Audio ....................................... |
56 |
Audio output overview........................................................ |
57 |
Audio input overview ......................................................... |
57 |
When to use multi-streaming audio....................................... |
57 |
Setting up multi-streaming audio .......................................... |
58 |
Configuring Audio for Media Center .................................... |
59 |
Configuring Audio for InterVideo WinDVD Player .................. |
60 |
Using Headphones............................................................. |
60 |
Using a 2.1 speaker system with headphones ....................... |
60 |
Using a 5.1 to 7.1 speaker system with headphones.............. |
61 |
Selecting recording devices................................................. |
61 |
Resolving Sound Issues ....................................................... |
61 |
Using the Creative Sound Blaster X-Fi Sound Card ................. |
62 |
Connecting the speakers ..................................................... |
62 |
Configuring the sound card software .................................... |
63 |
Configuring the FlexiJack connector ..................................... |
63 |
Recording with the sound card ............................................ |
64 |
Sound Blaster X-Fi configuration modes................................. |
64 |
Using the Sound Blaster X-Fi documentation........................... |
65 |
Using the PC Hardware............................... |
67 |
Using the Keyboard ........................................................... |
67 |
Special Keyboard Buttons ................................................... |
67 |
Access buttons ................................................................... |
67 |
Media control or playback buttons ....................................... |
68 |
Customizing the keyboard buttons........................................ |
68 |
Using the Remote Control.................................................... |
69 |
Remote sensor is not receiving a signal from the remote |
|
control ......................................................................... |
70 |
Memory Card Reader......................................................... |
70 |
Formatting a memory card .................................................. |
71 |
Using the memory card reader ............................................ |
71 |
Understanding the activity light ............................................ |
71 |
Memory Insertion Guide ..................................................... |
72 |
Troubleshooting the memory card reader .............................. |
74 |
Safely Remove Hardware Utility........................................... |
74 |
Using Your Storage or Docking Bay ..................................... |
75 |
Storing CDs, DVDs, or memory cards ................................... |
75 |
Installing an HP camera docking station................................ |
75 |
Connecting the Wireless LAN .............................................. |
78 |
Index.......................................................... |
79 |
iv HP Media Center PC Getting Started Guide

Before Getting Started
This guide can help you get started using your new HP Media Center PC. You may want to browse some of the other documentation that came with your HP Media Center PC.
1 Read the “Safety Information” section in the
Warranty and Support Guide that came with your PC.
2 Identify the items included with your HP Media Center PC.
3 Follow the setup information that came with your PC to connect your display.
4 Read this guide for information about using your HP Media Center PC.
 w
w
A warning describes information you need to avoid possible personal injury
or damage to equipment or data.
Read and follow all warnings.
PC Setup Tips
Choosing a PC setup location
If you intend to connect your PC to your TV, a set-top box, or a surround sound system, HP recommends that you choose a clear working area with easy access to the connectors of these devices. If your TV is wall-mounted, make sure that you have access to the rear ports on the TV before attempting to connect it to the PC.
Choosing a display
HP recommends using a PC monitor to initially set up the PC because it may be difficult to view text and images on a TV due to the higher resolution of Microsoft® Windows® XP. Some high resolutions may not be supported by some older or LCD displays. Also, high resolutions may result in a blank display if your display does not support it.
Using additional video cables
If you plan to connect your TV to the PC, you may need additional cables that are not included with your PC. HP Media Center PC models have different video output options, depending on your PC model. The options are: S-video, composite video, VGA, and DVI. For best video quality use DVI, then VGA, then S-video, followed by composite video. Check the documentation that came with your PC and TV to determine which cables you need. HP does not recommend video cable lengths over 1.5 meters (4.9 feet).
Using additional sound cables
If you plan to connect the PC audio to an amplifier or a TV, you may need additional sound cables that are not included with your PC. Your PC is able to output sound in several modes. Your PC has 3.5 mm female stereo headphone jacks for most outputs. Many amplifiers have RCA inputs. You need one 3.5 mm male-to-RCA stereo cable for stereo sound. You need three 3.5 mm male-to-RCA cables for surround sound. Check the documentation that came with your audio equipment for the best input method.
Using a video game console
If you are using a video game console device, HP recommends that you connect it directly to your display device using video signal switching hardware (not included) or connect it to a separate TV, rather than connecting it directly to the PC.
n
A note describes important information.
Before Getting Started 1

 w
w
Please read the “Safety Information” section in the
Warranty and Support Guide that came with your PC before installing and connecting your PC to the electrical power system.
Important Safety Information About Your HP Media Center PC
This product has not been evaluated for connection to an “IT” power system (an AC distribution system with no direct connection to the earth, according to IEC 60950).
Finding Guides on Your PC and on the Web
Onscreen guides
Onscreen guides are available in the User’s Guides folder on your PC (select models only).
Click Start on the taskbar, choose All Programs, User’s Guides, and then click an item to view.
Online guides
You can find guides and information for your PC using the Internet to access the Support Web site. Online manuals are associated with specific PC model numbers. Some models do not have online manuals.
1 Go to http://www.hp.com/support in your Web browser.
2 Select your country/region and language.
3 From the Support and Drivers page, click See support and troubleshooting information, enter the model number of your PC, and then click Search.
4 Click Manuals.
5 Locate the manual you want and do one of the following:
■Click the title to display the file in Adobe Acrobat Reader (you can download it from the Manuals page if it is not currently installed on your PC).
■Right-click the title, select Save Target As, specify a location on your PC where you want to save the file, rename the file (retaining the .pdf extension), and then click Save.
2 HP Media Center PC Getting Started Guide

Using the PC with Safety and Comfort
Before you begin using the PC, arrange the PC and your work area to maintain your comfort and productivity. Refer to the Safety & Comfort Guide for important ergonomic information:
■Click Start, choose All Programs, choose
User’s Guides, and then click Safety & Comfort Guide.
Or
■Type http://www.hp.com/ergo into your Web browser address box, and then press Enter on the keyboard.
Using PC Help & Tools
HP provides special utility programs in the PC Help & Tools folder that provide support information and initiate Application or System
Recovery. To find these programs, click Start, choose All Programs, PC Help & Tools, and then select a program or folder to view.
Connecting to the Internet
As part of the startup screens, you can select an Internet service provider (ISP). Before you can connect to the Internet, you must sign up with an ISP. You must have an Internet connection to use some of the Media Center features.
Easy Internet Sign-up helps you sign up for a new Internet account, set up an existing account, or configure Internet access using a LAN (local area network), cable modem, or DSL (digital subscriber line).
Connecting to the Internet requirements
■ |
A PC. |
■ |
Internet service with an ISP. |
■ |
A dial-up modem or a cable or DSL modem |
■ |
A Web browser. |
|
for high-speed broadband connections. |
|
|
|
Contact your ISP for any specific software and |
|
|
|
hardware you may need. |
|
|
 w
w
To reduce the risk of serious injury, read the Safety & Comfort Guide. It describes proper workstation setup, posture, and health and work habits for PC users. It also provides important electrical and mechanical safety information.
n
Easy Internet Sign-up or Internet Services provides a list of Internet service providers; however, you may choose another ISP or transfer an existing account to this PC. To transfer existing accounts, follow the instructions provided by the ISP.
n
A modem connector is included with select models only.
Before Getting Started 3

To set up and connect to the Internet:
1 Make sure the modem or other Internet access cable is connected.
2 Sign up with an ISP. If you already have an account with an ISP, skip this step and follow the instructions provided by the ISP. If Internet service was not set up during the initial setup of the PC, it can be set up now using the Easy Internet Sign-up or the Internet Services wizard (select models only).
3 Click Start on the taskbar, choose All Programs, Online Services, and then click Easy Internet Sign-up or Internet Services.
4 Follow the onscreen instructions to select an ISP and set up Internet service.
5 Connect to the Internet. You must connect through the ISP to connect to the Internet. Double-click the ISP-provided icon on the desktop.
6 Open your Web browser and browse the Web. You can use any Web browser; most PCs have Internet Explorer. Click Start, All Programs, and Internet Explorer.
Configuring and Registering Norton Internet Security Software
Norton Internet Security software is preinstalled on your PC and includes a complimentary 60-day subscription to protection updates. You can enable Symantec’s LiveUpdate™ to obtain protection updates automatically whenever you are online.
When you first set up the PC, the Norton Internet Security Information Wizard helps you to configure and register your copy of Norton Internet Security.
Be sure to set up Norton Internet Security before you start surfing the Internet. Just click the Norton Internet Security icon after you’ve established an Internet service account, and a wizard will guide you through the simple setup process.
1 Double click the Norton Internet Security icon in the system tray to launch the Configuration Wizard.
2 Click Next and follow the instructions to:
■Complete registration.
■Schedule post-installation tasks including running LiveUpdate™, scanning for viruses, and scheduling weekly scans of local hard drives.
3 On the Summary page, click Finish.
4 When registration and initial setup is finished, Norton Internet Security automatically begins the post-installation tasks you selected.
For information about using and updating the Norton Internet Security software, click Start, All Programs, Norton Internet Security, and then click Help and Support.
4 HP Media Center PC Getting Started Guide

Signing Up for Software Updates
Updates from HP
HP may send support information or special offers to your desktop (not available in all countries/regions). You must be connected to the Internet to receive these messages.
Messages arrive while you are connected to the Internet and display an alert or a notice on your desktop. You can view the messages as they arrive or read them later. Most Support updates delivered by Updates from HP messages are also available to you through the Support Web site under information for your PC model.
If you have turned off the Updates from HP feature, you will not receive these updates. To turn Updates from HP back on, click Start, choose
All Programs, PC Help & Tools, Updates from HP.
Automatic Updates
Microsoft continually updates the Windows operating system. It is recommended that you check for, download, and install these updates at least monthly. Take advantage of the Automatic Updates feature, a convenient way to keep the operating system up to date. When you are connected to the Internet, Windows Update automatically notifies you through a pop-up message or icon in the notification area when critical updates are available. When you see the Windows Update message, allow the updates to download to the system. If you update the system weekly, or at least monthly, the time required for download is minimal.
To configure Automatic Updates:
■Click Start, Control Panel, Other Control Panel Options, and then Automatic Updates.
In the Automatic Updates window, select the desired configuration:
■Automatic (recommended) — This is the default setting, and it allows you to specify a day and time to automatically download and install recommended updates.
■Download updates for me, but let me choose when to install them.
■Notify me but don’t automatically download or install them.
The Turn off Automatic Updates option makes the PC more vulnerable and is not recommended.
Before Getting Started 5

Getting messages
After you view or close a message, it will not automatically display again.
To read a previously received message, open Updates from HP:
1 Click Start on the taskbar.
2 Choose All Programs.
3 Choose PC Help & Tools.
4 Click Updates from HP. Updates from HP displays.
■If Updates from HP has been activated on your system, click View messages to view a list of previously received messages. To read a message, double-click the message title in the window. You can exit this window, and Updates from HP remains active.
■If Updates from HP has not been activated on your system, the screen contains an Activate button to activate the service. Click Activate to start the service and view a list of messages that may have been received previously.
Turning off messages
You cannot receive Updates from HP messages, including important information that may be critical to the operation of your PC, while the service is off.
To turn off the Updates from HP Service:
1 |
Click Start on the taskbar. |
4 |
Click Updates from HP. Updates from HP |
|
2 |
Choose All Programs. |
|
displays. |
|
5 |
Click Choose preferences and then |
|||
3 |
Choose PC Help & Tools. |
|||
|
Deactivate to deactivate the service. The |
service is turned off until you reactivate it.
6 HP Media Center PC Getting Started Guide
Setting Up Accounts on Your New PC
User accounts allow you to set the privileges for each user of your PC. For example, you can set the software programs that each user is allowed to access. Follow the simple steps in this section when setting up your PC to create user accounts.
Creating user accounts
The information below describes the different account types in Windows XP and explains how to change account types.
Creating multiple user accounts on the same PC has certain advantages as well as some drawbacks.
■Advantages to multiple user accounts:
■Ability to create individual user settings
■Ability to limit access to software for certain users
■Drawbacks to multiple user accounts:
■More memory (RAM) usage
Windows XP provides three types of user accounts:
■Administrative
Allowed to change account types for other users, change passwords, change systemwide settings, and install Windows XP-compatible software and drivers.
■Limited
■Multiple Temporary Internet Files folders to remove during disk cleanup
■More data to back up
■Longer time to complete virus scan
Not allowed to change other user settings, or passwords. Limited account may not be able to install or run some software.
Allowed to change the limited account picture, and create, edit, or delete the account password.
■ Guest
Not allowed to change other user settings or passwords.
Users who log on to the PC using the guest account do not have access to password-protected files, folders, and settings.
Before Getting Started 7

Creating passwords
Passwords help protect your PC and information from unauthorized access and help ensure that information on the PC stays private and secure. Use the following list as a basic guide when choosing your password:
■Choose a password that is easy for you to remember but difficult for others to guess.
■Choose a long password (minimum of 6 characters).
■Use a combination of uppercase and lowercase letters, numbers, and symbols.
■Don’t use personal information that others can easily figure out, such as your birthday, child’s name, or phone number.
■Don’t write down your password.
n
After you’ve completed registering, you may install any software programs that may have come on CDs or DVDs included in the PC box and are not preinstalled.
n
Only use licensed original software. Installing copied software may be illegal, may result in an unstable installation, or may infect your PC with a virus.
Installing Software and Hardware Devices
After you set up the PC, you may wish to install additional software programs or hardware devices. Keep in mind these important guidelines:
■Before installation, make a restore point using the Microsoft System Restore program.
■Click Start, All Programs, PC Help & Tools, and then System Restore.
■The restore point is a snapshot of your PC configuration. By using System Restore, you ensure that you have a point to return to before an issue occurred. For information about System Restore, refer to the Microsoft Web site at: http://www.microsoft.com/worldwide
■Choose software that is compatible with your PC — check the operating system, memory, and other requirements listed for the new software for compatibility with your PC.
■Install the new software according to the directions provided by the software manufacturer. Check the manufacturer’s documentation or customer service information for help if you need it.
■For antivirus software, uninstall the existing software program before reinstalling it or installing a new antivirus program.
8 HP Media Center PC Getting Started Guide

Transferring Files and Settings from Your Old PC to Your New PC
You can copy the old PC files to the new PC using media such as CD or DVD discs, Memory Sticks, or personal media drives. You can also copy certain settings such as Web browser Favorites and address books using Microsoft’s Files and Settings Transfer Wizard.
For more information click Start, All Programs, and then Help and Support.
Search for transfer wizard, and select the overview article, “Files and Settings Transfer Wizard overview.” This information describes a Microsoft solution for moving your files onto your new PC.
HP Products Work Better Together
HP computers include preloaded software for select HP All-In-One, camera, scanner, and printer peripheral products. Preloaded software simplifies and speeds product setup for HP peripherals.
Simply connect the HP peripheral product and turn it on, and your HP PC automatically configures it so it is ready to use.
Protecting the PC
HP provides a virus-scanning software program to help protect your PC (select models only).
The virus-scanning program manufacturer provides free virus scan updates through your Internet connection for an initial period after your PC purchase. You can purchase a subscription service for updates after the initial free period expires.
New types of viruses and spyware are invented all the time. Protect your PC by getting regular updates of your virus-scanning software from the program manufacturer.
If a software program or the operating system gets damaged, reinstall the software. See the PC Troubleshooting and Maintenance Guide that came with your PC for information about System Recovery, Application Recovery and System Restore. System Restore is a software that creates restore points, memory of the system file settings on the PC at a particular point in time.
When your PC has software problems, it is possible that a voltage spike, power outage, or brownout has occurred. Symptoms of voltage spikes include a flickering video display, unexpected PC startups, and the PC not responding to your commands. A voltage spike can occasionally corrupt or destroy files, so it is a good idea to consistently make backup copies of your data files. Prevent voltage spikes by installing a surge suppressor made for use with PCs between the power outlet and the PC power cord.
Before Getting Started 9

n
After you’ve completed registering, you may install any software programs that may have come on CDs or DVDs included in the PC box and are not preinstalled.
Installing Software
After you turn on the PC the first time and restart it, you can install any software programs that came on CDs or DVDs included in the PC box and are not preinstalled (select models only).
You may wish to install additional software programs or hardware devices on your PC. Restart the PC after each installation.
Choose software that is compatible with your PC; check the operating system, memory, and other requirements listed for the new software for compatibility with your PC.
Install the new software according to the directions provided by the software manufacturer. Check the manufacturer’s documentation or customer service information for help if you need it.
Getting Help
If you need more information about using or troubleshooting Media Center, refer to the Media Center online Help or Help and Support in the Start menu.
For help on general and miscellaneous problems you may be experiencing with the PC, refer to:
■The other troubleshooting documentation that came with your PC.
■The pages in this section.
■The topics in Help and Support. Press the Help button on your keyboard, or click Start on the taskbar and select Help and Support.
10 HP Media Center PC Getting Started Guide
Setting Up the PC
Follow the steps in the setup poster to set up the PC, |
Most of the hardware devices such as the monitor, |
and then read the topics in this section to find out |
keyboard, printer, and mouse can be connected at |
more about the location of components and |
the back of the PC. Some peripheral devices, such |
connectors on your PC, and to find out about some |
as a digital video camera, can be plugged into the |
setup alternatives. |
connectors on the back or the front of the PC. |
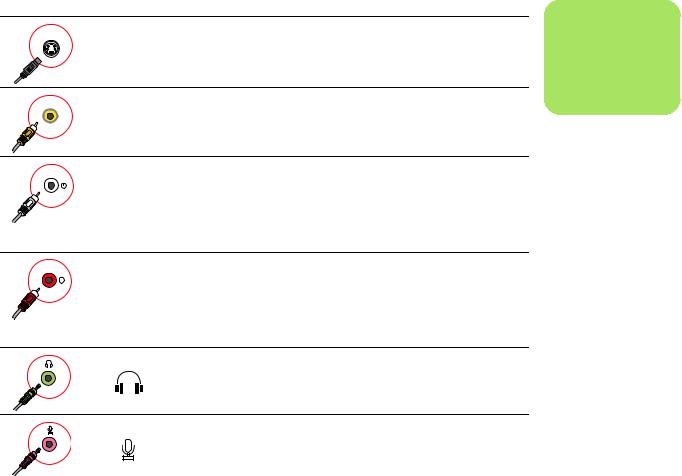
HP Media Center PC Front Connectors
Connector |
Icon/label |
Description and function |
S-video |
S-Video 2 |
Secondary S-video connector to connect your VCR, video camera, |
|
|
or other analog source to the PC. |
|
Composite |
Secondary Composite video connector (yellow) to connect to a |
|
Video 2 |
VCR, video camera, or other analog source to the PC. |
Video |
|
|
|
A/V In |
Secondary Left audio input connector (white). |
|
Audio 2 |
NOTE: This Audio In connector is connected to the TV tuner. You |
|
L |
|
|
|
must use the Audio In connector, which is connected to the |
|
|
motherboard and located on the back of the PC, to record audio |
|
|
only. (Select models only.) |
|
A/V In |
Secondary Right audio input connector (red). |
|
Audio 2 |
NOTE: This Audio In connector is connected to the TV tuner. You |
|
R |
|
|
|
must use the Audio In connector, which is connected to the |
|
|
motherboard and located on the back of the PC, to record audio |
|
|
only. (Select models only.) |
|
|
Headphones Out connector (green) to connect to headphones. |
Microphone In connector (pink) to connect to a microphone.
n
Location, availability, and number of connectors may vary.
Setting Up the PC 11

Connector |
Icon/label |
Description and function (Continued) |
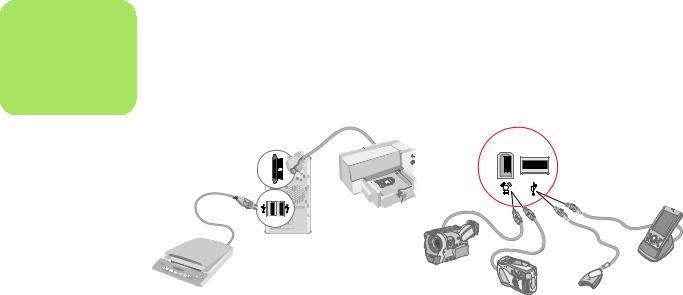
Universal Serial Bus (USB) 2.0 connector to connect to a mouse, keyboard, digital camera, or another device with a USB connector.
FireWire® (IEEE 1394) connector to connect video cameras and other devices with very fast transfer rates.
NOTE: You must use a 6-pin FireWire (IEEE 1394) transfer cable with this 6-pin connector.
HP Media Center PC Rear Connectors
Connector |
Icon/label |
Description and function |
Power connector
Mouse connector to connect a mouse.
Keyboard connector to connect a keyboard.
Printer (parallel) connector to connect a parallel printer.
(Select models only)
Universal Serial Bus (USB) 2.0 connector to connect a mouse, keyboard, digital camera, or another device with a USB connector.
FireWire (IEEE 1394) connector to connect video cameras and other devices with very fast transfer rates.
NOTE: You must use a 6-pin FireWire (IEEE 1394) transfer cable with this 6-pin connector.
12 HP Media Center PC Getting Started Guide
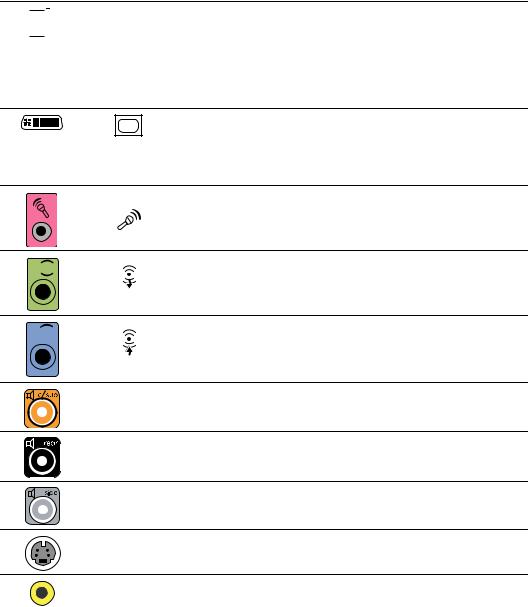
Connector
ETHERNET


Icon/label |
Description and function (Continued) |
ETHERNET Ethernet LAN connector is a network interface adapter (also called a network interface card, or NIC) which connects to an Ethernet (10BaseT) or Fast Ethernet (100BaseT) network hub. Connect this adapter in your PC to your local area network (LAN) hub or any broadband connection.
The green LED indicates a valid connection.
Digital video output connector to connect a TV or monitor.
(select models only)
See the documentation that came with your display device.
Microphone In (Mic) (pink) to connect to a microphone. The Mic connector also functions as a center/subwoofer Line Out when a multichannel audio configuration is activated.

 OUT
OUT
Audio Line Out (green) to connect front speakers.
OUT
 IN
IN
|
Audio Line In (blue) connector to connect to an analog audio device |
|
|
such as a CD player for input into PC. The Audio Line In connector |
|
IN |
also functions as rear Line Out when a multichannel audio |
|
configuration is activated. |
||
|
||
Center |
Line C/Sub (gold) connector to connect Center/Subwoofer |
|
|
speakers in a multichannel audio configuration. |
|
Rear |
Line Rear (black) connector to connect rear speakers in a |
|
|
multichannel audio configuration. |
|
Side |
Line Side (gray) connector to connect side speakers in an eight- |
|
|
speaker system (7.1). |
|
S-Video |
S-video In connector to connect from a set-top box output connector. |
|
Composite |
Composite Video In connector (yellow) to connect to a TV |
|
Video |
set-top box. |
Setting Up the PC 13
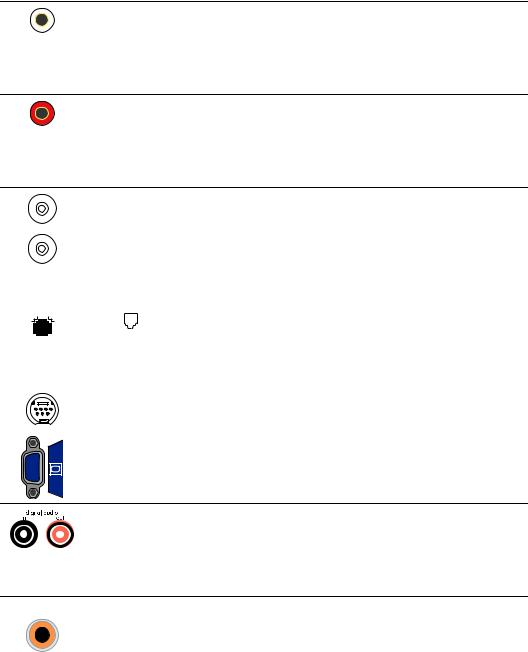
Connector |
Icon/label |
Description and function (Continued) |
A/V In
Audio 1
L
Primary left audio input from set-top box connector (white).
NOTE: Audio can be recorded by using this Audio In connector, which is connected to the motherboard. Some PC models include this primary left audio input connector on the front of the PC.
(Select models only.)
A/V In
Audio 1
R
Primary right audio input from set-top box connector (red).
NOTE: Audio can be recorded by using this Audio In connector which is connected to the motherboard. Some PC models include this primary right audio input connector on the front of the PC.
(Select models only.)
|
|
|
|
|
|
|
TV/Cable |
TV In (TV antenna or cable input from wall outlet with no |
|
|
|
|
|
|
|
Ant |
set-top box). |
|
|
|
|
|
|
|
|
|
|
|
|
|
|
|
|
FM Ant |
FM In (radio antenna input) connects to the FM antenna cable. |
|
|
|
|
|
|
|
|
Plug the FM radio antenna cable into the FM In port on the back of |
|
|
|
|
|
|
|
|
the PC on the TV tuner card. You may want to extend the ends of the |
|
|
|
|
|
|
|
|
cable to improve your FM radio signal reception. |
|
|
|
|
|
|
|
|
|
|
|
|
|
|
|
|
LINE |
Modem (Line In RJ-11) (select models only). |
|
|
|
|
|
|
|
||
|
|
|
|
|
|
|
||
|
|
|
|
|
|
|
Plug the modem cable (provided in the PC box) into the computer |
|
|
|
|
|
|
|
|
|
|
|
|
|
|
|
|
|
|
modem connector on the back of the PC. Plug the other end to your |
|
|
|
|
|
|
|
|
telephone line wall jack connector. |
|
|
|
|
|
|
|
|
|
|
|
|
|
|
|
|
Analog |
Analog Video Out: S-video or composite video (select models only) |
|
|
|
|
|
|
|
Video |
connects to a TV. |
|
|
|
|
|
|
|
|
|
|
|
|
|
|
|
|
VGA |
Monitor/VGA (blue) display output connector connects to a VGA |
|
|
|
|
|
|
|
|
monitor. |
Digital Audio
In and Out
Digital audio input (white) connects to a digital audio device with digital input (such as a home audio receiver/amplifier) or digital speakers (select models only).
Digital audio output (red) connects to a digital audio device with digital output (select models only).
DIGITAL
AUDIO OUT
Digital Audio |
Digital Out (orange) connects to a digital audio device with digital |
Out |
input (such as a home audio receiver/amplifier) or digital speakers |
|
(select models only). |
14 HP Media Center PC Getting Started Guide
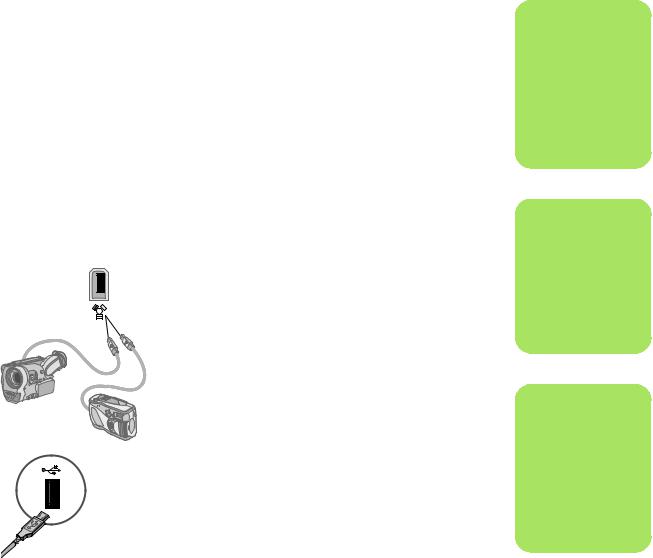
Connecting a Digital Video Camera to the PC
The following instructions only apply to digital cameras.
See the documentation that came with your digital camera or your digital video camera.
To connect a digital camera or a digital video camera:
1 Turn on the PC, and wait for Windows XP to start.
2 Connect the 6-pin video camera transfer cable into the camera and then into an open port on the front or back of the PC. Most digital video cameras use either the FireWire (IEEE 1394) or the USB port.
3 A Found New Hardware message appears. Wait 2 or 3 minutes for Windows to make the necessary settings for the new device. When installation is complete, a message appears telling you the camera is ready to use.
If the PC does not recognize your digital camera or your digital video camera:
1 Click Start on the taskbar, and then click
Control Panel.
2 Click Performance and Maintenance, if available, and then double-click the
System icon.
3 Click the Hardware tab, and then click the
Device Manager button.
4 Click the plus sign (+) next to imaging devices. If the name of the camera appears under imaging devices the device is ready. If the name is not there, try the following:
■Click Action, and then Scan for hardware changes. Look in Device Manager for a new addition under imaging devices.
■Unplug the video camera’s transfer cable from the PC, and plug it into a different port. Look in Device Manager for a new addition under imaging devices.
.
n
When connecting an analog video camera to the PC, use the Video and Audio In connectors on the front or back of
the PC.
n
If a Digital Video Device Auto Play window appears when you connect your camera, click
Cancel.
n
You must use a 6-pin (not a 4-pin) FireWire (IEEE 1394) cable with the 6-pin FireWire (IEEE 1394) connector on your HP Media Center PC.
Setting Up the PC 15
n
Some peripheral devices are not included with the PC.
Connecting to Other Devices
Other peripheral devices can be connected to the front or back of your HP Media Center PC by using USB or FireWire (IEEE 1394) ports. You can connect peripheral devices such as a printer, scanner, video camera, digital camera, memory card reader, and PDA (personal digital assistant) or handheld computer to the PC. See the documentation that came with your device.
16 HP Media Center PC Getting Started Guide
Connecting the Television Signal
Using TV Cables
Your HP Media Center PC includes video and audio cables to connect the television signals.
Use video and audio cables to connect to following:
■Video out from the HP Media Center PC to the TV
■TV signal source video in to the HP Media Center PC
■Audio out from the HP Media Center PC to the TV
■TV signal source audio in to the HP Media Center PC
n
Location and number of connectors may vary by model.
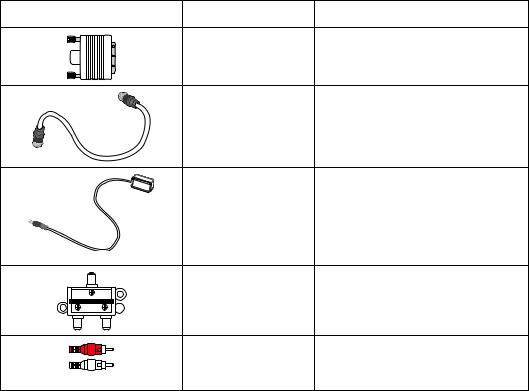
Audio and Video Cables
The following table shows cable types that may be required to connect your HP Media Center PC to your television system.
Cable |
Name |
Description |
|
Composite video |
RCA yellow end. Plug cable into an |
|
cable |
RCA connector such as Composite |
|
|
Video Out or TV Source In. |
|
|
|
|
|
|
S-video cable |
Y/C, 4-pin. Plug cable into an S-video |
|
|
|
|
|
|
(Delivers a sharper |
connector such as S-video Video Out |
|
|
|
|
|
|
image than composite |
or TV Source In. |
|
|
|
|
|
|
video by providing |
|
|
|
|
|
|
|
separate color and |
|
|
|
|
|
|
|
black-and-white |
|
|
|
|
|
|
|
image signals.) |
|
|
|
|
|
|
|
|
|
|
|
|
|
|
|
Analog video cable/ |
Used with analog video output |
|
|
|
|
|
|
||
|
|
|
|
|
|
adapter |
connector. Provides S-video and |
|
|
|
|
|
|
||
|
|
|
|
|
|
(select models only) |
composite video output. |
n
The number and type of cables required
to connect your PC may vary by model. Some cables are included for select models only.
Connecting the Television Signal 17
Cable |
Name |
Description (Continued) |
|
DVI-I or DVI-D cable |
Digital Video Out. Plug cable into a |
|
|
DVI-I or DVI-D input of an HDTV- |
|
|
capable TV or monitor. |
|
TV coaxial cable |
Plug cable into a TV signal source |
|
|
input connector from cable set-top |
|
|
boxes or antennas. |
|
Remote IR cable |
Remote IR cable. Used to control TV |
|
(Infrared transmitter) |
signal source from set-top box. |
|
NOTE: PC includes 1 |
|
|
with single TV tuner or |
|
|
2 with dual-tuner |
|
|
option. |
|
|
Splitter |
Used to connect one signal source to |
|
2 Way Splitter |
two RF inputs on your PC. |
|
|
|
|
RCA stereo |
RCA red and white ends. Used for TV |
|
|
signal source Audio In and Audio Out |
|
|
connectors to TV. |
You may need to purchase extra cables separately. Your HP Media Center PC box may not include all the cables you need for your PC setup and may vary by model.
For example, you may want to use an S-video cable to connect the TV Out on the PC to your TV, if your TV has an S-video input connector.
18 HP Media Center PC Getting Started Guide

Connecting the TV Signal Source
Connect the signal source for the TV by using the TV In coaxial connector or the composite/S-video In connector.
Plug the connector of a coaxial cable from your TV cable into the TV/Cable Ant connector on the back of the PC, and then turn the connector to tighten it.
Or
Plug a cable into the S-video or composite video In connector on the back of the PC; use an S-video cable (not provided) or the composite video cable. Plug the other end of the cable into your set-top box or other device that is providing the signal source for the TV.
You must also plug audio cables (not provided) from your set-top box into the Audio In right (red) connector and the Audio In left (white) connector on the back of the PC, if you are using a set-top box with S-video or composite video output.
Refer to “HP Media Center PC Front Connectors” on page 11.
You must also connect the Remote Emitter cable if you are using a set-top box. See “Connecting the Remote Sensor” on page 21.
n
Location and number of connectors may vary by model.
Connecting the Television Signal 19

n
The Television Program Guide is not available in all countries/regions.
Connecting a dual tuner
(Select models only)
The HP Media Center PC records television and allows you to control the television channels. The HP Media Center PC supports two tuner configurations:
TV Tuner |
Description |
Requirements |
|
|
|
Single-tuner |
Watch or record one program |
■ If you are using a TV antenna or standard cable |
TV source |
only in NTSC or PAL. |
connector, the signal is routed to a single tuner. |
|
|
|
Dual-tuner |
You can watch a show on one |
■ If you are using a TV antenna or standard cable |
TV source |
channel while Media Center |
connector, the signal is routed to both tuners |
|
records another show on a |
internally. |
|
different channel. You can |
■ You must connect a second set of inputs if you |
|
also record two different |
|
|
programs at the same time. |
are using a cable or satellite set-top box. |
|
|
Otherwise, connect a second set-top box to the |
|
|
second set of back-panel connectors. |
|
|
■ TV sources must be of the same type: Either |
|
|
cable TV, digital cable TV, satellite TV, or |
|
|
antenna. |
|
|
■ The TV sources must also have the same, |
|
|
identical channel lineup; for example, if you are |
|
|
using two satellite TV sources they must provide |
|
|
the exact same channels. |
|
|
■ All TV viewing and scheduling is provided |
|
|
through the Television (Electronic) Program |
|
|
Guide in Media Center, so both TV sources must |
|
|
have identical Television Program Guides. |
|
|
|
20 HP Media Center PC Getting Started Guide

Connecting the Remote Sensor
The remote sensor is a small device that connects to the PC and allows the remote control to work with the Media Center program.
1 If you have a cable TV set-top box, a satellite set-top box, or other set-top box that controls your TV signal, connect the remote control sensor cable (emitter) (A) into connector (1) on the back of the remote sensor; otherwise skip to step 3. Connector (2) can also be used if you have a second set-top box.
2 Remove the paper from the backing tape on the end of the cable (B), and then press the end of the cable over the remote infrared (IR) receiver window on your cable TV set-top box (C). You can locate the remote infrared receiver window by using a flashlight to shine through the plastic on the front of most devices.
P
2 1
3 Plug the remote control sensor cable into a USB connector (D) on the back of the PC.
4 Place the remote sensor so that you can easily point at it with the remote control. (An ideal spot would be on top of the monitor or desk.)
C
A
B
D
n
You can locate the remote infrared receiver window on your cable TV set-top box by using a flashlight to shine through the plastic on the front of most devices.
Connecting the Television Signal 21
Connecting the TV Signal Source When You Have an Existing Setup
This section describes how to connect the PC to an existing setup for your TV signal source.
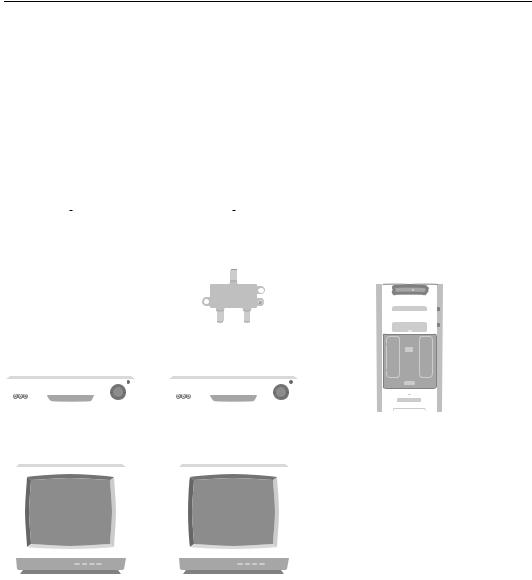
Wall to VCR to TV using coaxial cable
Remove the coaxial cable at the input to the VCR, and connect it to the input of a coaxial cable signal splitter (not included; available at electronics stores). Connect two coaxial cables to the splitter outputs. Connect one of these cables to the input of the VCR and the other one to the TV connector on the back of the PC.
|
|
|
Existing setup |
|
Add the PC with a splitter |
|
|
|
|
|
|
|
|
|
|
||||||||||||||||||
|
|
|
|
|
A |
|
|
|
|
|
|
A |
|
|
|
|
|
|
|
|
|
|
|
|
|
|
|||||||
|
|
|
|
|
|
|
|
|
|
|
|
|
|
|
|
|
|
|
|
|
|
|
|
|
|
|
|
|
|
|
|||
|
|
|
|
|
|
|
|
|
|
|
|
|
|
|
|
|
|
|
|
|
|
|
|
|
|
|
|
|
|
|
|
|
|
|
|
|
|
|
|
|
|
|
|
|
|
|
|
|
|
|
|
|
|
|
|
|
|
|
|
|
|
|
|
|
|
|
|
|
|
|
|
|
B |
|
|
|
|
|
|
|
|
|
B |
|
|
|
|
|
|
|
|
|
|
|
|
|
|
|
|
||
|
|
|
|
|
|
|
|
|
|
|
|
|
|
|
|
|
C |
|
|
|
|
|
|
|
|
|
|
|
|
|
|
||
|
|
|
|
|
|
C |
|
|
|
|
|
|
|
G |
H |
|
|
|
|
|
|
|
|
|
|
||||||||
|
|
|
|
|
|
|
|
|
|
|
|
|
|
|
|
|
|
|
|
|
|
|
|||||||||||
|
|
|
|
|
|
|
|
|
|
|
|
|
|
|
|
|
|
|
|
|
|
|
|
|
|
||||||||
|
|
|
|
|
|
|
|
|
|
|
|
|
|
|
|
|
|
|
|
|
|
|
|
|
|
||||||||
|
|
|
|
|
|
|
|
|
|
|
|
|
|
|
|
|
|
|
|
|
|
|
|
|
|
|
|
|
|
||||
|
|
|
|
|
|
|
|
|
|
|
|
|
H |
|
|
|
|
|
|
|
|
|
|
|
|
|
|
|
|||||
|
|
|
|
|
|
|
|
|
|
|
|
|
|
|
|
|
|
|
|
|
|
|
|
|
|
|
|
||||||
|
|
|
|
|
|
|
|
|
|
|
|
|
|
|
|
|
|
|
|
|
|
|
|||||||||||
|
|
|
|
|
|
|
|
|
|
|
|
|
|
|
|
|
|
|
|
|
|||||||||||||
|
|
|
|
|
|
|
|
|
|
|
|
|
|
C |
|
|
|
|
|
|
|
|
C |
|
|
|
|
|
|
|
|
|
|
|
|
|
|
|
D |
|
|
|
|
|
|
|
|
D |
|
|
|
|
|
|
|
|
|
J |
|
|
|
|
|
|
|
|
|
|
|
|
|
|
|
|
|
|
|
|
|
|
|
|
|
|
|
|
|
|
|
|
|
|
|
|
|
|
|
||||
|
|
|
|
|
|
|
|
|
|
|
|
|
|
|
|
|
|
|
|
|
|
|
|
|
|
|
|
|
|
||||
|
|
|
|
|
|
|
|
|
|
|
|
|
|
|
|
|
|
|
|
|
|
|
|
|
|
|
|
|
|
||||
|
|
|
|
|
|
|
|
|
|
|
|
|
|
|
|
|
|
|
|
|
|
|
|
|
|
|
|
|
|
|
|
||
|
|
|
|
|
|
|
|
|
|
|
|
|
|
|
|
|
|
|
|
|
|
|
|
|
|
|
|
|
|
|
|
|
|
|
|
|
|
|
|
|
|
|
|
|
|
|
|
|
|
|
|
|
|
|
|
|
|
|
|
|
|
|
|
|
|
|
|
|
|
|
|
|
E |
C |
|
|
|
|
|
|
E |
C |
|
|
|
|
|
|
|
|
|
|
|
|
|
|
|||||
|
|
|
|
|
|
|
|
|
|
|
|
|
|
A |
Wall |
||||||||||||||||||
|
|
|
|
|
|
|
|
|
|
|
|
|
|
|
|
||||||||||||||||||
|
|
|
|
|
F |
|
|
|
|
|
|
|
|
|
|
F |
|
|
|
|
|
|
B |
Cable outlet |
|||||||||
|
|
|
|
|
|
|
|
|
|
|
|
|
|
|
|
|
|
|
|
|
|
|
C |
Coaxial cable |
|||||||||
|
|
|
|
|
|
|
|
|
|
|
|
|
|
|
|
|
|
|
|
|
|
|
D |
VCR In |
|||||||||
|
|
|
|
|
|
|
|
|
|
|
|
|
|
|
|
|
|
|
|
|
|
|
E |
VCR Out |
|||||||||
|
|
|
|
|
|
|
|
|
|
|
|
|
|
|
|
|
|
|
|
|
|
|
F |
TV In |
|||||||||
|
|
|
|
|
|
|
|
|
|
|
|
|
|
|
|
|
|
|
|
|
|
|
G |
Splitter In |
|||||||||
|
|
|
|
|
|
|
|
|
|
|
|
|
|
|
|
|
|
|
|
|
|
||||||||||||
|
|
|
|
|
|
|
|
|
|
|
|
|
|
|
|
|
|
|
|
||||||||||||||
|
|
|
|
|
|
|
|
|
|
|
|
|
|
|
|
|
|
|
|
|
|
|
H |
Splitter Out |
|||||||||
|
|
|
|
|
|
|
|
|
|
|
|
|
|
|
|
|
|
|
|
|
|
|
J |
TV In on back of PC |
|||||||||
22 HP Media Center PC Getting Started Guide
Loading...