


HP Latex Drucker der 115, Latex 115 және 300, Latex 115 ve 300, Latex Drucker der 300 Introductory information [de]
HP Latex 115/300 Printers
EN |
HP Latex 115/300 Printers |
|
Introductory Information |
FR |
Imprimante HP Latex 115/300 |
|
Informations d'introduction |
IT |
Stampante HP Latex 115/300 |
|
Informazioni introduttive |
DE |
HP Latex 115/300 Drucker |
|
Einführende Informationen |
ES |
Impresora HP Latex 115/300 |
|
Información de introducción |
PT |
Impressora HP Latex 115/300 |
|
Informações iniciais |
RU |
Принтеры HP Latex 115/300 |
|
Введение |
UA |
Принтер HP Latex 115/300 |
|
Вступна інформація |
KKHP Latex 115/300 принтер Кіріспе ақпарат
CS Tiskáren HP Latex 115/300
Úvodní informace
EL εκτυπωτών HP Latex 115/300 Εισαγωγικές πληροφορίες
PL Drukarki z HP Latex 115/300
Informacje wstępne
SL Tiskalnikov HP Latex 115/300
Uvodne informacije
TR HP Latex 115/300
Yazıcı Tanıtıcı Bilgiler
NL HP Latex 115/300 printer Inleidende informatie
DA HP Latex 115/300-printer
Introduktionsoplysninger
JA HP Latex 115/300
ZHCN HP Latex 115/300
ZHTW HP Latex 115/300
KO HP Latex 115/300
TH HPLatex 115/300 |
ID HP Latex 115/300 Printer
Informasi Pendahuluan
AR HP Latex 115/300

English
iv |
ENWW |
HP Latex 115 and 300 Printer Series
Introductory Information
English
What is it?
Your printer is a color inkjet printer designed for printing high-quality images on flexible substrates. Some major features are:
■Sharpest print quality, smooth transitions, and fine details with its 6 colors and 1200 real dpi
■HP Latex 115 printer: 400 ml ink cartridges
■HP Latex 300 printer series: 775 ink cartridges
■Hundreds of ready-made substrate presets easily available, including outdoor applications
This introductory document includes legal notices, safety instructions, brief usage information, frontpanel error codes, power specifications, and declaration of conformity.
Where is the user guide?
The user guide to your printer can be downloaded from:
■http://www.hp.com/go/latex115/manuals
■http://www.hp.com/go/latex300/manuals Further information is available from:
■http://www.hp.com/go/latex115/support
■http://www.hp.com/go/latex300/support Videos about how to use the printer can be found in:
■http://www.hp.com/go/supportvideos
■http://www.youtube.com/HPSupportAdvanced
Join the community, find tools, and talk to experts. Visit the HP Latex Knowledge Center at:
■http://www.hp.com/go/communities/HPLatex
Legal notices
© Copyright 2017, 2018 HP Development Company, L.P.
The information contained herein is subject to change without notice. The only warranties for HP products and services are set forth in the express warranty statement accompanying such products and services. Nothing herein should be construed as constituting an additional warranty. HP shall not be liable for technical or editorial errors or omissions contained herein.
You can download the expressly provided HP Limited Warranty and Legal Information applicable to your product from http://www.hp.com/go/latex115/manuals or http://www.hp.com/go/latex300/manuals. For some countries/ regions a printed HP Limited Warranty is provided in the box. In countries/regions where the warranty is not provided in printed format, you may request a printed copy from http://www.hp.com/go/orderdocuments, or write to: HP, MS POD, 11311 Chinden Blvd, Boise, ID 83714, USA. Please include your product number, warranty period (found on your serial number label), name, and postal address.
ENERGY STAR® is a registered mark owned by the U.S. government.
ENWW |
Introductory Information |
1 |

English
Safety instructions
General safety guidelines
There are no operator-serviceable parts inside the printer except those covered by HP’s Customer Self Repair program (see http://www.hp.com/go/selfrepair). Refer servicing of other parts to qualified service personnel.
Turn off the printer and call your service representative in any of the following cases:
●The power cord or plug is damaged.
●The curing enclosures are damaged.
●The printer has been damaged by an impact.
●There is any mechanical or enclosure damage.
●Liquid has entered the printer.
●There is smoke or an unusual smell coming from the printer.
●The printer has been dropped or the curing module has been damaged.
●The printer is not operating normally.
Turn off the printer in either of the following cases:
●During a thunderstorm
●During a power failure
Take special care with zones marked with warning labels.
Electrical shock hazard
WARNING! The internal circuits of curing zones, vapor removal, print-zone heaters and built-in power supplies operate at hazardous voltages capable of causing death or serious personal injury.
The printer uses two power cords. Unplug both power cords before servicing the printer.
To avoid the risk of electric shock:
●The printer should be connected to earthed mains outlets only.
●Do not attempt to dismantle the curing modules.
●Do not remove or open any closed system covers or plugs.
●Do not insert objects through slots in the printer.
Heat hazard
The curing subsystems of the printer operate at high temperatures and can cause burns if touched. To avoid personal injury, take the following precautions:
●Do not touch the internal enclosures of the printer’s curing zones.
●Let the printer cool down before accessing the internal curing zone and output platen in the event of a substrate jam.
●Let the printer cool down before performing some maintenance operations.
Fire hazard
The curing subsystems of the printer operate at high temperatures.
2 |
HP Latex 115 and 300 Printer Series |
ENWW |

To avoid the risk of fire, take the following precautions:
● |
The customer is responsible for meeting the printer’s requirements and the Electrical Code requirements |
|
||
|
|
|
according to the local jurisdiction of the country where the printer is installed. Use the power supply voltage |
English |
|
|
|
specified on the nameplate. |
|
● |
Connect the power cords to dedicated lines, each protected by a branch circuit breaker according to the |
|||
|
|
|
information in the site preparation guide. Do not use a power strip (relocatable power tap) to connect both |
|
|
|
|
power cords. |
|
● |
Use only the power cords supplied by HP with the printer. Do not use a damaged power cord. Do not use the |
|
||
|
|
|
power cords with other products. |
|
● |
Do not insert objects through slots in the printer. |
|
||
● |
Take care not to spill liquid on the printer. After cleaning, make sure all components are dry before using the |
|
||
|
|
|
printer again. |
|
● |
Do not use aerosol products that contain flammable gases inside or around the printer. Do not operate the |
|
||
|
|
|
printer in an explosive atmosphere. |
|
● |
Do not block or cover the openings in the printer body. |
|
||
● |
Do not attempt to dismantle or modify the curing modules. |
|
||
● |
Ensure that the operating temperature of the substrate, as recommended by its manufacturer, is not |
|
||
|
|
|
exceeded. If this information is not available, ask the manufacturer. Do not load substrates that cannot be |
|
|
|
|
used at an operating temperature above 125°C (257°F). |
|
● |
Do not load substrates with auto-ignition temperatures below 250°C (482°F). If this information is not |
|
||
|
|
|
available, printing must be supervised at all times. |
|
|
|
|
|
|
|
|
|
NOTE: Test method based on EN ISO 6942:2002: Evaluation of materials and material assemblies when |
|
|
|
|
|
|
|
|
|
|
|
|
|
|
exposed to a source of radiant heat, method B. The test conditions to determine the temperature when the |
|
|
|
|
substrate starts ignition (either flame or glow) were: Heat flux density: 30 kW/m², copper calorimeter, K-type |
|
|
|
|
thermocouple. |
|
Mechanical hazard
The printer has moving parts that could cause injury. To avoid personal injury, take the following precautions when working close to the printer:
●Keep your clothing and all parts of your body away from the printer’s moving parts.
●Avoid wearing necklaces, bracelets, and other hanging objects.
●If your hair is long, try to secure it so that it will not fall into the printer.
●Take care that sleeves or gloves do not get caught in the printer’s moving parts.
●Avoid standing close to the fans, which could cause injury and could also affect print quality (by obstructing the airflow).
●Do not touch gears or moving rolls during printing.
●Do not operate the printer with covers bypassed.
Chemical hazard
See the safety data sheets available at http://www.hp.com/go/msds to identify the chemical ingredients of your Consumables. Sufficient ventilation needs to be provided to ensure that potential airborne exposure to these substances is adequately controlled. Consult your usual air conditioning or EHS specialist for advice on the appropriate measures for your location.
ENWW |
Safety instructions |
3 |

English
For more detailed information, see the “Ventilation” and “Air conditioning” sections included in the site preparation guide, available at:http://www.hp.com/go/latex15/manuals and http://www.hp.com/go/latex300/manuals.
Light radiation hazard
Light radiation is emitted from the illumination of the print zone. This illumination is in compliance with the requirements of the exempt group of IEC 62471:2006: Photobiological safety of lamps and lamp systems. However, you are recommended not to look directly at the LEDs while they are on. Do not modify the module.
Heavy substrate hazard
Special care must be taken to avoid personal injury when handling heavy substrates:
●Handling heavy substrate rolls may require more than one person. Care must be taken to avoid back strain and/or injury.
●Always use a forklift, pallet truck, or other handling equipment to lift substrates. The printer has been designed to be compatible with many of these devices.
●Always wear personal protective equipment including boots and gloves.
Ink handling and condensates
HP recommends that you wear gloves when handling ink system components and condensates.
Ventilation
Ensure that the room in which the system is installed meets local environmental, health, and safety (EHS) guidelines and regulations.
Adequate ventilation needs to be provided to ensure that potential exposure is adequately controlled. Consult the Safety Data Sheets available at http://www.hp.com/go/msds to identify chemical ingredients of your ink consumables.
Levels of certain substances in their facilities are dependent on workspace variables they control such as room size, ventilation performance and duration of equipment use. Consult your EHS specialist for advice on the appropriate measures for your location.
Air conditioning
In addition to fresh air ventilation, to avoid health hazards, also consider maintaining workplace ambient levels by assuring the climatic operating conditions specified in the “Environmental specifications” section of the Site Preparation Guide, to avoid operator's discomfort and equipment malfunction. Air conditioning in the work area should take into account that the equipment produces heat. Typically, the printer's power dissipation is:
●2.2 kW (7.5 kBTU/h) for HP Latex 115/315 Printers
●2.6 kW (8.9 kBTU/h) for HP Latex 335 Printer
●4.6 kW (15.7 kBTU/h) for HP Latex 365/375 Printers
Air conditioning should meet local environmental, health, and safety (EHS) guidelines and regulations.
 NOTE: The air conditioning units should not blow air onto the equipment.
Latex technology
Latex is an HP patented technology. Your printer’s inks use latex to improve quality and versatility. After printing, curing is required to fix the ink.
Speed, ink quantity, and curing temperature are correlated.
4 |
HP Latex 115 and 300 Printer Series |
ENWW |
Printing
In order to print, you must first configure your printer in your RIP software, then send jobs to your printer from the RIP. You can use the RIP provided with your printer if you do not already have one installed.
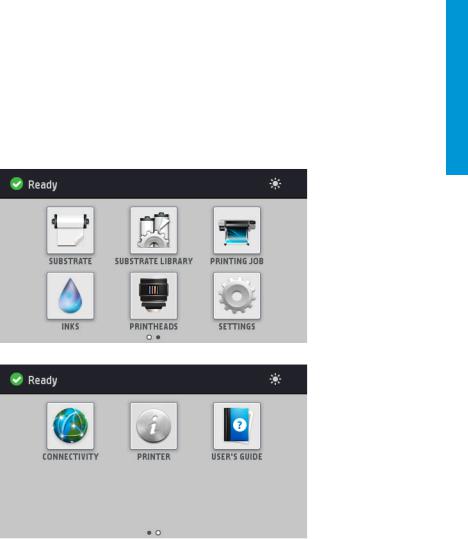
Front panel
The front panel is a touch-sensitive screen with a graphical user interface, located on the front right of the printer.
It gives you complete control of your printer: from the front panel, you can view information about the printer, change printer settings, perform calibrations and tests, and so on. The front panel also displays alerts (warning and error messages) when necessary.
There is an alternative home screen that you can see by sliding your finger across the screen to the left:
The front panel has a large central area to display dynamic information and icons. On the left and right sides you can see up to four fixed icons at different times. Normally they are not all displayed at the same time.
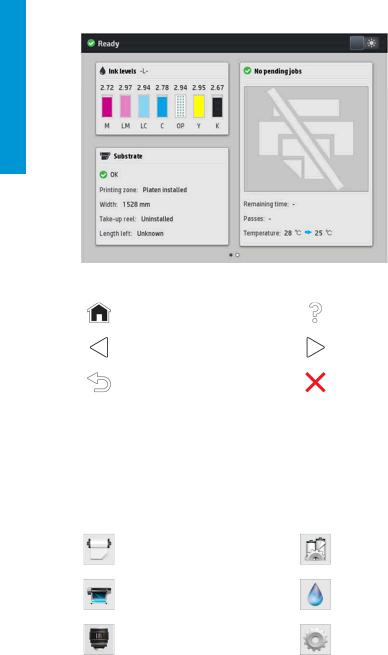
There is an alternative home screen you can see it by sliding your finger across the screen to the left. It summarizes the status of the ink cartridges, the substrate, and the current print job.
English
ENWW |
Printing |
5 |
English
Left and right fixed icons
|
Return to the home screen. |
|
View help about the current screen. |
|
|
|
|
|
Go back to the previous item. |
|
Go back to the next item. |
|
|
|
|
|
Go back to the previous screen without |
|
Cancel the current process. |
|
discarding changes. |
|
|
|
|
|
|
|
|
|
|
Home-screen dynamic icons
These items are displayed only on the home screen.
●At the top left of the screen is a message showing the printer status or the most important current alert. Tap this message to see a list of all current alerts, with an icon indicating the severity of each alert. You can tap an alert to get help in solving the problem.
● At the top right, tap  to turn on or off the print-zone illumination light.
|
View substrate status and perform |
|
Open the Substrate Library and access the |
|
substrate-handling operations. |
|
extensive online library of substrate presets. |
|
|
|
|
|
View information about the job that is |
|
View ink-cartridge status and perform |
|
currently printing. |
|
operations. |
|
|
|
|
|
View printhead status and perform |
|
View and change printer settings in general. |
|
operations. |
|
|
|
|
|
|
|
|
|
|
6 |
HP Latex 115 and 300 Printer Series |
ENWW |

|
View network and Internet status and change |
|
View information about the printer. |
|
related settings. |
|
|
|
|
|
|
|
|
|
|
|
Get help. |
|
|
|
|
|
|
Sleep mode
If the printer is left idle for some time, it goes into sleep mode and switches offthe front-panel display.
To change the time that elapses before sleep mode, tap , then Setup > Front panel options > Sleep mode wait time. You can set a time between 5 and 240 minutes; the default time is 30 minutes.
The printer wakes from sleep mode and switches on the front-panel display whenever there is some external interaction with it.
Problem solving
See the troubleshooting sections of the user guide.
Front-panel error codes
Under certain circumstances, a numeric error code appears on the front panel. Follow the advice in the Recommendation column to resolve the error. If the recommendation does not seem to solve the problem, call your service representative.
If an error code appears on the front panel that is not included in this list, turn off the printer and then turn it back on. If the problem persists, call your service representative.
Error code |
Recommendation |
|
|
|
|
03.21:01 |
PSU undervoltage detected. |
|
|
1. |
Turn off the printer and unplug both power cords. |
|
2. |
Check that the power cords are not visibly damaged. |
|
3. |
Ensure that the input voltage is within specifications (180–264 V AC). |
|
4. |
Plug in both power cords and make sure they are fully inserted. |
|
5. |
Turn on the printer. |
|
|
|
03.22:01 |
PSU overvoltage detected. |
|
|
1. |
Turn off the printer and unplug both power cords. |
|
2. |
Check that the power cords are not visibly damaged. |
|
3. |
Ensure that the input voltage is within specifications (180–264 V AC). |
|
4. |
Plug in both power cords and make sure they are fully inserted. |
|
5. |
Turn on the printer. |
|
|
|
English
ENWW |
Problem solving |
7 |

English
Error code |
Recommendation |
|
|
|
|
14.72:01 |
Zero voltage detected. |
|
|
1. |
Turn off the printer and unplug both power cords. |
|
2. |
Check that the power cords are not visibly damaged. |
|
3. |
Ensure that the input voltage is within specifications (180–264 V AC). |
|
4. |
Plug in both power cords and make sure they are fully inserted. |
|
5. |
Turn on the printer. |
|
|
|
14.73:01 |
Very low voltage detected. |
|
|
1. |
Turn off the printer and unplug both power cords. |
|
2. |
Check that the power cords are not visibly damaged. |
|
3. |
Ensure that the input voltage is within specifications (180–264 V AC). |
|
4. |
Plug in both power cords and make sure they are fully inserted. |
|
5. |
Turn on the printer. |
|
|
|
14.74:01 |
Low voltage detected. |
|
|
1. |
Turn off the printer and unplug both power cords. |
|
2. |
Check that the power cords are not visibly damaged. |
|
3. |
Ensure that the input voltage is within specifications (180–264 V AC). |
|
4. |
Plug in both power cords and make sure they are fully inserted. |
|
5. |
Turn on the printer. |
|
|
|
14.75:01 |
Excessive voltage detected. |
|
|
1. |
Turn off the printer and unplug both power cords. |
|
2. |
Check that the power cords are not visibly damaged. |
|
3. |
Ensure that the input voltage is within specifications (180–264 V AC). |
|
4. |
Plug in both power cords and make sure they are fully inserted. |
|
5. |
Turn on the printer. |
|
|
|
14.87:10 |
Curing power regulator overtemperature detected. |
|
|
1. |
Turn off the printer. |
|
2. |
Check that the ambient temperature is within printer specifications (15–35°C). |
|
3. |
Check that the electronic enclosures at the rear of the printer are properly |
|
|
ventilated. |
|
4. |
Turn on the printer. |
|
|
|
8 |
HP Latex 115 and 300 Printer Series |
ENWW |
Error code |
Recommendation |
|
|
|
|
16.01:00 |
The printer is unable to warm up within a preset time limit. |
|
|
1. |
Turn off the printer and unplug both power cords. |
|
2. |
Check that the power cords are not visibly damaged. |
|
3. |
Ensure that the input voltage is within specifications (180–264 V AC). |
|
4. |
If the voltage is low, decreasing the curing temperature may help. |
|
5. |
Plug in both power cords and make sure they are fully inserted. |
|
6. |
Check that the ambient temperature is within printer specifications (15–35°C). |
|
7. |
Check that the electronic enclosures at the rear of the printer are properly |
|
|
ventilated. |
|
8. |
Turn on the printer. |
|
|
|
16.02:00 |
The printer is unable to cool down within a preset time limit. |
|
|
1. |
Check that all fans are working and unblocked when printing. |
|
2. |
Turn off the printer. |
|
3. |
Check that the ambient temperature is within printer specifications (15–35°C). |
|
4. |
Check that the electronic enclosures at the rear of the printer are properly |
|
|
ventilated. |
|
5. |
Turn on the printer. |
|
|
|
16.03:00 |
Excessive heat in the printer. |
|
|
1. |
Check that the ambient temperature is within printer specifications (15–35°C). |
|
2. |
Reduce the curing temperature and/or increase the number of passes. |
|
3. |
Check that all fans are unblocked. |
|
|
|
16.04:00 |
Insufficient heat in the printer. Check that the ambient temperature is within printer |
|
|
specifications (15–35°C). |
|
|
|
|
16.11:10 |
Curing temperature sensor measurement out of range (temperature sensor 1 failed |
|
|
or not connected). |
|
|
1. |
Turn off the printer. |
|
2. |
Check that the ambient temperature is within printer specifications (15–35°C). |
|
3. |
Check that the electronic enclosures at the rear of the printer are properly |
|
|
ventilated. |
|
4. |
Turn on the printer. |
|
|
|
English
ENWW |
Front-panel error codes |
9 |

English
Error code |
Recommendation |
|
|
|
|
16.12:10 |
Curing temperature sensor measurement out of range (temperature sensor 2 failed |
|
|
or not connected). |
|
|
1. |
Turn off the printer. |
|
2. |
Check that the ambient temperature is within printer specifications (15–35°C). |
|
3. |
Check that the electronic enclosures at the rear of the printer are properly |
|
|
ventilated. |
|
4. |
Turn on the printer. |
|
|
|
16.13:10 |
Curing temperature sensor measurement out of range (temperature sensor 3 failed |
|
|
or not connected). |
|
|
1. |
Turn off the printer. |
|
2. |
Check that the ambient temperature is within printer specifications (15–35°C). |
|
3. |
Check that the electronic enclosures at the rear of the printer are properly |
|
|
ventilated. |
|
4. |
Turn on the printer. |
|
|
|
16.14:10 |
Curing temperature sensor measurement out of range (temperature sensor 4 failed |
|
|
or not connected). |
|
|
1. |
Turn off the printer. |
|
2. |
Check that the ambient temperature is within printer specifications (15–35°C). |
|
3. |
Check that the electronic enclosures at the rear of the printer are properly |
|
|
ventilated. |
|
4. |
Turn on the printer. |
|
|
|
16.84:03, 16.85:03 |
Air curtain resistor out of range. Check that the air curtain fans (at the front of the |
|
|
curing module) are working and unblocked. |
|
|
|
|
21:13 |
Unable to move the maintenance cartridge along its whole path. |
|
|
1. |
Turn off the printer. |
|
2. |
While the printer is off, remove the printhead maintenance cartridge manually. |
|
3. |
Make sure that the printhead maintenance cartridge path is clear. Remove any |
|
|
visible obstacles (paper, plastic parts, and so on) restricting the movement. |
|
4. |
Reinstall the printhead maintenance cartridge. |
|
5. |
Turn on the printer. |
|
6. |
If the error persists, replace the maintenance cartridge. |
|
|
|
10 HP Latex 115 and 300 Printer Series |
ENWW |

Error code |
Recommendation |
|
|
|
|
21.2:10 |
Maintenance cartridge error. |
|
|
1. |
Turn off the printer. |
|
2. |
Remove and reinsert the maintenance cartridge. |
|
3. |
Turn on the printer. |
|
4. |
If the error persists, replace the maintenance cartridge. |
|
|
|
21.5:03 |
The part that advances the printhead maintenance cartridge web wipe is blocked. |
|
|
1. |
Turn off the printer. |
|
2. |
Remove and reinsert the maintenance cartridge. |
|
3. |
Turn on the printer. |
|
4. |
If the error persists, replace the maintenance cartridge. |
|
|
|
25.n:10 (where n = the |
A possible error in the ink cartridge pressure sensor has been detected. The ink level |
|
ink cartridge number) |
reported may not be accurate. Call your service representative if feasible. |
|
|
|
|
27.1:00 |
Several blocked nozzles have been detected in the optimizer printhead. If print |
|
|
quality is not acceptable, clean or replace the printhead. |
|
|
|
|
27.n:01 (where n = the |
A large number of blocked nozzles have been detected in one or more printheads. |
|
printhead slot number) |
Calibration may have failed due to low printhead performance. Clean all the |
|
|
printheads and check their status. |
|
|
|
|
29:00 |
The maintenance cartridge (part number CZ681A) is almost full. It will need to be |
|
|
replaced soon. |
|
|
|
|
29:01 |
The maintenance cartridge is not inserted correctly. |
|
|
1. |
Open the maintenance cartridge door on the right of the printer. |
|
2. |
Make sure that the maintenance cartridge is correctly seated, then close the |
|
|
door. |
|
3. |
If the error persists, replace the maintenance cartridge. |
|
|
|
29.1:01 |
Unable to track the maintenance cartridge status. Check, visually, that the |
|
|
maintenance cartridge has a correct status pattern on it. |
|
|
|
|
29.2:00 |
Unable to advance the printhead cleaning roll. Replace the maintenance cartridge. |
|
|
|
|
32:01 |
The take-up reel is disconnected. If you want to use the take-up reel, turn off the |
|
|
printer and ensure that all take-up reel cables are connected (sensor cables, printer |
|
|
cable). If you do not want to use it, you may need to unload the substrate manually |
|
|
from the take-up reel. Remember to cut the substrate first. |
|
|
|
|
English
ENWW |
Front-panel error codes 11 |

English
Error code |
Recommendation |
|
|
|
|
32:01.1, 32:01.2 |
This error occurs when the tension bar stays in one of its sensor trigger positions for |
|
|
more than 8 seconds. The most likely causes of this error are as follows: |
|
|
● |
The winding-direction switch on the take-up reel motor is activated, but |
|
|
substrate has not been taped to the take-up reel yet. |
|
● |
The wrong take-up reel winding direction has been selected. |
|
● |
Something is blocking the movement of the tension bar. |
|
● |
The substrate is not following the correct path between the tension bar and |
|
|
the diverter. |
|
|
|
32:02 |
This error occurs during printer initialization, to warn you that the take-up reel has |
|
|
been disconnected while the printer was turned off. It also occurs if you try to enable |
|
|
the take-up reel, but it is not connected to the printer. Connect the take-up reel to |
|
|
the printer and tap OK to continue. |
|
|
|
|
41:03 |
Electrical current limit in paper motor. |
|
|
1. |
Turn off the printer. |
|
2. |
Open the window and check for any visible obstacles restricting the advance of |
|
|
the substrate. If there is a wrinkled mass of substrate inside the substrate |
|
|
path, lift the substrate pinch lever and clear the obstruction. Carefully remove |
|
|
as much as possible of the jammed substrate from the top of the printer. Cut |
|
|
the substrate if necessary. |
|
|
CAUTION: Try to avoid pulling the substrate out from the input path, because |
|
|
this reverses the normal direction of movement, and could damage printer |
|
|
parts. |
|
3. |
Turn on the printer. |
|
|
|
42:03 |
Scan-axis motor electrical current limit. |
|
|
1. |
Turn off the printer. |
|
2. |
Open the window and check for any visible obstacles restricting the advance of |
|
|
the substrate. If there is a wrinkled mass of substrate inside the substrate |
|
|
path, lift the substrate pinch lever and clear the obstruction. Carefully remove |
|
|
as much as possible of the jammed substrate from the top of the printer. Cut |
|
|
the substrate if necessary. |
|
3. |
Turn on the printer. |
|
|
|
63:04 |
An input/output problem has occurred in the network card. |
|
|
1. |
Make sure that the network cable is correctly connected to the network card. |
|
2. |
Check that your printer firmware is up to date. |
|
|
|
12 HP Latex 115 and 300 Printer Series |
ENWW |

Error code |
Recommendation |
|
|
|
|
63:05 |
The job is reaching the printer too slowly. The printer cancels the job if there are long |
|
|
pauses of more than 20 s. |
|
|
1. |
Make sure that a 1 Gigabit Ethernet card is correctly installed in the computer |
|
|
with the RIP. |
|
2. |
Check the RIP for any error messages. Check that the computer with the RIP is |
|
|
working correctly and has the minimum specification required by the RIP. |
|
|
Check that the hard disk is neither full nor excessively fragmented. |
|
3. |
Check whether the option RIP while printing is enabled. This option can cause |
|
|
slow printing if the computer is not sufficiently powerful. |
|
4. |
Try reducing the resolution of the job or increasing the number of passes. |
|
5. |
Check that all the components of your LAN are operating at Gigabit speed. |
|
|
|
68:03 |
There has been a loss of permanent data, such as configuration or accounting data. |
|
|
This can happen after a firmware update with a data structure not compatible with |
|
|
the older version. |
|
|
|
|
74:01 |
An error occurred when uploading the firmware update file. |
|
|
1. |
Turn off the printer by using the power key on the front panel and the power |
|
|
switch at the rear of the printer. Disconnect the power cord, then reconnect |
|
|
the power cord and turn on the printer. |
|
2. |
Try again to upload the firmware update file to the printer. |
|
|
|
78:08 |
Borderless printing is not possible. If you have an HP Latex 375/365 Printer, install |
|
|
the ink collector accessory. |
|
|
|
|
78.1:04 |
The printer has no substrate preset for this substrate. Follow the firmware update |
|
|
procedure to update the printer with the latest substrate presets. |
|
|
|
|
78.2:01 |
The back tension is lost. This could be due to a loose roll core or an imminent end of |
|
|
roll. If these are not the causes, try unloading and reloading the substrate. |
|
|
|
|
79:03, 79:04, 79.2:04 |
Generic firmware error. Update the printer’s firmware. |
|
|
|
|
81:01, 81.1:01, 81:03 |
It was impossible to stop the servo correctly before setting the encoder position. |
|
|
1. |
Turn off the printer. |
|
2. |
Open the window, observing all safety procedures, and check for any visible |
|
|
obstacles restricting the movement of the drive roller. If there is a wrinkled |
|
|
mass of substrate inside the substrate path, lift the pinchwheels (using the |
|
|
substrate lever) and clear the obstruction. |
|
3. |
Turn on the printer. |
|
|
|
English
ENWW |
Front-panel error codes 13 |

English
Error code |
Recommendation |
|
|
|
|
86:01, 86.2:01 |
There is a problem in the carriage assembly. |
|
|
1. |
Turn off the printer. |
|
2. |
Open the window, observing all safety procedures, and check for any visible |
|
|
obstacles restricting the movement of the carriage. If there is a wrinkled mass |
|
|
of substrate inside the substrate path, lift the pinchwheels (using the |
|
|
substrate lever) and clear the obstruction. |
|
3. |
Turn on the printer. |
|
|
|
87:01 |
The scan-axis encoder strip is detecting errors in the carriage position. Clean the |
|
|
encoder strip. |
|
|
|
|
89:11, 89.1:10, 89.2:10 |
The interior-light PCA may be failing or disconnected. The printer will continue |
|
|
operating normally, with only this functionality affected. |
|
|
|
|
94:01 |
Color cannot be calibrated on this substrate. White substrate measurement is out of |
|
|
range. |
|
|
|
|
94:02 |
Inconsistent colors found. |
|
|
1. |
Check that the substrate-type selection in the front panel corrresponds to an |
|
|
actual substrate loaded. |
|
2. |
Retry calibration. |
|
|
|
94:08 |
Color calibration failed. Try again. See more details about the color calibration |
|
|
functionality in the user guide. |
|
|
|
|
98:03 |
One or more printheads are malfunctioning. Use the printhead status plot to find out |
|
|
which printheads are malfunctioning, and replace them. |
|
|
|
|
Power specifications
|
HP Latex 115/315 Printer |
HP Latex 335 Printer |
HP Latex 365/375 Printer |
|
|
|
|
Approximate AC voltage |
200–240 V ±10% |
200–240 V ±10% |
200–240 V ±10% |
|
|
|
|
Frequency |
50/60 Hz |
50/60 Hz |
50/60 Hz |
|
|
|
|
Printer power |
200 W |
200 W |
2.5 kW |
|
|
|
|
Maximum printer current |
3 A |
3 A |
16 A |
|
|
|
|
Curing power |
2.0 kW |
2.4 kW |
2.1 kW |
|
|
|
|
Maximum curing current |
13 A |
16 A |
16 A |
|
|
|
|
14 HP Latex 115 and 300 Printer Series |
ENWW |

Regulatory notices
China altitude:
2000
China EMC (Class A products only):
Taiwan EMC (Class A products only):
English
ENWW |
Regulatory notices 15 |

Français
Imprimantes HP Latex 115 et 300
Informations d'introduction
Qu'est-ce que c'est ?
Votre imprimante est une imprimante couleur à jet d'encre conçue pour imprimer des images de qualité sur des substrats flexibles. Les fonctions principales sont les suivantes :
■Qualité d'impression optimale, transitions progressives et détails précis, avec ses 6 couleurs et 1 200 dpi réel
■Imprimante HP Latex 115 : Cartouches d'encre de 400 ml
■Imprimantes HP Latex 300 : 775 cartouches d'encre
■Des centaines de profils de substrat prédéfinis facilement disponibles, y compris pour les applications extérieures
Ce document de présentation contient les mentions légales et les instructions de sécurité, de brèves instructions d'utilisation, les codes d’erreur du panneau de commande, les spécifications d'alimentation et la déclaration de conformité.
Où se trouve le manuel de l'utilisateur ?
Le manuel de l'utilisateur de votre imprimante peut être téléchargé depuis l'adresse suivante :
■http://www.hp.com/go/latex115/manuals
■http://www.hp.com/go/latex300/manuals
Des informations supplémentaires sont disponibles sur :
■http://www.hp.com/go/latex115/support
■http://www.hp.com/go/latex300/support
Des vidéos sur l'utilisation de l'imprimante sont disponibles sur :
■http://www.hp.com/go/supportvideos
■http://www.youtube.com/HPSupportAdvanced
Rejoignez la communauté, trouvez des outils et communiquez avec des experts. Consultez le HP Latex Knowledge Center à l'adresse suivante :
■http://www.hp.com/go/communities/HPLatex
Notes légales
© Copyright 2017, 2018 HP Development Company, L.P.
Les renseignements contenus dans ce document peuvent être modifiés sans préavis. Les seules garanties couvrant les produits et les services HP sont celles stipulées de façon explicite dans les déclarations de garantie accompagnant ces produits et services. Rien dans le présent document ne peut être considéré comme constituant une garantie supplémentaire. HP n'est pas responsable en cas d'erreurs ou d'omissions techniques ou rédactionnelles dans le présent document.
Vous trouverez la garantie limitée HP expresse ainsi que les informations légales qui s'appliquent à votre produit aux adresses suivantes : http://www.hp.com/go/latex115/manuals ou http://www.hp.com/go/latex300/manuals. Dans certains pays/régions, une version imprimée de la garantie limitée HP est fournie dans le carton. Dans les pays/ régions où la garantie n’est pas mise à disposition en format imprimé, vous pouvez en demander une copie sur http://www.hp.com/go/orderdocuments ou écrire à : HP, MS POD, 11311 Chinden Blvd, Boise, ID 83714, États-Unis. Veuillez inclure le numéro de produit, la période de garantie (indiquée sur l'étiquette du numéro de série), votre nom et adresse postale.
Français
FRWW |
Informations d'introduction |
1 |

Français
ENERGY STAR® est une marque déposée appartenant au gouvernement américain.
Consignes de sécurité
Instructions générales de sécurité
Aucune pièce à l'intérieur de l'imprimante ne peut être réparée par l'utilisateur, exception faite de celles couvertes par le programme de réparation par le client de HP (Customer Self Repair) (rendez-vous sur http://www.hp.com/go/ selfrepair). Confiez l’entretien au personnel qualifié.
Mettez l'imprimante hors tension et appelez votre représentant du service de maintenance dans l'un des cas suivants :
●La prise ou le cordon d’alimentation est endommagé(e).
●Les modules de traitement thermique sont endommagés.
●L'imprimante a été endommagée par un impact.
●Le mécanisme ou le boîtier sont endommagés.
●Un liquide s’est introduit dans l’imprimante.
●L’imprimante émet de la fumée ou une odeur inhabituelle.
●L’imprimante est tombée ou le système de traitement thermique est endommagé.
●Le fonctionnement de l’imprimante n’est pas normal.
Mettez l'imprimante hors tension dans l'un des cas suivants :
●Pendant un orage
●Au cours d'une coupure de courant
Prenez des précautions particulières avec les zones marquées d'étiquettes d'avertissement.
Risque d’électrocution
AVERTISSEMENT ! Les circuits internes de traitement thermique, d'évacuation de la vapeur, de chauffage de la zone à imprimer et d'alimentation intégrée fonctionnent à des tensions dangereuses susceptibles de provoquer la mort ou des blessures graves.
L'imprimante utilise deux cordons d'alimentation. Débranchez les deux cordons d'alimentation avant de procéder à l'entretien de l'imprimante.
Pour éviter tout risque d’électrocution :
●L’imprimante doit être branchée uniquement sur des prises électriques raccordées à la terre.
●N'essayez pas de démonter les modules de traitement thermique.
●N'ouvrez aucun capot du système et ne retirez aucune prise.
●N’insérez aucun objet par les fentes de l’imprimante.
2 |
Imprimantes HP Latex 115 et 300 |
FRWW |
Risques liés à la chaleur
Les sous-systèmes de traitement thermique de l’imprimante fonctionnent à des températures élevées. Vous pouvez vous brûler à leur contact. Pour éviter les blessures corporelles, prenez les précautions suivantes :
●Ne touchez pas les coffrets internes des zones de traitement thermique de l’imprimante.
●Laissez l'imprimante refroidir avant d'accéder à la zone interne de traitement thermique et au plateau de sortie, en cas de bourrage du substrat.
●Laissez l'imprimante refroidir avant d'effectuer certaines opérations de maintenance.
Incendies
Les sous-systèmes de traitement thermique de l’imprimante fonctionnent à des températures élevées.
Pour éviter tout risque d’incendie, respectez les précautions suivantes :
●Le client est tenu de respecter les exigences de l'imprimante et du Code électrique en fonction de la juridiction locale du pays où l'imprimante est installée. Utilisez la tension d'alimentation électrique spécifiée sur la plaque signalétique.
●Branchez les cordons d'alimentation sur des lignes dédiées ; chacune doit être protégée par un disjoncteur divisionnaire, conformément aux informations indiquées dans le guide de préparation du site. N'utilisez pas de multiprise (amovible) pour brancher les deux cordons d'alimentation.
●Utilisez uniquement les cordons d'alimentation fournis par HP avec l'imprimante. N'utilisez pas de cordon d'alimentation endommagé. N’utilisez pas les cordons d'alimentation fournis avec d’autres produits.
●N’insérez aucun objet par les fentes de l’imprimante.
●Veillez à ne pas répandre de liquide sur l’imprimante. Après le nettoyage, assurez-vous que tous les composants sont secs avant d'utiliser l'imprimante de nouveau.
●N’utilisez pas de produit aérosol contenant des gaz inflammables à l’intérieur ou autour de l’imprimante. Ne faites pas fonctionner l'imprimante dans une atmosphère explosive.
●Ne bloquez pas et ne couvrez pas les ouvertures de l’imprimante.
●N'essayez pas de démonter ou de modifier les modules de traitement thermique.
●Assurez-vous que la température de fonctionnement du substrat ne dépasse pas celle recommandée par le fabricant. Si cette information n'est pas disponible, demandez au fabricant. Ne chargez pas des substrats qui ne peuvent pas être utilisés à une température d'exploitation au-dessus de 125 °C.
●Ne chargez pas des substrats ayant des températures d'auto-inflammation inférieures à 250 °C. Si cette information n'est pas disponible, l'impression doit être supervisée à tout moment.


 REMARQUE : Méthode de test basée sur la norme EN ISO 6942:2002 : Évaluation des matériaux et des assemblages de matériaux lors d'une exposition à une source de chaleur radiante, méthode B. Les conditions de test ayant servi à déterminer la température à laquelle le substrat commence à s'enflammer (flamme ou lueur) étaient : Densité de flux de chaleur : 30 kW/m², calorimètre en cuivre, thermocouple de type K.
Risques mécaniques
L’imprimante comporte des pièces mobiles pouvant provoquer des blessures. Afin d’éviter toute blessure corporelle, observez les précautions suivantes lorsque vous travaillez à proximité de l’imprimante :
●Tenez vos vêtements et toute partie de votre corps à l’écart des pièces mobiles de l’imprimante.
●Évitez le port de colliers, de bracelets et de tout autre objet pendant.
●Si vos cheveux sont longs, essayez de les attacher afin qu’ils ne tombent pas dans l’imprimante.
●Veillez à ce que vos manches ou vos gants ne soient pas entrainés par les pièces mobiles de l’imprimante.
Français
FRWW |
Consignes de sécurité |
3 |

Français
●Évitez de vous tenir à proximité des ventilateurs. Cela pourrait entraîner des blessures et réduire la qualité d’impression (en raison de l’obstruction du flux d’air).
●Ne touchez ni les engrenages ni les rouleaux en mouvement durant une impression.
●Ne faites pas fonctionner l'imprimante sans les capots.
Risques liés aux substances chimiques
Consultez les fiches de données de sécurité disponibles à l’adresse http://www.hp.com/go/msds pour identifier les composants chimiques de vos consommables. Un système de ventilation suffisant doit être fourni afin de vous assurer que l’exposition potentielle à ces substances est correctement contrôlée. Consultez votre spécialiste en conditionnement d’air et en matière d'environnement, de santé et de sécurité pour d’autres conseils sur les mesures appropriées à votre emplacement.
Pour obtenir plus d'informations, reportez-vous aux sections « Ventilation » et « Climatisation » incluses dans le guide de préparation du site, disponible à l'adresse :http://www.hp.com/go/latex15/manuals et http://www.hp.com/go/ latex300/manual.
Danger lié au rayonnement
Le rayonnement lumineux est émis à l'éclairage de la zone d'impression. Cet éclairage est en conformité avec les exigences du groupe exempté de la norme CEI 62471:2006 : Sécurité photobiologique des lampes et des systèmes de lampes. Toutefois, il est recommandé de ne pas regarder directement les LED lorsqu'elles sont allumées. Ne modifiez pas le module.
Risques liés aux substrats lourds
Lors du transport de substrats lourds, soyez vigilant afin d’éviter toute blessure corporelle :
●La manipulation de rouleaux de substrat lourds peut nécessiter plusieurs personnes. Agissez prudemment afin d’éviter toute blessure, notamment celles au dos.
●Utilisez toujours un chariot élévateur, un transpalette ou tout autre équipement de manutention pour soulever des supports. L'imprimante a été conçue pour être compatible avec la plupart de ces appareils.
●Portez toujours des équipements de protection personnelle, y compris des bottes et des gants.
Manipulation de l'encre et de condensés
HP recommande le port de gants lors de la manipulation des composants et des condensés du kit encreur.
Ventilation
Assurez-vous que la pièce dans laquelle le système est installé répond aux directives et règlementations locales en matière de santé et de sécurité de l’environnement.
Un système de ventilation adéquat doit être fourni pour s’assurer qu’une exposition potentielle est contrôlée correctement. Veuillez consulter les Fiches de données de sécurité disponibles à l’adresse http://www.hp.com/go/ msds pour identifier les composants chimiques de vos consommables d'encre.
Les niveaux de certaines substances dans leurs installations dépendent des variables de l’espace de travail qu’ils contrôlent, comme la taille de la pièce, la qualité de la ventilation et la durée d’utilisation de l’équipement. Consultez votre spécialiste en conditionnement d’air et en matière d'environnement, de santé et de sécurité pour d’autres conseils sur les mesures appropriées à votre emplacement.
Climatisation
En plus de la ventilation d’air frais pour éviter les risques sanitaires, pensez aussi à maintenir les niveaux ambiants du lieu de travail en garantissant le respect des conditions d’utilisation climatiques précisées dans la section
« Spécifications environnementales » du Guide de préparation du site afin d’éviter un manque de confort pour l'opérateur ou une défaillance de l’équipement. Le système de climatisation de l’espace de travail devrait tenir compte du fait que l’équipement produit de la chaleur. En règle générale, la dissipation de puissance de l'imprimante est la suivante :
4 |
Imprimantes HP Latex 115 et 300 |
FRWW |

●2,2 kW (7,5 kBTU/h) pour les imprimantes HP Latex 115/315
●2,6 kW (8,9 kBTU/h) pour l’imprimante HP Latex 335
●4,6 kW (15,7 kBTU/h) pour les imprimantes HP Latex 365/375
La climatisation doit répondre aux directives et règlementations locales en matière de santé et de sécurité de l'environnement.
 REMARQUE : Les unités de climatisation ne doivent pas souffler de l’air sur l’équipement.
Technologie Latex
LATEX est une technologie brevetée par HP Les encres de votre imprimante utilisent du latex afin d'améliorer la qualité et la polyvalence. Après l’impression, un traitement thermique est requis pour fixer l’encre.
La vitesse, la quantité d'encre et la température de traitement thermique sont liées.
Impression
Afin d'imprimer, vous devez tout d’abord configurer votre imprimante dans le logiciel RIP, puis envoyer des tâches à l'imprimante à partir du RIP. Vous pouvez utiliser le RIP fourni avec votre imprimante, si vous n’en avez pas déjà un installé.
Panneau de commande
Le panneau avant est un écran tactile doté d'une interface utilisateur graphique, situé à l'avant à droite de l'imprimante.
Il fournit un contrôle complet de l'imprimante : sur le panneau de commande, vous pouvez consulter toutes les informations relatives à l'imprimante, modifier ses paramètres, effectuer des étalonnages, des tests, etc. Le cas échéant, le panneau de commande affiche également des alertes (messages d'avertissement et d'erreur).
Il existe un autre écran d'accueil que vous pouvez afficher en faisant glisser votre doigt à travers l'écran vers la gauche :
Français
FRWW |
Technologie Latex |
5 |

Français
Le panneau avant est doté d'une large zone centrale pour afficher des informations dynamiques et des icônes. Sur les côtés gauche et droit, vous pouvez voir, à différents moments, jusqu'à six icônes fixes. Normalement, elles ne s'affichent pas toutes en même temps.
Il existe un écran d'accueil alternatif que vous pouvez afficher en faisant glisser votre doigt à travers l'écran vers la gauche. Celui-ci indique l'état des cartouches d'encre, du substrat et de la tâche d'impression en cours.
Icônes fixes à gauche et droite
|
Revenir à la page d'accueil. |
|
Afficher l'aide concernant l'écran actuel. |
|
|
|
|
|
Revenir à l’élément précédent. |
|
Passer à l’élément suivant. |
|
|
|
|
|
Revenir à l'écran précédent sans annuler les |
|
Annuler le traitement en cours. |
|
modifications. |
|
|
|
|
|
|
|
|
|
|
6 |
Imprimantes HP Latex 115 et 300 |
FRWW |
Icônes dynamiques de l’écran d’accueil
Ces éléments s'affichent uniquement sur l'écran d'accueil.
●Dans le coin supérieur gauche de l'écran, un message indique l'état de l'imprimante ou l'alerte actuelle la plus importante. Touchez ce message pour voir la liste de toutes les alertes en cours, avec une icône indiquant le niveau de gravité de chaque alerte. Vous pouvez toucher une alerte pour obtenir de l'aide pour résoudre le problème.
●En haut à droite, touchez l' pour activer ou désactiver l'éclairage de la zone d'impression.
|
Afficher l'état du substrat et effectuer des |
|
Ouvrir la Bibliothèque de substrats et accéder |
|
|
|
|
à la bibliothèque en ligne détaillée de |
|
|
|
|
opérations de manutention du substrat. |
|
|
|
|
|
|
préréglages de substrats. |
|
|
|
|
|
|
|
|
|
|
|
|
|
|
|
|
Afficher les informations sur la tâche en |
|
Afficher l'état des cartouches d’encre et |
|
|
|
cours d'impression. |
|
effectuer des opérations. |
|
|
|
|
|
|
|
Français |
|
Afficher l'état des têtes d'impression et |
|
Afficher et modifier les paramètres de |
|
|
|
effectuer des opérations. |
|
l'imprimante en général. |
|
|
|
|
|
|
|
|
|
Afficher l'état du réseau et d'Internet et |
|
Afficher les informations relatives à |
|
|
|
modifier leurs paramètres. |
|
l'imprimante. |
|
|
|
|
|
|
|
|
|
Obtenir de l'aide. |
|
|
|
|
|
|
|
|
||
|
|
|
|
|
|
Mode veille
Si l'imprimante reste inactive pendant un certain temps, elle bascule en mode veille et l'écran du panneau de commande s'éteint.
Pour changer le délai d'attente avant le passage en mode veille, touchez l' |
, puis Configuration > Options du |
panneau de commande > Temporisation du mode veille. Il est possible de définir un délai allant de 5 à 240 minutes ; La valeur par défaut est 30 minutes.
L'imprimante sort du mode veille et affiche le panneau avant dès qu'il y une interaction externe.
Résolution de problèmes
Consultez la section relative au dépannage de ce manuel de l'utilisateur.
Codes d'erreur du panneau de commande
Dans certaines circonstances, un code d'erreur numérique s'affiche sur le panneau de commande. Suivez le conseil indiqué dans la colonne Recommandation pour corriger l'erreur. Si la recommandation ne semble pas résoudre le problème, appelez votre représentant du service de maintenance.
Si le code d'erreur qui apparaît sur le panneau de commande n'est pas inclus dans cette liste, mettez l'imprimante hors tension, puis à nouveau sous tension. Si le problème persiste, appelez votre représentant du service de maintenance.
FRWW |
Résolution de problèmes |
7 |

Français
Code d'erreur |
Recommandation |
|
|
|
|
03.21:01 |
Sous-tension du bloc d'alimentation détectée. |
|
|
1. |
Mettez l'imprimante hors tension, puis débranchez les deux cordons |
|
|
d'alimentation. |
|
2. |
Vérifiez que les cordons d'alimentation ne sont pas endommagés. |
|
3. |
Assurez-vous que la tension d’alimentation correspond à la plage de tensions |
|
|
spécifiées (180 - 264 V AC). |
|
4. |
Branchez les deux cordons d'alimentation et assurez-vous qu'ils soient bien |
|
|
insérés. |
|
5. |
Mettez l'imprimante sous tension. |
|
|
|
03.22:01 |
Surtension du bloc d'alimentation détectée. |
|
|
1. |
Mettez l'imprimante hors tension, puis débranchez les deux cordons |
|
|
d'alimentation. |
|
2. |
Vérifiez que les cordons d'alimentation ne sont pas endommagés. |
|
3. |
Assurez-vous que la tension d’alimentation correspond à la plage de tensions |
|
|
spécifiées (180 - 264 V AC). |
|
4. |
Branchez les deux cordons d'alimentation et assurez-vous qu'ils soient bien |
|
|
insérés. |
|
5. |
Mettez l'imprimante sous tension. |
|
|
|
14.72:01 |
Aucune tension détectée. |
|
|
1. |
Mettez l'imprimante hors tension, puis débranchez les deux cordons |
|
|
d'alimentation. |
|
2. |
Vérifiez que les cordons d'alimentation ne sont pas endommagés. |
|
3. |
Assurez-vous que la tension d’alimentation correspond à la plage de tensions |
|
|
spécifiées (180 - 264 V AC). |
|
4. |
Branchez les deux cordons d'alimentation et assurez-vous qu'ils soient bien |
|
|
insérés. |
|
5. |
Mettez l'imprimante sous tension. |
|
|
|
14.73:01 |
Tension très basse détectée. |
|
|
1. |
Mettez l'imprimante hors tension, puis débranchez les deux cordons |
|
|
d'alimentation. |
|
2. |
Vérifiez que les cordons d'alimentation ne sont pas endommagés. |
|
3. |
Assurez-vous que la tension d’alimentation correspond à la plage de tensions |
|
|
spécifiées (180 - 264 V AC). |
|
4. |
Branchez les deux cordons d'alimentation et assurez-vous qu'ils soient bien |
|
|
insérés. |
|
5. |
Mettez l'imprimante sous tension. |
|
|
|
8 |
Imprimantes HP Latex 115 et 300 |
FRWW |

Code d'erreur |
Recommandation |
|
|
|
|
14.74:01 |
Basse tension détectée. |
|
|
1. |
Mettez l'imprimante hors tension, puis débranchez les deux cordons |
|
|
d'alimentation. |
|
2. |
Vérifiez que les cordons d'alimentation ne sont pas endommagés. |
|
3. |
Assurez-vous que la tension d’alimentation correspond à la plage de tensions |
|
|
spécifiées (180 - 264 V AC). |
|
4. |
Branchez les deux cordons d'alimentation et assurez-vous qu'ils soient bien |
|
|
insérés. |
|
5. |
Mettez l'imprimante sous tension. |
|
|
|
14.75:01 |
Tension excessive détectée. |
|
|
1. |
Mettez l'imprimante hors tension, puis débranchez les deux cordons |
|
|
d'alimentation. |
|
2. |
Vérifiez que les cordons d'alimentation ne sont pas endommagés. |
|
3. |
Assurez-vous que la tension d’alimentation correspond à la plage de tensions |
|
|
spécifiées (180 - 264 V AC). |
|
4. |
Branchez les deux cordons d'alimentation et assurez-vous qu'ils soient bien |
|
|
insérés. |
|
5. |
Mettez l'imprimante sous tension. |
|
|
|
14.87:10 |
Surchauffe du régulateur de puissance de traitement thermique détectée. |
|
|
1. |
Éteignez l'imprimante. |
|
2. |
Vérifiez que la température ambiante est conforme aux spécifications de |
|
|
l'imprimante (15–35 °C). |
|
3. |
Vérifiez que les boîtiers électroniques à l'arrière de l'imprimante sont ventilés |
|
|
de manière appropriée. |
|
4. |
Mettez l'imprimante sous tension. |
|
|
|
Français
FRWW |
Codes d'erreur du panneau de commande |
9 |

Français
Code d'erreur |
Recommandation |
|
|
|
|
16.01:00 |
L’imprimante ne parvient pas à chauffer avant la fin d'un délai prédéfini. |
|
|
1. |
Mettez l'imprimante hors tension, puis débranchez les deux cordons |
|
|
d'alimentation. |
|
2. |
Vérifiez que les cordons d'alimentation ne sont pas endommagés. |
|
3. |
Assurez-vous que la tension d’alimentation correspond à la plage de tensions |
|
|
spécifiées (180 - 264 V AC). |
|
4. |
Si la tension est faible, la diminution de la température de traitement |
|
|
thermique peut peut-être résoudre le problème. |
|
5. |
Branchez les deux cordons d'alimentation et assurez-vous qu'ils soient bien |
|
|
insérés. |
|
6. |
Vérifiez que la température ambiante est conforme aux spécifications de |
|
|
l'imprimante (15–35 °C). |
|
7. |
Vérifiez que les boîtiers électroniques à l'arrière de l'imprimante sont ventilés |
|
|
de manière appropriée. |
|
8. |
Mettez l'imprimante sous tension. |
|
|
|
16.02:00 |
L’imprimante ne parvient pas à refroidir avant la fin d'un délai prédéfini. |
|
|
1. |
Vérifiez que tous les ventilateurs fonctionnent et qu'ils ne sont pas bloqués |
|
|
lors de l'impression. |
|
2. |
Éteignez l'imprimante. |
|
3. |
Vérifiez que la température ambiante est conforme aux spécifications de |
|
|
l'imprimante (15–35 °C). |
|
4. |
Vérifiez que les boîtiers électroniques à l'arrière de l'imprimante sont ventilés |
|
|
de manière appropriée. |
|
5. |
Mettez l'imprimante sous tension. |
|
|
|
16.03:00 |
Chaleur excessive dans l'imprimante. |
|
|
1. |
Vérifiez que la température ambiante est conforme aux spécifications de |
|
|
l'imprimante (15–35 °C). |
|
2. |
Réduisez la température de traitement thermique et/ou augmentez le nombre |
|
|
de passages. |
|
3. |
Assurez-vous qu'aucun ventilateur n'est bloqué. |
|
|
|
16.04:00 |
Chaleur insuffisante dans l’imprimante. Vérifiez que la température ambiante est |
|
|
conforme aux spécifications de l'imprimante (15–35 °C). |
|
|
|
|
10 Imprimantes HP Latex 115 et 300 |
FRWW |

Code d'erreur |
Recommandation |
|
|
|
|
16.11:10 |
La mesure du capteur de température du traitement thermique se situe en dehors |
|
|
de la plage autorisée (le capteur de température 1 a échoué ou n'est pas connecté). |
|
|
1. |
Éteignez l'imprimante. |
|
2. |
Vérifiez que la température ambiante est conforme aux spécifications de |
|
|
l'imprimante (15–35 °C). |
|
3. |
Vérifiez que les boîtiers électroniques à l'arrière de l'imprimante sont ventilés |
|
|
de manière appropriée. |
|
4. |
Mettez l'imprimante sous tension. |
|
|
|
16.12:10 |
La mesure du capteur de température du traitement thermique se situe en dehors |
|
|
de la plage autorisée (le capteur de température 2 a échoué ou n'est pas connecté). |
|
|
1. |
Éteignez l'imprimante. |
|
2. |
Vérifiez que la température ambiante est conforme aux spécifications de |
|
|
l'imprimante (15–35 °C). |
|
3. |
Vérifiez que les boîtiers électroniques à l'arrière de l'imprimante sont ventilés |
|
|
de manière appropriée. |
|
4. |
Mettez l'imprimante sous tension. |
|
|
|
16.13:10 |
La mesure du capteur de température du traitement thermique se situe en dehors |
|
|
de la plage autorisée (le capteur de température 3 a échoué ou n'est pas connecté). |
|
|
1. |
Éteignez l'imprimante. |
|
2. |
Vérifiez que la température ambiante est conforme aux spécifications de |
|
|
l'imprimante (15–35 °C). |
|
3. |
Vérifiez que les boîtiers électroniques à l'arrière de l'imprimante sont ventilés |
|
|
de manière appropriée. |
|
4. |
Mettez l'imprimante sous tension. |
|
|
|
16.14:10 |
La mesure du capteur de température du traitement thermique se situe en dehors |
|
|
de la plage autorisée (le capteur de température 4 a échoué ou n'est pas connecté). |
|
|
1. |
Éteignez l'imprimante. |
|
2. |
Vérifiez que la température ambiante est conforme aux spécifications de |
|
|
l'imprimante (15–35 °C). |
|
3. |
Vérifiez que les boîtiers électroniques à l'arrière de l'imprimante sont ventilés |
|
|
de manière appropriée. |
|
4. |
Mettez l'imprimante sous tension. |
|
|
|
16.84:03, 16.85:03 |
La résistance du rideau d'air se situe en dehors de la plage autorisée. Vérifiez que les |
|
|
ventilateurs du rideau d'air (à l'avant du module de traitement thermique) |
|
|
fonctionnent et ne sont pas bloqués. |
|
|
|
|
Français
FRWW |
Codes d'erreur du panneau de commande 11 |

Français
Code d'erreur |
Recommandation |
|
|
|
|
21:13 |
Impossible de déplacer la cartouche de maintenance sur la totalité de son trajet. |
|
|
1. |
Éteignez l'imprimante. |
|
2. |
Pendant que l'imprimante est hors tension, retirez manuellement la cartouche |
|
|
de maintenance des têtes d'impression. |
|
3. |
Vérifiez que la cartouche de maintenance des têtes d'impression est dégagée. |
|
|
Retirez les obstacles visibles (papier, pièces en plastique, etc.) qui restreignent |
|
|
le déplacement. |
|
4. |
Réinstallez la cartouche de maintenance. |
|
5. |
Mettez l'imprimante sous tension. |
|
6. |
Si l'erreur persiste, remplacez la cartouche de maintenance. |
|
|
|
21.2:10 |
Erreur cartouche maint. |
|
|
1. |
Éteignez l'imprimante. |
|
2. |
Retirez et réinsérez la cartouche de maintenance. |
|
3. |
Mettez l'imprimante sous tension. |
|
4. |
Si l'erreur persiste, remplacez la cartouche de maintenance. |
|
|
|
21.5:03 |
La partie qui fait avancer le rouleau de nettoyage de la cartouche de maintenance |
|
|
est bloquée. |
|
|
1. |
Éteignez l'imprimante. |
|
2. |
Retirez et réinsérez la cartouche de maintenance. |
|
3. |
Mettez l'imprimante sous tension. |
|
4. |
Si l'erreur persiste, remplacez la cartouche de maintenance. |
|
|
|
25.n:10 (où n = numéro |
Une erreur possible dans le capteur de pression de la cartouche d'encre a été |
|
de la cartouche d'encre) |
détectée. Le niveau d'encre signalé peut ne pas être exact. Appelez votre |
|
|
représentant du service de maintenance si cela est possible. |
|
|
|
|
27.1:00 |
Plusieurs buses bloquées ont été détectées dans la tête d'impression de |
|
|
l'optimisateur. Si la qualité d'impression n'est pas acceptable, nettoyez ou remplacez |
|
|
la tête d'impression. |
|
|
|
|
27.n:01 (où n = numéro |
Un grand nombre de buses bloquées ont été détectées dans une ou plusieurs têtes |
|
du compartiment de la |
d'impression. Il est possible que la calibration ait échoué en raison des faibles |
|
tête d'impression) |
performances des têtes d'impression. Nettoyez toutes les têtes d'impression et |
|
|
contrôlez leur état. |
|
|
|
|
29:00 |
La cartouche de maintenance (numéro de référence CZ681A) est presque pleine. Elle |
|
|
doit être rapidement remplacée. |
|
|
|
|
12 Imprimantes HP Latex 115 et 300 |
FRWW |
 Loading...