


HP Jornada 520 Pocket PC, Jornada 525 Pocket PC, Jornada 540 Pocket PC, Jornada 545 Pocket PC, Jornada 547 Pocket PC User Manual
...hp pocket camera for hp jornada pocket pc
User’s Guide
Printed in Singapore
Edition 1

Copyright
The information contained in this document is provided “as is” and is subject to change without notice.
Hewlett-Packard Company makes no warranty of any kind with regard to this manual, including, but not limited to, the implied warranties of merchantability and fitness for a particular purpose. Hewlett-Packard Co. shall not be liable for any errors contained herein or for incidental or consequential damages in connection with the furnishing, performance, or use of this manual or the examples herein.
© Hewlett-Packard Co. 2001.
This document contains proprietary information that is protected by copyright. All rights are reserved. No part of this document may be photocopied, reproduced, adapted, or translated to another language without the prior written consent of Hewlett-Packard Co., except as allowed under the copyright laws.
The programs that control this product are copyrighted and all rights are reserved. Reproduction, adaptation, or translation of those programs without prior written permission of HewlettPackard Co. is also prohibited.
All brand names and product names used in this document are trade names, service marks, trademarks, or registered trademarks of their respective owners.

Contents |
|
Welcome........................................................................ |
1 |
What’s in the Box........................................................... |
2 |
The HP Pocket Camera................................................. |
3 |
Focusing Your Pocket Camera .................................. |
4 |
Getting Started............................................................... |
5 |
Step 1: Insert the HP Pocket Camera |
|
into Your HP Jornada .................................................... |
7 |
Step 2: Snap a Picture.................................................. |
8 |
Step 3: View and Share Pictures ................................ |
11 |
Viewing Pictures....................................................... |
11 |
Sharing Pictures....................................................... |
13 |
Removing Your HP Pocket Camera ............................ |
17 |
Tips for Taking Better Pictures..................................... |
19 |

Features and Usage .................................................... |
21 |
Using the Timer........................................................ |
22 |
Adjusting Exposure .................................................. |
23 |
Setting Picture Quality.............................................. |
25 |
Choosing Picture Size.............................................. |
26 |
Applying Digital Effects............................................. |
27 |
Metering Options...................................................... |
29 |
Viewing and Editing Pictures ....................................... |
30 |
Viewing Pictures....................................................... |
30 |
Editing Pictures ........................................................ |
36 |
Rotating Pictures...................................................... |
38 |
Recording Sounds with Pictures .............................. |
39 |
Conserving Memory ................................................. |
41 |
Advanced Options ....................................................... |
43 |
Conserving Power.................................................... |
43 |
Displaying Detailed Onscreen Information ............... |
46 |
Camera Log ............................................................. |
47 |
Troubleshooting and Support....................................... |
49 |
Caring for Your Pocket Camera ............................... |
52 |
Support..................................................................... |
52 |
Glossary....................................................................... |
53 |
Index............................................................................ |
55 |

Welcome
Congratulations on purchasing the HP pocket camera for HP Jornada Pocket PC. Take it with you wherever you go. It’s easy to snap pictures and share them with your friends or colleagues—just plug in the camera, snap a picture, and send it by e-mail!
Here are a few features that make the HP Jornada pocket camera ideal for business or personal use:
•Enjoy fully automatic, point-and-shoot photography.
•Easily transfer pictures from your HP Jornada to your desktop PC or to selected infrared-equipped printers (such as the HP DeskJet 990Cxi) that support IrOBEX.
•JPEG file format can be used in e-mail or on Web sites.
•Record voice notes along with a picture.
•Digital effects and manual control of exposure settings let you customize your pictures.
•Integrated slideshow program lets you view pictures in sequence right on your HP Jornada.
Quick Start
hp pocket camera |
1 |

What’s in the Box
In addition to the camera itself, your HP Jornada pocket camera comes with the following components:
•carrying pouch
•this User’s Guide
•regulatory information and warranty booklet
•HP CD-ROM
The HP CD-ROM contains two programs: the HP pocket camera software (for your HP Jornada) and a photo imaging program (for your desktop PC). The HP pocket camera software must be installed on your HP Jornada before you can snap pictures. The photo imaging program lets you edit and enhance the pictures you take with your HP Jornada pocket camera.
2 |
hp pocket camera |
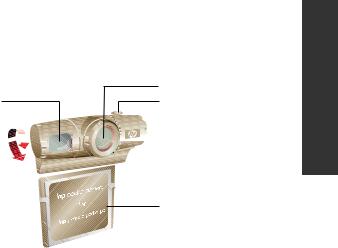
The HP Pocket Camera
|
1 |
6 |
2 |
|
|
|
|
7 

 3
3

 4
4
5
Quick Start
1Lens.
2Shutter button. Press this button to snap a picture.
3LED ring. Indicates camera status:
•Steady green light: camera is ready to snap pictures.
•Blinking slowly: camera is in Standby mode (using minimal power).
•Blinking fast: camera is busy.
•Off: camera is off or is not in use.
4Focus ring. Turn the ring to focus on your subject. See “Focusing your Pocket Camera.”
5CompactFlash™ Type I interface. Connects to the CompactFlash card slot on your HP Jornada.
6Optical viewfinder. Use the optical viewfinder for subjects at distances greater than 2 m (6 ft) or when it is difficult to see the digital viewfinder on the screen of your HP Jornada.
7Swivel lens. Rotate the lens to point to the front or back or any angle in between.
hp pocket camera |
3 |

Focusing Your Pocket Camera
51 cm (20 in.)
Closeups 


 Distance
18 cm (7 in.) 

 9 cm (3.5 in.)
11 cm (4.5 in.)
Turn the focus ring to focus on close-up subjects (10 – 110 cm [4 – 46 in.]). Adjust the focus ring until the image in the digital viewfinder on the screen of your HP Jornada is clear. The digital viewfinder displays subjects exactly as they will be captured by the pocket camera.
The diagram shows the approximate position of the focus ring, based on the estimated distance of the subject. For subjects at distances greater than 110 cm (46 in.), turn the ring clockwise until it clicks into place.
4 |
hp pocket camera |

Getting Started
Before using your HP Jornada pocket camera, you must first install the HP pocket camera software from the HP CD-ROM onto your HP Jornada. You only need to do this once.
However, if you reset your HP Jornada to the factory default settings, or if you lose power and thereby erase all data on your HP Jornada, you will need to reinstall the software before you can use your camera again.
To install the HP pocket camera software
1.Connect your HP Jornada to your desktop PC.
2.Insert the HP CD-ROM into a CD-ROM drive on your desktop PC. Installation should begin automatically.
If installation does not begin, click Run on the Start menu, and type d:hpcd.exe (where d: is the drive letter of the CD-ROM drive). Press Return.
3.Follow the instructions on your screen to complete installation.
Quick Start
hp pocket camera |
5 |

After you have installed the software onto your HP Jornada, follow these steps to begin snapping pictures and sharing them with your friends and colleagues:
Step 1:
Insert the pocket camera into your HP Jornada.
Step 2:
Snap a picture.
Step 3:
View and share pictures.
The following sections describe each of these steps in detail. In addition, the “Features and Usage” section provides further information on the features of your pocket camera and software that can help you take better pictures.
6 |
hp pocket camera |
Step 1: Insert the HP Pocket Camera into Your HP Jornada
To insert the HP pocket camera
Insert the pocket camera until it is firmly seated in the CompactFlash card slot of your HP Jornada, as shown in the diagram.
The green LED ring on the camera will blink and then change to steady green to indicate that it is ready.
When you insert the HP pocket camera, your HP Jornada automatically turns on in Capture mode. When you see the camera’s digital viewfinder on the screen of your HP Jornada, you’re ready to begin snapping pictures!
 When you place your HP Jornada and pocket camera on a flat surface, be sure that the lens is not facing down.
Resting the HP Jornada on the camera lens may place stress on the camera joints.
 Do not use excessive force when handling the HP pocket camera or when inserting or removing it. Align the CompactFlash interface of the camera carefully with the CompactFlash slot of your HP Jornada. Be sure the camera is oriented as shown.
Quick Start
hp pocket camera |
7 |

Step 2: Snap a Picture
Using the optical viewfinder
1.Look through the optical viewfinder to frame the subject.
2.Press the shutter button on the camera.
Using the digital viewfinder on the display of your HP Jornada
1.Move the camera as necessary to frame the subject you want to photograph in the digital viewfinder.
2.Tap the shutter button on the touch screen, or press and release the Action button on your HP Jornada.
When you snap a picture, your HP Jornada makes a clicking sound (if you have not muted the sounds), and the green LED ring on the camera blinks rapidly to indicate that the picture has been taken and your HP Jornada is processing the picture. It may take a few seconds to process and store the picture, depending on its size, quality, and complexity.
8 |
hp pocket camera |

Quick Start
Capture Mode
1. Digital viewfinder. |
4. Capture settings. Show |
||
Displays the picture |
the current picture and |
||
currently framed by the |
exposure settings. Tap to |
||
camera. Tap |
to |
change settings (for more |
|
zoom the view of the |
information, see the |
||
picture in or out. |
|
“Features and Usage” |
|
2. Last Picture window. |
section). |
||
5. Command bar. Tap |
|||
Displays the last picture |
|||
captured. |
|
menus or icons to change |
|
3. Shutter button. Tap to |
modes, set options, or |
||
display advanced controls. |
|||
snap a picture. |
|
||
|
Tap the Start button to |
||
|
|
||
|
|
switch between the HP |
|
|
|
pocket camera software |
|
|
|
and other applications. |
|
|
|
|
|
hp pocket camera |
|
9 |
|

 NOTES
NOTES
•Wait for the LED ring on the camera to shine a steady green before you snap a picture.
•If the pocket camera was not inserted properly, the digital viewfinder displays the  icon.
icon.
•The HP pocket camera software must be in Capture mode before you can snap a picture. If it is in Review mode, tap Capture on the View menu, or tap the icon in the Command bar, to switch to Capture mode.
 TIPS
TIPS
•Use the optical viewfinder when lighting conditions make it difficult to see the picture on your HP Jornada screen or when your HP Jornada cover is closed.
•Use the optical viewfinder when subjects are at distances greater than 2 m (6 ft).
•If you cannot get as close as you would like to your subject, tap  on the Command bar to zoom in on your subject. Tap again to return to normal.
•Pictures you snap using the zoom feature may not be as sharp as other pictures. Be careful to hold the camera steady when snapping zoomed pictures.
•After you aim the camera, wait a moment to steady the camera and to ensure that automatic exposure has taken effect. Remember: aim, steady, and then snap.
10 |
hp pocket camera |

Step 3: View and Share Pictures
Viewing Pictures
Use Review mode to browse the pictures you have taken and to send pictures in e-mail messages to friends and colleagues.
To switch to Review mode
On the View menu, tap Review. –or–
Tap  on the Command bar.
Quick Start
Review mode has many powerful features, including simple editing functions and the ability to display pictures in sequence as a slideshow. For more information, see the “Viewing and Editing Pictures” section.
hp pocket camera |
11 |

Review Mode
1.Preview window. Displays the selected picture. (If no picture is selected, the Preview window is blank.)
2.Image information. Displays the file name, capture date and time, quality, and size of the selected picture.
3.Thumbnails. Displays smaller images of all the pictures in the current folder. Tap a thumbnail to display that picture in the Preview window.
4.Scroll bar. Tap to scroll forward or back through thumbnails.
5.Command bar. Tap menus or icons to change modes, edit the selected picture, or send the picture by e- mail or infrared. Tap the Start button to switch between the HP pocket camera software and other applications.
12 |
hp pocket camera |

Sharing Pictures
You have several options for sharing pictures with friends and colleagues. You can send pictures as attachments to e-mail messages, send pictures to a desktop PC or Pocket PC via infrared, print pictures on an infrared-equipped printer, or transfer images to your desktop PC using Microsoft® ActiveSync®.
Sending Pictures by E-mail
E-mail is a fast, easy way to share pictures with friends and colleagues. You can send pictures by e-mail using the HP pocket camera software and the Inbox program on your HP Jornada.
To send pictures by e-mail
1.In Review mode, tap a thumbnail to select the picture you want to send.
2.On the Send menu, tap E-mail.
3.The Inbox application starts and opens a new e-mail message. The selected picture is attached to the message as a file attachment.
4.Enter the recipient’s name in the To field, and enter a subject for the message.
5.Enter any text in the body of the message.
6.When you have finished composing your message, tap
Send.
For more information on addressing and entering e-mail messages, refer to your HP Jornada User’s Guide or tap Help on the HP Jornada Start menu.
hp pocket camera |
13 |
Quick Start

The message remains in the Outbox folder on your HP Jornada until you connect to your Inbox service to send and receive messages, or until you connect your HP Jornada to your desktop PC to synchronize messages or perform an Inbox transfer. For more information on sending messages from your HP Jornada, refer to your HP Jornada User’s Guide, ActiveSync Help on your desktop PC, or Inbox Help on your HP Jornada.
Sending Pictures to Another Pocket PC or Infrared-Equipped Device
The infrared port on your HP Jornada enables you to share pictures with other Pocket PCs or mobile devices that use the IrDA protocol.
To send a picture by infrared
1.In Review mode, tap a thumbnail to select a picture.
2.On the Send menu, tap Infrared.
3.Align the infrared port on your HP Jornada with the infrared port on the receiving device.
4.If the receiving device is a Pocket PC, on the receiving device, tap the Start menu, tap Programs, and then tap the Infrared Receive icon.
–or–
If the receiving device is another type of Microsoft Windows CE device, in File Explorer on the receiving device, tap the File menu, and then tap Receive.
14 |
hp pocket camera |

Sending Pictures to a Desktop PC or Printer Using IrOBEX
The IrOBEX protocol is used by many new printers, such as the HP DeskJet 990Cxi, as well as by some desktop and notebook computers that run Microsoft Windows Me or Windows 2000.
You can transfer files directly from your HP Jornada to compatible infrared-equipped printers, desktop PCs, or notebook PCs using the IrOBEX protocol.
To send a picture using the IrOBEX protocol
1.In Review mode, tap a thumbnail to select a picture.
2.On the Send menu, tap IrOBEX.
3.Align the infrared port on your HP Jornada with the infrared port on the receiving device.
4.Wait until the picture has been sent.
You can usually send a picture using IrOBEX or IrDA without removing the camera from the CompactFlash slot of your HP Jornada; however, if you have difficulty sending a picture, try removing the camera to make it easier to line up the infrared ports of the two devices.
If you cannot send a picture to a printer or other infrared equipped device, check the documentation for that device to ensure that it supports the IrDA or IrOBEX protocols.
Quick Start
hp pocket camera |
15 |

Copying Pictures to Documents or Notes
You can use the clipboard on your HP Jornada to copy pictures from the Preview window to another file, such as a Pocket Word document or the Notes section of a contact, appointment, or task.
To copy a picture to a document
1.In Review mode, tap a thumbnail to select a picture.
2.On the Edit menu, tap Copy or tap Resize and Copy and then select a scale factor.
3.Open the document or note into which you want to paste the picture.
4.On the Edit menu, tap Paste.
The Notes section of a contact, appointment, or task has a maximum size limit of 64 KB. Pictures copied to the clipboard are stored uncompressed and may exceed this size limit. For a 640 x 320 picture, resize and copy to 12.5%. For a 320 x 240 picture, resize and copy to 25%. “Conserving Memory” in the “Viewing and Editing Pictures” section offers other tips for reducing the file size of your pictures.
16 |
hp pocket camera |
 Loading...