


 Loading...
Multimedia
User Guide
© Copyright 2009 Hewlett-Packard
Development Company, L.P.
Windows is a U.S. registered trademark of Microsoft Corporation.
The information contained herein is subject to change without notice. The only warranties for HP products and services are set forth in the express warranty statements accompanying such products and services. Nothing herein should be construed as constituting an additional warranty. HP shall not be liable for technical or editorial errors or omissions contained herein.
First Edition: August 2009
Document Part Number: 539583-001
Product notice
This user guide describes features that are common to most models. Some features may not be available on your computer.

Table of contents
1 |
Multimedia features |
|
|
Identifying your multimedia components .............................................................................................. |
2 |
|
Adjusting the volume ............................................................................................................................ |
4 |
|
Using the media activity hotkeys .......................................................................................................... |
6 |
2 Multimedia software |
|
|
|
Using HP MediaSmart software ........................................................................................................... |
8 |
|
Using other preinstalled multimedia software ....................................................................................... |
9 |
|
Installing multimedia software from a disc .......................................................................................... |
10 |
3 Audio |
|
|
|
Connecting external audio devices .................................................................................................... |
12 |
|
Checking your audio functions ........................................................................................................... |
13 |
4 Video |
|
|
|
Connecting an external monitor or projector ...................................................................................... |
15 |
|
Connecting an HDMI device ............................................................................................................... |
16 |
|
Configuring audio for HDMI (select models only) .............................................................. |
16 |
|
Watching TV ....................................................................................................................................... |
18 |
5 |
Optical drive |
|
|
Identifying the installed optical drive ................................................................................................... |
19 |
|
Using optical discs .............................................................................................................................. |
20 |
|
Selecting the right disc (CDs, DVDs, and BDs) .................................................................................. |
21 |
|
CD-R discs ......................................................................................................................... |
21 |
|
CD-RW discs ..................................................................................................................... |
21 |
|
DVD±R discs ..................................................................................................................... |
21 |
|
DVD±RW discs .................................................................................................................. |
21 |
|
LightScribe DVD+R discs .................................................................................................. |
21 |
|
Blu-ray Disc ....................................................................................................................... |
22 |
|
Playing music ..................................................................................................................................... |
23 |
|
Watching a movie ............................................................................................................................... |
24 |
|
Changing DVD region settings ........................................................................................................... |
25 |
iii
Creating or “burning” a CD or DVD .................................................................................................... |
26 |
Removing a CD, DVD, or BD ............................................................................................................. |
27 |
6 Webcam |
|
7 Troubleshooting |
|
The optical disc tray does not open for removal of a CD, DVD, or BD ............................................... |
30 |
The computer does not detect the optical drive ................................................................................. |
31 |
A disc does not play ........................................................................................................................... |
32 |
A disc does not play automatically ..................................................................................................... |
33 |
A movie stops, skips, or plays erratically ............................................................................................ |
34 |
A movie is not visible on an external display ...................................................................................... |
35 |
The process of burning a disc does not begin, or it stops before completion .................................... |
36 |
A DVD or BD playing in Windows Media Player produces no sound or display ................................ |
36 |
A device driver must be reinstalled .................................................................................................... |
36 |
Obtaining the latest Windows device drivers ..................................................................... |
37 |
Obtaining the latest HP device drivers ............................................................................... |
37 |
Index ................................................................................................................................................................... |
38 |
iv

1 Multimedia features
Your computer includes multimedia features that allow you to listen to music, watch movies, and view pictures. Your computer may include the following multimedia components:
●Optical drive for playing audio and video discs
●Integrated speakers for listening to music
●Integrated microphone for recording your own audio
●Integrated webcam that allows you to capture and share video
●Preinstalled multimedia software that allows you to play and manage your music, movies, and pictures
●Multimedia buttons and hotkeys that provide fast access to multimedia tasks
 NOTE: Your computer may not include all of the components listed.
The following sections explain how to identify and use the multimedia components included with your computer.
1
 dv6-2155dx User Manual")
Identifying your multimedia components
The following illustration and table describe the multimedia features of the computer.
Component |
Description |
|
|
|
|
(1) |
Internal microphones (2) |
Record sound. |
|
|
|
(2) |
Webcam light |
Turns on when video software accesses the webcam. |
|
|
|
(3) |
Webcam |
Records audio and video and captures still photographs. |
|
|
|
(4) |
Speakers (2) |
Produce sound. |
|
|
|
(5) |
Audio-out (headphone) jacks (2) |
Produce sound when connected to optional powered stereo |
|
|
speakers, headphones, earbuds, a headset, or television audio. |
|
|
WARNING! To reduce the risk of personal injury, adjust the |
|
|
volume before putting on headphones, earbuds, or a headset. For |
|
|
additional safety information, refer to the Regulatory, Safety and |
|
|
Environmental Notices. |
|
|
NOTE: When a device is connected to the headphone jack, the |
|
|
computer speakers are disabled. |
|
|
|
(6) |
Audio-in (microphone) jack |
Connects an optional computer headset microphone, stereo array |
|
|
microphone, or monaural microphone. |
|
|
|
2 Chapter 1 Multimedia features

Component |
Description |
|
|
|
|
(7) |
Volume scroll zone |
Adjusts speaker volume. Slide your finger to the left to decrease |
|
|
volume and to the right to increase volume. You can also tap the |
|
|
minus sign on the scroll zone to decrease volume, or tap the plus |
|
|
sign on the scroll zone to increase volume. |
|
|
|
(8) |
Volume mute button |
Mutes and restores speaker sound. |
|
|
|
Identifying your multimedia components |
3 |
Adjusting the volume
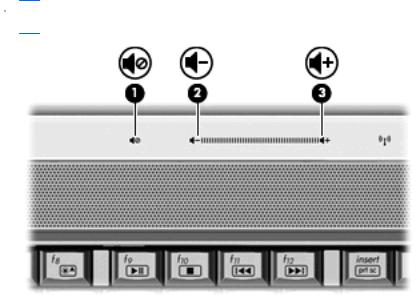
You can adjust the volume using the following controls:
●Computer volume buttons (select models only):
◦To mute or restore volume, press the mute button (1).
◦To decrease volume, slide your finger across the volume scroll zone from right to left or tap the volume down icon (2) repeatedly.
◦To increase volume, slide your finger across the volume scroll zone from left to right or tap the volume up icon (3) repeatedly.
 NOTE: The tapping sound made by the volume button is enabled at the factory. You can disable the sound in the Setup Utility (f10).
●Windows® volume control:
a.Click the Speakers icon in the notification area, at the far right of the taskbar.
b.Increase or decrease the volume by moving the slider up or down. Click the Mute Speakers icon to mute the volume.
– or –
a.Right-click the Speakers icon in the notification area, and then click Open Volume Mixer.
b.In the Speakers column, increase or decrease the volume by moving the slider up or down. You can also mute the volume by clicking the Mute Speakers icon.
If the Speakers icon is not displayed in the notification area, follow these steps to add it:
a.Right-click the Show hidden icons icon (the arrow at the left side of the notification area).
b.Click Customize notification icons.
c.Under Behaviors, select Show icon and notifications for the Volume icon.
d.Click OK.
●Program volume control:
4 Chapter 1 Multimedia features
Volume can also be adjusted within some programs.
Adjusting the volume |
5 |
Using the media activity hotkeys
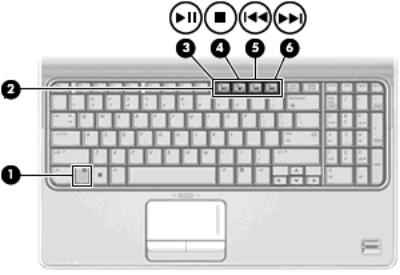
A media activity hotkey is a combination of the fn key (1) and a function key (2).
●When an audio CD or a DVD is not playing, press fn+f9 (3) to play the disc.
●When an audio CD or a DVD is playing, use the following hotkeys:
◦To pause or resume playing the disc, press fn+f9 (3).
◦To stop the disc, press fn+f10 (4).
◦To play the previous track of an audio CD or the previous chapter of a DVD, press fn+f11
(5).
◦To play the next track of an audio CD or the next chapter of a DVD, press fn+f12 (6).
6 Chapter 1 Multimedia features
2 Multimedia software
Your computer includes preinstalled multimedia software that allows you to play music, watch movies, and view pictures. The following sections provide details about HP MediaSmart and other preinstalled multimedia software.
7

Using HP MediaSmart software
HP MediaSmart turns your computer into a mobile entertainment center. With MediaSmart, you can enjoy music and DVD and BD movies. You can also view Internet TV and live TV, and manage and edit your photo collections.
 NOTE: You can use an integrated TV tuner (select models only) or an optional external TV tuner (purchased separately) to watch, record, and pause live TV on the computer.
MediaSmart includes the following features:
●Internet TV—With an Internet connection, play classic oldies, choose from a range of TV shows and channels, and watch the HP-TV channel streamed in full-screen.
●Playlist upload support:
◦Upload your photos to Internet photo albums, such as Snapfish.
◦Upload your home videos directly to YouTube.
◦Upload videos you created with the webcam to the Internet.
●Pandora Internet radio (North America only)—Listen to music selected just for you, streamed from the Internet.
To start MediaSmart, double-click the MediaSmart icon on the desktop of the computer.
For more information on using MediaSmart, select Start > Help and Support, and then type MediaSmart in the search box.
8 Chapter 2 Multimedia software

Using other preinstalled multimedia software
To locate other preinstalled multimedia software:
▲Select Start > All Programs, and then open the multimedia program you want to use. For example, if you want to use Windows Media Player to play an audio CD, click Windows Media Player.
 NOTE: Some programs may be located in subfolders.
Using other preinstalled multimedia software |
9 |

Installing multimedia software from a disc
To install any multimedia software from a CD or DVD, follow these steps:
1.Insert the disc into the optical drive.
2.When the installation wizard opens, follow the on-screen instructions.
3.Restart the computer if you are prompted to do so.
 NOTE: For details about using software included with the computer, refer to the software manufacturer’s instructions, which may be provided with the software, on disc, or on the manufacturer’s Web site.
10 Chapter 2 Multimedia software
Loading...