


Projector
PJ-TX300E
User’s Manual - Operating Guide
Thank you for purchasing this projector.
Please read this user’s manual thoroughly to ensure the proper use of this product.
Manuel d'utilisation - Guide d'utilisation
Merci d’avoir acheté ce projecteur.
Veuillez lire ce manuel d’utilisation entièrement, pour vous assurer que vous utiliserez correctement ce produit.
Bedienungsanleitung - Benutzerhandbuch
Herzlichen Glückwunsch zum Kauf dieses Projektors.
Bitte lesen Sie sich diese Bedienungsanleitung sorgfältig durch, um richtige und sichere Verwendung dieses Produkts sicherzustellen.
Manual de usuario - Guía de funcionamiento
Muchas gracias por la adquisición de este proyector.
Lea detenidamente el manual del usuario para asegurarse de usar apropiadamente este producto.
Manuale d'istruzioni - Guida operativa
Vi ringraziamo per avere acquistato questo proiettore.
Per garantirne l'impiego corretto vi raccomandiamo di leggerne a fondo il manuale d'istruzioni.
ENGLISH
FRANÇAIS
DEUTSCH
ESPAÑOL
ITALIANO
Projector
User's Manual - Safety Guide
Thank you for purchasing this projector.
WARNING • Before using, read these user's manuals of this projector to ensure  correct usage through understanding. After reading, store them in a safe place for future reference. Incorrect handling of this product could possibly result in personal injury or physical damage. The manufacturer assumes no responsibility for any damage caused by mishandling that is beyond normal usage defined in these manuals of this projector.
NOTE • The information in this manual is subject to change without notice.
•The manufacturer assumes no responsibility for any errors that may appear in this manual.
•The reproduction, transmission or use of this document or contents is not permitted without express written authority.
About The Symbols
Various symbols are used in this manual, the user’s manual and on the product itself to ensure correct usage, to prevent danger to the user and others, and to prevent property damage. The meanings of these symbols are described below. It is important that you read these descriptions thoroughly and fully understand the contents.
This symbol indicates information that, if ignored, could WARNING possibly result in personal injury or even death due to
incorrect handling.
This symbol indicates information that, if ignored, could CAUTION result possibly in personal injury or physical damage
due to incorrect handling.
Typical Symbols
This symbol indicates an additional warning (including cautions). An illustration is provided to clarify the contents.
This symbol indicates a prohibited action. The contents will be clearly indicated in an illustration or nearby (the symbol to the left indicates that disassembly is prohibited).
This symbol indicates a compulsory action. The contents will be clearly indicated in an illustration or nearby (the symbol to the left indicates that the power plug should be disconnected from the power outlet).
Safety Precautions
 WARNING
Never use the projector if a problem should occur.
Abnormal operations such as smoke, strange odor, no image, no sound, excessive sound, damaged casing or elements or cables, penetration of liquids or foreign matter, etc. can cause a fire or electrical shock.
In such case, immediately turn off the power switch and then disconnect the power plug from the power outlet. After making sure that the smoke or odor has stopped, contact your dealer. Never attempt to make repairs yourself because this could be dangerous.
• The power outlet should be close to the projector and easily accessible.
Use special caution for children and pets.
Incorrect handling could result in fire, electrical shock, injury, burn or vision problem.
Use special caution in households where children and pets are present.
Do not insert liquids or foreign object.
Penetration of liquids or foreign objects could result in fire or electrical shock. Use special caution in households where children are present.
If liquids or foreign object should enter the projector, immediately turn off the power switch, disconnect the power plug from the power outlet and contact your dealer.
•Do not place the projector near water (ex. a bathroom, a beach, etc.).
•Do not expose the projector to rain or moisture. Do not place the projector outdoors.
•Do not place flower vases, pots, cups, cosmetics, liquids such as water, etc on or around the projector.
•Do not place metals, combustibles, etc on or around the projector.
•To avoid penetration of foreign objects, do not put the projector into a case or bag together with any thing except the accessories of the projector, signal cables and connectors.
Never disassemble and modify.
The projector contains high voltage components. Modification and/or disassembly of the projector or accessories could result in fire or electrical shock.
•Never open the cabinet.
•Ask your dealer to repair and clean insider.
Do not give the projector any shock or impact.
If the projector should be shocked and/or broken, it could result in an injury, and continued use could result in fire or electrical shock.
If the projector is shocked, immediately turn off the power switch, disconnect the power plug from the power outlet and contact your dealer.
Do not place the projector on an unstable surface.
If the projector should be dropped and/or broken, it could result in an injury, and continued use could result in fire or electrical shock.
•Do not place the projector on an unstable, slant or vibrant surface such as a wobbly or inclined stand.
•Use the caster brakes placing the projector on a stand with casters.
•Do not place the projector in the side up position, the lens up position or the lens down position.
•In the case of a ceiling installation or the like, contact your dealer before installation.
Disconnect the plug from the power outlet.
Do not disassemble.
Safety Precautions (continued)
 WARNING
Be cautious of High temperatures of the projector.
High temperatures are generated when the lamp is lit. It could result in fire or burn. Use special caution in households where children are present.
Do not touch about the lens, air fans and ventilation openings during use or immediately after use, to prevent a burn. Take care of ventilation.
• Keep a space of 30 cm or more between the sides and other objects such as walls.
•Do not place the projector on a metallic table or anything weak in heat.
•Do not place anything about the lens, air fans and ventilation openings of the projector.
•Never block the air fan and ventilation openings.
•Do not cover the projector with a tablecloth, etc.
•Do not place the projector on a carpet or bedding.
Never look through the lens or openings when the lamp is on.
The powerful light could adversely affect vision.
Use special caution in households where children are present.
Use only the correct power cord and the correct power outlet.
Incorrect power supply could result in fire or electrical shock.
•Use only the correct power outlet depending on the indication on the projector and the safety standard.
•The enclosed power cord must be used depending on the power outlet to be used.
Be cautious of the power cord connection.
Incorrect connection of the power cord could result in fire or electrical shock.
•Do not touch the power cord with a wet hand.
•Check that the connecting portion of the power cord is clean (with no dust), before using. Use a soft and dry cloth to clean the power plug.
•Insert the power plug into a power outlet firmly. Avoid using a loose, unsound outlet or contact failure.
Be sure to connect with ground wire.
Connect the ground terminal of AC inlet of this unit with the ground terminal provided at the building using the correct power cord; otherwise, fire or electric shock can result.
• Don’t take the core of power cord away.
Surely connect the ground wire.

Safety Precautions (continued)
 WARNING
Be careful in handling the light source lamp.
The projector uses a high-pressure mercury glass lamp made of glass. The lamp can break with a loud bang, or burn out. When the bulb bursts, it is possible for shards of glass to fly into the lamp housing, and for gas containing mercury to escape from the projector’s vent holes.
Please carefully read the section “Lamp”.
Be careful in handling the power cord and external connection cables.
If you keep using a damaged the power cord or cables, it can cause a fire or electrical shock. Do not apply too much heat, pressure or tension to the power cord and cables.
If the power cord or cables is damaged (exposed or broken core wires, etc.), contact your dealer.
•Do not place the projector or heavy objects on the power cord and cables. Also, do not place a spread, cover, etc, over them because this could result in the inadvertent placing of heavy objects on the concealed power cord or cables.
•Do not pull the power cord and cables. When connecting and disconnecting the power cord or cables, do it with your hand holding the plug or connector.
•Do not place the cord near the heater.
•Avoid bending the power cord sharply.
•Do not attempt to work on the power cord.
Be careful in handling the battery of the remote control.
Incorrect handling of the battery could result in fire or personal injury. The battery may explode if not handled properly.
•Keep the battery away from children and pets. If swallowed consult a physician immediately for emergency treatment.
•Do not allow the battery in a fire or water.
•Avoid fire or high-temperature environment.
•Do not hold the battery with the metallic tweezers.
•Keep the battery in a dark, cool and dry play.
•Do not short circuit the battery.
•Do not recharge, disassemble or solder the battery.
•Do not give the battery a physical impact.
•Use only the battery specified in the other manual of this projector.
•Make sure the plus and minus terminals are correctly aligned when loading the battery.
•If you observe a leakage of the battery, wipe out the flower and then replace the battery. If the flower adheres your body or clothes, rinse well with water.
•Obey the local laws on disposing the battery.

Safety Precautions (continued)
 CAUTION
Be careful in moving the projector.
Neglect could result in an injury or damage.
•Do not move the projector during use. Before moving, disconnect the power cord and all external connections, and close the slide lens door or attach the lens cap.
•Avoid any impact or shock to the projector.
•Do not drag the projector.
•For moving the projector, use the enclosed case or bag if provided.
Do not put anything on top of the projector.
Placing anything on the projector could result in loss of balance or falling, and cause an injury or damage. Use special caution in households where children are present.
Do not attach anything other than specified things to the projector.
Neglect could result in an injury or damage.
• Some projector has a screw thread in a lens part. Do not attach anything other than specified options (such as conversion lens) to the screw thread.
Avoid a smoky, humid or dusty place.
Placing the projector in a smoke, a highly humid, dusty place, oily soot or corrosive gas could result in fire or electrical shock.
•Do not place the projector near a smoky, humid or dusty place (ex. a smoking space, a kitchen, a beach, etc.). Do not place the projector outdoors.
•Do not use a humidifier near the projector.
Take care of the air filter to normal ventilate.
The air filter should be cleaned periodically. If the air filter becomes clogged by dust or the like, internal temperature rises and could cause malfunction. The projector may display the message such as “CHECK THE AIR FLOW” or turn off the projector, to prevent the internal heat level rising.
•When the indicators or a message prompts you to clean the air filter, clean the air filter as soon as possible.
•If the soiling will not come off the air filter, or it becomes damaged, replace the air filter.
•Use the air filter of the specified type only. Please order the air filter specified in the other manual of this projector to your dealer.
•When you replace the lamp, replace also the air filter. The air filter may be attached when you buy a replacement lamp for this projector.
•Do not turn on the projector without air filter.
Avoid a high temperature environment.
The heat could have adverse influence on the cabinet of the projector and other parts. Do not place the projector, the remote control and other parts in direct sunlight or near a hot object such as heater, etc.
Avoid Magnetism.
Manufacture strongly recommends to avoid any magnetic contact that is not shielded or protected on or near the projector itself. (ie.,. Magnetic Security Devices, or other projector accessory that contains magnetic material that has not been provided by the manufacture etc.) Magnetic objects may cause interruption of the projector's internal mechanical performance which may interfere with cooling fans speed or stopping, and may cause the projector to completely shut down.

Safety Precautions (continued)
 CAUTION
Remove the power cord for complete separation.
•For safety purposes, disconnect the power cord if the projector is not to be used for prolonged periods of time.
•Before cleaning, turn off and unplug the projector. Neglect could result in
fire or electrical shock.
Ask your dealer to cleaning inside of the projector about every year.
Accumulations of dust inside the projector cause result in fire or malfunction. Cleaning inside is more effective if performed before every humid periods such as rainy season.
• Do not clean inside yourself because it is dangerous.
Disconnect the plug from the power outlet.
NOTE
Do not give the remote control any physical impact.
A physical impact could cause damage or malfunction of the remote control.
•Take care not to drop the remote control.
•Do not place the projector or heavy objects on the remote control.
Take care of the lens.
•Close the slide lens door or attach the lens cap to prevent the lens surface being scratched when the projector is not used.
•Do not touch the lens to prevent fog or dirt of the lens that cause deterioration of display quality.
•Use commercially available lens tissue to clean the lens (used to clean cameras, eyeglasses, etc.). Be careful not to scratch the lens with hard objects.
Take care of the cabinet and the remote control.
Incorrect care could have adverse influence such as discoloration, peeling paint, etc.
•Use a soft cloth to clean the cabinet and control panel of the projector and the remote control. When excessively soiled dilute a neutral detergent in water, wet and wring out the soft cloth and afterward wipe with a dry soft cloth. Do not use undiluted detergent directly.
•Do not use an aerosol sprays, solvents, volatile substances or abrasive cleaner.
•Before using chemical wipes, be sure to read and observe the instructions.
•Do not allow long-term close contact with rubber or vinyl.
About bright spots or dark spots.
Although bright spots or dark spots may appear on the screen, this is a unique characteristic of liquid crystal displays, and such do not constitute or imply a machine defect.
Be careful of printing of the LCD panel.
If the projector continues projecting a still image, inactive images or 16:9 aspect images in case of 4:3 panel, etc., for long time, the LCD panel might possibly be printed.

Safety Precautions (continued)
NOTE
About consumables.
Lamp, LCD panels, polarizors and other optical components, and air filter and cooling fans have a different lifetime in each. These parts may need to be replaced after a long usage time.
•This product isn’t designed for continuous use of long time. In the case of continuous use for 6 hours or more, or use for 6 hours or more every day (even if it isn’t continuous), or repetitious use, the lifetime may be shortened, and these parts may need to be replaced even if one year has not passed since the beginning of using.
•Any inclining use beyond the adjustment range explained in these user’s manuals may shorten the lifetimes of the consumables.
Before turning on the power, make the projector cool down adequately.
After turning the projector off, pushing the restart switch or interrupting of the power supply, make the projector cool down adequately. Operation in a high temperature state of the
projector causes a damage of the electrode and un-lighting of the lamp.
Avoid strong rays.
Any strong ray (such as direct rays of the sun or room lighting) onto the remote control sensors could invalidate the remote control.
Avoid radio interference.
Any interfering radiation could cause disordered image or noises.
• Avoid radio generator such as a mobile telephone, transceiver, etc. around the projector.
About displaying characteristic.
The display condition of the projector (such as color, contrast, etc.) depends on characteristic of the screen, because the projector uses a liquid crystal display panel. The display condition can differ from the display of CRT.
• Do not use a polarized screen. It can cause red image.
Turn the power on/off in right order.
To prevent any trouble, turn on/off the projector in right order mentioned below unless specifying.
•Power on the projector before the computer or video tape recorder.
•Power off the projector after the computer or video tape recorder.
Take care not to fatigue your eyes.
Rest the eyes periodically.
Set the sound volume at a suitable level to avoid bothering other people.
• It is better to keep the volume level low and close the windows at night to protect the neighborhood environment.
Connecting with notebook computer
When connecting with notebook computer, set to valid the RGB external image output (setting CRT display or simultaneous display of LCD and CRT).
Please read instruction manual of the notebook for more information.
Lamp
 WARNING
HIGH VOLTAGE HIGH TEMPERATURE HIGH PRESSURE
The projector uses a high-pressure mercury glass lamp. The lamp can break with a loud bang, or burn out, if jolted or scratched, handled while hot, or worn over time. Note that each lamp has a different lifetime, and some may burst or burn out soon after you start using them. In addition, when the bulb bursts, it is possible for shards of glass to fly into the lamp housing, and for gas containing mercury to escape from the projector’s vent holes.
About disposal of a lamp • This product contains a mercury lamp; do not put in trash. Dispose of in accord with environmental laws.
For lamp recycling, go to www.lamprecycle.org. (in USA)
For product disposal, contact your local government agency or www.eiae.org (in the US) or www.epsc.ca (in Canada).
For more information, call your dealer.
|
• If the lamp should break (it will make a loud bang when it does), unplug |
|
the power cord from the outlet, and make sure to request a replacement |
|
lamp from your local dealer. Note that shards of glass could damage the |
|
projector’s internals, or cause injury during handling, so please do not try to |
|
clean the projector or replace the lamp yourself. |
|
• If the lamp should break (it will make a loud bang when it does), ventilate |
Disconnect |
the room well, and make sure not to breathe the gas that comes out of the |
the plug from |
projector vents, or get it in your eyes or mouth. |
the power |
|
outlet |
• Before replacing the lamp, make sure the power switch is off and the |
|
power cable is not plugged in, then wait at least 45 minutes for the lamp to |
|
cool sufficiently. Handling the lamp while hot can cause burns, as well as |
|
damaging the lamp. |
|
|
|
• Do not open the lamp cover while the projector is suspended from above. |
|
This is dangerous, since if the lamp’s bulb has broken, the shards will |
|
fall out when the cover is opened. In addition, working in high places is |
|
dangerous, so ask your local dealer to have the lamp replaced even if the |
|
bulb is not broken. |
|
• Do not use the projector with the lamp cover removed. At the lamp |
|
replacing, make sure that the screws are screwed in firmly. Loose screws |
|
could result in damage or injury. |
|
|
|
• Use the lamp of the specified type only. |
|
• If the lamp breaks soon after the first time it is used, it is possible that |
|
there are electrical problems elsewhere besides the lamp. If this happens, |
|
contact your local dealer or a service representative. |
|
• Handle with care: jolting or scratching could cause the lamp bulb to burst |
|
during use. |
|
• Using the lamp for long periods of time, could cause it dark, not to light up |
|
or to burst. When the pictures appear dark, or when the color tone is poor, |
|
please replace the lamp as soon as possible. Do not use old (used) lamps; |
|
this is a cause of breakage. |

Warranty And After-Service
Unless seen any abnormal operations (mentioned with the first paragraph of WARNING in this manual), when a problem occurs with the equipment, first refer to the “Troubleshooting” section of the “Operating Guide”, and run through the suggested checks. If this does not resolve the problem contact your dealer or service company. They will tell you what warranty condition is applied.
Projector
PJ-TX300E
User’s Manual – Operating Guide
ENGLISH
Thank you for purchasing this projector.
 WARNING ► Before using this product, please read the "User's Manual - Safety Guide" and related manuals to ensure the proper use of this product. After reading them, store them in a safe place for future reference.
NOTE • The information in this manual is subject to change without notice.
•The manufacturer assumes no responsibility for any errors that may appear in this manual.
•The reproduction, transfer or copy of all or any part of this document is not permitted without express written consent.
Trademark acknowledgment
•VGA and XGA are registered trademarks of International Business Machines Corporation.
•Mac is registered trademarks of Apple Computer, Inc.
•VESA and SVGA are trademarks of Video Electronics Standard Association.
•Windows is a registered trademark of Microsoft Corporation.
•HDMI, the HDMI logo and High-Definition Multimedia Interface are trademarks or registered trademarks of HDMI Licensing LLC.
All other trademarks are the properties of their respective owners.
1

Content |
|
Content |
|
|
|
Before use................................................................................ |
4 |
Projector features......................................................................................... |
4 |
About this manual......................................................................................... |
4 |
About contents of package........................................................................... |
5 |
Part names................................................................................................... |
6 |
Projector....................................................................................................... |
6 |
Controls buttons........................................................................................... |
7 |
Ports............................................................................................................. |
7 |
Remote control............................................................................................. |
8 |
Preparations ............................................................................ |
9 |
Fastening the lens cover.............................................................................. |
9 |
Arrangement............................................................................................... |
10 |
Adjusting the projector’s elevation.............................................................. |
12 |
Connecting your devices............................................................................ |
13 |
With a VCR/DVD player............................................................................. |
13 |
For HDMI signal source ............................................................................. |
14 |
For DVI signal source................................................................................. |
14 |
For a SCART RGB input ............................................................................ |
14 |
With a computer......................................................................................... |
15 |
Example of computer signal....................................................................... |
16 |
Connecting a power supply........................................................................ |
17 |
Loading batteries into the remote control................................................... |
18 |
Using the remote control............................................................................ |
19 |
Using the remote control button lights........................................................ |
19 |
Projection............................................................................... |
20 |
Turning the power on.................................................................................. |
20 |
Selecting an input signal ............................................................................ |
21 |
Automatically adjusting the picture............................................................. |
21 |
Adjusting the display position..................................................................... |
22 |
Adjusting the zoom..................................................................................... |
22 |
Adjusting the focus..................................................................................... |
22 |
Turning the power off.................................................................................. |
23 |
Basic operation...................................................................... |
24 |
ASPECT..................................................................................................... |
24 |
IRIS ............................................................................................................ |
25 |
MODE......................................................................................................... |
26 |
BLACK........................................................................................................ |
27 |
BRIGHTNESS, CONTRAST, COLOR........................................................ |
27 |
MY MEMORY............................................................................................. |
28 |
EASY MENU ........................................................................... |
30 |
EASY MENU operation .............................................................................. |
30 |
2

Content
|
|
(EASY MENU) ......................................................................... |
30 |
EASY MENU functions............................................................................... |
31 |
ASPECT..................................................................................................... |
31 |
MODE, BLACK........................................................................................... |
32 |
BRIGHTNESS, CONTRAST, COLOR, TINT, SHARPNESS, MIRROR .....33 |
|
RESET, LANGUAGE, Go To Advance Menu ............................................. |
34 |
Advanced Menu ..................................................................... |
35 |
Advanced Menu operation ......................................................................... |
35 |
PICTURE menu.......................................................................................... |
37 |
BRIGHTNESS, CONTRAST, GAMMA....................................................... |
37 |
COLOR TEMP............................................................................................ |
39 |
COLOR, TINT, SHARPNESS..................................................................... |
40 |
IRIS, BLACK, MY MEMORY...................................................................... |
41 |
IMAGE menu.............................................................................................. |
43 |
ASPECT, OVER SCAN.............................................................................. |
43 |
V POSITION, H POSITION, H PHASE, H SIZE, AUTO ADJUST.............. |
44 |
INPUT menu............................................................................................... |
45 |
PROGRESSIVE, COLOR SPACE ............................................................. |
45 |
COMPONENT, VIDEO FORMAT, HDMI, FRAME LOCK........................... |
46 |
S-ASPECT, INFORMATION....................................................................... |
47 |
SETUP menu ............................................................................................. |
48 |
KEYSTONE, WHISPER, MIRROR ............................................................ |
48 |
SCREEN menu .......................................................................................... |
49 |
LANGUAGE, MENU POSITION, OSD BRIGHT......................................... |
49 |
START UP, MyScreen................................................................................ |
50 |
MyScreen Lock, MESSAGE....................................................................... |
51 |
DIGITAL SHUTTER.................................................................................... |
52 |
OPTION menu............................................................................................ |
53 |
AUTO OFF, LAMP TIME, FILTER TIME..................................................... |
53 |
SERVICE (FAN SPEED, GHOST, STRIPE)............................................... |
54 |
SERVICE (FILTER MESSAGE, FACTORY RESET) ................................. |
55 |
Maintenance .......................................................................... |
56 |
Lamp .......................................................................................................... |
56 |
Air filter....................................................................................................... |
58 |
Inside of the projector................................................................................. |
60 |
Lens............................................................................................................ |
60 |
Cabinet and remote control........................................................................ |
60 |
Troubleshooting..................................................................... |
61 |
Related message ....................................................................................... |
61 |
Regarding the indicator lamps.................................................................... |
62 |
Phenomena that may be easily mistaken as machine defects................... |
64 |
Warranty and after-service ................................................... |
67 |
Specifications ........................................................................ |
67 |
Dimension diagram .................................................................................... |
68 |
Glossary................................................................................. |
69 |
ENGLISH
3

Before use
Before use
Projector features
This projector is used to project computer and NTSC/PAL/SECAM video signals onto a screen. It requires only a small amount of space for installation and projects a large image from even a short distance.
The following features will turn any room into a High Definition Theater.
●Super Focus ED (Extra-low dispersion) lenses are used for the highest possible image quality.
●720P wide LCD panels are used for faithful reproduction of high definition images.
●Motorized iris control provides film-like images with a darker black.
●The 1.6x zoom lens and optical lens shift feature allow for flexibility of installation and viewing position.
About this manual
Various symbols are used throughout this manual. The meanings of these symbols are described below.
 WARNING This symbol indicates information that, if ignored, could possibly result in personal injury or even death due to incorrect handling.
 CAUTION This symbol indicates information that, if ignored, could possibly result in personal injury or physical damage due to incorrect handling.
NOTE |
To ensure proper use, please take special notice of information |
|
provided following this symbol. |
See the pages noted after this symbol for more information about the current topic.
4
Before use
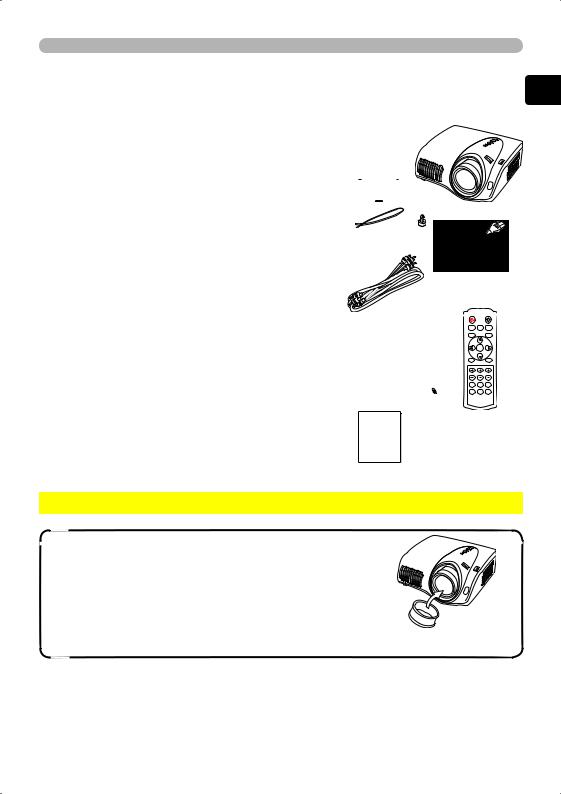
About contents of package
Your projector should come with the items shown below. Check to make sure that all the items are included. Contact your dealer immediately if anything is missing.
(1) Projector..................................................................................
(2) Lens cover, rivet and strap.................................... 
(3) Power cord...................................................................................
(4) Component video cable .......................................
ENGLISH
(5) SCART adapter (PJ-TX200E only)
(5) Remote control and 2 AAA batteries....................................... 
(6) User’s manuals ....................................................
POWER |
|
LIGHT |
BLACK |
MODE |
MEMORY |
ASPECT |
|
IRIS |
|
ENTER |
|
MENU |
|
RESET |
BRIGHT CONTRAST |
COLOR |
|
HDMI |
PC |
AUTO |
COMPO |
S-VIDEO |
VIDEO |
 WARNING ► Do not place the projector on an unstable surface.
NOTE • Keep the original packing materials for future reshipment.
Be sure to use the original packing material when moving the projector. Use special caution for the lens.
Use the original cushion for the lens.
 Cushion for the lens
5
Before use
Part names
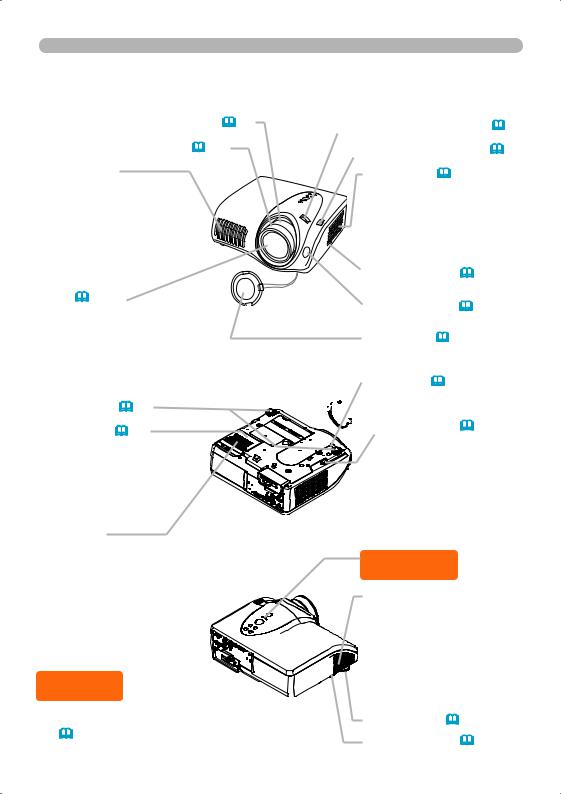
Projector
Zoom ring (22)
Focus ring (22)
Exhaust vent
►Do not block or cover the projector's vents.
►To avoid being burnt,
please do not touch areas near the vents while the projector is in use or immediately after use.
Lens (9, 60)
A bright light for projecting is emitted from the lens.
►Please do not look into the lens while the projector is in use.
Horizontal lens shift dials (22) Vertical lens shift dials (22)
Filter cover (58)
Covers the air filter and intake vent.
► Maintain the air filter to ensure proper ventilation.
Elevator button (12)
(Front right view) Remote sensor (19)
Lens cover (9)
Strap hole (9)
Elevator feet (12) |
|
Lamp cover (57) |
|
Covers the lamp. |
|
► The lamp has a finite |
|
product life. Preparation |
|
of a new lamp and |
|
early replacement are |
|
recommended. |
|
Intake vent |
(Bottom view) |
►Do not place anything that may be sucked into or stick to the vents underneath the projector.
Ports 
See next page.
► Please see the (Rear left view) “Connecting your devices”
(13) section for more information.
 Elevator button (12)
Control buttons
See next page.
Exhaust vent
►Do not block or cover the projector's vents.
►To avoid being burnt, please do not touch areas
near the vents while the projector is in use or immediately after use.
Elevator foot (12)
Elevator button (12)
6
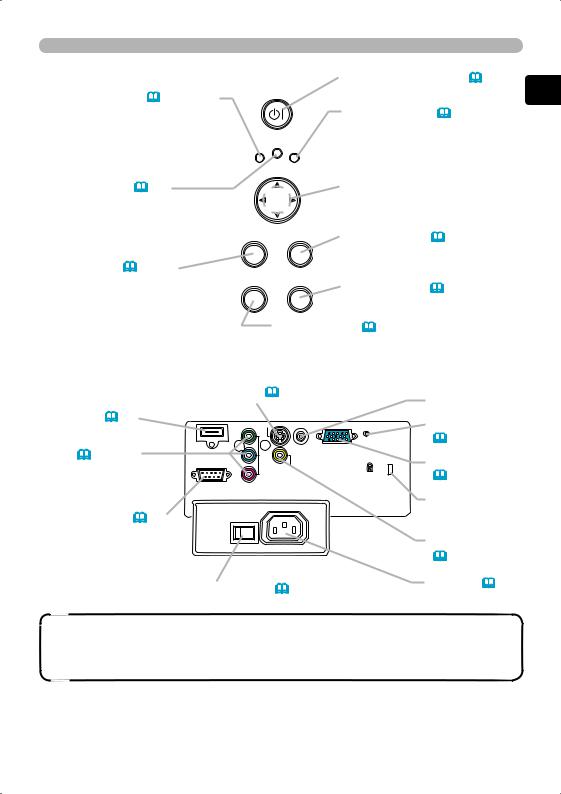
Control buttons
POWER indicator (20, 23, 62)
This indicator blinks while the projector is cooling down or warming up
►Note that a lit or blinking red indicator denotes a problem.
TEMP indicator (62)
►Note that a lit or blinking red indicator indicates a problem.
MENU button (30, 35)
Used to begin or end a menu operation.
STANDBY/ON
POWER TEMP LAMP
Before use
STANDBY/ON button (20, 23)
Used to turn the power on and off.
LAMP indicator (62)
►Note that a lit or blinking red indicator indicates a problem.
Cursor buttons ▲,▼,◄,►
Used to make adjustments and operate menus.
ENGLISH
MENU |
ENTER |
ENTER button (30, 35) |
|
|
Used to proceed to the next stage |
|
|
in a menu operation. |
INPUT |
RESET |
RESET button (31, 36) |
|
|
|
|
|
Used to cancel an adjustment. |
INPUT button (21)
Used to select an input signal. Pressing this button toggles between input ports.
Ports |
S-VIDEO port (13) |
|
|
||
HDMI port (14) |
|
S-VIDEO |
COMPONENT VIDEO |
|
TRIGGER COMPUTER |
|
|
Y |
ports (13, 14) |
HDMI |
CB/PB |
This is a set of input |
|
|
CONTROL |
CR/PR |
|
|
|
VIDEO |
ports composed of Y, CB/ |
|
COMPONENT VIDEO |
PB and CR/PR ports. |
|
|
CONTROL port (15) |
|
AC IN |
|
|
|
|
|
I O |
|
Power switch (20, 23) |
|
TRIGGER port
Restart switch (23, 64)
COMPUTER port (15)
Kensington lock slot
VIDEO port (13, 14)
AC inlet (17)
NOTE • Use only an HDMI cable marked with the HDMI logo for HDMI connections.
• The TRIGGER port (12V/25mA) is used to connect to a screen that can be controlled via a trigger signal from display equipment.
7
Before use
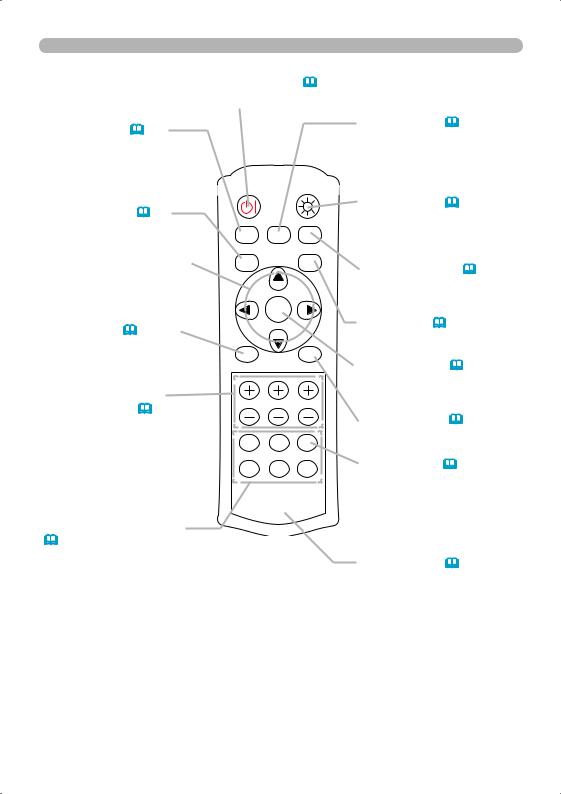
Remote control |
POWER button (20, 23) |
|
|
|
Used to turn the power on and off. |
BLACK button (27)
Used to select a BLACK mode. Each mode adjusts the black setting to suit different conditions.
ASPECT button (24)
Used to select an aspect ratio.
Cursor buttons ▲,▼,◄,►
Used to make adjustments and operate menus.
POWER LIGHT
BLACK MODE MEMORY
ASPECT IRIS
MODE button (26)
Used to select a mode. Each mode is a combination of settings for gamma, color temperature and iris.
LIGHT button (19)
Used to make the buttons on the remote control light up for a short time.
MEMORY button (28)
Used to save and load user adjustment settings.
ENTER
MENU button (30, 35) |
|
|
|
IRIS button (25) |
|
|
|
Used to adjust the iris. |
|
Used to begin or end a menu |
|
|
|
|
|
|
|
|
|
operation. |
MENU |
|
RESET |
ENTER button (30, 35) |
|
|
|
|
|
|
BRIGHT CONTRAST COLOR |
Used to proceed to the next |
||
CONTRAST, BRIGHT, |
|
|
|
stage in a menu operation. |
COLOR buttons (27) |
|
|
|
RESET button (31, 36) |
Used to adjust the contrast, |
|
|
|
|
brightness and color tone. |
HDMI |
PC |
AUTO |
Used to cancel an adjustment. |
|
|
|||
|
COMPO |
S-VIDEO |
VIDEO |
AUTO button (21) |
|
|
|
|
Used to enable the automatic |
|
|
|
|
adjustment function. |
PC, HDMI, COMPO, |
|
|
|
|
S-VIDEO, VIDEO buttons |
|
|
|
|
(21) |
|
|
|
|
Used to select an input port. |
|
|
|
Battery cover (18) |
PC button COMPUTER port |
|
|
|
|
HDMI button HDMI port |
|
|
|
The battery cover is on the |
COMPO button COMPONENT VIDEO ports |
|
back of the remote control. |
||
S-VIDEO button S-VIDEO port
VIDEO button VIDEO port
8

Preparations
Preparations
Fastening the lens cover
Fasten the lens cover to the projector using the included strap to prevent it from becoming lost.
Fix the strap to the lens (1) |
(2) |
1. cover strap ring. |
|
2.
3.
Put the strap into the groove on the rivet.
Press the rivet into the strap hole.
Strap
Lens cover strap ring
Strap hole
 Rivet
Rivet
ENGLISH
4. Put the lens cover on the lens of the projector.
 WARNING ► Do not fasten the lens cover during or immediately after use. Handling while the projector is hot could cause burn and/or projector malfunction.
 CAUTION ► When the projector is not in use, be sure to close the lens cover to prevent the lens surface being scratched.
9
Preparations
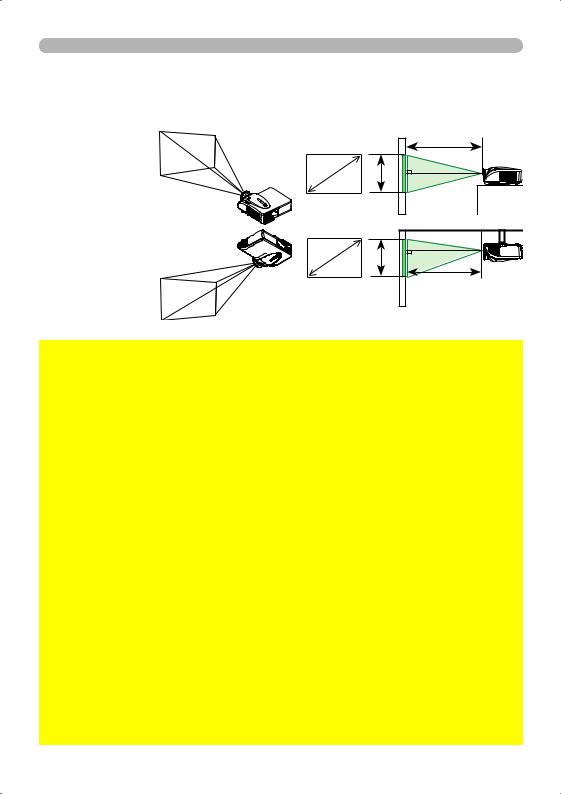
Arrangement
Arrange the projector according to the manner in which you will use the projector and the environment the projector will be used in.
On a horizontal surface
|
(b) |
(a) |
(c) |
|
Suspended from the ceiling
(a) |
(c) |
|
|
|
(b) |
 WARNING ► Place the projector in a stable, horizontal position. If the projector falls or is knocked over it could result in injury and/or damage to the projector. Using a damaged projector could result in fire and/or electric shock.
•Do not place the projector on an unstable, slant or vibratory surface such as a wobbly or inclined stand.
•Do not stand the projector on its side, front or rear faces.
•Contact your dealer before ceiling installations and similar.
►Place the projector in a cool place, with adequate ventilation. The high operating temperature of the projector could cause burns, fire and/or projector malfunction if not properly placed.
• Do not block or cover the projector's vents.
• Maintain a space of at least 30 cm between the sides of the projector and other objects such as walls.
• Do not place the projector on metallic objects or objects susceptible to heat.
• Do not place the projector on carpets, cushions or bedding.
• Do not place the projector in direct sunlight or near heat sources, such as heaters.
• Do not place anything on or near the projectors lens or vents. Do not place anything on top of the projector.
• The projector also has intake vents on the bottom. Do not place anything that may be sucked into or stick to the vents underneath the projector.
►Do not place the projector any place where it may get wet. Placing the projector in a humid place or inserting liquid in the projector could cause fire, an electric shock and/or malfunction to the projector.
• Do not place the projector in a bathroom or outdoors.
• Do not place anything containing liquid near the projector.
10

Preparations
Refer to the illustrations and tables below to determine the screen size and projection distance.
The values shown in the table are calculated (±10%) for a full size screen at 1280x720.
For 16:9 screens |
Screen size |
min. |
max. |
Screen height |
ENGLISH |
||||
|
(a) |
(b) Projection distance |
|
(c) |
|
||||
|
inch |
(m) |
m |
(inch) |
m |
(inch) |
cm |
(inch) |
|
(a) |
30 |
(0.8) |
0.8 |
(32) |
1.3 |
(52) |
37 |
(15) |
|
40 |
(1.0) |
1.1 |
(43) |
1.8 |
(70) |
50 |
(20) |
|
|
|
50 |
(1.3) |
1.4 |
(54) |
2.3 |
(89) |
62 |
(25) |
|
|
60 |
(1.5) |
1.7 |
(66) |
2.7 |
(107) |
75 |
(29) |
|
|
70 |
(1.8) |
2.0 |
(77) |
3.2 |
(125) |
87 |
(34) |
|
|
80 |
(2.0) |
2.2 |
(89) |
3.6 |
(143) |
100 |
(39) |
|
|
90 |
(2.3) |
2.5 |
(100) |
4.1 |
(161) |
112 |
(44) |
|
|
100 |
(2.5) |
2.8 |
(111) |
4.6 |
(179) |
125 |
(49) |
|
|
120 |
(3.0) |
3.4 |
(134) |
5.5 |
(215) |
149 |
(59) |
|
|
150 |
(3.8) |
4.3 |
(168) |
6.9 |
(270) |
187 |
(74) |
|
|
200 |
(5.1) |
5.7 |
(224) |
9.2 |
(360) |
249 |
(98) |
|
|
250 |
(6.4) |
7.1 |
(281) |
11.5 |
(451) |
311 |
(122) |
|
|
300 |
(7.6) |
8.6 |
(337) |
13.8 |
(541) |
374 |
(147) |
|
For 4:3 screens |
|
(a) |
(b) Projection distance |
|
(c) |
|
|||
|
Screen size |
min. |
max. |
Screen height |
|
||||
|
inch |
(m) |
m |
(inch) |
m |
(inch) |
cm |
(inch) |
|
(a) |
30 |
(0.8) |
1.0 |
(39) |
1.6 |
(65) |
46 |
(18) |
|
40 |
(1.0) |
1.4 |
(53) |
2.2 |
(87) |
61 |
(24) |
|
|
|
|
||||||||
|
50 |
(1.3) |
1.7 |
(67) |
2.8 |
(109) |
76 |
(30) |
|
|
60 |
(1.5) |
2.1 |
(81) |
3.3 |
(131) |
91 |
(36) |
|
|
70 |
(1.8) |
2.4 |
(95) |
3.9 |
(153) |
107 |
(42) |
|
|
80 |
(2.0) |
2.8 |
(109) |
4.5 |
(175) |
122 |
(48) |
|
|
90 |
(2.3) |
3.1 |
(122) |
5.0 |
(198) |
137 |
(54) |
|
|
100 |
(2.5) |
3.5 |
(136) |
5.6 |
(220) |
152 |
(60) |
|
|
120 |
(3.0) |
4.2 |
(164) |
6.7 |
(264) |
183 |
(72) |
|
|
150 |
(3.8) |
5.2 |
(206) |
8.4 |
(330) |
229 |
(90) |
|
|
200 |
(5.1) |
7.0 |
(275) |
11.2 |
(441) |
305 |
(120) |
|
|
250 |
(6.4) |
8.7 |
(344) |
14.0 |
(552) |
381 |
(150) |
|
|
300 |
(7.6) |
10.5 |
(413) |
16.8 |
(663) |
457 |
(180) |
|
 CAUTION ► Avoid smoky, humid and dusty places (e.g. near a humidifier, a smoking area, a kitchen etc.) Placing the projector in such a place could cause fire, electric shock and/or projector malfunction.
►Adjust the position of the projector so that light does not shine directly on the projector's remote sensor.
►The manufacturer strongly recommends avoiding any magnetic contact that is not shielded or protected on or near the projector itself. (e.g. Magnetic Security Devices, or other projector accessories that contain magnetic material that has not been provided by the manufacture etc.) Magnetic objects may cause interruption of the projector's internal mechanisms which may interfere with cooling fan speed or cause the fans to stop, and may cause the projector to shut down completely.
11
Preparations
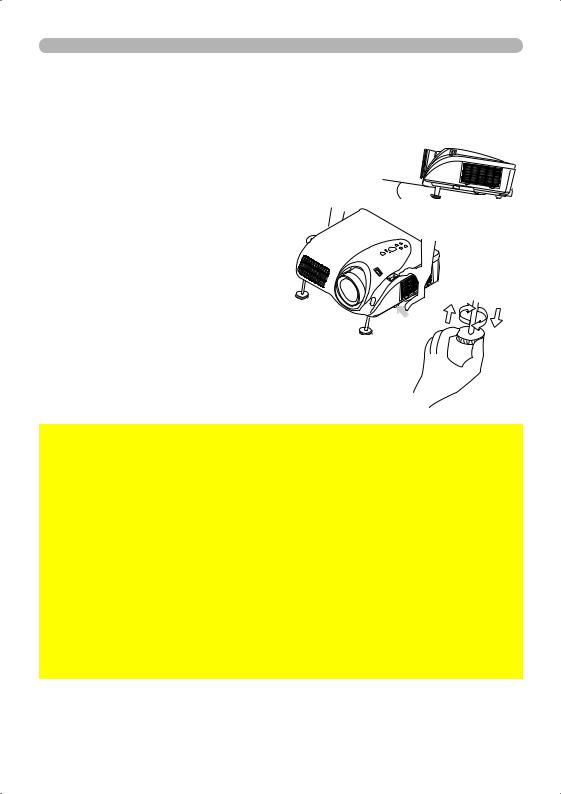
Adjusting the projector’s elevation
The elevator feet can be used to make adjustments if the surface on which the projector is set is uneven or if the projection angle needs to be otherwise adjusted. The adjustment range of the elevator feet is 0 to 7 degrees.
1. Press and hold in the elevator buttons while holding the projector.
There are elevator buttons and feet |
7° |
|
on the both sides of the projector. |
||
|
||
Raise or lower the projector to the |
|
|
2. desired height and release the |
|
|
elevator buttons. When the elevator |
|
|
buttons are released, the elevator |
|
|
feet will lock into position. |
|
|
If necessary, the elevator feet can |
|
|
3. be manually twisted to make more |
|
|
precise adjustments. |
|
 WARNING ► Do not adjust the elevation of the projector during or immediately after use. Handling while the projector is hot could cause burn and/or projector malfunction. Before adjusting the elevation, make sure that the power switch is off, that the power cord is unplugged, and that the projector is adequately cool.
 CAUTION ► Using the elevator buttons without holding the projector could cause the projector to fall, overturn, or strike your fingers and possibly cause projector malfunction. To prevent damaging the projector and injuring yourself, always hold the projector whenever using the elevator buttons to adjust the elevator feet.
►Do not tilt the projector to the right or left. Also be sure not to raise the front or rear of the projector more than 7 degrees. Raising the projector more than 7 degrees could cause projector malfunction or shorten the lifetime of consumables.
►Other than raising the projector using the elevator feet, place the projector horizontally.
12

Connecting your devices
With a VCR/DVD player
Y 


 CB/PB
CB/PB

 CR/PR
CR/PR


Component video Out
Component
cable
S-video Out |
S-video |
|
cable |
||
|
Preparations
HDMI CONTROL
S-VIDEO
Y
TRIGGER
CB/PB
VIDEO
CR/PR
COMPONENT VIDEO
ENGLISH
COMPUTER
S-VIDEO
|
Y |
|
HDMI |
TRIGGER |
COMPUTER |
CB/PB |
|
|
|
|
|
CONTROL |
VIDEO |
|
|
|
|
|
CR/PR |
|
|
COMPONENT VIDEO |
|
Video Out
Video cable
S-VIDEO
|
Y |
|
HDMI |
TRIGGER |
COMPUTER |
CB/PB |
|
|
|
|
|
CONTROL |
VIDEO |
|
|
|
|
|
CR/PR |
|
|
COMPONENT VIDEO |
|
 CAUTION ► Turn off all devices prior to connecting them to the projector. Attempting to connect a live device to the projector may generate extremely loud noises or other abnormalities that may result in malfunction and/or damage to the device and/or projector.
►Use the accessory cables or a designated cable type to make connections. Some cables have to be used with a core. A cable that is too long may cause picture degradation. Please consult with your dealer for more information. For cables that have a core only at one end, connect the end with the core to the projector.
►Make sure that devices are connected to the correct port. An incorrect connection may result in malfunction and/or damage to the device and/or projector.
NOTE • Be sure to tighten the screws on connectors to secure.
• Automatic adjustment may not function correctly with some input signals.
13
Preparations
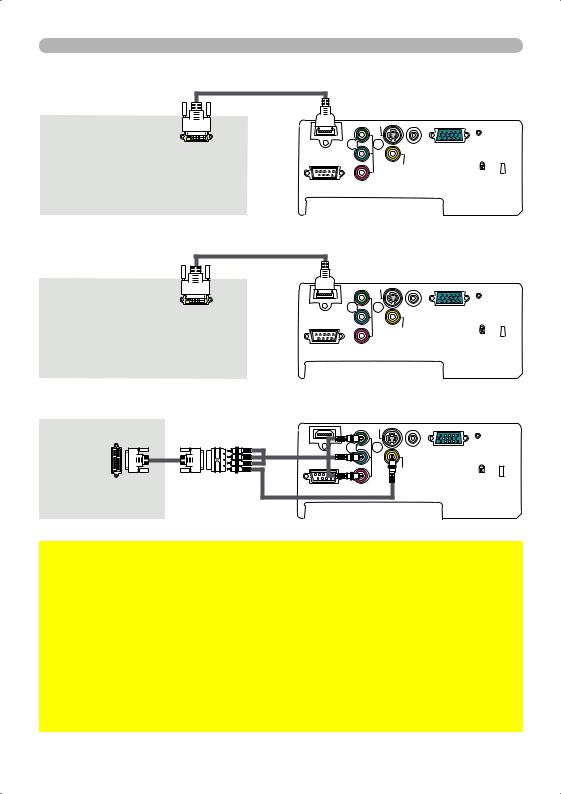
For an HDMI signal source
HDMI cable
HDMI Out
HDMI CONTROL
S-VIDEO |
|
Y |
|
|
TRIGGER |
CB/PB |
|
CR/PR |
VIDEO |
|
|
COMPONENT VIDEO |
|
COMPUTER
For a DVI signal source
|
DVI-HDMI cable |
DVI Out |
HDMI |
|
|
|
CONTROL |
S-VIDEO |
|
Y |
|
|
TRIGGER |
CB/PB |
|
CR/PR |
VIDEO |
|
COMPONENT VIDEO
COMPUTER
For an SCART RGB input
|
SCART |
Component |
|
cable |
|
|
cable |
|
|
|
|
SCART |
|
Adapter |
|
|
|
Out |
|
Video |
|
|
|
|
|
cable |
S-VIDEO
|
Y |
|
HDMI |
TRIGGER |
COMPUTER |
CB/PB |
|
|
|
|
|
CONTROL |
VIDEO |
|
|
|
|
|
CR/PR |
|
|
COMPONENT VIDEO |
|
 CAUTION ► Turn off all devices prior to connecting them to the projector. Attempting to connect a live device to the projector may generate extremely loud noises or other abnormalities that may result in malfunction and/or damage to the device and/or projector.
►Use the accessory cables or a designated cable type to make connections. Some cables have to be used with a core. A cable that is too long may cause picture degradation. Please consult with your dealer for more information. For cables that have a core only at one end, connect the end with the core to the projector.
►Make sure that devices are connected to the correct port. An incorrect connection may result in malfunction and/or damage to the device and/or projector.
14
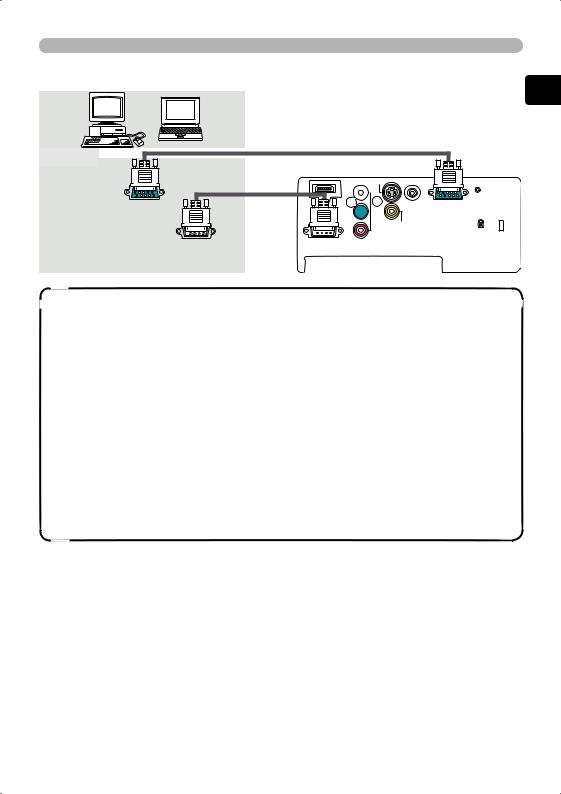
With a computer
RGB Out
RS-232C
Preparations
RGB cable
RS-232C cable
(optional
use)
ENGLISH
S-VIDEO

 Y
Y
TRIGGER COMPUTER

 CB/PB
CB/PB
VIDEO
CR/PR
COMPONENT VIDEO
NOTE • Be sure to tighten the screws on connectors to secure.
•Use only an HDMI cable marked with the HDMI logo for HDMI connections.
•Use a DVI-HDMI cable or adapter when connecting to a DVI output device. In some cases however, a DVI input to the HDMI port may not work properly.
•Whenever attempting to connect a laptop computer to the projector, be sure to activate the laptop’s external RGB output (set the laptop to CRT display or to simultaneous LCD and CRT display). For more information please refer to the instruction manual of the laptop computer.
•Be sure to check jack type, signal level, timing and resolution before connecting this projector to a computer.
•Some computers may have multiple screen display modes. Some of these modes cannot used with this projector.
•The image may not be displayed correctly when the input signal is a composite sync or a sync on G signal.
•For some computer signals the optional Mac adapter is necessary.
•Automatic adjustment may not function correctly with some input signals.
15
 Loading...