


LED TV RECEIVER
USER MANUAL
MODEL:
L3D42D25N
Please read this manual carefully before using your television and keep this manual in a good place for future reference.

Contents
Contents
Caution |
1 |
Safety Information |
2-3 |
Accessories |
4 |
Technical Specification |
4 |
|
|
Product Introduction |
5 |
Front View |
5 |
Rear View |
5 |
|
|
Connections |
6 |
|
|
Remote Control |
7-8 |
|
|
Basic Operation |
9 |
|
|
OSD Menu |
10-17 |
1. CHANNEL menu |
10-11 |
2. PICTURE menu |
12 |
3. SOUND menu |
13 |
4. TIME menu |
14 |
5. OPTION menu |
15 |
Hotel Mode |
16 |
6. PC Steup menu |
17 |
|
|
Multimedia Operation |
18-20 |
|
|
3D Imaging |
21-22 |
|
|
Smart TV |
23-33 |
1. Install Wizard |
23-25 |
2. Main Launcher |
26-31 |
3. Exception handling |
32-33 |
Simple Troubleshooting |
34 |
Caution
Caution
The lightening flash with arrowhead symbol, within an equilateral triangle is intended to alert the user to the presence of un-insulated “dangerous voltage” within the products enclosure that may be of sufficient magnitude to constitute a risk of electric shock to the persons.
The exclamation point within an equilateral triangle is intend to alert the user to the presence of important operating and maintenance (servicing) instructions in the literature accompanying the appliance.
Correct disposal of this Product
(Waste Electrical & Electronic Equipment (WEEE)
Your product is designed and manufactured with high quality materials and components which can be recycled and reused.
This symbol means that electrical and electronic equipment, at their end- of-life should be disposed of separately from your household waste. Please dispose of this equipment at your local community waste collection/ recycling center.
In the USA there are separate collection systems for used electrical and electronic products. Please help us to conserve the environment we live in!
1
Safety information
Safety information
Safety information
Mains supply
This television is designed to operate from a 100-240 Volts 50Hz AC mains supply. Other power sources may damage it. Check that the rating plate states 100-240V AC before you plug it in for the first time. The manufacturer accepts NO liability for damage or injury caused by using the product with the wrong mains voltage.
Mains plug
We have fitted this television with a standard mains plug.
 If for any reason you cut off the mains plug, please destroy the old plug as it would be dangerous if inserted into a live power outlet. Carefully follow the wiring instructions supplied with the new plug.
 fitted to the plug, remove the fuse before throwing the plug away.
r.
 The mains plug shall be the main disconnect device and shall be operable at all times.
Safe use and care of your television
We have designed and made this television to meet European safety standards, but as with any electronic
equipment you must take care to stay safe and get the best results. Here is some good advice to help you do this.
Don’t continue to use your television if you have spilt liquids in it, if it is damaged in any way or if it does not work normally. Immediately unplug the television and get expert advice.
Switch off mains power or pull out the power plug when you leave the television unattended, unless the function of the television requires a continuous power supply.
Protect the screen from fingerprints.
Ventilation
Place the television on a hard flat surface away from direct sunlight and heat sources. If it is in a cabinet, allow at least a 10cm gap all around. Don’t obstruct the ventilation slots, including those underneath, with soft furnishings. Overheating will shorten the life of the television and increase the risk of fire.
Cleaning
Disconnect the mains supply and use only a lightly dampened soft cloth. Do not use chemical solvents or strong detergents as these may damage the cabinet or screen.
Never allow water droplets to remain on the screen as moisture can cause permanent discolouration. Greasy marks must only be removed with a commercial cleaner specifically recommended for LED screens.
2
Safety information
Safety information
Batteries
Remove batteries when the television is not to be used for a long time. Batteries left in equipment may cause damage through deterioration and corrosive leakage, invalidating the guarantee. To protect the environment, use local recycling facilities for battery disposal.
Protect the mains lead. You must ensure the mains lead cannot be walked on, crushed, chafed, cut, trapped.
Avoid harsh conditions such as wet or damp places, high humidity, strong vibration, extremely high or low temperatures, strong sunlight, places which are very dusty.
Never fit makeshift stands or legs to the television.
Never push objects into holes and ventilation slots.
Don’t touch the LED display as it gets warm when operating, this is normal and is not a fault.
To prevent electric shock, do not remove any cover.
If anything goes wrong, don’t try and fix it yourself, get a qualified service agent to look at it.
To prevent injury this television must be securely attached to the wall or it’s supplied stand in accordance
with the installation instructions.
Pull the mains plug out of the wall socket and disconnect the aerial lead during thunderstorms.
Eye Fatigue
When using this product as a computer monitor, health and safety experts recommend short frequent breaks
rather than occasional, longer breaks, for example a 5-10 minute break after an hour of continuous screen
work is likely to be better than a 15 minute break every 2 hours.
Do not use the monitor against a bright background or where sunlight or other bright light source will shine
directly on the screen.
CAUTION:
WARNINGS:
 The apparatus shall not be exposed to dripping or splashing and that no objects filled with liquids, such as vases, shall be placed on the apparatus.
 flame sources, such as lighted candles, should be placed on the apparatus.
 To prevent injury, this apparatus must be securely attached to the floor / wall in accordance with the installation instructions.
 The mains plug shall be the main disconnect device and shall be operable at all times.
 This appliance is intended for domestic / household use only, and should not be used for any other purpose. Any other use may invalidate the warranty and might be dangerous.
 If the supply cord is damaged, it must be replaced by the manufacturer, its service agent or similarly qualified persons in order to avoid a hazard.
3
Accessories & Technical Specification
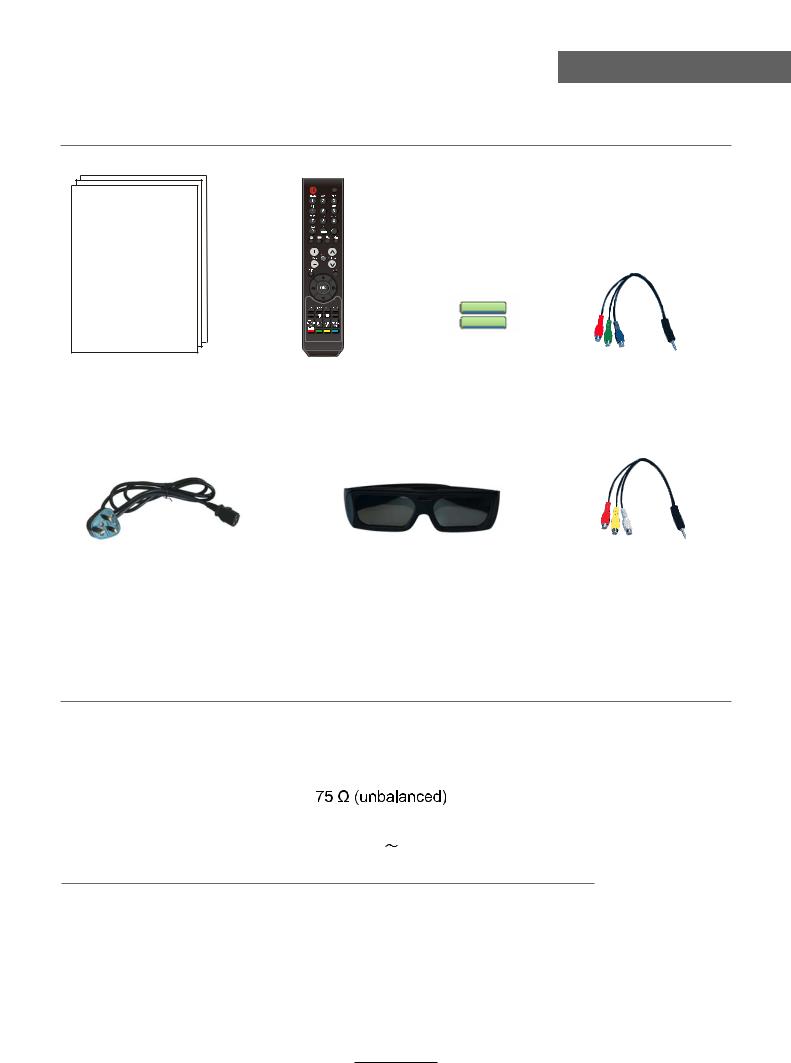
Accessories
SOURCE
FAV |
FAV- |
FAV+ |
ASPECT |
|
ZOOM |
ROOT |
|
NICAM/A2 |
A-B |
GOTO |
ABC/123 |
NOTIFICATION |
User’s Manual |
Remote control |
Batteries |
Converter cable |
for YPBPR video |
Power cord |
3D glasses |
Converter cable |
for AV |
Technical Specification
- TV System |
PAL BG/DK/I SECAM BG/DK |
- Screen Size |
42 inch (diagonal) |
- Resolution |
1920 x 1080 |
- Aerial input |
|
- Audio output power |
2x8W |
- Power Consumption |
100-240V 50/60Hz 160W |
Remote Control |
|
Type |
infrared |
Control distance |
5m |
Control angle |
30 0 (horizontal) |
Batteries |
2 x 1.5V, size AAA |
4

Product Introduction
Product Introduction
Front View
VOL
CH
Display the input source menu.
Display/exit the OSD menu.
CH
Scan through channels.
VOL 
Adjust the volume.
|
|
|
Turn on/standby the TV set. |
LED indicator |
Remote Control window(keep clear) |
||
(IR) Infrared Receiver: Receives IR signals from the remote control. |
|||
(Power on/Standby) LED indicator: Press |
to turn on and off. |
||
Indicator on(Red) |
Standby mode |
||
Indicator on(Green) |
Power on mode |
||
The effective receiving range for the signal is 5-8 metres from the front of the remote control window, and 300 to the left or right side and 200 above or below the control window.
Rear View
200mm
200mm
Connections
See next page
AC Power cable- Connect to AC power supply
5
Connections
Connections
|
|
|
|
|
|
|
|
|
|
|
|
|
|
|
|
|
|
|
|
|
|
|
|
|
|
|
|
|
SD Card |
|
|
|||
|
|
|
||||
USB2 |
USB1 |
|
|
|
|
|
|
|
|
|
|||
|
|
|
|
|||
|
USB |
|
|
|
||
|
|
|
|
|||
|
|
|
|
|
|
|
|
COAXIAL |
|||||
|
ANT IN |
|
|
|
||
|
|
|
||||
mini |
AV2 |
|||||
mini |
YPbPr2 |
|||||
|
1 |
|
|
|
|
|
|
R-AUDIO-L |
|||||
|
VIDEO |
|||||
PC |
AUDIO |
|||||
|
|
|
|
|
|
|
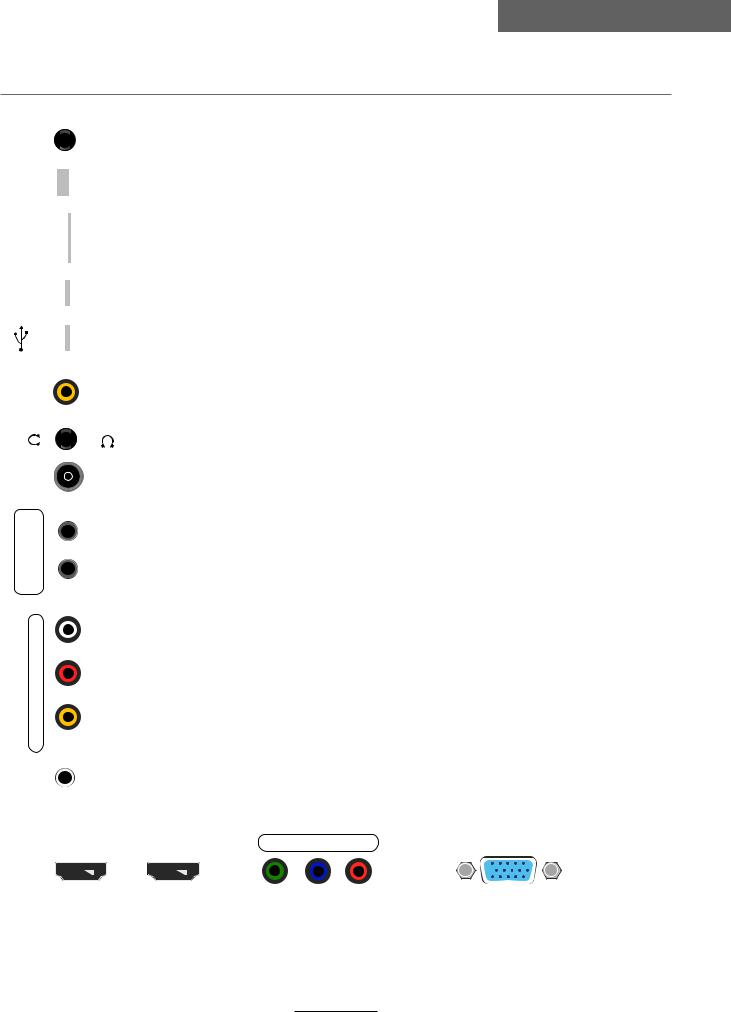
Recovery: Press revcovery button and hold on turn on TV enter the recovery mode.
RJ45: Ethernet connector.
SD Card: SD card slot.
USB1/2: Connect to USB device for multimedia (Used under andriod)
USB: Connect to USB device for multimedia (Used under the media channel)
COAXIAL: Output to audio amplifier
Headphone:Connect Headphone
ANT IN: Connect to antenna or cable source.
Mini AV 2: Connect to the Video & Audio output on external devices with the converter cable. (Audio outputs are shared with YPbPr 2)
Mini YPbPr 2: Connect to the YPbPr output on external devices with the converter cable.
(AUDIO)L/R IN 1: Audio signal input for AV. (Shared with YPbPr 1)
Video 1: Connect to the video output of external devices.
PC audio: PC audio input
HDMI1 IN |
HDMI2 IN |
Y |
Pb Pr 1 |
PC |
||||||||||||||||||
|
|
|
||||||||||||||||||||
|
|
|
|
|
|
|
|
|
|
|
|
|
|
|
|
|
|
|
|
|
|
|
|
|
|
|
|
|
|
|
|
|
|
|
|
|
|
|
|
|
|
|
|
|
|
|
|
|
|
|
|
|
|
|
|
|
|
|
|
|
|
|
|
|
|
|
|
|
HDMI 1/2 IN: Connect to the HDMI socket of your DVD or Satellite Box.
YPbPr 1: Connect to the YPbPr output on external devices.
PC: Connect to the PC VGA output to display PC graphics
6
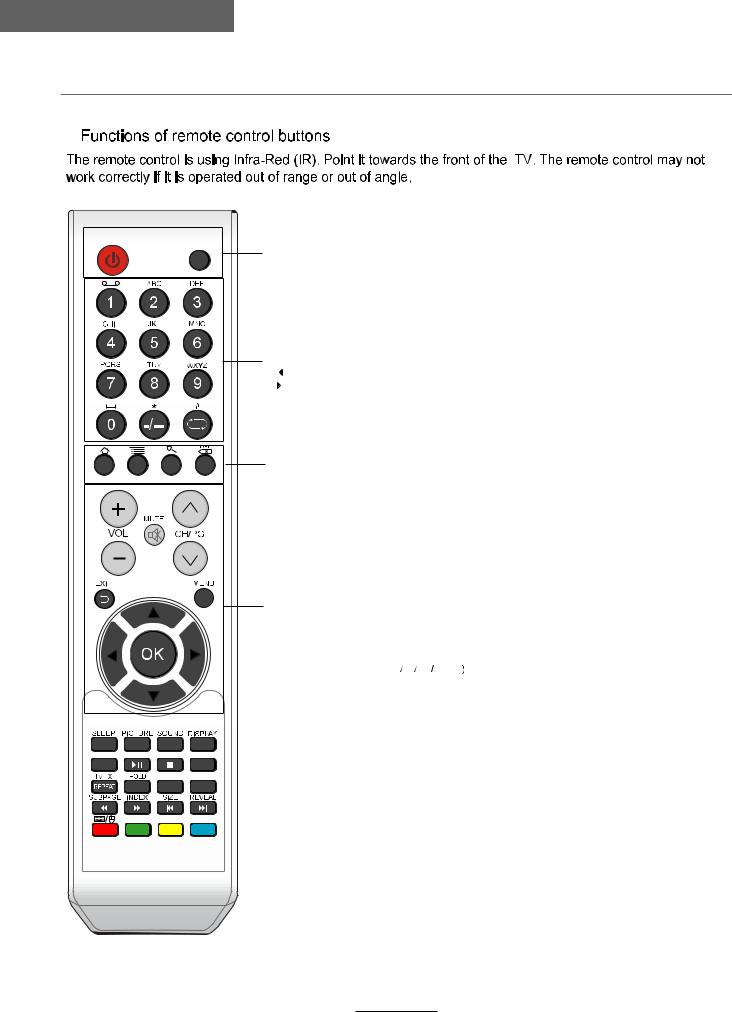
Remote Control
Remote Control
SOURCE
FAV |
FAV- |
FAV+ |
ASPECT
ZOOM |
ROOT |
NICAM/A2
A-B GOTO
POWER: Turn the TV on/standby.
SOURCE: Press to display the input source menu.
NUMBER BUTTONS
Press 0-9 and -/-- to select a TV channel directly when you are watching TV.
 Return to the previous channel viewed.
FAV: Display the favorite program list.
FAV+/-: Scan the favourite channels.
VOL+/- : Adjust the volume.
CH+/- : Scan through channels.
MUTE: Press to mute the sound, press again or press VOL+ to unmute.
EXIT: Exit the OSD menu.
MENU: System setup menu.
CURSOR KEYS 

 OK
OK
Allows you to navigate the on-screen menus and adjust the system settings to your preference.
ABC/123 NOTIFICATION
7
Remote Control
Remote Control
SOURCE
FAV |
FAV- |
FAV+ |
ASPECT
ZOOM |
ROOT |
NICAM/A2
A-B GOTO
ABC/123 NOTIFICATION
Buttons for Android
SLEEP: Standby timer.
PICTURE: Select the picture mode. SOUND: Select the sound mode.
DISPLAY: Means information, to display brief information concerning the current channel or disc you are wathching.
ASPECT: Cycles among screen display modes.
NICAM/A2: TV Nicam/A2 select.
TV/TXT: Turn off/on the Teletext display. HOLD: Hold or carry on the current subpage.
SUBPAGE: Press to enter subpages, press again to cancel. INDEX: Go to index.
SIZE: Press to see top half of page double size, Press again to see the bottom
half of page double size. Press again for normal size. REVEAL: Reveal any hidden text.
Color Buttons: Short cuts-follow the coloured links in the text.


 : Switch to keypad/mouse or remote control.
ABC/123: Switch to digital numbers or letters.
ZOOM: Zoom in/out the picture.
ROOT: Return to root menu.
Repeat: Repeat playing the title or chapter.
A-B: Select and play the preferable paragraph of the program by pressing the button twice at the beginning and end of it.
GOTO: Play your favorite title/chapter/track.
: Play/Pause program.
: Stop program.
 : Fast reverse.
 : Fast forward.
 : Previous chapter.
 : Next chapter.
8
Basic Operation
Basic Operation
Power on/off
1.Connect to the power supply with the power cord.
2.-To turn on the TV
Press POWER button on the TV or remote control. -To turn off the TV
Press POWER button on the TV or remote control.
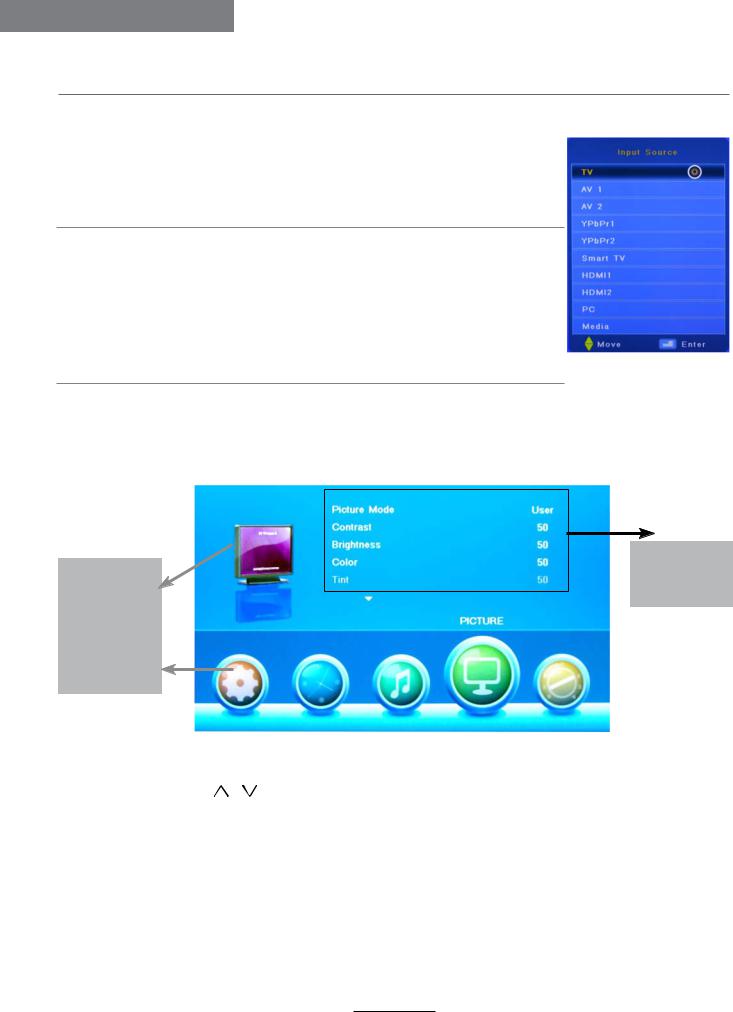
Input Source select
Press SOURCE button on the TV set or remote control to display input source menu, and use  button on the TV set or
  button
on remote control to select the input source, press OK button on the remote control to enter.
Note: Before you select the input source, make sure the connections are prepared.
Basic OSD Menu operation
Press MENU button to display the OSD menu as below:
Main menu
CHANNEL
PICTURE
SOUND
TIME
OPTION
Submenu
(Chanel menu for example)
Use  /
/  button to select the main menu, and press
  button to enter the submenu.
In the submenu, use / button to select the function item, press  /
/  button to adjust/setup, or press OK button to enter the submenu.
*(Press MENU button to return to the previous menu.)
*(Press EXIT button to exit the menu display.)
Note1: Only when you input the suitable signal, the relevant items can be activated Note2: Please operating the OSD menu according to hint on the bottom of the banner.
9
 Loading...