


01 SafetyWarnings
Welcome 2
2
Important Information 2
2
Safety notice


 3
3
Warning and cautions


 4
4
02 Introduction
Main Parameter


 5
5
Base Stand Assembly Instruction


 7
7
Wall Mounting Installation Guidelines


 8
8
Control Panel


 9
9
Rear/Side Sockets


 9
9
Connecting your HaierTV


 10
10
Common Interface


 11
11
03 Remote Control
Remote Control


 12
12
Teletext


 13
13
04 Operation
Installation Guide


 14
14
CHANNEL MENU


 15
15
AutoTuning(DVB-T)


 15
15
AutoTuning(DVB-C)


 16
16
DTVManualTuning(DVB-T)


 17
17
DTVManualTuning(DVB-C)


 17
17
ATV ManualTuning


 18
18
Program edit


 18
18
CIinformation


 18
18
PICTURE MENU


 18
18
SOUND MENU


 18
18
TIME MENU


 18
18
OPTION MENU


 19
19
LOCK MENU


 19
19
EPG Menu(Electronic Program Guide)


 19
19
PVR function


 20
20
Preparetorecordtheprogram


 20
20
Recordtheprogram


 21
21
Playtherecord


 21
21
Timeshift function


 22
22
Preparetorecordtheprogram


 22
22
USBDriveStorageFormat


 22
22
RecordapausedDTVprogram
toUSBstoragedevice


 22
22
Timeshiftlimitations


 23
23
USB Player


 24
24
05 Trouble shooting
Trouble shooting 


 25
25
Specification


 28
28
01 Safety warnings
Thanksforbuyingthis46"LEDLCDTV. Thisguidewillhelpyousetupand beginusing yourTV.
46"FullHD1080PDigital LEDLCDTV
Remote control
AAAbattery x2
InstructionManual
Quickstartguide
ScartCablex1
Stand
Nowyoucangetstarted!
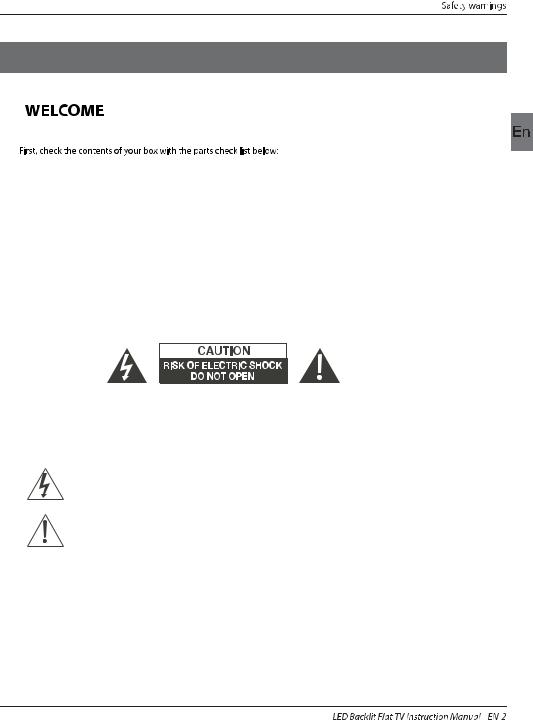
IMPORTANT INFORMATION
READALLINSTRUCTIONSBEFOREUSEANDKEEPFORFUTUREREFERENCE.
CAUTION
TOREDUCETHERISKOFELECTRICSHOCK,DONOTREMOVECOVER(ORBACK).NOUSERSERVICEABLEPARTSINSIDE. FORANYPROBLEMS,REFERSERVICINGTOTHECUSTOMERHELPLINE.THEREISALIGHTNINGARROWSYMBOLIN THETRIANGLE:THISSYMBOLINDICATESHIGHVOLTAGEISPRESENTINSIDE.ITISDANGEROUSTOMAKEANYKINDOF CONTACTWITHANYINSIDEPARTOFTHISPRODUCT.
THEREISAEXCLAMATIONMARKINTHETRIANGLE:THISSYMBOLALERTSYOUTHATIMPORTANTLITERATURE
CONCERNINGOPERATIONANDMAINTENANCEHASBEENINCLUDEDWITHTHISPRODUCT.
CAUTION:TOREDUCETHERISKOFELECTRICSHOCKANDFIRE,DONOTPUTTHETVSETNEAR
SOURCESOFHUMIDITY.DONOTUSEANYABRASIVECLEANERSWHICHMAYSCRATCHORDAMAGE
THELCDSCREEN.AVOIDCONTACTWITHOBJECTSTHATMAYSCRATCHTHELCDSCREEN.
NOTE:SERVICINGTHEUNITYOURSELFISUNAUTHORISEDANDCOULDLEADTOINJURYORPRODUCT
DAMAGE.REFERALLSERVICINGTOTHECUSTOMERHELPLINE.

Safety notice
the
EN-3 
WARNING AND CAUTIONS
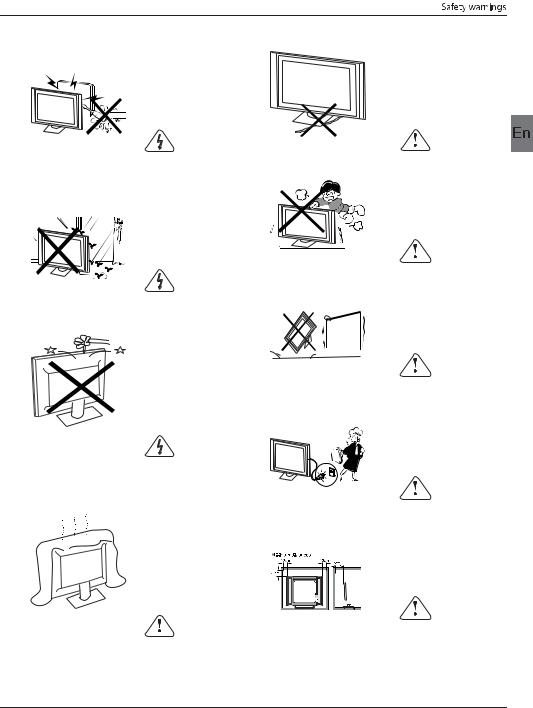
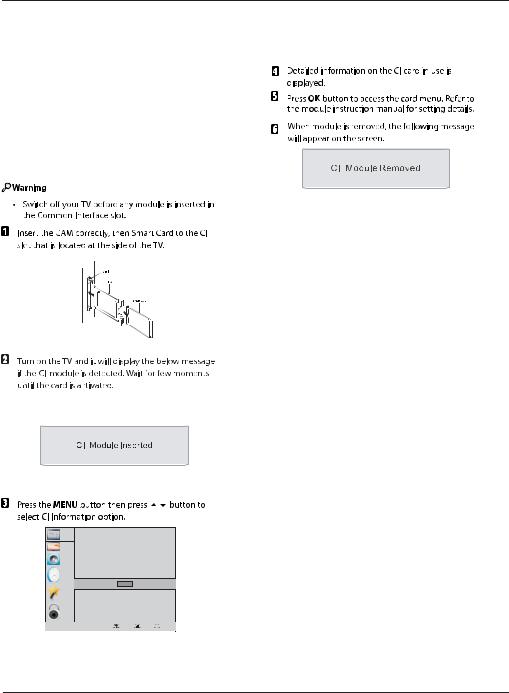
Warning
Highvoltagesareusedintheoperationofthis televisionreceiver.Donotremovethecabinet backfromyourset. Referservicingtoqualified servicepersonnel.
Warning
Topreventfireorelectricalshockhazard,do notexpose thetelevisionreceivertorainor moisture.
Warning
Donotdroporpushobjectsintothe televisioncabinet slotsoropenings.Never spillanykindofliquidonthetelevision receiver.
Caution
Donotblocktheventilationholesintheback cover.Adequateventilationisessentialto preventfailureof electricalcomponents.
Caution
Donottrapthepowersupplycordunderthe televisionreceiver.
Caution
Neverstandon,leanon,orsuddenlypushthe televisionoritsstand.Youshouldpayspecial attentiontochildren.Serious injurymayresultif itshouldfall.
Caution
Donotplaceyourtelevisiononanunstablecart, stand,shelfortable.Seriousinjurytoan individual,anddamagetothetelevision,may resultifitshouldfall.
Caution
Whenthetelevisionreceiverisnotusedforan extendedperiodoftime,itisadvisableto disconnecttheACpowercordfromtheAC outlet.
Caution
Ifthetelevisionistobebuiltintoacompartment orsimilarenclosure,theminimumdistancesmust bemaintained.Heatbuild-upcanreducethe servicelifeofyourtelevision,andcanalsobe dangerous.
 EN-4
EN-4
Introduction
02 Introdution
CAUTION
Nevertamperwithanycomponentsinsidethe
TV,oranyotheradjustmentcontrolsnot describedinthismanual.AllLED-TV'sarehigh voltageelectricalequipment.
Whenyoucleandustoranywaterdropsoffthe
SCREENorCABINEToraroundanyofthe buttonsorconnectors,thepowercabledshould beremovedfromthepowersocket.WipetheTV withasoft,dry,dustfreecloth.
Duringthunderstorms,unplugthepowercable andaerial/antennacabletopreventdamageto yourTVandanyotherdevicesconnectedtoit. AllrepairstothisTVshouldonlybeperformed byqualifiedTVservice
personnel.
INSTALLATION
*LocatetheTVintheroomwherelightdoes notstrikethescreendirectly.
*Totaldarknessorareflectiononthepicture screencancauseeyestrain.Softand indirect lightingisrecommendedforcomfortable viewing.
*AllowenoughspacebetweentheTVandthe walltopermitventilation.
*Avoidexcessivelywarmlocationstoprevent possibledamagetothecabinetor premature componentfailure.
*Donotcovertheventilationopeningswhen usingtheTV.
Main features
1 |
Used as Television, display |
terminal, |
4 |
NICAM |
|||
|
|
PCdisplay |
|
|
|
|
|
2 |
High luminance, |
wide viewingangle |
5 |
Time-shift |
|||
3 |
HDMI interface and SCART Interface |
|
|
||||
Main parameter |
|
|
|
|
|||
|
|
|
|
|
|
|
|
|
Panel |
|
|
46 |
|
|
|
|
|
TV System |
|
|
PAL-B/G I D/K |
|
|
|
|
|
|
SECAM- B/G D/K L L' |
|||
|
|
|
|
|
|||
|
|
|
|
|
|
|
|
|
|
VideoSignalSystem |
|
|
PAL/SECAM |
|
|
|
|
InputPower Voltage |
|
|
AC 100-240V |
50/60Hz |
|
|
|
Powerconsumption |
|
|
98W |
|
|
|
|
StandbyPowerconsumption |
|
<0.5W |
|
|
|
|
|
AudioOutputPower |
THD 7% |
|
2x8W |
|
|
|
|
SignalInput |
|
|
Analog RGB(PC)x1;PCaudiox1 |
||
|
|
|
|
|
High-DefinitionMultimediaInterface (HDMI)x2 |
||
|
|
|
|
|
Video Inputx1 |
|
|
|
|
|
|
|
AudioInputx1 |
|
|
|
|
|
|
|
YPb Prx1 |
|
|
|
|
|
|
|
MiniSCARTx1 |
|
|
|
|
|
|
|
CIx1 |
|
|
|
|
|
|
|
USBx1 |
|
|
|
|
|
|
|
RFCo-Axx1 |
|
|
|
|
|
|
|
|
|
|
|
|
|
|
|
|||
|
Horizontaldefinition |
TV line |
|
Composite Video input >=350 |
|||
|
|
|
|
|
YPbPr |
|
>=400 |
EN-5 

Introduction
PC
PRESET MODE
|
RESOLUTION |
V.Freq.(KHz) |
H.Freq.(KHz) |
|
|
|
|
1 |
640x480 |
60 |
31.47 |
|
|
|
|
2 |
800x600 |
60 |
37.88 |
|
|
|
|
3 |
1024x768 |
60 |
48.36 |
|
|||
|
|
|
|
4 |
1360x768 |
60 |
47.7 |
|
|||
|
|
|
|
5 |
1280x1024 |
60 |
63.98 |
|
|
|
|
6 |
1920x1080 |
60 |
66.64 |
|
|
|
|
 EN-6
EN-6

Introduction
Base Stand Assembly Instruction
1.PlacetheTVwiththedisplaysidedownona |
2.Attachthestandbaseplatetothestandpole |
flatsurface.Useaclothtoprotectthe |
byfirmlytighteningthesuppliedscrews. |
display.Positionthestandbaseplateontothe |
|
bottomofthestandpole. |
|
 INSTALLATION NOTES
LocatetheTVinaroomwherelightdoesnotstrikethescreendirectly.Totaldarknessor a reflectiononthescreencancauseeyestrain.Softandindirectlightingisrecommendedfor comfortableviewing.
AllowenoughspacebetweentheTVandthewalltopermitventilation.
PleasedonotattempttorotatetheTVonthestand.
Avoidexcessivelywarmlocationstopreventpossibledamagetothecabinetorpremature componentfailure.
EN-7 

Introduction
WALL MOUNTING INSTALLATION GUIDELINES
Thistelevisioncanbewallmountedasfollows:
1.PlacetheLEDLCDTelevisionontoasolid surface.Pleaseplacesomesoftmaterial overthefrontofthescreentoprotectit fromanydamage.
2.Removethescrewsfromthelowerpartofthe television,wherethebasejoinstotheTV,andtake awaythestand(putthestandsomewheresafefor futureuse).
3.UsethefourscrewsprovidedtofixtheTVontoawallmountingbracket (notincluded) viathefourVESA standardholesonthebackofthetelevision.
M6x9 |
M6x9 |
M6x9 |
M6x9 |
 EN-8
EN-8
Introduction
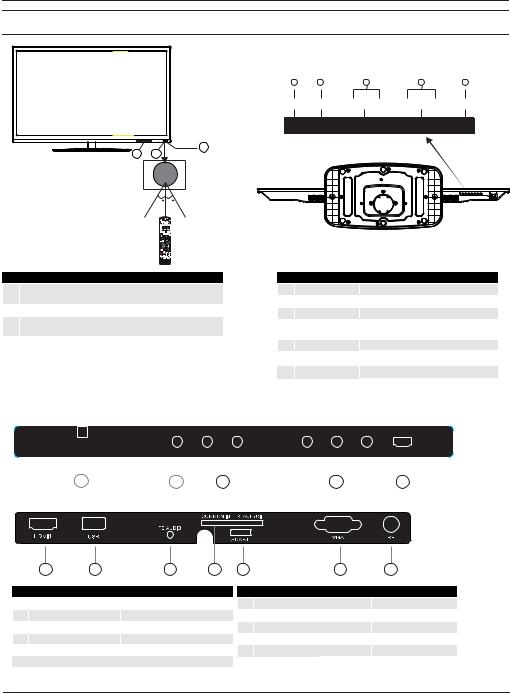
Front control panel
1 |
2 |
|
3 |
4 |
5 |
SOURCE |
MENU |
CH+ |
CH- |
VOL- |
VOL+ STANDBY |
3 |
2 |
1 |
|
||
|
30 |
30 |
1 |
|
Remotecontrolsensor. |
|
1 |
SOURCE |
|
|
Displaytheinputsourcemenu. |
|
|
||||||||||||
|
|
2 |
MENU |
|
|
Displaymain MENU. |
|
|
||||||||||||||
2 |
|
IndicatorLED: |
|
|
|
|
|
|
|
|||||||||||||
|
|
|
|
3 |
CH+/CH- |
|
|
InTVmode,pressCH+orCH- |
tochange |
|||||||||||||
|
|
|
|
|
|
|
|
|
|
|||||||||||||
|
|
|
BLUE:POWERON. |
RED:STANDBY. |
|
|
|
|
|
|
|
|
|
thechannelupanddown. |
selectitems. |
|||||||
3 |
|
Keyboard. |
|
|
|
|
|
|
VOL+/VOL- |
|
|
InMENU,pressCH+orCH-to |
||||||||||
|
|
|
|
4 |
|
|
Adjustsoundlevel. |
|
|
|||||||||||||
|
|
|
|
|
|
|
|
|
|
|
|
|
|
|
|
InMENU,adjusttheitemthat youselected. |
||||||
|
|
|
|
|
|
|
|
5 |
STANDBY |
|
|
|
|
|
|
|
|
|
||||
|
|
|
|
|
|
|
|
|
|
|
|
|
|
|
|
|
|
|
|
|||
Rear/Side Sockets |
|
|
|
|
|
|
|
|
|
|
|
|
|
|
|
|
||||||
|
|
|
|
|
|
|
|
|
|
|
|
|
|
|
|
|
|
|
|
|
|
|
|
|
|
AC-INPUT |
VIDEO |
L |
|
R |
Y |
Pb |
Pr |
HDMI2 |
|
|
|||||||||
|
|
|
|
|
||||||||||||||||||
|
|
|
|
|
|
|
|
|
|
|
|
|
|
|
|
|
|
|
|
|
||
|
|
|
100-240V~50/60Hz |
|
|
|
|
|
|
|
|
|
|
|
|
|
|
|
|
|||
|
|
|
|
|
|
|
|
|
|
|
|
|
|
|
|
|
|
|
|
|
|
|
|
|
|
|
|
|
|
|
|
|
|
|
|
|
|
|
|
|
|
|
|
|
|
|
|
3 |
1 |
|
2 |
|
|
|
|
4 |
|
|
|
5 |
|
|
||||||
6 |
7 |
8 |
9 |
10 |
11 |
12 |
1 |
AV |
input |
2 |
L/RAUDIO |
input |
3 |
ACPowerSource |
input |
4 |
YPbPr |
input |
5 |
HDMI2 |
input |
6 |
HDMI1 |
input |
7 |
USB |
input |
8 |
PCAUDIO |
input |
9 |
COMMONINTERFACE(CI) |
Intput |
10 |
SCART |
Intput |
11 |
VGAINPUT |
Input |
12 |
ANT |
input |
EN-9 


Introduction
Connecting to your HaierTV
Connecting a DVD player / Satellite / cable set top box receiver / games console / PC or Laptop
ThereareseveraloptionstoconnectingaDVD player/SatelliteorCablesettopbox receiver/ gamesconsole/PCorLaptoptoyourTV.
Option1SCART
 ConnectaSCARTcable(notsupplied) fromtheSCARTsocketontheTVtotheDVD player/Satelliteorcablesettopboxreceiveror gamesconsol.
 Toselectthedeviceconnectedwiththe SCARTcablepresstheSOURCE buttononthe remoteandusethe
 keystoselectSCART andpresstheOK button.
Note:-TheTVwilldefaulttotheSCART connectionwhentheTVisswitchedon.
Option2HDMI
 IfthedeviceyouwanttoconnecttotheTV isswitchedon,switchoffthedevicefirst.
ConnectaHDMIcable(notsupplied)from theHDMIsocketontheTVtotheDVDplayer/ Satelliteorcablereceiverorgamesconsol.
 Switchonthedeviceyouhavejust connectedtotheTV
 Toselectthedeviceconnectedwiththe
HDMIcablepresstheSOURCE buttononthe remoteandusethe keystoselectHDMI and presstheOK button.
Option3AV AudioVisual
(Yellow/White/Red)
MakesurethatbothTVandthedeviceare switchedoffbeforeconnecting.
ConnecttheAVcables(notsupplied)from theVideo(yellow)andAudio(white,red) socketsontheTVtotheDVDplayerorgames consoleetc.
 Toselectthedeviceconnectedwiththe AVIcablepresstheSOURCEbuttononthe remoteandusethe
 keystoselectAVand presstheOKbutton.
Option4COMPONENT
(Green/Blue/Red)+(White/Red)
 MakesurethatbothTVandthedeviceare switchedoffbeforeconnecting.
 Connectthecables(notsupplied)fromthe COMPONENTINsocketsY,Pb,Pr(green,
blue,red)andL-Audio-R(white,red)ontheTV totheDVDplayerorgamesconsoleetc.
 ToselectthedeviceconnectedwiththeAVI cablepresstheSOURCEbuttonontheremote andusethe
 keystoselectCOMPONENT andpresstheOK button.
Option5 VGA (15pinSub-D)
 ConnectaVGAcable(notsupplied)fromthe VGAsocketontheTVtothePC/Laptop.
 ToselectthePC/Laptopconnectedwiththe VGAcablepresstheSOURCEbuttononthe remoteandusethe
 keystoselectPC and presstheOK button.
NoteVGAisvideoonly.Foraudiofromyour PC/Laptopyouneedtoconnectaseparate cablefromthePCAudio(3.5mmjack)tothe headphonesocketonyouPC/Laptop(3.5mm jack)
Option6 USB
 MostUSBstickscanbeconnectedtoyourTV andsomedigitalcamerasmayalsowork.
 ConnectUSBstick(notsupplied)oraUSB cable(notsupplied)totheTV.
 ToselecttheUSBdeviceconnectedtotheTV, presstheSOURCEbuttonontheremoteand usethe
 keystoselectUSBandpressthe
OK button.
Note1:Only*.jpgand*.mp3fileswillwork, otherfiletypesarenotguaranteedandmaynot.
Note2.AppleiPhonesandiPodsarenot compatiblewithyourTV.
Note3.WhenconnectinganydevicetotheUSB connection,keeptheUSBcablelengthasshort aspossible.
 EN-10
EN-10
Introduction
COMMON INTERFACE
Thecommoninterface(CI)slotisdesignedto accepttheconditionalAccess(CA)Moduleand SmartcardinordertoviewthepayTV programmesandadditionalservices.
ContactyourCommonInterfaceserviceprovider togetmoreinformationaboutthemodulesand subscription.
PleasenotedthatCAmodulesandsmartcards areneithersuppliednoroptionalaccessories fromus.
CHANNEL |
Auto Tuning |
|
|
|
PICTURE |
DTV Manual Tuning |
|
|
|
|
ATV Manual Tuning |
|
|
|
SOUND |
Programme Edit |
|
|
|
|
Signal Information |
|
|
|
TIME |
CI Information |
|
|
|
|
OK |
|
|
|
OPTION |
Software Update(USB) |
|
|
|
LOCK |
|
|
|
|
|
MENU |
MOVE |
OK |
OK |
EN-11
RemoteControl
03 Remote Control
Insert Batteries Into the Remote Control
1.Removethebatterycover.
2.Insertingthe2AAA1.5Vbatteriesmaking surethepolarity(+or-)ofthebatteriesmatches thepolaritymarksinsidetheunit
3.Mount thebatterycover.Replace withnew batterieswhentheTVsetbeginsto show the followingsymptoms:Operationisunsteadyor erratic.SometimestheTVsetdoesnotfunction withRemote ControlUnit.
Remark:
1)AlkalineBatteryRecommeded.
2)Removebatterieswhentheyareexhausted oriftheremote controlisnotto beusedforlong time.
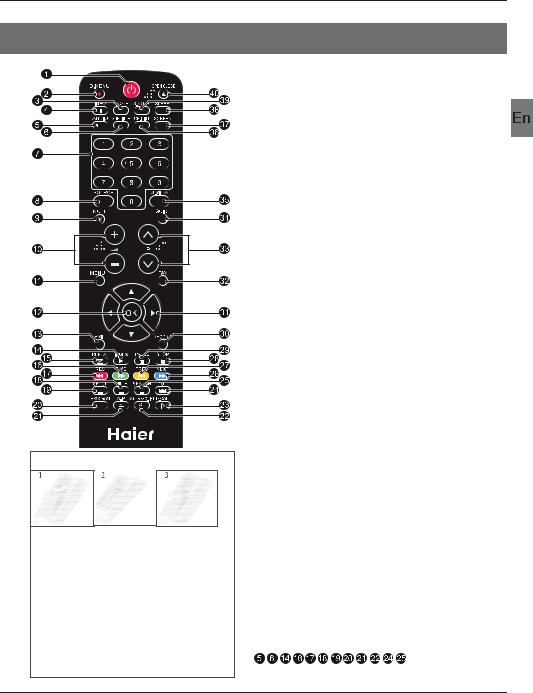
1.POWER:PresstoturnontheTV.
2.D.MENU:Nofunction.
3.P.Mode:Toswitchpicturemode.
4.INFO:Presstodisplaythecurrentsignal status,includinginputsourceandchannelaudio mode.
5.AUDIO I/II: PresstoselectMONO,Nicam stereo for ATVchannel.Select AudiolanguageforDTVchannel.
6.SUBTITLE:PresstoturnthesubtitleOn orOff.
7.Number Buttons:Fordirectaccesstochannels.
8.SOURCE:Toselectinputsource.
9.MUTE:Todisableorenablethesoundoutput.
10.Volume Control:Toadjustsoundlevel.
11.MENU:TodisplayTVmenu. 12.OK:Toconfirmselection.
13.EXIT:Toreturntothepreviousmenuorexitmenu.
14.Teletext Index/USB PLAY 15.REPEAT:Nofunction
16.Teletext Green Button / USB Fast Forward 17.Teletext Red Button / USB Fast Rewind 18.Teletext Mix
19.TeletextText 20.Teletext Reveal 21.Teletext Size
22.TeletextTime/ANGLE/REC.LIST(teletexttimeisno function)
23.Teletext Mode:Nofunction
24.Teletext Hold
25.Teletext Subcode:Teletext Subpage 26.Teletext Blue Button / USB Next File 27.TeletextYellow Button / USB Previous File 28.USB STOP
29.USB PAUSE 30.START RECORD
31.UP,DOWN,LEFT,RIGHT Cursor:Presstonavigate yourselection.
32.Fav:Toaccessyourfavouritechannelslist inTVor
DTVmode.
33.Select Programme:Press Buttontoselectthe next orpreviousTVchannel.
34.GUIDE:Presstodisplayelectronicprogramme guideinTVmode.
35.Q.View:Toaccessthepreviouslyviewed channel. 36.CH.LIST: Presstodisplaythechannellist. 37.Screen:Tochangepictureaspectratio. 38.Sleep :SettimertoturnofftheTV. 39.S.Mode:Toswitchsoundmode.
40.OPEN/CLOSE:NoFunction


 :NoDVDfunction
 EN-12
EN-12
RemoteControl
TELETEXT
Teletextisaninformationsystembroadcastbycertainchannelswhichcanbeconsultedlike anewspaper.Italsooffersaccesstosubtitlesforviewerswithhearingproblemsorwhoare notfamiliarwiththetransmissionlanguage(cablenetworks,satellitechannels,etc.)
Press:
TEXT
SELECTING A PAGE
DIRECT ACCESS TOTHEITEMS
INDEX
SUBPAGE
HOLD
REVEAL
LIST
You willobtain: |
E |
|
Thisisusedtocallorexitteletextmodes.Thesummaryappearswithalist ofitemsthatcanbeaccessed.Eachitemhas a corresponding 3digitpage number.If thechannelselecteddoesnotbroadcastteletext,theindication 100willbedisplayedandthescreenwillremainblank(inthiscase,exit teletextandselectanotherchannel).
Enterthenumberofthepagerequiredusingthe0to9up/down.Example: page120,enter120.Thenumberisdisplayedtopleft,thecounterturnsand thenthepageisdisplayed.Repeatthisoperationtoviewanotherpage.If thecountercontinuestosearch,thismeansthatthepageis not transmitted.Select anothernumber.
Colouredareasaredisplayedatthebottomofthescreen.The4coloured keysareusedtoaccesstheitemsorcorresponding pages.Thecoloured areasflashwhentheitemorthepageis notyetavailable.
Thisreturnstothecontentspage(usuallypage100).
Certainpagescontainsub-pageswhichareautomaticallydisplayed successively.Thiskeyisusedtostoporresumesub-page acquisition. Theindication appearstopleft.
Tofreezethepage.
Todisplayorhidetheconcealedinformation(gamessolutions).
Theusercansetfourfavoritepagestobedirectlylinkedtothefourcolor keys.Whilelistmodeisactivated,itisnotpossibilitytouseTOPorFLOF navigationwiththecolorkeys.Thefavoritepagenumbersshouldbestored andrestoredto/fromnonvolatilememoryforeachchannelbythesystem software.
EN-13

Operation
04 OPERATION
Installation Guide
TheinstallationguideonlyappearwhentheTVfirst timeturnonorresettofactoryset.
Please select on OSD language
Czech |
Spanish |
Italian |
|
|
|
|
Polski |
Deutsch |
Greek |
Magyar |
Russian |
|
|
|
|
English |
French |
Nederlands |
Romanian |
|
|
|
|
 OK
OK
Mode Select
HomeMode
 Shop Mode
 OK
OK
Password
Please enter old password
Please enter new password
Confirm new password
1).Pressthe buttonstonavigatethemenuand
changethesettings.PresstheOKbuttontoconfirm. Selectyourdesiredlanguage,Home/ShopModetobe displayedonthemenu.
 Note: Thedefaultpasswordis6666.
HOME or SHOP modes
1.HomeModeisanenergy-savingMode.Home Modeisrecommendedfornormalviewingsettingand issetasdefaultduringmanufacturer.
2.ShopModeisanoptionforretailersfor
Advertisingorproductpresentation.
ShopModehasabrighterimagethanHomeMode. 3.YoumayswitchbetweenHomeorShopMode asyouchoose.IfyouchooseShopMode,itwillenter
HDMI1sourceautomatically,andyouwilpressExitkey toexitPOPmenu.
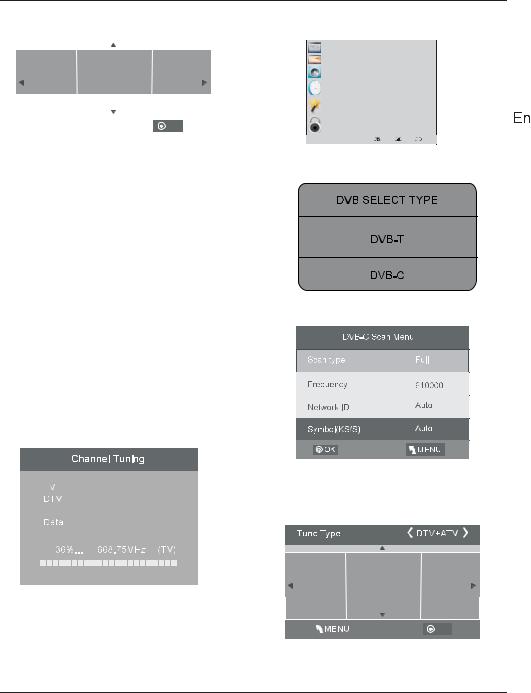
2).Pressthe buttonstoselectDVB-T/DVB-Cand thenpresstheOKbuttontoconfirm.
a.IfyouselectDVB-T,thenextstepistoselectthe
TunetypeandcountrythenpresstheOKbuttonto starttuning.
|
|
|
|
French |
Hungary |
Nederlands |
|
Germany |
Italy |
Norway |
|
|
|
|
|
Greece |
Luxembourg |
Poland |
|
|
|
|
|
|
|
|
OK |
|
|
|
|
b.IfyouselectDVB-C,thenextstepistoconfigthe
DVB-Csystemlike(scantype /Frequency/Network ID/Symbol(KS/S)thenpressOKbuttontointothe tunetypeandcountryselectmenu,thisstepisthe sameasDVB-T,selectthetunetype(DTV/ATV).
Choosetherightcountry,pressOKbuttontostart tuning.
 EN-14
EN-14
Operation
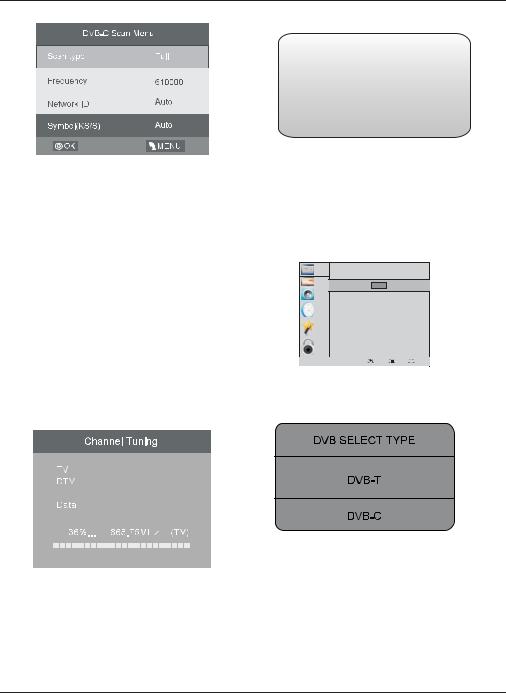
3).Channeltuningwillcommence.Thisoperation maytakeupto6minutes.Thedisplaywillshow theprogressofthetuningandthenumberof channelsfound.
4).IfyouwanttoskiptheATVtuning,pressthe MENUbuttontointerruptthetuninghalfway. Apop-upscreenwillbedisplayed,pressthe
 buttontoselectYEStoconfirm.Youwillthengo straighttoDTVtuning.
Youmayrepeattheabovestepifyoualsowant toskiptheDTVtuning.Aninstallationreminder willappearthenexttimeyouturnontheTV.
5).Aftertuningiscomplete,thechannelsare arrangedinapresetorder.Ifyouwishtoskipchannels, modifythepresetorderorrename
channels,selectProgrammeEditunderthe Channelmenu.
Congratulations!!!
Completed Initial Quick Setup.
Enjoy your Haier TV
Press OK to Exit
1. CHANNEL MENU
1. 1)AutoTuning (DVB-T)
1).PresstheMENUbuttonandthenpressthe  buttonstoselecttheCHANNELmenu andthenpresstheOKbutton.
2).Pressthe buttonstoselectAutoTuning andthenpresstheOKbutton.
CHANNEL |
Auto Tuning |
|
|
|
PICTURE |
OK |
|
|
|
|
|
|
|
|
SOUND |
DTV Manual Tuning |
|
|
|
|
|
|
|
|
|
ATV Manual Tuning |
|
|
|
TIME |
Programme Edit |
|
|
|
|
|
|
|
|
|
Signal Information |
|
|
|
OPTION |
CI Information |
|
|
|
Software Update(USB) |
|
|
|
|
LOCK |
|
|
|
|
|
MENU |
MOVE |
OK |
OK |
3).Pressthe buttonstoselectDVB-T/ DVB-CPressselectDVB-Tandthenpress theOKbuttontoconfirm.
 1 Programme(s)

 Programme(s)


 Programme(s)

 Programme(s)
4).IntheTuneTypemenu,pressthe
 buttonsto
selectATV/DTV/DTV+ATV.Pressthe button
andthenpressthe

 buttonstoselectthe
6)Congratulations
countrywhereyouwilloperatetheTV.Pressthe
OK buttontoconfirm
EN-15
Operation
|
|
|
|
French |
Hungary |
Nederlands |
|
Germany |
Italy |
Norway |
|
|
|
|
|
Greece |
Luxembourg |
Poland |
|
|
|
|
|
|
|
|
OK |
|
|
|
|
5).Channeltuningwillcommence.This operationmaytakeupto6minutes.Thedisplay willshowtheprogressofthetuningandthe numberofchannelsfound.
6).IfyouwanttoskiptheATVtuning,pressthe MENUbuttontointerruptthetuninghalfway.A pop-upscreenwillbedisplayed,pressthe  buttontoselectYEStoconfirm.Youwillthengo straighttoDTVtuning.Youmayrepeatthe abovestepifyoualsowanttoskiptheDTV tuning.Aninstallationreminderwillappearthe nexttimeyouturnontheTV.
7).Aftertuningiscomplete,thechannelsare arrangedinapresetorder.Ifyouwishtoskip channels,modifythepresetorderorrename channels,selectProgrammeEditunderthe channelmenu.
 1 Programme(s)

 Programme(s)


 Programme(s)

 Programme(s)
1.2 )AutoTuning (DVB-C)
1).PresstheMENUbuttonandthenpressthe  buttonstoselecttheCHANNELmenuandthen presstheOKbutton.
2).Pressthe  buttonstoselectAutoTuningand thenpresstheOKbutton.
CHANNEL |
Auto Tuning |
|
|
||
PICTURE |
|
|
|
|
|
|
|
OK |
|
|
|
SOUND |
CADTV Manual Tuning |
|
|
||
|
|
|
|||
|
ATV Manual Tuning |
|
|
||
TIME |
Programme Edit |
|
|
||
|
Signal Information |
|
|
||
OPTION |
CI Information |
|
|
||
|
|
||||
Software Update(USB) |
|
|
|||
LOCK |
|
|
|
|
|
|
|
|
|
|
|
MENU |
MOVE |
OK OK |
3).Pressthe  buttonstoselectDVB-T/DVB-C PressselectDVB-CandthenpresstheOKbutton toconfirm.
4).Press buttonstoselectScantype/Symbol (Ks/S)presstheOKbuttontoconfirm.
5).IntheTuneTypemenu,pressthe
 buttonsto selectATV/DTV/DTV+ATV.Pressthe
  button andthenpressthe

 buttonstoselectthe countrywhereyouwilloperatetheTV.Pressthe OKbuttontoconfirm.
French |
Hungary |
Nederlands |
|
Germany |
Italy |
Norway |
|
Greece |
Luxembourg |
Poland |
|
|
|
|
OK |
|
|
|
|
 EN-16
EN-16
Operation
6).Channeltuningwillcommence.Thisoperationmay takeupto6minutes.Thedisplaywillshowthe progressofthetuningandthenumberofchannels found.
7).IfyouwanttoskiptheATVtuning,presstheMENU buttontointerruptthetuninghalfway.Apop-upscreen
willbedisplayed,pressthe buttontoselectYESto confirm.YouwillthengostraighttoDTVtuning.You mayrepeattheabovestepifyoualsowanttoskipthe DTVtuning.Aninstallationreminderwillappearthe nexttimeyouturnontheTV.
8).Aftertuningiscomplete,thechannelsarearranged inapresetorder.Ifyouwishtoskipchannels,modify thepresetorderorrenamechannels,selectProgramme Editunderthechannelmenu.
 1 Programme(s)

 Programme(s)


 Programme(s)

 Programme(s)
AllthechannelsincludingATV, DTVandRadio canbetuningbyonetime,iftheTuneTypeis
DTV+ATV.
Allthestoredchannelswillbedisappearafter autotuning.
Afterautotuning,thechannelwillskipto thefirstDTVchannel.
2. 1 )DTV ManualTuning (DVB-T)
1).PresstheMENUbuttonandthenpressthe  buttonstoselecttheCHANNELmenuandthen presstheOKbutton.
2).Pressthe buttonstoselectDTVManualTuning andthenpresstheOKbutton.
CHANNEL |
Auto Tuning |
|
|
|
PICTURE |
DTV Manual Tuning |
|
|
|
SOUND |
OK |
|
|
|
|
ATV Manual Tuning |
|
|
|
TIME |
Programme Edit |
|
|
|
|
|
|
|
|
|
Signal Information |
|
|
|
OPTION |
CI Information |
|
|
|
Software Update(USB) |
|
|
|
|
LOCK |
|
|
|
|
|
MENU |
MOVE |
OK |
OK |
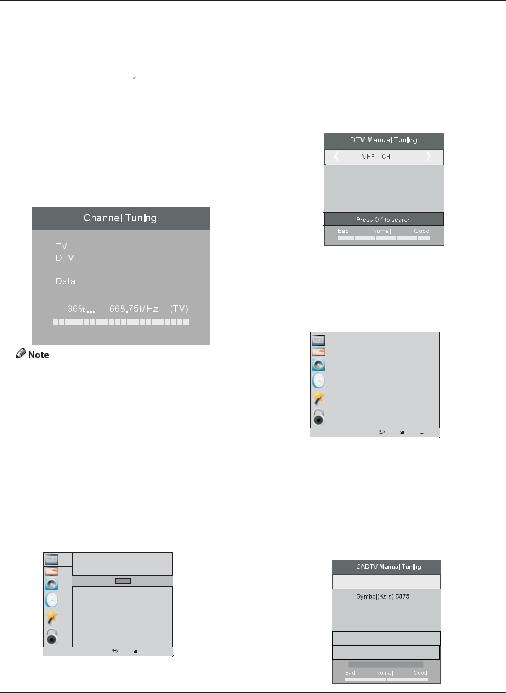
3).TheDTVManualTuningscreenwillpopup. Pressthe
 buttonstoselectthedesiredUHF channelandthenpresstheOKbuttonto commencethesearchofthatchannel.Whenthe signalhasbeentuned,thepictureandsignal strengthwillbedisplayedonthescreen.
4).PresstheMENUbuttontoreturnbacktothe mainmenu.
5).PresstheEXITbuttontoexitthemenu.
D
2. 2 )DTV ManualTuning (DVB-C)
1).PresstheMENUbuttonandthenpressthe buttonstoselecttheCHANNELmenuandthen presstheOKbutton.
2).Pressthe buttonstoselectCADTVManual TuningandthenpresstheOKbutton.
CHANNEL |
Auto Tuning |
||
PICTURE |
CADTV Manual Tuning |
||
|
|
|
|
SOUND |
|
OK |
|
|
ATV Manual Tuning |
||
TIME |
Programme Edit |
||
|
Signal Information |
||
OPTION |
CI Information |
||
Software Update(USB) |
|||
LOCK |
|
|
|
|
|
|
|
MENU |
MOVE |
OK OK |
3).TheCADTVManualTuningscreenwillpopup. Pressthe buttonstoselect(Frequency/Symbol
(ks/s/QAMTypeQAM)presstheOKbuttonto commencethesearchofthatchannel.Whenthe signalhasbeentuned,thepictureandsignal strengthwillbedisplayedonthescreen.
4).PresstheMENUbuttontoreturnbacktothe mainmenu.
5).PresstheEXITbuttontoexitthemenu.


 490000


 16
16
NOSIGNAL
EN-17
Operation
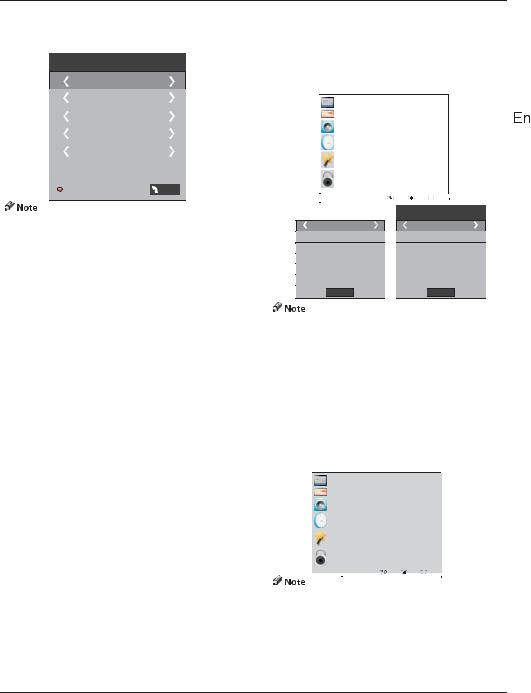
3) ATV Manual tuning :
Youcanchangethesoundsystemtosearchthe analogTVchannelsandfinetunethechannels, thenstoragethechannelsyouselected.
ATV Manual Tuning
Storage To 1
System BG
Current CH 1
Search
Fine-Tune
Frequency 424.25 MHz
Save |
MENU |
Press teletextred buttontostoragetochannels aftermanualtuning.
4). Program edit:
YoucanDelete,Rename,Move,Skip,FAVany programs.
 Delete
Press teletextredbutton,the programincursor willdelete.
 Rename:
OnlycanrenameATVprograms.
Movethecursortotheprogram,pressteletext greenbuttontorenametheprogram.
Press tochoosethecharacter. Press
 to movethecursor.
PressMENUbutton toexitedit ,Press EXITto exit themenu.
Note:ATVprogramsnameonlycanbe5character, DTVprogramsnamecan be25 character.
 Move:
Move:
UsetheArrowButtonstoselectthechannelyou wishtomove.ThenpresstheYellowButtonto selectMovefunction.OnceactiveusetheArrow ButtonstomoveandthenpressOKtoconfirm.
 Skip:
Skip:
Press tochoosetheprogram,pressteletext bluebuttontoskipthisprogram,The
  will showontherightsideoftheprogram.
Choose theskippedprogram,press bluebutton again,youcan canceltheskip,The  will disappear.
 Favourite:
Press tochoosetheprogram,pressFAV button,itwillshow
 ontherightsideofthe program.ChoosetheFAVprogram,press FAVbuttonagain,youcancanceltheFAV,
the willdisappear.
Onceyourfavoritegroupiscreated,youcan presstheFAVkeytoquicklyaccessyourfavorite channel.
5). CI information: (optional)
ThismenucandisplaytheCIcard'sinformation.
2. PICTUREMENU
TheseconditemoftheMENUisPICTUREMENU. Youcanadjustpictureeffecthere,suchas contrast,brightness,etc.
PressOKtomove,pressOKtoadjust.
CHANNEL |
|
Picture Mode |
|
|
|
|
|
||
|
|
|
|
|
|
||||
PICTURE |
|
|
|
|
|
|
|
|
|
|
Eco |
Stsndard |
|
Mild |
User |
|
|
|
|
SOUND |
|
|
|
|
|
|
|
|
|
|
|
Color Temperature |
|
|
|
|
|
||
|
|
Aspect Ratio |
|
|
|
|
|
||
TIME |
|
Noise Reduction |
|
|
|
|
|
||
|
|
Screen |
|
|
|
|
|
|
|
OPTION |
|
|
|
|
|
|
|
|
|
LOCK |
|
|
|
|
|
|
|
|
|
|
|
|
|
|
|
|
|
|
|
|
|
|
MENU |
MOVE |
OK OK |
|
|
||
|
|
|
|
|
|
|
|
|
|
Picture Mode |
Standard |
|
|
Contrast 50
Brightness 50
Color 50
Sharpness 75
Tint 50

 MENU
MENU
Color Temperature Medium
Red 50
Green 50
Blue 50

 MENU
MENU
1).Tintisavailablein NTSCsystemonly.
2).Therearefourcolorstemperaturemodes canbeselectedmedium,warm,cool,user 3).Screen isavailableinPCmodeonlywhich canadjustHorizontalposition,vertical position,sizeandphase.
3.SOUND MENU
ThethirditemoftheMENUistheSOUND MENU.
Youcanadjustthesoundeffecthere suchas treble,bass,balanceetc.
Press tomove,pressOKtoadjust.
CHANNEL |
Sound Mode |
|
|
||
PICTURE |
|
|
|
|
|
|
|
|
|
|
|
Standard |
Music |
Theater |
Sports |
User |
|
SOUND |
Balance |
|
|
||
|
|
|
|||
|
Auto Volume |
|
|
||
TIME |
Surround Sound |
|
|
||
OPTION |
|
|
|
|
|
LOCK |
|
|
|
|
|
|
|
|
|
|
|
|
|
|
MENU |
MOVE |
OK OK |
|
|
|
|
|
|
Autovolume:onlyavailablewhentheinput signalvolumeistoolargeordistortion.
4.TIME MENU
TheforthitemofthemenuistheTIMEMENU Youcanadjusttheclock,poweron/offtime, sleeptimeetcPress
 tomove,pressOKto adjust.
 EN-18
EN-18

Operation
CHANNEL Clock |
|||
|
Off Time |
||
PICTURE |
|
|
|
|
|
OK |
|
SOUND |
On Time |
||
|
|||
|
Sleep Timer |
||
TIME |
Auto Sleep |
||
|
Time Zone |
||
OPTION |
|
|
|
LOCK
MENU |
MOVE |
OK OK |
Within15minutesthereisnosignal, theTV willautosleep,ifAutoSleepissetON.The clocktimecangetfromtheDTVsystemauto.
5.OPTION MENU
ThefifthitemoftheMENUistheOPTION
MENU.YoucanadjusttheMenulanguage,
Audiolanguage,Subtitlelanguageetc.
CHANNEL |
OSD Language |
|
|||
PICTURE |
|
|
|
|
|
|
|
OK |
|
|
|
SOUND |
Audio Languages |
|
|||
|
|
||||
|
Subtitle Language |
|
|||
TIME |
Country |
|
|||
|
PVR File System |
|
|||
OPTION |
Restore Factory Default |
|
|||
Automatic power-down(4h) |
|||||
|
|||||
|
Home/Shop Mode |
|
|||
LOCK |
DCR |
|
|||
|
|
|
|
|
|
|
|
MENU |
MOVE OK OK |
||
Automatic Power-down
1.Ifafter4hoursfromswitchonandnochangeshave beenmadetotheTV,forexamplenochannelorvolume changes,theTVwillstarttheautomaticpowerdown sequence.
Andpop-upwindowwillappearonscreen.
XXX’s to automatic power-down
Please press any Key to Cancel
After150secondstheTVwillautomaticallyswitchto standby.Tooverridetheautomaticshutdownpressany buttonontheremotecontrol.
2.Tocanceltheautomaticpower-down
OntheOptionMenuselectAutomaticpower-down(4H) PressOK.Apop-upmessagewillappear
“Areyousureyouwanttoenableautomaticpowerdown?”
UsetherightarrowkeytoselectNO
TheTVscreenreturnstotheOptionMenuandthe Automaticpower-down(4H)optionwilldisplay. Automaticpower-down(4H) OFF
Toreturntoautoshutdownafter4hoursrepeatthe aboveexcept
usetheleftarrowkeytoselectYES.
InPVRFilesystemmenuyoucansetupUSB diskforPVR.
Select Disk |
C: |
Check PVR File System |
Start |
USB Disk |
|
Format |
|
Time Shift Size |
|
Speed |
|
Free Record Limit |
6 Hr. |
OK |
MENU |
Restorefactorydefaultwillclearalltheprograms andpassword.
6.LOCK MENU
ThesixthitemofthemenuistheLOCKMENU Youcanlocksystem,setpassword,blockprogram andsetparental guidanceOnceyousetthelock systemonyoucannotsearchthechannelsor change anyprograms.
CHANNEL Lock System |
|||
PICTURE |
|
|
|
|
|
OK |
|
SOUND |
Set Password |
||
|
|||
|
Block Program |
||
TIME |
Parental Guidance |
||
OPTION |
|
|
|
LOCK
MENU |
MOVE |
OK OK |
Thedefaultpasswordis0000,Ifyouforgetthe password,youcanusethesuperpassword:9443. Blockprogram:Press tochoosethe program,pressteletextgreenbuttontoblock theprogram. Ifyouwantunblocktheprogram, plsenterthemainmenu,inputthepassword, thenpressgreenbuttonagain.Parental guidance:Press
 tochooserating.
7.EPG Menu(Electronic Program Guide).
TheEPGmenuisusedtolookatwhatisbeing broadcastedonDTVorRadiochannel intheday. ToaccesstheEPGmenu,presstheEPG botton,thefollowingmenuwillbedisplayed:
|
PROGRAMMEGUIDE |
TIME |
||
|
|
26/Jan 11:40 |
|
|
|
1 |
TV3 |
Club/Super3-Naturalmen.. |
|
|
2 |
3/24 |
No Information |
|
|
3 |
TVC HD |
No Information |
|
|
Record INFO |
Schedule Remind |
OK INDEX |
|
1. |
INFO |
|
|
|
Use |
tochoosetheprograms,Press |
|||
INFOkey,you candisplaythehighlight program's information.
2. |
Schedule |
|
Press the teletextyellowkey,Itcanlist |
||
allthereminderschedule,press |
tochoose |
|
thelist, pressredkey DELETE todeletethe schedulelist.
Schedule List |
04:55 28th Apr |
Delete |
|
|
|
Time Date |
Programme Title Channel Name |
|
|
|
|
|
|
|
|
|
|
|
|
|
EN-19
Operation
3.  Record
Press the redkey,Itcansettheprogram toberecorded.
4.  Remind
Pressthebluekeytochooseoneprogram
andsetuponeremindertime,theTVscreenwill skiptothechoosedprogramintheremindertime automatically.
|
|
Reminder |
|
|
1 TV3 |
|
|
37 Minute |
|
|
11 Hour |
|
|
Jan Month |
|
|
26 Date |
|
|
Once Mode |
|
OK |
BACK |
|
|
|
8.PVR function
1.Prepare to record the program
PVRfunctiononlyworksinDTV.
FromOPTIONMENUenterintoPVRFileSystem
In OPTIONMENU ,pleasechoose |
check |
||
PVRFileSystem |
.Click OK ,until |
|
|
checking changeinto |
Success . |
||
Note:pleasechecktheterm |
speed |
.Ifitis |
|
HDsupport |
,thatmeansthespeedofUSB |
||
deviceisavailablefortimeshiftandrecord.If not,pleaseformatthedevice,tomakesurethe deviceavailable.Thedefault FreeRecord Limit is6hour,ifthespaceonthediskisbig enough.Ifthespaceisnot
bigenough,therecordtimeshouldbeshorter, dependsontheroomonthedevice.Duringthe checkPVRFileSystem checking,pleasedo nottakeanyotheroperationuntilitfinished.
TherecordingsmustbedonewiththeTVPVR system.ItcanonlybeplayedinthesameTV, notinanyotherkindofdevice(computer, DVD,etc.)whichisnotcompatiblewith. TS.fileformat.
Pleasenotethatinordertocarryoutanykindof recording,theTVwillrequireyoutoformatthe connectedUSBdevicetostoretherecording.
WARNING.WHENYOUFORMAT,THE EXTERNALUSBDEVICEYOUWILLLOSEALL THEFILESANDINFORMATIONYOUHAVE
STORAGEONTHEDEVICE.
TheUSBfilesystemwilllimitthesizeofthe storagesize.
Filesystem: NTFSupto2TB
FAT32withupto192GB FAT16withupto2GB
FromOPTIONMENUenterintoPVRFile Systemasbelow:
CHANNEL |
OSD Language |
|
||
PICTURE |
Audio Languages |
|
||
Subtitle Language |
|
|||
SOUND |
Country |
|
||
PVR File System |
|
|||
|
|
|||
TIME |
|
OK |
|
|
|
Restore Factory Default |
|
||
OPTION |
Automatic power-down(4h) |
|||
Home/Shop Mode |
|
|||
|
|
|||
LOCK |
DCR |
|
||
|
|
|
|
|
|
|
|
|
|
|
|
MENU |
MOVE OK OK |
|
Select Disk |
C: |
Check PVR File System |
Start |
USB Disk |
|
Format |
|
Time Shift Size |
|
Speed |
|
Free Record Limit |
6 Hr. |
OK |
MENU |
SelectDisk:selectwhichdisctosavethe recordfile.
Select Disk
USB 0
Disk C:
 OK
OK
CheckPVRFileSystem:checkifthePVRFile
SystemsetupintheUSBdeviceornot.
Format:
File System Size
PVR File System Type Hi Speed FS
PVR File System Size All
SD 104 Mins
HD 29 Mins
 OK
OK
File System Size
PVR File System Type |
FAT32 |
|
|
SD 104 Mins
HD 29 Mins
 OK
OK
EN-20

Operation
(Suggesttoformatthedeviceby |
HighSpeedFs... , |
|||||||
whichcanspeeduptherecord.) |
|
|
|
|||||
|
|
|
|
Format disk |
||||
|
|
|
|
|
|
|
|
|
|
|
|
|
Format disk |
|
|||
|
|
|
Warning! All data will be lost. |
|
||||
|
|
|
|
|
|
|
|
|
|
|
|
|
Start |
Exit |
|||
|
|
|
|
|
|
|
|
|
|
|
|
|
|
OK |
|
|
|
|
|
|
|
Format disk |
||||
|
|
|
|
Do not unplug USB device. |
||||
|
|
|
|
Formatting,please wait |
||||
belowmenuappearafterFormatfinish: |
||||||||
|
Select Disk |
C: |
||||||
|
Check PVR File System |
Checking |
||||||
|
USB Disk |
Pass |
||||||
|
Format |
Pass |
||||||
|
Time Shift Size |
All |
||||||
|
Speed |
|
|
Checking |
||||
|
Free Record Limit |
6 Hr. |
||||||
|
|
OK |
|
|
MENU |
|||
|
Select Disk |
C: |
||||||
|
CheckPVRFileSystem |
SUCCESS |
||||||
|
USB Disk |
Pass |
||||||
|
Format |
|
|
Pass |
||||
|
Time Shift Size |
All |
||||||
|
Speed |
HD Support |
2730KB/S |
|||||
|
Free Record Limit |
6 Hr. |
||||||
|
|
OK |
|
|
MENU |
|||
Ifyouselectthe |
HiSpeedFS |
formatmode, |
||||||
thenyoucanchangethetimeshiftsize: |
||||||||
|
|
|
|
Time Shift Size |
||||
|
Time Shift Disk Size |
512 MB |
||||||
|
|
|
|
SB 14 Mins |
||||
|
|
|
|
HD 4 Mins |
|
|
|
|
|
|
|
|
|
|
|
|
|
|
|
|
|
|
OK |
|
|
|
|
|
|
|
|
|
|
|
|
2.Record the program
AsplayingtheDTVsource,choosethechannel
andclick |
record |
,therecordframewillpop |
up.Click |
record |
again,therecordframewill |
disappearandthe |
REC iconstillontheleft |
|
top.Itwilldisappearuntilyouclick stop .
3.Play the record
Theprogramrecordedonthe“USB”willbe savedinthefolder“_MSTPVR”onthe device.
1.TheUSBstoragesizecanbebetween 128MBand500GBinsize,butforpracticaluse
2GBto500GBisrecommended.
2.VideomaybecomepixelatedwhenVideo bitrateistoolow.Thiscanbecausedby connectingaUSBextensioncableinsteadof pluggingtheUSBdirectlyintotheTV
3.NotallUSBdevicesarecompatible. BelowisalistofrecommendedUSBdrives. Modelsthatarenotlistedmaybecompatible, butitisnotguaranteedtowork.
TheUSBsupportlistarethesameasTimeshift function,seethefollowingpagesfordetails.
EN-21
Operation
9.Timeshift function
Prepare to record the program
ThisTVallowsyoutopauseandrecordthe currentlywatcheddigitalprogram toaUSB storagedevice,andtoresumetothepoint whereitwaspaused.
 FormattingaUSB2.0storagedevicewill beneeded.Saveyouroriginaldata beforeformatting.Allthedatastoredin theUSBdevicewillbeerasedafter formatting.
USB Drive Storage Format
SelecttoformattheUSBdeviceandallocatethe amountofspacefortheTimeShiftfunction.
 Theformatprocesswilltakeatleast2 minutes.Pleasedonotturnoffthepoweror removetheUSBdeviceduringformatting.
 Duringformatting,aspeedtestwillbedone ontheUSBdevice.Ifitfails,itmeanstheUSB devicemaynotsupporttheTimeShift function.
Record a paused DTV program to
USB storage device
1.WhileintheDTVinputsource,insert USBstoragedevicetotheUSBportonthe sideofyourTV.
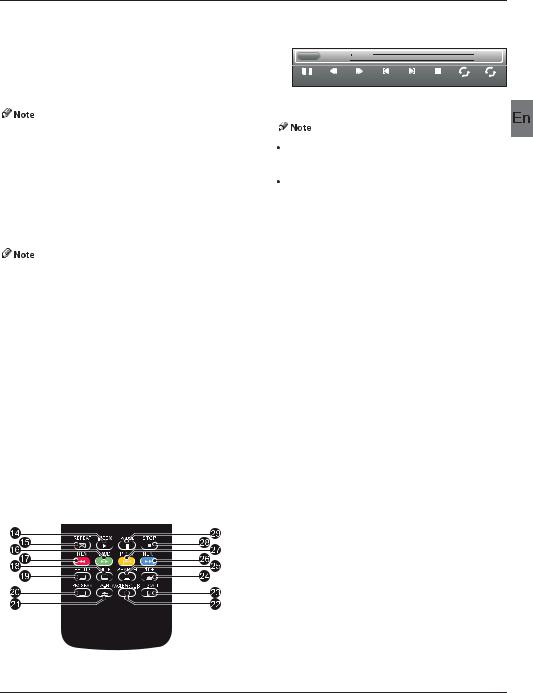
2.PressPAUSE tostartTimeShift function.TheTVprogrampaused.TheTime ShiftOSDappears,andstartsrecording.
3.PressSTOP tostopTimeShift functionandstoprecordingprogram.
 play 00:04:22
 00:04:22
|
|
|
|
|
AB |
Pause |
FB |
FF |
Prev. |
Next |
Stop RepeatALL SetA |
PleasedonotunplugtheUSBstoragedevice whentheTimeShiftfunctionisactivated.
Approximately4GBofmemorybuffers aboutoffer140minutes.
 EN-22
EN-22

Operation
Time Shift limitations:
1.WhentheTimeShiftfeatureisactivated,only thePLAY/PAUSE/STOP/FWD/REV/ VOL+/VOL-/MUTEkeysandsomebasic operationkeys(ENTER/EXIT/navigationkeys) areavailable.
2.Videoplaybackmaynotbesmoothandskipif
USBrecordingspeeddoesnotmeetthe minimumrequirements.
3.DoNotremoveUSBdiskorswitchoffthe powerduringTimeShiftoperations.Itwill abortoncethesignalislost.
4.DoNotremovethesignalsourceduringTime Shiftoperations.
5.DoNotquicklyandrepeatedlychange operationsbetweenPLAY/PAUSE/FWD/REV.
6.VideomaybecomepixelatedwhenVideobit rateistoolow.
7.NotallUSBdevicesarecompatible,TheUSB harddiskdriveelectrictyshouldbe
<500MA.
BelowisalistofrecommendedUSBdrvies. Modelsthatarenotlistedmaybecompatible, butitisnotguaranteedtowork.
SanDiskExtreme®Contour |
USBFlash |
Drive-8GBSDCZ8-8192-E75 |
|
SanDiskExtreme®Contour |
USBFlash |
Drive-16GBSDCZ8-016G-A75
KingstonDataTraveler410USB2.0
FlashDrive-8GBDT410/8GB
KingstonDataTraveler410USB2.0
FlashDrive-16GBDT410/16GB
OCZ TechnologyRally2USB2.0Flash
Drive-4GBOCZUSBR2DC-4GB
OCZ TechnologyATVUSB2.0Flash
Drive-8GBOCZUSBATV-8GB
OCZ TechnologyRally2USB2.0Flash
Drive-8GBOCZUSBR2DC-8GB
SZMSUNG-Hm500JI-500G
8.Thisfeatureisnotavailableforalldigital TV,suchasscrambledoraudioonlychannels.
EN-23
Operation
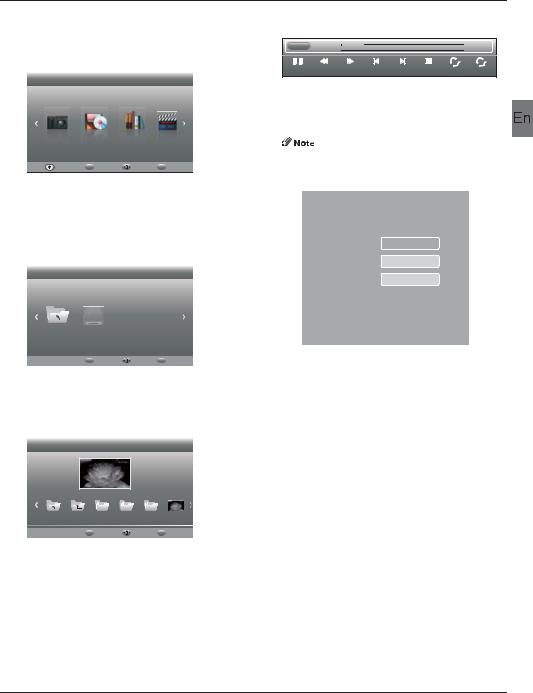
10.USB Player
Presssourcekey,andselectUSBinsource list,pressOKbuttontoentertheUSBmenu.
Haier Innovation Life
PHOTO |
MUSIC |
TEXT |
MOVIE |
|
USB2.0 |
MENU Back |
|
Move |
OK Select |
|
||||
PleasemakesurethattheUSBdevicehave pluggedintheslot.Therearefourtypemedia itemcanbeselected,suchasphoto,music, Movie,andtext.Selectthetypemediaitemby pressing
 ,pressOK buttontoenter
thediskselectionmenu.
Haier Innovation Life
Return |
C |
|
|
|
|
MENU Back |
|
Move |
OK Select |
|
|
Pressthe
 toselecttherightdiskandpress OK todisplaymediafilesandfolderlistor chooseReturntobacktothemediatype selectionmenu.
Picture
|
|
0021.JPG |
|
|
|
|
|
|
||
|
|
|
|
|
|
|
|
|
|
|
|
|
|
|
|
|
|
|
|
|
|
Return |
Up Folder |
720 |
480 |
1080 |
0021.JPG |
|||||
|
MENU Back |
|
Move |
|
|
OK |
Select |
|||
|
|
|||||||||
Selectthemediafilebypressing 
 or
or  ,then thepreviewframewillpopup.Pressthebutton
  toplaythemediafileinfullscreen.Whenthe mediafile(photo,Movie,ortexttype)isplaying, presstheOK orInfobuttoncandisplaythecontrol bar.
 play 00:04:22
 00:04:22
|
|
|
|
|
AB |
Pause |
FB |
FF |
Prev. |
Next |
Stop RepeatALL SetA |
Press
 toselectthefunctionicon,pressOK buttontoconfirmthefunction.
Press  orEXITbuttontoexitthecontrolbar exceptformusic.
Youcanadjusttheaudiotrack,orprograminthe
InfomenuwhilePlayingthevideofile.Choosethe
InfoiconandpressOKcandisplaytheInfoMENU.
SUB-10.avi
Resolution: 720x400
AudioTrack: 1/1
Subtitle: OFF
Program: --/0
Size: |
4142 KBytes |
|
Close |
USBplaybackissupportedforthefollowingphoto fileformats:
-JPEG(JPEGformat,fileswiththeextension".jpg") -BMP(fileswiththeextension".bmp")
-PNG(fileswiththeextension".png")
USBplaybackissupportedforthefollowingmusic fileformats:
-MP3(fileswiththeextension".mp3") -WAV(fileswiththeextension".wav")
USBplaybackissupportedforthefollowingtext fileformats:
-TXT(fileswiththeextension".txt")
USBplaybackissupportedforthefollowingmovie fileformats:
-AVI(filewiththeextension".avi") -TS(MPEG2&H.264)
 EN-24
EN-24
TroubleShooting
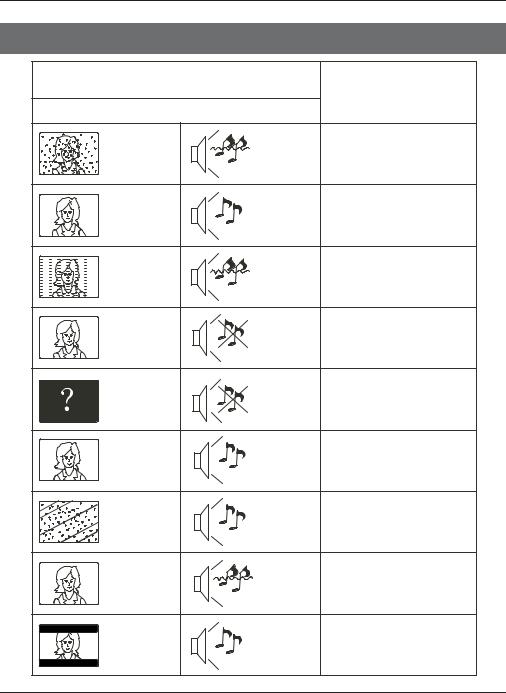
05 Trouble shooting
TroublephenomenonSymptom
InspectionCheck
Picture |
Audio |
Snow
Ghost
Interference
NormalPicture
Nopicture
Noise |
antennaposition,direction |
|
orconnection |
||
Normalaudio |
antennaposition,direction |
|
orconnection |
||
Noise |
electronicequipment,car/ |
|
motorcycle,fluorescentlight |
||
|
||
Mute |
Volume(checkifmuteis |
|
activatedoriftheaudiosystem |
||
|
connectionsare notcorrect) |
|
|
Powercordisnotinserted |
|
|
Powerswitchisnotopened |
|
Mute |
Contrastandbrightness/volume |
|
setup |
||
|
Pressstandbykeyontheremote |
|
|
controlforinspecting |
Nocolour |
Normalaudio |
Colourcontrol |
|
Picture |
Normalaudio |
retunechannel |
|
breakingup |
orweak |
|
|
Nocolour |
Noise |
TVsystem |
|
|
|||
|
|
||
Thereisblackbar |
Normalaudio |
Changeaspecttozoom |
|
ontopandbottom |
|||
|
|
EN-25

TroubleShooting
Trouble Shooting
MyTVdoesnotdisplaythepicture |
MostPC'sandlaptopswhenconnectedwithaVGAPlug(the |
|
blue15pinplugonyourPCorlaptop)requireyoutopress |
||
onmylaptop/PCwhenconnected. |
||
somebuttonsonyourkeyboardtogetapictureonaTVor |
||
|
||
|
otherexternaldisplay.ThisisusuallytheF7(Dell)orF4(HP/ |
|
|
Samsung)orF5(Toshiba).Onlaptops,youhavetopressthe |
|
|
“Fn”keyatthesametimeasthe“F”key. |
|
|
TheVGAcableonlycarriesthevideoorpictureinformation. |
|
IhaveconnectedmyPC/Laptopto |
||
Youneedtoconnectaseparatecableconnectedtothe |
||
theTVandgetapicturebutno |
earphonesocket(3.5mmjack)onyouPC/Laptoptothe3.5m |
|
sound.Why? |
(PCAudioIN)socketonyourTV.Youwillneedtoselect“PC” |
|
|
usingtheSourcebuttononyourremote. |
|
|
AlternativelyconnectyourPC/LaptopusingaHDMIcableif |
|
|
youPC/LaptophasaHDMIconnector.HDMIisbothaudioand |
|
|
video. |
|
Thepictureisnotautoresizing |
CheckthattheTVpictureAspectRatioissetto'Auto'onall |
|
inputsATV,DTV,SCART,HDMI1,2etc. |
||
whenchangingchannels. |
||
Tosettheaspectratio,(Auto,4:3or16:9).PressSourcebutton |
||
|
||
|
startatATVandrepeatthesequencebelowforallinput |
|
|
sourcesATV,DTV,SCART,HDMI1and2aseachinputsourceis |
|
|
controlledseparately. |
|
|
PressTVMenubutton |
|
|
PressRightArrowtoaccessPicturesubmenu |
|
|
PressDownArrowtoselectAspectRatio |
|
|
SelectAuto |
|
|
PressExit |
|
|
Repeatforallinputsources. |
|
IhavejustpluggedinaDVDplayer |
ThisisapplicabletoanyitemofequipmentpluggedtotheTV |
|
1.TurnbothTV&DVDplayeroff(plugsoutofthewallsocket, |
||
oranotheritemintomyTVandit |
||
notstandby). |
||
doesn'twork. |
||
2.TurnoffanyequipmentconnectedtotheSCARTsocket. |
||
|
||
|
3.DisconnecttheSCARTplugfromtheTV. |
|
|
4.PluginandturnTVon |
|
|
5.PluginandturnDVDplayeron |
|
|
6.SelectHDMIfromSourceMenu |
|
|
7.PressplayonDVDplayerandcheckmovieplaysok |
|
|
NOTE: TheSCARTsockethaspriorityoverHDMIanditis |
|
|
importantthattheequipmentconnectedtotheSCARTsocket |
|
|
ontheTVisswitchedOFF(notinstandby). |
|
|
Pleasefollowthisinformation.Iftheadviceworksandthe |
|
|
DVDplayerworks,theTVisOKitisjustabitconfused. |
|
|
ProbablyHDMIplugshavebeenremovedandpluggedbackin |
|
|
whentheTVisswitchedon. |
|
|
NeverremoveorpluginHDMIcablesoranydigitalequipment |
|
|
withtheequipmentswitchedon. |
|
|
Alwaysswitchoffallequipmentwhenunpluggingor |
|
|
connectinganydigitalequipment. |
 EN-26
EN-26

TroubleShooting
Trouble Shooting DigitalTV Problems and possible Solutions.
Picture Breaks into Pixels
Atypicalexampleofareceptionproblemincludesthebreak up of pictures (pixilation)orthepicture freezing, sometimesthereareclicking or squeaking soundsorthesound drops out orthereisNO reception atall.
Yourpicturemaybreakintopixelsduetothedigitalvideosignaldropping.Thesignaldroppingmayoccurbecauseof eitherproblemswith weaksignals(seeTVAerials)orifyouareconnectedbycableaweakcablesignal.Iftheproblem isweaksignals,useanamplifiertostrengthenthesignal.Acabletechniciancanhelpyouinstallaninlineamplifierora pre-amplifier.Thiswillboostyoursignalstrengthandfixthepixelproblem.
IfyouarereceivingyourTVsignalbysatellite,checkyourdishhasnotmovedfollowinghighwinds,orthatthesignalis blockedbytrees.TreescanbeaproblemastheTVsignalcanchangedependingifatreebetweenthesatellitedishand satelliteisinbareorinfullleaf.
Missing channels
Itmaybethatyoufindthattherearechannels missing,oryou'rereceivingchannelsfromthewrongregion. Sometimestheinteractive services (red button) doesn't work.Thisisusuallycausedbyweaksignal,seeTVAerials
TV Aerials
Digitalterrestrialtelevision(Freeview)comestoyourTVviaanaerial,TheoldaerialthatwasgoodforanalogueTVmay notworkwellfordigitalsomayneedupgrading.IfyouaregettingsomebutnotallofthedigitalchannelsonDTV
(Freeview)forexampleyougetBBC1,BBC2,Channel4,butnotITVorChannel5,thisisusuallybecauseyouraerialisa narrowbandtype,andneedstobechangedtoawidebandtype.
Faulty Leads and Cables
CheckyourTV.Aretheleadsattheback-tothemains,theaerial,theset-topbox,thevideoorDVDplayerorrecorder properlyconnected?SCARTleadsareknowntoworklooseovertimeandcanresultinbothaudioandvideo(picture) problems.Eitherleftorrightorbothaudioismissingandthecoloursarepoorormuddylooking.PushtheSCART plugsfirmlyin,thisshouldfixtheproblem.
HDMIplugsneedtobepushedinfirmly;it'sonlythelastmillimetrethatthecontactsmake.Typicallytheblackplastic partoftheHDMIplugshouldbeverycloseortouchingthebodyoftheTVorcomponent.
WhenplugginginanyHDMIcablesyoumayexperienceproblemsiftheHDMIcablesarepluggedinwhentheTVorthe othercomponentisswitchedon.AlwaysswitchoffboththeTVandthecomponentyouarepluggingin.Ifyouhave checkedtheplugsandsockets,switchofftheTVandwhateveryouhavepluggedintotheTVandthenswitchthemon again.
I have connected my PC to theTV.There is no sound.
IfyouconnectyourPCorLaptoptotheTVusingaVGA(15pinSubD)cablethereisnoaudio,youneedtoconnecta separateaudiocabletotheTVfromthePCorlaptop.
Unnatural Colours and FleshTones
UnnaturalfleshtonesandothercolourscouldpresentanotherproblemeveninanewHDTV.ThisisduetotheTV picturesettings,whichareoptimizedforashowroomenvironment.Fixthisbychangingthepicturemodetonaturalin thepicturemenu.Formoreprecision,trymanuallysettingthecolour,contrastandbrightnessoptionsinthepicture menu.
White Outlines
WhiteoutlinesaroundobjectsandpeoplegenerallyappeareitheriftheTVsharpnessissettoveryhigh,orifyour televisionsetusessomeedge-enhancementprocessingtechnology.Gotothepicturemenuandadjustthesharpness tillthewhiteoutlinedisappears.Ifedge-enhancementisenabled,trytodisableitusingtheservicemenu.
ChoppyVideo
Attimesthevideomightbecomechoppy.Whenthishappens,checkwhetherthesignalisstrongenough.Ifthesignal isstrongtheproblemiswiththecableoperator.Ifthesignalstrengthisweak,tryboostingthesignalstrengthwiththe helpofanamplifier.
The picture does not fill the screen
WhenconnectingPC'sorlaptopstotheTV,thepicturemaynotfillthescreen.CheckthedisplaysettingsonyourPCor laptop(Windows>Start>ControlPanel>AppearanceandPersonalization>Displaysettings)andselectthebest resolution.OnyourTVselect:- TVMenu>Picture>SettingsandthentryAUTO,ZOOM1orZOOM2forthebestdisplay.
USB Connection
TheUSBconnectionwillworkwith*.jpg(photo)and*.mp3(music)files.PleasenotetheTVdoesnotrecognizeApple iPhone,oriPod'sconnectedtotheUSBconnectorontheTV.TheTVmayplayotherfiles,butduetothemultiple differentfileformats,thereisnoguaranteethattheseotherfileformatswillwork.
EN-27

TroubleShooting
Specification
46"FullHD1080PDigitalLEDLCDTV
Television picture quality:
Connectivity:
Sound quality:
Standby Power consumption
Digital features:
Additional features:
FULLHD
Integrateddigital.
ScreenSize:117cm
Resolution1920x1080pixels50Hz.
2HDMIsockets.
1SCARTsocket.
PCinputsocket.
Componentvideosocket.
Composite.
1USBport.
NICAMstereosoundsystem. 2x8wattsRMSpoweroutput.
<0.5W
Digitallyinteractive. Digitaltext.
Digitalvideobroadcasting(DVB)subtitlesavailable. Autosetup.
Autoscanfornewchannels. Nowandnextprogrammeguide.
7dayelectronicprogrammeguide(EPG). TopupTVcompatible.
CIslot.
Audiodescriptioncompatible.
UHF/VHFtuner.
Sleeptimer.
Childlock.
Pictureandtext.
Remotecontrolbatteriesrequired2xAAA(included).
VESAMountSize:200x200mm
PackageSize(WxHxD):1285x780x170mm
SetSize(WxHxD)withStand:1074x703x280mm
SetSize(WxHxD)withoutStand:1074x645x78mm
Packageweight:17kg
Setweightwithstand:13.7kg
Setweightwithoutstand:11.8kg
*ThepartspecificationsofthisTVsetprovidedhere areforreferenceonly. Difierencesmayoccurasproducttechnologyis updated.
Designandspecificationsaresubjecttochange withoutnotice.
Scart Output description :
1.WhencurrentsourceisATV/AV/SCART,scartoutputsignalisATV.
2.WhencurrentsourceisDTV,scartoutputsignalisDTV.
3.Othersourcehavenoscartoutputsignal.
 EN-28
EN-28

 Loading...