


Climber 7.10

02298/11
Climber 710
OPERATOR’S MANUAL
MANUALE DELL’OPERATORE
MANUEL D’UTILISATION
BEDIENUNGSANLEITUNG

SUMMARY
Safety rules
1
Informations and warnings
4
Instructions :
5
Warnings
5
Identification and servicing
6
Technical specifications
7
Putting the machine into service
8
Instructions for use
8
Maintenance and lubrication
9
Commands (Fig.1)
42
Pictures’ list
43
Transporting
47
EC Declaration of Conformity
48
INDICE
Norme antinfortunistiche
1
Etichette e avvertenze
4
Istruzioni :
15
Avvertenze
15
Identificazione e assistenza
16
Caratteristiche tecniche
17
Messa in opera della macchina
17
Istruzioni d’uso
17
Manutenzione e lubrificazione
19
Comandi (Fig.1)
42
Elenco figure
43
Trasporto
47
Certificato di Conformità CE
48
INDEX
Règles de sécurité
1
Etiquettes et mise en garde
4
Instructions :
23
Mises en garde
24
Identification et assistance
24
Caractéristiques techniques
25
Mise en service de la machine
25
Mode d’emploi
26
Maintenance et lubrification
27
Commandes (Fig. 1)
42
Tableau des illustrations
43
Transport
47
Certificat de Conformité CE
48
INHALTSÜBERSICHT
Sicherheitsvorschriften
1
Etiketten und Warnungen
4
Anleitung:
32
Sicherheitsrelevante Hinweise
32
Identifikation der Maschine und Kundendienst
33
Technische Daten
34
Inbetriebnahme der Maschine
35
Wartung und Schmierung
36
Steuerung (Abb. 1)
42
Abbildungsverzeichnis
43
Transport
47
EG-Konformitätserklärung
48
1
2
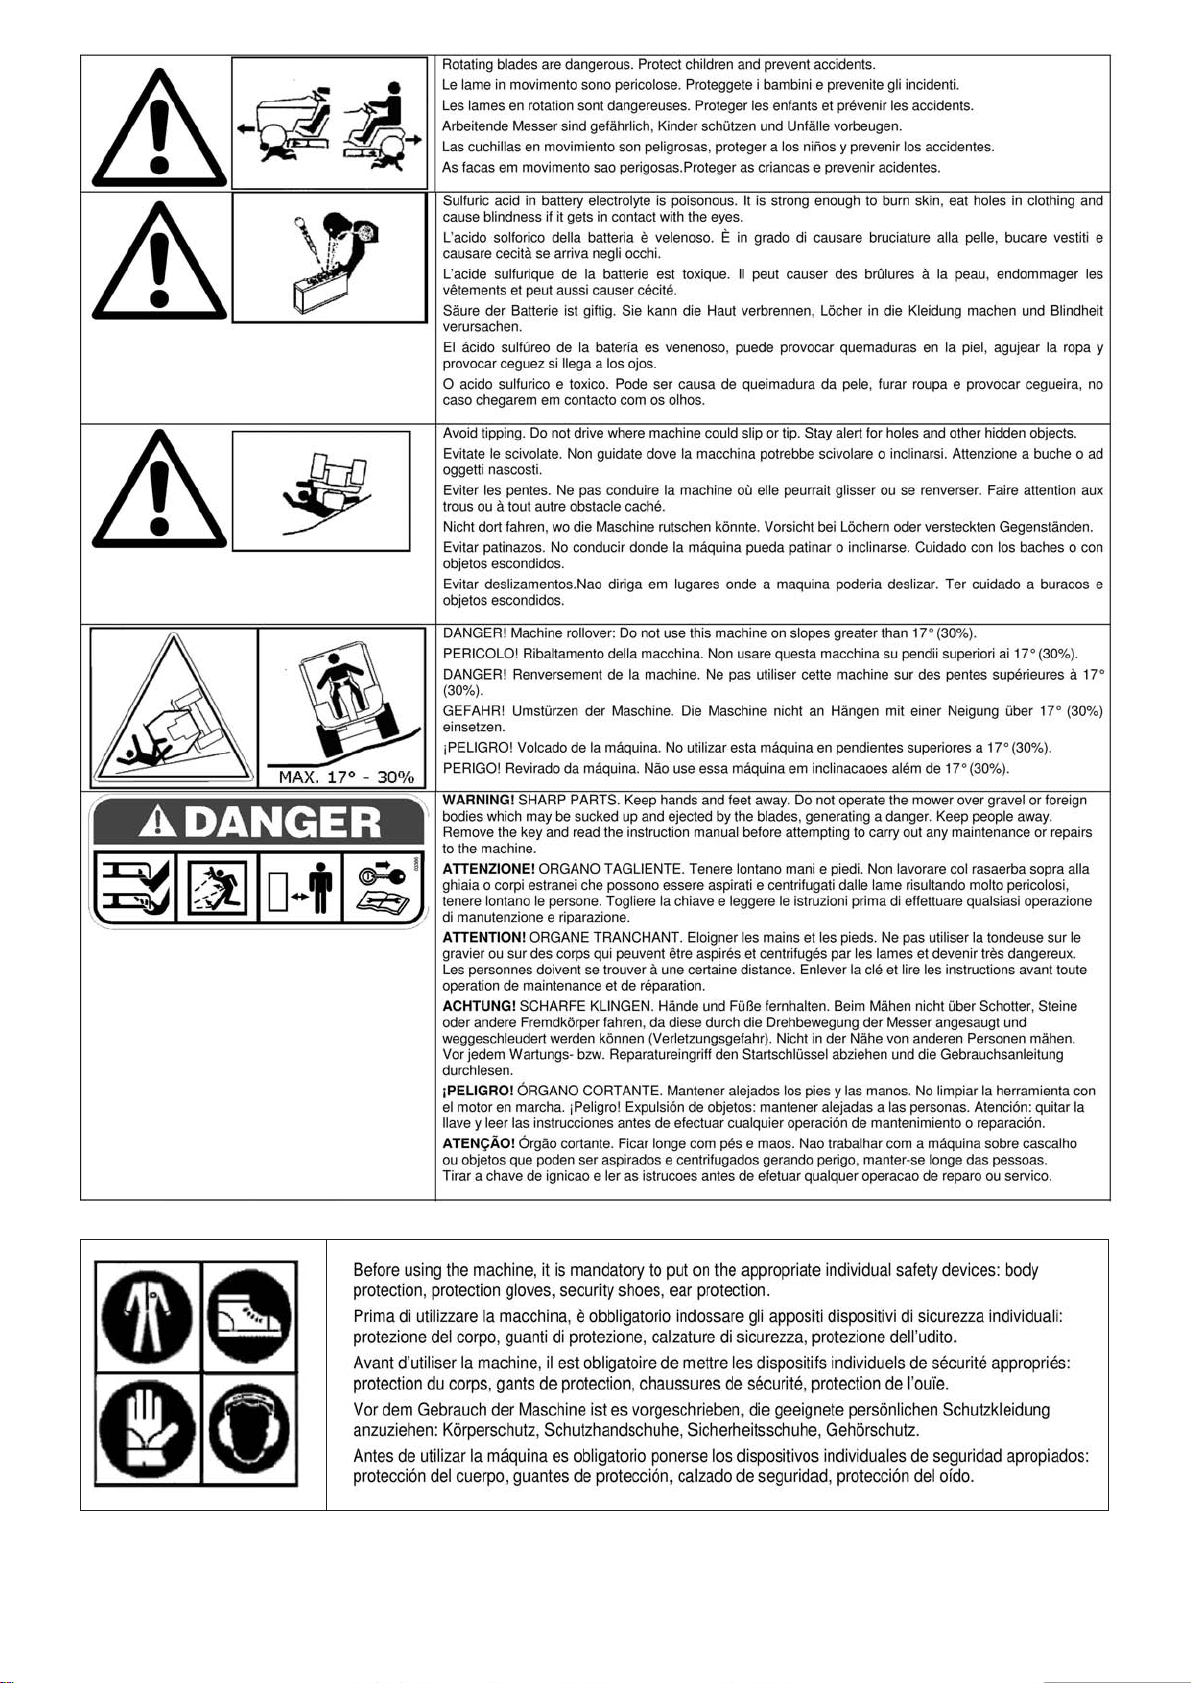
Take special care not to touch hot parts of the engine.
Prestate particolare attenzione a non entrare in contatto con parti surriscaldate del motore.
Veiller tout particulièrement à ne pas toucher des éléments surchauffés du moteur.
Achtung – keine heißen Motorteile berühren!
No tocar partes recalentadas del motor.
Tome muito cuidado para não entrar em contacto com as partes aquecidas do motor.
Engine exhaust fumes can cause sickness or death. If it is necessary to run an engine in an enclosed area,
use an exhaust pipe extension to remove the fumes. Always try to work in a well ventilated area.
I gas di scarico possono causare malanni o morte. Se è necessario mettere in moto un motore in uno
spazio chiuso, usare una prolunga tubo di scarico per far uscire il fumo. Lavorare in una zona ben
ventilata.
L’exhalation des gaz d’échappement peut être cause d’intoxication ou de mort. S’il est vraiment nécessaire
d’allumer le moteur à l’interieur, appliquer au tuyau d’échappement un autre tuyau extensible pour
permettre la sortie des gaz. Il est toujours mieux de travailler en plein air.
Auspuffgase können Übelkeit oder Tod verursachen. W enn es notwendig ist, einen Motor in einem
geschlossenen Raum laufen zu lassen, benützen Sie eine Verlängerung, um das Auspuffgas abzuleiten.
Versuchen Sie immer in einem gut belüfteten Raum zu arbeiten.
Los gases de escape pueden provocar enfermedades o muerte. De tener que poner en marcha un motor
en un espacio cerrado, usar una prolongación del tubo de escape para que salga el humo. Trabajar en una
zona bien ventilada.
Os gases de escape podem causar danos ou morte. Caso seja ncessário fazer com que o motor funcione
num espaço fechado, utilize uma extensão para o tubo de escape que os fumos sejam espulso para o
exterior. Trabalhe numa área bem ventilada.
Caution! Never touch moving pulleys or belts. They can be very dangerous. Never do maintenance with
engine running.
Attenzione! Non toccare mai pulegge o cinghie in movimento, creano gravi danni alla persona. Non fare
manutenzione col motore in moto.
Attention! Ne jamais toucher ni poulies ni courroies en mouvement, elles peuvent provoquer des accidents
aux personnes. Ne pas faire l’entretien quand le moteur est en marche.
Vorsicht! Nie laufende Riemenscheiben oder Treibriemen anfassen, da es gefährlich ist. Nie bei laufendem
Motor Instandhaltung machen.
¡Atención! No tocar jamás poleas o correas en movimiento, porque pueden crear graves daños a la
persona. No efectuar el mantenimiento con el motor en marcha.
Atenção! Nunca toque nas polias ou correias em movimento devido ao alto risco de ferimentos. Nunca
faça a manutenção da máquina com o motor ligado.
Sharp component. Keep hands and feet away. Do not clean the attachment when the engine is turning.
Organo tagliente. Tenere lontano piedi e mani. Non pulire l’attrezzo con il motore in moto.
Organe tranchat. Ne pas approcher mains et pieds. Ne pas nettoyer l’outil quand le moteur est en marche.
Scharfe Klinge. Hände und Füße fernhalten. Niemals bei laufendem Motor reinigen.
¡Peligro! Órgano cortante. Mantener lejos los pies y las manos. No limpiar la herramienta con el motor en
marcha.
Perigo! Órgão afiado. Mantenha as mãos e os pés afastados. Não limpe o equipamiento com o motor em
movimento.
A burst which separates the tyre from the rim parts can cause serious injury or death.
La separazione fra pneumatico e cerchione, causata dall’esplosione del pneumatico, può provocare serie
ferite o addirittura la morte.
La séparation entre le pneu et la jante, provoquée par l’explosion d’une roue peut causer des dommages,
blessures ou la mort.
Die Trennung der Räder von den Felgen durch Explosion kann schwere Verletzungen oder den Tod
verursachen.
La separación entre el neumático y la llanta producida por la explosión del neumático puede provocar
graves herida e incluso la muerte.
A separação entre o pneumático e o aro, provocada pela explosão do pneumático, pode causar graves
ferimentos ou até mesmo a morte.
Prevent battery explosions: keep sparks, lighted matches and open flames away from the top of the
battery. Battery gas can explode.
Per prevenire l’esplosione della batteria, tenete scintille, fiammiferi accesi e fiamme lontani dalla stessa. Il
gas della batteria può esplodere.
Prevenir l’explosion de la batterie: tenir les éticelles, les alumettes et le feu loin de la batterie. Le gaz de la
batterie peut exploser.
Vorbeugung der Batterie-Explosion. Entfernen Sie Funken, Zündhölzer und Flammen von der Batterie. Das
Batteriegas kann explodieren.
Para prevenir la explosión de la batería, mantener chispas, cerillas encendidas y llamas lejos de la misma.
El gas de la batería puede explotar.
Para prevenir explosao da bateria ter centelhas, fosforos acendido e chamas longe da mesma.O gas da
bateria poderia expludir.
Handle fuel with care, it is highly flammable: Do not refuel machine while smoking, when machine is near
an open flame or sparks, or when the engine is running. Stop the engine.
Maneggiare il carburante con cura, è altamente infiammabile; non fate rifornimento mentre fumate, o vicino
a fiamme o scintille, o quando il motore è acceso.
Manier avec soin le carburant car c’est très inflammable. Ne pas remplir le réservoir si vous êtes en train
de fumer ou pendant que la machine est près du feu ou d’étincelles ou encore pendant que la machine
travaille. Arrêter le moteur.
Treibstoff vorsichtig handhaben, da er sehr entzündbar ist: beim Tanken nicht rauchen. Nicht tanken,
wenn die Maschine in der Nähe von Flammen oder Funken ist oder wenn der Motor läuft. Immer den Motor
abschalten.
Manejar el combustible con cuidado porque es sumamente inflamable; no repostar mientras se fuma o
cerca de llamas o chispas, o cuando el motor está encendido.
Manuseie o carburante com cuidado, pois este è altamente inflamável; não fume durante o abastecimento
da máquina ou enquanto o motor estiver ligado, não o aproximado de chiama ou de faíscas.
3

CAUTION, DANGER! PLAESE, READ THE MANUAL.
ATTENZIONE, PERICOLI! LEGGERE IL MANUALE.
ATTENTION, DANGER! LIRE LE MANUEL.
ACHTUNG BITTE! BITTE LESEN SIE DIE ANCEITUNG.
¡ATENCIÓN, PELIGRO! LEER EL MANUAL
NOISE LEVEL - LIVELLO SONORO – INIVEAU
SONORE – LAUTSTÄRKEPEGEL – ANIVEL DE
RUÍDO
STARTER
MAX
MIN
FAST
VELOCE
RAPIDE
SCHNELL
RÁPIDA
SLOW
LENTA
LENTE
LANGSAM
LENTA
SLOW
LENTA
LENTE
LANGSAM
LENTA
FAST
VELOCE
RAPIDE
SCHNELL
RÁPIDA
CUTTING
HEIGT
ALTEZZA
DI TAGLIO
HAUTEUR
DE COUPE
SCHNITTH
ÖHE
ALTURA
DE CORTE
BLADE ENGAGEMENT
INSERIMENTO LAMA
EMBRAYAGE LAME
MESSER EINSETZT
CONEXIÓN CUCHILLA
PARKING BRAKE
FRENO DI STAZIONAMENTO
FREIN DE STATIONNEMENT
FESTSTELLBREMSE
FRENO DE
ESTACIONAMIENTO
CAUTION, DANGER!
ATTENZIONE, PERICOLI!
ATTENTION, DANGER!
ACHTUNG BITTE!
¡ATENCIÓN, PELIGRO!

Climber 7.10 / Translation of the original instructions
“GRILLO CLIMBER 7.10”
HYDROSTATIC TRACTOR MOWER
Dear Customer,
thank you for choosing the Grillo CLIMBER. We hope that this new tractor mower/grass-chopper will
perfectly meet your requirements.
For best use and maintenance over time, please read carefully and follow the instructions given in this
manual. This will enable you to get top results from your mower and will prevent avoidable expense.
Please keep this manual which should always go with the machine.
GENERAL DESCRIPTION AND INTENDED USE
The Grillo machine Climber 7.10 is a lawnmower with operator on board, designed for the cut of grass,
also on slopes.
WARNING! Before starting the engine, read this manual carefully. The
following warnings are very important in ensuring safety!
WARNINGS
Caution is the main safeguard in preventing accidents!
We urge you to read the warnings that follow when using the mower, before starting any work at all.
Improper use of the mower and its equipment can be dangerous. To reduce the risks to the minimum,
observe the necessary precautions set out below:
1) Read the whole of this manual before turning on and using the mower for the first time.
2) Pay particular attention to the warnings and safety labels set out around the mower.
3)
Before allowing others to use the machine, make sure they are aware of the safety precautions and
how it is used.
4) Before starting work, always change into suitable working clothes, gloves, boots and goggles.
5) Wear special acoustic protections (ear-caps) during work.
6) Before turning on the machine, make sure there are no persons around it; especially children.
7) Before driving the machine in reverse, make sure there are no persons or obstacles in the way.
8) Check the condition of the ground before mowing. Make sure there are no stones, sticks or other
objects, which could be run over and become a danger when projected.
9) If any impact with a foreign object occurs, disengage the blade, turn off the engine, remove the
ignition key and examine the lawnmower. It the machine vibrates, have it repaired.
10) Before getting off the mower, turn off the engine, disengage the P.T.O., remove the ignition key and
lower the cutting deck to its lowest position.
11) Always drive slowly along uneven paths.
12) Keep the speed down when driving down slopes.
13
) Always turn slowly when driving downhill.
14) The user is always liable for any damage caused to third parties.
15) Deformed or damaged blades must always be replaced, never just repaired.
16) Always use original GRILLO spare parts and accessories.
17) Only work in sunlight or under effective artificial lighting.
18) Only store fuel in suitable containers designed for the purpose.
19) Be very careful when working close to a road.
20) Allow the engine to cool before putting the machine away in a closed environment.
21) Do not operate the machine when tired or after drinking alcohol.
22) Do not allow any fuel spillage and after filling the tank wipe away any spilled fuel before starting the
engine.
23) Do not tamper with the safety devices or disable them.
24) Do not change the engine settings, especially the maximum number of revs.
25) Do not rest heavy loads on the seat, the starter safety device could become disengaged.
26) Never attempt any adjustments or cleaning with the engine running.
27) Never allow anyone to check the machine while you are seated at the controls with the engine
running.
5

Climber 7.10 / Translation of the original instructions
IMPROPER USE TO BE AVOIDED
1) Do not allow passengers to ride on the machine
2) Do not allow under-age children to operate it; use is prohibited to children under 16 years old.
3) Do not operate the mower near to ditches or verges which could collapse under the weight of the
machine, especially when the surface is loose or wet.
4) Replace worn or damaged exhausts.
FURTHER SAFETY ADVICE
The above mentioned warnings could not be enough to avoid any risk, if the operator does not
use the present lawnmower correctly. Therefore for your safety we give you following advices:
1) The mower blade is very dangerous when rotating, never put hands or feet underneath the mower
deck.
2) Do not drive in reverse at high speed.
3) It is dangerous to operate the steering wheel abruptly with the motor at full power.
4) Fill the tank with fuel before starting the engine. Only refuel outdoors, always turn off the engine,
keep away from sparks or naked flames, do not smoke! Always replace the cap on the fuel tank and
those on fuel containers properly.
5) If the fuel tank has to be emptied, only do so outdoors.
6) Do not operate the mower over gravel which could become sucked up and drawn into the blade,
becoming very dangerous.
7) If you have children, hide the ignition key after using the machine.
8)
CAUTION: to avoid the risk of fire, keep the engine compartment, exhaust, discharge outlets,
battery, tank area and fuel pipes free from grass, leaves, dirt, etc.
9) Do not store the machine inside any building where the engine fumes can reach naked flames,
sparks or bare electrical wires.
IDENTIFICATION AND SERVICING
IDENTIFICATION
The Grillo CLIMBER CL 7.10 has a label on the steering column indicating the machine’s serial number.
TECHNICAL ASSISTANCE
This manual provides instructions for use and basic maintenance of the mower by the user.
For operations that are not described in this manual, contact your Area Dealer.
SPARE PARTS
Only use original spare parts. These are the only parts that ensure safety and interchangeability.
Always quote the machine’s serial number and the code number of the part to be replaced when
ordering spare parts.
For engine parts, follow the indications given in the specific manual.
GUARANTEE
The guarantee is provided according to the law in force.
For the engine and the battery, the conditions of the relative manufacturers apply.
6

Climber 7.10 / Translation of the original instructions
RECOMMENDED LIST OF SPARE PARTS TO BE KEPT IN STORE
2 x mowing blades
2 x blade screws
2 x blade screw nuts
1 x set of belts
1 x air filter for engine
1 x oil filter for engine
1 x throttle cable
2 x wiring system fuses
TECHNICAL SPECIFICATIONS
ENGINE:
BRIGGS & STRATTON INTEK 344, 4-stroke OHV petrol, 13 HP,
with oil pump, oil filter and cast iron cylinder.
HOURLY CONSUMPTION:
3 lt/h.
STARTING SYSTEM:
electric, with battery 12V.
GEARBOX:
hydrostatic transmission.
CLUTCH:
for PTO with electromagnetic clutch.
GROUND SPEED:
from 0 to 9 km/h with continuous variation and reverse from 0 to 4 km/h.
TYRES (GARDEN wheels) front:
13x5.00-6;
rear:
16x 7.50-8.
BRAKE:
rear parking disc brake.
OPERATOR SEAT:
sprung und adjustable
.
CUTTING DECK:
side/rear discharge.
CUTTING SYSTEM:
single rotating blade with floating terminals.
CUTTING WIDTH:
780 mm.
BLADE SPEED:
74 m/sec.
CUTTING HEIGTH:
from 35 mm to 85 mm, 6 cutting positions and 1 for travelling.
WORK CAPACITY:
4500 m
2
/h (indicative).
STEERING RADIUS:
450 mm.
FUEL TANK:
7 lt.
RESERVE TANK:
1,5 lt.
IMPLEMENTS:
towing bar as a standard, front headlight
.
SIZES:
Width: 900 mm - Length: 1895 mm - Height: 975 mm
.
WEIGHT:
215 kg.
INSTRUCTIONS FOR USE
PUTTING THE MACHINE INTO SERVICE
1) Check that the machine has not been damaged in transit.
2) Check the oil levels of the engine, hydrostatic transmission and final drive.
3) Check the tyre pressure:
1 BAR front wheels 13 x 5.00-6
1.2 BAR rear wheels 16 x 7.50-8.
4) Check the battery voltage; it must be at least 12,5 Volts. Charge if necessary.
IMPORTANT!!! During assembly take care not to reverse the polarity of the battery.
5) Fix the steering wheel taking care the key is properly inserted and the screw is tight enough
(tightening torque 2 KgF.m [20 N.m]).
RUNNING IN - CAUTION!!
Change the engine oil and filter after the first 5 working hours.
Check that there are no oil leaks or slack screws, especially those which fix the blade and the steering.
INSTRUCTIONS FOR USE
Before starting up the engine, always check that:
7

Climber 7.10 / Translation of the original instructions
– the travel lever is in the idle position (fig. 3);
– the engine oil level is correct (fig. 4);
– the engine cooling intake grilles are clean (fig. 4);
– the air filter is clean (fig. 8).
– the mowing deck is clean;
– the hydrostatic axle fins are clean (fig. 5);
– the blades are sharp and firmly fastened in place;
– the screw in the centre of the blade hub is safety tightened (3, fig. 9)
– the oil in the hydraulic axle is at the correct level (fig. 5); the correct level is 12 mm underneath the
bottom of the tank (fig. 6);
Fill the fuel tank using a funnel with very fine filter (4, fig. 10).
Adjust the seat by using the lever fig. 11.
STARTING UP THE ENGINE
-
Sit down on the operator seat.
- Put the forward lever into the STOP position (2, fig. 3).
- Switch off the PTO (switch no. 4, fig.1 in the OFF position).
- Push the throttle half way in (5, fig. 3).
- If the engine is cold, use the choke (6, fig. 3). Turn the ignition key (1, fig. 1).
- Once the engine has started, turn off the choke and wait for a few minutes to allow the engine to
warm up.
N.B. When travelling with the mower from one place to another, you are advised to keep the cutting deck
at the maximum height setting.
SWITCHING ON THE HEADLAMP
To switch on the headlamp, put the ignition key in the second position (fig.18, position A)
IMPORTANT
Switch on the headlamp only once the engine has started up to avoid battery discharge.
STARTING WORK
–
Choose the desired cutting height by means of the lever 8 fig. 2. Suitably accelerate the engine and
engage the PTO lever (no. 4, fig.1). Gently operate the forward travel lever (2, fig. 3) and start work.
To stop, return the forward travel lever to the stop position.
– The lever (2, fig. 3) is also used to reverse. When it is moved back, the machine moves backwards;
always operate it gently.
PARKING BRAKE
To engage the parking brake lift the loop up (10, fig. 3) and hook the lever.
To adjust the parking brake use the register (fig. 5).
USEFUL RULES FOR EFFICIENT USE
1)
Never strain the engine: when fumes are emitted from the exhaust it means that it is being strained.
Slow down.
2) Do not leave the machine out in the rain.
3) Frequently sharpen the mower blades: the cut will be better and the engine will not be strained as
much.
4) Check the land before mowing to make sure that there are no stones, sticks or foreign bodies.
5) Keep the engine at peak rpm during mowing, adjust the speed according to the height of the grass.
6) Keep the grilles above the engine and the cooling fins of the hydrostatic axle (fig. 4 - 5) clean.
CUTTING POSITIONS
The cutting position is adjusted using the lever 8 fig. 2.
The deck can be set in 4 different cutting positions from 35 to 80 mm and one travel position in which the
blade disengages automatically.
8

Climber 7.10 / Translation of the original instructions
In case of uneven ground, humps or dips, the deck should be kept in the highest cutting position to
prevent knocks by the blade.
SLOPING GROUND
If possible, steep slopes must be mown in the up/down direction, taking great care when turning that the
wheels upstream do not strike obstacles (stones, branches, roots, etc.) which might cause the machine
to overturn, or lead to loss of control.
Assess the conditions and take care if the ground and grass are damp since the machine might slip.
Downhill, set off at low speed and do not pass over dry or cut grass since the wheels lose grip.
INTERVENTION OF SAFETY DEVICES
Remember that the engine will stop whenever:
– The operator gets up from the seat.
The engine will not start up if:
– The blade engaging switch is at ON setting (4, fig. 1).
– Nobody is sitting in the driver’s seat.
– If the forward lever isn’t at STOP setting (2, fig. 3).
MAINTENANCE AND LUBRICATION
CAUTION
Remove the key and disconnect the plug before performing any cleaning, maintenance
or repair operation. Always wear suitable clothing and working gloves.
IMPORTANT!
Protect the environment: carefully dispose of used oils, petrol and any other pollutant product!
Efficient maintenance and correct lubrication help keep the machine in perfect working order.
ENGINE
For the lubrication intervals, follow the instructions provided in the engine handbook; in all cases the oil
must be changed after the first 5 working hours, and then every 50 hours or every season,
together with the oil filter (fig. 12, oil drain plug; please, use a second key in the fixing part).
At every oil change, replace the engine oil filter (fig. 13).
The first precaution is to ensure that the engine is correctly serviced with the air filter, cooling fins and
cylinder head clean and the oil at the correct level.
Check the air filter every 4 hours, or even more often in very dusty environments.
Check the engine cooling intake grille (fig. 4).
HYDROSTATIC AXLE
With the engine cold, check that the expansion tank (fig. 5) is empty.
Clean the hydraulic motor cooling fans often, every 4 working hours in summer when conditions are very
dusty (fig. 5).
Replace oil after the first 50 working hours, then every 200 hours, use 10W60 engine oil; quantity: 1.85
lt. For the replacement follow the instructions given:
1) remove the two plugs fig. 14;
2) remove the plug using a screwdriver fig. 15;
3) screw the two caps fig. 14 (tightening torque 13-17 N.m);
4) add oil, fix the cap fig. 15;
5) make sure the expansion tank is empty, the correct oil level is 12 mm underneath the bottom of
the expansion tank (fig. 6).
FRONT WHEEL AXLE
Grease the wheel pivot pins (fig. 16) every 20 hours.
Lubricate the steering joints.
9

Climber 7.10 / Translation of the original instructions
Lubricate the bushing in the belt stretcher of cutting deck- engine belt (fig. 16/A).
AIR FILTER
Check the air filter every 4 hours, or more frequently if working in a very dusty environment (fig. 8).
CHECKING THE BLADES AND CUTTING DECK
A blunt blade tears the grass, therefore the cutting edges of both blades must be sharpened. To remove
a blade, take hold of it firmly, wearing work gloves, and unscrew the central screw (3 fig. 9),
remembering that the screw has a right-hand thread. Sharpen both cutting edges using a medium-grain
grinding wheel and check that the blade is balanced by standing it on a round bar inserted in the central
hole.
Fit the two cutting blades following the diagram in fig. 9.
CAUTION!
Tighten the fixing screw (3 fig. 9) firmly.
Always replace damaged or crooked blades; never attempt to repair them! When fitting, always follow
the diagram fig. 9.
ALWAYS USE ORIGINAL BLADES! If they are worn they can be turned round since they have two
cutting edges. Always check that the blade bolts are not worn or damaged.
ADJUSTING THE CUTTING DECK
Levelness of the cutting deck is essential in order to obtain an evenly mown lawn.
Park the mower on a flat surface and check that the tyre pressure is correct. Adjust the 4 adjustment
devices (fig. 17 – 17A), so that the edge of the cutting plate is at the same distance from the floor, 110
mm, on both sides (with the operator sitting on board and the cutting deck in the lowest position, fig.
18/A).
If you are unable to level off the deck, contact an Authorised Grillo After-Sales Service Centre.
BLADE - ENGINE BELT
If the belt becomes twisted or comes off, make all the checks and adjustments illustrated in fig. 18/A,
keeping the deck at the lowest position.
Take care when positioning the belt guides; move them towards the belt, checking the deck at the
various height settings (A, fig 19).
HYDROSTATIC AXLE - ENGINE BELTS
These belts are self-adjusting and do not require any adjustment. Simply check the spring tension. To
replace the belts, release the tension spring (fig. 21).
BLADE ROTATION
Rotation is started and stopped using the switch 4 in fig. 1.
When rotation is engaged, the engine must be running at medium rpm and the machine must not be in
the grass for cutting. Never start the blades with the engine at maximum rpm.
The machine is equipped with an electromagnetic clutch which also brakes the blade during
disengagement.
The blades are also disengaged automatically when the cutting height adjuster lever is moved to the
highest position.
CAUTION!!!
To reactivate the blade, put the lever no. 8 fig. 2 into the desired cut position and
press the PTO button (fig. 1 n. 4)
The blade must stop within 5 seconds, if this is not the case, adjust the 3 nuts of the electromagnetic
clutch, placing a 0.3 mm feeler gauge under the brake plate.
N.B. This operation must be carried out by an authorized after-sales service centre.
10

Climber 7.10 / Translation of the original instructions
CHANGING THE BELTS
The movement is transmitted from the motor to the hydraulic transmission and to the blades by means of
two v-belts. Replace the belts as soon as they show signs of wear!
Their replacement and subsequent adjustment are fairly complex procedures and must be carried out by
an Authorised After-Sales Service Centre.
For cutting deck drive belt, the three belt guides beside the deck pulley have to be removed (A, fig. 19);
release the belt stretcher spring (fig. 20).
ALWAYS USE ORIGINAL BELTS!
TRACTION RELEASE LEVER
The traction release device is located at the back of the machine (fig. 22); if the machine breaks down, to
allow it to be towed or moved by hand, move the lever to idle position (B, fig. 22). In the position (A)
shown in fig. 22 the machine is in working condition.
TROUBLE-SHOOTING:
PROBLEM
CAUSE REMEDY
Dashboard OFF with key in “AVV.” (ON) pos.
– Battery not supplying power – Check connecting cables
– Recharge battery
– Change the fuse
Dashboard ON, but starter motor does not turn over with key in “AVV” (ON) pos.
– Battery not supplying enough power – Recharge battery
– Start-up go-ahead not given – Travel lever in stop position
– Disengage blades
– Sit in the driver’s seat
– Check the three safety sensors (seat –
blades engagement - forward lever)
Difficult starting or irregular running of engine
– Carburation problems – Clean or change the air filter
– Adjust the carburettor (follow engine manual
instructions)
– Deposits or dirt in fuel – Empty the tank and use fresh petrol
– Check and change the petrol filter if necessary
Starter motor turns over but engine does not start
– No petrol flow – Check that the choke has been activated (if
engine is cold)
– Check petrol level in tank
– Check wiring of carburettor opening control
– Check petrol filter (and change if necessary)
- Check that the vent on the tank cap is not
blocked
– Fault in ignition system – Check that the caps of the sparkplugs are
correctly fastened
11

Climber 7.10 / Translation of the original instructions
– Check that the electrodes are clean and at the
correct distance apart.
Drop in engine performance during cutting
– Speed too high for cutting height – Reduce speed
– Raise cutting deck by a few notches
Uneven cutting
– Cutting deck not parallel to ground – Check tyre pressure
– Level off the deck
– Blades fault – Check that the blades are correctly mounted
– Sharpen or change the blades
– Check the tension of the deck motor belt
Vibrations during operation
– Blades unbalanced – Balance blades or replace if damaged
– Fastenings are loose – Check and fasten the blade fixing screws as
well as the fixing screws of the engine and
chassis.
ELECTRIC SYSTEM
The electric system is protected by a fuse which cuts out the entire electric system if blown.
After finding and repairing the fault, replace the fuse with another of the same rating.
Never replace the fuse with one of a different rating.
The electric system fuses are on the left-hand side of the steering wheel (fig. 23).
If the problems persist after all the procedures described above have been carried out, contact the
Authorised After-Sales Service Centre.
Never attempt to make difficult repairs unless you have the necessary equipment and technical
expertise.
IMPORTANT!
–
Take care not to reverse the battery polarity.
– Never operate the mower without the battery, since it is equipped with a charge regulator.
– Take care not to cause short-circuits.
THE MACHINE DOES NOT REMAIN IN NEUTRAL
Adjust the device (fig. 24) by loosening the counter-nut and acting on the central screws.
FORWARD LEVER
To adjust the forward and reverse travel speeds, use the screws (A, fig. 7). If the forward lever
automatically returns to zero adjust the self-locking nut (B, fig. 7).
ENDING WORK
After mowing, disengage the blades and drive back to base with the cutting deck in the highest position.
To stop, move the travel lever to the STOP position (2, fig. 3), set the throttle lever on the minimum rpm,
switch off the engine by turning the key (1, fig. 1) and lower the deck to the lowest position.
12

Climber 7.10 / Translation of the original instructions
CLEANING
Clean the outside of the mower after each use, particularly the engine grille and the exhaust zone.
STORAGE AND PROLONGED PERIODS OF DISUSE
Store the mower in a dry place, away from atmospheric agents, and preferably cover with a sheet. If the
mower is not going to be used for a long period (over 1 month), disconnect the positive battery cable and
follow the instructions given in the engine manual. Also lubricate all of the articulated joints.
Regularly check that the battery voltage does not drop below 12,5 Volts. If it does, recharge the battery.
Use the preservative additive for unleaded petrol. If the machine is to be out of use for more than 30
days, drain the fuel from the engine tank to prevent sticky deposits from forming in the fuel intake system
or in vital parts of carburettor. To protect the engine we advise you to use the Briggs & Stratton fuel
additive, available at all Briggs & Stratton authorised services centres. Add the additive to the fuel in the
tank or in the fuel container. Run the engine a little to circulate the additive through the carburettor. The
engine and carburettor can be stored for up to 24 months.
NB.: If no additive are used or the engine is running on petrol which contains alcohol, drain the fuel tank
and run the engine until there is no fuel left.
13
 Loading...