


ARHF12LL
General ARHF12LL, ARHF12LALU, AOHA12LALL, AOHA12LACL, AOHB12LALL User Manual
...
P/N9374379255
AIR CONDITIONER
DUCT TYPE
KEEP THIS MANUAL FOR FUTURE REFERENCE
DIESE ANLEITUNG BITTE SORGFÄLTIG AUFBEWAHREN
CONSERVEZ CE MODE D’EMPLOI AFIN DE POUVOIR VOUS Y RÉFÉRER ULTÉRIEUREMENT
GUARDE ESTE MANUAL PARA PODERLO CONSULTAR EN EL FUTURO
CONSERVARE QUESTO MANUALE PER OGNI EVENTUALE FUTURO RIFERIMENTO
KPATHΣTE TO EΓXEIPIΔIO ΓIA MEΛΛONTIKH ANAΦOPA
GUARDE ESTE MANUAL PARA CONSULTA POSTERIOR
СОХРАНИТЕ НАСТОЯЩЕЕ РУКОВОДСТВО ДЛЯ БУДУЩИХ ССЫЛОК
BU KILAVUZU, DAHA SONRA BAŞVURMAK ÜZERE SAKLAYIN
OPERATING MANUAL
BEDIENUNGSANLEITUNG
MODE D’EMPLOI
MANUAL DE FUNCIONAMIENTO
MANUALE DI ISTRUZIONI
ΕΓΧΕΙΡΙΔΙΟ ΛΕΙΤΟΥΡΓΙΑΣ
MANUAL DE INSTRUÇÕES
РУКОВОДСТВО ПО ЭКСПЛУАТАЦИИ
KULLANMA KİTABI
EnglishDeutschFrançaisEspañolItaliano
EλληvIkά
Português
Pусский
Türkçe
En-1
CONTENTS
SAFETY PRECAUTIONS ........................................ 1
NAME OF PARTS .................................................. 2
PREPARATORY OPERATION ................................. 3
OPERATION ........................................................... 4
TIMER FUNCTIONS ............................................... 6
ON/OFF TIMER ....................................................... 6
SAFETY PRECAUTIONS
l Do not attempt to install this air conditioner by yourself.
l This unit contains no user-serviceable parts. Always consult authorized service person-
nel for repairs.
l When moving, consult authorized service personnel for disconnection and installation
of the unit.
l Do not become over-exposed to cold air by staying in the direct path of the airfl ow of
the air conditioner for extended periods of time.
l Do not insert fi ngers or objects into the outlet port or intake grilles.
l Do not start and stop air conditioner operation by turning off the electrical breaker and
so on.
l In the event of a malfunction (burning smell, etc.), immediately stop operation, turn
off the electrical breaker, and consult authorized service personnel.
l Provide occasional ventilation during use.
l Do not direct air fl ow at fi replaces or heating apparatus.
l Do not climb on, or place objects on, the air conditioner.
l Do not hang objects from the indoor unit.
l Do not set fl ower vases or water containers on top of air conditioners.
l Do not expose the air conditioner directly to water.
l Do not operate the air conditioner with wet hands.
l Do not touch the switches with sharp objects.
l Turn off power source when not using the unit for extended periods.
l Always turn off the electrical breaker whenever cleaning the air conditioner or chang-
ing the air fi lter.
l Connection valves become hot during Heating; handle with care.
l Check the condition of the installation stand for damage.
l Do not place animals or plants in the direct path of the air fl ow.
l When restarting after a long period of disuse in the winter, turn the power switch on
at least 12 hours before starting the unit.
l Do not drink the water drained from the air conditioner.
l Do not use in applications involving the storage of foods, plants or animals, precision
equipment, or art works.
l Do not apply any heavy pressure to radiator fi ns.
l Operate only with air fi lters installed.
l Do not block or cover the intake grille and outlet port.
l Ensure that any electronic equipment is at least one metre away from either the indoor
or outdoor units.
l Avoid installing the air conditioner near a fi replace or other heating apparatus.
l When installing the indoor and outdoor units, take precautions to prevent access by
infants.
l Do not use infl ammable gases near the air conditioner.
l
Before using the appliance, read these “SAFETY PRECAUTIONS” thoroughly and operate in the correct way.
l The instructions in this section all relate to safety; be sure to maintain safe operating conditions.
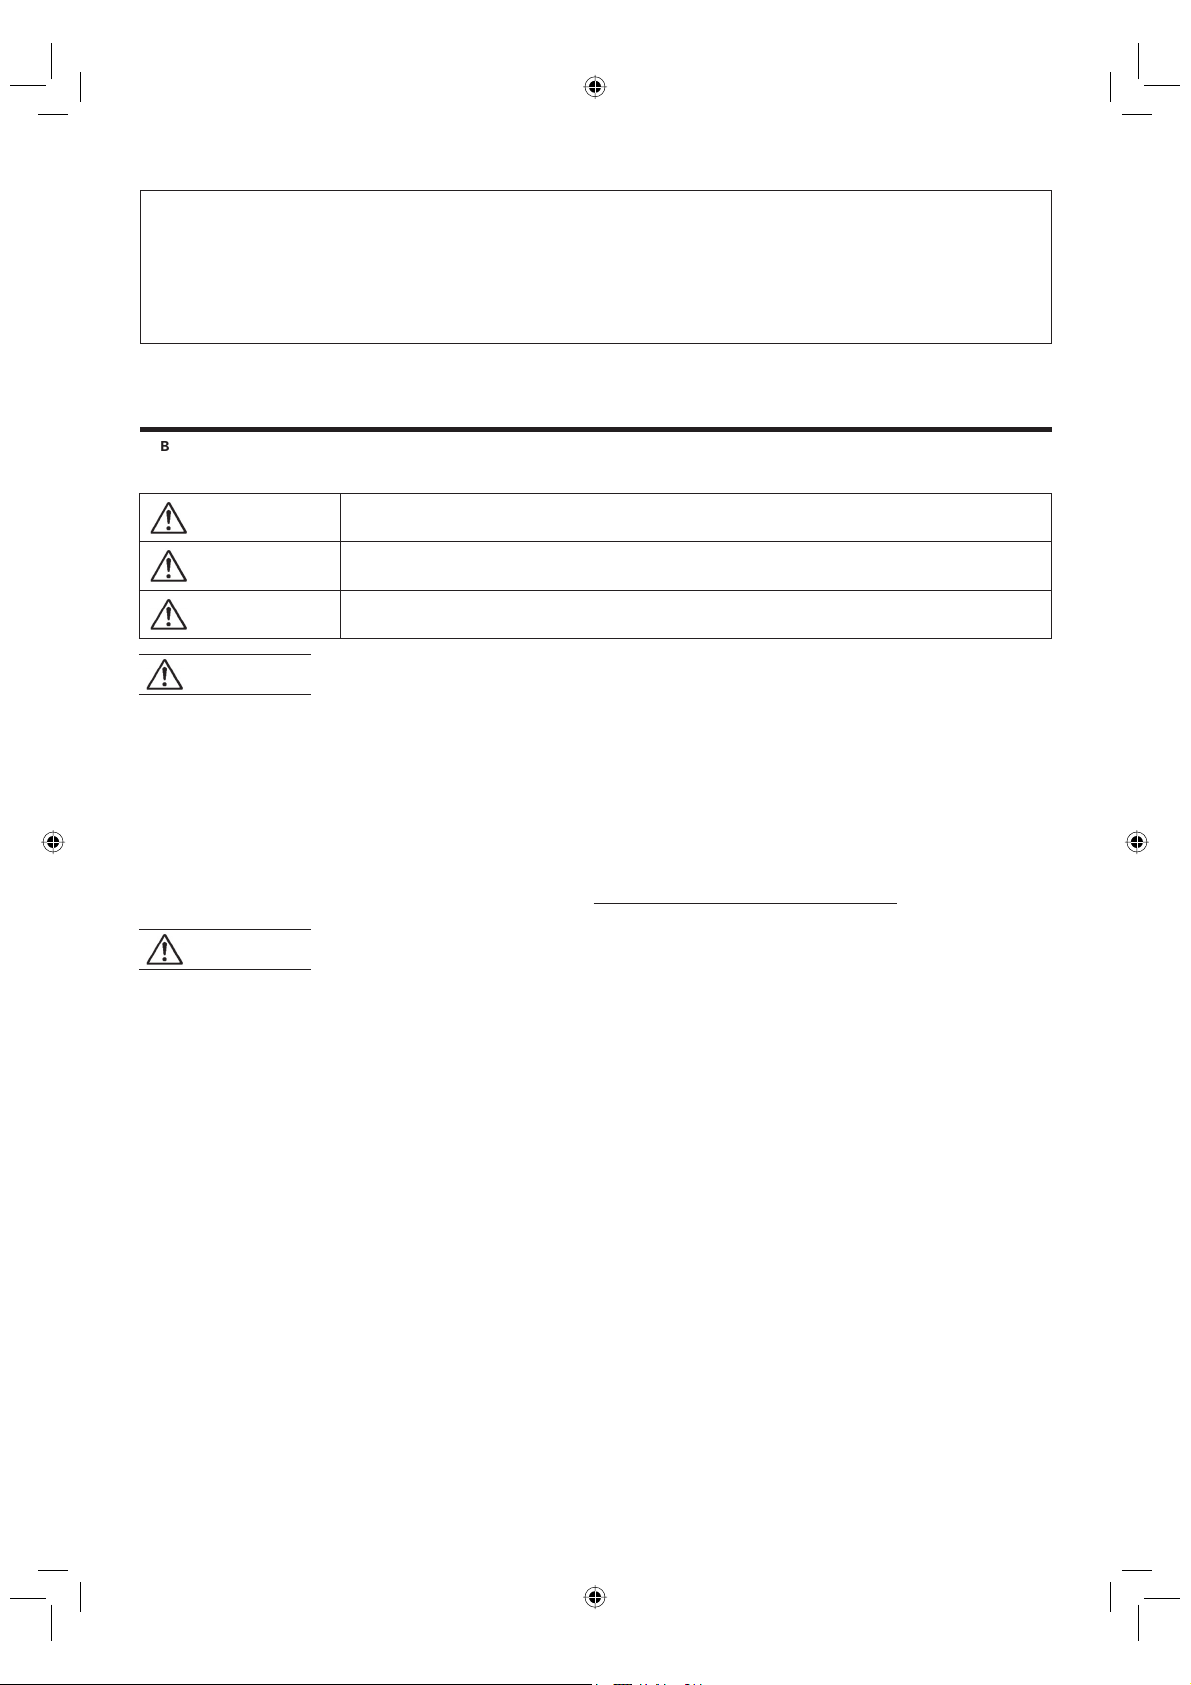
l “DANGER”, “WARNING” and “CAUTION” have the following meanings in these instructions:
WEEKLY TIMER ...................................................... 7
TEMPERATURE SET BACK TIMER ....................... 9
CLEANING AND CARE ........................................ 10
TROUBLESHOOTING .......................................... 10
OPERATING TIPS ................................................. 12
SELF-DIAGNOSIS ................................................ 14
DANGER!
This mark indicates procedures which, if improperly performed, are most likely to
result in the death of or serious injury to the user or service personnel.
WARNING!
This mark indicates procedures which, if improperly performed, might lead to the
death or serious injury of the user.
CAUTION!
This mark indicates procedures which, if improperly performed, might possibly result
in personal harm to the user, or damage to property.
DANGER!
CAUTION!
9374379170-EN.indd Sec1:19374379170-EN.indd Sec1:1 10/6/07 10:02:45 AM10/6/07 10:02:45 AM
En-2
NAME OF PARTS
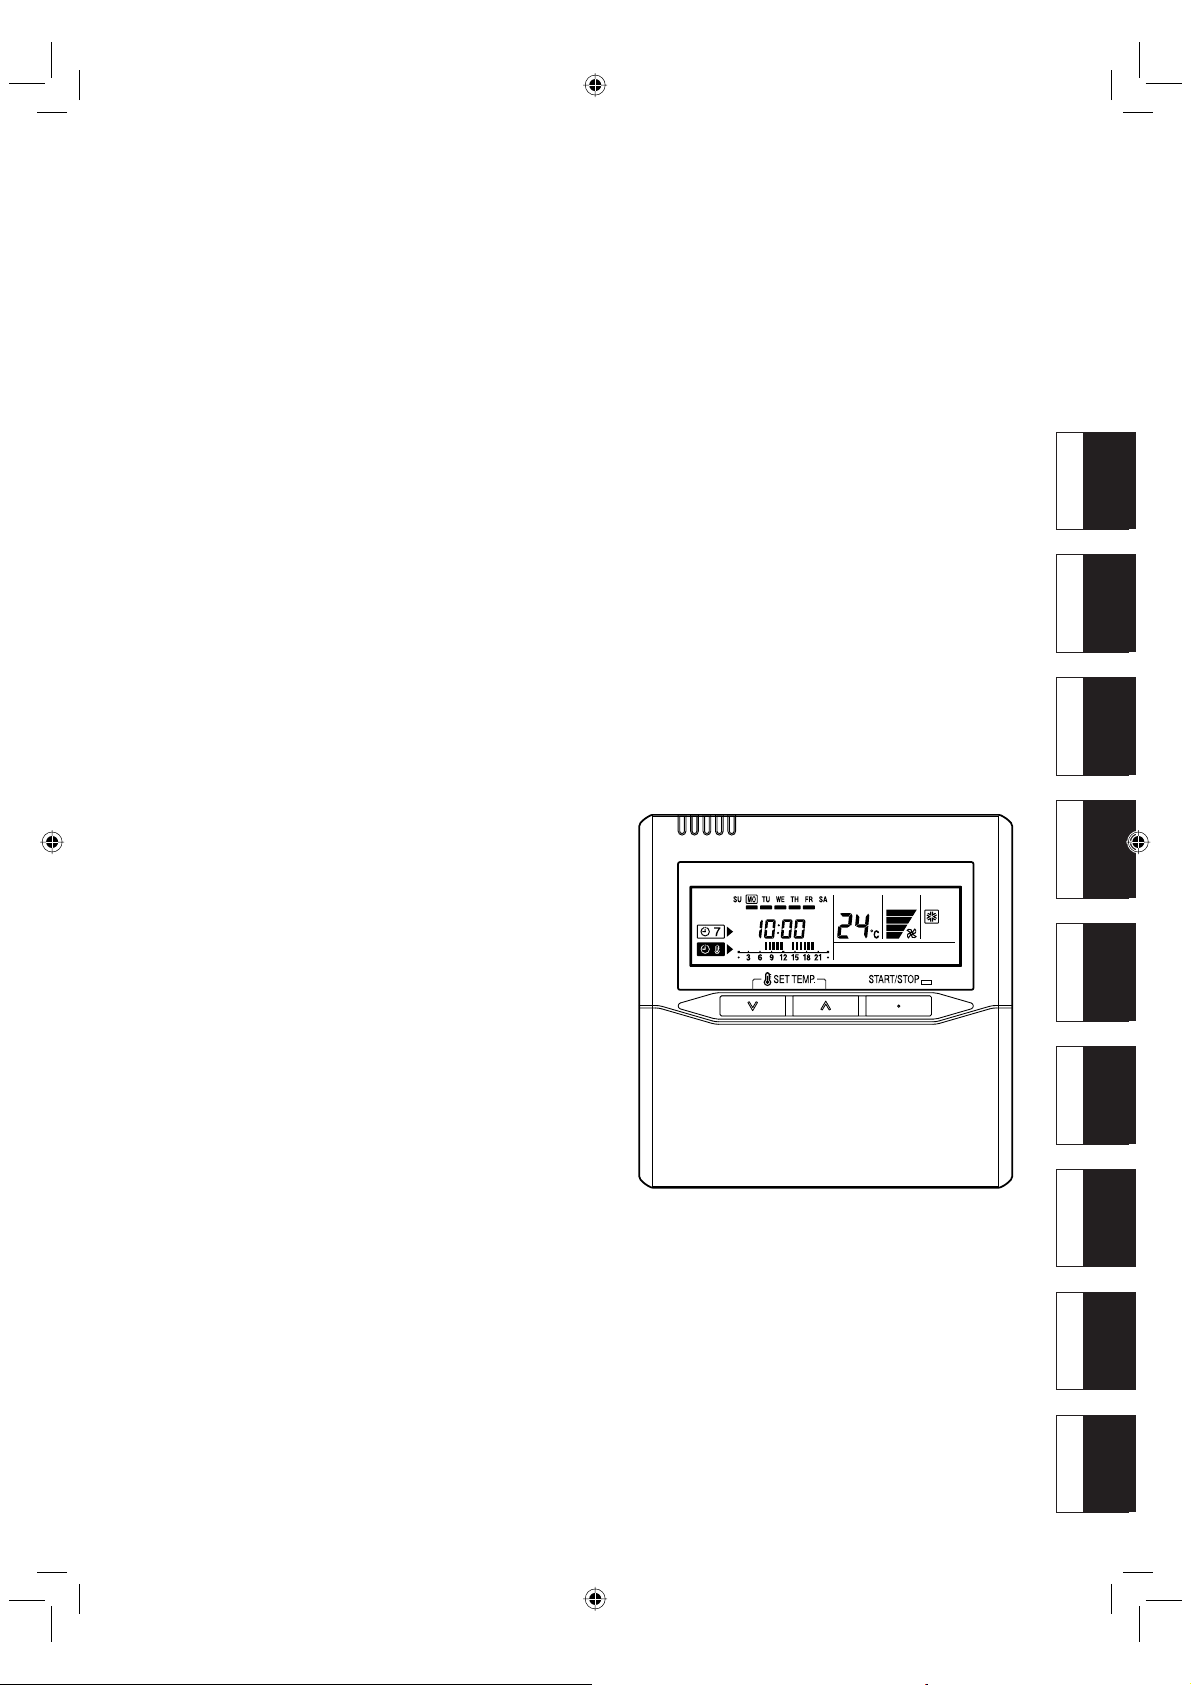
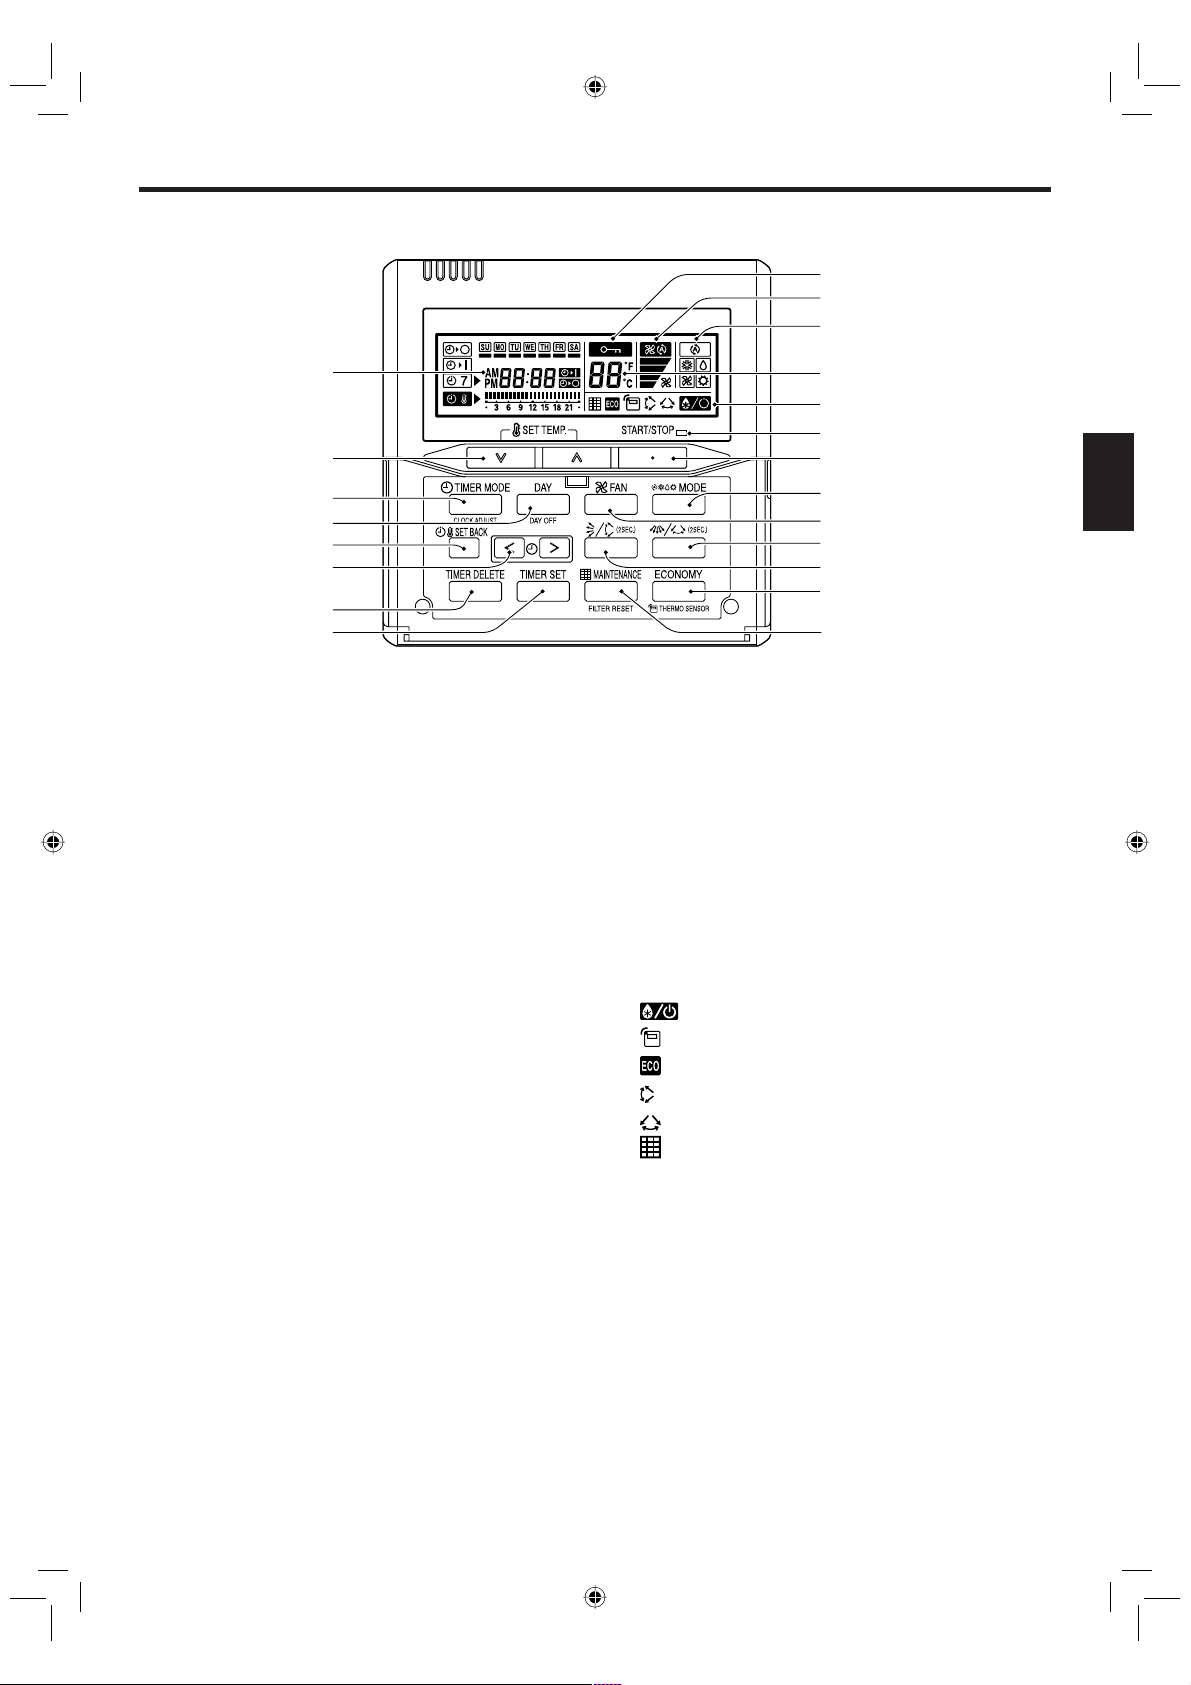
Remote controller
1
Start/Stop Button
2
Set Temperature Button
3
Master Control Button
4
Fan Control Button
5
Economy Button
6
Timer Mode (CLOCK ADJUST)
Button
7
DAY (DAY OFF) Button
8
SET BACK Button
9
Set Time Button
!
DELETE Button
"
SET Button
#
Vertical Airfl ow Direction and
Swing Button
*1
$ Horizontal Airfl ow Direction and
Swing Button
*2
% Filter Button
*3
& Operation Lamp
(
Timer and Clock Display
)
Operation Mode Display
~
Fan Speed Display
+
Operation Lock Display
,
Temperature Display
-
Function Display
Defrost Display
Thermo Sensor Display
Economy Display
Vertical Swing Display
*4
Horizontal Swing Display
*5
Filter Display
*6
*1~6 These functions cannot be used.
I
H
G
J
K
E
1
C
5
D
A
0
3
4
B
8
6
2
F
9
7
9374379170-EN.indd Sec1:29374379170-EN.indd Sec1:2 10/6/07 10:02:47 AM10/6/07 10:02:47 AM
En-3
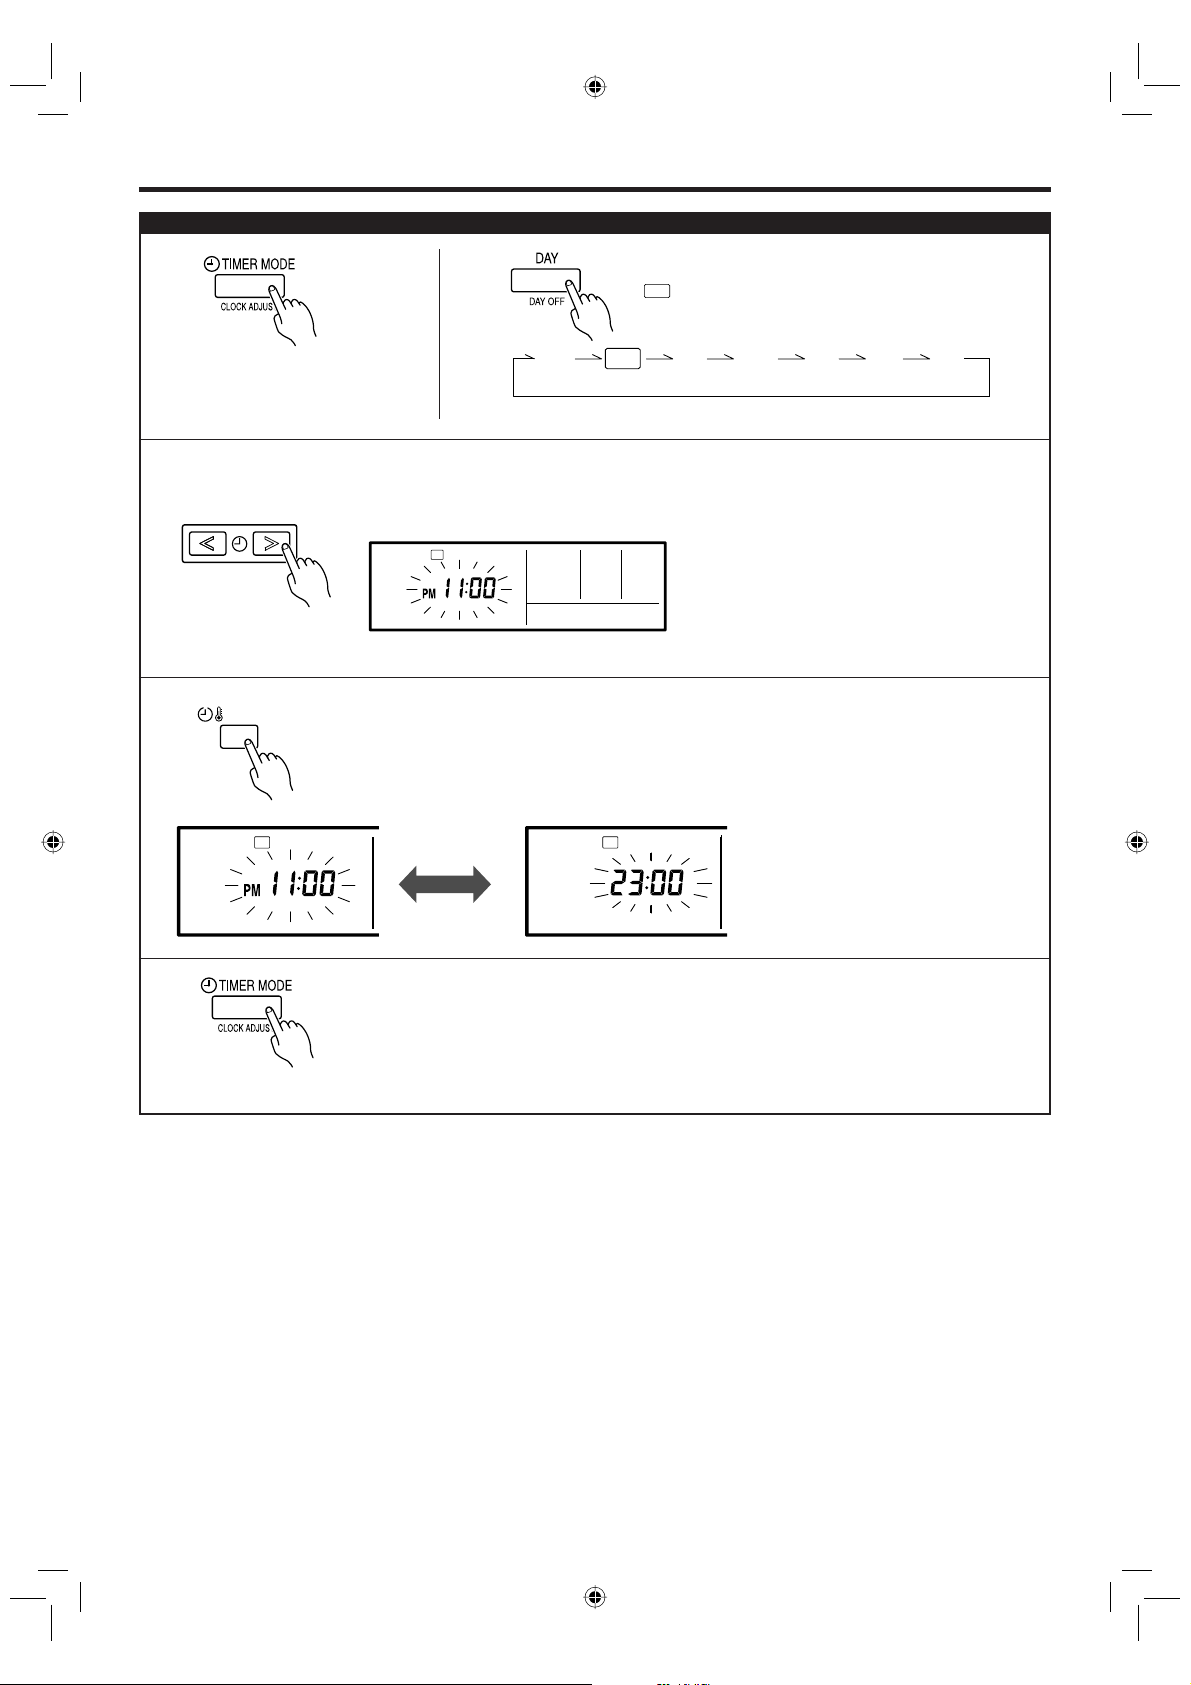
PREPARATORY OPERATION
Press the timer mode (CLOCK
ADJUST) button for 2 seconds
or more. The time display on the
remote controller will fl ash.
2
SU MO TU WE TH FR SA
Press the DAY button and select the current day.
A
appears around the selected day.
Press the set time buttons to set the current time.
Press repeatedly to adjust the current time in 1-
minute increments. Press and hold to adjust the
current time in 10-minute increments.
ex. Monday PM11:00
Press again to end.
SU
MO
TU
WE
TH FR
SA
1
3
5
Press the SET BACK button to switch between the
12- and 24-hour time displays.
3
4
SU
MO
TU
WE
TH FR
SA
SU
MO
TU
WE
TH FR
SA
SET BACK
Set the current day and time
9374379170-EN.indd Sec1:39374379170-EN.indd Sec1:3 10/6/07 10:02:48 AM10/6/07 10:02:48 AM
En-4
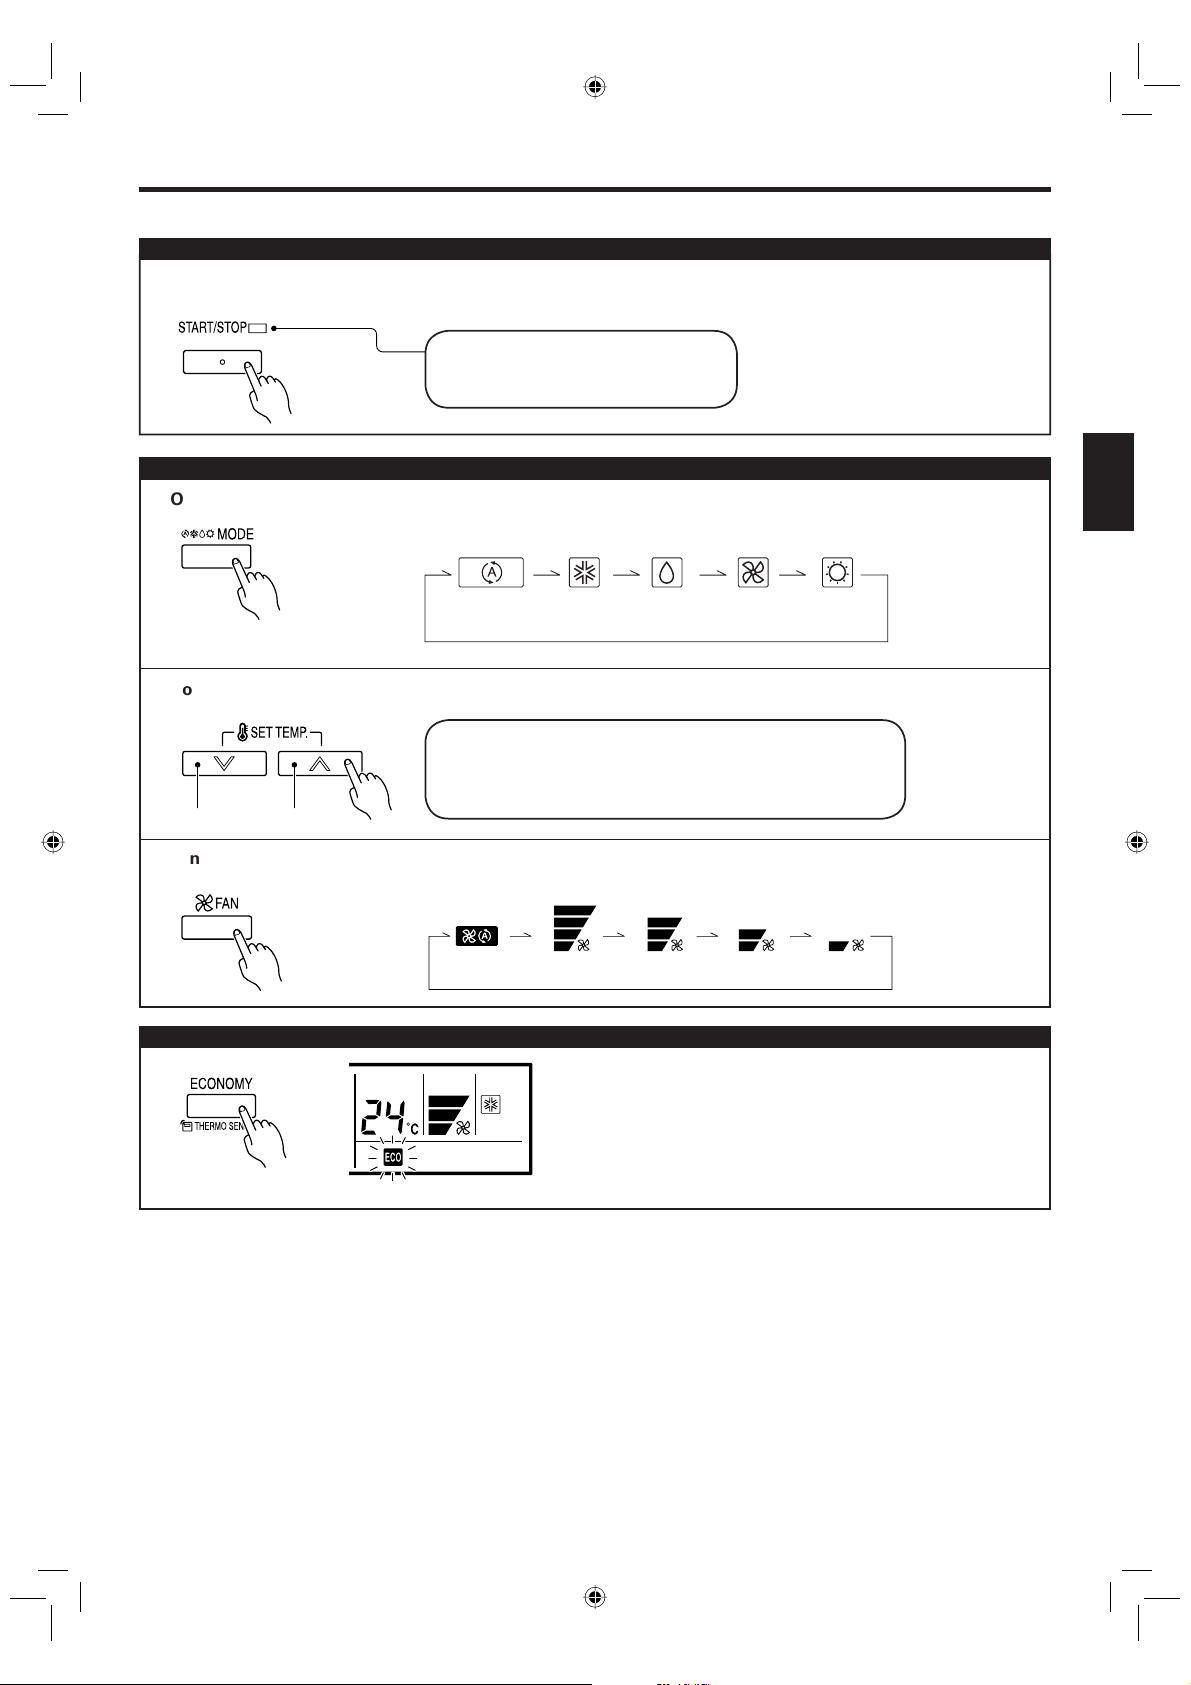
OPERATION
AUTO COOL DRY *HEATFAN
AUTO MEDHIGH LOW QUIET
Temperature setting range
AUTO .............................................. 18 to 30 °C
COOL/DRY ....................................... 18 to 30 °C
* HEAT ................................................ 16 to 30 °C
Lower Rise
Operation lamp
Air conditioner ON: Lit brightly
Air conditioner OFF: Not lit
Press the start/stop button.
Press the master control button to set the operation mode.
If DRY is selected, the fan speed will be set to AUTO.
Press the set temperature buttons to set the room temperature.
Press the fan control button to set the fan speed.
Press the ECONOMY button to start or stop ECONOMY OPERA-
TION.
For details on the function, refer to page 12.
Instructions relating to heating (*) are applicable only to “HEAT & COOL MODEL” (Reverse Cycle).
To start/stop operation
To set the operation mode
l
Operation mode setting
l
Room temperature setting
l
Fan speed setting
ECONOMY OPERATION
9374379170-EN.indd Sec1:49374379170-EN.indd Sec1:4 10/6/07 10:02:48 AM10/6/07 10:02:48 AM
 Loading...