


GE ZIF360NXALH, ZIF360NXARH, ZIFP360NXALH, ZIFP360NXARH, ZIFS360NXALH Installation Guide
...
USE THESE INSTRUCTIONS FOR MONOGRAM SINGLE-DOOR UNITS ONLY
Installation Instructions Single Door Drain Pan Kit (WR74X10355)
MODELS: ZIF*360NX* AND ZIR*360NX*
Questions? Call 1-800-GE-CARES (1-800-432-7237)
PARTS PROVIDED:
Single Door Drain Pan Kit (WR74X10355)
Drain Pan Assembly
Baffle Template
Evaporator Cover Assembly
#10 Self-tapping Screw
10 Watt Heater
Harness
TOOLS REQUIRED:
#2 Phillips Screwdriver with
6” Extension for Screwdriver and 1/4 Head-head attachment RTV 102
Flat-head Screwdriver Scraper
PPE REQUIRED:
Safety Goggles
Safety Gloves
Padding/Support for knees
IMPORTANT SAFETY NOTICE:
This kit is to be installed by a qualified service technician only. Any attempt to repair a major appliance may result in personal injury and property damage. Failure to follow these installation instructions can result in personal injury or property damage.
Printed in the United States |
224D3383P001 31-49005 03-13 GE |
1

PROCEDURE:
SNACK PAN SHELF FZ
SNACK PAN ASM
 COVER IM ASM
 SHOWCASE LID PAN
ASM
 COVER ICE BUCKET
ASM
 VEG PAN BASKET ASMS
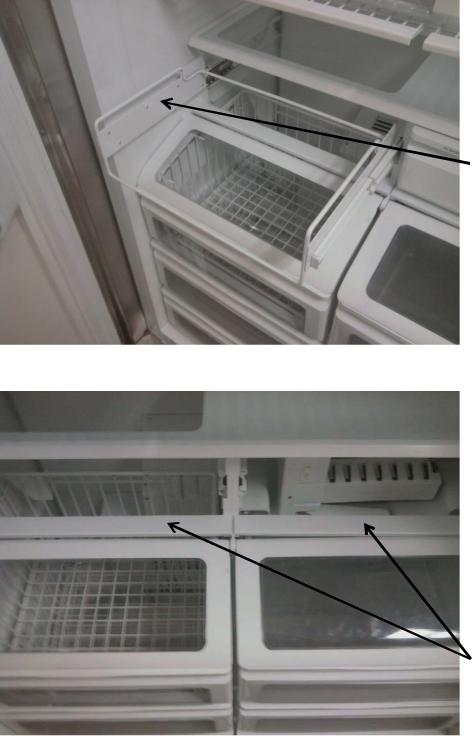
Picture 1
1.Unplug the unit.
2.Remove SNACK PAN SHELF FZ {WR17X12679}. (See PICTURE 1)
3.Pull out, disengage clips, and pull off of the slide rail to remove COVER IM ASM {WR32X10804}.
Left Side Clip is pushed upward. |
Right Side Clip is pushed downward. |
4.Pull out and upward to remove SNACK PAN ASM {WR32X10078}. (See Picture 1)
5.Pull out, disengage clips (Refer to Picture under Step 3), and pull off of the slide rail to remove SUPPORT SNACK PAN ASM {WR72X10325}.
Printed in the United States |
224D3383P001 31-49005 03-13 GE |
2
SUPPORT SNACK PAN
ASM
6. Pull out to remove two STRIP SD FZ VEG PAN {WR02X13223}.
STRIP SD FZ VEG PAN
7.Remove screw and WASHER SHOWCASE PIVOT {WR01X10046} (these will be put back) from side nearest unit wall to allow SHOWCASE LID PAN ASM {WR32X10720} to be removed from bushing.
Printed in the United States |
224D3383P001 31-49005 03-13 GE |
3

Screw to be removed
Washer to be removed
8.Push inwards at sides in back and dislodge from bushing (if bushing falls, put it back on the wall of the cabinet) to remove Left {WR32X10119} and Right SHOWCASE LID PAN ASM {WR32X10720}. (See PICTURE 1)
9.Pull out and upward to remove COVER ICE BUCKET ASM {WR32X10728}. (See PICTURE 1)
10.Pull out and upward to remove VEG PAN WIRE ASM {WR21X10209}.
11.Pull out, disengage clips (Refer to Picture under Note 2), and pull off of the slide rail to remove Left {WR72X10324} and Right SUPPORT BASKET ASM {WR72X10323}.
 SUPPORT BASKET ASM
 VEG PAN WIRE ASM
Printed in the United States |
224D3383P001 31-49005 03-13 GE |
4

12.Pull out and upward to remove four VEG PAN BASKET ASM {WR32X10121}.
13.Pull out, disengage clips (Refer to Picture under Note 2), and pull off of the slide rail to remove four SUPPORT VEG BASKET ASM {WR72X10200}. (See PICTURE 1)
SUPPORT VEG BASKET
ASM
14.Remove two 8-32 X 5/8" PH SS TCS SCREWS {WR01X10484} holding the ice maker. (Freezer only)
15.Unplug the icemaker. (Freezer only)
NOTE: Flathead screwdriver may be needed to disengage clips.
Unplug icemaker here
Screws to be removed
Printed in the United States |
224D3383P001 31-49005 03-13 GE |
5
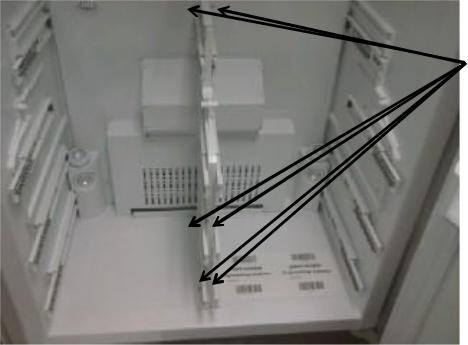
16.Remove icemaker assembly and set it aside. (Freezer only)
17.Remove eight #10-16 X 1/2 TAPPING SCREWS holding the center divider assembly. (These will be reused)
18.Pull out to remove DIVIDER CENTER ASM {WR72X10320}.
 Screws to be removed
 Center Divider Assembly
19.Use screw driver to remove seven SELF DRILL TRIM P SCREWS holding the evaporator cover. Save fasteners for reuse.
20.Remove EVAP COVER ASM {WR74X10355} and discard.
Printed in the United States |
224D3383P001 31-49005 03-13 GE |
6
 Loading...