


ZIS360NMC
GE ZIS360NMC, ZIS420NMA, ZIS420NMB, ZIS420NMC, ZIS420NMD Installation Guide
...
Installation
Instructions
Side bySide Refrigerators
ZIS360N,ZISB360D,ZISW360D
ZISS360N,ZISS360D
ZIS420N,ZISB420D,ZISW420D
ZISS420N,ZISS420D
ZIS480N,ZISB480D,ZISW480D
ZISS480N,ZISS480D
Design Guide
With Installation Instructions
Q
Monogram:'
We bringgood things to life

Safety Information
BEFORE YOU BEGIN
Read these instructions completely and carefully.
• IMPORTANT Save these instructions for
local inspector's use. Observe all governing
codes and ordinances.
• Note to Installer- Be sure to leave these instruc-
tions with the Consumer.
• Note to Consumer - Keep these instructions with
your Owner's Manual for future reference.
WARNING:
This appliance must be properly grounded. See
"Grounding the Refrigerator," page 10.
AVERTISSEMENT
Cet appareil dolt 6tre correctement mis _ la terre.
Consulter <<Mise a la terre du r0frigdrateur >_,page 10.
If you received a damaged refrigerator, you should
immediately contact your dealer or builder.
CAUTION:
Due to the weight and size of this refrigerator, and to
reduce the risk of personal injury or damage to the
product- TWO PEOPLE ARE REQUIRED FOR
PROPER INSTALLATION.
PRUDENCE
tk cause du poids et de la taille de ce rdfrigdrateur et
pour r0duire le risque de blessure et de dommages, IL
FAUT DEUX PERSONNES POUR FAIRE
L'INSTALLATION CORRECTEMENT.
Skill Level - Installation of this refrigerator requires
basic mechanical, carpentry and plumbing skills.
Proper installation is the responsibility of the in-
staller. Product failure due to improper installation is
not covered under the GE Appliance Warranty. See
the Owner's Manual for warranty information.
WARNING:
• These refrigerators are top-heavy and must be
secured to prevent the possibility of tipping for-
ward. Anti-Tip protection is required. See page 12
for details.
• Use this appliance only for its intended purpose.
• Immediately repair or replace electric service cords
that become frayed or damaged.
• Unplug the refrigerator before cleaning or making
repairs.
• Repairs should be made by a qualified service
technician.
AVERTISSEMENT
• Ces rdfrigdrateurs sont lourds en haut et il faut les
arrimer pour dviter leur basculement. II faut avoir
un syst_me de protection contre le renversement.
Voir les ddtails page 12.
• Iine faut utiliser cet appareil que pour l'utilisation
appropri0e.
• R0parer ou remplacer imm0diatement tout cordon
01ectrique effilochd ou endommagd.
• Ii faut d0brancher le rdfligdrateur avant le
nettoyage ou toute intervention.
• tes r0parations doivent 6ire faites par un
technicien qualifi0.
For Monogram local service ill your area,
1-800-444-1845.
For Monogram service in Canada
1-888-880-3030
For Monogram Parts and Accessories, call
1-800-626-2002.
www. monogram.com
CONTENTS
PlanningGuide
The Installation Space ....................................3
Dimensionsand Clearances ..........................3
130° Door Swing ..............................................4
90° Door Swing ................................................5
Customization Basics .....................................6
1/4"Framed Panel Dimensions......................7
314"Overlay Pane[Dimensions......................8
RaisedOverlay PanelDesign........................9
Side Panels.....................................................10
Installation Instmoti0ns
Tools,Hardware, Materials .........................10
Grounding the Refrigerator ..........................10
Step 1, RemovePackaging ..........................11
Step 2, Install Water Line .............................11
Step 2A, ROWater Line ................................12
Step 3, Install Side Panels ...........................12
Step 4, Install Anti-lip Brackets .................12
Step 5, Level Refrigerator ............................13
Step 6, Secure Refrigerator to Cabinetry .. 13
Step 7, Adjust Door Swing ...........................13
Step 8, Install Grille Panel............................14
Step 9, Install Framed Panels......................15
Step 9A, Install Overlay Panels ...................16
Step 10,Install Dispenser Trim....................17
Step 11,Connect Water Supply ..................17
Step 12,Connect Power ...............................18
Step 13,Start Icemaker ................................18
Step 14,Install Toekick .................................18
2
Design Guide
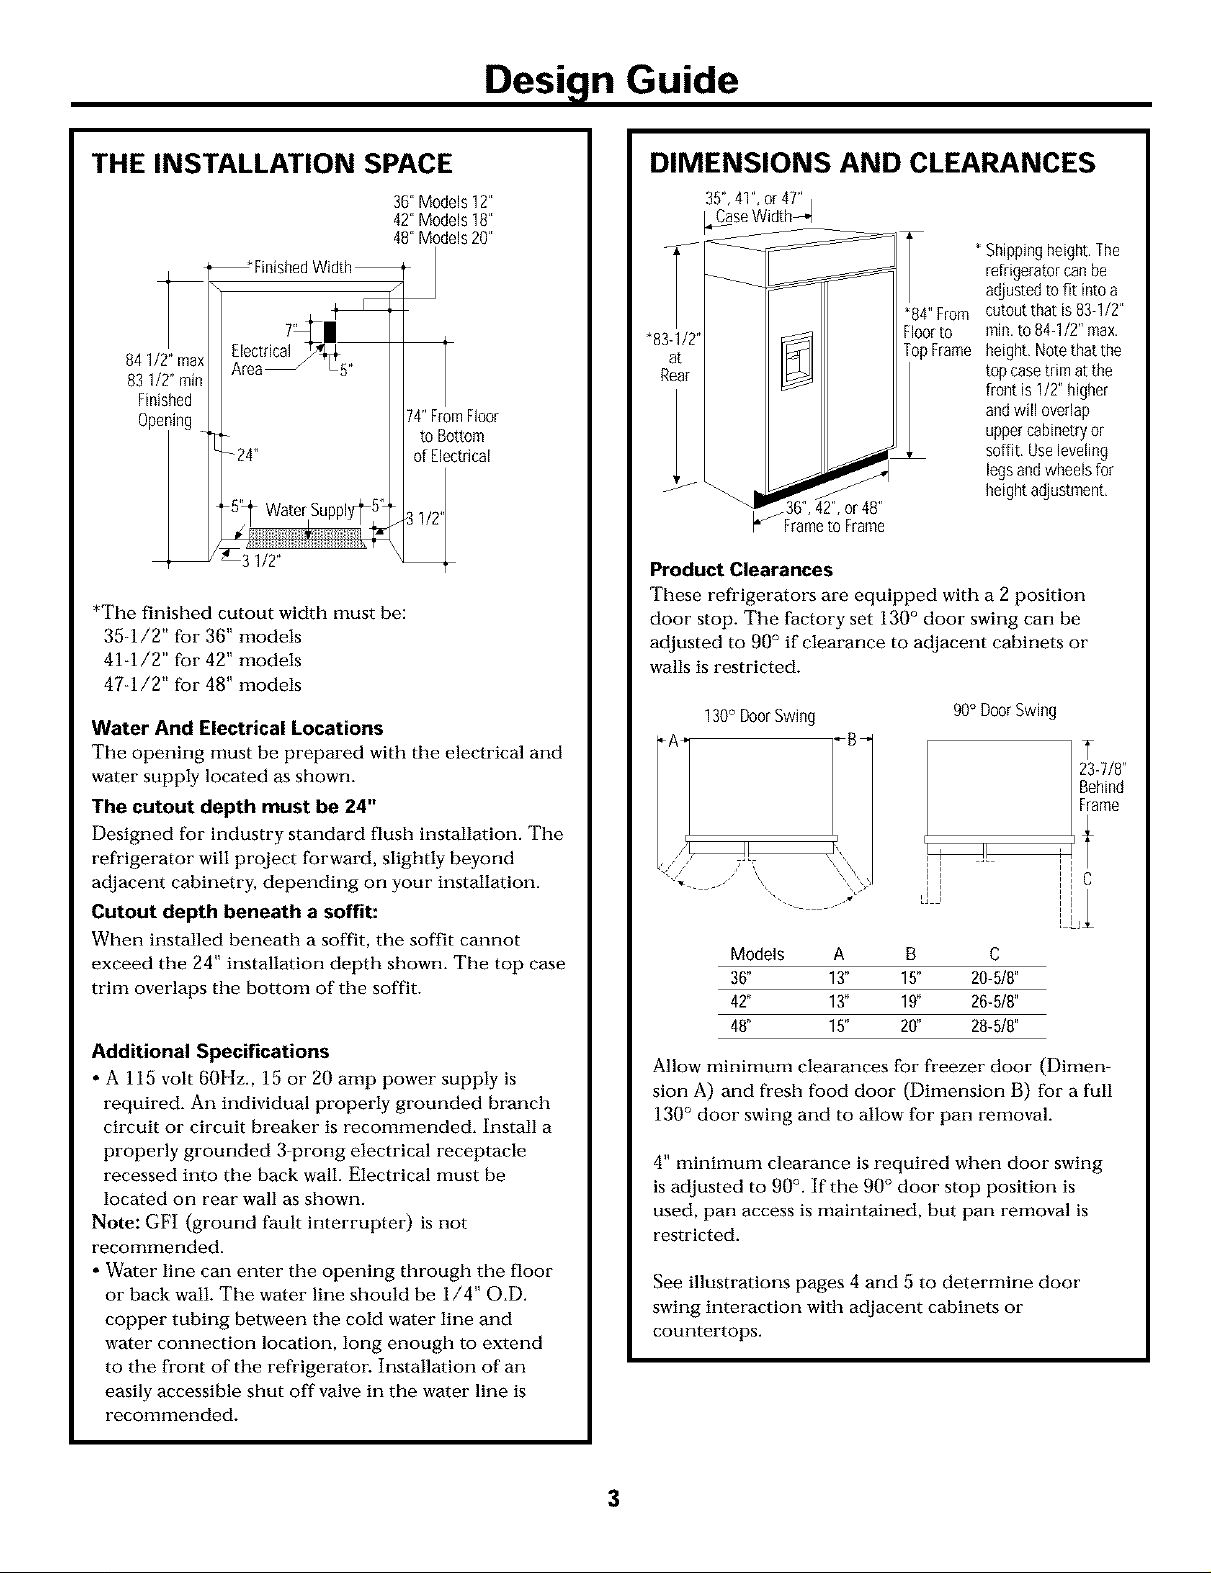
THE INSTALLATION SPACE
36"Models12"
42"Models18"
48"Models20"
_*FinishedWidth_
841/2"max
83 1/2"min
Finished
Ope_
74"FromFloor
to Bottom
of Electrical
*The finished cutout width must be:
35-1/2" for 36" models
41-1/2" for 42" models
47-1/2" for 48" models
Water And Electrical Locations
The opening must be prepared with the electrical and
water supply located as shown.
The cutout depth must be 24"
Designed for industry standard flush installation. The
refrigerator will project forward, slightly beyond
adjacent cabinetry, depending on your installation.
Cutout depth beneath a soffit:
When installed beneath a soffit, the soffit cmmot
exceed the 24" installation depth shown. The top case
trim overlaps the bottom of the soffit.
Additional Specifications
, A 115 volt 60Hz., 15 or 20 amp power supply is
required. An individual properly grounded branch
circuit or circuit breaker is recommended. Install a
properly grounded 3-prong electrical receptacle
recessed into the back wall. Electrical must be
located on rear wall as shown.
Note: GFI (ground fault interrupter) is not
recommended.
• Water line can enter the opening through the floor
or back wall. The water line should be 1/4" O.D.
copper tubing between the cold water line and
water connection location, long enough to extend
to the front of the refrigerator. Installation of an
easily accessible shut off valve in the water line is
recommended.
DIMENSIONS AND CLEARANCES
35",41",or4T'
_,_aseWidth_,d
"83-1/2" Floorto
at TopFrame
Rear
A
or48"
_" Frameto Frame
Shippingheight,The
refrigeratorcanbe
adjustedto fit intoa
cutoutthat is83-1/2"
rain,to 84-1/2"max,
height,Notethat the
top casetrimatthe
front is 1/2"higher
andwill overlap
uppercabinetryor
soffit, Useleveling
legsandwheelsfor
heightadjustment,
Product Clearances
These refrigerators are equipped with a 2 position
door stop. The factory set 130 ° door swing can be
adjusted to 90° if clearance to adjacent cabinets or
walls is restricted.
90° DoorSwing
l
i
23-7/8"
Behind
Frame
Models A B C
36' 13" 15" 20-5/8"
42" 13" 19' 26-5/8"
48" 15" 20' 28-5/8"
Allow minimum clearances for freezer door (Dimen-
sion A) and fresh food door (Dimension B) for a full
130° door swing and to allow for pan removal.
4" minimum clearance is required when door swing
is adjusted to 90 °. If the 90 ° door stop position is
used, pan access is maintained, but pan removal is
restricted.
See illustrations pages 4 and 5 to determine door
swing interaction with adjacent cabinets or
countertops.
3
Design Guide
Refrigerator
4\
\
\
\
\
\
\
\
\
\
\
\
\
\
\
\
\
\
\
\
\
\
\
23-7/8"From
Rearof
Refrigerator
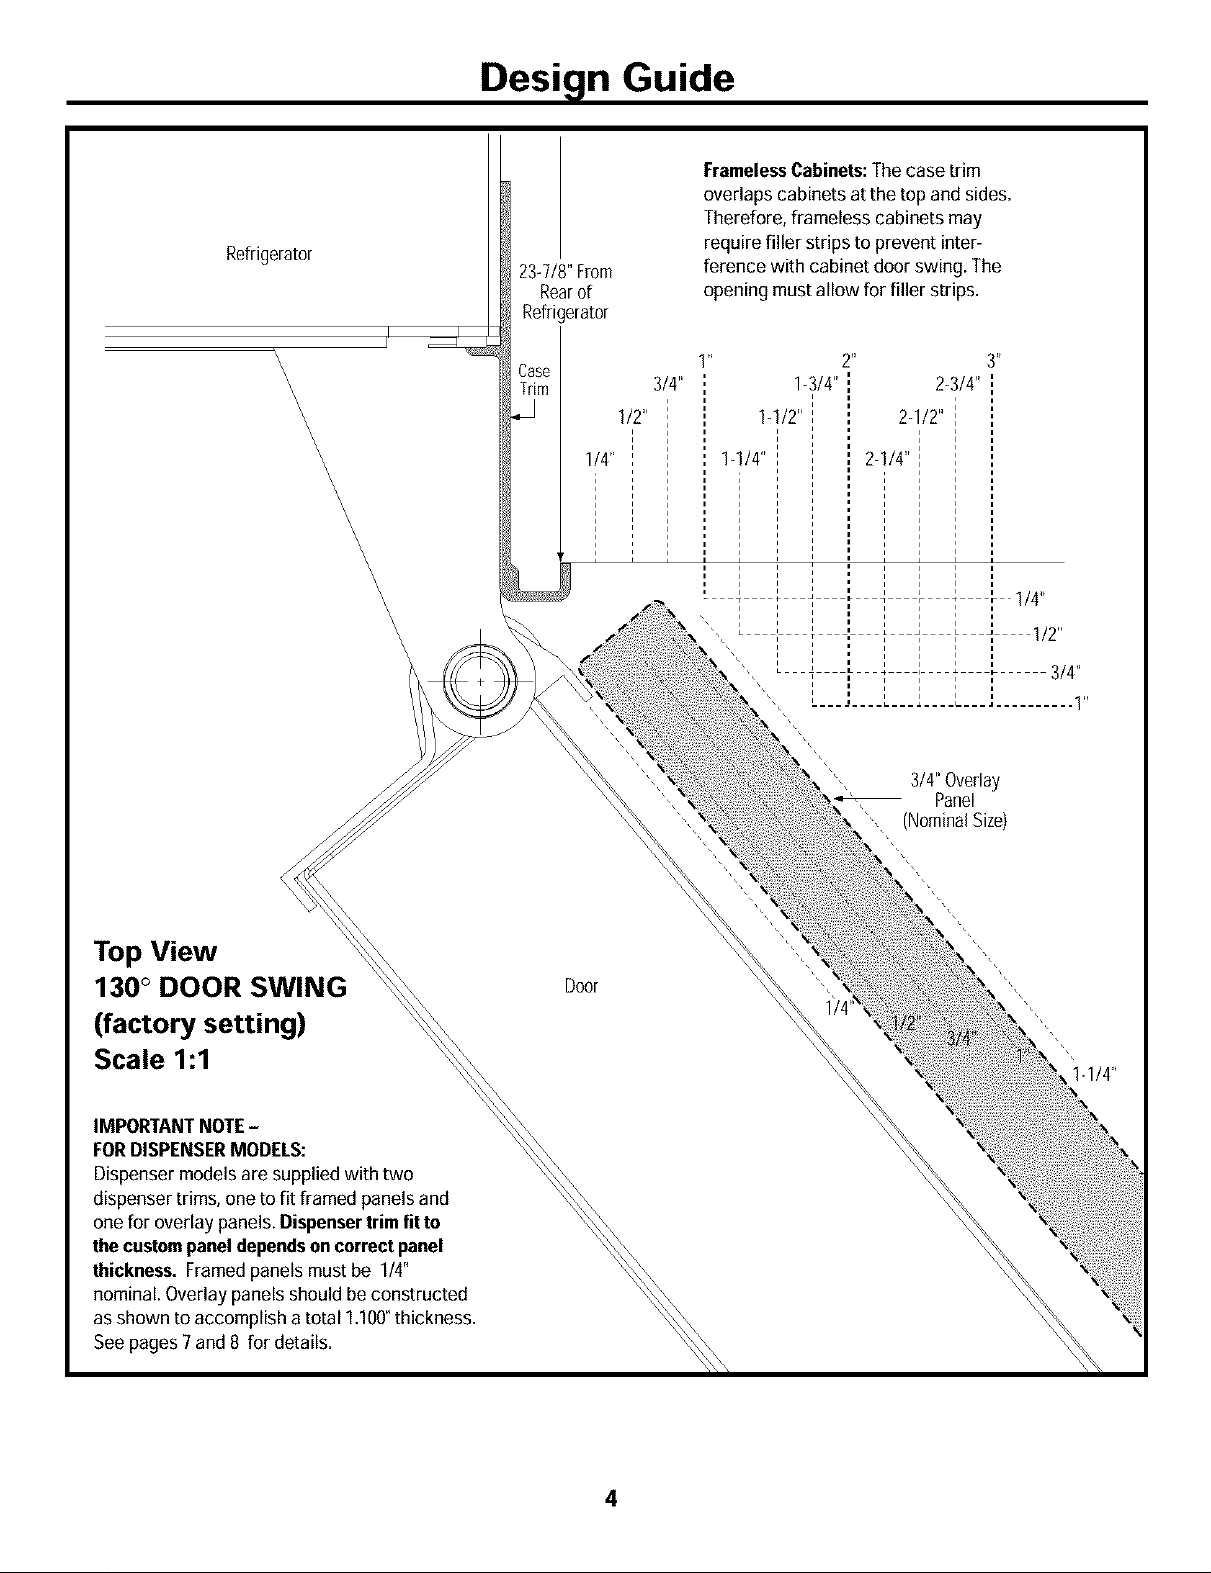
FramelessCabinets:The case trim
overlaps cabinets atthe to ) and sides.
Therefore, frameless cabinets may
require filler strips to prevent inter-
ference with cabinet door swing. The
opening mustallow for filler strips.
Case
_m
3/4"
1/2"
1/4"
1 " 2"
1-3/4" 2-3/4"
I
1-1/2" I 2-1/2"
2-I/#'
i i
i i
1-1/4"
3_
3/4"Overlay
Panel
_]ominalSize
\
Top View
130 ° DOOR SWING
(factory setting)
Scale 1:1
Door
\
IMPORTANTNOTE -
FORDISPENSERMODELS:
Dispensermodels are supplied with two
dispenser trims, one to fit framed panels and
one for overlay panels. Dispensertrim fit to
thecustompanel dependson correctpanel
thickness. Framedpanels mustbe 1/4"
nominal. Overlay panels should be constructed
as shown to accomplish a total 1.100°thickness.
and 8 for details.

Design Guide
Refrigerator
\
\
\
\
\
\
\
\
\
\
\
\
\
\
Top View
90 ° DOOR SWING
(optional setting)
Scale 1:1
IMPORTANTNOTE-
FORDISPENSERMODELS:
Dispensermodels are supplied with
two dispenser trims, one to fit framed
panels and one for overlay panels.
Dispensertrimfit tothecustom
paneldependsoncorrectpanel
thickness. Framedpanels mustbe
1/4"nominal. Overlay panelsshould
be constructed asshown to accom-
plish a total 1.100°thickness. See
pages 7and 8 for details.
\
\
\
\
\
\
\
\
\
\
Door
_Case #im
FramelessCabinets:
Thecase trim overlaps
cabinets at the top
and sides.
Therefore, frameless
cabinets may require filler
strips to prevent inter-
ference with cabinet door
swing. Theopeningmust
allow for filler strips,
23-7/8"
FromRearof
Refri{erator
r
i i i
.... I/2
3/4"
1-1/4"
1-1/2"
3/4" Overlay
Panel
(NominalSize)
1-1/4"

Design Guide
CUSTOMIZATION BASICS:
Framed Or Overlay Panels, Custom Handles and Accessory Kits
Stainless Steel Wrapped Models
36" wide models- ZISS360N, ZISS360D
42" wide models =ZISS420N, ZISS420D
48" wide models =ZISS480N, ZISS480D
Trimmed Models
36" wide models- ZIS360N, ZISB360D, ZISW360D
42" wide models- ZIS420N, ZISB420D, ZISW420D
48" wide models- ZIS480N, ZISB480D, ZISW480D
Stainless Steel Wrapped Refrigerators
Stainless Steel wrapped refrigerators have wrapped
doors and grille panel, beveled edges, and tubular
stainless steel handles that coordinate with other
Monogram appliances. These models are shipped
ready for installation.
Trimmed Refrigerators
Trimmed refrigerators are designed to be customized
with decorative panels. Field installed custom door and
grille panels are required.
Framed panels
You may install 1/4" thick custom panels from your
cabinet manufacturer. The decorative panel slides into
the factory installed trim. Or, order black, white and
stainless steel accessory panels from your Monogram
dealer.
Overlay panels
You may also choose to install custom overlay panels
from your cabinet manufacturer. This design provides a
seamless appearance which integrates smoothly with
surrounding cabinetry.
/
3/4" OverlayPanel
,10"ThickSpacerPanel
1/4"ThickBackerPanel
StandardDoorHandles
Standard supplied handles shown in314"overlay panel position.
Door Handles
The standard supplied handles can be adjusted to
accommodate both framed or overlay panels. Custom
handles of your choice, supplied by your cabinet maker
can also be installed. If desired, you may order ZKHSS2
Monogram stainless steel tubular handle kit for overlay
panels.
Side Panels
Side panels must be used whenever the sides of the
refrigerator will be exposed.
/
FramedPanel
StandardDoorHandles
Standardsupplied handles shown in I14"panel position.
Optional Accessory Kits
ZKHSS2: Monogram Tubular Stainless Steel handles
designed to fit overlay panels.
Accessory Panels
White, black and stainless steel accessory panels are
available from your Monogram dealer. Panels are cut to
size and ready to install.
ZISW480D ZPW480D ZPS480D
ZtS480N ZPW480N ZPB480N ZPS480N
ZlSB420D ZPB420D ZPS420D
ZlSW360D ZPW360D ZPS360D
ZIS360N ZPW360N ZPB360N ZPS360N
6
 Loading...