


 Loading...
GE ZIS360N, ZISB360D, ZISW360D, ZISS360N, ZISS360D Installation Instructions
...Installation
Instructions
If you have questions, call 800.626.2000 or visit our website at: www.monogram.com
Side by Side Refrigerators
ZIS360N, ZISB360D, ZISW360D
ZISS360N, ZISS360D
ZIS420N, ZISB420D, ZISW420D
ZISS420N, ZISS420D
ZIS480N, ZISB480D, ZISW480D
ZISS480N, ZISS480D
Design Guide
With Installation Instructions
Monogram.®

Safety Information
BEFORE YOU BEGIN
Read these instructions completely and carefully.
• IMPORTANT - Save these instructions for local inspector’s use. Observe all governing codes and ordinances.
• Note to Installer - Be sure to leave these instructions with the Consumer.
• Note to Consumer - Keep these instructions with your Owner’s Manual for future reference.
WARNING:
This appliance must be properly grounded. See “Grounding the Refrigerator,” page 10.
AVERTISSEMENT
Cet appareil doit être correctement mis à la terre. Consulter « Mise à la terre du réfrigérateur », page 10.
If you received a damaged refrigerator, you should immediately contact your dealer or builder.
CAUTION:
Due to the weight and size of this refrigerator, and to reduce the risk of personal injury or damage to the product – THREE PEOPLE ARE REQUIRED FOR PROPER INSTALLATION OF A 36" WIDE UNIT. FOUR PEOPLE ARE REQUIRED FOR INSTALLATION OF A 42" OR 48" WIDE MODEL.
PRUDENCE
À cause du poids et de la taille de ce réfrigérator et pour réduire le risque de blessure et de dommages, IL FAUT TROIS PERSONNES POUR INSTALLER
CORRECTEMENT D’UN APPAREIL DE 91 cm (36 po) DE LARGE. IL FAUT QUATRE PERSONNES POUR L’INSTALLATION D’UN MODÈLE DE 107 OU 122 cm (42 OU 48 po) DE LARGE.
Skill Level - Installation of this refrigerator requires basic mechanical, carpentry and plumbing skills. Proper installation is the responsibility of the installer. Product failure due to improper installation is not covered under the GE Appliance Warranty. See the Owner’s Manual for warranty information.
WARNING:
•These refrigerators are top-heavy and must
be secured to prevent the possibility of tipping forward. Anti-Tip protection is required. See page 12 for details.
•Use this appliance only for its intended purpose.
•Immediately repair or replace electric service cords that become frayed or damaged.
•Unplug the refrigerator before cleaning or making repairs.
•Repairs should be made by a qualified service technician.
AVERTISSEMENT
•Ces réfrigérateurs sont lourds en haut et il faut les arrimer pour éviter leur basculement. Il faut avoir un système de protection contre le renversement. Voir les détails page 12.
•Il ne faut utiliser cet appareil que pour l’utilisation appropriée.
•Réparer ou remplacer immédiatement tout cordon électrique effiloché ou endommagé.
•Il faut débrancher le réfrigérateur avant le nettoyage ou toute intervention.
•Les réparations doivent être faites par un technicien qualifié.
For Monogram local service in your area, 1-800-444-1845.
For Monogram service in Canada 1-888-880-3030
For Monogram Parts and Accessories, call 1-800-626-2002.
www. monogram.com
CONTENTS |
|
|
|
|
|
Planning Guide |
|
Installation Instructions |
|
|
|
The Installation Space |
3 |
|
Step 7, Adjust Door Swing |
13 |
|
Tools, Hardware, Materials ........................ |
10 |
||||
Dimensions and Clearances .......................... |
3 |
Grounding the Refrigerator .......................... |
10 |
Step 8, Install Grille Panel ............................ |
14 |
130° Door Swing .............................................. |
4 |
Step 1, Remove Packaging .......................... |
11 |
Step 9, Install Framed Panels ...................... |
15 |
90° Door Swing ................................................ |
5 |
Step 2, Install Water Line ............................ |
11 |
Step 9A, Install Overlay Panels .................. |
16 |
Customization Basics ...................................... |
6 |
Step 2A, RO Water Line ................................ |
12 |
Step 10, Install Dispenser Trim .................... |
17 |
1/4" Framed Panel Dimensions ...................... |
7 |
Step 3, Install Side Panels .......................... |
12 |
Step 11, Connect Water Supply .................. |
17 |
3/4" Overlay Panel Dimensions ...................... |
8 |
Step 4, Install Anti-Tip Brackets ................ |
12 |
Step 12, Connect Power .............................. |
18 |
Raised Overlay Panel Design ........................ |
9 |
Step 5, Level Refrigerator ............................ |
13 |
Step 13, Start Icemaker ................................ |
18 |
Side Panels...................................................... |
10 |
Step 6, Secure Refrigerator to Cabinetry .. |
13 |
Step 14, Install Toekick ................................ |
18 |
|
|
|
|
|
|
2

Design Guide
THE INSTALLATION SPACE
36" Models 12"
42" Models 18"
48" Models 20"
|
|
|
*Finished Width |
|
|
|
|
|||||||||
|
|
|
|
|
|
|
||||||||||
|
|
|
|
|
6" |
|
|
|
|
|
|
|
|
|
|
|
|
|
|
|
|
|
|
|
|
|
|
|
|
|
|
|
|
|
|
|
|
|
|
|
|
|
|
|
|
|
|
|
|
|
|
|
|
|
|
|
|
|
|
|
|
|
|
|
|
|
|
84 1/2" max |
Electrical |
|
|
|
|
|
|
|
|
|
|
|
||||
Area |
5" |
|
|
|
|
|||||||||||
83 1/2" min |
|
|
|
|
||||||||||||
|
|
|
|
|
|
|
|
|
|
|
|
|
|
|||
Finished |
|
|
|
|
|
|
|
|
|
|
|
75" From Floor |
||||
Opening |
|
|
|
|
|
|
|
|
|
|
|
|||||
|
|
|
24" |
|
|
|
|
|
|
|
|
|
to Bottom |
|||
|
|
|
|
|
|
|
|
|
|
|
|
of Electrical |
||||
|
|
|
|
|
|
|
|
|
|
|
|
|
|
|
Area |
|
|
|
|
5" |
|
Water Supply |
5" |
|
|
|
|||||||
|
|
|
|
|||||||||||||
|
|
|
|
|
|
|
|
|
|
|
|
|
3 1/2" |
|
||
|
|
|
3 1/2" |
|
|
|
|
|
|
|
|
|
|
|
||
*The finished cutout width must be: 35-1/2" for 36" models
41-1/2" for 42" models
47-1/2" for 48" models
Water And Electrical Locations
The opening must be prepared with the electrical and water supply located as shown.
The cutout depth must be 24"
The refrigerator will project forward, slightly beyond adjacent cabinetry, depending on your installation.
Cutout depth beneath a soffit:
When installed beneath a soffit, the soffit cannot exceed the 24" installation depth shown. The top case trim overlaps the bottom of the soffit.
Additional Specifications
• A 115 volt 60Hz., 15 or 20 amp power supply is required. An individual properly grounded branch circuit or circuit breaker is recommended. Install a properly grounded 3-prong electrical receptacle recessed into the back wall. Electrical must be located on rear wall as shown.
Note: GFI (ground fault interrupter) is not recommended.
•Water line can enter the opening through the floor or back wall. The water line should be 1/4" O.D. copper tubing or GE SmartConnect™ kit between the cold water line and water connection location, long enough to extend to the front of the refrigerator. Installation of an easily accessible shut off valve in the water line is required.
DIMENSIONS AND CLEARANCES
|
25-3/8" Framed Models |
35", 41", or 47" |
25-3/4" Stainless Steel Models |
Case Depth |
|
Case Width |
|
* Shipping height. The |
|||||
|
|
|
|
|
|
|
|
refrigerator can be |
|
|
|
|
|
|
|
|
|
|
|
|
|
|
|
|
|
adjusted to fit into a |
|
|
|
|
|
|
|
|
cutout that is 83-1/2" |
|
|
|
|
|
|
|
|
min. to 84-1/2" max. |
|
|
|
|
*84" From |
height. Note that the |
|||
*83-1/2" |
|
|
|
Floor to |
top case trim at the |
|||
at |
|
|
|
Top Frame |
front is 1/2" higher |
|||
Rear |
|
|
|
|
|
|
|
and will overlap |
|
|
|
|
|
|
|
|
upper cabinetry or |
|
|
|
|
|
|
|
|
soffit. Use leveling |
|
|
|
|
|
|
|
|
legs and wheels for a |
|
|
|
|
|
|
|
|
maximum 1” height |
|
|
|
|
|
|
|
|
|
|
|
|
|
|
|
|
|
adjustment. |
36", 42", or 48" Frame to Frame
Depth Including Handles:
26-7/8" Framed Models
27-3/4" Stainless Steel Models
Product Clearances
These refrigerators are equipped with a 2 position door stop. The factory set 130° door swing can be adjusted to 90° if clearance to adjacent cabinets or walls is restricted.
130° Door Swing |
90° Door Swing |
|
A |
B |
|
|
90° Door Swing |
23-7/8" |
|
Behind |
|
|
|
Frame |
|
|
C |
4" Min. to Wall
Models |
A |
B |
C |
36" |
13" |
15" |
20-5/8" |
42" |
13" |
19" |
26-5/8" |
48" |
15" |
20" |
28-5/8" |
Allow minimum clearances for freezer door (Dimension A) and fresh food door (Dimension B) for a full 130° door swing and to allow for pan removal.
4" minimum clearance is required when door swing is adjusted to 90°. If the 90° door stop position is used, pan access is maintained, but pan removal is restricted.
See illustrations pages 4 and 5 to determine door swing interaction with adjacent cabinets or countertops.
3

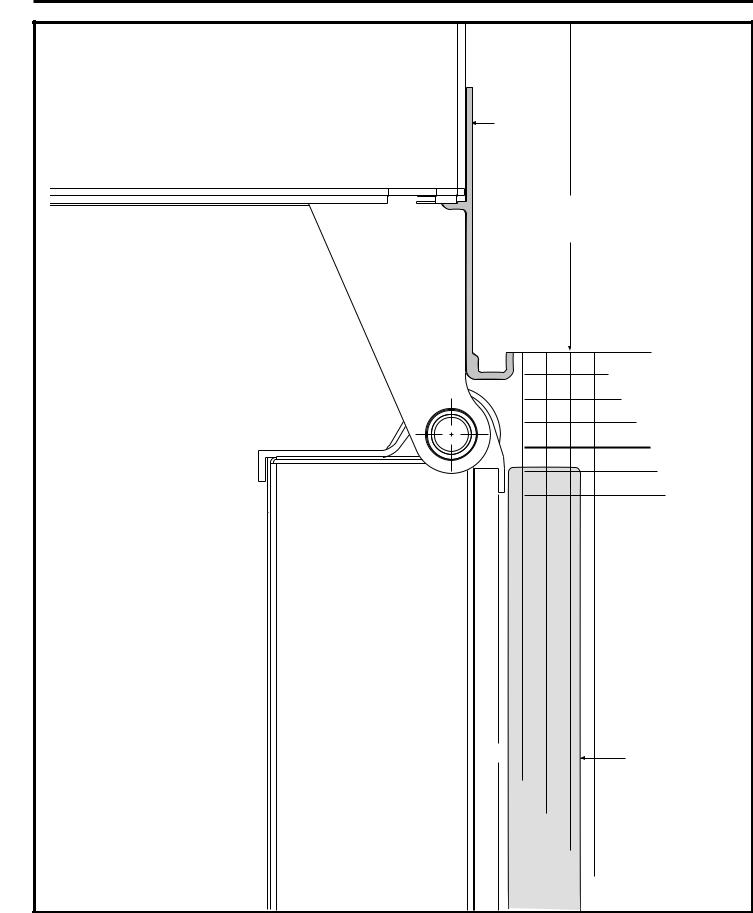
Design Guide |
|
|
||
|
|
Frameless Cabinets: The case trim |
||
|
|
overlaps cabinets at the top and sides. |
||
|
|
Therefore, frameless cabinets may require |
||
Refrigerator |
|
filler strips to prevent interfeence with cabinet |
||
From |
door swing. The opening must allow for filler |
|||
|
strips. |
|
|
|
|
of |
|
|
|
Case |
|
1" |
2" |
3" |
3/4" |
1-3/4" |
|
2-3/4" |
|
Trim |
|
|||
|
1/2" |
1-1/2" |
|
2-1/2" |
|
1/4" |
1-1/4" |
|
2-1/4" |
1/4"
1/2"
3/4"
1"
3/4" Overlay
Panel
(Nominal Size)
Top View |
Door |
|
130° DOOR SWING |
1/4" |
|
1/2" |
|
|
a57(factory setting) |
3/4" |
|
1" |
1-1/4" |
|
Scale 1:1 |
|
|
| <![if ! IE]> <![endif]>194D |
|
|
IMPORTANT NOTE – |
|
|
FOR DISPENSER MODELS: |
|
|
Dispenser models are supplied with two |
|
|
dispenser trims, one to fit framed panels |
|
|
and one for overlay panels. Dispenser trim |
|
|
fit to the custom panel depends on correct |
|
|
panel thickness. Framed panels must be |
|
|
1/4" nominal. Overlay panels should be |
|
|
constructed as shown to accomplish a total |
|
|
1.100" thickness. See pages 7 and 8 |
for details. |
|
4
Design Guide
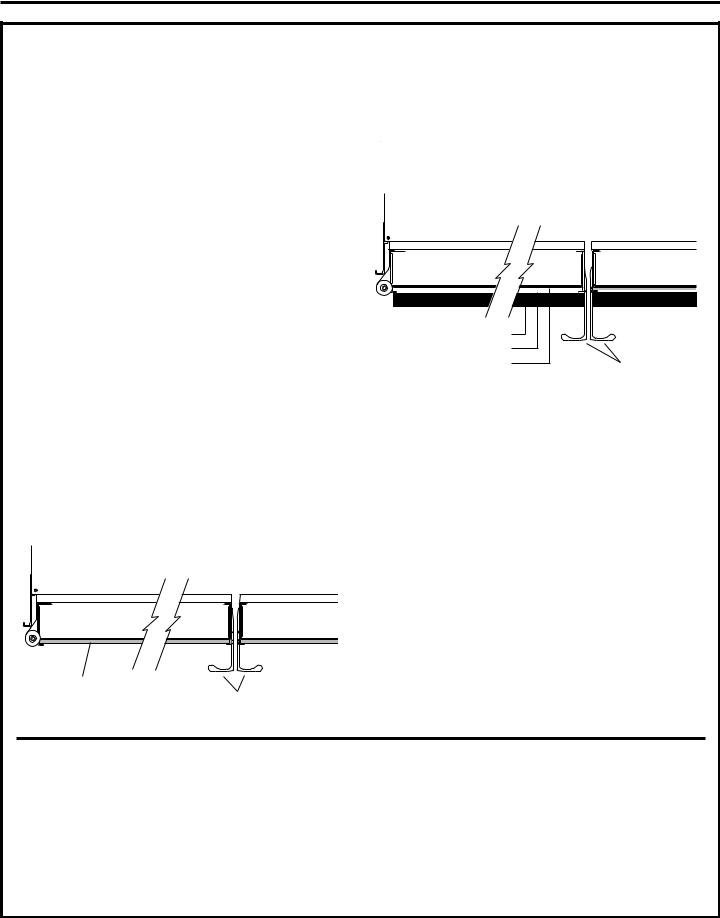
|
|
Frameless Cabinets: |
|
|
The case trim overlaps |
|
|
cabinets at the top |
|
|
and sides. Therefore, |
Refrigerator |
|
frameless cabinets may |
|
Trim |
require filler strips to |
|
prevent interference with |
|
|
|
|
|
|
cabinet door swing. The |
|
|
opening must allow for |
|
|
filler strips. |
|
|
23-7/8" |
|
From Rear of |
|
|
Refrigerator |
|
1/4"
1/2"
3/4"
1"
1-1/4"
1-1/2"
Top View
90° DOOR SWING
(optional setting)
Door
Scale 1:1
IMPORTANT NOTE –
FOR DISPENSER MODELS:
Dispenser models are supplied with two dispenser trims, one to fit framed panels and one for overlay panels. Dispenser trim fit to the custom panel depends on correct panel thickness. Framed panels
must be 1/4" nominal. Overlay panels should be constructed as shown to accomplish a total 1.100" thickness. See pages 7 and 8 for details.
1/4" |
3/4" Overlay |
|
Panel |
||
|
||
|
(Nominal Size) |
|
|
1/2" |
3/4"
1"
1-1/4"
5
Design Guide
CUSTOMIZATION BASICS:
Framed Or Overlay Panels, Custom Handles and Accessory Kits
Stainless Steel Wrapped Models
36" wide models - ZISS360N, ZISS360D 42" wide models - ZISS420N, ZISS420D 48" wide models - ZISS480N, ZISS480D
Trimmed Models
36" wide models - ZIS360N, ZISB360D, ZISW360D 42" wide models - ZIS420N, ZISB420D, ZISW420D 48" wide models - ZIS480N, ZISB480D, ZISW480D
Stainless Steel Wrapped Refrigerators
Stainless Steel wrapped refrigerators have wrapped doors and grille panel, beveled edges, and tubular stainless steel handles that coordinate with other Monogram appliances. These models are shipped ready for installation.
Trimmed Refrigerators
Trimmed refrigerators are designed to be customized with decorative panels. Field installed custom door and grille panels are required.
Overlay panels
You may also choose to install custom overlay panels from your cabinet manufacturer. This design provides a seamless appearance which integrates smoothly with surrounding cabinetry.
3/4" Overlay Panel
.10" Thick Spacer Panel
1/4" Thick Backer Panel
Standard Door Handles
Standard supplied handles shown in 3/4" overlay panel position.
Door Handles
Framed panels
You may install 1/4" thick custom panels from your cabinet manufacturer. The decorative panel slides into the factory installed trim. Or, order black, white and stainless steel accessory panels from your Monogram dealer.
The standard supplied handles can be adjusted to accommodate both framed or overlay panels. Custom handles of your choice, supplied by your cabinet maker can also be installed on overlay panels. If desired, you may order ZKHSS2 Monogram stainless steel tubular handle kit for 3/4" overlay panels.
Side Panels
Side panels must be used whenever the sides of the refrigerator will be exposed.
Framed Panel
Standard Door Handles
Standard supplied handles shown in 1/4" panel position.
Optional Accessory Kits
ZKHSS2: Monogram Tubular Stainless Steel handles designed to fit 3/4" overlay panels.
Accessory Panels
White, black and stainless steel accessory panels are available from your Monogram dealer. Panels are cut to size and ready to install.
Models |
White |
Black |
Stainless |
|
|
Acrylic |
Acrylic |
Steel |
|
ZISW480D |
ZPW480D |
|
ZPS480D |
|
ZISB480D |
|
ZPB480D |
ZPS480D |
|
ZIS480N |
ZPW480N |
ZPB480N |
ZPS480N |
|
ZISW420D |
ZPW420D |
|
ZPS420D |
|
ZISB420D |
|
ZPB420D |
ZPS420D |
|
ZIS420N |
ZPW420N |
ZPB420N |
ZPS420N |
|
ZISW360D |
ZPW360D |
|
ZPS360D |
|
ZISB360D |
|
ZPB360D |
ZPS360D |
|
ZIS360N |
ZPW360N |
ZPB360N |
ZPS360N |
|
6
Loading...