GE ZMC1090WV, ZMC1090BV, ZEM200WV, ZEK757WW, ZEK737WW User Manual
...GE Monogram®
Installation
Instructions
27" Built-In Ovens
Models
ZEK757WW
ZEK757BW
ZEK737WW
ZEK737BW

Before you begin—Read these instructions completely and carefully. IMPORTANT: Save these instructions for local inspector’s use.
IMPORTANT: OBSERVE ALL GOVERNING CODES AND ORDINANCES. NOTE TO INSTALLER: Be sure to leave these instructions with the Consumer.
NOTE TO CONSUMER: Keep these instructions with your Use and Care Book for future reference.

 CAUTIONWARNING This appliance must be properly grounded. See “Electrical Supply”, page 16.
If you have questions concerning the installa- |
Proper installation is the responsibility of the |
tion of this product, call the GE Answer |
installer. Product failure due to improper installation |
Center® Consumer Information Service at |
is not covered under the GE Appliance Warranty. See |
800.626.2000, 24 hours a day, 7 days a week. |
the Use & Care Guide for warranty information. |
If you received a damaged oven, you should |
|
contact your dealer. |
|
|
|
CAUTION:
•This oven should be installed by a qualified installer or service technician.
•Never use the oven for warming or heating a room. Prolonged use of the oven without adequate ventilation can be hazardous.
Check with local utilities for electrical codes which apply in your area. Local codes vary. Installation, electrical connections and grounding must comply with applicable codes. In the absence of local codes, the oven should be installed in accordance with National Electrical Code ANSI/NFPA 70-1990.
Contents |
Design Information |
|
|
Models Available.................................................................................................................................. |
3 |
|
Dimensions and Clearances ............................................................................................................... |
3 |
|
Cabinet Style Options ......................................................................................................................... |
4 |
|
Installation Options ............................................................................................................................ |
5 |
|
Side-by-side Installation Option ......................................................................................................... |
5 |
|
Cabinetry |
|
|
Tools and Materials required ............................................................................................................. |
6 |
|
Framed Cabinet, Double Oven .......................................................................................................... |
6 |
|
Framed Cabinet, Single Oven ............................................................................................................ |
7 |
|
Recessed Installation: Front framed cabinets with inset doors and drawers .................................. |
8 |
|
Frameless Cabinets .............................................................................................................................. |
9 |
|
Single Oven Installed Below a Microwave Oven ............................................................................. |
10 |
|
Single Oven Installed Below a Countertop ...................................................................................... |
11 |
|
Cabinetry Modification Suggestions |
|
|
Provide Oven Supports ..................................................................................................................... |
12 |
|
Install Oven Supports ........................................................................................................................ |
12 |
|
Determine Need for Filler Panels..................................................................................................... |
13 |
|
Filler Panel Construction .................................................................................................................. |
13 |
|
Cut Rail for Filler Panel .................................................................................................................... |
14 |
|
Cut Appearance Panel ...................................................................................................................... |
14 |
|
Determine Location of Cleats ........................................................................................................... |
14 |
|
Cut and Secure Cleats to Filler Panel ............................................................................................... |
15 |
|
Secure Rail to Appearance Panel ..................................................................................................... |
15 |
|
Secure Assembled Filler Panel to Cabinet ....................................................................................... |
15 |
|
Installation |
|
|
Tools and Materials Required .......................................................................................................... |
16 |
|
Electrical Locations ........................................................................................................................... |
16 |
|
Finalize Installation ........................................................................................................................... |
17 |
|
Route Cable Through Cutout ........................................................................................................... |
17 |
|
Secure Oven to Cabinet .................................................................................................................... |
18 |
|
Replace the Oven Door ..................................................................................................................... |
18 |
|
Connect Electrical ............................................................................................................................. |
18 |
2

Design Information
Built-In Ovens
Models |
ZEK757WW |
|
|
|
|
|
available |
White double convection oven |
|
|
|
|
|
|
ZEK757BW |
|
|
|
|
|
|
Black double convection oven |
|
|
|
|
|
|
ZEK737WW |
|
|
|
|
|
|
White single convection oven |
|
|
|
|
|
|
|
|
|
|
||
|
ZEK737BW |
|
|
|
|
|
|
Black single convection oven |
|
|
|
|
|
|
|
|
|
|
|
|
|
|
|
|
|
|
|
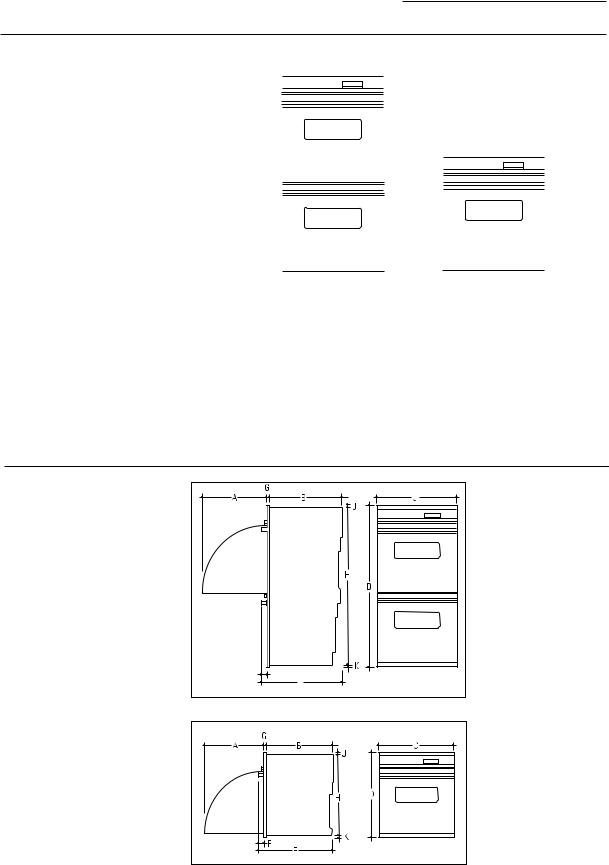
Dimensions and clearances
With both single and double built-in styles, contemporary Monogram ovens offer an array of choices for the custom kitchen:
•Built-in double convection ovens
•Built-in single convection ovens
•Monogram built-in ovens are available in sophisticated black or glistening white.
Double oven
A - 20" (508 mm)
B - 23 -1/2" (597 mm)
C - 26 -13/16" (681 mm)
D - 50 -3/4" (1289 mm)
E - 26 -3/16" (665 mm)
F - 1 -3/4" (44 mm)
G - 15/16" (24 mm)
H - 49 -5/8" (1260 mm)
J - 1/4" (6 mm)
K - 7/8" (22 mm)
Single oven
A - 20" (508 mm)
B - 23 -1/2" (597 mm)
C - 26 -13/16" (681 mm)
D - 28-9/16" (725 mm)
E - 26-3/16" (665 mm)
F - 1 -3/4" (44 mm)
G - 15/16" (24 mm)
H - 27-7/16" (697 mm)
J - 1/4" (6 mm)
K - 7/8" (22 mm)
3

Design Information
Built-In Ovens
Cabinet style options
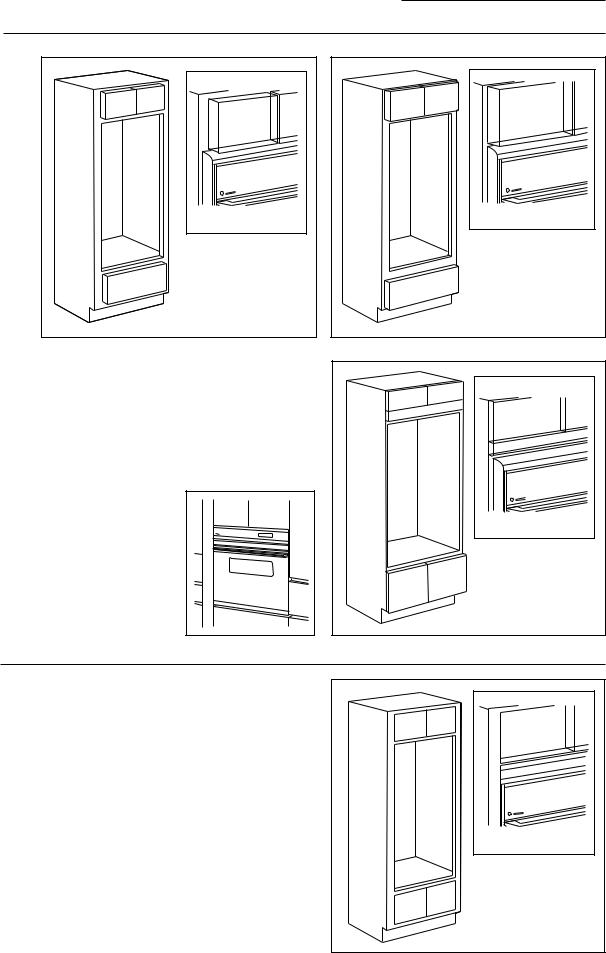
Front Framed Partial Overlay Door
Monogram ovens are installed directly into a wall or wall oven cabinetry, 27" minimum width. The front surface of the ovens will be nearly flush with surrounding cabinetry. To obtain optimal appearance, cabinet cutouts must be exact. The examples shown here illustrate typical styles of 27" cabinets and oven fit. Installation instructions for each of these basic cabinetry styles are provided in this section.
Designer Note: Whenever possible, align the oven with cabinetry details such as drawers, doors and reveals.
Front Framed Full Overlay Door |
Frameless |
Monogram ovens can be recessed into front framed cabinets with inset flush doors. This installation requires 26-7/8" wide and 24-1/2" deep cutout. See page 6 for details.
Recessed Installation In |
Front Framed Inset Flush Door |
Note: This installation requires |
26-7/8" wide, 24-1/2" deep |
cutout. |
4

Design Information
Built-In Ovens
Installation
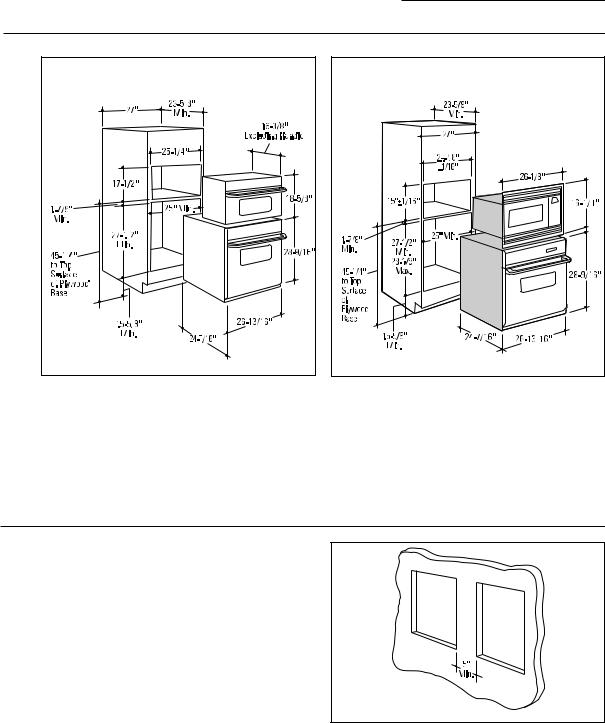
Single Oven Installed Below A
options
ZMC1090WV/ZMC1090BV Microwave Oven
Single Oven Installed Below A |
ZEM200WV Microwave Oven |
Side-by-side installation option
•Install a single oven alone or below any Monogram microwave oven.
•For an integrated look, install a single oven below the ZMC1090BV and ZMC1090WV built-in style microwave ovens. No trim kits required.
•Install a single oven below a ZEM200WV microwave oven. JX827WN trim kit required.
Install single ovens side-by-side. Minimum spacing allowed:
•5" minimum separation between cabinet openings— any type oven.
5

Tools and materials required
Framed cabinet double oven
|
|
Cabinetry |
||
|
|
|
|
|
|
|
|
|
Built-In Ovens |
|
|
|
||
• |
2" x 4" lumber for runners |
Ovens are designed for installation in a cabinet 27" min. wide. |
||
• |
Saw |
• |
Cut 2" x 4" runners of appropriate length or solid shelf to |
|
• |
Level |
|
support oven. |
|
• |
Phillips screwdriver and wood screws or other hardware for |
• |
Attach runners or solid shelf in opening as shown. |
|
|
installing runners or shelf to support oven. |
• |
Runners must be level and rigidly mounted. |
|
|
Front Framed |
Front Framed Full |
|
Overlay Door |
|
|
Partial Overlay Door |
|
|
|
|
|
DIMENSIONS |
|
A |
Cabinet Width |
27" Min. |
B |
Cutout Width |
25 " Min. |
C |
Cutout Height |
49-11/16" Min./50-1/8" Max. |
D |
Cutout Depth |
23-5/8" Min. |
E |
Cutout Location |
13-1/4" Min. |
H |
Overall Height |
50-3/4" |
W |
Overall Width |
26-13/16" |
Use the information in this dimension drawing for typical framed cabinets. The front face of the oven will be flush with cabinetry doors or drawers.
Order a double oven cabinet.
Rough opening for double oven must be:
•Depth—23-5/8" min. from inside back to front of cabinet frame.
•Width—25" min.
•Height—49-11/16" min. 50-1/8" max.
•Installing 13-1/4" from floor will place base of upper oven at countertop level.
–May be more than 13-1/4" from floor, depending upon user preference.
•All Monogram ovens require 7/8" overlap to both sides and bottom. Allow 1/4" min. for top overlap.
•Oven overlaps will conceal all raw edges.
6
 Loading...