

Page 1

E-4200
User's Guide
Page 2

E-4200
User’ s Guide
Part #8503808 MAN SYS US E-4200 USR GDE R0 10/98
In our effort to use nature’s resources efficiently and wisely, we print all manuals on recycled papers that meet the
minimum requirements established by the Federal EPA i n its guidelines f or recycled paper products.
Page 3

Notices
Copyright © 1998 Gateway 2000, Inc.
All Rights Reserved
610 Gateway Drive
N. Sioux City , SD 57049 USA
All Rights Reserved
This publication is protected by copyright and all rights are reserved. No part of it may be reproduced
or transmitted by any means or in any form, without prior consent in writing from Gateway 2000.
The information in this manual has been carefully checked and is believed to be accurate. However,
changes are made periodically . These changes are incorporated in newer publication editions.
Gateway 2000 may improve and/or change products described in this publication at any time. Due to
continuing system improvements, Gateway 2000 is not responsible for inaccurate information which
may appear in this manual. For the latest product updates, consult the Gateway 2000 web site at
www.gateway.com. In no event will Gateway 2000 be liable for direct, indirect, special, exemplary,
incidental, or consequential damages resulting from any defect or omission in this manual, even if
advised of the possibility of such damages.
In the interest of continued product development, Gateway 2000 reserves the right to make
improvements in this manual and the products it describes at any time, without notices or obligation.
T r ademark Acknowledgments
AnyKey, black-and-white spot design, CrystalScan, Destination, EZ Pad, EZ Point, Field Mouse, Solo,
TelePath, Vivitron, stylized “G” design, and “You’ve got a friend in the business” slogan are registered
trademarks and GA TEWA Y, Gateway Solo, green stylized GA TEWAY , green stylized Gateway logo, and
the black-and-white spotted box logo are trademarks of Gateway 2000, Inc. Intel, Intel Inside logo, and
Pentium are registered trademarks and MMX is a trademark of Intel Corporation. Microsoft, MS, MSDOS, and Windows are trademarks or registered trademarks of Microsoft Corporation. All other
product names mentioned herein are used for identification purposes only, and may be the trademarks
or registered trademarks of their respective companies.
Copyright © 1998 Advanced Logic Research, Inc. (ALR)
All Rights Reserved
9401 Jeronimo
Irvine, CA 92618 USA
All Rights Reserved
This publication is protected by copyright and all rights are reserved. No part of it may be reproduced
or transmitted by any means or in any form, without prior consent in writing from ALR.
The information in this manual has been carefully checked and is believed to be accurate. However,
changes are made periodically . These changes are incorporated in newer publication editions. ALR
may improve and/or change products described in this publication at any time. Due to continuing
system improvements, ALR is not responsible for inaccurate information which may appear in this
manual. For the latest product updates, consult the ALR web site at www.alr.com. In no event will ALR
be liable for direct, indirect, special, exemplary , incidental, or consequential damages resulting from
any defect or omission in this manual, even if advised of the possibility of such damages.
In the interest of continued product development, ALR reserves the right to make improvements in this
manual and the products it describes at any time, without notices or obligation.
T r ademark Acknowledgments
ALR is a registered trademark of Advanced Logic Research, Inc. All other product names mentioned
herein are used for identification purposes only , and may be the trademarks or registered trademarks
of their respective companies.
Page 4

Contents
Preface
Conventions used in this guide .............................................................. iv
Safety instructions ....................................................................................v
Additional information sources ............................................................ vii
Getting Started
Identifying your computer case ...............................................................2
Setting up your system .............................................................................3
Starting your system.................................................................................4
Using power management .......................................................................6
Turning off your system...........................................................................8
Resetting your computer..........................................................................9
System Featur es
Standard features ................................................................................... 12
Front panel features............................................................................... 13
Rear panel features ................................................................................ 16
....................................................................................................... iii
The Gateway Support Center......................................................... vii
The System Restoration CD .......................................................... vii
...........................................................................................1
Understanding the Power-On Self-Test...........................................5
Completing the operating system setup............................................5
Using Suspend Mode........................................................................7
.................................................................................... 11
Desktop front panel........................................................................ 13
Mid-tower front panel .................................................................... 14
Tower front panel........................................................................... 15
Desktop rear panel.......................................................................... 16
Mid-tower rear panel...................................................................... 18
Tower rear panel............................................................................. 19
Maintaining an d Clean ing Your System
Maintaining your system....................................................................... 22
Maintaining the hard disk............................................................... 22
Installing LANDesk Client Manager ............................................ 23
Cleaning your system............................................................................ 23
Cleaning the mouse........................................................................ 23
Cleaning the keyboard.................................................................... 24
........................................ 21
i
Page 5

Cleaning the monitor screen...........................................................24
Cleaning the computer and monitor cases .....................................24
Protecting against viruses ...............................................................25
Appendix
................................................................................................... 26
Acronyms and abbreviations.................................................................27
Terms and definitions ...........................................................................29
Regulatory compliance statements........................................................32
Index
........................................................................................................... 35
ii E-4200 User’s Guide
Page 6

Pref ace
Conventions used in this guide .............................. iv
Safety instructions ................................................... v
Additional information sources.............................vii
Page 7
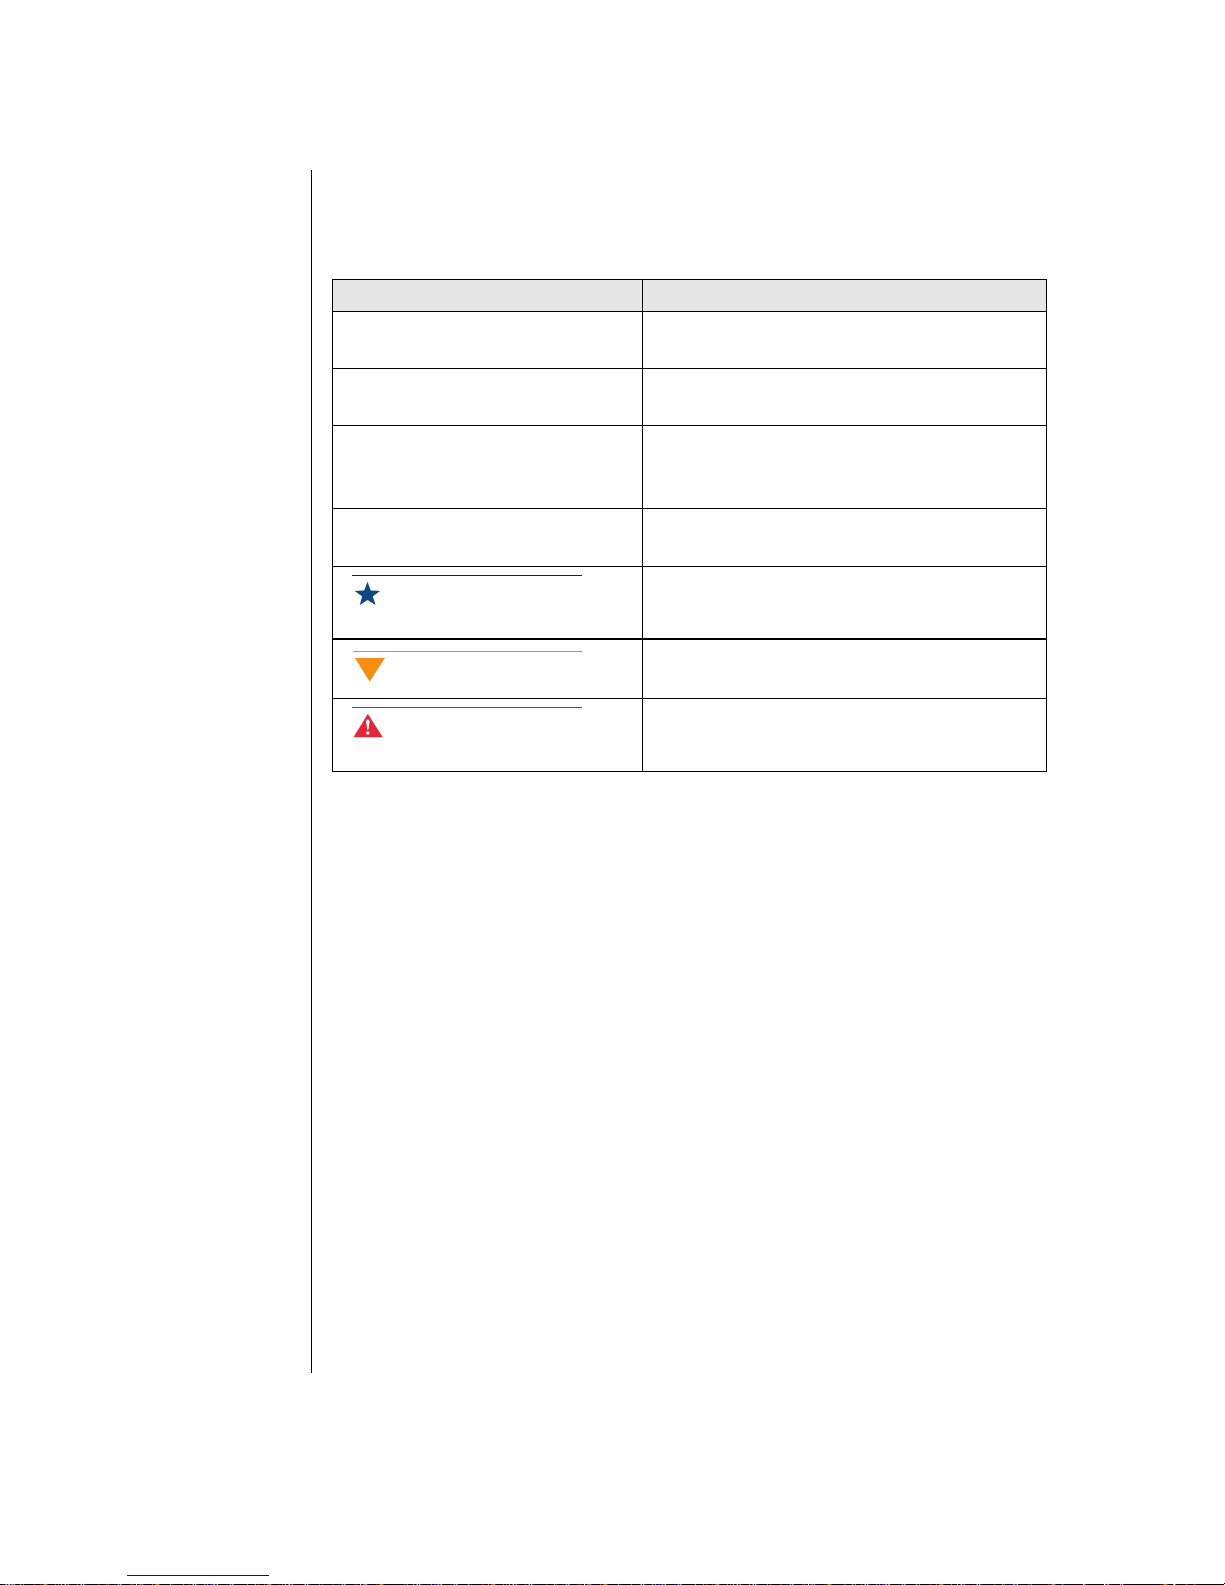
Con ventions used in this guide
Throughout this guide, you will see the following conventions:
Convention Description
NTER
E
TRL+ALT+DEL
C
Setup
User’s Guide
Important!
Keyboard key names are printed in small
capitals.
A plus sign i ndicat es t hat t he k e ys m ust be
pressed simul taneously.
Commands to be entered, options to
select, and messa ges that appear on you r
monitor are printed in bold.
Names of publ ications and f iles are printed
in italic .
An important note informs you of special
circumstances.
Caution!
Warning!
A caution warns you of possible damage
to equipment or loss of data.
A warning indic at e s th e pos si b ilit y of
personal injury.
iv E-4200 User’s Guide
Page 8

Safety instructions
Observe the following safety instructions when using your system:
Follow all instructions marked on the system and in the
•
documentation.
When the computer is turned off, a small amount of electrical
•
current still runs through the computer. Always unplug the
computer from the electrical outlet before cleaning the system or
opening the computer cover. (Follow the cleaning instructions in
your user’s guide.)
Do not use this product near water or a heat source, such as a
•
radiator or heat register.
Do not spill anything on or into the system. The best way to avoid
•
spills is to avoid eating and drinking near your system.
Make sure you set up the system on a stable work surface.
•
Openings in the computer cabinet are provided for ventilation. Do
•
not block or cover these openings. Make sure you provide adequate
space (at least 12 inches) around the system for ventilation when
you set up your work area. Never insert objects of any kind into the
computer ventilation slots.
Warn ing!
Do not attempt to service
the syst em yo ur sel f except
as explained elsewhere in
the syst em docu me ntat i on.
Adjust only t hose con trols
covered in the instructions.
Opening or removing
covers marked “Do Not
Remov e” ma y e x po se y ou
to dange r ou s el ec tric al
voltages or other risks.
Refer all servicing of those
compartmen t s to qual if i ed
service pe rson ne l.
Use the voltage setting for your area. The voltage selector switch is
•
set at the factory to the correct voltage.
As a safety feature, this system is equipped with a 3-wire power
•
cord to ensure that the product is properly grounded when in use.
The plug will only fit into a grounding-type outlet. If you are
unable to insert the plug into an outlet, contact an electrician to
install the appropriate outlet.
Do not walk on the power cord or allow anything to rest on it.
•
If you use an extension cord with this system, make sure the total
•
ampere ratings on the products plugged into the extension cord do
not exceed the extension cord ampere rating. Also, the total ampere
requirements for all products plugged into the wall outlet must not
exceed 15 amperes.
Preface v
Page 9

There is a danger of explosion if the CMOS (complementary
•
metal-oxide semiconductor) battery is replaced incorrectly.
Replace the battery with the same or equivalent type recommended
by the manufacturer. Dispose of used batteries according to the
manufacturer’s instructions.
Unplug the system from the wall outlet and refer servicing to
•
qualified personnel if:
• The power cord or plug is damaged.
• Liquid has been spilled into the system.
• The system does not operate properly when the operating
instructions are followed.
• The system was dropped or the cabinet is damaged.
• The system’s performance changes.
vi E-4200 User’s Guide
Page 10

Ad ditional inf ormati on sour ces
Along with this manual and your user’s guide, you can find additional
information by using the following sources.
The Gate wa y Support Center
Log on to the Gateway Support Center at www.gateway.com/support to
access information about your system or other Gateway products. Some
types of information you can access are:
Hardware driver (including BIOS) and software
•
application updates
An expanded glossary
•
Technical tips
•
Service Agreement information
•
Technical documents and component information
•
Frequently Asked Questions (FAQ)
•
Online access to Tech Support
•
The Syste m Restoration CD
The System Restoration CD included with your system can be used to:
Restore your Windows 95 or Windows 98 operating system
•
Install hardware drivers for Windows 95, Windows 98, and
•
Windows NT
Reinstall selected software applications, such as LANDesk Client
•
Manager or McAfee Virus Scan
View or install component online documentation
•
Instructions for each operating system are provided with the System
Restoration CD.
Preface vii
Page 11

viii E-4200 User’s Guide
Page 12

Getting Started
Identifying your computer case............................... 2
Setting up your system ............................................ 3
Starting your system................................................ 4
Using power management....................................... 6
Turning off your system.......................................... 8
Resetting your computer ......................................... 9
1
Page 13

Identifying your computer case
Your computer case comes in three models: desktop, mid-tower and tower.
2 E-4200 User’s Guide
Mid-to we r case
Tower case
Desktop case
Page 14

Setting up your system
Follow the instructions on the poster that came with your system for
assembling your system. Before you assemble your system, prepare a safe
working environment for it.
Provide a clean, flat, and stable surface for your system. Allow at
•
least 12 inches at the rear of the computer for cabling and air
circulation.
Obtain a grounded (three-prong) AC surge-protected power strip.
•
A surge-protected power strip helps protect against AC line spikes.
Protect your system from extreme temperature and humidity. Do
•
not expose your system to direct sunlight, heater ducts, or other
heat-generating objects.
Keep your computer away from equipment that generates magnetic
•
fields, such as unshielded stereo speakers. Even a telephone placed
too close to the computer may cause interference.
Plug the computer into a wall outlet or power strip that is easily
•
accessible. When you turn off the computer with the power button,
some electricity still flows through the computer. To remove all
power from the computer, you need to unplug it.
Important!
Keep the product carton
and packing material, in
case y ou nee d t o send th e
system out for repair. If you
return your system to the
factory in different
pac kag in g, y ou r w arranty
may be void.
Caution!
Make su re y ou r comput er
and peri pher a l s are t urned
off and unplugged from the
pow er ou tl et whe n y ou
connect periph erals to the
computer.
Getting Started 3
Page 15

Starting your system
Before you start your system for the first time:
Check that the voltage selector switch on the back of the computer
•
is still set to the correct voltage for your area. This switch is set at
the factory to the correct voltage (see “Rear panel features” on
page 16 for voltage selector switch location).
Make sure all cables are firmly connected to the proper cable ports
•
on the rear panel of the computer.
Make sure the computer and monitor are plugged into an AC outlet
•
or power strip.
To start the system
If you have connected the system components to a power strip, make
1.
sure all the system components are turned off, and then turn on the
power strip.
Press the power button on the monitor to turn on the monitor.
2.
Press the power button on the computer to turn on the computer. The
3.
power light-emitting diode (LED) on the front panel is lit when the
computer’s power is on.
Turn on any other components connected to the computer, such as
4.
speakers, a printer, or a scanner.
If nothing happens when you turn on the system:
5.
Recheck the power cables to see that they are securely plugged in
•
and that your power strip (if you are using one) is plugged in and
turned on.
Make sure the monitor is connected to the computer, plugged into
•
the power strip or AC outlet, and turned on. You may also need to
adjust the brightness and contrast controls on the monitor.
4 E-4200 User’s Guide
Page 16

Wait until the startup procedure is finished before loading a diskette in the
diskette drive, or the computer may search the diskette for startup
information.
For more troubleshooting information, see the “Troubleshooting” chapter in
Maintaining and Troubleshooting Your E-4200 System.
Understanding the P ower-On Self-Test
When you turn on your computer, the power-on self-test (POST) routine
checks the system memory and components. To see this information on the
screen, press T
memory count.
The system displays an error message if POST finds any problems. Write
down the error message that appears. See the “Troubleshooting” chapter of
Maintaining and Troubleshooting Your E-4200 System for a description of
error messages.
AB during POST. Press ESC to bypass the remaining
Completi ng the operating system setup
The first time you start your computer, the operating system takes a few
minutes to set up.
Refer to your software documentation for specific instructions on what to
do after the computer starts.
To complete the operating system setup
After the computer starts, start-up wizard opens. Click Next to
1.
continue.
Type the requested information in the appropriate text boxes. When
2.
you have finished entering the information, click Next.
At the screen prompting you to enter your product number, refer to the
3.
Certificate of Authenticity located on the front cover of your Windows
manual.
Getting Started 5
Page 17

Continue following the instructions and selecting options in the
4.
start-up wizard dialog boxes, clicking Next to move through the dialog
boxes until the wizard tells you to restart your computer.
Most of the dialog boxes that open in the start-up wizard have a button
that takes you back to previous dialog boxes in case you need to
change or correct the information you typed.
Restart your system. The setup is complete.
5.
Using power management
The Windows 95 and Windows 98 operating systems (together with a
supporting system board and BIOS capabilities) provide many power
saving options. You can set when you want to have the hard drive spin
down, if the monitor should go into a lowered power state, and other
options.
Consult your Windows Help or operating system documentation for more
information about using power management.
6 E-4200 User’s Guide
Page 18

Using Suspend Mode
Suspend, available in Windows 95, is a power management feature that lets
you leave your computer on in a power-saving mode. When your computer
is in Suspend, it appears to be off. However, it continues to receive incoming
faxes and perform automatic tasks you have scheduled. When you exit
Suspend, the computer returns to the state it was in without going through
the normal startup routine.
To put your system into Suspend
Save and close any open files to prevent data loss in the event of a
1.
power failure.
Click Start, and then click Suspend on the Start menu.
2.
The power LED turns amber and the monitor becomes dark,
3.
indicating that the computer has entered Suspend mode.
Important!
If you r sys tem is part of a
Microsoft network, putting
your computer in sleep
mode doe s not di sc on ne ct
you from your network
connection.
To take your system out of Suspend
Press any key on the keyboard or move the mouse.
1.
The power LED turns green, and your computer returns to the state it
2.
was in before it entered Suspend. However, if your system is part of a
Novell network, putting your computer in Suspend disconnects you
from your network connection. To reestablish your network
connection:
Click Start and then click Shut Down.
A.
From the
B.
on as a different user
process and displays your network logon dialog box.
Enter your password and click OK. Your logon script runs and your
C.
network connections are reestablished.
Shutdown Windows options, select Close all programs and log
. Selecting that option bypasses the restart
Important!
If yo u ha ve a Nove ll
networ k an d y ou pu t y our
system in Su spe nd m ode , it
will disconnect from the
network.
Getting Started 7
Page 19

Warning!
When y ou turn th e
computer off by pressing
the power button, some
electric current still flows
through the computer.
Bef o re op eni n g th e
comput er cas e or
connect ing or remov ing an y
periph erals, turn off the
comput er an d t hen unpl ug
the power cord from the
elect ric al out l et .
Turning off your system
Every time you turn off your system, shut down the operating system first.
You may lose data if you do not follow the proper procedure.
To turn off your system in Windows 95
On the Taskbar, click Start.
1.
Click Shut Down.
2.
Select Shut down the computer?
3.
Click Yes . The computer turns off.
4.
Turn off the monitor and peripherals.
5.
To turn off your system in Windows NT and Windows 98
On the Taskbar, click Start.
1.
Click Shut Down (Windows 98) or Shut down the computer? (Windows
2.
NT).
Select Shut Down.
3.
Click OK. The computer turns off. If you see a message saying It is now
4.
safe to turn off your computer
(Windows NT only), press your computer’s
power button to turn off the computer.
Turn off the monitor and peripherals.
5.
8 E-4200 User’s Guide
Page 20

Resetting your computer
If your computer does not respond to keyboard or mouse input, you may
have to close a program or programs that may not be responding. If closing
nonresponsive programs does not restore your computer to normal
operation, you may have to reset the system.
To reset your system in Windows 95 or Windows 98
Press CTRL+ALT+DEL. A window opens that enables you to close a
1.
program that is not responding.
Highlight a program that displays a not-responding message and click
2.
End Task. Follow any additional screen prompts to close the program.
If the computer does not respond, press and hold the power button for
3.
5 seconds.
The power indicator light turns off, indicating that the computer is
4.
turned off.
Important!
The r eset op tio n is a v ail abl e
on the Tower computer only.
Press and release the power button again to turn on the system.
5.
After displaying some of the startup screens, a message appears
6.
asking if you would like to run ScanDisk.
Press any key to run ScanDisk. Follow the on-screen instructions.
7.
When the checks are finished, Windows will start.
To reset your system in Windows NT
Press CTRL+ALT+DEL. A window opens that enables you to close a
1.
program that is not responding.
Click Task Manager, select the program that is not responding, and click
2.
End Task.
If the computer does not respond, press and hold the power button for
3.
5 seconds.
Getting Started 9
Page 21

The power indicator light turns off, indicating that the computer is
4.
turned off.
Press and release the power button again to turn on the system.
5.
As a part of the regular startup process, a program to check the disk
6.
status will automatically run. When the checks are finished, Windows
will start.
10 E-4200 User’s Guide
Page 22

2
Chapter 1:
System Features
Standard features ................................................... 12
Front panel features............................................... 13
Rear panel features ................................................ 16
Page 23

Standard features
The following features are standard in the E-4200 system:
Intel® Pentium® II processor
•
Three DIMM sockets that support up to 384 megabytes (MB) of
•
Synchronous Dynamic Random Access Memory (SDRAM)
512K of L2 cache
•
LM81 management
•
Intel 440 BX chipset
•
Three PCI slots, one shared PCI/ISA slot, and one ISA slot
•
1.44-MB 3.5-inch diskette drive
•
PIIX4E controller
•
Keyboard port, mouse port, two serial ports, parallel port, and two
•
USB ports
Phoenix BIOS
•
200-watt power supply
•
10/100 Mbit per second Ethernet network support
•
AGP video with Synchronous Graphic Random Access Memory
•
(SGRAM)
12 E-4200 User’s Guide
Page 24

Front panel features
The following front panel features are included with your desktop,
mid-tower, and tower computers.
Desktop fro nt panel
The desktop front panel includes the following features:
Audio-out
jack
CD-R OM dr ive Disk ett e ej ec t
CD-ROM
volume control
CD-ROM
eject but ton
Diskette
drive
button
Hard
drive LED
Power
LED
Power button
Audio-out jack: Connects headphones or powered speakers that
enable you to listen to an audio CD (directly from the CD-ROM
drive).
CD-ROM eject button: Ejects a CD from the CD-ROM drive.
Hard drive LED: Lights when the hard drive is active.
Power LED: Lights when the computer is turned on. The green light
indicates your computer is using full power. The amber light indicates
your computer is in low power mode.
Power button: Turns the computer on and off.
Diskette eject button: Ejects diskettes from the diskette drive.
Diskette drive: Writes to and reads from 3.5-inch, 1.44 MB diskettes.
CD-ROM volume control: Controls the volume of an audio CD.
CD-ROM drive: Plays data or audio CDs.
System Features 13
Page 25

Mid-tow er front panel
The mid-tower case front panel includes the following features:
CD-ROM
vol ume con t rol
Audio-out jack
CD-ROM drive
CD-ROM
eject button
Diskette drive
Hard drive LED
Diskette eject
button
Power LED
Power button
CD-ROM drive: Plays data or audio CDs.
CD-ROM eject button: Ejects a CD from the CD-ROM drive.
Diskette eject button: Ejects diskettes from the diskette drive.
Power LED: Lights when the computer is turned on. The green light
indicates your computer is using full power. The amber light indicates
your computer is in low power mode.
Power button: Turns the computer on and off.
Hard drive LED: Lights when the hard drive is active.
Diskette drive: Writes to and reads from 3.5-inch, 1.44 MB diskettes.
14 E-4200 User’s Guide
Page 26

Audio-out jack: Connects headphones or powered speakers that
enable you to listen to an audio CD (directly from the CD-ROM
drive).
CD-ROM volume control: Controls the volume of an audio CD.
Tow er front panel
The tower case front panel includes the following features:
CD-R OM dr iv e
Audio-out jack
CD-ROM
volu me co ntr ol
Disk et te dr iv e
Reset button
(tower only)
CD-ROM
eject b u tt o n
Disk et t e ej ec t
button
Power button
Power LED
Hard dri v e LED
CD-ROM eject button: Ejects a CD from the CD-ROM drive.
Diskette eject button: Ejects diskettes from the diskette drive.
Power button: Turns the computer on and off.
Power LED: Lights when the computer is turned on. The green light
indicates your computer is using full power. The amber light indicates
your computer is in low power mode.
System Features 15
Page 27

Hard drive LED: Lights when the hard drive is active.
Reset button: Restarts the system.
Diskette drive: Writes to and reads from 3.5-inch, 1.44 MB diskettes.
CD-ROM volume control: Controls the volume of an audio CD.
Audio-out jack: Connects headphones or powered speakers that
enable you to listen to an audio CD (directly from the CD-ROM
drive).
CD-ROM drive: Plays data or audio CDs.
Rear panel features
The following rear panel features are included with your desktop,
mid-tower, and tower computers.
Desktop re ar panel
The desktop case rear panel includes the following I/O ports, connectors,
and switches:
USB
ports
Ke yboard
port
Serial
port A
Serial
port B
Video port
RJ-45 LAN
connector
Voltage
selector
Power
connector
Mouse
port
Power Connector: Connects the computer power cord. The other end
of the power cord plugs into an AC outlet or power strip.
16 E-4200 User’s Guide
Page 28

USB ports: Connect external Plug-and-Play devices that are
automatically configured when they are plugged into the computer
through one of these ports. Some USB devices are keyboards,
pointing devices, and monitors.
Video port: Connects the monitor’s interface cable.
RJ-45 LAN connector: Connects a cable that connects the computer
to a network.
Serial ports: Connect serial devices, such as musical instrument
digital interface (MIDI) devices.
Keyboard port: Connects a Personal System/2 (PS/2) compatible
keyboard.
Mouse port: Connects a PS/2-compatible mouse.
Parallel port: Connects a printer or other parallel device.
Voltage selector: Sets the voltage for your area, either 115 V or 230 V.
System Features 17
Page 29

Mid-tow er rear panel
The mid-tower case rear panel includes the following I/O ports, connectors,
and switches:
Voltage
selector
Power
Connector
Keyboard
port
USB ports
Mouse port
Serial port A
Serial port B
RJ-45 L AN
connector
Parallel port
Vide o po rt
Mouse port: Connects a PS/2-compatible mouse.
Parallel port: Connects a printer or other parallel device.
Video port: Connects the monitor’s interface cable.
RJ-45 LAN connector: Connects a cable that connects the computer
to a network.
Serial ports: Connect serial devices, such as musical instrument
digital interface (MIDI) devices.
18 E-4200 User’s Guide
Page 30

USB ports: Connect external Plug-and-Play devices that are
automatically configured when they are plugged into the computer
through one of these ports. Some USB devices are keyboards,
pointing devices, and monitors.
Keyboard port: Connects a Personal System/2 (PS/2) compatible
keyboard.
Power Connector: Connects the computer power cord. The other end
of the power cord plugs into an AC outlet or power strip.
Voltage selector: Sets the voltage for your area, either 115 V or 230 V.
Tow er rear panel
The tower case rear panel includes the following I/O ports, connectors, and
switches:
Voltag e
select or
Ke yboa r d po rt
USB ports
Serial po rt A
Serial po rt B
RJ-45 LA N
connector
Power
Connector
Mouse po rt
Pa ra ll el po rt
Video port
System Features 19
Page 31

Voltage selector: Sets the voltage for your area, either 115 V or 230 V.
Power Connector: Connects the computer power cord. The other end
of the power cord plugs into an AC outlet or power strip.
Mouse port: Connects a PS/2-compatible mouse.
Parallel port: Connects a printer or other parallel device.
Video port: Connects the monitor’s interface cable.
RJ-45 LAN connector: Connects a cable that connects the computer
to a network.
Serial ports: Connect serial devices, such as musical instrument
digital interface (MIDI) devices.
USB ports: Connect external Plug-and-Play devices that are
automatically configured when they are plugged into the computer
through one of these ports. Some USB devices are keyboards,
pointing devices, and monitors.
Keyboard port: Connects a Personal System/2 (PS/2) compatible
keyboard.
20 E-4200 User’s Guide
Page 32

3
Maintaining and
Cleaning Your
System
Maintaining your system....................................... 22
Cleaning your system............................................ 23
Page 33

Maintaining your system
Your system and its components need regular maintenance. Some programs
that help maintain the integrity of the hard disks in your system come as
part of your operating system. The following sections contain information
about maintaining your system.
Maintai ning the hard disk
Hard disks need regular maintenance because running the system software
divides files, creates spaces between data, and otherwise decreases hard
disk performance. Windows 95 and Windows 98 provide maintenance tools
that help prevent possible hard disk problems. The two most important tools
for hard disk maintenance are the programs ScanDisk and Disk
Defragmenter. Windows NT has a similar maintenance tool called Check
Disk. To use these programs, consult your Windows Help or the operating
system documentation.
Hard disk partition information
The hard drive shipped with your Windows 95 or Windows 98 system is
partitioned using file allocation table (FAT) 32.
The first 2 gigabytes (GB) of the hard drive shipped with your Windows
NT system are partitioned as FAT16. The rest of the space on the drive is
partitioned as NT file system (NTFS). Any other hard drives shipped from
the factory with your system are partitioned as NTFS.
FAT16, FAT32, and NTFS are different methods the operating system uses
to locate files on a hard drive. NTFS supports large drive sizes, but NTFS
partitions cannot be viewed with Microsoft® disk operating system
(MS-DOS®) diagnostic utilities, like fdisk. See your Windows NT manual
for more information on NTFS.
22 E-4200 User’s Guide
Page 34

Installi ng LANDesk Client M anager
Intel’s LANDesk Client Manager is the Desktop Management Interface
(DMI) solution that is already loaded on your system. LANDesk Client
Manager lets you monitor your system for critical situations that may need
your attention. It also lets your system administrator remotely inventory and
manage systems on your network.
To install LANDesk Client Manager
In the C:\DMI folder, double-click the Setup icon to launch the
1.
®
InstallShield
Follow the instructions that appear on your screen. If you are prompted
2.
for a password during the installation process, enter LOWTCO.
LANDesk Client Manager comes with complete electronic documentation
and online help. Refer to these documents and Help for any LANDesk
concerns.
wizard.
Cleaning your system
Your system needs to be cleaned occasionally. The following sections
contain information about caring for the parts of your system.
Cleaning t he mouse
If the mouse pointer on the screen moves erratically when you move the
mouse, dirt is probably on the rollers inside the mouse.
To clean the mouse
Turn off the computer.
1.
Turn your mouse upside down and remove the mouse ball cover.
2.
Maintaining and Cleaning Your System 23
Page 35

Cup your hand under the mouse and turn your mouse right-side up.
3.
The mouse ball should drop into your hand. If it does not, gently shake
the mouse until the ball drops out of the socket.
Once the mouse ball is free, use adhesive tape to pick up any dust or
4.
lint on its surface and wipe away dirt or lint inside the ball socket. You
can also blow into the socket to remove dirt and lint.
If foreign matter is trapped inside the socket or on the rollers, use a
cotton swab dipped in isopropyl alcohol to loosen it. Let surfaces dry
completely after cleaning.
Return the mouse ball to the socket and replace the cover.
5.
Cleaning t he key board
You should clean the keyboard occasionally to remove dust and lint
particles trapped under the keys. The easiest way to do this is to blow
trapped dirt from under the keys using an aerosol can of air with a narrow,
straw-like extension.
If you spill liquid on the keyboard, turn off the computer and disconnect the
keyboard. Turn the keyboard upside down to let the liquid drain out
overnight before trying to use it again. If it fails to work after draining,
contact Technical Support.
Cleaning t he monitor screen
Use a soft cloth and window cleaner to clean the monitor screen. Squirt a
little cleaner on the cloth (never directly on the screen), and wipe the screen
with the cloth.
Cleaning t he computer and monitor cases
Always turn off the computer and other peripherals before cleaning any
components.
Use a damp lint-free cloth to clean the computer case, monitor case,
keyboard, speakers, and other parts of your system. Avoid abrasive or
solvent cleaners because they can damage the finish on your components.
24 E-4200 User’s Guide
Page 36

Protecting against viruses
A virus is a program written with malicious intent for the purpose of
creating havoc in a computer system. It attaches itself to executable files or
boot sectors, so it can replicate and spread. Some viruses may only cause
your system to beep or display messages or images on the screen. Other
viruses are highly destructive and corrupt or erase the contents of your files
or diskettes. To be safe, never assume any virus is harmless.
Viruses spread through direct contact with executable programs or boot
sectors. Diskettes used in a contaminated system get a virus and transfer the
virus when used in another system. A virus can also spread through
programs downloaded from bulletin boards or the Internet.
To protect your system against viruses
Obtain an antivirus program and scan your system regularly.
•
Make backup copies of all files and write-protect the diskettes.
•
Obtain all software from reputable sources and always scan new
•
software for any viruses before installing files.
If you suspect your system has been infected, find and remove the viruses
immediately using an antivirus program. Next, turn your system off and
leave it off for at least 15 seconds before turning it back on. This is the only
way to ensure the virus does not remain in your system RAM.
Maintaining and Cleaning Your System 25
Page 37

Appendix
Acronyms and abbreviations................................. 27
Terms and definitions............................................ 29
Regulatory compliance statements....................... 32
A
Page 38

Acron yms and abbreviations
ASIC - Application specific integrated circuit
BIOS - Basic input/output system
CMOS - Complementary metal-oxide semiconductor
DIMM - Dual inline memory module
DMI - Desktop management interface
DRAM - Dynamic random access memory
ECC - Error correcting code
FAT - File allocation table
GB - Gigabyte
IDE - Integrated drive electronics
IRQ - Interrupt request line
ISA - Industry standard architecture
LAN - Local area network
LED - Light-emitting diode
MB - Megabyte
Mbps - Megabits per second
MIDI - Musical instrument digital interface
MHz - Megahertz
MS-DOS - Microsoft disk operating system
NTFS - NT file system
POST - Power-on self-test
PS/2 - Personal System/2
RAM - Random-access memory
Appendix 27
Page 39

ROM - Read-only memory
SCSI - Small computer system interface
SDRAM - Synchronous dynamic random access memory
TCP/IP - Transmission control protocol/Internet protocol
V - Volt
28 E-4200 User’s Guide
Page 40

T erms and definitions
This list of terms should help you get acquainted with terms used in your
computer’s documentation and in your system software.
Applications - Software installed on your system. Sometimes called
programs.
BIOS - Basic input/output system. The BIOS is software that is
independent of any operating system. It enables the computer to
communicate with the monitor, keyboard, and other peripheral devices
without using programs on the hard disk.
The BIOS on your computer is flash BIOS, which means that is has been
recorded on a memory chip that can be updated if needed.
Boot - To load the first software program (usually the operating system)
that starts your computer. To perform a cold (or hard) boot, you turn the
computer on when it is off. To perform a warm (or soft) boot, you reset the
computer when it is already turned on.
Boot disk - A disk containing operating system programs required to start
your computer. A boot disk can be a diskette, hard drive, or CD.
Byte - The basic unit of measure for computer memory. A character, such
as a letter of the alphabet, uses one byte of memory. Each byte is made up
of eight bits. Computer memory is often measured in kilobytes (1,024
bytes) or megabytes (1,048,576 bytes).
Cache memory - Cache is very fast memory that can be located in the
processor. Cache reduces the average time required for the processor to get
the data it needs from the main memory by storing recently accessed data in
the cache.
CMOS memory - Complementary metal oxide semiconductor memory.
CMOS memory is memory that is retained even when the computer is
turned off. The Setup program settings and other parameters are maintained
in CMOS memory.
Default - The option that the software or system uses when you have not
made a choice yourself.
Disc - A compact disc (CD).
Appendix 29
Page 41

Disk - The device used by the computer to store and retrieve information.
Disk can refer to a diskette or a hard disk.
Diskette - A removable disk, also called a floppy.
Hard drive - The drive installed inside your computer that stores all your
system and data files. Depending on its configuration, the computer may
have more than one hard drive. Each drive is assigned its own drive letter. If
you have only one drive, its drive letter is C, and it is often called “the C
drive.”
I/O - Input/output. Refers to devices, such as printers, whose purpose is to
enter data into a computer or extract data from a computer. An I/O device is
accessed through an I/O address: a location in memory reserved for the
device to exchange information between itself and the rest of the computer.
IRQ - Interrupt request line. The IRQ is a hardware line that a device uses
to signal the processor when the device needs the processor’s services. The
number of IRQs is limited by industry standards.
Operating system - A program that supervises the computer’s operation,
including handling I/O, networking and connectivity, and device drivers.
Path - A sequence of information that directs the system to the file it needs.
For example, c:\windows\bubbles.bmp is the path to a graphics file on
your system. The c: tells the system it is on the C hard drive, the \windows
tells the system it is in the windows folder, and bubbles.bmp is the file.
Pixel - A pixel is an individual dot in a graphic displayed on your computer.
Pixels are so close together that they look as though they are connected.
POST - Power-on self-test. POST tests your computer’s components
whenever you turn on the computer.
Programs - Software installed on your system. Programs are sometimes
called applications.
RAM - Random access memory. RAM is the computer’s system memory.
You can write to and read from RAM. Information stored in RAM is
temporary and is erased when the computer is turned off.
30 E-4200 User’s Guide
Page 42

Refresh rate - The refresh rate is the rate at which the image on the monitor
screen is rewritten to the screen. A fast refresh rate helps keep the image
from flickering.
Resolution - The resolution is the sharpness or clarity of the image on the
monitor screen. Resolution is measured by the number of pixels the screen
can display. For example, a resolution of 800x600 means that the screen can
display 800 pixels in a row and can display 600 rows. The more pixels
displayed, the higher the resolution and the clearer the images.
ROM - Read-only memory. Permanent computer memory dedicated to a
particular function. For example, the instructions for starting the computer
when you first turn on power are contained in ROM. You cannot write to
ROM.
Appendix 31
Page 43

Regulatory compliance st atements
Americ an Us ers:
Caution!
The Federal
Comm unications
Commissi o n warns the
users that changes or
modifications to the unit not
expressly approved by the
party responsible for
compliance could void the
user’s authority to operate
the eq ui pment .
This device has been tested and found to comply with the limits for a Class B
digital device, pursuant to Part 15 of the FCC rules. These limits are designed to
provide reasonable protection against harmful interference in a residential
installation. This equipment generates, uses and can radiate radio frequency energy
and, if not installed and used in accordance with the instructions, may cause
harmful interference to radio or television reception. However, there is no
guarantee that interference will not occur in a particular installation. If this
equipment does cause interference to radio and television reception, which can be
determined by turning the equipment off and on, the user is encouraged to try to
correct the interference by one or more of the following measures:
Reorient or relocate the receiving antenna
•
Increase the separation between the equipment and receiver
•
Connect the equipment into an outlet on a circuit different from
•
that to which the receiver is connected
Consult the dealer or an experienced radio/TV technician for help.
•
Accessories: This equipment has been tested and found to comply with the limits
of a Class B digital device. The accessories associated with this equipment are as
follows:
Canadian Users:
Shielded video cable
•
Shielded power cord.
•
These accessories are required to be used in order to ensure compliance with FCC
rules.
This digital apparatus does not exceed the Class B limits for radio noise emissions
from digital apparatus as set out in the radio interference regulations of Industry
Canada.
Le présent appareil numérique n’émet pas de bruits radioélectriques dépassant les
limites applicables aux appareils numériques de Classe B prescrites dans le
règlement sur le brouillage radioélectrique édicté par Industrie Canada.
Attention!
Couper le courant avant l’entretien.
32 E-4200 User’s Guide
Page 44

This Information Technology Equipment has been tested and found to comply with
the following European directives:
[i]EMC Directive 89/336/EEC amending directive 92/31/EEC & 93/68/EEC as per
- EN 50081-1:1992 according to
EN 55022:1995 Class B
EN 61000-3-2:1995 or EN 60555-2:1986
EN 61000-3-3: 1995
- EN50082-1:1992 according to
EN 61000-4-2:1995 or IEC 801-2:1984
ENV 50140:1994 or IEC 801-3:1984
EN 61000-4-4:1988 or IEC 801-4:1998
[ii]Low Voltage Directive (Safety) 73/23/EEC as per EN 60950: 1992
Europe an U se rs:
This equipment is in the Class 2 category (Information Technology Equipment to
be used in a residential area or an adjacent area thereto) and conforms to the
standards set by the Voluntary Control Council for Interference by Information
Technology Equipment aimed at preventing radio interference in such residential
area.
When used near a radio or TV receiver, it may become the cause of radio
interference. Read instructions for correct handling.
This device has been tested and found to comply with the limits for a Class B
digital device, pursuant to the Australian/New Zealand standard AS/NZS 3548 set
out by the Spectrum Management Agency.
Caution!
Disconnect po wer bef ore servicing.
Japanese Users:
Aus tr al ia n an d Ne w
Zealand Users:
Appendix 33
Page 45

34 E-4200 User’s Guide
Page 46

Index
A
abbreviations 27
C
Check Disk 22
D
definitions of terms 29
Disk Defragmenter 22
F
FAQ, accessing vii
features
front panel 13
rear panel 16
standard 12
front panel features 13
desktop 13
mid-tower 14
tower 15
G
glossary
terms and definitions 29
glossary, accessing on Internet vii
H
hard disk
maintaining 22
partitioning 22
I
installing
LANDesk Client Manager 23
K
keyboard
cleaning 24
L
LANDesk client manager
entering password 23
installing 23
M
manual conventions iv
monitor
adjusting 4
cleaning 24
mouse 17
cleaning 23
O
operating system, setup 5
P
POST (power-on self-test)
explained 5
power
button 4
LED (light-emitting diode) 4
Power management
for Windows 7
Suspend mode 7
R
rear panel features 16
desktop 16
mid-tower 18
tower 19
resetting your system 9
S
safety guidelines v
ScanDisk 22
setting up, operating system 5
shut-down procedures 8
standard features 12
starting your system 4
system
cleaning 23
starting 4
turning off 8
35
Page 47

virus information 25
system board features 20
T
turning off your system
Windows 95 8
Windows 98 8
Windows NT 8
W
Windows 95
setup 5
shut-down procedures 8
Windows 98
setup 5
shut-down procedures 8
Windows NT
setup 5
shut-down procedures 8
36 E-4200 User’s Guide
Page 48

 Loading...