

Page 1
Game Experience May Change
During Online Play.
Page 2
[170]
™
PRIMA OFFICIAL GAME GUIDE
F.E.A.R. COMBAT
BRIEF DESCRIPTION:
F.E.A.R. Combat
is the complete multiplayer component of
F.E.A.R. (First Encounter Assault Recon)
.
F.E.A.R. Combat
includes all the updates, all the new official maps and
new official modes released for F.E.A.R. multiplayer in one
free downloadable file.
F.E.A.R. Combat
users will be able
to play against the owners of the retail version of
F.E.A.R.
as well as other
F.E.A.R. Combat
users. To play, simply
visit www.joinfear.com to download the file and register
for a free Combat keycode.
Features include:
• 10 Multiplayer Game Modes
• 19 Multiplayer Maps
• 12 different weapons
• Punkbuster™ anti-cheat support
• The capability to download user generated content
MULTIPLAYER MODES:
Deathmatch (DM): Deathmatch is a free for all, where it’s
every man for himself.
Slowmo Deathmatch (SDM): Slowmo Deathmatch is a
version of Deathmatch with the exception that there is a
slowmo hypo that any player can obtain. Once the power up
is fully charged, that player can slow the whole game down
and utilize the speed advantage given by the power up.
Team Deathmatch (TDM): Team Deathmatch is a team based
free for all, where the only goal is to kill as many of the other
team as possible.
Slowmo Team Deathmatch (STDM): Slowmo Team
Deathmatch is the slowmo version of Team Deathmatch,
with the exception that there is a slowmo hypo that any
player can obtain for their team. Once the power up is fully
charged, that player can slow the whole game down and
utilize the speed advantage for their whole team.
Elimination (ELM): Elimination is game of last man
standing. Every player starts with one life and must fight to
be the last man standing in order to win.
Team Elimination (TELM): Team Elimination is the team
based version of Elimination, where one team must
eliminate the other in order to win.
Capture the Flag (CTF): Capture the Flag is a team based
mode, where each team’s objective is to capture the other
team’s flags. The team with the most flag caps at the end of
the round will win.
Slowmo Capture the Flag (SCTF): Slowmo Capture the Flag
is a version of CTF with the exception that there is a slowmo
hypo that any player can obtain for their team. Once
charged and activated one team will be able to utilize the
speed advantage given when the whole game is running in
slowmo, giving many strategic advantages for that team.
Conquer All (CA): Is a form of Capture and Hold, where Two
teams compete for three Control Points. Teams earn points
for each Control Point they hold. To win, your team must
reach the score limit before enemy team or have the highest
score when the time limit expires.
Control (CON): Control is also a form of Capture and Hold,
but with a slightly different scoring system. Two teams
compete for five Control Points. Team points are earned for
neutralizing or capturing a Control Point as well as killing
enemy players. To win, your team must capture all five
Control Points, reach the score limit before enemy team
does, or have the highest score when the time limit expires.
Multiplayer Maps
(Map-Available Modes);
Asylum - DM, SDM, TDM, STDM, ELM, TELM, CON
Cafeteria - DM, SDM, TDM, STDM, ELM, TELM, CON
Campus - DM, SDM, TDM, STDM, ELM, TELM, CON
Construction - DM, SDM, TDM, STDM, ELM, TELM, CON
Dead Wood - CTF, SCTF, CA
Depot - CTF, SCTF, CA
Docks - DM, SDM, TDM, STDM, ELM, TELM, CON
Evacuation - DM, SDM, TDM, STDM, ELM, TELM, CON
Facility - CTF, SCTF, CA
Factory - DM, SDM, TDM, STDM, ELM, TELM, CON
Heliport - CTF, SCTF, CA
High Tech - DM, SDM, TDM, STDM, ELM, TELM, CON
Labs - CTF, SCTF, CA
Office - DM, SDM, TDM, STDM, ELM, TELM, CON
Refinery - DM, SDM, TDM, STDM, ELM, TELM, CON
SpillKill - CTF, SCTF, CA
Stockpile - DM, SDM, TDM, STDM, ELM, TELM, CON
Streets - CTF, SCTF, CA
Waterworks - DM, SDM, TDM, STDM, ELM, TELM, CON
Page 3
[171]
PRIMAGAMES.COM
MULTIPLAYER MAYHEM
UN-SAFETY IN NUMBERS
In addition to its chilling single-player game, F.E.A.R.
features a full online multiplayer mode with a variety of
game types that will test seasoned first-person shooter
fans, as well as welcome newcomers into the fold. The
online game is composed of 10 different maps, several of
which can be used in the different game types, with all
maps based on locations from the single-player game.
GAME TYPES
When you host a game, you can select the type of game
you wish to play, such as Capture the Flag or Deathmatch.
When other players log on to the servers, they see the
types of games in the on-screen list and can decide which
match to participate in. There are eight online game types:
• Deathmatch
• Slo-Mo Deathmatch
• Team Deathmatch
• Slo-Mo Team Deathmatch
• Capture the Flag (CTF)
• Slo-Mo Capture the Flag (SMCTF)
• Elimination
• Team Elimination
Deathmatch/Slo-Mo Deathmatch
Deathmatch rounds are free-for-all carnage calls where
players rush for the best weapons, seek out the best
vantage points, and try to rack up the most kills before
the timer runs out. Slo-Mo Deathmatch rounds add a
Slo-mo Recharge to the map, which can be held by only
a single player at a time. When the player holding the
Slo-mo Recharge is neutralized, the Slo-mo Recharge falls
to the ground and can be picked up by another player.
While having access to slo-mo puts you at an advantage
over other players, with only one Slo-mo Recharge in play,
there is no better way to paint a target on your back.
Available Maps
• Campus
• Construction
• Docks
• Evacuation
• Factory
• High Tech
• Office
• Refinery
Hosting a Deathmatch game? Consider making it a
melee-only match, where players put down their guns
and settle things like the gentlemen of yesteryear.
Team Deathmatch/
Slo-Mo Team Deathmatch
Team Deathmatch divides the players into two factions, so
instead of engaging in every-man-for-himself combat, you kill
for the greater good of your team. When the time limit
expires, the team with the most kills wins. Turning on friendly
fire is an option in Team Deathmatch; every time you pop a
teammate, your team loses points. In the slo-mo variation of
this game type, a Slo-mo Recharge enables participants to
use slo-mo to pull off some pretty amazing moves.
Available Maps
• Campus
• Construction
• Docks
• Evacuation
• Factory
• High Tech
• Office
• Refinery
Protected by copyright. Unauthorized or unlawful copying or downloading expressly prohibited.
Page 4
[172]
™
PRIMA OFFICIAL GAME GUIDE
Capture the Flag/
Slo-Mo Capture the Flag
Capture the Flag (CTF) games again divide all players into
two camps. Each team has a flag, which must be
protected at all costs. The goal is to cross the map and
take possession of your opponents’ flag (simply touch the
flag to acquire it) and then return it to your flag to score a
point. There are options for limiting the number of
captured flags required for a victory, as well as a sudden
death mode, should the time limit expire when the score
is tied. The slo-mo version of this game introduces a
Slo-mo Recharge to the mix.
Available Maps
• Facility
• Streets
Elimination/Team Elimination
Elimination rounds are last-man-standing affairs, where
players must focus on survival, because getting shot
takes you out of the game. Daredevil tactics can be
employed to great fanfare in this game type, but heroics
that get you killed result only in a personal loss. The team
variation of this game splits the players into two factions.
Available Maps
• Campus
• Construction
• Docks
• Evacuation
• Factory
• High Tech
• Office
• Refinery
Weapon Select
When you host an online match, you can decide which
types of weapons players can use. When players join the
game, they choose their base weapon, which they always
carry after they spawn. These are the default available
weapons—notice the lack of hardware such as the Type-7
Particle Weapon. Put something like that in regular
rotation and nobody will even bother with weapons such
as pistols.
• AT-14 Pistols
• RPL Sub-Machinegun
• VK-12 Combat Shotgun
• G2A2 Assault Rifle
• 10mm HV Penetrator
• ASP Rifle
Chat
Players have the option of chatting while playing an online
game. To open a dialogue and speak to all game participants, press t. You can then type out a quick message
on the keyboard and send it by pressing the return key .
While this is a good way to identify friends and have fun
with a little trash-talk, remember that while typing your
message, you’re a sitting duck. Every single player can
see you standing there, so don’t write a novella. And
because you never know who you are playing with, try
to keep it clean—nobody likes playing with somebody
who acts like he just learned how to curse.
Protected by copyright. Unauthorized or unlawful copying or downloading expressly prohibited.
Page 5
[173]
PRIMAGAMES.COM
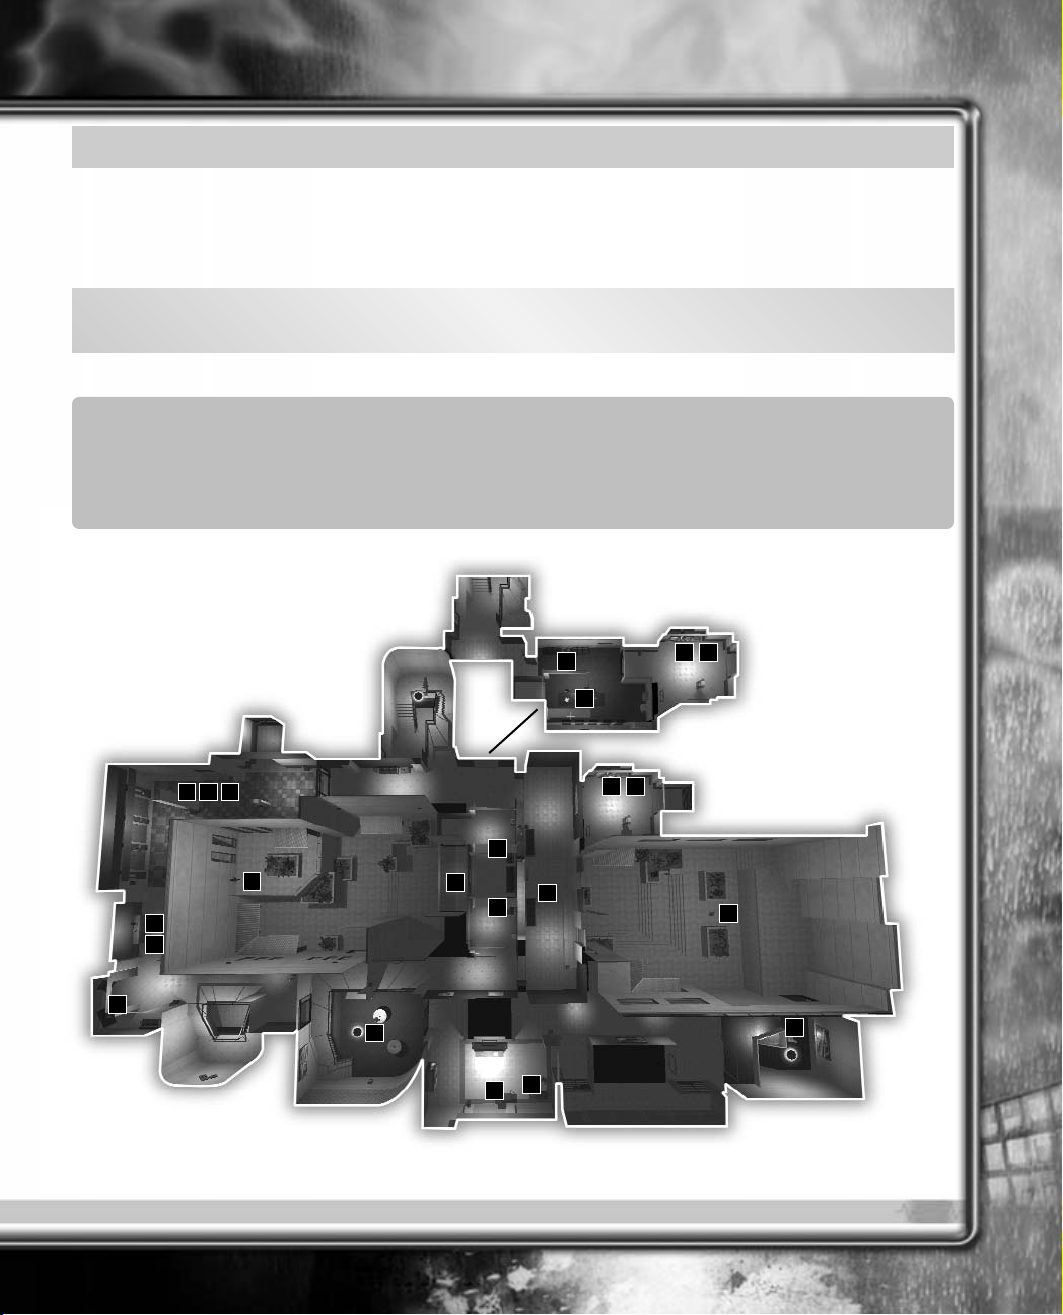
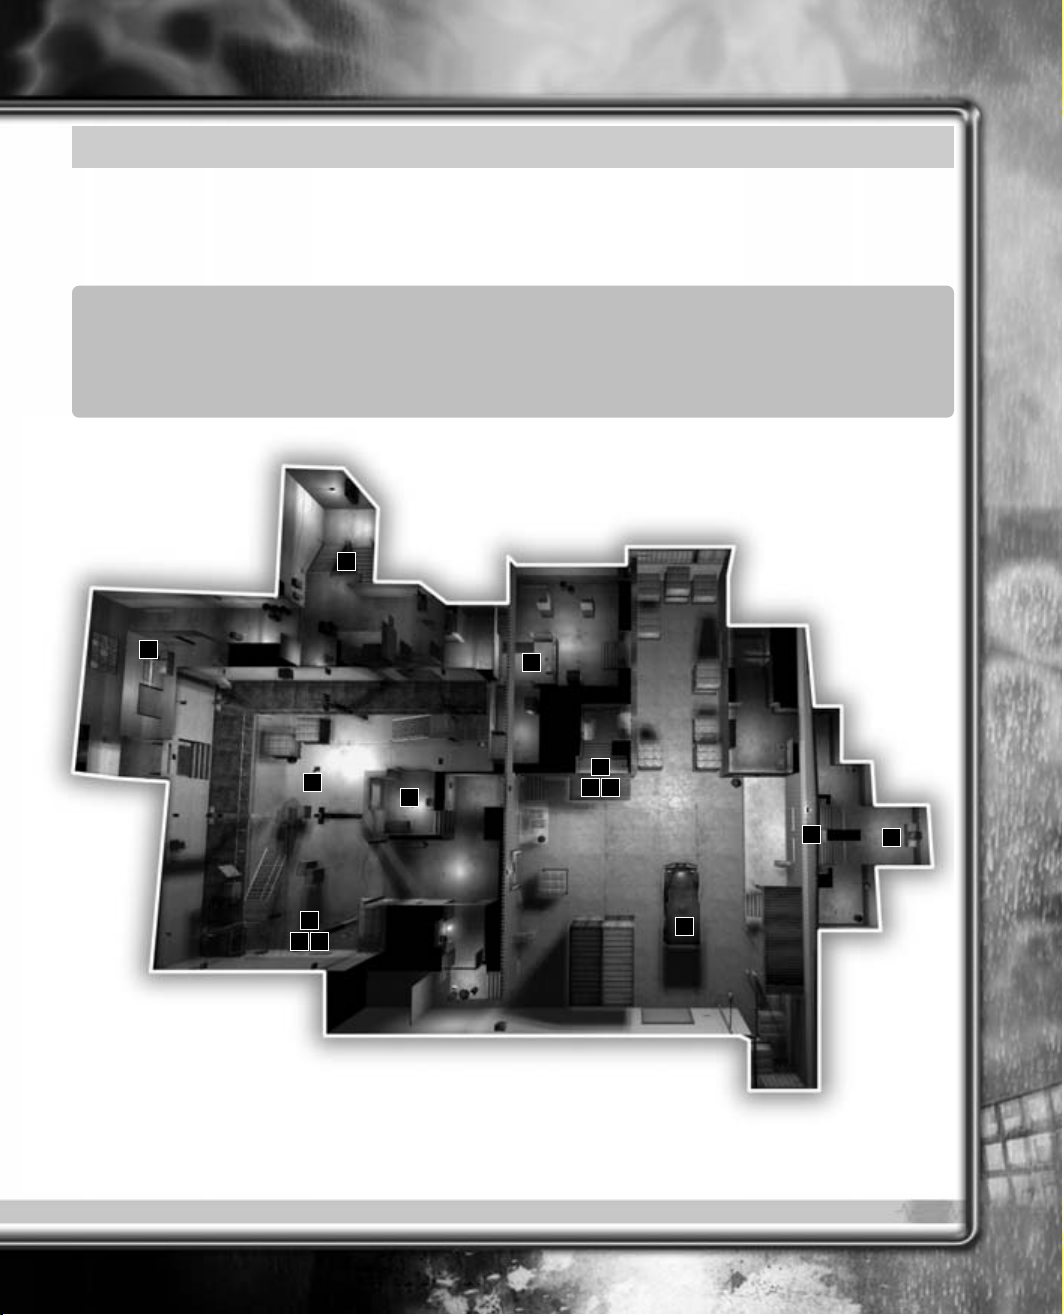
CAMPUS
Talented snipers are definitely considered the big men on Campus. The central courtyard is a danger zone for casual
players if a sniper armed with a Type-7 Particle Weapon is perched in a window bay looking down on them. There are
several interior corridors where gunners and melee fanatics can try to circumvent snipers, but a good sniper will know
to expect this and be ready for anything.
MULTIPLAYER MAYHEM
LEGEND
1. MP-50 Repeating Cannon
2. Type-7 Particle Weapon
3. MOD-3 Multi-Rocket Launcher
4. N6A3 Fragmentation Grenade
5. M77 Remote Bomb
6. AT-S Proximity Grenade
7. Medkit
8. Body Armor
9. Ammo Boxes
10. Medical Station
11. Slo-mo Recharge
4 4 4
3
9
10
8
8
8
11
7
2
4
6
8
Lower Area
4
4 4
8
1
9
10
In the following maps, some letter icons appear. These indicate connection points between the layers of a level.
So, A on the upper floor leads to the A on the lower floor.
Protected by copyright. Unauthorized or unlawful copying or downloading expressly prohibited.
Page 6
[174]
PRIMA OFFICIAL GAME GUIDE
GOTTA-HAVES
Every map has a choice selection of weapons and gear
that you must be aware of to survive and thrive. Hunt
down the best weapons as soon as possible. Don’t let
your opponents grab them first and find a nice camping
spot to frag you when you come looking for the hardware.
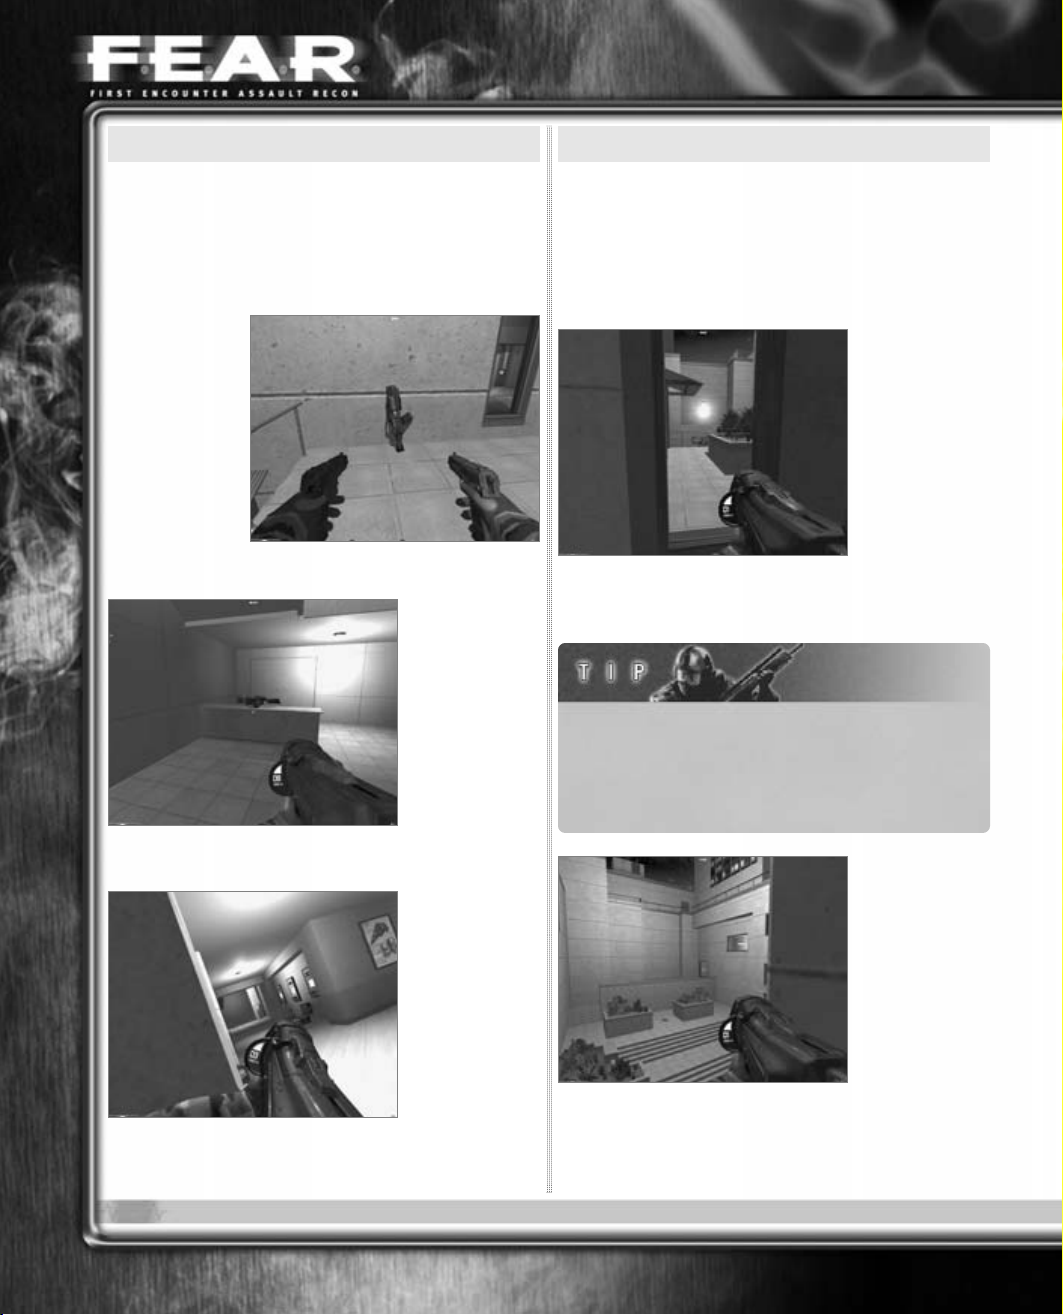
The MOD-3
Multi-Rocket
Launcher isn’t a
precision weapon
by any means,
but if you can
stand out of view
of a sniper and
fire in his general
direction, you can
splash him with damage.
The MP-50
Repeating
Cannon is tucked
inside the unfinished area of the
campus. Swipe it
off the counter,
and if you are
feeling especially
punishing, crouch
behind the counter and wait for the next person to arrive.
Snipers can
start the match
with the ASP Rifle,
but they should
upgrade to the
Type-7 Particle
Weapon as soon
as possible.
STRATEGIES
Courtyard Combat
The central courtyard in the middle of the map is where
snipers will earn most of their points. Thankfully, there
are only a few sniping positions, so not everybody will
attempt to settle in, leaving the courtyard a ghost town.
Break windows
and stand back
from them to
decrease your
visibility to the
other players.
Everybody will
scan the upper
perches and
ledges for any
sign of a sniper, so if you stand back, you decrease your
chances of being spotted. Even this far back from the
window, you can still see fairly deep into the courtyard.
Shattering glass is always a good heads-up that other
players are nearby. Noise carries, so if you hear the
crinkling of broken glass or can see a few fragments
cascading through the air, make sure your weapon is at
chest level, because somebody is stirring it up nearby.
Players have to
enter the
courtyard
somehow,
sometime. Take up
position opposite
the doors that lead
outside, and snipe
soldiers as they
step through them.
So, don’t just brazenly walk through any door leading
outside. Jump through doors or slide through them by
performing a slide kick—just do anything to keep yourself
from being an easy kill.
™
Protected by copyright. Unauthorized or unlawful copying or downloading expressly prohibited.
Page 7
[175]
PRIMAGAMES.COM
Tired of getting sniped? Try sniping them right back.
Locate and pick up the Type-7 Particle Weapon and take
refuge in another sniping position, somewhere near the
last place you got plastered all over the wall. Lean out
and return fire. By the time the sniper can zero in on
you, the last thing he’ll see through the scope will be
your incoming round.
Missile Madness
Sniping is a finesse art, but it’s not for everybody.
Sometimes sheer firepower and brutality are just as lethal
as a fine sniping shot, and if you can score the MOD-3 MultiRocket Launcher, you can dish out incredible damage.
The MOD-3 Multi-Rocket Launcher has very limited
ammunition; you cannot just pepper everything you see
with rockets and hope for the best. Choose your shots
wisely, but take comfort in knowing that the rockets’
blast radius will make up for any lack of accuracy.
Just because
you don’t have a
sniper rifle
doesn’t mean you
cannot take up
position in the
windows. Haul
your rockets up
to a perch and
look down on the
courtyard. Because your rockets travel much slower than
a sniper’s bullet, though, you must plan in advance.
You can hide
from snipers in
an overhead
cover in the
courtyard’s
center. Crouch
down near the
central planters
and target
players as they
seek cover in the map’s center.
If you take up a position in the middle of the map like
this during team play, make sure you have somebody
watching your back.
If you have friendly fire turned on, watch out for firing
rockets near your teammates. The splash from the rocket
attack can injure them—and possibly even kill them.
Key Features
Keep these map features in mind while you are hunting
your online opponents.
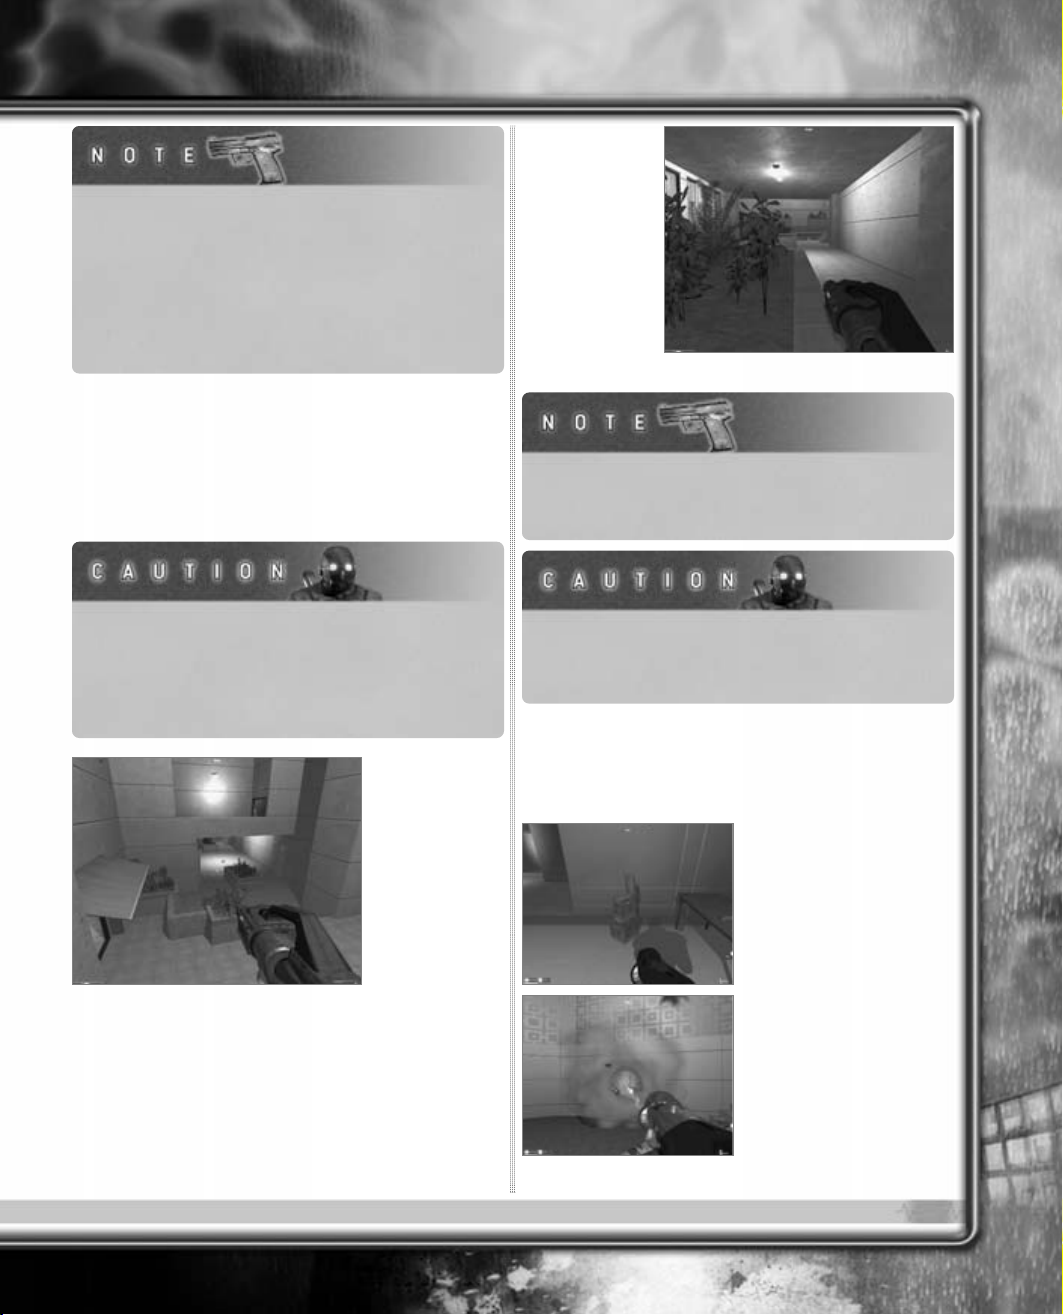
If you start running low
on ammunition, seek out
the Ammo Boxes and
restock your rounds.
Fire extinguishers are
highly volatile. If you shoot
one, it explodes, sending out
shrapnel and a cloud of
flame-retardant powder. An
enemy standing near it will
be killed by the blast.
MULTIPLAYER MAYHEM
Protected by copyright. Unauthorized or unlawful copying or downloading expressly prohibited.
Page 8
[176]
PRIMA OFFICIAL GAME GUIDE
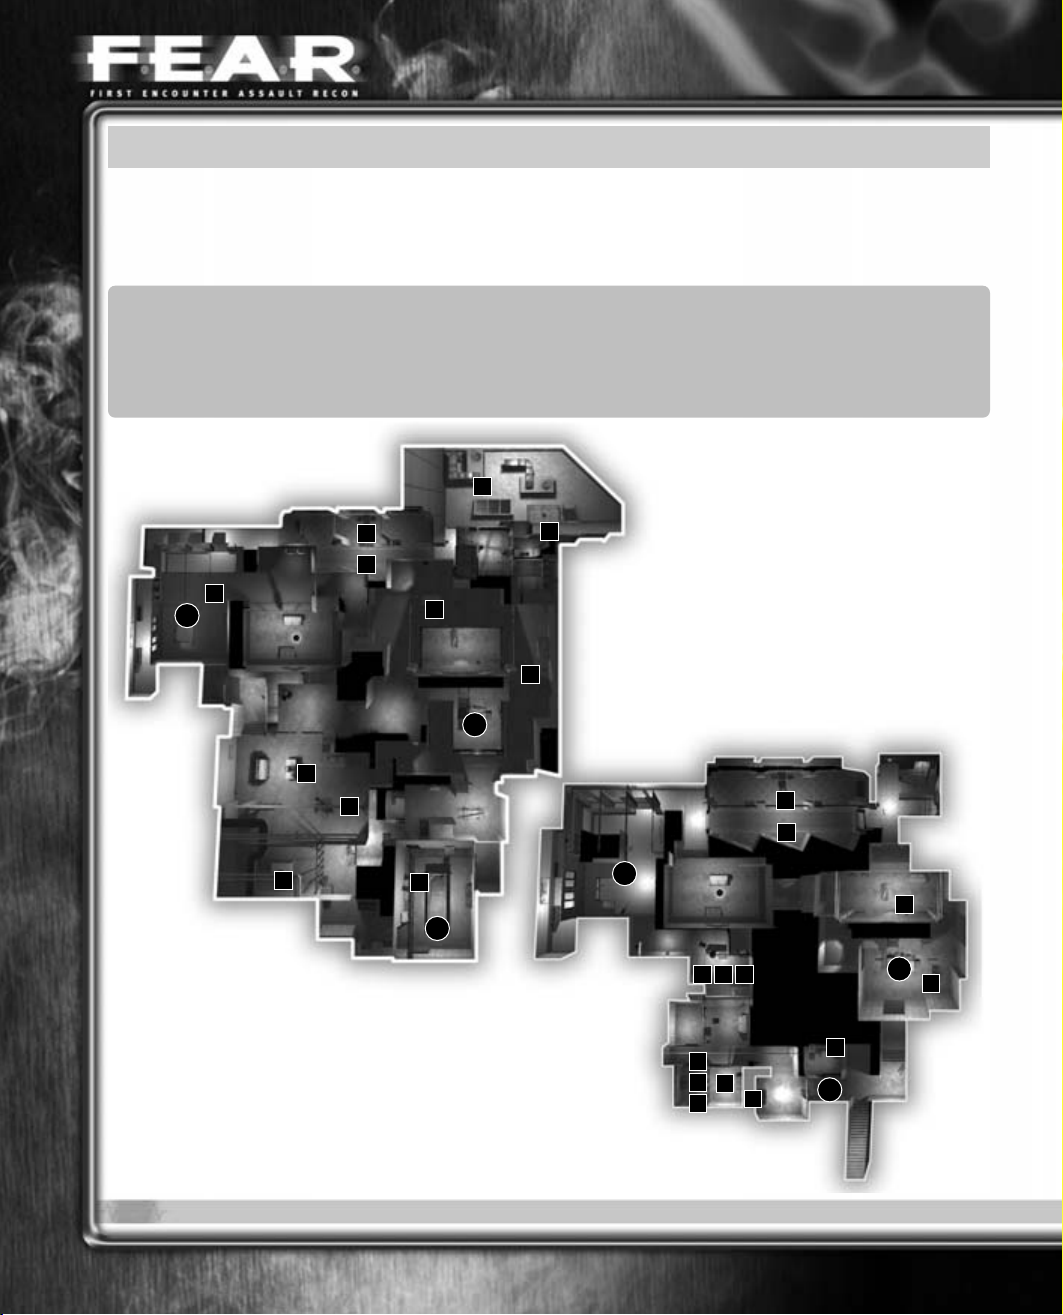
CONSTRUCTION
Construction is an excellent map for players to hide and wait for just the right opportunity to surprise opponents.
Building debris, stacks of drywall sheets, and tables provide excellent cover for leaners, making this site well-known
for protracted showdowns between experienced shooters.
™
LEGEND
1. MP-50 Repeating Cannon
2. Type-7 Particle Weapon
3. MOD-3 Multi-Rocket Launcher
4. N6A3 Fragmentation Grenade
5. M77 Remote Bomb
6. AT-S Proximity Grenade
7. Medkit
8. Body Armor
9. Ammo Boxes
10. Medical Station
11. Slo-mo Recharge
10
6
5 5 5
4
9
4
8
A
8
10
C
Lower
Upper
A
8
10
6
10
3
8
9
8
8
2
C
B
9
11
B
8
Protected by copyright. Unauthorized or unlawful copying or downloading expressly prohibited.
Page 9
[177]
PRIMAGAMES.COM
GOTTA-HAVES
An AT-S Proximity Grenade is tucked in the finished
hallway, directly across from the bay of computer
screens. Grenades make for excellent traps, if you know
exactly where to hide them.
Look for the
MOD-3 MultiRocket Launcher
on top of this
yellow box.
The Medical
Station heals your
injuries as long
you stand next to
it, but notice the
complete lack of
cover. While you
are trying to heal
yourself, another
player has ample
openings to shoot you.
STRATEGIES
Remote Control
The M77 Remote Bombs are devilishly clever weapons in
the hands of a smart player. Once you pick them up, there
are a handful of excellent places you can hide them to do
the maximum amount of damage.
M77 Remote
Bombs adhere to
whatever surface
you throw them
on, even people.
Because they are
black and have
a discreetly
flashing light
once set, you can
easily hide them against busy surfaces such as this stack
of drywall. Most players won’t even notice the Remote
Bomb as they run by. Even better, if you stick the bomb on
an object that many players use for cover, you can set it off
once you notice a camper settling into his favorite location.
Consider
attaching a M77
Remote Bomb to
the back of the
Medical Station in
the hallway with
the screens.
Because you can
see only the front
of the station
from the hallway entries, chances are most players will
not suspect such a trap. Hide behind a chair or a pillar
and wait until a wounded (and unlucky) player attempts
to heal, then blow him sky high.
Proximity Grenade Protocol
M77 Remote Bombs require you to actually set them off,
while AT-S Proximity Grenades detonate on their own as
soon as the presence of somebody other than the player
MULTIPLAYER MAYHEM
Protected by copyright. Unauthorized or unlawful copying or downloading expressly prohibited.
Page 10
[178]
PRIMA OFFICIAL GAME GUIDE
who set it is detected. However, in exchange for this
convenience, AT-S Proximity Grenades have a blinking
light that starts the moment the grenade is set.
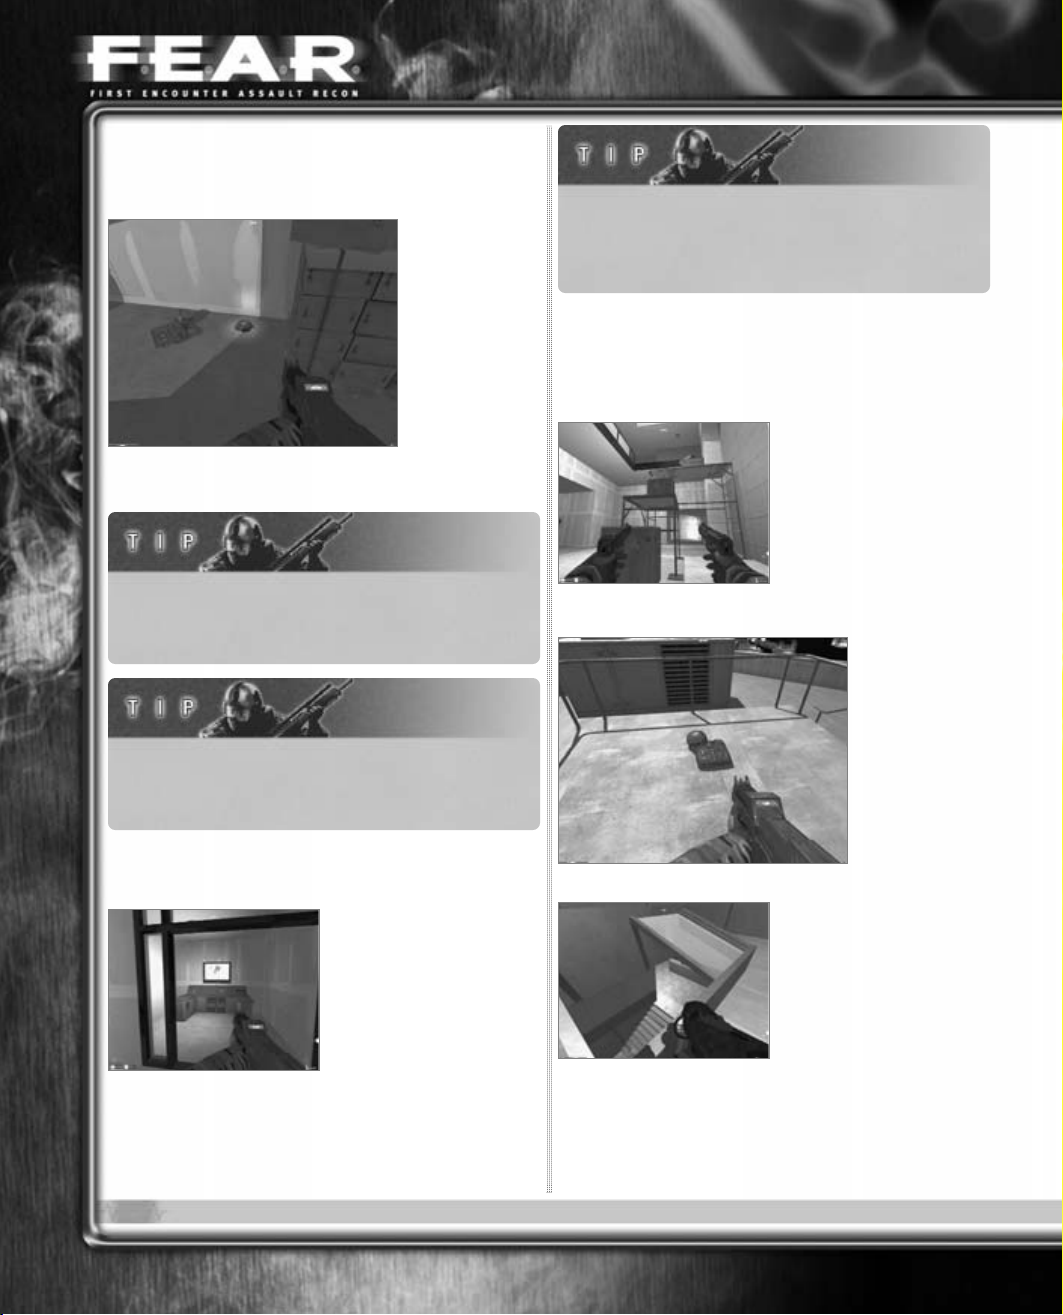
Do not set an
AT-S in a dark
area, as players
can easily spot
the telltale
flashing light and
avoid the trap.
Instead, place the
grenade in a welllit hallway, or at
least behind an object so big that players won’t see the
flashing light until it is too late.
If you set a chain of AT-S Proximity Grenades close
enough to each other, you can set off a chain reaction
injuring more than one player.
If you have a sniping weapon, you can give somebody
setting an AT-S a deadly surprise. As soon as he sets the
grenade on the ground, snipe it and it will blow up in his face.
Voyeurism
Use this control panel to
access all of the security
cameras in the map.
Pressing f while standing
in front of the screen
switches between cameras,
revealing what kind of action
is happening elsewhere on the map. The security cameras
are hidden behind black shells that cannot be destroyed,
so you never have to worry about somebody obstructing
your view by conventional means.
You can shoot the walls to kick up enough dust to block
security cameras, which might be a good idea for
players trying to hide M77 Remote Bombs in rooms with
security cameras.
The Roof
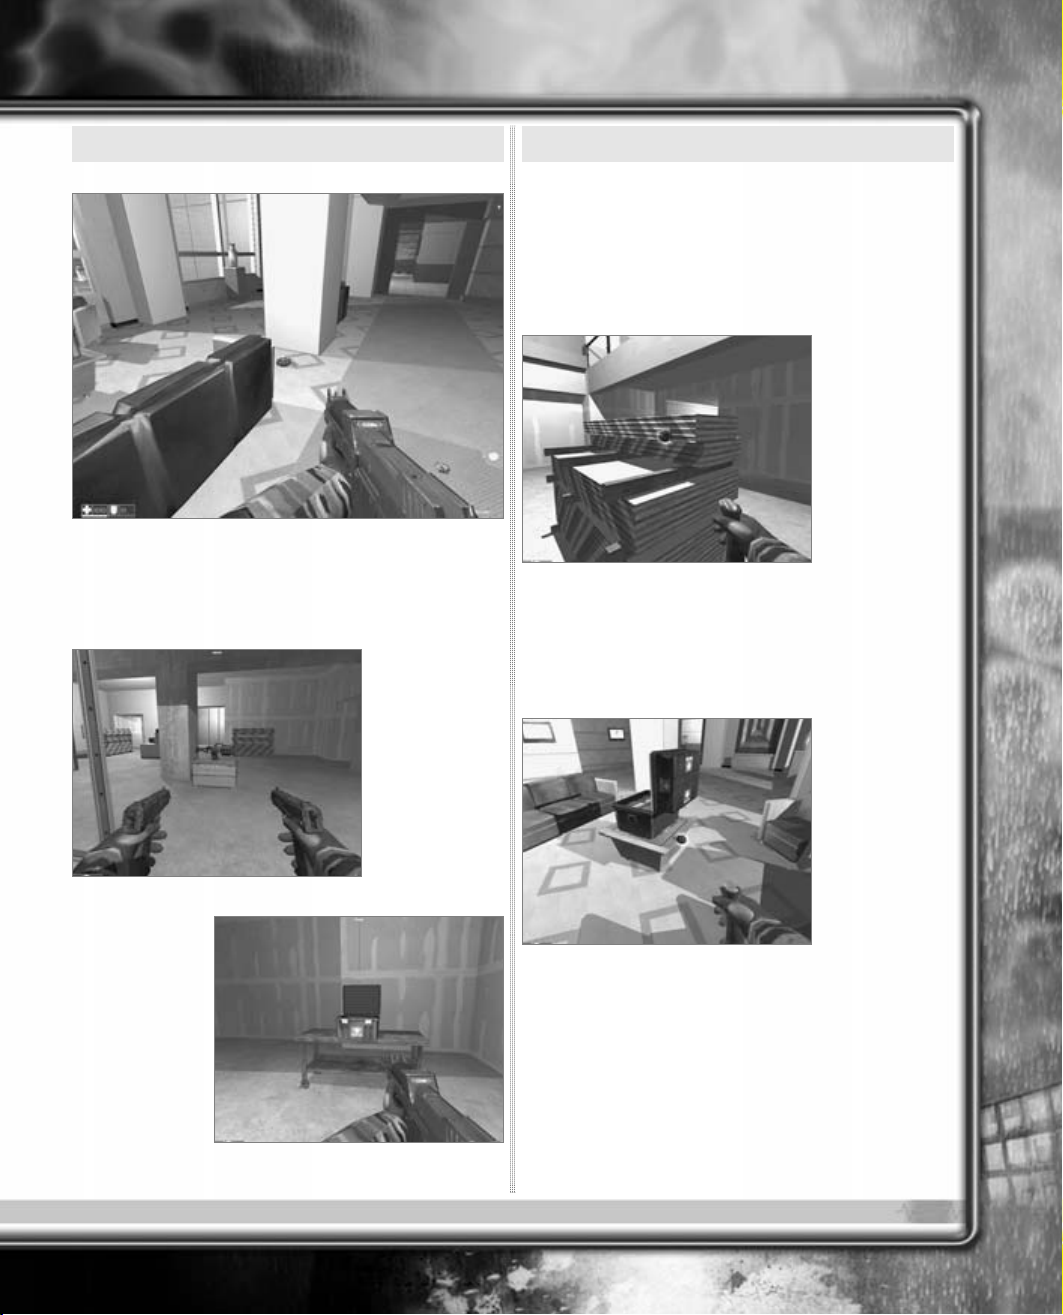
You have access to the roof, giving players a more openair environment to use for heated gunplay.
Use this stack of crates
to scale to the interior’s
upper level. Remember,
though, while jumping up
the crates, you have
absolutely no cover and are
a very easy target for enterprising sharpshooters.
Once on the
roof, collect this
Body Armor as
soon as possible.
Up here you can
engage in some
furious firefights
and you’ll need all
of the protection
you can get.
Look for the skylight that
opens into the building
below. After breaking the
window, snipers can make
some deliriously accurate
head shots while players
run by in search of gear and
other soldiers. If you are discovered, simply step away
from the skylight—but beware of possible grenades being
thrown up to the roof in retaliation.
™
Protected by copyright. Unauthorized or unlawful copying or downloading expressly prohibited.
Page 11
[179]
PRIMAGAMES.COM
DOCKS
The docks on the waterfront offer both interior and exterior shooting galleries. The large outdoor shipping yards host
great firefights with players using shipping containers for cover while exchanging volleys of bullets. The inside
locations, such as a packing room and some small side offices, are better for one-on-one shootouts between friends.
And snipers have no shortage of perches and posts for practicing their deadly art.
MULTIPLAYER MAYHEM
LEGEND
1. MP-50 Repeating Cannon
2. Type-7 Particle Weapon
3. MOD-3 Multi-Rocket Launcher
4. N6A3 Fragmentation Grenade
5. M77 Remote Bomb
6. AT-S Proximity Grenade
7. Medkit
8. Body Armor
9. Ammo Boxes
10. Medical Station
11. Slo-mo Recharge
1
8
8
9
4 4
11
6
8
4 4
3
8
10
Protected by copyright. Unauthorized or unlawful copying or downloading expressly prohibited.
Page 12
[180]
PRIMA OFFICIAL GAME GUIDE
GOTTA-HAVES
The MP-50
Repeating
Cannon is just
the kind of
bruiser you need
to perform quick
kills without
limiting yourself
to a sniper-style
weapon.
If you are
playing a Slo-Mo
match, you find
the Slo-mo
Recharge in this
small office.
Remember,
everybody wants
this item, and if
players realize
they are too far away from it, they may opt to just target
the office and shoot you through the windows.
Find an AT-S Proximity Grenade in the office next to the
vending machines. Throw it behind some crates or a stack
of barrels, or in a particularly popular sniping spot, to
achieve the maximum effect.
STRATEGIES
Shipping Yard
The middle of the shipping yard sees a lot of action, but
you can hang back on the periphery and dish out major
damage without exposing yourself. However, as soon as
players discern your location, you may see a team effort
to take you out.
Use the stacks
of crates around
the edges of the
shipping yard as
cover. If you arm
yourself with a
sniper rifle, you
can take the time
to aim some
proper head
shots without too much concern for discovery.
Use the pallets
of shrinkwrapped boxes at
the end of the
long alley to pop
players as they
walk past the
armored truck in
the yard. The two
doorways just on
the other side of these stacks also are likely to see high
traffic, so use this location to drop players, too.
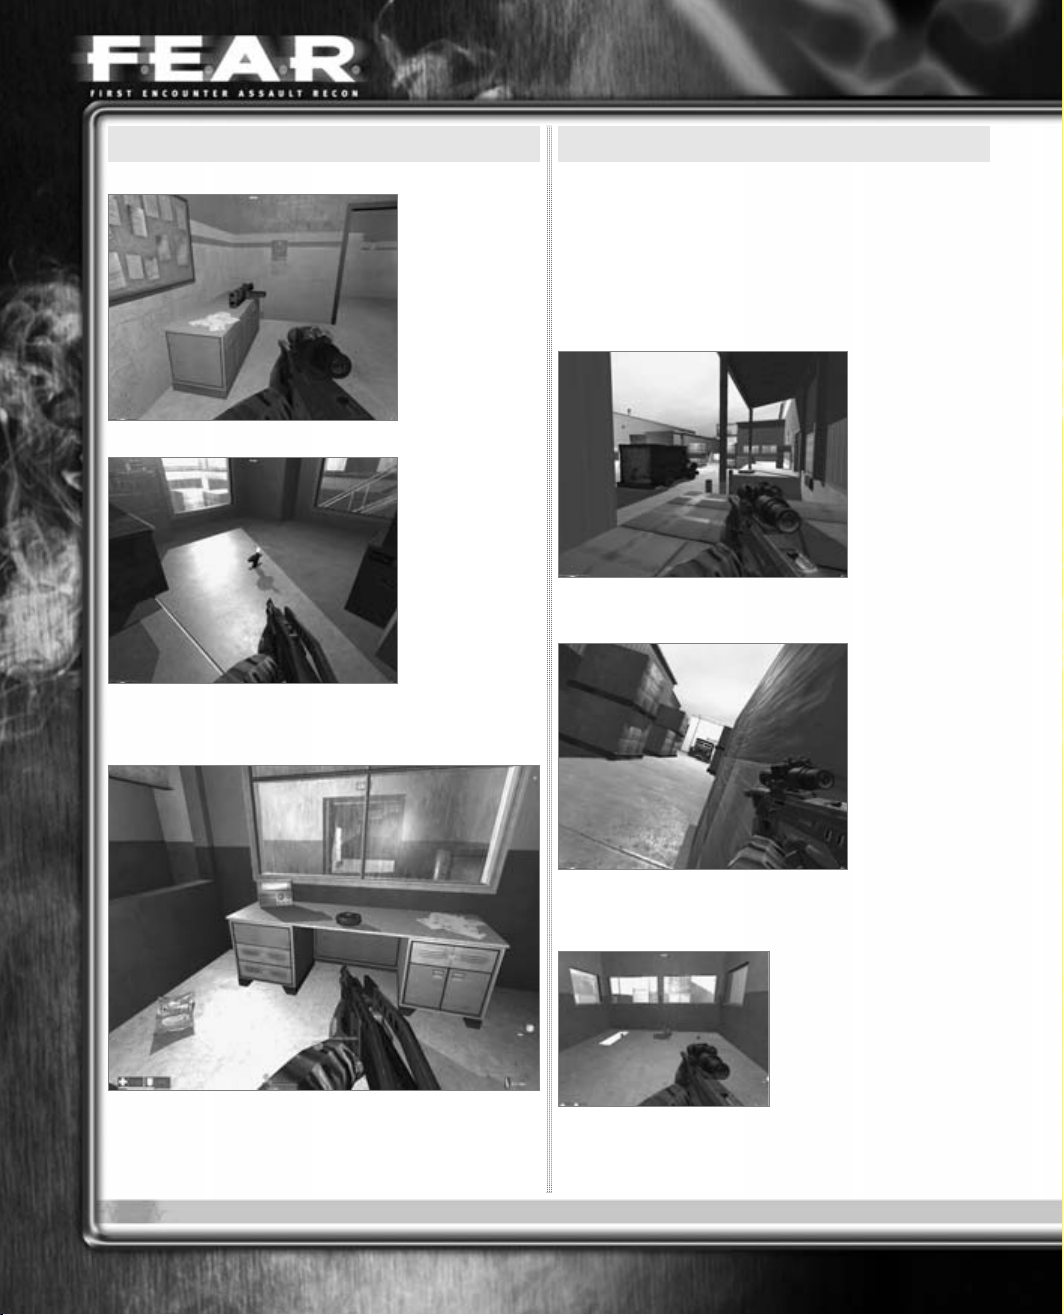
This office offers more
than Body Armor and
grenades. From the
windows, you can look out
over the shipping yard and
snipe a few players before
discovery.
™
Protected by copyright. Unauthorized or unlawful copying or downloading expressly prohibited.
Page 13

[181]
PRIMAGAMES.COM
While it is hard for another player to charge your
sniping position and gun you down, beware of
grenades. While you’re staring through the scope at a
player, you may not notice the N6A3 Fragmentation
Grenade that just sailed over your head and dropped
behind you.
Interior Motives
Use cover whenever possible inside the buildings
surrounding the shipping yard. Take cover behind a stack
of barrels near the top of the main stairwell, and blast
anybody who tries to come upstairs. Use the MP-50
Repeating Cannon for a guaranteed kill.
Inside the main shipping room, use crates and the
wide metal support poles as cover. Lean out and train
your weapon on anybody you see coming.
Hide in the
shadows beneath
the shipping
platform, and
players in a hurry
might not spot
you. Somebody
coming down
these steps is
unlikely to see
you until your muzzle flash illuminates the corner, but by
then, you’ve gotten off a couple of good shots.
In this hallway in the main shipping room, you can
see three entrances to the room, as well as the entire
central area. Watch your back while sniping from here,
however, since anyone can surprise you from behind in
this hallway.
Since this hallway is near the MP-50 Repeating Cannon
spawn point, this is a useful place to camp and refill
your ammo whenever you run out.
Use the security cameras
to keep tabs on the other
players in this match.
Access this control panel
to switch between the
different cameras and
track where the action is.
If you are severely wounded, this is a good way to plan
a safe route through the map.
MULTIPLAYER MAYHEM
Protected by copyright. Unauthorized or unlawful copying or downloading expressly prohibited.
Page 14

[182]
PRIMA OFFICIAL GAME GUIDE
EVACUATION
Good snipers can evacuate their opponents to the great beyond on this map, which offers a rooftop arena full of ventilation shafts and air-conditioning units. While the roof will certainly be a central area for combat-hungry players,
plenty of gunfire can be exchanged in interior locations too. Slo-Mo matches on this map can even the odds against
favored snipers by giving the carrier a chance to avoid the lightning-fast rounds from the Type-7 Particle Weapon.
™
LEGEND
1. MP-50 Repeating Cannon
2. Type-7 Particle Weapon
3. MOD-3 Multi-Rocket Launcher
4. N6A3 Fragmentation Grenade
5. M77 Remote Bomb
6. AT-S Proximity Grenade
7. Medkit
8. Body Armor
9. Ammo Boxes
10. Medical Station
11. Slo-mo Recharge
Lower
B
7
8
9
2
10
8
7
1
A
Protected by copyright. Unauthorized or unlawful copying or downloading expressly prohibited.
Page 15

[183]
PRIMAGAMES.COM
GOTTA-HAVES
The Type-7
Par ticle Weapon
is on the roof,
perched on top of
an air-conditioning unit. The
only problem is
that if another
player has
already grabbed
it, he has a great vantage point above here to snipe
players searching for their own Type-7.
Look for this shelf holding
three M77 Remote Bombs—
more than enough to cause
some real trouble with.
The MP-50 Repeating
Cannon is on top of some
crates near the stairwell,
just a stone’s throw from the
shelf with the M77 Remote
Bombs. Use this technological terror to eliminate
runners with a shot to the back.
MULTIPLAYER MAYHEM
B
7
8
10
8
9
6
2
8
6
8
7
7
A
1
5
5
5
Upper
Protected by copyright. Unauthorized or unlawful copying or downloading expressly prohibited.
Page 16

[184]
PRIMA OFFICIAL GAME GUIDE
STRATEGIES
Environmental Hazards
This map is replete with fire extinguishers and electrical
boxes that can be used offensively by players with sharp
eyes and a little patience.
Fire extinguishers are not
entirely unlike
M77 Remote
Bombs. One is
located right next
to the Medical
Station, so if you
can hide in a
corner with a
sniping weapon, you can detonate the fire extinguisher
right next to a wounded player’s head—effectively
finishing him off.
It’s also dangerous to stand next to electrical boxes. If
you shoot one, it explodes, sending shrapnel everywhere
as well as a short flash of electrical arcs. So, look for the
small yellow triangles, and keep away from them.
Smart Sniping
This map has no shortage of sniping positions. As soon as
you get the Type-7 Particle Weapon, a whole new set of
options opens to you for dealing out a little death and
destruction.
Try hiding
beneath the
stairs on the far
side of the roof
from where you
snagged the
Type-7 Particle
Weapon. The
Type-7 rounds
are narrow
enough to easily slip between the steps and snipe people
all the way on the other side of the roof.
Jump up and
tuck yourself
behind this ventilation shaft on
the roof. The
position is bathed
in shadow, so it’s
difficult for other
players to spot
you as you rain
down bullets from above.
If you currently carry the Slo-mo Recharge, you have a
small triangle above your head indicating your bounty
to the other players. This makes it a little harder to
effectively hide.
™
Protected by copyright. Unauthorized or unlawful copying or downloading expressly prohibited.
Page 17

[185]
PRIMAGAMES.COM
Use the
window bay
overlooking the
roof to pepper the
other players
with bullets. If
you already have
the Type-7, this is
a great position
for punishing
other players trying to get it.
Getting the Drop
Use the catwalk
overlooking the
steps down here
to drop any
players on their
way to the roof
outside. You
cannot camp up
here because
there are too
many access points, but if you are running across the
catwalk, make sure to look down for easy prey.
The interior areas are dark, so sandwich yourself
between machines and wait for other players to run by or
use nearby doors.
Because M77
Remote Bombs
are also available
on this map, you
can rely on this
great trick for
finishing off
players who think
they will find
their salvation at
this Medical Station. Plant the M77 behind the station box
and then melt into the corner of the room and wait with
detonator in hand. The only drawback is if players are on
to you, they may peek around the corner and snipe you.
Because you have the detonator in hand, it’s impossible
to defend yourself right away.
MULTIPLAYER MAYHEM
Protected by copyright. Unauthorized or unlawful copying or downloading expressly prohibited.
Page 18

[186]
PRIMA OFFICIAL GAME GUIDE
™
LEGEND
1. MP-50 Repeating Cannon
2. Type-7 Particle Weapon
3. MOD-3 Multi-Rocket Launcher
4. N6A3 Fragmentation Grenade
5. M77 Remote Bomb
6. AT-S Proximity Grenade
7. Medkit
8. Body Armor
9. Ammo Boxes
10. Medical Station
11. Slo-mo Recharge
12 . F l a g
FACILITY
The Facility map is based on the Vault environment from the single-player game. It’s filled with small labs, science
equipment, and no shortage of crates and boxes that can be used for hiding spots during high-frag Capture the Flag
matches. The map is small compared to the other CTF map, Streets, which definitely keeps the action frantic. The best
feature of this map is the plethora of yellow barrels, which can be popped like party favors when a player is spied
standing dangerously close.
12
7
9
4
8
7 4
8
8
4
4
5
5
5
8
C
A
B
D
8
5
5
5
4
4
8
8
4 7
8
4
9
7
12
11
C
D
8
8
A
B
3
Middle
Lower
Upper
10
8
8
10
Protected by copyright. Unauthorized or unlawful copying or downloading expressly prohibited.
Page 19

[187]
PRIMAGAMES.COM
GOTTA-HAVES
Heavy-duty weapons are
few and far between on this
map. The basement holds an
MOD-3 Multi-Rocket
Launcher, but as there’s an
easy view down into the
treasure room, you can
expect gunfire and grenades from above.
In such cramped
quarters, where firefights
will be frequent, seek out
Body Armor such as this
(located upstairs) to provide
some semblance of
protection against the
torrent of bullets.
Tiny corners reveal great
surprises, such as M77
Remote Bombs. Use them to
mine the hallways leading
between the flag bays. Cut
off all routes, and the
opposing team will have no
option besides sacrificing players to detonate the bombs
before they can kill the flag-bearer.
STRATEGIES
Flag Bays
The goal of Capture the Flag matches is to snake the other
team’s flag from their presumably fortified flag bay and
return it to your own.
Even though the Facility
map is small, your view still
includes a triangle icon that
displays the general
direction of the opposing
team’s flag bay.
Not every
player in a CTF
match should
make a break for
the opposing
team’s flag. At
least one player
should hang back
and protect your
flag bay. Boxes
and shelves surrounding the flag bays can serve as
sniping positions. From vantage points such as this, you
can monitor the doors. You also enjoy a clear shot at your
own flag bay, so should the opposing team mount a
hydra-headed assault, you can at least direct your
attention on the prize.
The flag bays
are surrounded
by explosive
yellow barrels
that the opposing
team will use to
incinerate a flag
defender. Before
the other team
can use them to
their advantage, back away from your flag bay and shoot
the barrels. Just make sure you coordinate with team
members about keeping distance from the barrels. Hard
feelings are sure to erupt if friendly fire results in a
team death.
Red or green wall signs announce which flag bay you
are close to. Teams have “territories” in CTF maps, and
because these hallways start looking similar during a
flag run, the signs are useful tools.
MULTIPLAYER MAYHEM
Protected by copyright. Unauthorized or unlawful copying or downloading expressly prohibited.
Page 20

[188]
PRIMA OFFICIAL GAME GUIDE
Hazardous Materials
The entire map is loaded with yellow barrels, many of
which are nearby prime hiding spots or along welltraveled routes.
The importance of yellow
barrels cannot be
understated.
They are superior
to grenades and
gunplay as far as
lethal effectiveness is
concerned. (And,
frankly, a certain amount of satisfaction comes from
watching an opponent’s rag-doll body bounce off a wall
after being blasted for standing too close to a yellow
barrel.) You must maintain constant awareness of your
position in relation to one of these barrels, lest you be
caught in a blast radius. It’s unnecessary to use the
missile launcher to pop a barrel—the rockets are slow
enough for a fast-moving player to dive out of the way,
and the rockets themselves are explosive enough—so
players should probably stick to using bullets as triggers.
Body Armor will not save you if you are standing right
next to a barrel when it explodes.
Hiding Spots
Despite the fact that this is a smaller map, there are still
a few good hiding spots where enterprising (and patient)
players can deal serious setbacks to the opposing team.
Downstairs in one of the
darker labs, there is a
shelving unit without a back.
Slip behind the shelving and
train your weapon at head- or
chest-level. Because players
need to swing down here to get to and from the flag area,
you won’t have to fish for very long before you get a bite.
Use the walls
to mask your
approach to the
opposing team’s
flag bay. The
curved hallways
in the middle of
the room have
well-lit bottom
levels, so watch
out for snipers on the walkways or ledges above, and use
the supports and odd corners to hide and frag an unwary
foe as he speeds by.
A few series of
alcoves along the
hallways are just
big enough for a
player to back
into and wait
until an opponent
comes rushing
by. If you are
holding the flag,
either try to avoid these gauntlets or work with another
team member to clear the alcoves before you come
trucking through.
Use the
walkways above
the central hub to
paint the walls
with flag-bearers
as they come
screaming
through to take
the prize back to
their flag bay.
Warning: you’re fairly exposed up here, especially if you’re
only looking down.
™
Protected by copyright. Unauthorized or unlawful copying or downloading expressly prohibited.
Page 21

[189]
PRIMAGAMES.COM
FACTORY
This factory produces one thing and one thing only: corpses. An assembly line of mayhem runs right through the
middle of this map, providing an open-air arena where braver players can stand their ground. However, the machine
shops and storage rooms off the central area are cavities where stealthy soldiers can practice the finer arts of
sneaking and shooting the legs out from under their opponents. This map has also been infused with some killer
weaponry, such as the Type-7 Particle Weapon. Memorize the weapon locations, and as soon as the green flag is
dropped on the chaos, make a beeline for the good stuff.
MULTIPLAYER MAYHEM
LEGEND
1. MP-50 Repeating Cannon
2. Type-7 Particle Weapon
3. MOD-3 Multi-Rocket Launcher
4. N6A3 Fragmentation Grenade
5. M77 Remote Bomb
6. AT-S Proximity Grenade
7. Medkit
8. Body Armor
9. Ammo Boxes
10. Medical Station
11. Slo-mo Recharge
4 4
9
8
10
6
11
7
8
8
1
7
8
7
3
8
5 5 5
2
Protected by copyright. Unauthorized or unlawful copying or downloading expressly prohibited.
Page 22

[190]
PRIMA OFFICIAL GAME GUIDE
GOTTA-HAVES
The MOD-3 Multi-Rocket
Launcher has been cleverly
dropped in the center of the
factory’s shipping yards.
There’s no cover—only speed
and a nimble finger on the
jump button will keep you
from getting jacked while grabbing this coveted weapon.
You can make a
spectacular entrance to a
firefight with the MP-50
Repeating Cannon. It’s on
some boxes in the northernmost chamber, but the
catwalk surrounding the MP50 Repeating Cannon gives other players ample vantage
points for taking you down.
The Slo-mo
Recharge is a
precious
commodity in SloMo matches, but
it’s not exactly
easy to get to
first. The powerup is in the
easter nmost
room, but you must run a gauntlet of other rooms before
reaching it.
Stop by the
shelf full of M77
Remote Bombs
and take all three
before another
player can get to
them.
STRATEGIES
Doorways to Death
Snipers have no shortage of perches from which to disperse
their death-valentines. One of the best locations snipers can
cover are doorways, which are used constantly. There is
simply no way to move around this map without passing
through doors, so never use one without either peeking out
first or flying through at a dead run.
Position yourself across from a door and draw a bead
at head- or chest-level. Always seek cover before trying to
snipe a door—if you’re standing straight up in the open,
your quarry could lean out and see you before running
through the door. A bay of windows (with only one or two
windows shot out) or a stack of crates and barrels make
excellent cover.
Sniping requires patience and a willingness to keep
your back turned on a potential route to your position.
Use AT-S Proximity Grenades to cover your rear.
When you’re
trying to cover
wide doors, such
as this entrance
to a shipping bay,
use a weapon
with a larger blast
radius. The Battle
Cannon’s area of
effect will
eliminate an opponent trying to slip through an entrance
not directly in your sights.
™
Protected by copyright. Unauthorized or unlawful copying or downloading expressly prohibited.
Page 23

[191]
PRIMAGAMES.COM
Use the hole in the floor in the central chamber either
to snipe players running through this hallway, or to stand
over and pick off players who walk too close to the crates
you use to ascend through the opening.
Of course, almost every tactic has a shortcoming.
Standing in the hole leaves your legs partially exposed,
while standing above leaves your entire frame open to
attack. Consider this opening as more of a target of opportunity. Don’t bank your entire game on camping here, but
check in from time to time to see if there’s an easy kill.
Yellow Barrel Fever
Use objects in your environment, such as exploding
barrels, whenever possible. Only yellow barrels can be
detonated with gunfire—regular blue barrels are harmless.
The factory yard is full of exploding barrels.
Sometimes they are easier to shoot than the actual
player, as it takes only one bullet to blow a barrel.
When you spy
another player
standing dangerously close to a
yellow barrel, aim
for the barrel and
pull the trigger.
The resulting
explosion is more
than enough to
kill him. However, be aware that several hiding spots in
this map are near yellow barrels. Make sure you’re safe
before crouching down and waiting for a kill.
Dumpster Diving
Always be on the lookout for hiding spots, especially if
you prefer to snipe rather than directly engage. The
factory is full of nooks and crannies that are the perfect
size for a human body.
There is a
small refuse
dump opposite
the MOD-3 MultiRocket Launcher.
Jump into the
garbage and fire
upon players as
they try to grab
the MOD-3 Multi-
Rocket Launcher from the flatbed trailer.
Use weapons as bait. The lure of grabbing some highpowered hardware is too much, and players often zip
right out in the open for the promise of a better weapon.
Speed is extremely important in online matches, so
remember that the weapon you hold affects your
running rate. Bigger weapons, such as the missile
launcher and battle cannon, really sap your speed.
Smaller instruments, such as a pistol, have little effect.
For maximum speed, empty your hands and put up your
dukes. A new weapon is just a scroll wheel away, or you
could rely on a melee attack such as a flying kick. One
of these to the back of the head can be just as lethal as
a bullet.
MULTIPLAYER MAYHEM
Protected by copyright. Unauthorized or unlawful copying or downloading expressly prohibited.
Page 24

[192]
PRIMA OFFICIAL GAME GUIDE
HIGH TECH
This small map is perfect for duels or game with a limited number of players. The tight hallways and shrunken rooms
keep the round on full throttle, as players have few places to effectively hide from the competition. Most of the lab
spaces are surrounded by windows, too, so it’s easy to peer into rooms as you run by them at top-speed, desperately
trying to identify a target while fleeing from a pursuer.
™
LEGEND
1. MP-50 Repeating Cannon
2. Type-7 Particle Weapon
3. MOD-3 Multi-Rocket Launcher
4. N6A3 Fragmentation Grenade
5. M77 Remote Bomb
6. AT-S Proximity Grenade
7. Medkit
8. Body Armor
9. Ammo Boxes
10. Medical Station
11. Slo-mo Recharge
8
9
11
4
3
10
8
6
5
5
5
Protected by copyright. Unauthorized or unlawful copying or downloading expressly prohibited.
Page 25

[193]
PRIMAGAMES.COM
GOTTA-HAVES
The MOD-3 MultiRocket Launcher
is situated
against some
crates in this
dark room. It’s
the only superpowered weapon
on the map, so it
will be heavily
coveted. If you aren’t the first player there, chances are
good you’ll have a surprise waiting for you.
Beneath the
slanted window
bay in one of the
main rooms, find
an AT-S Proximity
Grenade. It’s on
the desk, next to
the computer
equipment.
Grenades can be
used to great effect in this small map, particularly if you
mine the area surrounding the MOD-3 Multi-Rocket
Launcher.
STRATEGIES
Environmental Hazards
A few features in this map can cause great harm indiscriminately. Use these to your advantage whenever possible.
There is a crackling
energy beam in the central
chamber, surrounded on the
top floor by a walkway and
some pipes. Do not enter the
beam, as it will drain your
health with remarkable
speed. It might be possible to push an opponent into it
with the shotgun or a firm punch, but in most cases the
beam should just be avoided at all costs.
It takes
several circuit
breakers to
regulate the juice
pumping through
that energy
beam, so the
walls of this map
are adorned with
electrical boxes.
Use these as wall-mounted explosives and shock your
opponents by shooting them when they stand too close to
one. Conversely, make a point of never stopping and
standing by one yourself.
Pipe Dreams
Use the network of pipes running along the ceiling not
only as travel routes, but also as vantage points for
shooting players from above.
The pipes often
intersect, so you
can jump from
one pipe to
another and keep
moving. Many
pipes also slither
past doorways
and passages
where you can
disappear into another room if you are spotted from below.
The pipes are close enough to the ground that you won’t
take damage from jumping off.
MULTIPLAYER MAYHEM
Protected by copyright. Unauthorized or unlawful copying or downloading expressly prohibited.
Page 26

[194]
PRIMA OFFICIAL GAME GUIDE
Prime Positions
Because real estate is so tight on this map, attempt to
secure a few can’t-miss positions. These prime shooting
spots give you great views of high-traffic areas, guaranteeing plenty of points.
There is a bay
of slatted
windows directly
over a central
chamber (where
you find the AT-S
Proximity
Grenades) that
many players
must pass
through to cross the map. From behind the windows, you
can look down at the well-traveled route. But the first shot
breaks the glass and increases visibility for not only you,
but also the people on the ground floor.
Ammunition
stocks are going
to be popular on
this map, so hang
back and fire
through this
window at
players rushing
in to grab a fresh
clip. (The window
is too narrow for you to step through.) Of course, if you
are going to monitor the ammunition station, keep
glancing left and right, as these are open routes.
If you suspect that other players have this same idea,
use the barrels to the right of the window as cover and
fire upon people trying to shoot up the ammo stocks.
The catwalks that connect the upper floors often look
down on high-traffic routes, such as this doorway and
Medical Station. With the MOD-3 Multi-Rocket Launcher,
you can finish off any wounded player hoping to heal at
the Medical Station. Just be sure you look down at a
shallow angle so you can also monitor the doorway
opposite of the catwalk to avoid being surprised.
Use this security panel to monitor the action in a few of
the laboratory’s rooms by pressing f when standing
next to it. All action happens in real-time, so you can
assess the situations on the fly and make your move
with the benefit of extra intel.
The footage comes from wall-mounted security
cameras, hidden behind black plastic bubbles. As with
other maps, these bubbles cannot be broken and the
cameras cannot be deactivated.
™
Protected by copyright. Unauthorized or unlawful copying or downloading expressly prohibited.
Page 27

[195]
PRIMAGAMES.COM
OFFICE
Somebody’s working late tonight.
The Office map is two stories of fragging madness, especially if you can lure a few players into the central lobby
where few environmental features impede the unloading of heavy artillery. The individual offices upstairs, and the
winding corridors that connect them, moderate only the speed of kill shots, not the intensity. Play hide-and-seek
games within the cubicle farms, crouching down and waiting for just the right moment to spring up and drop a few
slugs into an unsuspecting passerby. Some might call that camping—but the game registers it only as points.
MULTIPLAYER MAYHEM
LEGEND
1. MP-50 Repeating Cannon
2. Type-7 Particle Weapon
3. MOD-3 Multi-Rocket Launcher
4. N6A3 Fragmentation Grenade
5. M77 Remote Bomb
6. AT-S Proximity Grenade
7. Medkit
8. Body Armor
9. Ammo Boxes
10. Medical Station
11. Slo-mo Recharge
1
8
6
8
8
10
11
5 5
5
8
9
4 4
Protected by copyright. Unauthorized or unlawful copying or downloading expressly prohibited.
Page 28

[196]
PRIMA OFFICIAL GAME GUIDE
GOTTA-HAVES
Executives
always get the
best toys. The
MP-50 Repeating
Cannon is in a
corner office
upstairs,
accessed by the
walkway over the
main lobby. You
have a limited number of shots, but with good aim, each
one will do enough horrific damage to boost your score.
The Medical
Station—where all
wounds are
healed—is tucked
in a small room
upstairs, near the
cubicle farm.
Beware of a player
camping out in the
cubicle directly
across from the entrance. Always enter the room back first,
making sure nobody has a surprise planned for you.
If you are
playing a Slo-Mo
match, there’s
typically a mad
rush for the Slomo Recharge,
which is stashed
in a small alcove
on the map’s
upper level.
STRATEGIES
Lobby Showdowns
The central lobby in the heart of the map is often the
sight of some spectacular gunplay, thanks to the wide
open space.
Use the planters near the bottom of the stairs to fire on
incoming players. The assault rifle can cut down players
streaming in from the right and left. Working with a
teammate armed with a more close-quarters weapon,
such as the shotgun, will help you fortify this position.
You are extremely vulnerable to a grenade here. Repeat
gunfire will kick up a lot of dust, which could potentially
obscure the sight of a grenade zooming overhead.
™
Protected by copyright. Unauthorized or unlawful copying or downloading expressly prohibited.
Page 29

[197]
PRIMAGAMES.COM
The walkway circling the lobby overhead grants
players a vantage point for firing down on foes in the
lobby. When holding down the fort on the main level,
always keep one eye on the sky (or have a teammate
doing so) to prevent getting sniped from above.
Corridor Hunt
Every room in this map is somehow connected, making
the hallways extremely well-traveled. The rapid traffic
keeps the action going, even away from the hot spots,
such as the main lobby.
Never underestimate the use of corners as cover.
Before entering a larger area, such as this foyer, peek
around the corner. You may spot another player in the
middle of doing something else (such as trying to mine this
receptionist’s desk), and that’s when you lower the boom.
Use AT-S Proximity Grenades in desks, cubicles, or under
stairs. A potential camper looking for a place to hide
might not notice the blinking light until it’s too late.
Cubicle Cat-and-Mouse
The cubicle farm on the lower level provides some
excellent cover for players who prefer stalking their prey
or for wounded players who need a place to catch their
breath before making a run for the Medical Station.
The cubicle desks are just the right height for
crouching. The desk blocks some of your torso, so if you
dig in, it’s possible that other players will not see you as
they go running by. As soon as your foe’s back is turned,
you can draw a bead and remind him of your presence.
Of course, there are caveats to camping techniques
such as this. Should other players become wise to your
position, you could find yourself on the receiving end of a
grenade. The three-walled cubicles leave only one way
out, and by the time you pop up and try to clear the desk,
it may be too late.
MULTIPLAYER MAYHEM
Protected by copyright. Unauthorized or unlawful copying or downloading expressly prohibited.
Page 30

[198]
PRIMA OFFICIAL GAME GUIDE
REFINERY
The Refinery is another small map, which guarantees high-scoring matches thanks to intense firefight situations. The
architecture is based on the wastewater treatment plant, so the cramped rooms are full of generators and storage
tanks with sewage and water pipes spidering out in every direction. Most of the hallways are dank and dingy—so
learn to make the most of such a low-light scenario. Hiding becomes easier, as running players are more likely not to
notice slightly out-of-place shadows and outlines.
™
LEGEND
1. MP-50 Repeating Cannon
2. Type-7 Particle Weapon
3. MOD-3 Multi-Rocket Launcher
4. N6A3 Fragmentation Grenade
5. M77 Remote Bomb
6. AT-S Proximity Grenade
7. Medkit
8. Body Armor
9. Ammo Boxes
10. Medical Station
11. Slo-mo Recharge
Upper
8
4
11
4
7
8
9
4
10
5
5
5
D
E
Protected by copyright. Unauthorized or unlawful copying or downloading expressly prohibited.
Page 31

MULTIPLAYER MAYHEM
LEGEND
1. MP-50 Repeating Cannon
2. Type-7 Particle Weapon
3. MOD-3 Multi-Rocket Launcher
4. N6A3 Fragmentation Grenade
5. M77 Remote Bomb
6. AT-S Proximity Grenade
7. Medkit
8. Body Armor
9. Ammo Boxes
10. Medical Station
11. Slo-mo Recharge
[199]
PRIMAGAMES.COM
Middle
Lower
D
G
H
C
B
E
F
10
5
5
5
7
8
10
8
9
4
8
A
G
C
H
B
6
9
F
3
1
Protected by copyright. Unauthorized or unlawful copying or downloading expressly prohibited.
Page 32

GOTTA-HAVES
Quick players can grab the MOD-3 Multi-Rocket Launcher in
the “basement” level of the map, where water pipes line
every passageway. It’s easy just to drop down from this
hole in the floor and grab it, but you can also access the
weapon by slipping into the main trench and following it to
the MOD-3.
The Ammo Box
is on top of one of
the control panels,
next to a N6A3
Fragmentat ion
Grenade. This
room has multiple
access points,
making it a
hotbed of activity.
Throw a grenade into the room the moment you spot even a
single pixel of another player.
The MP-50
Repeating Cannon
is tucked inside a
stairwell, on the
small concrete
landing where the
steps change
direction. The
hallway is going to
be popular, so
linger at the top or bottom to peel off a few rounds on players
who try to access the stairs.
STRATEGIES
Lean and Mean
Lean out and peer down the dark hallways before
stepping out. The Body Armor pick-up in the middle of this
hall is sure to attract players. By leaning out first, you
can possibly pick off an opponent en route to the Body
Armor. Remember, always minimize your exposure—it’s
one of the best ways to last longer in an online match.
[200]
PRIMA OFFICIAL GAME GUIDE
™
Protected by copyright. Unauthorized or unlawful copying or downloading expressly prohibited.
Page 33

[201]
PRIMAGAMES.COM
MULTIPLAYER MAYHEM
Vantage Point
The ladder to the “basement” actually has quite a bit of
space behind it. It’s more than big enough for a player to
stand in and wait until an opponent either descends the
ladder or drops through the hole from the floor above.
Beware of using the MOD-3 in these tight spaces, though, as
the damage splash from an exploding rocket can injure you.
This map has
three layers—the
basement, the
main floor, and a
system of
catwalks that
look down on the
floor. From this
vantage point at
the top of the
map, you can look all the way down to the bottom level.
The water
processing
generators are
big and clunky
enough to offer
significant cover
while you’re
trying to hunt
down other
players. The
space between the tanks is obscured by shadow, so if you
stand close to one of the large units, you’ll be difficult to
spot. The downside to standing in the dark is that the
second you fire, the muzzle flash quickly alerts anybody
in the area of your presence.
Always be careful using highly volatile weapons such
as the MOD-3, MP-50 Repeating Cannon, and grenades
in close-quarter maps such as the Refinery. Some
rooms are so tight that the blast radius covers almost
the entire area, costing you precious health.
Protected by copyright. Unauthorized or unlawful copying or downloading expressly prohibited.
Page 34

[202]
PRIMA OFFICIAL GAME GUIDE
™
Upper
Lower
12
13
10
4
4
8
8
9
5
5
5
8
6
7
1
8
7
7
5
4
11
7
4
5
7
8
1
7
6
8
13
8
9
5 55
8
10
4
4
12
A
B
A
B
3
8
8
LEGEND
1. MP-50 Repeating Cannon
2. Type-7 Particle Weapon
3. MOD-3 Multi-Rocket Launcher
4. N6A3 Fragmentation Grenade
5. M77 Remote Bomb
6. AT-S Proximity Grenade
7. Medkit
8. Body Armor
9. Ammo Boxes
10. Medical Station
11. Slo-mo Recharge
12 . F l a g
13. Turret
STREETS
The Streets is a much larger Capture the Flag map than Facility. A major avenue runs straight through the center of the
map and connects the two flag bays—but getting from “here” to “there” is no trip down easy street. Repeating guns
near the flag bays with unlimited ammunition will quickly chew up oncoming players. Sound attack and defense
strategies and team cooperation are the keys to winning a CTF match on this map.
Protected by copyright. Unauthorized or unlawful copying or downloading expressly prohibited.
Page 35

[203]
PRIMAGAMES.COM
GOTTA-HAVES
The MP-50
Repeating
Cannon is on
an old dresser in
an abandoned
room. The
weapon will be a
huge draw, so
hang back on the
balcony just
outside the door, watching for players coming up the
stairs to fetch it. They may not see you in their fervor,
but you’ll certainly see them—right down the barrel of
your shotgun.
This map is
perfect for snipers,
so get your hands
on the Type-7
Par ticle Weapon.
The rundown
buildings that line
the streets are full
of cracks and
windows that you
can fire through, taking down players either on the street or in
the side alleys that jut off in intervals.
This room has
a view of the
entrance to either
flag bay, making
it a perfect place
to camp and use
the MP-50
Repeating
Cannon and Type7 Particle Weapon
to take out any opponents making a grab for the flag.
Cover your back with a Proximity Grenade to ensure you
don't get backdoored.
With as much
shooting and
sniping as there
will be on this
map, seek out
Body Armor
whenever possible.
This set is lying on
the couch in the
old lobby.
STRATEGIES
Flag Bays
The two flag bays are nestled into nearly identical-looking
empty garages at each end of the map. You must communicate with your team and fortify the flag bay if you want
to keep in the lead.
Stairs lead
down to your
flag bay. The
main entrance to
the bay is via the
garage door, so
stand up here
and keep your
weapon trained
down on the flag.
With a weapon such as the MP-50 Repeating Cannon,
you can knock encroachers out of the room with a
single blast.
Also, take advantage of the crates and the locker bays
that flank the flag bay. Use them as cover so when an
opponent sees the flag bay, he will mistakenly believe
you are away. When foes enter, pop up and surprise them
with a major show of force. And if the enemy has
organized a raiding party, the fortified positions offer
valuable cover in the ensuing firefight.
MULTIPLAYER MAYHEM
Protected by copyright. Unauthorized or unlawful copying or downloading expressly prohibited.
Page 36

[204]
PRIMA OFFICIAL GAME GUIDE
Snipers with
the ASP Rifle or
the Type-7
Par ticle Weapon
can peer into
your flag bay
from the street
and get off some
good shots. Stand
clear of the
garage door to avoid being an easy target. With a Type-7
in play, you have to assume that you could be sniped at
any second from any angle.
Repeating Guns
The two repeating guns next to each team’s flag bay
cause major trouble for any player attempting a full
frontal assault.
The guns have
unlimited
ammunition, so
to unleash a
torrent of hot
lead, just drop
down behind the
weapon and
press f. You can
fire as long as
you like, blasting anybody who comes around the corner
and tries to take your flag.
There is debris between the gun and the corner
leading to the flag bay. The burned out automobile and the
mailbox are big enough for opponents to crouch behind
and hide. You can keep blazing to pin them down, but they
can also coordinate a response, such as running interference while one player throws a grenade at you.
Firing the
repeating gun
gives you a real
feeling of power,
but if you take a
moment to look
around, you can
see that power is
indeed fleeting.
Snipers can fire
upon you from vantage points above the guns. A head
shot from the ASP is possible from these open corners in
the surrounding buildings, and all it takes is a shot from
the Type-7 at any point on your body to kill you.
™
Protected by copyright. Unauthorized or unlawful copying or downloading expressly prohibited.
Page 37

[205]
PRIMAGAMES.COM
If the other team gets the word out that you are behind
the repeating gun, they will work hard to eliminate you.
Use the repeating gun only when necessary.
Trouble Spots
You can use
counters in the
lobbies as cover.
Crouch behind
the counter and
position yourself
far enough back
that you can
raise your gun to
head-level.
Stairs connect to the second story of most buildings,
but clambering up this series of crates gets you to the top
of the center much faster. And the corner behind the
crates is an excellent spot for players to hide in, waiting
for somebody to come along and use the crates.
A few alleys jut
off of the main
avenue. Use
these as cover to
fire upon players
as they run by.
For example, this
alley overlooks
the ammunition
restock. While the
shotgun isn’t the best weapon to use from this kind of
distance, a player with a sniping weapon can eliminate an
opponent with a single, smartly-placed shot.
Filthy windows make
good cover. You can fire
through them and
neutralize an opponent,
but the obscuring grime
may prevent your foe
from seeing you until he
hears broken glass. And, by then, it may be too late.
MULTIPLAYER MAYHEM
Protected by copyright. Unauthorized or unlawful copying or downloading expressly prohibited.
 Loading...