


FDW 614 D7P A++
EN |
User manual |
|
|
Dishwasher |
||
CS |
Návod pro uživatele |
|
|
|
|
Myčka |
DE |
Bedienungsanleitung |
|
|
Geschirrspüler |
||
EL |
Εγχειρίδιο χρήστη |
|
|
Πλυντήριο πιάτων |
||
ES |
Manual de usuario |
|
|
Lavavajillas |
||
FR |
Manuel d‘utilisation |
|
|
Lave-vaisselle |
||
IT |
Istruzioni per l‘uso |
|
|
Lavastoviglie |
||
PL |
Instrukcja obsługi |
Zmywarka do naczyń |
||||
PT |
Manual do utilizador |
|
|
Lava-louças |
||
RO |
Manual de utilizare |
|
|
Spalator de vase |
||
SK |
Návod na používanie |
|
|
Umývačka riadu |
||
|
|
|
|
|
|
|
|
|
|
|
|
|
|

EN ENGLISH ........................................................................................................................... |
3 |
CS |
ČESKY ............................................................................................................................... |
11 |
DE DEUTSCH ......................................................................................................................... |
19 |
EL ΕΛΛΗΝΙΚΑ .................................................................................................................. |
27 |
ES |
ESPAÑOL ........................................................................................................................ |
35 |
FR |
FRANÇAIS ....................................................................................................................... |
43 |
IT |
ITALIANO ........................................................................................................................ |
51 |
PL |
POLSKI ............................................................................................................................. |
59 |
PT |
PORTUGUÊS ................................................................................................................. |
67 |
RO ROMÂNĂ ........................................................................................................................ |
75 |
SK SLOVENČINA ................................................................................................................ |
83 |
2
EN
DAILY REFERENCE
GUIDE
Before using the appliance carefully read Health and Safety guide.
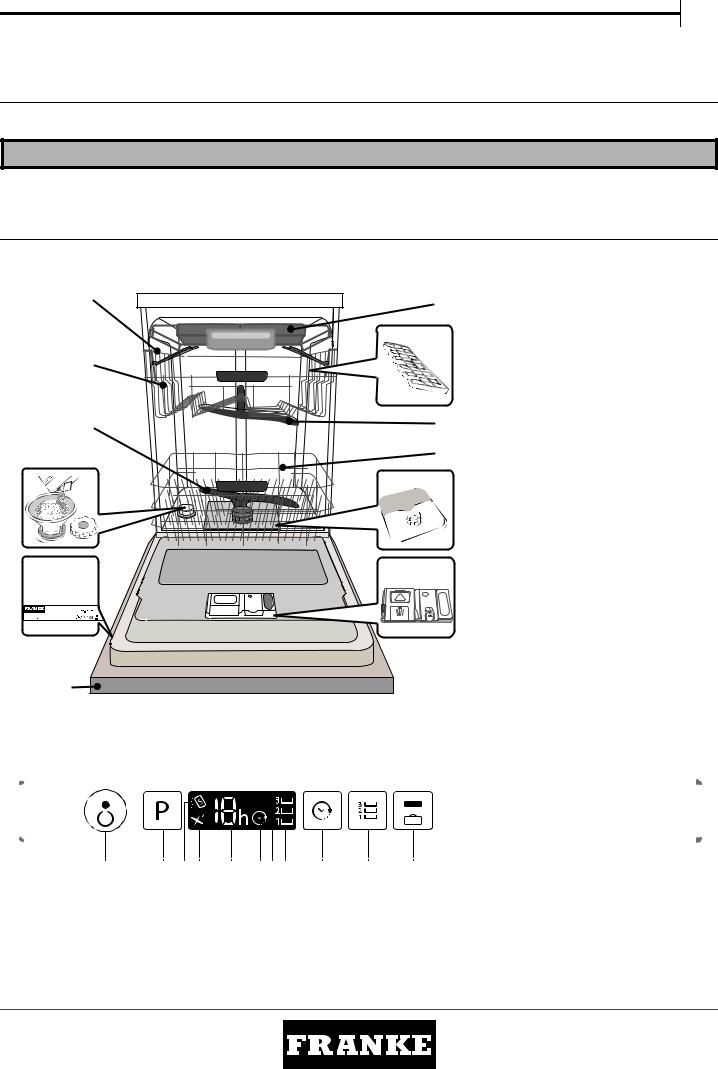
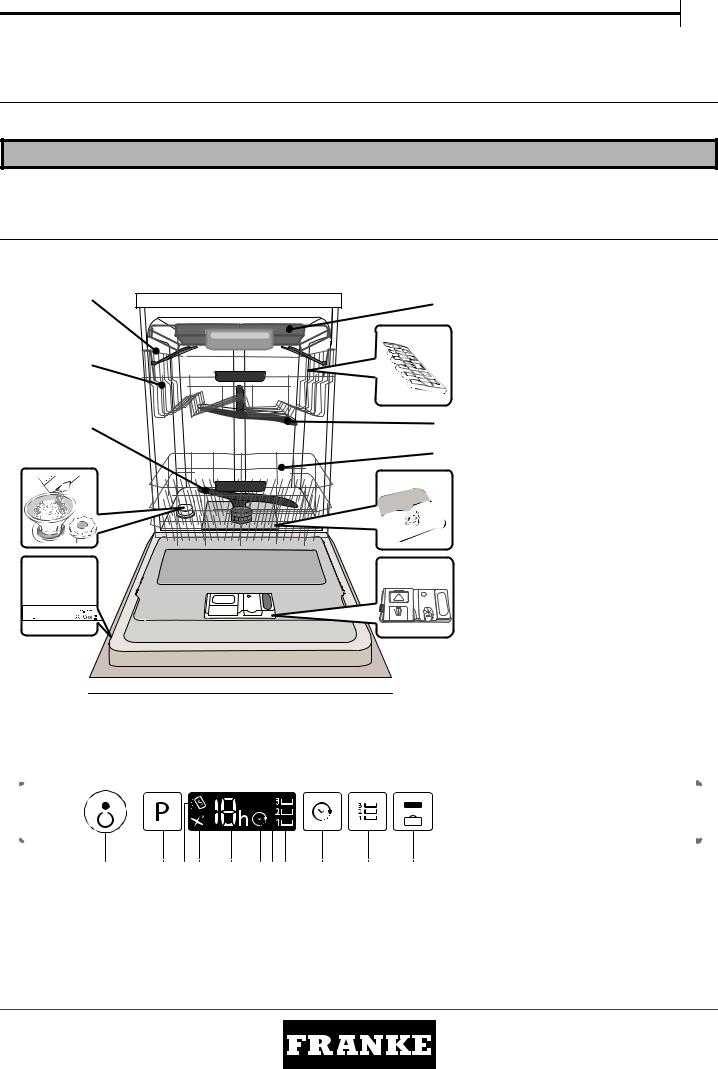
PRODUCT DESCRIPTION
APPLIANCE |
|
|
|
|
|
1 |
2 |
1. |
Upper rack |
|
2. |
Cutlery rack |
||
|
|
3 |
3. |
Foldable flaps |
|
|
4. |
Upper rack height adjuster |
|
|
4 |
|
5. |
Upper spray arm |
|
|
6. |
Lower rack |
|
|
|
|
7. |
Lower spray arm |
|
|
|
8. |
Filter Assembly |
|
7 |
5 |
9. |
Salt reservoir |
|
10. |
Detergent and Rinse Aid dispensers |
||
|
|
6 |
11. |
Rating plate |
|
9 |
8 |
12. |
Control panel |
|
|
|
||
|
11 |
10 |
|
|
|
FDW 614 D7P A++ 61530110100 S/N xxxxxxxxx |
|
|
|
|
117.0496.323 |
|
|
|
|
61530110100 |
|
|
|
220-240 V~50 Hz 0,05 ÷ 1 MPa |
4 |
|
|
|
Max.1900W 1800 W |
TYPE: DWL-DEA701-B |
|
|
|
12 |
|
|
|
|
CONTROL PANEL
|
|
|
|
|
|
|
|
|
|
|
|
|
|
|
|
|
|
|
|
|
|
|
|
|
|
|
|
|
|
|
|
|
|
|
|
|
|
|
|
|
|
|
|
|
|
|
|
|
|
|
|
|
|
|
|
|
1 |
2 |
3 |
4 |
5 |
6 |
7 8 |
9 |
10 |
11 |
|
||
1. |
On-Off/Reset button with indicator light |
|
|
|
|
7. |
Display |
||||||
2. |
Program selection button |
|
|
|
|
|
|
|
8. |
Multizone indicator light |
|||
3. |
Salt refill indicator light |
|
|
|
|
|
|
|
9. |
Delay button |
|||
4. |
Rinse Aid refill indicator light |
|
|
|
|
|
|
|
10. |
Multizone button |
|||
5. |
Program number and setting delay |
|
|
|
|
|
11. |
Tablet (Tab) button with indicator light |
|||||
6. |
Delay indicator light |
|
|
|
|
|
|
|
|
|
|
|
|
3
FIRST TIME USE
SALT, RINSE AID AND DETERGENT
ADVICE REGARDING THE FIRST TIME USE
After installation, remove the stoppers from the racks and the retaining elastic elements from the upper rack.
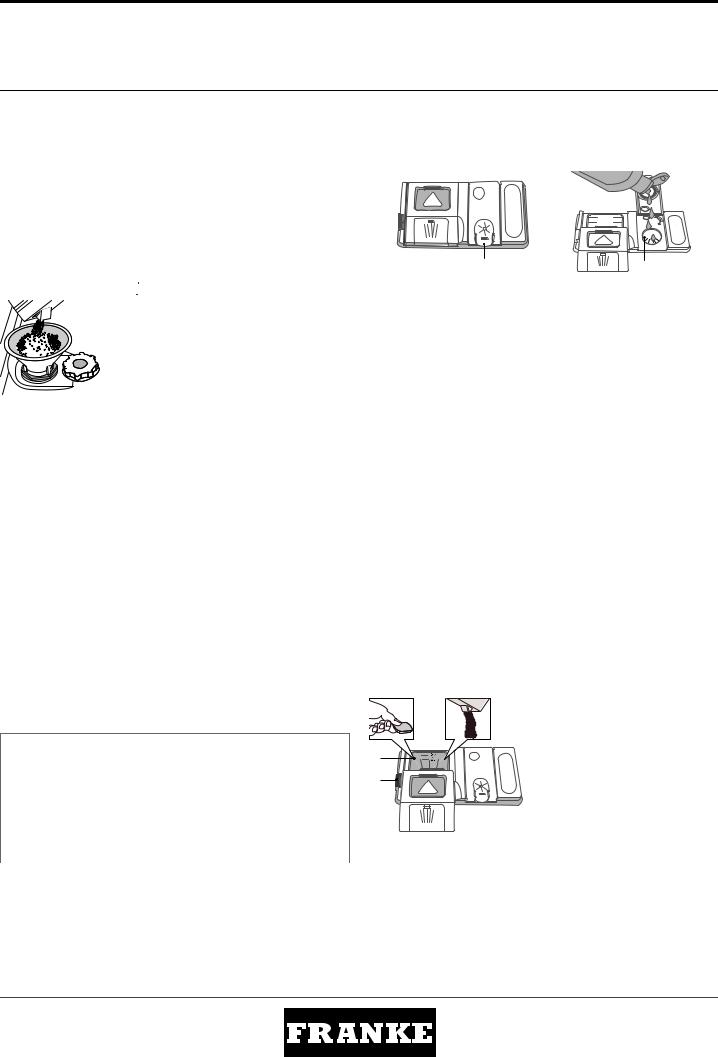
FILLING THE SALT RESERVOIR
The use of salt prevents the formation of LIMESCALE on the dishes and on the machine’s functional components.
•It is important that the salt reservoir be never empty.
•It is important to set the water hardness.
The salt reservoir is located in the lower part of the dishwasher (see PROGRAMS DESCRIPTION) and should be filled when the SALT REFILL
indicator light |
in the display is lit. |
|
1.Remove the lower rack and unscrew the |
|
reservoir cap (anticlockwise). |
|
2.Position the funnel (see figure) and fill the salt |
|
reservoir right up to its edge (approximately 1 kg); |
|
it is not unusual for a little water to leak out. |
|
3.Remove the funnel and wipe any salt residue |
|
away from the opening. |
Make sure the cap is screwed on tightly, so that no detergent can get into the container during the wash program (this could damage the water softener beyond repair).
Whenever you need to add salt, we recommend carrying out the procedure before the washing cycle is started.
SETTING THE WATER HARDNESS
To allow the water softener to work in a perfect way, it is essential that the water hardness setting is based on the actual water hardness in your house. This information can be obtained from your local water supplier.
The factory setting is for average (3) water hardness.
•Switch on the appliance by pressing the ON/OFF button.
•Switch off the appliance by pressing the ON/OFF button.
•Hold down button P for 5 seconds, until you hear a beep.
•Switch on the appliance by pressing the ON/OFF button.
•The current selection level number and the salt indicator light both flash.
•Press button P to select the desired hardness level (see WATER HARDNESS TABLE).
|
|
Water Hardness Table |
|
||
|
|
|
|
|
|
|
Level |
°dH |
|
°fH |
|
|
German degrees |
|
French degrees |
||
|
|
|
|||
|
|
|
|
|
|
1 |
Soft |
0 |
- 6 |
|
0 - 10 |
|
|
|
|
|
|
2 |
Medium |
7 - 11 |
|
11 - 20 |
|
|
|
|
|
|
|
3 |
Average |
12 |
- 17 |
|
21 - 30 |
|
|
|
|
|
|
4 |
Hard |
17 |
- 34 |
|
31 - 60 |
|
|
|
|
|
|
5 |
Very hard |
35 |
- 50 |
|
61 - 90 |
|
|
|
|
|
|
• Switch off the appliance by pressing the ON/OFF button. Setting is complete!
As soon as this procedure is complete, run a program without loading.
Only use salt that has been specifically designed for dishwashers.
After the salt has been poured into the machine, the SALT REFILL indicator light switches off.
If the salt container is not filled, the water softener and the heating element may be damaged as a result.
FILLING THE RINSE AID DISPENSER
Rinse aid makes dish DRYING easier. The rinse aid dispenser A should be filled when the RINSE AID REFILL indicator light  in the display is lit.
35
25
A |
X |
M |
B |
A |
1.Open the dispenser B by pressing and pulling up the tab on the lid.
2.Carefully introduce the rinse aid as far as the maximum (110 ml) reference notch of the filling space - avoid spilling it. If this happens, clean the spill immediately with a dry cloth.
3. .Press the lid down until you hear a click to close it.
NEVER pour the rinse aid directly into the tub.
ADJUSTING THE DOSAGE OF RINSE AID
If you are not completely satisfied with the drying results, you can adjust the quantity of rinse aid used.
•Switch the dishwasher on using the ON/OFF button.
•Switch it off using the ON/OFF button.
•Press button P three times - a beep will be heard.
•Switch it on using the ON/OFF button.
•The current selection level number and rinse aid indicator light flash.
•Press button P to select the level of rinse aid quantity to be supplied.
•Switch it off using the ON/OFF button
Setting is complete!
If the rinse aid level is set to ZERO (ECO), no rinse aid will be supplied. The LOW RINSE AID indicator light will not be lit if you run out of rinse aid. A maximum of 4 levels can be set according to the dishwasher model. The factory setting is for a medium level.
•If you see bluish streaks on the dishes, set a low number (1-2).
•If there are drops of water or limescale marks on the dishes, set a high number (3-4).
FILLING THE DETERGENT DISPENSER
|
To open the detergent dispenser |
|
use the opening device A. Introduce |
|
the detergent into the dry dispenser |
|
B only. Place the amount of |
|
detergent for pre-washing directly |
A |
inside the tub. |
|
1.When measuring out the detergent |
|
refer to the (see PROGRAMS TABLE) to |
|
add the proper quantity. |
|
Compartment B comprises a level |
showing the maximum quantity of liquid or powder detergent that can be added to each cycle.
2.Remove detergent residues from the edges of the dispenser and close the cover until it clicks.
3.Close the lid of the detergent dispenser by pulling it up until the
closing device is secured in place.
The detergent dispenser automatically opens up at the right time according to the program. If all-in-one detergents are used, we recommend using the TABLET button, because it adjusts the program so that the best washing and drying results are always achieved.
4
EN
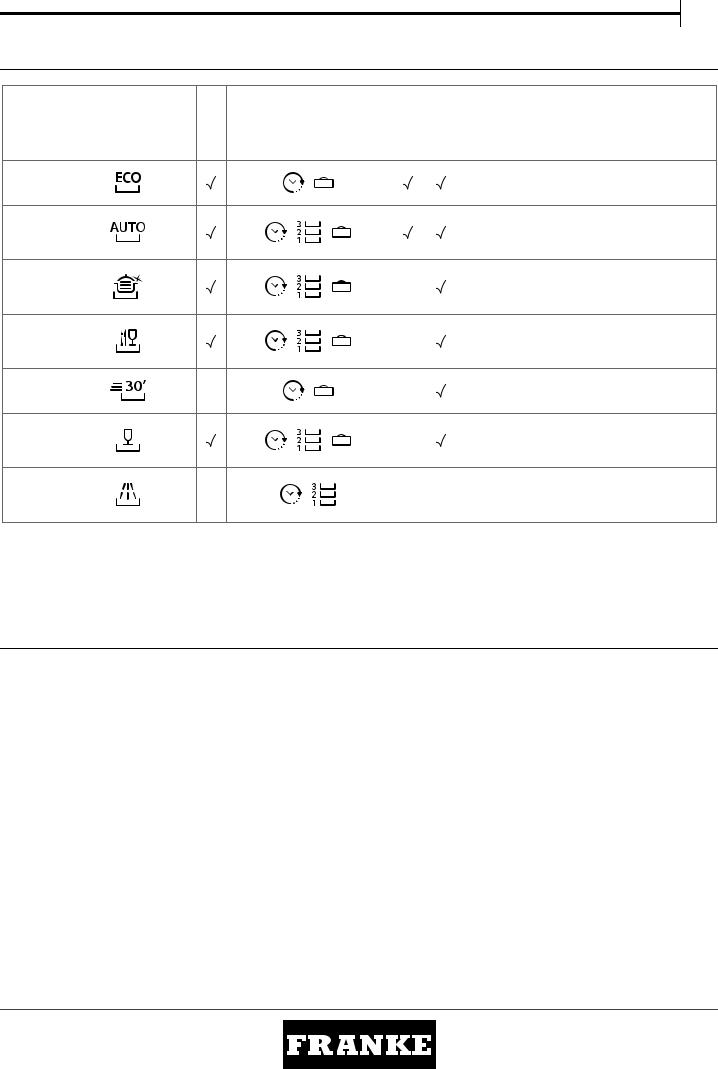
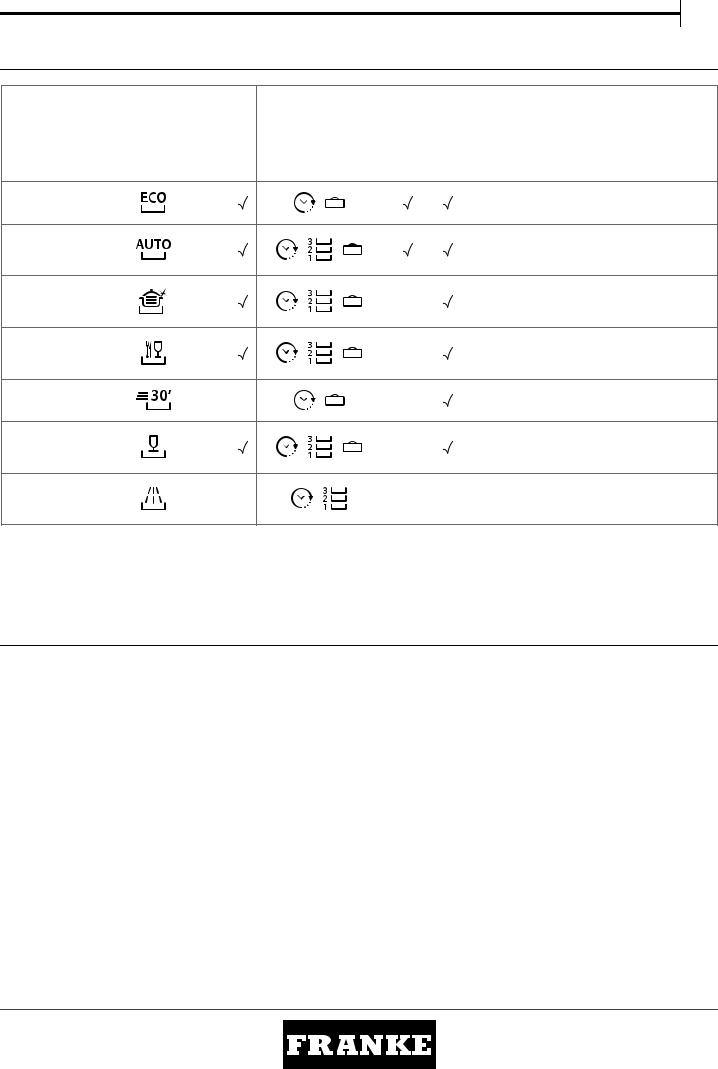
PROGRAMS TABLE
Program
1. |
Eco |
50° |
2. |
Auto |
50-60° |
3. |
Intensive |
65° |
4. |
Daily |
50° |
5. |
Rapid 30’ |
50° |
6. |
Crystal |
45° |
7. |
Pre-Wash |
- |
Drying phase
-
-
|
|
|
|
|
Detergent |
Duration of |
Water |
Energy |
||
Available options *) |
dispenser |
|||||||||
wash program |
consumption |
consumption |
||||||||
|
|
|||||||||
|
|
|
|
|
|
|
(h:min)**) |
(litres/cycle) |
(kWh/cycle) |
|
|
|
|
|
|
Tub |
B |
||||
|
|
|
|
|
|
|
|
|||
|
|
|
|
|
|
|
3:40 |
9,0 |
0,93 |
|
|
|
|
|
|
|
|
||||
|
|
|
|
|
|
|
1:25- 3:00 |
7,0-14,0 |
0,90-1,40 |
|
|
|
|
|
|
|
|
||||
|
|
|
|
|
- |
|
2:50 |
16,0 |
1,60 |
|
|
|
|
|
|
|
|||||
|
|
|
|
|
- |
|
1:30 |
13,0 |
1,15 |
|
|
|
|
|
|
|
|||||
|
|
|
|
|
- |
|
0:30 |
9,0 |
0,55 |
|
|
|
|
|
|
|
|||||
|
|
|
|
|
- |
|
1:40 |
11,5 |
1,20 |
|
|
|
|
|
|
|
|||||
|
|
|
|
|
- |
- |
0:12 |
4,5 |
0,01 |
|
|
|
|
|
|
|
|
|
|
|
|
ECO program data is measured under laboratory conditions according to European Standard EN 50242.
*) The duration of the program shown on the display or in the booklet is an estimate calculated on standard conditions. The actual time may vary depending on many factors such as temperature and pressure of the incoming water, room temperature, amount of detergent, quantity and type of load, load balancing, additional selected options and sensor calibration. The sensor calibration can increase program duration up to 20 min.
Standby consumption: Left-on mode consumption: 5 W - Off mode consumption: 0.5 W
PROGRAMS DESCRIPTION
Instructions on wash cycle selection.
ECO
Normally soiled crockery. Standard program, the most efficient in terms of its combined energy and water consumption.
AUTO
For normally soiled dishes with dried food residues. Senses the level of soiling on the dishes and adjusts the program duration and temperature accordingly.
INTENSIVE
Program recommended for heavily soiled crockery, especially suitable for pans and saucepans (not to be used for delicate items).
DAILY
Normally soiled crockery. Everyday cycle, that ensures optimal cleaning performance in shorter time.
RAPID 30’
Program to be used for lightly-soiled dishes with no dried food residues. Ideal for 2 place settings.
CRYSTAL
Cycle for delicate items, which are more sensitive to high temperatures, for example glasses and cups.
PRE-WASH
Crockery to be washed later. No detergent to be used with this program.
Notes:
Optimum performance levels when using the “Rapid” program can be achieved by observing the maximum amounts of specified place settings.
To reduce consumption even further, only run the dishwasher when it is full.
5
OPTIONS AND FUNCTIONS
OPTIONS can be selected directly by pressing the corresponding button (see CONTROL PANEL).
If an option is not compatible with the selected program see PROGRAMS TABLE, the corresponding LED flashes rapidly 3 times and beeps will sound. The option will not be enabled.
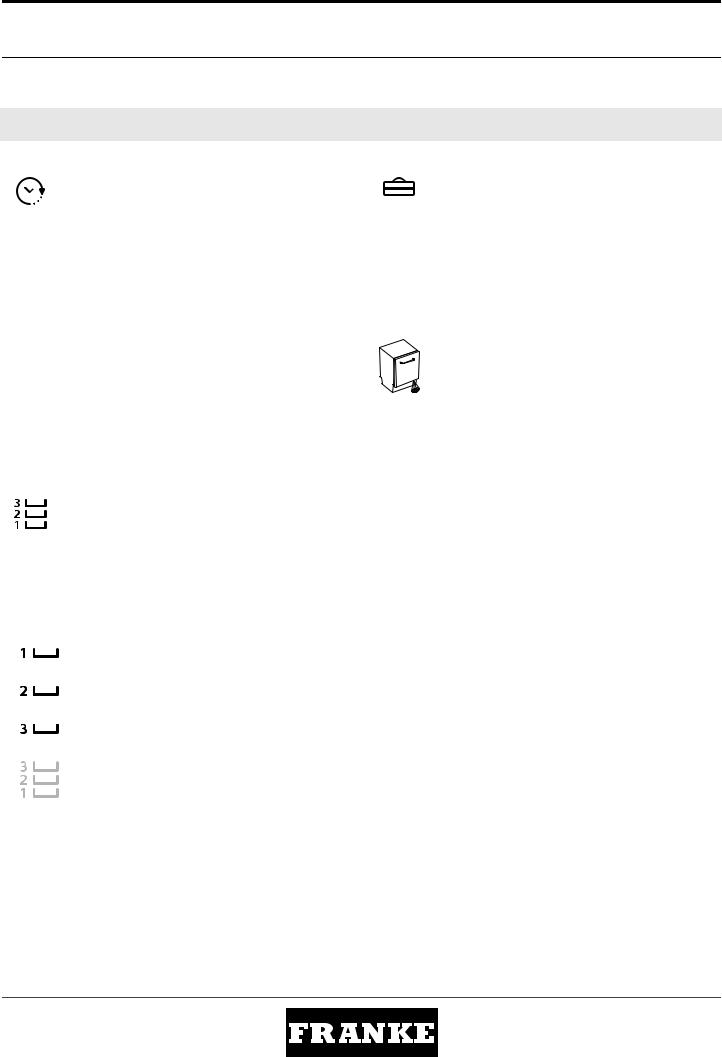
DELAY
The start time of the program may be delayed for a period of time between 1 and 12 hours.
1.Press the DELAY button: the corresponding symbol appears on the display; each time you press the button, the time (1h, 2h, etc. up to max. 12h) from the start of the selected wash cycle will be increased.
2.Select the wash program and close the door: the timer will begin counting down;
3.Once this time has elapsed, the indicator light switches off and the wash cycle begins.
To adjust the delay time and select a shorter period of time, press the DELAY button. To cancel it, press the button repeatedly until the selected delayed start indicator light switches off.
The wash program will start automatically as soon as the door is shut.
The Delay function cannot be set once a wash cycle has been started.
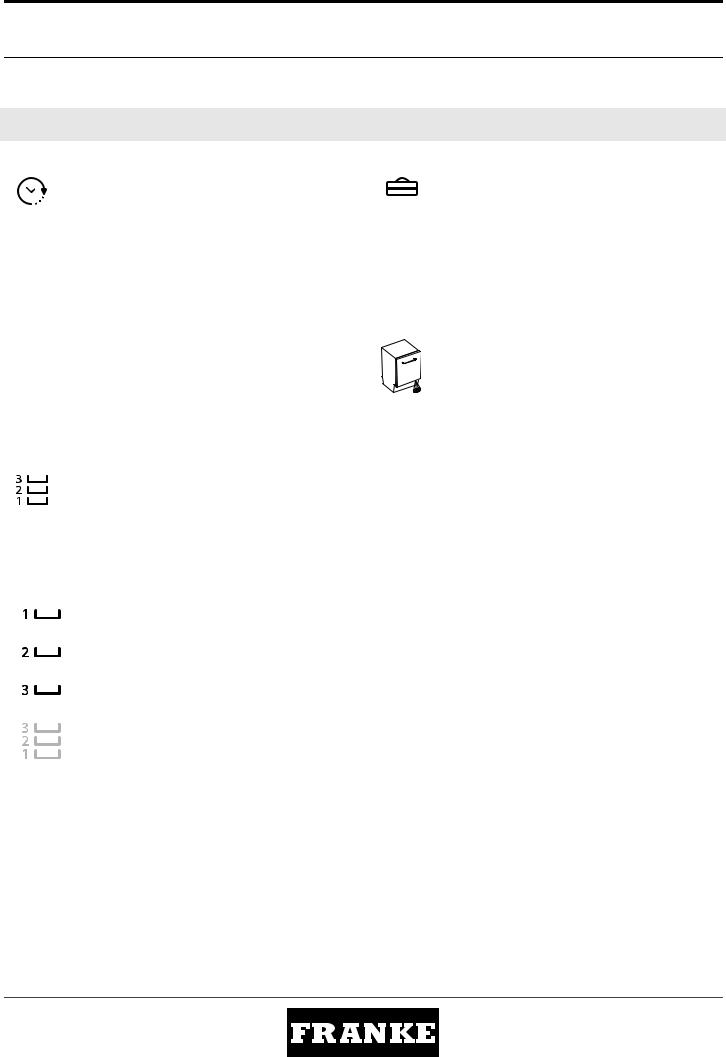
MULTIZONE
If there are not many dishes to be washed, a half loading may be used in order to save water, electricity and detergent.
Select the program and then press the MULTIZONE button: the symbol of the chosen rack will appear on the display. By default the appliance washes dishes in all racks.
To wash only the specific rack, press this button repeatedly:
shown on the display (only lower rack)
shown on the display (only upper rack)
shown on the display (only cutlery rack)
shown on the display (option is OFF and the appliance will wash dishes in all racks).
Remember to load the upper or lower rack only, and to reduce the amount of detergent accordingly.
TABLET (Tab)
This setting allows you to optimize the performance of the program according to the type of detergent used. Press the TABLET button (the indicator light will light up) if you use combined detergents in tablet form (rinse aid, salt and detergent in 1 dose).
If you use powder or liquid detergent, this option should be switched off.
OPERATION INDICATOR
An amber LED light on the floor indicates that the dishwasher is working. One of the following operating modes can be selected:
a)Disabled function.
b)When the cycle starts the light goes on for few seconds, stays off during the cycle and flashes at the end of the cycle.
c)The light stays on during the cycle and flashes at the end of the cycle (default mode).
If the delayed start was set, the light goes on either for the first few seconds or the entire duration of the countdown, based on whether mode b) or c) was set.
The light goes off every time the door is opened. To select the mode you prefer, switch on the machine, hold down button P until one of the three letters appears on the display, press button P until you reach the desired letter (or mode), hold down button P to confirm the selection.
6

EN
DAILY USE
1.CHECK WATER CONNECTION
Check that the dishwasher is connected to the water supply and that the top is open.
2.SWITCH THE DISHWASHER ON
Open the door and press the ON/OFF button.
3.LOAD THE RACKS
(see LOADING THE RACKS)
4.FILLING THE DETERGENT DISPENSER
(see PROGRAMS TABLE).
5.CHOOSE THE PROGRAM AND CUSTOMISE THE CYCLE
Select the most appropriate program in accordance with the type of crockery and its soiling level (see PROGRAMS DESCRIPTION) by pressing the P button.
Select the desired options (see OPTIONS AND FUNCTIONS).
The machine will switch off automatically during certain extended periods of inactivity, in order to minimise electricity consumption. If the crockery is only lightly soiled or if it has been rinsed with water before being placed in the dishwasher, reduce the amount of detergent used accordingly.
MODIFYING A RUNNING PROGRAM
If a wrong program was selected, it is possible to change it, provided that it has only just begun: open the door (beware of HOT steam!), press and hold the ON/OFF button, the machine will switch off.
Switch the machine back on using the ON/OFF button and select the new wash cycle and any desired options; start the cycle by closing the door.
6.START
Start the wash cycle by closing the door. When the program starts you hear a beep.
7.END OF WASH CYCLE
The end of the wash cycle is indicated by beeps and by the flashing of the wash cycle indicator on the panel and the light on the floor (if activated). Open the door and switch off the appliance by pressing the ON/OFF button.
Wait for a few minutes before removing the crockery - to avoid burns. Unload the racks, beginning with the lower one.
ADDING EXTRA CROCKERY
Without switching the machine off, open the door (beware of HOT steam!) and place the crockery inside the dishwasher. Close the door and the cycle will begin from the point at which it was interrupted.
ACCIDENTAL INTERRUPTIONS
If the door is opened during the wash cycle, or if there is a power cut, the cycle stops. It starts again from the point at which it was interrupted once the door has been closed or the electricity supply is restored.
ADVICE AND TIPS
TIPS
Before loading the baskets, remove all food residues from the crockery and empty the glasses. You do not need to rinse beforehand under running water.
Arrange the crockery so that it is held in place firmly and does not tip over; and arrange the containers with the openings facing downwards and the concave/convex parts placed obliquely, thus allowing the water to reach every surface and flow freely.
Warning: lids, handles, trays and frying pans do not prevent the sprayer arms from rotating.
Place any small items in the cutlery basket.
Very soiled dishes and pans should be placed in the lower basket because in this sector the water sprays are stronger and allow a higher washing performance.
After loading the appliance, make sure that the sprayer arms can rotate freely.
HYGIENE
To avoid odour and sediment which can be accumulated in the dishwasher please run a high temperature program at least once
a month. Use a tea spoon of detergent and run it without the loading to clean your appliance.
DAMAGE TO GLASS AND CROCKERY
•Only use glasses and porcelain guaranteed by the manufacturer as dishwasher safe.
•Use a delicate detergent suitable for crockery
•Collect glasses and cutlery from the dishwasher as soon as the wash cycle is over.
UNSUITABLE CROCKERY
Items which are not dishwasher-safe:
•Wooden dishes, pots or pans: these may be damaged by the high washing temperatures.
•Hand crafted items: these are rarely suitable for washing in a dishwasher. The relatively high water temperatures and the detergents used may damage them.
•Plastic dishes: these are not heat resistant and may lose their shape. Heat resistant plastic dishes must be washed in the upper basket.
•Dishes and objects in copper, tin, zinc or brass: these tend to stain.
•Aluminium dishes: items made from anodised aluminium may lose their colour.
•Silverware: silver items may stain.
•Glass and crystal: in general, glass and crystal objects can be washed in the dishwasher. However, certain types of glass and crystal may become dull and lose their clearness after many washings. Therefore, for these items we recommend using the least aggressive program available.
•Decorated items: the decorated objects available on the market are generally able to withstand washing in the dishwasher, although the colours may fade after a great many washes. If in doubt as to the fastness of the colours, it is advisable to wash just a few items at a time for approximately one month.
7

LOADING THE RACKS
CUTLERY RACK
The third rack was designed to
house the cutlery.
Arrange the cutlery as shown in
the figure.
A separate arrangement of the
cutlery makes collection easier
after washing and improves
washing and drying performance.
Knives and other utensils with sharp edges must be positioned with the blades facing downwards.
The geometry of the rack makes it possible to place such small items as coffee cups in the area in the middle.
FOLDABLE FLAPS WITH ADJUSTABLE POSITION
The side foldable flaps can be positioned at three different heights to optimize the arrangement of crockery inside the rack. Wine glasses can be placed safely in the foldable flaps by inserting the stem of each glass into the corresponding slots.
For optimum drying results incline the foldable flaps more. To change the inclination, pull up the foldable flap, slide it slightly and position it as you wish.
LOWER RACK
For pots, lids, plates, salad bowls, cutlery etc. Large plates and lids should ideally be placed at the sides to avoid interferences with the spray arm.The lower rack has tip-up supports which can be used in a vertical position when arranging plates or in a horizontal position (lower) to load pans and salad bowls easily.
UPPER RACK
Load delicate and light dishes: glasses, cups, saucers, low salad bowls.
(loading example for the lower rack)
(loading example for the upper rack)
ADJUSTING THE HEIGHT OF THE UPPER RACK
The height of the upper rack can be adjusted: high position to place bulky crockery in the lower basket and low position to make the most of the tip-up supports by creating more space upwards and avoid collision with the items loaded into lower rack.
The upper rack is equipped with a Upper Rack height adjuster (see figure), without
pressing the levers, lift it up by simply holding the rack sides, as soon as the rack is stable in its upper position.
To restore to the lower position, press the levers A at the sides of the rack and move
the basket downwards.
We strongly recommend that you do not adjust the height of the rack when it
is loaded.
NEVER raise or lower the basket on one side only.
8

EN
CARE AND MAINTENANCE
CLEANING THE FILTER ASSEMBLY
Regularly clean the filter assembly so that the filters do not clog and that the waste water flows away correctly.
The filter assembly consists of three filters which remove food residues from the washing water and then recirculate the water: to obtain the best washing results, you need to keep them clean.
The dishwasher must not be used without filters or if the filter is loose.
After several washes, check the filter assembly and if necessary clean it thoroughly under running water, using a non-metallic brush and following the instructions below:
1.Turn the cylindrical filter A in an anti-clockwise direction and pull it out (Fig 1).
2.Remove the cup filter B by exerting a slight pressure on the side flaps (Fig 2).
3.Slide out the stainless-steel plate filter C (Fig 3).
4.Inspect the trap and remove any food residues.
NEVER REMOVE the wash-cycle pump protection (black detail) (Fig 4).
CLEANING THE SPRAY ARMS
On occasions, food residue may become encrusted onto the spray arms and block the holes used to spray the water. It is therefore recommended that you check the arms from time to time and clean them with a small non-metallic brush.
To remove the upper spray arm, turn the plastic locking ring in an anticlockwise direction. The upper spray arm should be replaced so that the side with the greater number of holes is facing upwards.
1 |
2 |
|
A |
B |
|
A |
||
|
C |
|
3 |
4 |
After cleaning the filters, re-place the filter assembly and fix it in position correctly; this is essential for maintaining the efficient operation of the dishwasher.
The lower spray arm may be removed by pulling it upwards.
CLEANING THE WATER INLET HOSE
If the water hoses are new or have not been used for an extended period of time, let the water run to make sure it is clear and free of impurities before performing the necessary connections. If this precaution is not taken, the water inlet could become blocked and damage the dishwasher.
9

TROUBLESHOOTING
Your dishwasher may not work properly.
Before contacting the Service Centre check if the problem can be solved by going through the following list.
PROBLEMS |
POSSIBLE CAUSES |
SOLUTIONS |
|
|
|
The dishwasher |
The appliance has not been plugged in |
Insert the plug into the socket. |
won’t start or does |
properly. |
|
not respond to com- |
|
|
mands. |
Power outage. |
The dishwasher starts automatically when the power returns. |
|
|
|
|
The dishwasher door is not closed. |
Vigorously push the door until you hear the “click”. |
|
|
|
|
It does not respond to commands. |
Switch off the appliance by pressing the ON/OFF button, switch it back on |
|
|
after approximately one minute and reset the program. |
|
|
|
The dishwasher |
The wash cycle has not finished yet. |
Wait until the wash cycle finishes. |
won’t drain. |
|
|
|
The drain hose is bent. |
Check that the drain hose is not bent (see INSTALATION INSTRUCTION). |
|
|
|
|
The sink drain pipe is blocked. |
Clean the sink drain pipe. |
|
|
|
|
The filter is clogged up with food residues |
Clean the filter (see CLEANING THE FILTER ASSEMBLY). |
|
|
|
The dishwasher |
The dishes are rattling against each. |
Arrange the crockery correctly (see LOADING THE RACKS). |
makes excessive |
|
|
noise. |
An excessive amount of foam has been |
The detergent has not been measured out correctly or it is not suitable for |
|
produced. |
use in dishwashers (see FILLING THE DETERGENT DISPENSER). Reset dish- |
|
|
washer by pressing the DRAIN button (see OPTIONS AND FUNCTIONS) and |
|
|
run new program without detergent. |
|
|
|
The dishes are not |
The crockery has not been arranged prop- |
Arrange the crockery correctly (see LOADING THE RACKS). |
clean. |
erly. |
|
|
|
|
|
The spray arms cannot rotate freely, being |
Arrange the crockery correctly (see LOADING THE RACKS). |
|
hindered by the dishes. |
|
|
|
|
|
The wash cycle is too gentle. |
Select an appropriate wash cycle (see PROGRAMS TABLE). |
|
|
|
|
An excessive amount of foam has been |
The detergent has not been measured out correctly or it is not suitable for |
|
produced. |
use in dishwashers (see FILLING THE DETERGENT DISPENSER). |
|
|
|
|
The cap on the rinse aid compartment has |
Make sure the cap of the rinse aid dispenser is closed. |
|
not been shut correctly. |
|
|
|
|
|
The filter is soiled or clogged. |
Clean the filter assembly (see CARE AND MAINTENANCE). |
|
|
|
|
There is no salt. |
Fill the salt reservoir (see FILLING THE SALT RESERVOIR). |
|
|
|
TECHNICAL DATASHEET
The technical data can be downloaded from the website: www.franke.com
CONTACTING AFTER-SALES SERVICE
When you contact the After-Sales Service, |
|
|
|
|
you must provide the codes shown on |
|
|
|
|
the rating plate attached to the left or |
|
|
|
|
right side inside the door of the |
|
|
|
|
dishwasher. The phone number is listed |
|
|
|
|
in the warranty booklet or on the website: |
|
|
|
117.0496.323 |
|
|
|
|
FDW 614 D7P A++ 61530110100 S/N xxxxxxxxx |
www.franke.com |
|
MADE IN POLAND |
61530110100 |
|
|
|
|
||
220-240 V~50 Hz 0,05 |
÷ 1 MPa |
4 |
||
|
Max.1900W 1800 W |
TYPE: DWL-DEA701-B |
||
10
CS
NÁVOD KE KAŽDODENNÍMU
POUŽITÍ
Před použitím spotřebiče si pečlivě přečtěte Bezpečnostní upozornění.
POPIS PRODUKTU
SPOTŘEBIČ |
|
|
|
|
|
1 |
2 |
1. |
Horní koš |
|
|
3 |
2. |
Košík na nádobí |
|
|
3. |
Sklopná ramena |
|
|
4 |
|
4. |
Regulátor výšky horního koše |
|
|
5. |
Horní ostřikovací rameno |
|
|
|
|
6. |
Spodní koš |
|
|
|
7. |
Spodní rameno s tryskami |
|
7 |
5 |
8. |
Filtrační jednotka |
|
9. |
Zásobník na sůl |
||
|
|
6 |
10. |
Přihrádky na čisticí prostředek a leštidlo |
|
9 |
11. |
Destička s údaji |
|
|
8 |
12. |
Ovládací panel |
|
|
11 |
10 |
|
|
|
FDW 614 D7P A++ 61530110100 S/N xxxxxxxxx |
|
|
|
|
117.0496.323 |
|
|
|
|
61530110100 |
|
|
|
220-240 V~50 Hz 0,05 ÷ 1 MPa |
4 |
|
|
|
Max.1900W 1800 W |
TYPE: DWL-DEA701-B |
|
|
|
12 |
|
|
|
|
OVLÁDACÍ PANEL
|
|
|
|
|
|
|
|
|
|
|
|
|
|
|
|
|
|
|
|
|
|
|
|
|
|
|
|
|
|
|
|
|
|
|
|
|
|
|
|
|
|
|
|
|
|
|
|
|
|
|
|
|
|
|
|
|
1 |
2 |
3 |
4 |
5 |
6 |
7 8 |
9 |
10 |
11 |
|
||
1. |
Tlačítko „zapnout-vypnout/vynulovat“ s kontrolkou |
|
|
7. |
Displej |
||||||||
2. |
Tlačítko volby programu |
|
|
|
|
|
|
|
8. |
Kontrolka funkce „Multizone“ |
|||
3. |
Kontrolka „Doplnění soli“ |
|
|
|
|
|
|
|
9. |
Tlačítko „Odložený start“ |
|||
4. |
Kontrolka „Nedostatek leštidla“ |
|
|
|
|
|
|
10. |
Tlačítko „Multizone““ |
||||
5. |
Čísla programu a nastavení zpoždění |
|
|
|
|
11. |
Tlačítko „Prášek/Tableta“ (Tab) s kontrolkou |
||||||
6. |
Kontrolka „Odložený start“ |
|
|
|
|
|
|
|
|
|
|
|
|
11

PRVNÍ POUŽITÍ
SŮL, LEŠTIDLO A MYCÍ PROSTŘEDEK
DOPORUČENÍ TÝKAJÍCÍ SE PRVNÍHO POUŽITÍ
Po instalaci odstraňte z košů zarážky a z horního koše odstraňte elastické prvky.
DOPLNĚNÍ LEŠTIDLA
Leštidlo usnadňuje SUŠENÍ. Zásobník leštidla A je třeba doplnit jakmile se na displeji rozsvítí kontrola DOPLNĚNÍ LEŠTIDLA  .
.
DOPLNĚNÍ ZÁSOBNÍKU NA SŮL
Abyste předešli tvorbě VODNÍHO KAMENE na nádobí a na funkčních komponentech spotřebiče, používejte sůl.
•Je důležité, aby zásobník na sůl nebyl nikdy prázdný.
•Nastavení tvrdosti vody je důležité.
Zásobník na sůl se nachází ve spodní části myčky nádobí (see the POPIS PROGRAMŮ) a pokud se na displeji rozsvítí kontrolka DOPLNĚNÍ SOLI

 , je třeba ji doplnit.
1.Vysuňte spodní koš a odšroubujte víčko
zásobníku (proti směru hodinových ručiček).
2.Umístěte násypku (viz obrázek) a zásobník na sůl
doplňte až po jeho okraj (zhruba 1 kg); může dojít
k vytečení malého množství vody.
3.Násypku odstraňte a z okolí otvoru odstraňte jakékoli zbytky soli.
Ujistěte se, zda je víčko pevně přišroubované, aby se během programu mytí nedostal do zásobníku mycí prostředek (to by mohlo poškodit změkčovaní vody).
Kdykoli potřebujete přidat sůl, doporučujeme, abyste postup provedli před spuštěním cyklu mytí.
NASTAVENÍ TVRDOSTI VODY
Aby mohlo změkčování vody fungovat co nejlépe, je nezbytné, aby se nastavení tvrdosti vody zakládalo na skutečné tvrdosti vody ve vaší domácnosti. Informace lze získat od vašeho lokálního dodavatele vody. V továrním nastavení je nastavena průměrná tvrdost vody (3).
•Spotřebič zapněte stisknutím tlačítka ZAP./VYP. .
•Spotřebič vypněte stisknutím tlačítka ZAP./VYP..
•Na 5 sekund stiskněte tlačítko P dokud neuslyšíte pípnutí.
•Spotřebič zapněte stisknutím tlačítka ZAP./VYP. .
•Aktuální nastavení úrovně a kontrolka soli blikají.
•Stiskněte tlačítko P a vyberte požadovanou tvrdost vody (viz TABULKA TVRDOSTI VODY).
|
|
Tabulka úrovně tvrdosti vody |
|||
|
|
|
|
|
|
|
Úroveň |
|
°dH |
°fH |
|
|
|
Německé stupně |
Francouzské stupně |
||
|
|
|
|||
|
|
|
|
|
|
1 |
Měkké |
|
0 |
- 6 |
0 - 10 |
|
|
|
|
|
|
2 |
Střední |
|
7 - 11 |
11 - 20 |
|
|
|
|
|
|
|
3 |
Průměr |
|
12 |
- 17 |
21 - 30 |
|
|
|
|
|
|
4 |
Tvrdé |
|
17 |
- 34 |
31 - 60 |
|
|
|
|
|
|
5 |
Velmi tvrdé |
|
35 |
- 50 |
61 - 90 |
|
|
|
|
|
|
• Spotřebič vypněte stisknutím tlačítka ZAP./VYP.. Nastavení je dokončeno!
Jakmile se tento proces dokončí, spusťte program bez náplně.
Používejte pouze sůl, která byla navržena konkrétně pro myčky nádobí.
Po doplnění soli do myčky kontrolka DOPLNĚNÍ SOLI zhasne.
Není-li zásobník na sůl doplněný, může dojít k poškození dekalcifikátoru vody a topného prvku.
35
25
A |
X |
M |
B |
A |
1.Zásobník B otevřete stisknutím a stlačením zarážky na víčku.
2.Pečlivě nalijte leštidlo, až po rysku maximálního objemu (110 ml) - dejte pozor, abyste leštidlo nepřelili. Pokud k tomu dojde, okamžitě rozlité leštidlo utřete suchým hadříkem.
3.Víčko přitiskněte tak, abyste zaslechli cvaknutí.
Leštidlo NIKDY nelijte přímo do nálevky.
NASTAVENÍ DÁVKOVÁNÍ LEŠTIDLA
V případě, že s výsledky sušení nejste zcela spokojeni, můžete nastavit množství použitého leštidla.
•Myčku nádobí zapněte stisknutím tlačítka ZAP./VYP. .
•Vypněte ji stisknutím tlačítka ZAP./VYP..
•Třikrát stiskněte tlačítko P a ozve se pípnutí.
•Zapněte ji stisknutím tlačítka ZAP./VYP..
•Aktuální nastavení a kontrolka leštidla blikají.
•Pro výběr množství dodaného leštidla stiskněte tlačítko P.
•Vypněte ji stisknutím tlačítka ZAP./VYP. .
Nastavení je dokončeno!
Je-li úroveň množství leštidla nastavená na NULU (EKO), nebude se používat žádné leštidlo. Pokud leštidlo dojde, kontrolka MÁLO LEŠTIDLA se nerozsvítí.
V závislosti na modelu myčky nádobí lze nastavit 4 úrovně. Tovární nastavení je na střední úroveň.
•Pokud na nádobí vidíte modravé čmouhy, nastavte nízké číslo (1-2).
•Jsou-li na nádobí kapky vody nebo vodního kamene, nastavte vysoké číslo (3-4).
PLNĚNÍ PŘIHRÁDKY NA MYCÍ PROSTŘEDEK
|
K otevření přihrádky na mycí |
|
|
prostředek použijte zařízení A. |
|
|
Mycí prostředek dejte pouze do |
|
|
části označené B.. |
|
|
Množství mycího prostředku na |
|
A |
předmytí dejte přímo do trubice. |
|
1.Při odměřování množství mycího |
||
|
||
|
prostředku postupujte dle informací |
|
|
uvedených v (viz TABULKA |
|
|
PROGRAMŮ). V prostoru B je |
|
znázorněno maximální množství tekutého nebo práškového |
||
mycího prostředku, který lze přidat ke každému cyklu. |
||
2.Před zavřením krytu odstraňte z okrajů přihrádky usazeniny mycího prostředku.
3.Víčko zásobníku na mycí prostředek zavřete zatlačením - tak, aby vše bylo na svém místě.
Zásobník se automaticky otevře v pravou chvíli v závislosti na použitém programu.
Používáte-li tablety typu „vše v jednom“, doporučujeme stisknout tlačítko TABLET, čímž se program přizpůsobí, aby bylo možno dosáhnout ideálních mycích výsledků.
12
CS
TABULKA PROGRAMŮ
|
|
Program |
Fáze sušení |
|
|
|
|
1. |
Eko |
50° |
|
2. |
Auto |
50-60° |
|
3. |
Intenzivní |
65° |
|
4. |
Denní |
50° |
|
5. |
Rychlý 30’ |
50° |
- |
6. |
Křišťál |
45° |
|
7. |
Předmytí |
- |
- |
|
|
|
|
|
|
|
|
|
Zásobník |
|
|
|
||
|
|
|
|
|
mycího pro- |
Délka mycího |
Spotřeba |
Spotřeba |
||
Dostupné funkce*) |
středku |
|
||||||||
|
programu |
vody |
energie |
|||||||
|
|
|
||||||||
|
|
|
|
|
|
|
|
(h:min)**) |
(litry/cyklus) |
(kWh/cyklus) |
|
|
|
|
|
Prostor |
|
B |
|||
|
|
|
|
|
|
|
|
|
||
|
|
|
|
|
myčky |
|
|
|
|
|
|
|
|
|
|
|
|
|
|
|
|
|
|
|
|
|
|
|
|
3:40 |
9,0 |
0,93 |
|
|
|
|
|
|
|
|
|||
|
|
|
|
|
|
|
|
1:25- 3:00 |
7,0-14,0 |
0,90-1,40 |
|
|
|
|
|
|
|
|
|||
|
|
|
|
|
- |
|
|
2:50 |
16,0 |
1,60 |
|
|
|
|
|
|
|
||||
|
|
|
|
|
- |
|
|
1:30 |
13,0 |
1,15 |
|
|
|
|
|
|
|
||||
|
|
|
|
|
- |
|
|
0:30 |
9,0 |
0,55 |
|
|
|
|
|
|
|
||||
|
|
|
|
|
- |
|
|
1:40 |
11,5 |
1,20 |
|
|
|
|
|
|
|
||||
|
|
|
|
|
- |
|
- |
0:12 |
4,5 |
0,01 |
|
|
|
|
|
|
|
|
|
|
|
Data programu EKO jsou změřená v laboratorních podmínkách, v souladu s evropskou směrnicí EN 50242. *) Všechny možnosti nelze používat současně.
**) Délka trvání programu zobrazená na displeji nebo v brožuře je odhad vypočtený za standardních podmínek. Skutečný čas se může lišit v závislosti na řadě faktorů, například teplotě a tlaku přiváděné vody, množství mycího prostředku, kvalitě a typu náplně, vyvážení náplně, vybraných doplňkových možnostech a kalibraci senzoru. Kalibrace senzoru může zvýšit délku trvání programu až o 20 minut.
Spotřeba v pohotovostním stavu: Spotřeba v režimu zapnutí: 5 W - Spotřeba v režimu vypnutí: 0,5 W
POPIS PROGRAMŮ
Pokyny k výběru cyklu mytí.
EKO
Normálně zašpiněné nádobí. Standardní program, nejefektivnější co do kombinované spotřeby energie a vody.
AUTO
Pro běžně zašpiněné nádobí se zaschlými nečistotami. Myčka zjistí úroveň zašpinění nádobí a odpovídajícím způsobem nastaví trvanie programu a teplotu.
INTENZIVNÍ
Program doporučený pro silně znečištěné nádobí, zejména vhodný na hrnce a pánve (nelze ho používat na křehké nádobí).
DENNÍ
Běžně zašpiněné nádobí. Běžný program zajišťující ideální mytí v kratším čase.
KŘIŠŤÁL
Program pro jemné nádobí citlivější na vysoké teploty, jako jsou například sklenice a hrníčky.
PŘEDMYTÍ
Nádobí, které má být umyto později. V tomto programu se nepoužívá žádný mycí prostředek.
Poznámky:
Optimálních úrovní výkonu při použití programů “Rychlý” lze dosáhnout dodržením maximálního množství nastavení místa.
Abyste ještě více snížili spotřebu energie, myčku nádobí spouštějte pouze je-li plná.
RYCHLÝ 30’
Program na lehce znečištěné nádobí bez zaschlých zbytků jídla. (Ideální pro natavení 2 míst.)
13
MOŽNOSTI A FUNKCE
MOŽNOSTI lze volit přímo stiskem příslušného tlačítka (viz OVLÁDACÍ PANEL).
Není-li možnost kompatibilní se zvoleným programem viz TABULKA PROGRAMŮ, příslušná kontrolka třikrát rychle zabliká a ozve se zvukové znamení. Možnost nebude zvolena.
ODLOŽENÝ START
Start programu lze odložit o 1 až 12 hodin. 1.Stiskněte tlačítko „ODLOŽENÝ START“. Na displeji se
objeví příslušný symbol. Každým stiskem tlačítka se prodlužuje doba odložení začátku mycího programu (1 h, 2 h atd. až do max. 12 h).
2.Zvolte mycí program a zavřete dvířka: Časovač začne odpočítávat.
3.Po vypršení stanoveného času kontrolka zhasne a mycí program se automaticky spustí.
Chcete-li upravit dobu odloženého startu a zvolit kratší, stiskněte tlačítko „Odložený start“. Pro zrušení stiskněte tlačítko opakovaně, dokud nezhasne kontrolka „Odložený start“.
Po zavření dvířek se mycí program automaticky spustí.
Funkci „Odložený start“ nelze zvolit, pokud již program běží.
MULTIZONE“
Pokud je k mytí pouze malé množství nádobí, lze využít funkci „Poloviční náplň“ šetřící elektrickou energii, vodu a mycí prostředek.
Vyberte program a stiskněte tlačítko „MULTIZONE“: na displeji se zobrazí symbol zvoleného koše. Ve výchozím nastavení myčka myje nádobí ve všech koších.
Chcete-li provést mytí pouze ve zvoleném koši, stiskněte opakovaně toto tlačítko:
zobrazeno na displeji (pouze dolní koš);
zobrazeno na displeji (pouze horní koš);
zobrazeno na displeji (pouze přihrádka na příbory);
zobrazeno na displeji (zvolená možnost je VYPNUTO a myčka bude mýt nádobí ve všech koších).
Nezapomeňte nejprve vždy zcela naplnit pouze horní nebo dolní koš a přiměřeným způsobem snížit množství dávkovaného mycího prostředku
PRÁŠEK/TABLETA“ (Tab)
Toto nastavení vám umožňuje přizpůsobit průběh programu typu použitého mycího prostředku. Stiskněte tlačítko TABLETA (rozsvítí se kontrolka), používáte-li kombinované mycí prostředky ve formě tablet (leštidlo, sůl a mycí prostředek v jedné dávce).
Používáte-li mycí prostředek v prášku, měla by být tato možnost vypnuta.
INDIKÁTOR PROVOZU
Oranžové světlo LED na podlaze indikuje, že myčka funguje. Je možno zvolit jeden z následujících režimů:
a)Funkce vypnutá.
b)Po začátku cyklu se světlo rozsvítí na několik sekund, v průběhu cyklu je zhasnuté a zabliká na konci cyklu.
c)Světlo svítí po celou dobu cyklu a bliká na jeho konci
(výchozí režim).
Pokud byl nastaven odložený start, rozsvítí se světlo buď na prvních několik sekund, nebo svítí po celou dobu odpočítávání, a to v závislosti na tom, zda byl nastaven režim b), nebo c).
Světlo se rozsvítí při každém otevření dveří. Pro výběr zvoleného režimu zapněte spotřebič a držte stisknuté tlačítko P, dokud se na displeji nezobrazí jedno ze tří písmen, tisknutím tlačítka P následně zvolte písmeno označující vybraný režim a přidržením tlačítka P výběr potvrďte.
14

CS
KAŽDODENNÍ POUŽITÍ
1.ZKONTROLUJTE PŘÍVOD VODY
Zkontrolujte, zda je myčka nádobí připojená k přívodu vody a zda je kohoutek otevřený.
2.ZAPNUTÍ MYČKY NÁDOBÍ
Otevřete dveře a stiskněte tlačítko ZAP./VYP..
3.PLNĚNÍ KOŠŮ
(viz PLNĚNÍ KOŠŮ)
4.PLNĚNÍ PŘIHRÁDKY NA MYCÍ PROSTŘEDEK
(viz TABULKA PROGRAMŮ).
5.VYBERTE PROGRAM A UPRAVTE CYKLUS
Vyberte nejvhodnější program podle typu nádobí a míry jeho znečištění (see POPIS PROGRAMŮ) - k tomu použijte tlačítko P . Vyberte požadované možnosti (viz MOŽNOSTI A FUNKCE).
6.START
Cyklus mytí spusťte Zavření dveří. Když se program spustí, uslyšíte pípnutí.
7.KONEC CYKLU MYTÍ
Konec cyklu mytí je oznámen pípnutím a a rozbliká se kontrolka vybraného programu. Otevřete dveře a spotřebič vypněte stisknutím tlačítka ZAP./VYP. .
Než nádobí vyndáte, počkejte několik minut - abyste předešli popálení.
Vyprázdněte koše, začněte spodním košem.
Spotřebič se během určitých delších období nečinnosti automaticky vypne, aby se tak minimalizovala spotřeba elektřiny. Je-li nádobí pouze lehce znečištěné nebo pokud bylo před vložením do myčky opláchnuto vodou, snižte množství mycího prostředku.
ÚPRAVA SPUŠTĚNÉHO PROGRAMU
Pokud byl vybrán špatný program, je možné ho změnit, za předpokladu, že se právě spustil: otevřete dveře (dejte si pozor na HORKOU páru!), stiskněte a přidržte tlačítko ZAP./VYP., spotřebič se vypne.
Spotřebič znovu zapněte pomocí tlačítka ZAP./VYP. a vyberte nový cyklus mytí a další požadované možnosti, cyklus spusťte zavřením dveří.
PŘIDÁNÍ DALŠÍHO NÁDOBÍ
Aniž byste spotřebič vypínali, otevřete dveře (dejte si pozor na HORKOU páru!) a nádobí vložte do myčky. Zavřete dveře a a cyklus se spustí od okamžiku, v kterém byl přerušený.
NÁHODNÉ PŘERUŠENÍ
Pokud během cyklu mytí dojde k otevření dveří, nebo pokud dojde k odpojení napájení, cyklus se zastaví. Jakmile se dveře zavřou nebo se obnoví napájení, spustí se znovu v místě, v kterém byl přerušený.
RADY A TIPY
TIPY
Než nádobí vložíte do košů, odstraňte z nich všechny zbytky jídla a skleničky vylijte. Nemusíte provádět předmývání pod tekoucí vodou.
Nádobí uspořádejte tak, aby na místě drželo pevně a nepřevrátilo se; a nádoby dejte tak, aby jejich otvory směřovaly dolů a konkávní/ konvexní části umístěte šikmo, díky čemuž se voda dostane na každý povrch a bude moci volně stékat.
Varování: poklice, držadla, pekáče a pánve nesmí bránit v otáčení ostřikovacích ramen.
Do košíku na nádobí můžete dát jakékoli malé předměty.
Velmi znečištěné nádobí a pánve je třeba vložit do spodního košíku, protože v této části jsou vodní trysky silnější a poskytují vyšší mycí výkon.
Po naplnění spotřebiče se ujistěte, zda se mohou ostřikovací ramena volně otáčet.
HYGIENA
Abyste předešli možnému hromadění zápachu a usazenin v myčce, nejméně jednou za měsíc spusťte program s vysokou teplotou. Před spuštěním spotřebiče bez nádobí přidejte lžičku mycího prostředku.
POŠKOZENÍ SKLA A NÁDOBÍ
•Používejte výhradně sklenice a porcelán, u nichž výrobce zaručuje možnost mytí v myčce.
•Používejte jemný mycí přípravek vhodný na porcelánové nádobí.
•Vyjměte sklo a příbory z myčky hned po skončení mycího cyklu.
NEVHODNÉ NÁDOBÍ
Položky, které nejsou mýt v myčce nádobí:
•Dřevěné nádobí, hrnce nebo pánve: mohou být poškozeny vysokou mycí teploty.
•Ručně vyrobené předměty: jsou zřídka vhodné pro mytí v myčka. Relativně vysoké teploty vody a detergenty používané může dojít k jejich poškození.
•Plastové nádobí: tito nejsou tepelně odolné a mohou ztratit svůj tvar. Tepelně odolné plastové nádobí se musí mýt v horním koši.
•Nádobí a předměty z mědi, cínu, zinku nebo mosazi: mají tendenci skvrny.
•Hliníkové nádobí: předměty vyrobené z eloxovaného hliníku mohou ztratit jejich barva.
•Příbor: stříbrné předměty mohou skvrny.
•Sklo a křišťál: obecně skleněné a křišťálové objekty mohou být mýt v myčce. Nicméně, některé druhy skla a krystal se může stát nudné a ztratí svou průzračnost po mnoha mycí stroj. Proto se pro tyto položky doporučujeme použití nejméně agresivní dostupný program.
•Zdobené předměty: zdobené předměty k dispozici na trhu jsou obecně schopné odolat mytí v myčce nádobí, ačkoli barvy mohou blednout po mnoha praní. v případě pochybnost, pokud jde o stálost barev, je vhodné umýt jen pár věcí najednou za přibližně jeden měsíc.
15

PLNĚNÍ KOŠŮ
ZÁSUVKA NA PŘÍBORY
Třetí koš je určen na příbory. Příbory ukládejte tak, jak je znázorněno na obrázku. Oddělené umístění příborů usnadňuje jejich pozdější úklid a zlepšuje sušení.
Nože a další ostré nástroje musí být umístěny ostřím dolů. Je třeba je umisťovat pouze do přední části dolního koše.
Tvar koše umožňuje umístění drobnějších předmětů, jako například kávových lžiček, do střední části.
HORNÍ KOŠ
Křehké a lehké nádobí: skleničky, hrnky, misky, salátové misky..
(příklad naplnění horního koše) |
NASTAVENÍ VÝŠKY HORNÍHO KOŠE |
Výšku horního koše lze nastavit: ve vysoké pozici lze do spodního koše |
vložit velké kusy nádobí a v nízké pozici lze přizpůsobit pomocí |
nastavitelných držáků a vytvořit tak více prostoru na výšku a předejít |
kolizi s předměty vloženými do spodního koše. |
Horní koš je vybavený Regulátorem |
výšky horního koše (viz obrázek), |
stiskněte páky a koš uchopte po stranách a |
zdvihněte ho a jakmile je v horní pozici, |
zajistěte ho. |
Pro obnovení spodní pozice stiskněte páky |
A po stranách koše a koš přesuňte dolů. |
Doporučujeme, abyste nastavení výšky |
koše neprováděli v případě, že je |
naplněný. |
NIKDY koš nezdvihejte ani nesnižujte pouze po jedné straně.
DRŽÁKY S NASTAVITELNOU POZICÍ
Postranní držáky lze umístit do tří různých výšek a optimalizovat tak uspořádání nádobí v koši.
Skleničky na víno lze umístit do skládacích držáků zasunutí nožičky každé skleničky na odpovídající místo.
Abyste dosáhli optimálních výsledků sušení, můžete držáky naklonit. Chcete-li naklonění změnit, skládací držák lehce nakloňte do požadované pozice.
SPODNÍ KOŠ
Na hrnce, police, talíře, salátové mísy, příbory, atd. Velké talíře a poklice je ideální umístit po stranách a předejít tak kontaktu s ostřikovacím ramenem.
(příklad naplnění spodního koše)
16

CS
PÉČE A ÚDRŽBA
ČIŠTĚNÍ FILTRU
Filtrační jednotku čistěte pravidelně, aby se filtry neucpaly a odpadní voda mohla správně odtékat.
Filtrační jednotku tvoří tři filtry, které z vody odstraňují zbytky jídla - voda se následně použije znovu; abyste dosáhli co nejlepších výsledků, musíte je udržovat čisté.
Myčku nelze používat bez filtru nebo je-li filtr uvolněný.
Filtrační jednotku zkontrolujte po několika mytích a je-li třeba, důkladně ji očistěte pod tekoucí vodou, pomocí nekovového kartáčku a při dodržení níže uvedených pokynů:
1.Kruhový filtr A otočte proti směru hodinových ručiček a vysuňte ho
(Obr. 1).
2.Na filtr B vyviňte lehký tlak po stranách a vysuňte ho (Obr. 2).
3.Vysuňte deskový filtr z nerezové oceli C (Obr. 3).
4.Zkontrolujte sítko a odstraňte případné zbytky jídla.
NIKDY NEVYNDÁVEJTE ochranu čerpadla (černý detail) (Obr. 4)..
1 |
2 |
|
A |
B |
|
A |
||
|
C |
|
3 |
4 |
Po vyčištění filtrů vraťte filtrační jednotku na místo a správně ji upevněte; to je nezbytné k zachování efektivního provozu myčky.
ČIŠTĚNÍ OSTŘIKOVACÍCH RAMEN
Na ostřikovacích ramenou mohou občas zůstat zbytky potravin a blokovat tak otvory použité ke stříkání vody. Proto se doporučuje, abyste ramena čas od času zkontrolovali a očistili je malým, nekovovým kartáčkem.
Chcete-li vyjmout horní ostřikovací rameno, otočte plastovým zajišťovacím kroužkem proti směru hodinových ručiček. Horní ostřikovací rameno je třeba vrátit na místo tak, aby strana s větším počtem otvorů směřovala nahoru.
Spodní ostřikovací rameno lze vyjmout vysunutím směrem nahoru.
ČIŠTĚNÍ HADICE PRO PŘÍVOD VODY
Před provedením zapojení a v případě, že hadice pro přívod vody jsou nové nebo pokud nebyly použity delší dobu, nechte jimi protéct vodu a ujistěte, že jsou čisté a bez nečistot. Není-li toto bezpečnostní opatření dodrženo, může dojít k zablokování přívodu vody a poškození myčky.
17

ŘEŠENÍ PROBLÉMŮ
Vaše myčka nádobí nemusí fungovat správně. Než kontaktujete servisní centrum, projděte si následující seznam a zkontrolujte, zda by nebylo možné problém vyřešit.
PROBLÉMY |
MOŽNÉ PŘÍČINY |
ŘEŠENÍ |
|
|
|
Myčka se nespustí |
Spotřebič není správně zapojený. |
Zapojte zástrčku do zásuvky. |
nebo nereaguje na |
|
|
příkazy. |
Výpadek napájení. |
Myčka nádobí se automaticky spustí jakmile dojde k obnovení napájení. |
|
|
|
|
Dveře myčky se nezavírají. |
Dveře razantně zabouchněte, tak, abyste zaslechli “cvaknutí”. |
|
|
|
|
Nereaguje na příkazy. |
Spotřebič vypněte stisknutím tlačítka ZAP./VYP. , po uplynutí zhruba jedné |
|
|
minuty ho znovu zapněte a program restartujte. |
|
|
|
Myčka nevypouští |
Cyklus mytí dosud neskončil. |
Počkejte, dokud cyklus mytí neskončí. |
vodu. |
|
|
|
Odtoková hadice je ohnutá. |
Zkontrolujte, zda není odtoková hadice ohnutá (viz POKYNY K INSTALACI). |
|
|
|
|
Odtokové potrubí je zablokované. |
Odtokové potrubí vyčistěte. |
|
|
|
|
Filtr je ucpaný zbytky jídla. |
Vyčistěte filtr (viz ČIŠTĚNÍ FILTRAČNÍ JEDNOTKY). |
|
|
|
Myčka nádobí |
Nádobí drnčí. |
Nádobí správně uspořádejte (viz PLNĚNÍ KOŠŮ). |
vydává nadměrný |
|
|
hluk. |
Tvoří se nadměrné množství pěny. |
Mycí prostředek nebyl správně odměřen nebo není k použití v myčce |
|
|
nádobí (see the PLNĚNÍ PŘIHRÁDKY NA MYCÍ PROSTŘEDEK). Myčku nádobí |
|
|
restartujte stisknutím tlačítka VYPUSTIT (viz MOŽNOSTI A FUNKCE) a spusťte |
|
|
nový program bez použití mycího prostředku. |
|
|
|
Nádobí není čisté. |
Nádobí nebylo správně uspořádáno. |
Nádobí správně uspořádejte (viz PLNĚNÍ KOŠŮ). |
|
|
|
|
Ostřikovací ramena se nemohla otáčet |
Nádobí správně uspořádejte (viz PLNĚNÍ KOŠŮ). |
|
volně, bránilo jim v tom nádobí. |
|
|
|
|
|
Cyklus mytí je příliš jemný. |
Vyberte vhodný cyklus mytí (viz TABULKA PROGRAMŮ). |
|
|
|
|
Tvoří se nadměrné množství pěny. |
Mycí prostředek nebyl správně odměřen nebo není k použití v myčce |
|
|
nádobí (see the PLNĚNÍ PŘIHRÁDKY NA MYCÍ PROSTŘEDEK). |
|
|
|
|
Víčko zásobníku na leštidlo nebylo správně |
Ujistěte se, zda je víčko zásobníku na leštidlo zavřené. |
|
zavřené. |
|
|
|
|
|
Filtr je znečištěný nebo ucpaný. |
Vyčistěte filtr (viz PÉČE A ÚDRŽBA). |
|
|
|
|
V myčce není žádná sůl. |
Doplňte zásobník na sůl (see the DOPLNĚNÍ ZÁSOBNÍKU NA SŮL). |
|
|
|
TECHNICKÝ LIST |
|
KONTAKTOVÁNÍ POPRODEJNÍHO SERVISU |
Technické údaje lze stáhnout z webové stránky: www.franke.com |
Když budete kontaktovat poprodejní |
|
servis, musíte uvést kódy na štítku, který |
|
se nachází v myčce, v levé nebo pravé |
|
části. Telefonní číslo je uvedeno v |
|
záručním listu nebo na webové stránce: |
|
www.franke.com |
|
|
|
|
FDW 614 D7P A++ 61530110100 S/N xxxxxxxxx |
|
|
|
|
117.0496.323 |
|
MADE IN POLAND |
61530110100 |
||
|
|
|
|
|
220-240 V~50 Hz 0,05 ÷ 1 MPa |
4 |
|||
Max.1900W |
|
1800 W |
TYPE: DWL-DEA701-B |
|
18
DE
KURZANLEITUNG
GUIDE
Lesen Sie vor Inbetriebnahme des Geräts sorgfältig die Sicherheitshinweise.
PRODUKTBESCHREIBUNG
GERÄT
1 |
2 |
1. |
Oberkorb |
|
3 |
2. |
Besteckschublade |
|
3. |
Faltbare Klappen |
|
4 |
|
4. |
Oberkorb Höhenversteller |
|
5. |
Oberer Sprüharm |
|
|
|
6. |
Unterkorb |
|
|
7. |
Unterer Sprüharm |
7 |
5 |
8. |
Filtereinheit |
9. |
Salzbehälter |
||
|
6 |
10. |
Spülmittel und Klarspülerspender |
9 |
11. |
Typenschild |
|
8 |
12. |
Bedienfeld |
11 |
10 |
|
|
|
FDW 614 D7P A++ 61530110100 S/N xxxxxxxxx |
|
|
|
117.0496.323 |
220-240 V~50 Hz 0,05 ÷ 1 MPa |
61530110100 |
||
4 |
|||
Max.1900W |
1800 W |
TYPE: DWL-DEA701-B |
|
12

BEDIENTAFEL
|
|
|
|
|
|
|
|
|
|
|
|
|
|
|
|
|
|
|
|
|
|
|
|
|
|
|
|
|
|
|
|
|
|
|
|
|
|
|
|
|
|
|
|
|
|
|
|
|
|
|
|
|
|
|
|
|
1 |
2 |
3 |
4 |
5 |
6 |
7 8 |
9 |
10 |
11 |
|
||
1. |
Ein-Aus/Reset Taste mit Anzeigelicht |
|
|
|
|
|
7. |
Anzeige |
|||||
2. |
Programmwahl-Taste |
|
|
|
|
|
|
|
8. |
Multizone Anzeigelicht |
|||
3. |
Anzeigelicht zum Salz auffüllen |
|
|
|
|
|
|
9. |
Startvorwahl-Taste |
||||
4. |
Anzeigelicht zum Klarspüler auffüllen |
|
|
|
|
10. |
Multizone-Taste |
||||||
5. |
Programmnummer und Einstellverzögerung |
|
|
|
11. |
Tab-Taste mit Anzeigelicht |
|||||||
6. |
Startvorwahl Anzeigelicht |
|
|
|
|
|
|
|
|
|
|
|
|
19
ERSTER GEBRAUCH
SALZ, KLARSPÜLER UND SPÜLMITTEL
HINWEISE ZUR ERSTEN INBETRIEBNAHME
Nach Abschluss der Installation die Puffer an den Körben und die Rückhaltegummis vom oberen Korb entfernen.
SALZBEHÄLTER BEFÜLLEN
Mit der Verwendung von Salz werden KALKABLAGERUNGEN auf dem Geschirr und den funktionalen Komponenten des
Geschirrspülers verhindert.
•Wichtig ist, dass der Salzbehälter nie leer bleibt.
•Es ist wichtig, die Wasserhärte einzustellen.
Der Salzbehälter befindet sich im Geschirrspülerboden (siehe PROGRAMMBESCHREIBUNG) und muss aufgefüllt werden, wenn die
SALZNACHFÜLLANZEIGE 
 der Display leuchtet.
1.Ziehen Sie den Unterkorb heraus und
schrauben Sie den Salzbehälterdeckel gegen den
Uhrzeigersinn ab.
2.Setzen Sie den Trichter auf (siehe Abbildung) und
füllen Sie den Behälter bis zum Rand mit Salz (ca.
1 kg), es ist normal,wenn etwas Wasser ausläuft. 3.Den Trichter abnehmen und die Salzreste vom
Öffnungsrand entfernen.
Sicherstellen, dass der Deckel fest angeschraubt ist, so dass kein Spülmittel während dem Waschprogramm in den Behälter gelangt (dies könnte den Wasserenthärter irreparabel beschädigen).
Wenn Sie Salz hinzufügen müssen, empfehlen wir Ihnen, den Vorgang vor Start des Waschzyklus durchzuführen.
WASSERHÄRTE EINSTELLEN
Damit der Wasserenthärter perfekt arbeiten kann, muss die Wasserhärte je nach der aktuellen Wasserhärte in Ihrem Haus eingestellt werden. Diese Information erhalten sie bei Ihrem örtlichen Wasserversorger.
Die werkseitigen Einstellungen sind die durchschnittliche (3) Wasserhärte.
•Gerät mit der EIN/AUS-Taste einschalten.
•Gerät mit der EIN/AUS-Taste ausschalten.
•Die Taste P 5 Sekunden lang gedrückt halten, bis Sie einen Piepton hören.
•Gerät mit der EIN/AUS-Taste einschalten.
•Die Nummer der aktuell ausgewählten Stufe und die Salznachfüllanzeige blinken.
•Drücken Sie die Taste P um die gewünschte Härtestufe auszuwählen (siehe WASSERHÄRTE-TABELLE).
Wasserhärte-Tabelle
|
Stufe |
°dH |
°fH |
|
|
Deut. Härtegr. |
Französischer Härtegr. |
||
|
|
|||
|
|
|
|
|
1 |
Weich |
0 |
- 6 |
0 - 10 |
|
|
|
|
|
2 |
Mittel |
7 - 11 |
11 - 20 |
|
|
|
|
|
|
3 |
Durchschnittlich |
12 |
- 17 |
21 - 30 |
|
|
|
|
|
4 |
Hart |
17 |
- 34 |
31 - 60 |
|
|
|
|
|
5 |
Sehr hart |
35 |
- 50 |
61 - 90 |
|
|
|
|
|
• Gerät mit der EIN/AUS-Taste ausschalten. Die Einstellung ist abgeschlossen!
Sobald dieses Verfahren abgeschlossen ist, ein Programm ohne Beladung laufen lassen.
Verwenden Sie bitte nur Spezialsalz für Geschirrspüler.
Nach dem Einfüllen des Salzes erlischt die SALZNACHFÜLLANZEIGE.
Das Nichtfüllen des Salzbehälters kann eine Beschädigung des Wasserenthärters und des Heizwiderstandes bewirken.
KLARSPÜLERSPENDER AUFFÜLLEN
Klarspüler macht das TROCKNEN von Geschirr einfacher. Der Klarspülerspender A muss aufgefüllt werden, wenn das KLARSPÜLER
AUFFÜLLEN Anzeigelicht  auf der Display leuchtet.
35
25
A |
X |
M |
B |
A |
1.Den Behälter B durch Drücken und Anheben der Zunge am Deckel öffnen.
2.Den Klarspüler vorsichtig bis zur maximalen Füllstandsmarkierung (110 ml) an der Füllöffnung einfüllen und ein Überlaufen vermeiden. Andernfalls sofort mit einem trockenen Tuch abwischen.
3.Den Deckel schließen bis er einrastet.
Füllen Sie den Klarspüler NIEMALS direkt ins Innere des Geschirrspülers.
KLARSPÜLERDOSIERUNG
Sollte das Trockenergebnis unzufrieden stellend sein, kann die Klarspülerdosierung neu eingestellt werden.
•Den Geschirrspüler mit der Taste EIN/AUS einschalten.
•Mit der Taste EIN/AUS ausschalten.
•Drücken Sie die Taste P drei Mal - ein Piepton ertönt.
•Mit der Taste EIN/AUS ausschalten.
•Die Nummer der aktuell ausgewählten Stufe und die Klarspülernachfüllanzeige blinken.
•Drücken Sie die Taste P, um den Stand der gelieferten Klarspülermenge auszuwählen.
•Mit der Taste EIN/AUS ausschalten
Die Einstellung ist abgeschlossen!
Die Klarspülerstufe kann auf NULL (ECO) eingestellt werden. In diesem Fall wird kein Klarspüler ausgegeben. Die Kontrollleuchte zur ANZEIGE DES FEHLENDEN KLARSPÜLERS leuchtet nicht mehr auf.
Je nach Gerätemodell können bis max. 4 Stufen eingestellt werden. Der voreingestellte Wert entspricht einer mittleren Stufe.
•Wenn Sie bläuliche Streifen auf dem Geschirr sehen, stellen Sie eine niedrigere Zahl ein (1-2).
•Wenn Wassertropfen oder Kalkablagerungen auf dem Geschirr sind, eine höhere Zahl einstellen (3-4).
EINFÜLLEN DES SPÜLMITTELS
|
Zum Öffnen des Spülmittelbehälters |
|
|
den ÖffnungsmechanismusA drücken. |
|
|
FüllenSiedasSpülmittelausschließlich |
|
|
in das trockene Fach B ein. |
|
|
Die für den Vorspülgang benötigte |
|
A |
Spülmittelmenge wird direkt in den |
|
Geschirrspüler gegeben. |
||
|
||
|
1.Hinsichtlich der Dosierung verweisen |
|
|
wir auf die PROGRAMMTABELLE, in der |
|
|
die richtige Menge angegeben ist. Der |
|
|
Behälter B hat eine Füllstandsanzeige, |
die die maximale Menge des flüssigen oder pulverförmigen Spülmittels für jeden Spülgang anzeigt.
2.Entfernen Sie eventuelle Spülmittelrückstände von den Kanten der Kammern und schließen Sie den Deckel so, dass er einrastet.
3.Schieben Sie den Deckel der Spülmittelkammer zum Schließen nach oben, bis er einrastet.
Die Spülmittelkammer öffnet sich automatisch zum richtigen Zeitpunkt des jeweils gewählten Programms.
Werden Kombispülmittel verwendet, dann empfehlen wir, die Option TAB zu verwenden. Damit werden die Programme dem verwendeten Spülmittel angepasst, um das bestmögliche Spülergebnis zu erhalten.
20
PROGRAMMTABELLE
Programm |
Trockenphase |
Verfügbare |
|
Zusatzfunktionen*) |
1. |
Eco |
50° |
|
2. |
Auto |
50-60° |
|
3. |
Intensiv |
65° |
|
4. |
Täglich |
50° |
|
5. |
Express 30’ |
50° |
- |
6. |
Kristall |
45° |
|
7. |
Vorspülen |
- |
- |
DE
Behälter |
|
|
|
|
|
für Spülmittel |
Programm- |
Wasserver- |
Energiever- |
||
|
|
|
|||
Geschirr- |
|
|
dauer |
brauch |
brauch |
spüler- |
|
B |
(Std:Min)**) |
(Liter/Zyklus) |
(kWh/Zyklus) |
Innenraum |
|
|
|
|
|
|
|
|
3:40 |
9,0 |
0,93 |
|
|
|
1:25- 3:00 |
7,0-14,0 |
0,90-1,40 |
- |
|
|
2:50 |
16,0 |
1,60 |
- |
|
|
1:30 |
13,0 |
1,15 |
- |
|
|
0:30 |
9,0 |
0,55 |
- |
|
|
1:40 |
11,5 |
1,20 |
- |
|
- |
0:12 |
4,5 |
0,01 |
|
|
|
|
|
|
Die ECO-Programmdaten sind Labormessdaten, die gemäß der europäischen Vorschrift EN 50242 erfasst wurden. *) Nicht alle Optionen können gleichzeitig verwendet werden.
**) Die Programmdauer auf dem Display oder in dem Heft ist eine ungefähre Berechnung unter Standardbedingungen. Die aktuelle Zeit kann auf Grundlage von mehreren Faktoren, wie Temperatur und Druck des eintretenden Wassers, Raumtemperatur, Spülmittelmenge, Menge und Art der Beladung, Lastausgleich, zusätzlich gewählte Optionen und Sensoreichung variieren. Die Sensoreichung kann die Programmdauer bis zu 20 Min. erhöhen. Standby-Verbrauch: Verbrauch in eingeschaltetem Modus: 5 W - Verbrauch in ausgeschaltetem Modus: 0,5 W
PROGRAMMBESCHREIBUNG
Anweisungen bezüglich der Auswahl des Waschzyklus.
ECO
Normal verschmutztes Geschirr. Das Standardprogramm nutzt Energie und Wasser am effizientesten.
AUTO
Für normal verschmutztes Geschirr mit trockenen Speiseresten. Erfasst den Grad der Verschmutzung auf dem Geschirr und passt das Programm entsprechend an.
INTENSIV
Programm empfohlen für stark verschmutztes Geschirr, besonders Töpfe und Pfannen (nicht für empfindliche Teile verwenden).
TÄGLICH
Normal verschmutztes Geschirr. Täglicher Zyklus, der optimale Reinigungsleistung in kürzester Zeit garantiert.
EXPRESS 30’
Programm für leicht verschmutztes Geschirr ohne getrocknete Speisenreste. Ideal für 2 Maßgedecke.
KRISTALL
Zyklus für empfindliches Geschirr, das empfindlicher auf hohe Temperaturen ist, zum Beispiel Gläser und Becher.
VORSPÜLEN
Geschirr, das später gespült werden soll. Für dieses Programm wird kein Spülmittel verwendet.
Hinweise:
Optimale Leistungsstufen bei Verwendung von “Express”-Programm können durch Einhaltung der maximalen Menge an Maßgedecken erreicht werden.
Um den Verbrauch noch weiter zu reduzieren, den Geschirrspüler nur in vollem Zustand laufen lassen.
21
OPTIONEN UND FUNKTIONEN
OPTIONEN kann direkt durch Drücken der entsprechenden Taste ausgewählt werden (siehe BEDIENBLENDE).
Wenn eine Option nicht mit dem ausgewählten Programm kompatibel ist siehe PROGRAMMTABELLE, blinken die entsprechenden LED
3 Mal schnell und ein Piepton ertönt. Die Option wird nicht aktiviert.
STARTZEITVORWAHL
Der Programmstartzeit kann um eine Zeit von 1 bis 12 Stunden verzögert werden.
1.Drücken Sie die Taste STARTVERZÖGERUNG: Das betreffende Symbol erscheint auf dem Display; bei jedem Drücken der Taste, erhöht sich die Zeit (1 Std., 2 Std., usw. bis zu max. 12 Std.) ab dem Start des ausgewählten Spülprogramms.
2.Das Spülprogramm wählen und die Tür schließen: die Zeitschaltuhr beginnt mit der Rückzählung;
3.Nach Ablauf dieser Zeit, schaltet sich das Anzeigelicht aus und das Programm beginnt automatisch.
Um die Startverzögerung anzupassen und eine kürzere Dauer auszuwählen, die Taste STARTVERZÖGERUNG drücken. Um abzubrechen, die Taste wiederholt drücken, bis das ausgewählte Startverzögerung-Anzeigelicht aus geht. Das Spülprogramm startet automatisch sobald die Tür geschlossen wird.
Bei bereits in Gang gesetztem Programm ist eine Startzeitvorwahl nicht mehr möglich.
MULTIZONE
Haben Sie nur wenig Geschirr zu spülen, wählen Sie den Spülgang Halbe Füllung. Sie sparen Wasser, Strom und Spülmittel.
Wählen Sie das Programm und drücken Sie dann die Taste MULTIZONE: Symbol des gewählten Korbes erscheint auf dem Display. Standardmäßig wäscht das Gerät das Geschirr in allen Körben.
Drücken Sie diese Taste wiederholt, um nur einen bestimmten Korb zu spülen:
gezeigt auf dem Display (nur Unterkorb)
gezeigt auf dem Display (nur Oberkorb)
gezeigt auf dem Display (nur Besteckschublade)
gezeigt auf dem Display (Option ist AUS und das Gerät wäscht Geschirr in allen Körben).
Denken Sie daran, nur den Oberoder Unterkorb zu füllen, und die Menge an Spülmittel entsprechend zu reduzieren.
TAB
Diese Einstellung erlaubt, die Spülleistung des Programms je nach verwendetem Spülmitteltyp zu optimieren.
Drücken Sie die TAB Taste (das Anzeigelicht leuchtet), wenn Sie kombinierte Spülmittel in Tablettenform verwenden (Klarspüler, Regeneriersalz und Spülmittel in 1 Dosierung).
Wenn Sie Pulver oder Flüssigspülmittel verwenden, muss diese Option ausgeschaltet sein.
BETRIEBSANZEIGE
Ein bernsteinfarbenes LED Licht auf dem Fussboden zeigt an, dass der Geschirrspüler läuft. Eine der folgenden Betriebsarten kann ausgewählt werden:
a)Deaktivierte Funktion.
b)Wenn das Programm startet schaltet sich das Licht für einige Sekunden ein, bleibt während dem Programm ausgeschaltet und blinkt zu Programmende.
c)Das Licht bleibt während dem Programm an und blinkt
zu Programmende (Standardbetriebsweise).
Wenn der verzögerte Start ausgewählt wurde, schaltet sich das Licht entweder die ersten paar Sekunden an oder bleibt während der gesamten Dauer der Rückzählung an, je nachdem ob b) oder c) eingestellt wurde.
Das Licht geht aus, sobald die Tür geöffnet wird. Um die bevorzugte Betriebsart auszuwählen, die Maschine einschalten, die Taste P gedrückt halten, bis einer der drei Buchstaben auf dem Display erscheint, die Taste P drücken, bis der gewünschte Buchstabe (oder Betriebsweise) erreicht ist, die Taste P gedrückt halten, um die Auswahl zu bestätigen.
22

DE
TÄGLICHER GEBRAUCH
1.ANSCHLUSS AN DIE WASSERLEITUNG PRÜFEN
Sicherstellen, dass der Geschirrspüler an die Wasserleitung angeschlossen und der Wasserhahn auf ist.
2.SCHALTEN SIE DEN GESCHIRRSPÜLER EIN
Tür öffnen und EIN-/AUS-Taste drücken.
3.KÖRBE BELADEN
(siehe KÖRBE BELADEN)
4.EINFÜLLEN DES SPÜLMITTELS
(siehe PROGRAMMTABELLE).
5.PROGRAMM WÄHLEN UND DAS PROGRAMM ANPASSEN
Das am besten geeignete Programm je nach Besteckart und Verschmutzungsgrad auswählen (siehe PROGRAMMBESCHREIBUNG) durch Drücken der Taste P.
Die gewünschten Optionen auswählen (siehe OPTIONEN UND FUNKTIONEN).
6.START
Das Spülprogramm mit der Die Tür schließen. Bei Programmstart ertönt ein Piepton.
7.ENDE DES SPÜLPROGRAMMS
Das Programmende wird durch akustische Signale und das Blinken der Programmnummer auf dem Display angezeigt. Die Tür öffnen und das Gerät mit der EIN/AUS-Taste ausschalten.
Vor Entnahme des Bestecks einige Minuten warten - um Verbrennungen zu vermeiden.
Die Körbe entladen, mit dem Unteren beginnen.
Die Maschine schaltet sich automatisch während bestimmter überschrittener Zeiten der Inaktivität aus, um den Stromverbrauch zu reduzieren.
Für nur leicht verschmutztes Geschirr, oder für Geschirr, das vorher unter laufendem Wasser abgespült wurde, kann die Spülmittelmenge erheblich reduziert werden.
EIN LAUFENDES PROGRAMM ÄNDERN
Wenn ein falsches Programm ausgewählt wurde, kann es geändert werden, wenn es gerade erst gestartet wurde: die Tür öffnen (Vorsicht HEISSER Dampf!), die EIN/AUS-Taste drücken und gedrückt halten, um die Maschine auszuschalten.
Die Maschine mit der EIN/AUS-Taste wieder einschalten und das neue Spülprogramm und die gewünschten Optionen auswählen; das Spülprogramm durch Schließen der Tür
HINZUFÜGEN VON WEITEREM GESCHIRR
Ohne die Maschine auszuschalten, die Tür öffnen (Vorsicht HEISSER Dampf!) und das Geschirr in den Geschirrspüler geben. Schließen Sie die Tür ; das Programm läuft automatisch weiter.
UNBEABSICHTIGTES UNTERBRECHEN DES SPÜLPROGRAMMS
Wird während des Spülgangs die Gerätetür geöffnet, oder sollte ein Stromausfall stattfinden, wird der Spülgang unterbrochen. Es läuft an der Stelle weiter, an der es unterbrochen wurde, sobald die Tür geschlossen wird oder der Strom zurückkehrt.
HINWEISE UND TIPPS
EMPFEHLUNGEN
Bevor Sie das Geschirr in den Geschirrspüler einräumen, befreien Sie es von Speiserückständen und entleeren Sie Gläser
und Behälter von Flüssigkeitsresten. Es ist nicht notwendig, das
Geschirr unter fließendem Wasser vorzuspülen..
Stellen Sie das Geschirr so ein, dass es fest steht und nicht umfallen kann Behälter müssen mit der Öffnung nach unten eingestellt werden und hohle oder gewölbte Teile müssen schräg stehen, damit das Wasser alle Oberflächen erreicht und dann abfließen kann.
Achtung: Achten Sie darauf, dass Deckel, Griffe, Töpfe und Tabletts die Drehung der Sprüharme nicht behindern.
Stellen Sie kleine Gegenstände in den Besteckkorb.
Stark verschmutztes Geschirr und Töpfe sollten in dem Unterkorb untergebracht werden, da in diesem Bereich die Wasserstrahlen stärker sind und eine höhere Spülleistung garantieren.
Stellen Sie nach Einräumen des Geschirrs sicher, dass sich die Sprüharme frei bewegen können.
HYGIENE
Um Gerüche und Ablagerung, die sich in dem Geschirrspüler ansetzen können zu vermeiden, bitte mindestens einmal monatlich ein Hochtemperaturprogramm laufen lassen. Einen Teelöffel Spülmittel verwenden und ohne Geschirr laufen lassen, um Ihr Gerät zu reinigen.
SCHÄDEN AN GLAS UND GESCHIRR
•Spülen Sie nur Gläser und Geschirr in Ihrem Geschirrspüler, die vom Hersteller als spülmaschinenfest ausgezeichnet sind.
•Verwenden Sie ein Feinspülmittel für Geschirr.
•Nehmen Sie Gläser und Besteck so bald wie möglich nach Ablauf des Programm aus der Spülmaschine.
UNGEEIGNETES GESCHIRR
Nicht spülmaschinenfest:
•Holzschalen, Töpfe oder Pfannen: Diese können durch die hohen Waschtemperaturen beschädigt werden.
•Handgefertigte Gegenstände: Diese sind nur sehr selten zum Spülen geeignet. Die relativ hohen Wassertemperaturen und die verwendeten Waschmittel können sie beschädigen.
•Kunststoffschalen: Diese sind nicht hitzebeständig und können ihre Form verlieren. Hitzebeständige Kunststoffschalen müssen im Oberkorb gewaschen werden.
•Geschirr und Gegenstände aus Kupfer, Zinn, Zink oder Messing: diese neigen dazu, zu färben.
•Aluminiumschalen: Gegenstände aus eloxiertem Aluminium können ihre Farbe verlieren.
•Silberwaren: Silbergegenstände können fleckig sein.
•Glas und Kristall: Im Allgemeinen können Glas und Kristallobjekte in der Spülmaschine gewaschen werden. Allerdings können bestimmte Arten von Glas und Kristall stumpf und verlieren ihre Klarheit nach vielen Waschungen. Daher empfehlen wir Ihnen, das am wenigsten aggressive Programm zu verwenden.
•Dekorierte Gegenstände: Die auf dem Markt erhältlichen dekorierten Gegenstände sind in der Regel in der Lage, dem Waschen in der Spülmaschine zu widerstehen, obwohl die Farben nach vielen Wäschen verblassen können. Bei Zweifeln an der Echtheit der Farben ist es ratsam, nur ein paar Gegenstände zu einem Zeitpunkt für etwa einen Monat zu waschen.
23
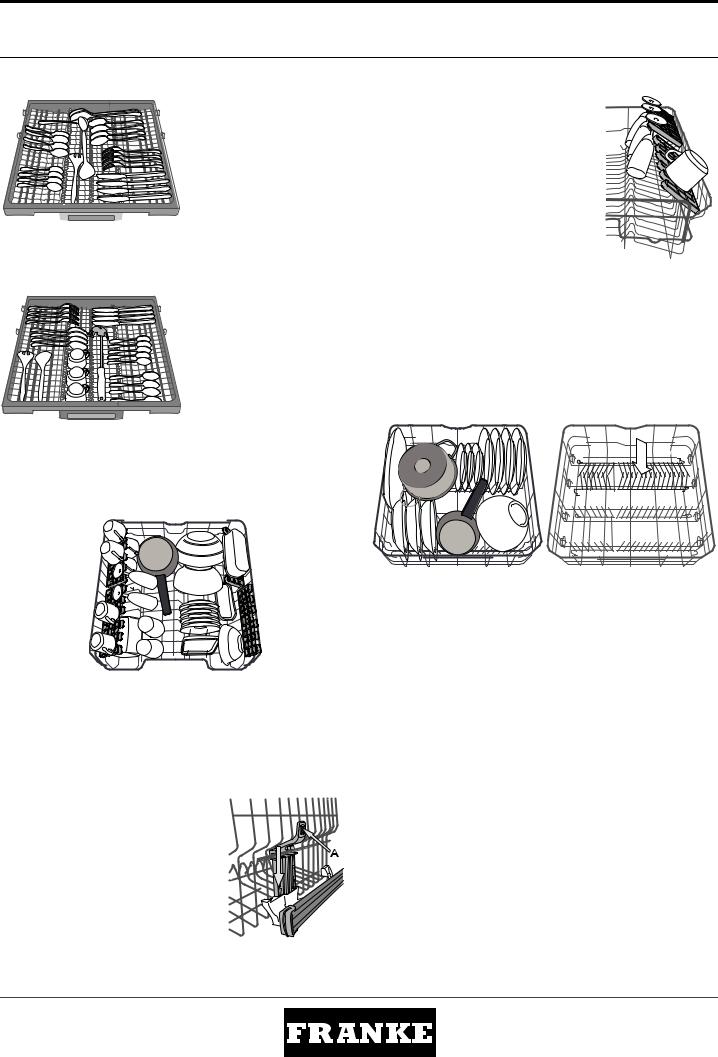
KÖRBE BELADEN
BESTECKSCHUBLADE
Die dritte Schublade wurde für
das Hineinlegen von Besteck
entwickelt.
Platzieren Sie das Besteck wie
abgebildet.
Eine getrennte Anordnung des
Bestecks macht das Sortieren
nach dem Spülen einfacher und verbessert die Spülund Trockenleistung.
Messer und andere Küchenutensilien mit scharfen Spitzen sind mit nach unten gerichteten Schneiden einzuordnen .Sie darf nur an der Vorderseite des Unterkorbs eingesetzt werden.
Die Geometrie des Korbes macht es möglich auch kleine Teile wie Kaffeetassen in den mittleren Bereich zu stellen.
KLAPPBARE KLAPPEN MIT VERSTELLBARER POSITION
Die seitlichen klappbaren Klappen können auf drei verschiedenen Höhen positioniert werden, um beim Einräumen des Geschirrs den Platz im Korb optimal auszunutzen.
Stielgläser können an den Ablagen stabilisiert werden, indem sie mit dem Stiel in die vorgesehene Aussparung gestellt werden. Die Ablagen trocknen besser, wenn sie stärker geneigt werden. Der Neigewinkel lässt sich verstellen, indem die Ablage nach oben gezogen und in die gewünschte Position gebracht wird.
UNTERKORB
Für Töpfe, Deckel, Teller, Salatschüsseln, Besteck usw. Große Teller und Deckel sollten idealerweise an die Seiten gelegt werden, um nicht mit dem Sprüharm in Kontakt zu kommen. Der Unterkorb verfügt über klappbare Ablagen, die in vertikaler Stellung für Teller oder in horizontaler (niedriger) Position für Pfannen und Salatschüsseln verwendet werden können.
OBERKORB
Hier sortieren Sie empfindliches und leichtes Geschirr ein: Gläser,
Tassen, kleine Teller, flache Schüsseln.
(Sortierbeispiel für den Unterkorb)
(Sortierbeispiel für den Oberkor)
HÖHENEINSTELLUNG DES OBERKORBES
Der Oberkorb kann in der Höhe verstellt werden: stellen Sie ihn in die oberste Position, wenn Sie großes Geschirr in den Unterkorb einräumen wollen. Wenn Sie eher die klappbaren Bereiche nutzen wollen, dann stellen Sie ihn in die untere Position. Somit vermeiden Sie Zusammenstoßen mit dem Geschirr im Unterkorb.
Der Oberkorb ist mit einem Oberkorb Höhenversteller (siehe Abbildung)
ausgestattet. Ohne Drücken der Hebel
kann er einfach durch Heben der Korbseiten angehoben werden, sobald der
Korb stabil in seiner unteren Stellung ist. Um den Korb zurück in die untere Stellung
zu bringen, drücken Sie die Hebel A an den Seiten des Korbs und schieben Sie ihn
nach unten.
Es empfiehlt sich, die Höhe des Oberkorbes bei leerem Korb zu regulieren.
Heben oder senken Sie den Korb NIEMALS nur an einer Seite.
24

DE
PFLEGE UND WARTUNG
REINIGUNG DER FILTEREINHEIT
Die Filtereinheit regelmäßig reinigen, damit die Filter nicht verstopfen und das Abwasser korrekt abfließen kann.
Die Filtereinheit setzt sich aus drei Filtern zusammen, die Spülwasser reinigen, von Speiseresten befreien und wieder in Umlauf bringen: für beste Spülergebnisse, müssen diese sauber gehalten werden.
Der Geschirrspüler darf nie ohne Filtersiebe oder mit ausgehängten Filtern in Betrieb genommen werden.
Kontrollieren Sie nach einigen Spülgängen die Filtersiebgruppe. Bei Bedarf ist diese sorgfältig unter laufendem Wasser auszuspülen. Nehmen Sie hierzu ein kleines Bürstchen (das nicht aus Metall sein darf) zu Hilfe. Verfahren Sie wie folgt:
1.Drehen Sie das zylinderförmige Filtersieb A gegen den Uhrzeigersinn heraus (Abb. 1).
2.Ziehen Sie den Siebbecher B durch leichten Druck auf die seitlichen Flügel heraus (Abb. 2).
3.Nehmen Sie den Stahl-Siebteller C ab (Abb. 3).
4.Kontrollieren Sie den Hohlraum und befreien Sie diesen von eventuellen Speiseresten.
Das Spülpumpenschutzteil (schwarzes Teil) NICHT ABGENOMMEN
WERDEN(Abb 4).
1 |
2 |
|
A |
B |
|
A |
||
|
C |
|
3 |
4 |
Setzen Sie die Filtereinheit nach der Reinigung der Filtersiebe wieder korrekt in ihren Sitz ein, dies ist äußerst wichtig, um eine ordnungsgemäße Betriebsweise des Geschirrspülers zu gewährleisten.
REINIGUNG DER SPRÜHARME
Es kann vorkommen, dass Speisereste an den Sprüharmen hängen bleiben und die Wasserdüsen verstopfen. Prüfen Sie die Sprüharme daher regelmäßig und reinigen Sie sie bei Bedarf mit einer Kunststoffbürste.
Zur Abnahme des oberen Sprüharms drehen Sie den Kunststoffring gegen den Uhrzeigersinn ab. Der obere Sprüharm ist mit jener Seite nach oben wieder einzusetzen, die die meisten Löcher aufweist.
Um den unteren Sprüharm abzunehmen, ihn nach oben ziehen.
WASSERZULAUFSCHLAUCH REINIGEN
Wenn der Wasserschlauch neu ist oder für längere Zeit nicht in Betrieb war, das Warmwasser laufen lassen, um sicherzustellen, dass es klar und frei von Verschmutzungen ist, bevor die erforderlichen Anschlüsse vorgenommen werden. Bei Nichtbeachtung dieser Vorsichtsmaßnahme, kann die Wasserzufuhr blockieren und den Geschirrspüler beschädigen.
25

LÖSEN VON PROBLEMEN
Ihr Geschirrspüler funktioniert nicht richtig.
Bevor Sie den Kundendienst kontaktieren, prüfen Sie, ob das Problem mit der folgenden Liste behoben werden kann.
STÖRUNGEN |
MÖGLICHE URSACHEN |
LÖSUNG |
|
|
|
|
|
Die Spülmaschine |
Das Gerät wurde nicht richtig eingesteckt. |
Schließen Sie den Netzstecker an. |
|
startet nicht oder |
|
|
|
reagiert nicht auf die |
Stromausfall. |
Der Geschirrspüler startet automatisch nach Spannungsrückkehr. |
|
Bedienungseinga- |
|
|
|
Die Gerätetür schließt nicht. |
drücken Sie die Tür energisch, bis ein „Klicklaut“ zu hören ist. |
||
ben. |
|||
|
|
|
|
|
Das Gerät reagiert nicht auf Bedienungs- |
Schalten Sie das Gerät durch das Drücken der ON/OFF-Taste aus und nach |
|
|
eingaben. |
etwa einer Minute wieder ein und wiederholen Sie die Programmeinstel- |
|
|
|
lung. |
|
|
|
|
|
Der Geschirrspüler |
Das Spülprogramm ist noch nicht ganz |
Warten Sie, bis das Programm beendet ist. |
|
pumpt das Wasser |
abgelaufen. |
|
|
nicht ab. |
|
|
|
Der Ablaufschlauch ist geknickt. |
Prüfen Sie, dass der Ablaufschlauch nicht geknickt ist (siehe INSTALLATIONS- |
||
|
|||
|
|
ANWEISUNGEN). |
|
|
|
|
|
|
Der Ablauf des Spülbeckens ist verstopft. |
Den Ablauf des Spülbeckens reinigen. |
|
|
|
|
|
|
Im Filtersieb haben sich Speisereste ange- |
Den Filter reinigen (siehe REINIGUNG DER FILTEREINHEIT). |
|
|
sammelt |
|
|
|
|
|
|
Der Geschirrspüler |
Das Geschirr schlägt aneinander. |
Positionieren Sie das Geschirr korrekt (siehe KÖRBE BELADEN). |
|
ist zu laut. |
|
|
|
Es hat sich zu viel Schaum gebildet. |
Das Spülmittel wurde nicht richtig dosiert oder ist für Geschirrspüler unge- |
||
|
|||
|
|
eignet (siehe EINFÜLLEN DES SPÜLMITTELS). Den Geschirrspüler zurückset- |
|
|
|
zen durch Drücken der ABLAUF Taste siehe OPTIONEN UND |
|
|
|
FUNKTIONEN)und lassen Sie das neue Programm erneut ohne Spülmittel |
|
|
|
laufen. |
|
|
|
|
|
Das Geschirr ist nicht |
Das Geschirr wurde nicht korrekt einge- |
Positionieren Sie das Geschirr korrekt (siehe KÖRBE BELADEN). |
|
sauber geworden. |
räumt. |
|
|
|
|
|
|
|
Die Sprüharme können nicht frei drehen, |
Positionieren Sie das Geschirr korrekt (siehe KÖRBE BELADEN). |
|
|
werden durch das Geschirr blockiert. |
|
|
|
|
|
|
|
Das Spülprogramm ist zu schwach.. |
Ein geeignetes Spülprogramm wählen (siehe PROGRAMMTABELLE). |
|
|
|
|
|
|
Es hat sich zu viel Schaum gebildet. |
Das Spülmittel wurde nicht richtig dosiert oder ist für Geschirrspüler unge- |
|
|
|
eignet (siehe EINFÜLLEN DES SPÜLMITTELS). |
|
|
|
|
|
|
Der Stöpsel des Klarspülerbehälters wurde |
Sicherstellen, dass der Stöpsel des Klarspülerbehälters geschlossen ist. |
|
|
nicht korrekt geschlossen. |
|
|
|
|
|
|
|
Das Filtersieb ist schmutzig oder verstopft. |
Die Filtereinheit reinigen (siehe PFLEGE UND WARTUNG). |
|
|
|
|
|
|
Fehlendes Regeneriersalz. |
Füllen Sie den Salzbehälter (siehe SALZBEHÄLTER BEFÜLLEN). |
|
|
|
|
TECHNISCHES DATENBLATT |
KUNDENDIENST KONTAKTIEREN |
Das technische Datenblatt kann von der Internetseite: www.franke.com
Wenn Sie den Kundendienst kontaktieren, müssen Sie die Codes angeben, die sich auf dem Typenschild an der linken oder rechten Innenseite der Tür des Geschirrspülers befinden. Die Telefonnummer ist in dem Garantieheft oder auf der Internetseite aufgelistet: www.franke.com
|
|
|
|
FDW 614 D7P A++ 61530110100 S/N xxxxxxxxx |
|
|
|
|
117.0496.323 |
|
MADE IN POLAND |
61530110100 |
||
|
|
|
|
|
220-240 V~50 Hz 0,05 ÷ 1 MPa |
4 |
|||
Max.1900W |
|
1800 W |
TYPE: DWL-DEA701-B |
|
26

|
|
|
|
EL |
ΚΑΘΗΜΕΡΙΝΗ ΑΝΑΦΟΡΑ |
|
|
|
|
ΠΡΟΒΛΗΜΑΤΩΝ |
|
|
|
|
Πριν χρησιμοποιήσετε τη συσκευή διαβάστε προσεκτικά τον οδηγό υγείας και ασφάλειας. |
||||
ΠΕΡΙΓΡΑΦΗ ΠΡΟΪΟΝΤΟΣ |
|
|
|
|
ΣΥΣΚΕΥΗ |
|
|
|
|
|
1 |
2 |
1. |
Επάνω καλάθι |
|
|
3 |
2. Καλάθι για τα μαχαιροπίρουνα |
|
|
|
3. |
Αναδιπλούμενα πτερύγια |
|
|
4 |
|
4. |
Ρυθμιστής ύψους άνω καλαθιού |
|
|
5. |
Πάνω εκτοξευτήρας |
|
|
|
|
6. |
Κάτω καλάθι |
|
|
|
7. |
Κάτω εκτοξευτήρας |
|
7 |
5 |
8. |
Σύστημα φίλτρου |
|
9. |
Δοχείο αλατιού |
||
|
|
6 |
10. |
Δοχεία απορρυπαντικού και λαμπρυντικού |
|
9 |
8 |
11. |
Πινακίδα τεχνικών στοιχείων |
|
12. |
Πίνακας ελέγχου |
||
11 |
10 |
|
|
|
FDW 614 D7P A++ |
61530110100 S/N xxxxxxxxx |
|
|
|
117.0496.323 |
|
|
|
|
61530110100 |
|
|
|
|
220-240 V~50 Hz 0,05 ÷ 1 MPa |
4 |
|
|
|
Max.1900W 1800 W TYPE: DWL-DEA701-B |
|
|
|
|
12 |
|
|
|
|
ΠΙΝΑΚΑΣ ΕΛΕΓΧΟΥ |
|
|
|
|
|
|
|
|
|
|
|
|
|
|
|
|
|
|
|
|
|
|
|
|
|
|
|
|
|
|
|
|
|
|
|
|
|
|
|
|
|
|
|
|
|
|
|
|
|
|
|
|
|
|
|
|
|
|
|
|
|
1 |
2 |
3 |
4 |
5 |
6 |
7 8 |
9 |
10 |
11 |
|
||
1. |
Κουμπί On/Off με ενδεικτική λυχνία |
|
|
|
|
|
7. |
Οθόνη |
|||||
2. |
Κουμπί επιλογής προγραμμάτων |
|
|
|
|
|
|
8. |
Ενδεικτική λυχνία πολυζωνικής λειτουργίας |
||||
3. |
Ενδεικτική λυχνία επαναπλήρωσης αλατιού |
|
|
|
9. |
Κουμπί καθυστέρησης |
|||||||
4. |
Ενδεικτική λυχνία επαναπλήρωσης λαμπρυντικού |
|
|
10. |
Κουμπί πολυζωνικής λειτουργίας |
||||||||
5. |
Αριθμός προγράμματος και να ορίσετε μια χρονική καθυστέρηση |
11. |
Κουμπί ταμπλέτας (Tab) με ενδεικτική λυχνία |
||||||||||
6. |
Ενδεικτική λυχνία καθυστέρησης |
|
|
|
|
|
|
|
|
|
|
||
27

ΠΡΩΤΗ ΧΡΗΣΗ |
|
|
|
|
||
ΑΛΑΤΙ, ΛΑΜΠΡΥΝΤΙΚΟ ΚΑΙ ΑΠΟΡΡΥΠΑΝΤΙΚΟ |
|
|||||
ΣΥΣΤΑΣΗ ΓΙΑ ΤΗΝ ΠΡΩΤΗ ΧΡΗΣΗ |
ΠΛΗΡΩΣΗ ΘΗΚΗΣ ΛΑΜΠΡΥΝΤΙΚΟΥ |
|||||
Μετά την εγκατάσταση, αφαιρέστε τα στοπ από τα καλάθια και τα |
Το λαμπρυντικό διευκολύνει το ΣΤΕΓΝΩΜΑ. Η θήκη λαμπρυντικού A |
|||||
ελαστικά στοιχεία συγκράτησης από το επάνω καλάθι. |
πρέπει να γεμίζει όταν στον πίνακα ελέγχου ανάβει η ενδεικτική |
|||||
ΠΛΗΡΩΣΗ ΤΟΥ ΔΟΧΕΙΟΥ ΑΛΑΤΙΟΥ |
λυχνία ΑΝΑΠΛΗΡΩΣΗΣ ΛΑΜΠΡΥΝΤΙΚΟΥ |
|
||||
|
|
|
||||
Η χρήση αλατιού αποτρέπει το σχηματισμό ΑΛΑΤΩΝ στα πιάτα και στα |
|
|
|
|||
λειτουργικά μέρη της συσκευής. |
|
|
|
|
||
• Είναι σημαντικό να μην είναι ποτέ άδειο το δοχείο αλατιού. |
|
35 |
|
|||
• Είναι σημαντικό να ρυθμιστεί η σκληρότητα του νερού. |
|
|
||||
|
25 |
|
||||
|
|
A |
||||
|
|
|
|
|
||
Το δοχείο αλατιού βρίσκεται στην κάτω πλευρά του πλυντηρίου πιάτων |
|
|
M X |
|||
|
|
|
||||
(βλ. ΠΕΡΙΓΡΑΦΗ ΠΡΟΓΡΑΜΜΑΤΩΝ) και πρέπει να γεμίζεται όταν ανάβει η |
|
B |
|
|||
ενδεικτικήλυχνία ΑΝΑΠΛΗΡΩΣΗΣ ΑΛΑΤΙΟΥ |
στον πίνακα ελέγχου. |
|
A |
|||
1. |
Ανοίξτε τη θήκη B πιέζοντας και τραβώντας προς τα επάνω το |
|||||
|
1.Αφαιρέστε το κάτω καλάθι και ξεβιδώστε το |
|||||
|
|
γλωσσίδι στο καπάκι. |
|
|||
|
πώμα του δοχείου (αριστερόστροφα). |
|
|
|||
|
2. |
Εισαγάγετε προσεκτικά το λαμπρυντικό έως τη μέγιστη ενδεικτική |
||||
|
2.Τοποθετήστε το χωνί (βλ. εικόνα) και γεμίστε το |
|||||
|
|
εγκοπή (110 ml) του χώρου πλήρωσης - αποφύγετε τη διαρροή. Αν |
||||
|
δοχείο αλατιού μέχρι το άνω χείλος (περίπου 1 kg). |
|
διαρρεύσει, καθαρίστε αμέσως το υγρό που διέρρευσε με ένα |
|||
|
Δεν είναι ασυνήθιστο φαινόμενο να διαρρεύσει |
|
στεγνό πανί. |
|
||
|
λίγο νερό. |
|
3. |
Πιέστε κάτω το καπάκι έως ότου ακούσετε το χαρακτηριστικό κλικ |
||
|
3.Αφαιρέστε το χωνί και καθαρίστε τυχόν |
|
κλεισίματος. |
|
||
|
υπολείμματα αλατιού από το άνοιγμα. |
ΠΟΤΕ μην ρίχνετε λαμπρυντικό απευθείας στον κάδο. |
||||
Βεβαιωθείτε ότι το πώμα είναι καλά βιδωμένο, ώστε να μην εισέρχεται |
ΡΥΘΜΙΣΗ ΔΟΣΟΛΟΓΙΑΣ ΛΑΜΠΡΥΝΤΙΚΟΥ |
|
||||
απορρυπαντικό στο δοχείο κατά τη διάρκεια του προγράμματος |
Αν δεν είστε πλήρως ικανοποιημένοι από τα αποτελέσματα στεγνώματος, |
|||||
πλύσης (αυτό μπορεί να προκαλέσει ζημιά στον αποσκληρυντή και να |
μπορείτε να ρυθμίσετε την ποσότητα λαμπρυντικού που χρησιμοποιείται. |
|||||
φτάσει έως την ανάγκη επισκευής). |
|
• |
Ενεργοποιήστε το πλυντήριο πιάτων με το κουμπί ON/OFF. |
|||
Όταν χρειάζεστε να προσθέσετε αλάτι, συνιστούμε να διεξάγετε τη |
• |
Απενεργοποιήστε το με το κουμπί ON/OFF . |
|
|||
διαδικασία πριν ξεκινήσει ο κύκλος πλύσης. |
|
• |
Πιέστε το κουμπί P τρεις φορές - θα ακούσετε ένα μπιπ. |
|
||
ΡΥΘΜΙΣΗ ΣΚΛΗΡΟΤΗΤΑΣ ΝΕΡΟΥ |
|
• |
Ενεργοποιήστε το με το κουμπί ON/OFF . |
|
||
|
• |
Ο αριθμός επιπέδου της τρέχουσας επιλογής και η ενδεικτική |
||||
Για να μπορέσει να λειτουργήσει τέλεια ο αποσκληρυντής νερού, είναι |
|
λυχνία λαμπρυντικού αναβοσβήνουν. |
|
|||
σημαντικό η ρύθμιση της σκληρότητας νερού να γίνεται στην |
• |
Πιέστε το κουμπί P για να επιλέξετε το επίπεδο ποσότητας |
||||
πραγματική σκληρότητα νερού του σπιτιού σας. Μπορείτε να έχετε |
|
λαμπρυντικού που πρέπει να παρασχεθεί. |
|
|||
αυτήν την πληροφορία από τον τοπικό πάροχο νερού. |
• |
Απενεργοποιήστε το με το κουμπί ON/OFF |
|
|||
Η εργοστασιακή ρύθμιση γίνεται στη μέτρια σκληρότητα νερού (3). |
Η ρύθμιση ολοκληρώθηκε! |
|
||||
• Ενεργοποιήστε τη συσκευή πιέζοντας το κουμπί ON/OFF. |
Αν το επίπεδο λαμπρυντικού έχει ρυθμιστεί στο ΜΗΔΕΝ (ECO), δεν θα |
|||||
• Απενεργοποιήστε τη συσκευή πιέζοντας το κουμπί ON/OFF. |
παρασχεθεί καθόλου λαμπρυντικό. Η ενδεικτική λυχνία ΜΙΚΡΗ ΠΟΣΟΤΗ- |
|||||
• |
Κρατήστε πατημένο το κουμπί P για 5 δευτερόλεπτα έως ότου |
ΤΑ ΛΑΜΠΡΥΝΤΙΚΟΥ δεν θα ανάψει αν εξαντληθεί το λαμπρυντικό. |
||||
|
ακούσετε ένα μπιπ. |
|
Μπορούν να ρυθμιστούν έως και 4 επίπεδα ανάλογα με το μοντέλο πλυ- |
|||
|
|
ντηρίου πιάτων. Η εργοστασιακή ρύθμιση είναι στο μεσαίο επίπεδο. |
||||
• Ενεργοποιήστε τη συσκευή πιέζοντας το κουμπί ON/OFF. |
||||||
• |
Αν δείτε μπλε γραμμές στα πιάτα, ρυθμίστε χαμηλότερο αριθμό (1-2). |
|||||
• Ο αριθμός επιπέδου της τρέχουσας επιλογής και η ενδεικτική |
||||||
• |
Αν υπάρχουν σταγόνες νερού ή σημάδια αλάτων στα πιάτα, |
|||||
|
λυχνία αλατιού αναβοσβήνουν. |
|
||||
|
|
|
ρυθμίστε σε μεγαλύτερο αριθμό (3-4). |
|
||
• Πιέστε το κουμπί P για να επιλέξετε το επιθυμητό επίπεδο |
|
|
||||
ΠΛΗΡΩΣΗ ΤΟΥ ΔΟΧΕΙΟΥ ΑΠΟΡΡΥΠΑΝΤΙΚΟΥ |
||||||
|
σκληρότητας (βλ. ΠΊΝΑΚΑΣ ΣΚΛΗΡΌΤΗΤΑΣ ΝΕΡΟΎ). |
|||||
Πίνακας σκληρότητας νερού
|
Επίπεδο |
°dH |
°fH |
|
|
Γερμανικούς βαθμούς |
Γαλλικούς βαθμούς |
||
|
|
|||
|
|
|
|
|
1 |
Μελάτα |
0 |
- 6 |
0 - 10 |
|
|
|
|
|
2 |
Mεσαία |
7 - 11 |
11 - 20 |
|
|
|
|
|
|
3 |
Μέσος όρος |
12 |
- 17 |
21 - 30 |
|
|
|
|
|
4 |
Σφιχτά |
17 |
- 34 |
31 - 60 |
|
|
|
|
|
5 |
Πολύ σκληρό |
35 |
- 50 |
61 - 90 |
|
|
|
|
|
• Απενεργοποιήστε τη συσκευή πιέζοντας το κουμπί ON/OFF. Η ρύθμιση ολοκληρώθηκε!
Μόλις ολοκληρωθεί αυτή η διαδικασία, θέστε σε λειτουργία το πρόγραμμα χωρίς φορτίο.
Χρησιμοποιείτεμόνοαλάτιπουπροορίζεταιειδικάγιαπλυντήριαπιάτων.
Μετά την τοποθέτηση του αλατιού στη συσκευή, η ενδεικτική λυχνία ΕΠΑΝΑΠΛΗΡΩΣΗ ΑΛΑΤΙΟΥ σβήνει.
Αν δεν έχει γεμίσει το δοχείο αλατιού, αυτό μπορεί να έχει ως αποτέλεσμα την πρόκληση ζημιάς στον αποσκληρυντή νερού και στο στοιχείο θέρμανσης.
|
Για να ανοίξετε το δοχείο |
|
απορρυπαντικού χρησιμοποιήστε |
|
τη διάταξη ανοίγματος A. |
|
Προσθέστε το απορρυπαντικό |
B |
μόνο στο στεγνό δοχείο B . |
A |
Τοποθετήστε την ποσότητα |
απορρυπαντικού για πρόπλυση |
|
|
απευθείας μέσα στον κάδο. |
|
1.Όταν μετράτε το απορρυπαντικό |
|
ανατρέξτε στον (βλ. ΠΙΝΑΚΑΣ |
|
ΠΡΟΓΡΑΜΜΑΤΩΝ) για να προσθέσετε |
την κατάλληλη ποσότητα. Το διαμέρισμα B περιλαμβάνει ένα |
|
επίπεδο που δείχνει τη μέγιστη ποσότητα υγρού απορρυπαντικού ή |
|
απορρυπαντικού σε σκόνη που μπορεί να προστεθεί σε κάθε κύκλο. |
|
2. Αφαιρέστε τα υπολείμματα απορρυπαντικού από τις άκρες των |
|
δοχείων πριν κλείσετε το καπάκι, έως ότου ακουστεί το κλικ. |
|
3. Κλείστε το καπάκι του δοχείου απορρυπαντικού τραβώντας το |
|
επάνω έως ότου η διάταξη κλεισίματος ασφαλίσει στη θέση της. |
|
Το δοχείο απορρυπαντικού αυτόματα ανοίγει τη σωστή στιγμή |
|
σύμφωνα με το πρόγραμμα. Αν χρησιμοποιούνται απορρυπαντικά όλα |
|
σε ένα, συνιστούμε να χρησιμοποιείτε το κουμπί ΤΑΜΠΛΕΤΑ, γιατί |
|
ρυθμίζει το πρόγραμμα με τέτοιο τρόπο ώστε να επιτυγχάνονται τα |
|
καλύτερα αποτελέσματος πλυσίματος και στεγνώματος. |
|
28
 Loading...