

FLORABEST FLV 1200 B1 Translation Of Original Operation Manual

®
ELECTRIC SCARIFIER/AERATOR FLV 1200 B1
EIGB
ELECTRIC SCARIFIER/AERATOR
Translation of original operation manual
LT
ELEKTRINIS SKARIFIKATORIUS /
AERATORIUS
Originalios naudojimo instrukcijos vertimas
FI
SÄHKÖKÄYTTÖINEN NURMIKON ILMAAJA /
SAMMALEENPOISTAJA
Alkuperäisen ohjeen käännös
IAN 291739
PL
ELEKTRYCZNY WERTYKULATOR / AERATOR
Tłumaczenie oryginalnej instrukcji obsługi
SE
ELEKTRISK VERTIKALSKÄRARE/
GRÄSMATTELUFTARE
Översättning av originalbruksanvisningen
ELEKTRO-VERTIKUTIERER / RASENLÜFTER
Originalbetriebsanleitung

EIGB
Before reading, unfold the page containing the illustrations and familiarise yourself with all
Before reading, unfold the page containing the illustrations and familiarise yourself with all
functions of the device.
functions of the device.
PL
Przed przeczytaniem proszę rozłożyć stronę z ilustracjami, a następnie proszę zapoznać się z
wszystkimi funkcjami urz
LT
ądzenia.
Prieš skaitydami instrukciją atsiverskite lapą su paveikslėliais ir susipažinkite su visomis šio
prietaiso funkcijomis.
SE
Vik ut sidan med bilder innan du börjar att läsa och sätt dig sedan in i alla funktioner hos
apparaten.
FI
Käännä ennen lukemista laitteen kuvat sisältävät sivut auki ja tutustu sitten kaikkiin laitteen
toimintoihin.
.tuartrev setäreG sed nenoitknuF nella tim
dneßeilhcsna hcis eiS nehcam dnu sua negnudlibbA ned tim etieS eid neseL med rov eiS neppalK
EI/BG Page 4
launam noitarepo lanigiro fo noitalsnarT
PL Tłumaczenie oryginalnej instrukcji obsługi 42 anortS
LT Originalios naudojimo instrukcijos vertimas
Översättning av originalbruksanvisningen SE 770 Sida
FI Alkuperäisen ohjeen käännös 92 Sivu
gnutielnasbeirteblanigirO HC / TA / ED 114 etieS
Manual FLV 1200 B1 - CB3,version 1.07 dated 2017-9-12
84 lsP

A
19
18
17
16
15
14
13
12
1
2 3
4a
4b
5
6
7
8
20
9
10
11
21

B
E
18
4a
16
19
15
4b
12
C
21
3
4a
13
14
4b
7
22
13
F
23
6
24
20
D
18
17
5
G
1
2
19

IEGB
Content
Introduction ..............................4
Intended purpose .....................4
General description...................5
Scope of delivery..........................5
Overview......................................5
Functional description.....................6
Technical data............................6
Safety precautions ....................6
Symbols used in the manual...........7
Symbols on the implement...........7
General notes on safety...............8
Assembling instructions ...........16
...
Assembling the handle bar ............17
Mounting and emptying the
collection bag .............................17
Exchanging the cylinder ................17
Operation .................................18
Setting the working positions ..............18
Switching on and off .........................18
Working with the implement ...............19
Cleaning/maintenance ............. 20
General cleaning and maintenance
work ...............................................20
Storage.................................... 20
Disposal and protection of the
environment ............................ 20
Trouble shooting....................... 21
Guarantee..................................22
Repair Service........................... 23
Service-Center............................23
Importer.....................................23
Translation of the original EC
declaration of conformity .........137
Introduction
Congratulations on the purchase of your
new device. With it, you have chosen a
high quality product. During production,
this equipment has been checked for
quality anb subjected to a final inspection.
The functionality of your equipment
is therefore guaranteed. It cannot be
ruled out that residual quantities of
water or lubricants will remain on or
in the equipment/hose lines in isolated
cases. This is not a fault or defect and it
represents no cause for concern.
The operating instructions constitute
part of this product. They contain
important information on safety,
use and disposal. Before using the
product, familiarise yourself with
all of the operating and safety
instructions. Use the product only as
described and for the applications
specified. Keep this manual safely
and in the event that the product is
passed on, hand over all documents
to the third party.
Intended purpose
This implement is used:
- As a lawn aerator and to rake leaves,
moss and weeds out of the lawn and to
collect these leaves and plant residues.
- As a verticuttor to cultivate the grass
sward and thereby regenerate the
lawn.
Any other use that is not specifically
approved in these Instructions can result
in damage to the implement and could be
a serious danger to the user.
The implement must only be operated by
adults. Children and people who are not
4

IEGB
familiar with these Instructions must not be
allowed to use this implement. Never
operate this implement while it is raining
and in a wet environment.
The owner or operator is responsible for
accidents or harm to people and their
property.
The manufacturer cannot be held liable for
damage caused by incorrect operation of
the implement or if it is not used in
conformity with its intended purpose.
General description
Scope of delivery
Carefully unpack the implement and check
that all the subsequently listed parts are
complete:
• Implement case with verticuttor cylinder
and impact protector
• Aerating cylinder
• Upper handle bar complete with starting
lever, power plug, unlocking button and
firmly mounted power cable
• Lower bar
• 2 centre bars
• Collection bag
• Cable strain relief
• 2 cable clips
• Mounting accessories:
- 2 Philips screws, 4 screws and 4
wing nuts to fasten the bar
- Spanner to change the cylinders
• Instruction Manual
Overview
The illustration of the principal
functioning parts can be found
on the front and back foldout
pages.
1 Unlocking button
A
2 Starting lever
3 Upper handle bar
4a+b 4 screws and 4 wing nuts to
secure the bar
5 Collection bag
6 Impact protector
7 Lower bar
8 Implement case
9 Adjustment wheel
10 2 rear wheels
11 2 front wheels
12 Cable clip
13 Spanner
14 Tool holder
15 2 centre bars
16 Cable clip
17 Power cable
18 Cable strain relief
19 Machine cable
20 Aerator cylinder with sprung
tines
21 Verticutor cylinder with knives
22 Philips screws
B
23 Collection bag frame
C
24 Square receptacle
E
5

IEGB
Functional description
The verticuttor and lawn aerator has two
easily exchangeable work cylinders:
An aerator cylinder made of hard plastic
with vertically rotating sprung tines, and a
verticutor cylinder with vertically mounted
high-grade steel knives.
The implement features a high-quality
plastic case with collection bag and a
handle bar with a folding function. Please
refer to the subsequent descriptions for the
actual functions of the individual control
elements.
Technical data
Motor input ..............................1200 W
Rated voltage ...........230-240 V~, 50 Hz
Protection Class ............................... II
Degree of protection ....................... IPX4
Rotating speed of the tool
(no) .......................3600 min
Cylinder width .............................31 cm
Readjustment range for wear...........9 mm
Volume collection bag ......................30 l
Weight .......................................9.8 kg
Acoustic pressure level
(L
) ..............85.7 dB (A); KpA= 3 dB(A)
pA
Sound power level (L
Measured ..99.5 dB (A); K
Guaranteed ....................... 103 dB (A)
Vibration (a
) ...3.108 m/s2; K= 1.5 m/s
n
)
wA
-1
(r.p.m)
= 2.49 dB (A)
wA
The stated vibration emission value was
measured in accordance with a standard
testing procedure and may be used to
compare one power tool to another.
The stated vibration emission value may
also be used for a preliminary exposure
assessment.
Warning: The vibration emission
value may differ during actual use
of the power tool from the stated
value depending on the manner in
which the power tool is used.
Safety precautions aimed at
protecting the user should be based
on estimated exposure under actual
usage conditions (all parts of the
operating cycle are to be considered,
including, for example, times during
which the power tool is turned off
and times when the tool is turned on
but is running idle).
Safety precautions
This section covers the basic
safety instructions when
2
working with this implement.
The noise and vibration values were
established by the standards and
stipulations listed in the Conformity
Declaration.Technical and visual changes
can be completed in the course of
further development without notication.
Consequently,all dimensions, references
and details in these Operating Instructions
are without guarantee. Consequently
legal claims based on these Operating
Instructions cannot be asserted.
6
IEGB
Symbols used in the
manual
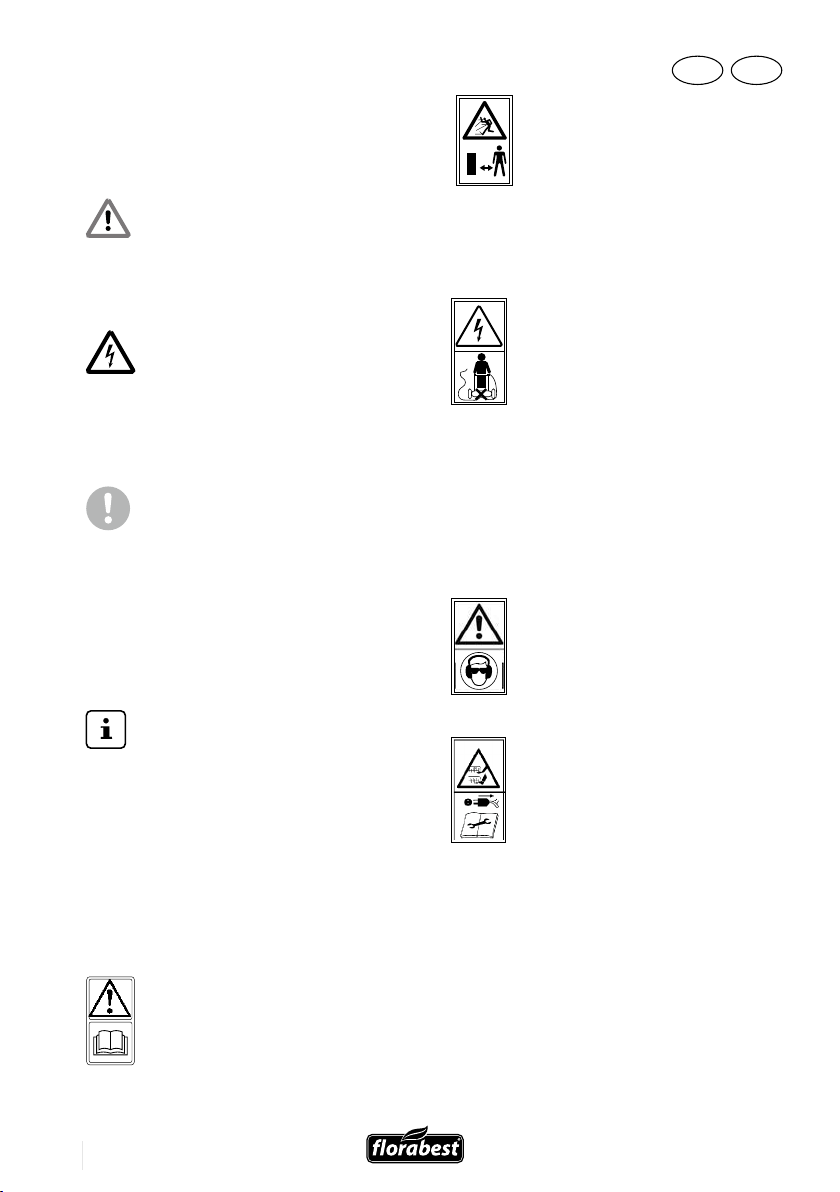
Warning symbols with
information on damage
and injury prevention.
Warning symbol with
information on the
danger of electric
shock.
Instruction symbols (the
instruction is explained
at the place of the
exclamation mark)
with information on
preventing damage.
Danger of injury due
to flung-out material!
Keep bystanders
well away from the
implement.
Danger of electric
shock if the power
cable is damaged!
Always ensure that the
power cable is kept
well away from the
implement and its
cutting tools.
Caution!
Wear eye and ear
protection.
Help symbols with
information on
improving tool
handling.
Symbols on the
implement
Caution!
These Instructions must
be read.
Caution! - Sharp tools.
Ensure that the hands
and feet are kept well
away from the cutting
tools. The cutting
cylinder continues to
rotate briefly after the
motor has been
7
IEGB
switched off.
Always disconnect the
plug from the mains
prior to maintenance
work or if the power
cable is damaged.
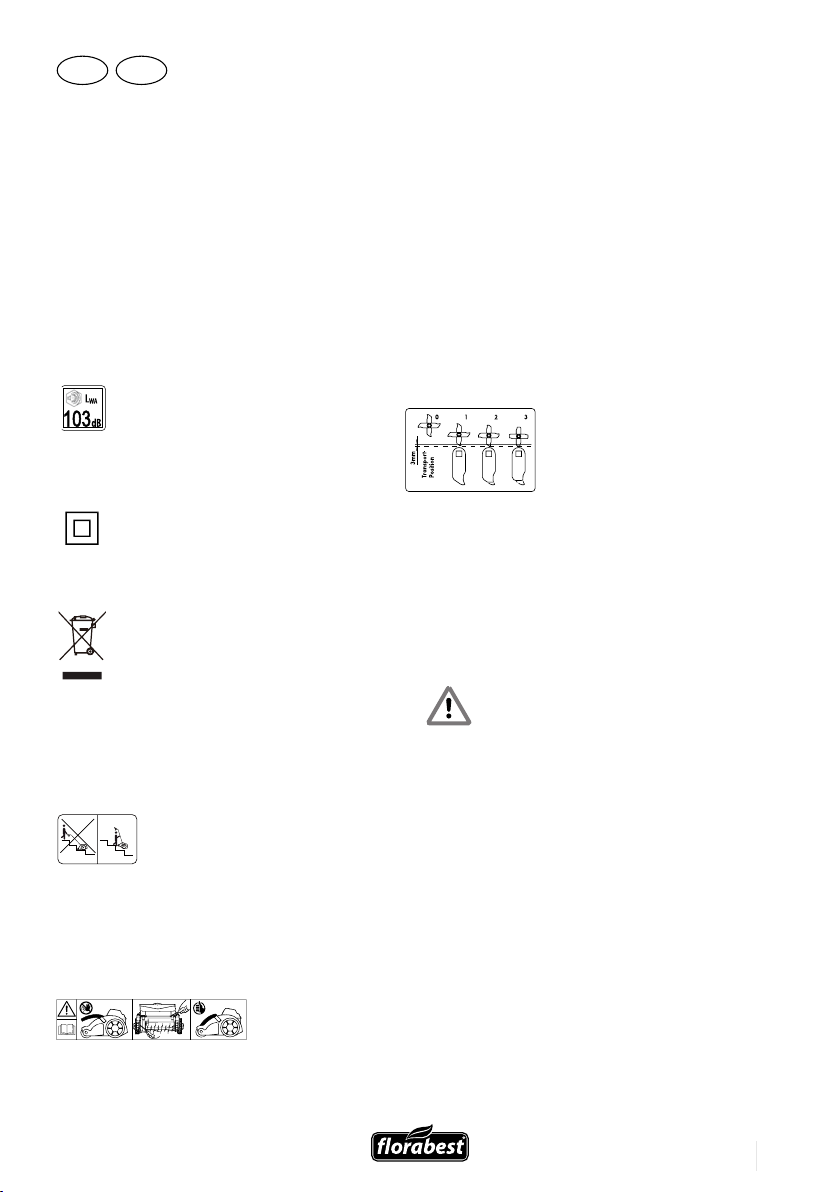
Noise level ratings
LWA in dB(A).
Protection Class II
Electrically powered
implements must not
be disposed of with
the domestic waste.
Caution with steps!
Turn off the power
when the implement
is to be carried
across steps.
impact protection cover
and/or the housing to
ensure that the cover closes
correctly. When operating
without the collection
basket, the impact
protection cover must be
completely closed.
Transport and
working
positions
General notes on
safety
This implement can
cause serious injuries if
it is not properly used.
Please read these
Operating Instructions
carefully and
familiarize
yourself with all the
control elements
before operating this
implement.
Remove any soil residue
from the springs of the
8

IEGB
Keep these Operating
Instructions in a
readily accessible
place so that this
information is always
at your disposal.
Please note that despite
all measures to integrate
safety measures into the
construction, the safety
devices and supplemental
safety measures, a
resiudual risk remains
when using this plement.
Operating the implement:
WARNING! The
implement can cause
serious injuries. How
to a avoid accidents
and injuries:
preparations:
• The implement is not
suitable for use by
children.
• Never allow children,
persons with reduced
physical, sensory or
mental capabilities or
lack of experience and
knowledge or people
unfamiliar with these
instructions to use the
product.Loc regulations
may stipulate a minimum
age for operators.
• Never start up the
implement while other
people, but especially
children and domestic
pets, are in the vicinity.
• Check the area on which
the implement is to be
used. Remove all stones,
sticks, wire and other
foreign bodies that could
be caught up and flung
out.
• Never use the implement
to level out uneven
patches.
• Always wear ppropriate
protective work clothes
9

IEGB
and firm shoes with
nonslip soles, strong long
trousers, ear defenders
and goggles. Never
operate the implement
while bare footed or
when wearing open
sandals.
The protective devices
and your personal
protective equipment will
protect yourself and other
people and ensure that
the equipment can be
smoothly operated.
• Never operate the
implement if it is
damaged, incomplete or
has been modified
without the consent of the
manufacturer. Never
work with damaged
or missing protective
devices (e.g. starting
lever, unlocking knob,
impact protector).
Never disengage
protective devices (e.g.
by tying the starting
lever). This ensures that
the equipment remains
safe.
• Before starting the
equipment, ensure that no
objects or branches are
pushed into the blade
opening, that the
equipment is standing
stably and that the
workspace is tidy and not
blocked.
Check the condition of
your extension cable and
the connecting cable of
your equipment. Use the
necessary protective
equipment. There is a risk
of injury.
• If your equipment vibrates
or emits unusual noises
when switched on,
disconnect the plug from
the socket and check the
cutting cylinder. Ensure
that no remains of
chopped matter are
blocking the cutting
cylinder or jammed
10

IEGB
between the blades. If
you find no problems,
return the equipment to a
customer service centre.
• If the blades no longer cut
correctly or if the motor is
overloaded, check all the
parts of your equipment
and replace the worn
parts. If a more extensive
repair is required, contact
a customer service centre.
Use:
• CAUTION – A very sharp
tool. Avoid cutting your
fingers or toes. While
working always keep
your feet and fingers well
away from the cutting
cylinder and the ejector
opening. There is the
danger of serious injury!
• Do not operate the
implement while it is
raining, in poor weather
conditions and when the
surrounding area and
lawn are wet. Operate
the implement only
during daylight hours or
with bright lighting. There
is a risk of accidents.
• Do not operate the
implement if you are tired
or are lacking in
concentration and after
having drunk alcohol or
taken medicine. Always
take a work break in due
time. Approach the work
with common sense. A
moment of carelessness
when using the equipment
can result in serious
injury.
• Familiarize yourself with
the terrain and remain
focused on the potential
hazards that you could
miss on account of the
motor noise.
• Always maintain a secure
footing while working,
especially on a sloping
terrain. Avoid abnormal
11

IEGB
body positions and
always keep your
balance, so that you
continually have a sure
footing on slopes. Always
work across slopes - never
up and down! Be
particularly careful when
changing the travelling
direction.
Do not work on very
steep slopes. This enables
you to control the
equipment better in
unexpected situations.
• Do not run! Always guide
the implement at a
walking pace with both
hands on the handle. Be
especially careful when
you turn the implement
around or draw it
towards you. Danger of
stumbling!
• Start or actuate the
starting lever with care
and in conformity with the
directions in these
Instructions.
• Do not tilt the implement
when starting, other than
it has to be lifted. In this
case tilt the implement
only to the extent that is
absolutely necessary and
always lift the implement
on the side that is
opposite to the operator.
• Never operate the
implement without the
attached collection bag or
impact protector. Danger
of injury! Always keep
well away from the
ejector opening.
• Do not operate the
implement in the vicinity
of inflammable liquids or
gases as this could give
rise to the danger of a fire
or explosion.
• Always disconnect the
plug from the mains
socket before any
maintenance.
12

IEGB
Work interruptions:
• After the implement has
been turned off, the
cutting cylinder will
continue to rotate for a
few seconds. Keep hands
and feet well away.
• Do not touch the spring
tines before the implement
has been disconnected
from the mains and the
spring tines have come to
a complete standstill. Risk
of injury owing to a sharp
implement!
• Only remove plant parts
when the implement is
standing completely still.
Ensure that the grass
ejector opening is clean
and free.
• Switch off the power
when the implement is to
be transported, lifted or
tilted and when traversing
other surfaces than grass.
• Never leave the
implement unattended at
place of work.
Children should be
supervised to ensure that
they do not play with the
appliance.
• Always switch off the
implement and disconnect
the power plug:
- Whenever you leave the
implement
- Before you clean the
ejector opening or
unblock or unclog the
implement
- When the implement is
not being used
- During all maintenance
and cleaning work
- When the power cable
is damaged or has
become tangled
- When the implement
hits an obstruction
during work or when
unusual vibrations arise.
Establish the cause and
see if the implement has
been damaged. Do not
repair it yourself! Have
13

IEGB
the implement repaired
by an authorised
workshop!
• Store the implement in a
dry place well out of
reach of children.
CAUTION! The
following states how
to avoid damage to the
implement and any
resulting harm to
people:
Take care of your
implement:
• Switch off the power
when the implement is to
be carried across steps.
• Inspect the implement
each time before it is to
be used. Never operate
the implement if safety
devices (e.g. impact
protector, parts of the
cutting facility or bolts)
are missing, worn out or
damaged.
Check especially the
power cable and starting
lever for damage.
To avoid imbalance, all
tools and bolts must be
exchanged as complete
sets.
• Only use spare parts and
accessories that have
been supplied or
recommended by the
manufacturer. The use of
alien parts results in the
immediate loss of all
guarantee claims.
• Ensure that all nuts, bolts
and screws are firmly
tightened and that the
implement is in a safe
working state.
• Never try to repair the
implement yourself, unless
you have been trained
accordingly. All work that
has not been listed in
these Instructions must
only be carried out by
authorised servicing
14

IEGB
agencies.
• Treat the implement with
the greatest care. Always
keep the tool clean for
better and safer work.
Follow the maintenance
instructions.
• Never overload the
implement. Always work
within the specified
capacity range. Do not
use low-power machines
for heavy-duty work. Do
not operate the implement
for purposes for which it
is not intended.
Electrical safety:
CAUTION! The
following states how
to avoid accidents and
injuries due to electric
shock:
• Before each use, carry
out a visual inspection of
the power and extension
cables for signs of
damage or ageing.
Damaged mains power
cables increase the risk of
electric shock.
• Connect the implement to
a power socket with a
residual-current circuit
breaker that has a rated
current of not more than
30 mA.
• Always keep the
extension cable well
away from the cutting
tools.
Should the power cable
become damaged during
work, then instantly
disconnect the power
cable from the mains. DO
NOT TOUCH THE
POWER CABLE BEFORE
IT HAS BEEN
DISCONNECTED FROM
THE MAINS! Risk of
electric shock.
• If the power cable for this
equipment is damaged,
15

IEGB
it must be replaced with a
special power cable
available from the
manufacturer or his
service agent.
• Keep the extension cables
away from the sprung
tines and verticutor
knives.
They may damage the
cables and result in
contact with live parts.
• Check that the mains
voltage is the same as
indicated on the rating
plate.
• Avoid body contact with
earthed parts (e.g.
metal fences, metal
posts). There is an
increased risk of
electric shock if your
body is earthed.
• Only use approved
extension cables of the
type H05RN-F with a
maximum length of 75
m and which have been
approved for open-air
use. The stranded cord
diameter of the extension
cable must be at least
2.5 mm². Always unreel
a cable drum to its full
length so that the entire
cable can be checked
for damage.
• Use the included cable
suspension when
attaching an extension
cable.
• Never pull the cable to
disconnect the plug from
the socket. Protect the
cable from heat, oil and
sharp edges
• If the connecting cable is
damaged, first disconnect
the extension cable from
the socket. You can then
disconnect the connecting
cable of the equipment.
Assembling instructions
Prior to any work on the implement
always disconnect the plug from the
power socket!
Ensure during assembly that the
power cable is not squeezed and
that it has sufficient play
.
16

Assembling the handle
bar
1. Insert the lower bar (7) into the
A
implement case (8) and screw
it on with the two Philips screws
(22).
2. Use the screws and the wing nuts
(4b) to attach both central bars
(15) to the lower bar (7).
3. Hang the cable strain relief (18)
on the upper handle bar (3).
4. Use the screws and the wing nuts
(4a) to attach the upper bar (3) to
both central bars (15).
5. Fasten the machine cable (19)
with the machine cable clip
(12/16) to the bar.
6. Attach the tool retainer (14) and
clip the tool key (13).
IEGB
Mounting the collection bag on the
implement:
3. Lift the impact protector (6).
4. Push the pins on the collection
bag rods into the socket in the
implement case.
5. Release the impact protector so
that it holds the collection bag (5)
in its position.
Removing and emptying the collection
bag:
6. Lift the impact protector (6) and
take out the collection bag (5).
Exchanging the cylinder
Switch off the implement, disconnect
the mains plug and wait until the
cylinder is standing still.
Mounting and emptying
the collection bag
WARNING: Never operate the
implement without the impact
protector. Danger of Injury!
Recommendation: Work with the
collection bag for aerating and
without the collection bag for
verticuting
Assembling the collection bag:
The collection bag is delivered in a folded
state and must therefore be assembled
before it is mounted on the implement.
1. Pull the collection bag over the
C
frame (23).
2. Pull the collection bag's plastic
straps over the frame's rods
and clip them in.
Wear gloves when handling the
cylinder.
1. Turn the implement over.
E
2. Remove any grass or debris from
either end of the mounted
cylinder to ensure no foreign
objects hinder reassembly.
3. Take the spanner (
A
the holder (
4. Loosen the fastening screws and
pull the bearing support
upwards.
5. Tilt the cylinder (
F
upwards and pull the shaft out of
the square receptacle (24).
6. Insert the new cylinder (
20/21) by reversing the
sequence.
14).
A
A
13) out of
20/21)
A
17
IEGB
Operation
Please observe local regulations
concerning noise protection.
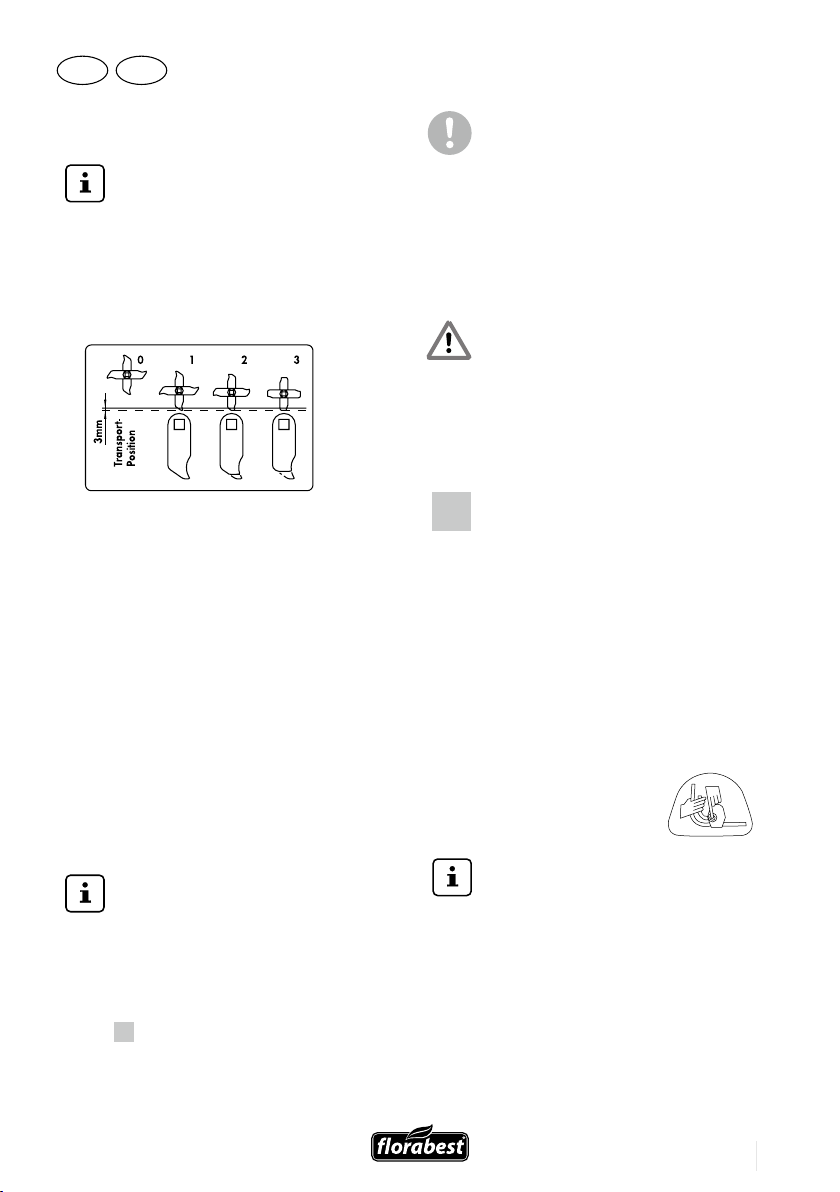
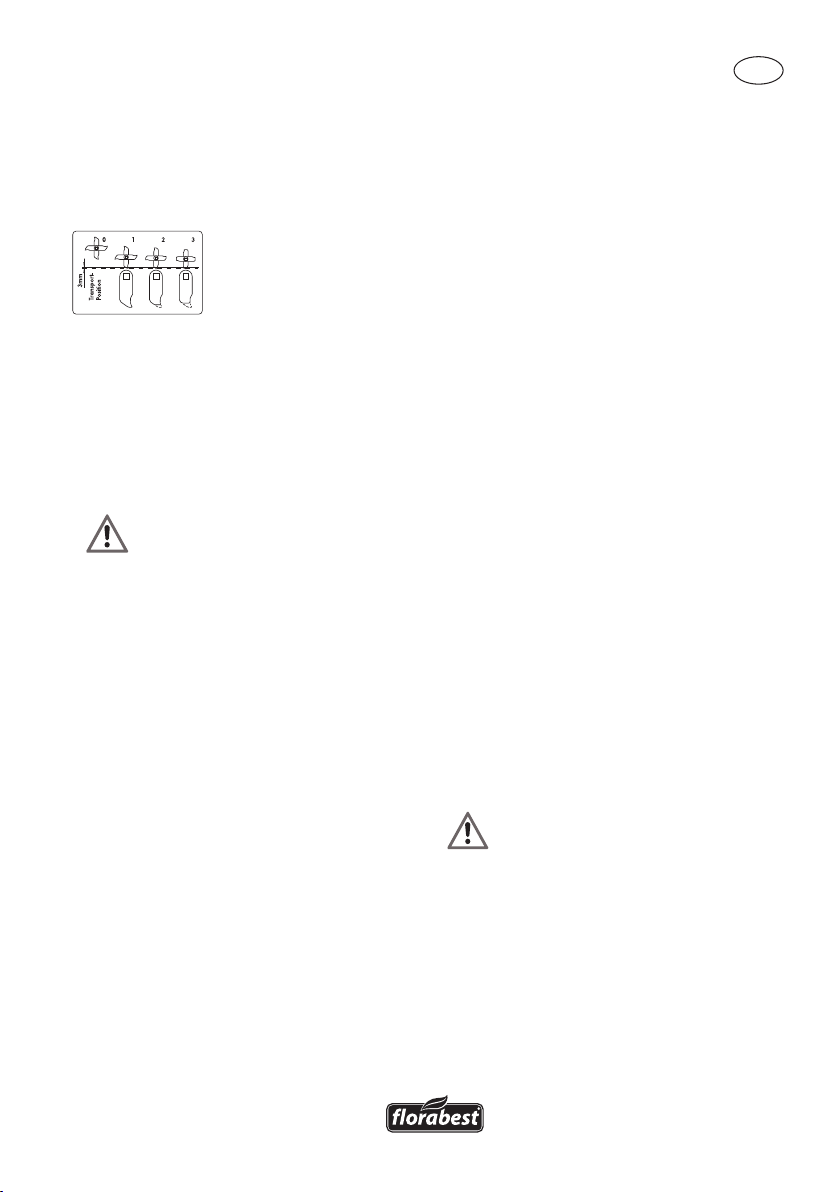
Setting the working positions
The implement has 4 principal position
settings:
Setting 0 : Transport position
This position sets the maximum safety spacing
between the tool and the floor.
Setting 1 : Working position
Set this position when working with a new
implement.
Settings 2 - 3 : Readjustment positions
The working position can be lowered with
increased knife and sprung tine wear.
wear can be identified from an increasingly
poor result.
The readjusting depth amounts to approx.
3 mm per setting.
The implement is delivered with
the height set to the Transport
Position (0).
1. The implement must be switched off to
set the working position.
2. Pull the adjustment wheel for adjustment
A
9) and turn it to the desired
(see
position until it clicks into place.
Both wheels (right and left) must be
individually set to the same position.
The adjustment wheel is not intended
for height adjustment but rather to
compensate for wear. Selection of
a readjustment position without the
corresponding wear can overload
the motor and damage the cylinder.
Switching on and off
Before switching on the implement
ensure that it is not
in contact with any objects.
Keep your feet and hands
well away from the cylinder
and the ejector opening. Danger
of injury!
1. Place the implement on a level
D
lawn surface.
2. Connect the power cable (17)
with the extension cable.
3. Form a loop in the end of the
power cable and hang it into the
cable strain relief (18).
4. Connect the implement to the
mains voltage.
5. To switch on, press the unlocking
button (1) on the handle and
simultaneously press the starting
lever (2). Release the unlocking
button (1).
6. To switch off, release
the starting lever (2).
Overload protection: The motor
is automatically switched off
when the implement is overloaded.
Release the starting lever and allow
the implement a cooling down
period of approx. 1 minute to reset.
1
2
18
IEGB
WARNING! The cylinder continues
to run for a brief period
after the implement has
been switched off. Do not tilt
or carry the implement while
the motor is still running and
do not touch the cylinder
while it is still rotating. Danger
of injury!
Working with the implement
To maintain a well cared-for lawn, it
should be aerated every 4 to 6 weeks.
Verticuting is a more intensive
intervention than aerating and should
only be carried out once or twice a year.
The best time is in spring after the lawn
has been mown for the first time. If
necessary, repeat this in late summer.
When working on slopes
always proceed across the
slope. Be particularly careful
when walking backwards
and pulling the implement.
Danger of stumbling!
After work and to transport the
implement disconnect the power plug
and wait until the cylinder is standing
still.
The shorter the grass, the better the
lawn can be treated. Furthermore,
the implement is less stressed and
the service life of the cylinder is
prolonged.
• The implement can be operated with or
without the collection bag.
Recommendation: Work with the
collection
bag for aerating and without the
collection bag for verticuting.
• Mow the lawn to the required grass
height.
• Do not use the scarifier in lomg
grass may otherwise wind around the
scariequipment.
• Select the appropriate working or
readjustment position (in the event of
cylinder wear) so that the implement
is not overloaded.
• Commence work in the vicinity of the
power socket and proceed away from
the socket.
• Always ensure that the extension cable
is behind you, and after turning move
it to the side that has already been
treated.
• Guide the implement at a walking
pace down lanes that are as straight
as possible. To ensure uninterrupted
aerating or verticuting the individual
lanes should always overlap by a few
centimetres. Dwelling too long at the
same place while the implement is
running can damage the grass sward.
• To ensure that the extension cable is not
an impediment, turn the implement in
such a manner that the cable strain
relief on the bar always faces the side
that has been treated.
• Adjust the transport position 0 setting
(see “Setting the Working Position”)
when transporting the implement.
• Lift the implement to transport it over
steps and sensitive surfaces (e.g.
tiles).
• Always clean the implement after each
use (see “Cleaning/Maintenance”).
• After having treated lawns with dense
moss growth, it is advisable to reseed
the lawn so that it can regenerate
itself quicker.
19
IEGB
Cleaning/maintenance
Work that has not been described
in these Instructions
must be carried out by a servicing
agency authorised by
us. Only use original parts.
Wear gloves when handling the
cylinder.
Prior to all maintenance and
cleaning work always switch off the
implement, disconnect the plug from
the power socket and wait until the
cylinder is standing still.
General cleaning and
maintenance work
Do not use water jets or high
pressure water to clean the
implement.
Never clean the implement
under flowing water. Either
would result in the danger of an
electric shock and the implement
could be damaged.
• When work has finished remove plant
residues adhering to the wheels, inside
the ventilation opening, the grass
ejector opening and the cylinder. Do
not use hard or pointed objects for this
purpose as they could damage the
implement.
• Completely empty the collection bag
• Always keep the implement clean. Do
not use cleaning agents or solvents.
Storage
• Store the implement in a dry place well
out of reach of children.
• Allow the motor to cool down before
placing the implement in a closed
room.
• Do not wrap nylon sacks around the
implement as this could result in the
formation of moisture.
Loosen the wing nuts so that the bar
G
can be folded up for space-saving
storage.
Ensure that the cables are not
squeezed.
Disposal and protection
of the environment
Dispose of the implement, accessories and
packaging in an environment-friendly
manner.
Electrically-powered appliances
must not be disposed of with the
domestic waste.
Hand in the spent implement to a recycling
centre. The plastic and metal parts can then
be sorted out and graded for recycling.
Our Service Center will be happy to answer
any questions in this respect.
We cannot be held liable for damage
caused by our implements if they were
improperly repaired, if non-original parts
have been used or if they were used not in
keeping with their intended purpose.
20

Trouble shooting
IEGB
Problem Possible causeR
Foreign body on cylinder
(
20/21)
Damaged sprung tines (
Abnormal noises,
clatter or
vibrations
Implement does
not start
Motor fails
Work result not
satisfactory
20) or cylinder knives (
21)
Cylinder (
incorrectly mounted
Toothed-belt slip
No power
Starting lever (
defective
Carbon brushes worn out
Motor defective
Blocked by foreign bodyR
Grass is too long
Clogged discharge Clean discharge
Overload protection tripped
Sprung tines of aerator
cylinder (
Knives of verticutor cylinder
(
21) blunt or damaged
Toothed belt defective Replace by After-Sales Service
Transport Position or
incorrect Working Position
selected
Grass is too long
20) worn out
20/21)
2)
Remedy
Remove foreign body
Exchange cylinder
Install cylinder correctly (see
“Exchanging the cylinder”)
Switch device off and pull power
plug. Remove any soil and grass
residues.
Check power socket, cable, line;
Repair by After-Sales Service
Remove foreign body
Mow beforehand; see chapter
“Operation”
Allow implement to cool down for
about 1 minute
Exchange cylinder
Exchange cylinder
Select Working Position 1 or
Readjust Position 2-3 (see chapter
“Setting the Working Positions”)
Mow beforehand; see chapter
“Operation”
21

IEGB
Guarantee
Dear Customer,
This equipment is provided with a 3-year
guarantee from the date of purchase.
In case of defects, you have statutory rights
against the seller of the product. These
statutory rights are not restricted by our
guarantee presented below.
Terms of Guarantee
The term of the guarantee begins on the
date of purchase. Please retain the original
receipt. This document is required as proof
of purchase.
If a material or manufacturing defect
occurs within three years of the date of
purchase of this product, we will repair or
replace – at our choice – the product for
you free of charge. This guarantee requires
the defective equipment and proof of
purchase to be presented within the
three-year period with a brief written
description of what constitutes the defect
and when it occurred.
If the defect is covered by our guarantee,
you will receive either the repaired product
or a new product. No new guarantee
period begins on repair or replacement of
the product.
Guarantee Period and Statutory
Claims for Defects
The guarantee period is not extended by
the guarantee service. This also applies for
replaced or repaired parts. Any damages
and defects already present at the time of
purchase must be reported immediately
after unpacking. Repairs arising after expiry
of the guarantee period are chargeable.
Guarantee Cover
The equipment has been carefully
produced in accordance with strict quality
guidelines and conscientiously checked
prior to delivery.
The guarantee applies for all material and
manufacturing defects. This guarantee
does not extend to cover product parts that
are subject to wear and tear and therefore
considered consumable (e.g.cylinders,
v-belt or attachments) or to cover damage
to breakable parts (e.g. switches, batteries,
or parts made of glass).
This guarantee shall be invalid if the product
has been damaged, used incorrectly or
not maintained. Precise adherence to all of
manual is required for proper use of the
product. Intended uses and actions against
which the operating manual advises or
warns must be categorically avoided.
The product is designed only for private
and not commercial use. The guarantee
will be invalidated in case of misuse or
improper handling, use of force, or
interventions not undertaken by our
authorised service branch.
Processing in Case of Guarantee
To ensure quick handling of you issue,
please follow the following directions:
• Please have the receipt and item number
(IAN 291739) ready as proof of
purchase for all enquiries.
• Please find the item number on the
rating plate, an engraved plate, on the
front page of your manual (bottom left),
or as a sticker on the back or bottom.
• Should functional errors or other defects
occur, please initially contact the
telephone or by e-mail. You will
then
receive further information on the
processing of your complaint.
• After consultation with our customer
service, a product recorded as defective
22

IEGB
can be sent postage paid to the
service address communicated to you,
with the proof of purchase (receipt)
the defect and when it occurred. In order
to avoid acceptance problems and
additional costs, please be sure to use
only the address communicated to you.
Ensure that the consignment is not sent
carriage forward or by bulky goods,
express or other special freight. Please
send the equipment inc. all accessories
supplied at the time of purchase and
ensure adequate, safe transport
packaging.
Repair Service
For a charge, repairs not covered by the
guarantee can be carried out by our se-r
vice branch, which will be happy to issue
a cost estimate for you.
We can handle only equipment that has
been sent with adequate packaging and
postage.
Attention: Please send your equipment to
our service branch in clean condition and
with an indication of the defect.
Equipment sent carriage forward or by
bulky goods, express or other special
freight will not be accepted.
We will dispose of your defective devices
free of charge when you send them to us.
Service-Center
GB
Service Great Britain
teknihall Elektronik GmbH
Breitefeld 15 64839 Münster Germany
Email: gapo-service-gb@teknihall.com
Tel: 0044 2036300345
Fax: 0049 21529603111
IE
Service Ireland
teknihall Elektronik GmbH
Breitefeld 15 64839 Münster Germany
gapo-service-ie@teknihall.com
Tel: 0035314372338
Fax: 0049 21529603111
IAN 291739
importer
Please note that the following address is
not a service address. Please initially
contact the service centre specified above .
Ga-Po-Vertrieb GmbH
Heinrich-Horten-Straße 5
47906 Kempen, Germany
23

PL
Spis treści
Wprowadzenie.....................................24
Przeznaczenie..................................24
Opis ogólny.........................................25
Zakres dostawy..............................25
Przegląd.....................................25
Opis działania ..........................26
Dane techniczne..................................26
Wskazówki bezpieczeństwa..............26
Symbole w instrukcji obsługi.............27
Symbole na urządzeniu....................27
Ogólne wskazówki bezpieczeństwa.
.........................................................29
Instrukcja montażu............................38
Montaż rękojeści uchwytu...................38
Montaż i opróżnianie
zasobnika zbiorczego.......................39
Wymiana walca...............................39
Ob sługa..................................... 40
Ustawianie pozycji roboczych..........40
Włączanie i wyłączanie...................40
Praca z urządzeniem.......................41
Czyszczenie i konserwacja................42
Ogólne czyszczenie i prace
kons erwacyjne........................42
Przechowywanie................................43
Utylizacja i ochrona środowiska.......43
Usuwanie błędów..............................44
Gw aran cja .................. ... ...... ... .... 45
Serwis naprawczy.............................46
Centrum serwisowe............................47
Impo rter. . . ......... . ........ . . . . . . ......4 7
Tłumaczenie oryginal -nej deklaracji
zgodności WE ..................................136
Wprowadzenie
Gratulujemy Państwu zakupu nowego
urządzenia. Zdecydowali się Państwo na
produkt wysokiej jakości. Niniejsze
urządzenie zostało sprawdzone w czasie
produkcji pod kątem jakości i pozytywnie
przeszło kontrolę końcową. W związku z
powyższym sprawność Państwa urządzenia
jest gwarantowana. Nie można wykluczyć, że
w pojedynczych przypadkach na urządzeniu
lub w jego wnętrzu znajdą się resztki środka
smarnego. Nie jest to wybrakowanie czy
defekt urządzenia i nie stanowi to powodu do
zmartwień.
Instrukcja obsługi stanowi część
składową tego urządzenia. Zawiera
ważne wskazówki dotyczące
bezpieczeństwa, przeznaczenia i
utylizacji.
Przed uruchomieniem urządzenia
należy zapoznać się z wszystkimi
wskazówkami dotyczącymi
użytkowania i bezpieczeństwa.
Produkt należy stosować wyłącznie
zgodnie z opisem i z podanym
zastosowaniem. Instrukcję obsługi
należy przechowywać w bezpiecznym
miejscu, a w przypadku przekazania
urządzenia osobie trzeciej wręczyć jej
wszystkie dokumenty z nim związane.
Przeznaczenie
Niniejsze urządzenie stosowane jest:
- jako urządzenie do przewietrzania
trawników, czyli do wyczesywania liści,
mchu i chwastów i do zbierania tych liści
oraz resztek roślin.
- jako skaryfikator do obróbki darniny i
regeneracji powierzchni trawników
Każde inne zastosowanie, które nie zostało
w sposób jednoznaczny dozwolone w tej
instrukcji obsługi, może prowadzić do
uszkodzeń urządzenia i stanowić poważne
24

A
B
C
E
PL
zagrożenie dla użytkownika.
Urządzenie może obsługiwać wyłącznie
osoba dorosła. Urządzenia nie mogą
użytkować dzieci oraz osoby, które nie
zaznajomiły się z niniejszą instrukcją.
Eksploatacja urządzenia w deszczu i
wilgotnym otoczeniu jest zabroniona.
Właściciel urządzenia lub osoba
obsługująca je są odpowiedzialni za
wypadki i urazy innych osób oraz ich
mienia.
Producent nie ponosi odpowiedzialności
za szkody, które są spowodowane
niewłaściwą obsługą urządzenia lub jeśli
jest ono wykorzystywane niezgodnie ze
swoim przeznaczeniem.
Opis ogólny
Zakres dostawy
Należy ostrożnie odpakować urządzenie i
sprawdzić, czy wszystkie niżej wymienione
części są kompletne:
• Korpus z walcem skaryfikatora i osłoną
odbojową
• Walec napowietrzający
• Górna rękojeść uchwytu z dźwignią
włączającą, gniazdko sieciowe,
przycisk odryglowujący i na stałe
zamontowany kabel przyłączeniowy
• Dolna rękojeść uchwytu
• Dwie środkowe rękojeści uchwytu
• Pojemnik zbiorczy
• Odciążenie przewodu zasilającego
• 2 zaciski kablowe
• Akcesoria montażowe
- 2 śrubokręty krzyżowe, 4 śruby i 4
nakrętki motylkowe do
zamocowania rękojeści uchwytu
- śrubokręt do wymiany walców
• Instrukcja obsługi
Przegląd
Ilustracje przedstawiające
najważniejsze części
funkcyjne znajdują się na
pierwszej i ostatniej stronie
rozkładanej okładki.
1 Przycisk odryglowujący
2 Dźwignia włączająca
3 Górna rękojeść uchwytu
4a+b 4 śrubokręty krzyżowe i 4
nakrętki motylkowe do
zabezpieczenia rękojeści
uchwytu
5 Pojemnik zbiorczy
6 Osłona odbojowa
7 Dolna rękojeść uchwytu
8 Korpus
9 Pokrętło regulujące
10 2 koła tylne
11 2 koła przednie
12 Zacisk kablowy
13 Klucz płaski
14 Uchwyt narzędziowy
15 Dwie środkowe rękojeści
uchwytu
16 Zacisk kablowy
17 Kabel elektryczny
18 Uchwyt kablowy odciążający
19 Kabel maszynowy
20 Walec napowietrzający z
ocynkowanymi palcami
kultywatora
21 Walec skaryfikatora z nożami
22 Śrubokręt krzyżowy
23 Rama pojemnika zbiorczego
24 Rama kwadratowa
25

PL
Opis działania
Wertykulator i urządzenie do
napowietrzania trawy posiada dwa łatwo
wymienialne walce robocze:
walec napowietrzający z twardego
tworzywa sztucznego z pionowo
obracającymi się palcami kultywatora i
walec skaryfikatora z umieszczonymi w
pionowej pozycji nożami ze stali
szlachetnej.
Urządzenie jest wyposażone w korpus z
wysokiej jakości tworzywa sztucznego i
pojemnik zbiorczy oraz składaną rękojeść
uchwytu. Sposób działania
poszczególnych elementów obsługi
znajduje się poniższych opisach.
Dane techniczne
Moc pobierana przez silnik............1200 W
Napięcie sieciowe.......230-240 V~, 50 Hz
Klasa ochrony ................................. II
Stopień ochrony...............................IPX4
Prędkość obrotowa narzędzia
).................................3600 obr./min
(n
0
Szerokość wałka...............................31 cm
Zakres nastawczy związany ze zużyciem
…………............................................9 mm
Pojemność zasobnika zbiorczego.........30 l
Masa.................................................9,8 kg
Poziom ciśnienia akustycznego
)............85,7 dB (A); KpA= 3 dB(A)
(L
pA
Poziom mocy akustycznej
(L
.................. 99,5 dB (A); K
gwarantowany..........................103 dB (A)
Wibracje (a
Wartości akustyczne i prędkości wibracji
opierają się na normach i procedurach
) zmierzony
wA
= 2.49 dB (A)
wA
).........3,108 m/s² ; K= 1,5 m/s²
n
wymieniowych w deklaracji zgodności.
Zmiany techniczne i optyczne mogą być
wprowadzane w ramach rozwoju
technicznego bez wcześniejszej zapowiedzi.
Tym samym wszelkie wymiary, wskazówki i
dane tej instrukcji są niewiążące. W związku
z powyższym wyklucza się wszelkie
roszczenia prawne zgłaszane na podstawie
niniejszej instrukcji obsługi.Podana wartość
emisji drgań została zmierzona metodą
znormalizowaną i może być wykorzystywana
do porównań urządzenia elektrycznego z
innymi urządzeniami. Podana wartość emisji
drgań może też służyć do szacunkowej
oceny stopnia ekspozycji użytkownika na
drgania.
Ostrzeżenie: Wartość emisji drgań
może się różnić od podanej wartości
podczas rzeczywistego korzystania z
urządzenia elektrycznego. Zależy to
od sposobu używania urządzenia.
Środki ostrożności podejmowane w
celu ochrony użytkownika powinny
opierać się na ocenie ekspozycji w
rzeczywistych warunkach używania
urządzenia (należy przy tym
uwzględnić wszystkie etapy cyklu
roboczego, na przykład okresy pracy,
w których urządzenie elektryczne jest
wyłączone bądź włączone, ale pracuje
bez obciążenia).
Wskazówki dotyczące
bezpieczeństwa
W niniejszym punkcie
wymieniono podstawowe
26
PL
przepisy bezpieczeństwa w
trakcie pracy z
zastosowaniem urządzenia.
Symbole winstrukcji
obsługi
Znaki ostrzegawcze z
danymi dotyczącymi
zapobiegania
obrażeniom osób i
szkodom materialnym.
Znaki nakazu z
informacjami
dotyczącymi
zapobiegania szkodom
Symbole na
urządzeniu
Uwaga!
Wskazówki należy
przeczytać.
Niebezpieczeństwo
obrażeń ciała ze
strony wyrzucanych
przedmiotów! Osoby
(nieupoważnione)
powinny przebywać z
dala od urządzenia.
Niebezpieczeństwo
porażenia prądem
(w miejscu wykrzyknika
umieszczono
objaśnienie nakazu).
Znaki zawierające
informacje pomocnicze,
zapewniające lepsze
obchodzenie się z
narzędziami.
elektrycznym przez
uszkodzony kabel
sieciowy! Należy
pamiętać o tym, aby
trzymać kabel
sieciowy z dala od
urządzenia i jego
zespołów tnących.
27
PL
Uwaga! Nosić okulary
ochronne i środki
ochrony słuchu.
Uwaga! – Ostre
narzędzia. Zadbać o
to, aby ręce i nogi
znajdowały się daleko
od zespołów tnących.
Walec obraca się
jeszcze przez krótką
chwilę po wyłączeniu
silnika. Wyciągać
zawsze wtyczkę z
gniazda sieciowego
przed konserwacją
lub gdy kabel
Urządzeń z napędem
elektrycznym nie
należy wyrzucać z
odpadami
pochodzącymi z
gospodarstw
domowych.
Uwaga na
stopniach!
Wyłączyć
urządzenie na czas
transportu po
schodach.
Osunąć resztki ziemi
28
sieciowy jest
uszkodzony.
Informacje dotyczące
poziomu mocy
akustycznej LWA w
dB(A).
Poziom ochrony II
ze sprężyn pokrywy
odbojowej i/lub
korpusu, aby upewnić
się, że osłona jest
prawidłowo
zamknięta. W
przypadku pracy bez
pojemnika zbiorczego
należy się upewnić,
że pokrywa odbojowa
PL
jest całkowicie
zamknięta.
Pozycje
transportowe i
robocze
Ogólne wskazówki
bezpieczeństwa.
W przypadku
nieprawidłowego
użycia urządzenie
może spowodować
poważne obrażenia
ciała.
łatwo dostępnym
miejscu, aby
informacje były
zawsze pod ręką.
Należy pamiętać, że mimo
zastosowania
zintegrowanych
zabezpieczeń z
konstrukcją, mimo środków
zabezpieczającychI
uzupełniających środków
ochronnych istnieje nadal
ryzyko resztkowe związane
z eksploatacją tego
urządzenia.
Przed rozpoczęciem
pracy z niniejszym
urządzeniem należy
dokładnie przeczytać
instrukcję jego obsługi
i zapoznać się z
wszystkimi częściami
obsługi. Instrukcję
obsługi należy
przechowywać w
Obsługa urządzenia:
OSTRZEŻENIE!
Urządzenie może
spowodować poważne
obrażenia ciała. W ten
sposób można
zapobiegać wypadkom
i obrażeniom ciała:
29
 Loading...