


Operating Instructions
Mode d’emploi
Instrucciones de funcionamiento
Model/Modèle/Modelo: |
PB 300 |
|
PB 400 |
|
PB 500 |
A
B
C
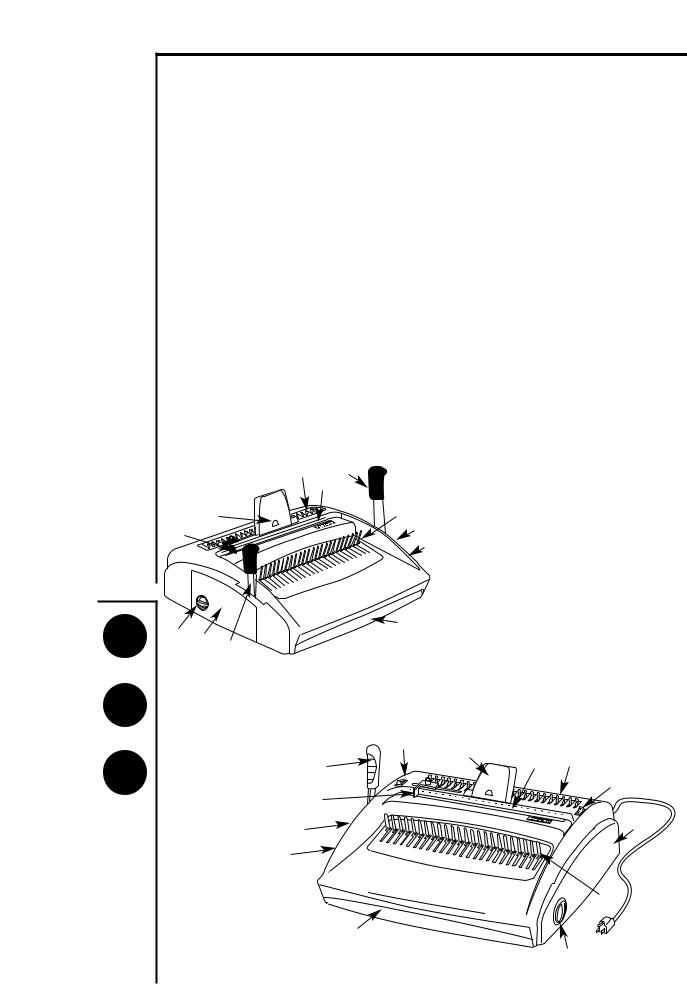
Equipment Parts |
Assembly |
A
B
C
1. |
Punching Handle (PB 300/400 only) |
|
|
|
To Assemble your PB 300/400 Binding |
||
2. |
Binding Handle |
|
|
|
|
||
|
|
|
|
Machine |
|||
3. |
Sheet Supporter/Adjustable Comb Guide Selector |
|
|
|
|||
|
|
|
1. There are two (2) handles supplied with the machine. |
||||
4. |
Adjustable Margin Guide |
|
|
|
|
||
5. |
Punching Area |
|
|
|
|
Attach the longer (Punching Handle) to the right side |
|
6. |
Binding Area (Metal Rakes) |
|
|
|
|
of the machine by firmly pressing square hole of |
|
7. |
Waste Paper Drawer |
|
|
|
|
handle onto square shaft. To operate correctly, the |
|
8. |
Left Side Cover |
|
|
|
|
handle should be positioned as illustrated. NOTE: If |
|
9. |
Right Side Cover |
|
|
|
|
the handle is not positioned as illustrated it will not |
|
10. Disengagable Punching Dies (PB 400/500 only) |
|
|
|
punch. |
|||
11. Margin Depth Setter (PB 400/500 only) |
|
|
|
Once the handle is fully attached, secure it by |
|||
12. Binding Lock Dial (PB 400/500 only) |
|
|
|
inserting the screw supplied. |
|||
13. On/Off Switch (PB 500 only) |
|
|
|
|
2. Carefully attach the Right Side Cover over the |
||
14. Punching Switch (PB 500 only) |
|
|
|
|
Punching Handle. |
||
|
|
|
|
|
|
|
3. Attach the shorter, handle (Binding Handle) to the |
|
|
|
|
|
|
|
left-side of the machine by firmly pressing square |
|
|
|
|
|
|
|
hole of handle onto square shaft, position as |
|
|
|
|
|
|
|
illustrated. NOTE: If the handle is not positioned as |
|
|
|
|
|
|
|
illustrated, it will not bind properly. |
|
|
|
|
|
|
|
Secure the handle by inserting the screw supplied. |
|
|
|
|
|
|
|
4. Carefully attach the Left Side Cover over the Binding |
|
|
10 |
1 |
|
|
|
Handle. |
|
|
|
5 |
|
|
|
5. To mount the Sheet Supporter/Adjustable Comb |
|
|
|
|
|
|
|
|
|
|
3 |
|
6 |
|
|
Guide Selector, first be sure the two (2) phillips |
|
|
|
|
|
screws are loose enough so the Supporter/Selector |
||
4 |
|
|
|
|
9 |
|
|
|
|
|
|
|
slides easily into place. Mount Supporter/Selector |
||
|
|
|
|
|
|
12 |
|
|
|
|
|
|
|
and secure by tightening screws. |
|
|
|
|
|
|
|
|
|
|
|
|
|
|
|
|
To Assemble your PB 500 Binding Machine |
|
|
|
|
|
|
|
Follow steps 3-5 for PB 300/400 assembly instructions. |
11 |
|
|
|
|
7 |
|
|
8 |
2 |
|
|
|
|
|
|
|
|
|
|
|
|
||
PB 300 & PB 400
|
|
14 |
3 |
|
|
|
|
10 |
|
|
2 |
|
5 |
|
|
|
|
|
|
|
|
|
|
13 |
|
4 |
|
|
|
11 |
|
|
|
9 |
|
|
|
|
|
8 |
|
|
|
|
|
|
|
|
6 |
PB 500 |
|
7 |
|
|
|
|
|
|
12 |
2
 Loading...