


Heavy Duty Laminator
GB Thank you for choosing the Proteus laminator.
Please read these instructions before use and take time to register your machine at www.fellowes.com/register
FR Merci d’avoir choisi la plastifieuse Proteus.
Lire ces instructions avant d’utiliser l’appareil et prendre le temps d’enregistrer votre produit en ligne sur www.fellowes.com/register
DE Vielen Dank, dass Sie sich für das Proteus Laminiergerät entschieden haben. Bitte lesen Sie diese Anleitungen vor Gebrauch des Geräts genau durch und registrieren Sie es unter www.fellowes.com/register
ES Gracias por elegir la plastificadora Proteus.
Lea atentamente estas instrucciones antes del uso y registre su máquina en www. fellowes.com/register
|
|
|
|
|
|
|
|
|
|
|
|
|
|
|
|
|
|
|
|
|
|
|
|
|
|
|
|
405600_EUR_Proteus_All_v1.5.indd 1 |
|
|
12/23/2010 1:50:31 PM |
|
|
|
|
|
|
|
|
|
|
|
|
|
|
|
|

INDEX
ENGLISH |
3-7 |
FRANCAIS |
8-12 |
DEUTSCH |
13-17 |
ESPAÑOL |
18-22 |
405600_EUR_Proteus_All_v1.5.indd 2 |
|
|
12/23/2010 1:50:31 PM |
|
|
||
|
|
|
|

ENGLISH 
CAPABILITIES
Performance |
|
Technical Data |
|
Format |
A3 |
Voltage / Frequency / Current(Amps) |
220-240V AC, 50/60Hz, 5A |
Entry width |
320mm |
Wattage |
1000 Watts |
Pouch thickness (min) |
75 microns (per side) |
Dimensions (HxWxD) |
58 x 30 x 14 cm |
Pouch thickness (max) |
250 microns (per side) |
Net weight |
15 kg |
Estimated heat-up time |
3 minutes |
Laminating capacity |
Max document thickness = 2mm (0.08”) |
Cool down time |
30-60 minutes |
|
Min pouch = 75 micron |
Lamination speed |
Variable speed (0-95 cm/min) |
|
(total thickness = 2x75 = 150 micron) |
Number of rollers |
6 |
|
Max pouch = 250 micron |
Ready indication |
Light |
|
(total thickness = 2x 250 = 500 micron) |
Reverse function |
Yes |
|
|
Soft touch buttons + beep |
Yes |
|
|
LED interface |
Yes |
|
|
Photo capable |
Yes |
|
|
Carrier-free |
Yes |
|
|
External cooling plate |
Yes |
|
|


 IMPORTANT SAFETY INSTRUCTIONS - KEEP FOR FUTURE USE
-Plug the machine into an easily accessible socket.
-To prevent electrical shock - do not use the appliance close to water, do not spill water on to the appliance, power cord or wall socket.
DO ensure the machine is on a stable surface.
DO test laminate scrap sheets and set the machine before final laminations. DO remove staples and other metal articles prior to laminating.
DO keep the machine away from heat and water sources. DO turn off the machine after each use.
DO unplug the machine when not in use for an extended period. DO use pouches designed for use at the appropriate settings. DO keep away from pets, while in use.
DO ensure self-adhesive pouches are only used with the cold setting.
DO NOT leave the power cord in contact with hot surfaces. DO NOT leave power cord hanging from cupboards or shelves. DO NOT use appliance if the power cord is damaged.
DO NOT attempt to open or otherwise repair the machine. DO NOT exceed the machines quoted performance.
DO NOT allow children to use this machine without adult supervision. DO NOT laminate sharp or metal objects (eg: staples, paper clips).
DO NOT laminate heat-sensitive documents (eg: tickets, ultrasounds etc) on hot settings.
DO NOT laminate with self-adhesive pouches on hot settings. DO NOT laminate an empty pouch.
FEATURES & TIPS
•Always put item into the appropriate sized pouch.
•Always test laminate with a similar size and thickness before final process.
•If required, trim excess material from around the item after lamination and cooling.
•For best results, use Fellowes ® brand pouches:
Enhance 80, Impress 100, Capture 125, Protect 175, Preserve 250 (Enhance 80 - cold pouch)
•When working with different pouch thickness’ (temperature settings) it is recommended to start first with the thinnest pouches.
•Prepare pouch and item for lamination. Place item within pouch centred and touching the leading sealed edge. Ensure the pouch is not too large for the item.
NEED HELP?
Let our experts help you with a solution. Customer Service... www.fellowes.com
Always call Fellowes before contacting your place of purchase, see the rear cover for contact details.
3
405600_EUR_Proteus_All_v1.5.indd 3 |
|
|
12/23/2010 1:50:32 PM |
|
|
||
|
|
|
|
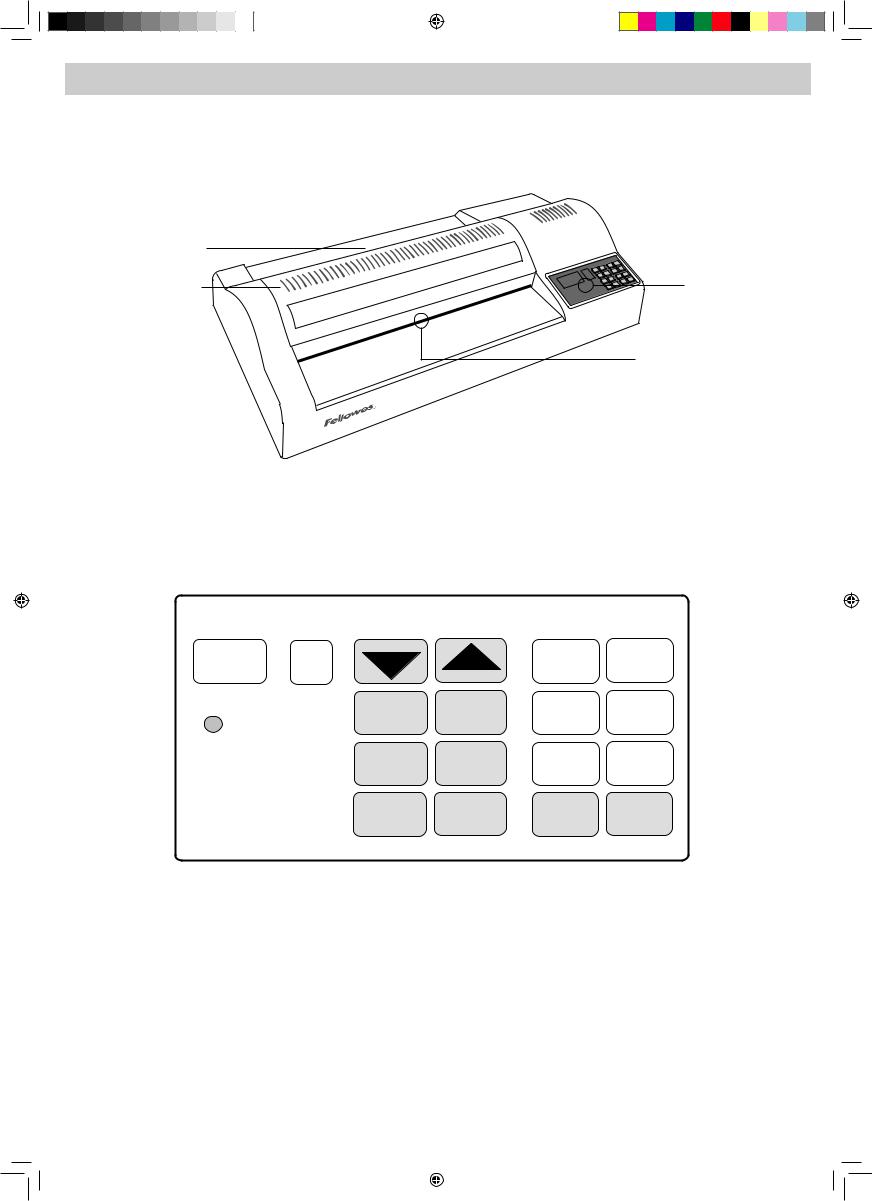
LAMINATOR CONTROLS
Main fuse location (at rear next to power inlet) |
|
|
|
On/off switch (at rear) |
|
|
|
||
|
|
|
|
|
|
|
|
|
|
Pouch / document exit |
|
Cooling system vents |
Illuminated user interface |
|
Pouch / document entry |
DISPLAY |
TEMPERATURE |
SPEED/ MOTOR |
90 °C |
5 |
DN |
UP |
TEMPERATURE |
SPEED |
MEAS |
CARRI |
|
|
5 6
34
READY MEAS |
CARRI |
|
|
1 |
2 |
PREHT |
MOUNT |
PREHT |
MOUNT |
||
|
|
|
|
||
COLD |
HOT |
COLD |
HOT |
STOP |
REV |
|
|
|
|
|
|
|
|
|
|
|
|
|
|
|
|
|
|
|
|
LED & Status Display |
|
Temperature |
Adjustment |
Speed & Motor Controls |
|||
|
|
|
& Function Controls |
|
|
||
4
405600_EUR_Proteus_All_v1.5.indd 4 |
|
|
12/23/2010 1:50:32 PM |
|
|
||
|
|
|
|
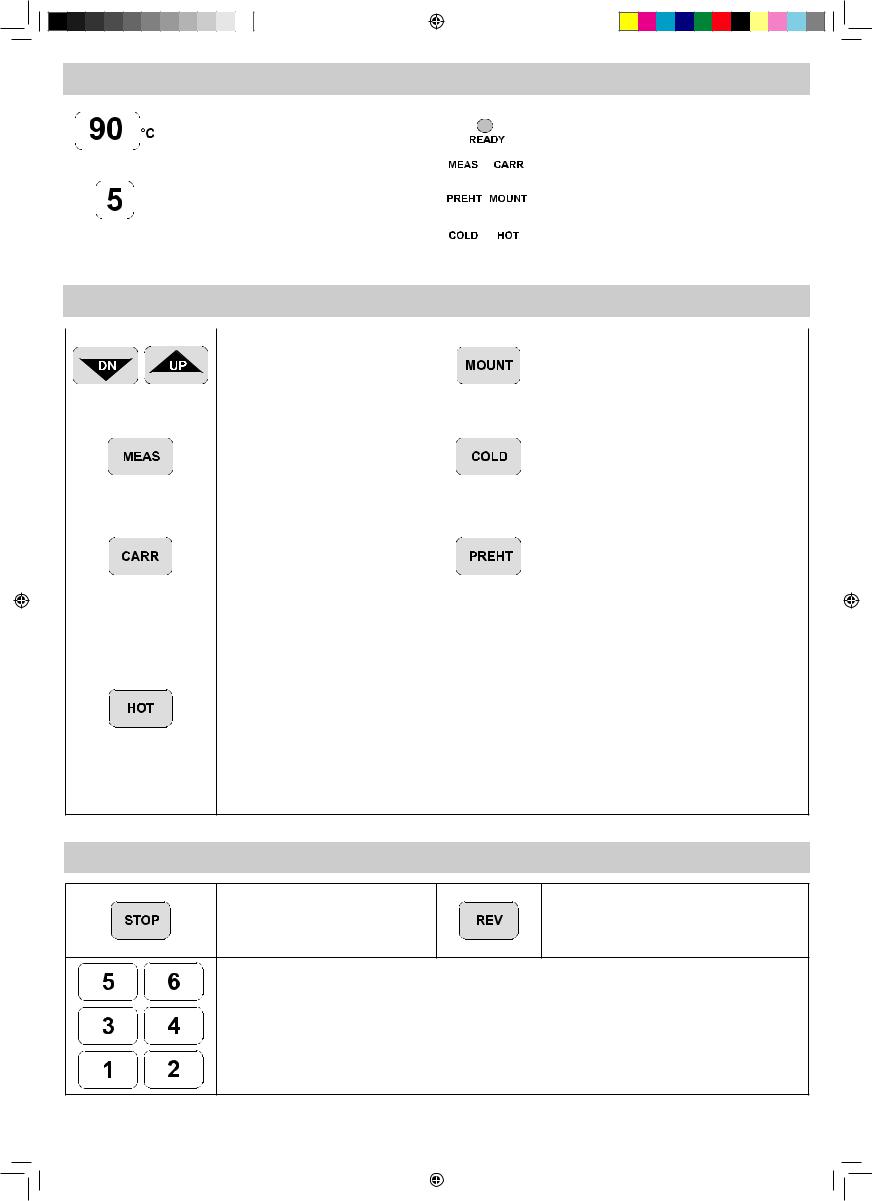
LED & STATUS DISPLAY
|
|
|
|
|
|
|
|
Indicates roller temperature (pre-set and actual). |
|
|
“READY” LED switches to show the roller temperature is |
|
|
|
|
|
|
|
|
|
|
||
|
|
|
|
|
|
|
|
|
|
||
|
|
|
|
|
|
|
|
|
|
ready to laminate. |
|
|
|
|
|
|
|
|
|
|
|
|
|
|
|
|
|
|
|
|
|
|
|
|
|
|
|
|
|
|
|
|
|
Indicates running speed of the rollers. |
|
|
Function LED displays showing the selected function in |
|
|
|
|
|
|
|
|
|
|
||
|
|
|
|
|
|
|
|
|
|
||
|
|
|
|
|
|
|
|
|
|
||
|
|
|
|
|
|
|
|
|
|
||
|
|
|
|
|
|
|
|
|
|
operation. |
|
|
|
|
|
|
|
|
|
|
|
|
|
|
|
|
|
|
|
|
|
|
|
|
|
TEMPERATURE ADJUSTMENT & FUNCTION CONTROLS
|
|
|
|
|
|
|
|
|
|
|
|
|
|
Select “UP” or “DOWN” controls to adjust the |
|
|
|
|
|
Select function to laminate with ‘MOUNT BOARD’. |
|
|
|
|
|
|
|
|
|
|
|
|
|
|
roller laminating temperature. |
|
|
|
|
|
A function for laminating hard board more than 1mm |
|
|
|
|
|
|
|
|
|
|
|
|
|
|
|
|
|
|
|
||
|
|
|
|
|
|
|
|
|
|
|
|
|
|
|
|
|
|
|
||
|
|
|
|
|
|
|
|
|
|
|
|
|
|
Manually adjust the roller temperatures to |
|
|
|
|
|
thickness. The function selects temperature 130°c and |
|
|
|
|
|
|
|
|
|
|
|
|
|
|
|
|
|
|
|
||
|
|
|
|
|
|
|
|
|
|
|
|
|
|
|
|
|
|
|
||
|
|
|
|
|
|
|
|
|
|
|
|
|
|
suit the thickness of laminating stock. |
|
|
|
|
|
motor speed “1”. |
|
|
|
|
|
|
|
|
|
|
|
|
|
|
Select function to ‘MEASURE’ the actual |
|
|
|
|
|
Select function for ‘COLD’ or no-heat lamination. |
|
|
|
|
|
|
|
|
|
|
|
|
|
|
|
|
|
|
|
Cold lamination automatically selects temperature and |
|
|
|
|
|
|
|
|
|
|
|
|
|
|
|
temperature of rollers. |
|
|
|
|
|
motor speed of “0”. If roller temperature is above 60°c, |
|
|
|
|
|
|
|
|
|
|
|
|
|
|
|
|
|
|
|
||
|
|
|
|
|
|
|
|
|
|
|
|
|
|
The button can be pressed anytime for an im- |
|
|
|
|
|
motor speed of “2” will operate until rollers have cooled |
|
|
|
|
|
|
|
|
|
|
|
|
|
|
|
|
|
|
|
||
|
|
|
|
|
|
|
|
|
|
|
|
|
|
mediate read out in the temperature display. |
|
|
|
|
|
safely. This action will prevent heat damage to the |
|
|
|
|
|
|
|
|
|
|
|
|
|
|
|
|
|
|
|
|
rollers. |
|
|
|
|
|
|
|
|
|
|
|
|
|
|
Select function for laminating with ‘CARRIER’. |
|
|
|
|
|
Select function for ‘PRE-HEAT’ . |
|
|
|
|
|
|
|
|
|
|
|
|
|
|
|
|
|
|
|
Pre-Heat can be selected as a ‘Stand-By’ function ideal |
|
|
|
|
|
|
|
|
|
|
|
|
|
|
|
The function for laminating pouches with |
|
|
|
|
|
|
|
|
|
|
|
|
|
|
|
|
|
|
|
|
|
|
|
|
|
for extended periods of use. The function operates at |
|
|
|
|
|
|
|
|
|
|
|
|
|
|
|
Carriers. The function selects 100°c and motor |
|
|
|
|
|
|
|
|
|
|
|
|
|
|
|
|
|
|
|
|
|
|
|
|
|
||
|
|
|
|
|
|
|
|
|
|
|
|
|
|
|
|
|
|
|
80°c and motor speed “2”, until another function is |
|
|
|
|
|
|
|
|
|
|
|
|
|
|
|
speed “2”. |
|
|
|
|
|
|
|
|
|
|
|
|
|
|
|
|
|
|
|
|
|
|
|
|
|
selected. |
|
|
|
|
|
|
|
|
|
|
|
|
|
|
|
|
|
|
|
|
|
Select function for ‘HOT’ lamination. Hot lamination for normal hot pouch films. For 80mic pouch, the machine will select temperature of 90°c and motor speed of “5”. This is ideal for 80g copy paper and 80mic pouch. For thicker pouches, select the corresponding engine speed followed by temperature adjustment. Adjustment to temperature using “UP” and “DN” buttons to suit the thickness of paper as required.
EG: |
|
250 micron |
= motor speed 2 |
200 micron |
= motor speed 3 |
175 micron |
= motor speed 3 |
150 micron |
= motor speed 3 |
125 micron |
= motor speed 5 |
100 micron |
= motor speed 5 |
80 micron |
= motor speed 5 |
SPEED & MOTOR CONTROLS
“STOP” function.
Press and hold to stop the rollers running. Do not use for long periods especially when the roller temperature is above 90°c.
“Reverse” function.
Press and hold to reverse the rollers. This will help remove mis-fed pouches.
Select the motor speed to suit the chosen pouch thickness. Then adjust temperature to suit paper thickness if required. EG:
motor speed 1 = mounting board motor speed 2 = 250 micron & carriers motor speed 3 = 200, 175, 150 micron motor speed 5 = 125, 100, 80 micron
5
405600_EUR_Proteus_All_v1.5.indd 5 |
|
|
12/23/2010 1:50:33 PM |
|
|
||
|
|
|
|

BEFORE LAMINATING
1.Ensure the machine is on a stable surface.
2.Check there is enough clear space (min 50cm) behind the machine to allow items to pass through freely.
3.Select the correct power lead for the appropriate power supply. Fit the lead to the machine (the socket is at the rear of the machine).
4.Plug the machine into an easily accessible mains socket. Switch the mains supply on.
5.Ensure the ‘Cooling Plate’ is fitted correctly with the graphics “Top Side” visible.
STEPS TO COLD LAMINATE
Cold lamination is the default function setting when power is switched on. Cold lamination can only operate when the rollers run at a temperature below 30°c. Press the “MEAS” button to measure the roller temperature.
1.Switch the power on (located at the rear of the machine).
2.Select the “COLD” function. Wait for roller temperature to fall below 30°c.
3.When “COLD” & “READY” lamp is on, select speed 2 or 3 and laminate cold pouches.
STEPS TO HOT LAMINATE
1. |
Switch the power on (located at the rear of the machine). Cold lamina- |
3. |
|
|
tion is the default function setting when power is switched on. |
4. |
|
2. |
Select the “HOT” function. The temperature will automatically select |
||
|
90°c. The rollers will start turning when the temperature is above 60°c.
When “READY” lamp is on, the machine is ready to start laminating.
Select the motor speed best suited to the pouch thickness (see graph on machine) EG: 80 micron pouch = motor speed 5 / 90°c. The machine will automatically select the optimum laminating temperature. Laminating temperatures can also be adjusted manually as required.
STEPS TO SWITCH OFF THE MACHINE
To preserve the rollers, do not switch off the machine when it is hot.
1. |
Select “COLD” function. The machine will set temperature at 0°c and |
3. Unplug the power cord. |
|
motor speed at “2”. When the roller temperature has cooled to below |
|
|
60°c, the rollers will stop automatically. |
|
2. |
Switch off the power using the switch at the back of the machine. |
|
STORAGE & CLEANING
Switch off the machine at the wall. Allow the machine to cool. The outside of the machine can be cleaned with a damp cloth. Do not use solvents or flammable materials to polish the machine. Cleaning sheets can be used with the machine. When the machine is warm – run the sheets through the machine to clean any residue off the rollers. For optimum performance, it is recommended that cleaning sheets are used with the machine regularly.
REPLACING THE FUSE
This machine is fitted with a fuse, located between the mains switch and the mains socket on the rear of the machine. To replace the fuse:
• |
Isolate the machine from the mains supply. |
• |
Open the fuse holder with a screwdriver blade. |
• |
Insert a new fuse in the holder and replace the holder into the machine. |
Note: Always use the recommended fuse and DO NOT replace it with one of a different rating.
6
405600_EUR_Proteus_All_v1.5.indd 6 |
|
|
12/23/2010 1:50:33 PM |
|
|
||
|
|
|
|

THERMAL RE-SET
The machine is supplied with a thermal re-set switch. The switch will activate when the machine becomes too hot. This condition should not occur during normal use. To re-set the switch:
• Isolate the machine from the mains supply.
• Safely support the machine - to access the underside.
• Using a cross-head screwdriver, open the cover plate.
• Using a suitable tool, insert the tool through the aperture and press the metal switch until it snaps closed. The switch will close correctly, only if the machine is cool enough.
•Replace the cover plate and screws.
•Power-on the machine.
TROUBLESHOOTING
Problem |
Possible cause |
Solution |
|
|
|
|
|
No power on LED |
Machine is not switched on |
Switch on machine at rear next to plug inlet and at the wall socket |
|
|
|
|
|
Ready light does not come on after a |
Machine is in a hot or humid area |
Move the machine to a cooler and dry area |
|
long period |
|||
|
|
||
|
|
|
|
Pouch does not completely seal the item |
Item may be too thick to laminate |
Pass through the machine again |
|
Temperature setting may be incorrect |
Check pouch thickness is correctly selected and pass through again |
||
|
|||
|
|
|
|
Pouch has waves or bubbles |
Temperature setting may be incorrect |
Check pouch thickness is correctly selected and pass through again |
|
|
|
|
|
Pouch is lost in the machine |
Pouch is jammed |
|
|
|
|
|
|
|
Pouch was used ‘open end’ first |
|
|
|
|
|
|
|
Pouch was not centred on entry |
Select reverse button and pull out the item by hand. Check cooling |
|
|
|
||
Jamming |
Pouch was not straight upon entry |
plate is correctly positioned. |
|
|
|||
|
|
|
|
|
Empty pouch was used |
|
|
|
|
|
|
|
Cooling plate not fixed correctly |
|
|
|
|
|
|
Pouch is damaged after lamination |
Damaged rollers or adhesive on rollers |
Pass cleaning sheets through the machine to test and clean rollers |
|
|
|
|
|
Temperature not increasing |
Main fuse failure |
Check and replace |
|
|
|||
Power cord not fitted correctly |
|||
|
|
||
|
|
|
|
Curled or burnt laminations |
Too hot |
Reduce temperature or increase speed |
|
|
|
|
|
Soft or poor lamination |
Too cold |
Increase temperature or reduce speed |
|
|
|
|
|
Rollers not running |
Rollers too cold (< 60°c) |
Wait for rollers to warm-up |
|
|
|
||
"STOP" button may be pressed |
Press "MOTOR" or "SPEED" button |
||
|
|||
|
|
|
|
Unstable lamination temperature |
Roller electric brush may be broken |
|
|
|
|
|
|
Cannot select any Mode |
Circuit board error |
|
|
|
|
|
|
Rollers not running & motor is running |
Loose circuit bolts on gear |
Contact service engineer |
|
|
|
|
|
Excessive noise |
Gears word or damaged |
|
|
|
|
|
|
Master fuse keeps failing |
Damaged circuit board |
|
|
|
|
|
7
405600_EUR_Proteus_All_v1.5.indd 7 |
|
|
12/23/2010 1:50:33 PM |
|
|
||
|
|
|
|

FRANÇAIS FR
CAPACITÉS
Performance |
|
Données techniques |
|
Format |
A3 |
Tension / Fréquence / Intensité (amp) |
220-240 V CA, 50/60 Hz, 5 A |
Largeur de fente d'entrée |
320 mm |
Puissance |
1000 watts |
Épaisseur mini de pochette |
75 microns (par face) |
Dimensions (H x L x P) |
58 x 30 x 14 cm |
Épaisseur maxi de pochette |
250 microns (par face) |
Poids net |
15 kg |
Temps de préchauffage estimé |
3 minutes |
Capacité de plastification |
Épaisseur maxi de document = 2 mm (0,08”) |
Temps de refroidissement |
30-60 minutes |
|
Pochette mini = 75 microns |
Vitesse de plastification |
Vitesse variable (0-95 cm/min) |
|
(épaisseur totale = 2 x 75 = 150 microns) |
Nombre de rouleaux |
6 |
|
Pochette maxi = 250 microns |
Indication plastifieuse prête à |
Voyant |
|
(épaisseur totale = 2 x 250 = 500 microns) |
fonctionner |
|
||
|
|
|
|
Fonction marche arrière |
Oui |
|
|
Boutons à pression douce + bip |
Oui |
|
|
Interface DEL |
Oui |
|
|
Plastification de photos |
Oui |
|
|
Sans transporteur |
Oui |
|
|
Plaque de refroidissement extérieure |
Oui |
|
|


 CONSIGNES DE SÉCURITÉ IMPORTANTES - À CONSERVER
-Brancher la machine à une prise secteur facile d'accès.
-Pour éviter les risques de court-circuit - ne pas utiliser l'appareil à proximité de l'eau, ne pas renverser d'eau sur l'appareil, sur le cordon d'alimentation ou sur la prise secteur.
VEILLER à ce que la machine repose sur une surface stable.
FAIRE un essai de plastification sur du papier brouillon et régler la machine avant de plastifier les documents.
ENLEVER les agrafes et autres objets métalliques avant de procéder à la plastification.
TENIR la machine à l'écart des sources de chaleur et d'eau. ÉTEINDRE la machine après chaque utilisation.
DÉBRANCHER la machine si elle ne doit pas être utilisée pendant une longue période.
UTILISER des pochettes conçues pour utilisation aux réglages appropriés. TENIR les animaux domestiques à l'écart lors de l'utilisation.
VEILLER à ce que les pochettes auto-adhésives ne soient utilisées qu'avec le réglage froid.
NE PAS laisser le cordon en contact avec des surfaces chaudes. NE PAS laisser le cordon pendre de placards ou d'étagères. NE PAS utiliser l'appareil si le cordon est endommagé.
NE PAS tenter d'ouvrir ou de réparer la machine.
NE PAS dépasser les performances spécifiées pour la machine.
NE PAS laisser des enfants utiliser la machine sans la surveillance d'un adulte.
NE PAS plastifier des objets tranchants ou métalliques (par ex. : agrafes, trombones).
NE PAS plastifier des documents sensibles à la chaleur (par ex. : tickets, échographies, etc.) sur les réglages chauds.
NE PAS plastifier avec des pochettes auto-adhésives sur des réglages chauds. NE PAS plastifier une pochette vide.
FONCTIONS ET CONSEILS
•Toujours placer le document à plastifier dans une pochette de la taille appropriée.
•Toujours effectuer un test avec un document de taille et d'épaisseur similaires avant de plastifier le document proprement dit.
•Le cas échéant, recouper les bords une fois le document plastifié et refroidi.
•Pour obtenir les meilleurs résultats, utiliser des pochettes de la marque Fellowes ® :
Enhance 80, Impress 100, Capture 125, Protect 175, Preserve 250, (Enhance 80 - pochette froide)
8
•Lors de la plastification avec différentes épaisseurs de pochette (réglages de températures), il est conseillé de commencer par les pochettes les plus minces.
•Préparer la pochette et le document à plastifier. Placer le document dans la pochette, il doit être bien centré et toucher le bord déjà soudé. Vérifier que la pochette n'est pas trop grande pour le document.
405600_EUR_Proteus_All_v1.5.indd 8 |
|
|
12/23/2010 1:50:33 PM |
|
|
||
|
|
|
|
 Loading...