


 Loading...
User’s Guide
NPD4965-00 EN

User’s Guide
Copyright and Trademarks
Copyright and Trademarks
Copyright and Trademarks
No part of this publication may be reproduced, stored in a retrieval system, or transmitted in any form or by any means, electronic, mechanical, photocopying, recording, or otherwise, without the prior written permission of Seiko Epson Corporation. No patent liability is assumed with respect to the use of the information contained herein. Neither is any liability assumed for damages resulting from the use of the information herein. The information contained herein is designed only for use with this Epson product. Epson is not responsible for any use of this information as applied to other products.
Neither Seiko Epson Corporation nor its affiliates shall be liable to the purchaser of this product or third parties for damages, losses, costs, or expenses incurred by the purchaser or third parties as a result of accident, misuse, or abuse of this product or unauthorized modifications, repairs, or alterations to this product, or (excluding the U.S.) failure to strictly comply with Seiko Epson Corporation’s operating and maintenance instructions.
Seiko Epson Corporation and its affiliates shall not be liable for any damages or problems arising from the use of any options or any consumable products other than those designated as Original Epson Products or Epson Approved Products by Seiko Epson Corporation.
Seiko Epson Corporation shall not be held liable for any damage resulting from electromagnetic interference that occurs from the use of any interface cables other than those designated as Epson Approved Products by Seiko Epson Corporation.
EPSON® is a registered trademark, and EPSON EXCEED YOUR VISION or EXCEED YOUR VISION is a trademark of Seiko Epson Corporation.
PRINT Image Matching™ and the PRINT Image Matching logo are trademarks of Seiko Epson Corporation. Copyright © 2001 Seiko Epson Corporation. All rights reserved.
Intel® is a registered trademark of Intel Corporation.
PowerPC® is a registered trademark of International Business Machines Corporation. Microsoft®, Windows®, and Windows Vista® are registered trademarks of Microsoft Corporation.
Apple®, Macintosh®, Mac OS®, and OS X® are registered trademarks of Apple Inc.
Adobe, Adobe Reader, Acrobat, and Photoshop are trademarks of Adobe systems Incorporated, which may be registered in certain jurisdictions.
General Notice: Other product names used herein are for identification purposes only and may be trademarks of their respective owners. Epson disclaims any and all rights in those marks.
Copyright © 2013 Seiko Epson Corporation. All rights reserved.
The contents of this manual and the specifications of this product are subject to change without notice.
2

User’s Guide
Contents
Contents
Copyright and Trademarks
Copyright and Trademarks. . . . . . . . . . . . . . . . . . . 2
Introduction
Where to Find Information. . . . . . . . . . . . . . . . . . . 5
Caution, Important and Note. . . . . . . . . . . . . . . . . 5
Operating System Versions. . . . . . . . . . . . . . . . . . . 5
Important Instructions
Safety Instructions. . . . . . . . . . . . . . . . . . . . . . . . . 7
Product Advisories and Warnings. . . . . . . . . . . . . . 7
Setting up/using the product. . . . . . . . . . . . . . . . 7 Handling ink. . . . . . . . . . . . . . . . . . . . . . . . . . . 8
Getting to Know Your Product
Product Parts. . . . . . . . . . . . . . . . . . . . . . . . . . . . 10
Guide to the Control Panel. . . . . . . . . . . . . . . . . . 12
Buttons and lights. . . . . . . . . . . . . . . . . . . . . . . 12
Paper Handling
Introduction to Using, Loading, and Storing
Media. . . . . . . . . . . . . . . . . . . . . . . . . . . . . . . . . . 13
Storing paper. . . . . . . . . . . . . . . . . . . . . . . . . . 13
Selecting Paper. . . . . . . . . . . . . . . . . . . . . . . . . . . 13
Loading Paper. . . . . . . . . . . . . . . . . . . . . . . . . . . . 14
Printing
Printer Driver and Status Monitor. . . . . . . . . . . . . 16
Accessing the printer driver for Windows. . . . . 16 Accessing the printer driver for Mac OS X. . . . . 17
Basic Operations. . . . . . . . . . . . . . . . . . . . . . . . . . 18
Basic printing. . . . . . . . . . . . . . . . . . . . . . . . . . 18 Canceling printing. . . . . . . . . . . . . . . . . . . . . . 20
Other Options. . . . . . . . . . . . . . . . . . . . . . . . . . . 22
Product presets (for Windows only). . . . . . . . . . 22 2-sided printing (for Windows only). . . . . . . . . 22 Fit to page printing. . . . . . . . . . . . . . . . . . . . . . 24 Pages per sheet printing. . . . . . . . . . . . . . . . . . . 25
Sharing the Product for Printing. . . . . . . . . . . . . . 26
Setup for Windows. . . . . . . . . . . . . . . . . . . . . . 26 Setup for Mac OS X. . . . . . . . . . . . . . . . . . . . . . 29
Ink Bottles Information
Refilling Ink
Ink Bottle Safety Instructions, Precautions, and
Specifications. . . . . . . . . . . . . . . . . . . . . . . . . . . . 31
Safety instructions. . . . . . . . . . . . . . . . . . . . . . . 31 Precautions on refilling ink. . . . . . . . . . . . . . . . 31 Ink bottle specifications. . . . . . . . . . . . . . . . . . . 32
Checking the Ink Levels. . . . . . . . . . . . . . . . . . . . . 32
Refilling the Ink Tanks. . . . . . . . . . . . . . . . . . . . . 32
Maintaining Your Product and
Software
Checking the Print Head Nozzles. . . . . . . . . . . . . . 35
Using the Nozzle Check utility for Windows
. . . . . . . . . . . . . . . . . . . . . . . . . . . . . . . . . . . . 35 Using the Nozzle Check utility for Mac OS X
. . . . . . . . . . . . . . . . . . . . . . . . . . . . . . . . . . . . 35 Using the control panel. . . . . . . . . . . . . . . . . . . 36
Cleaning the Print Head. . . . . . . . . . . . . . . . . . . . 36
Using the Head Cleaning utility for Windows
. . . . . . . . . . . . . . . . . . . . . . . . . . . . . . . . . . . . 37 Using the Head Cleaning utility for Mac OS X
. . . . . . . . . . . . . . . . . . . . . . . . . . . . . . . . . . . . 37 Using the control panel. . . . . . . . . . . . . . . . . . . 37
Aligning the Print Head. . . . . . . . . . . . . . . . . . . . 38
Using the Print Head Alignment utility for Windows. . . . . . . . . . . . . . . . . . . . . . . . . . . . . 38 Using the Print Head Alignment utility for
Mac OS X. . . . . . . . . . . . . . . . . . . . . . . . . . . . . 38
Cleaning the Paper Guide. . . . . . . . . . . . . . . . . . . 39
Using the Paper Guide Cleaning utility for Windows. . . . . . . . . . . . . . . . . . . . . . . . . . . . . 39 Using the Paper Guide Cleaning utility for Mac
OS X. . . . . . . . . . . . . . . . . . . . . . . . . . . . . . . . 39
Replacing Ink inside the Ink Tubes. . . . . . . . . . . . 40
Using the Power Ink Flushing utility for
Windows. . . . . . . . . . . . . . . . . . . . . . . . . . . . . 40 Using the Power Ink Flushing utility for Mac
OS X. . . . . . . . . . . . . . . . . . . . . . . . . . . . . . . . 40
Saving Power. . . . . . . . . . . . . . . . . . . . . . . . . . . . 41
For Windows. . . . . . . . . . . . . . . . . . . . . . . . . . 41
3

User’s Guide
Contents
For Mac OS X. . . . . . . . . . . . . . . . . . . . . . . . . . 41
Quieter Printer Operations. . . . . . . . . . . . . . . . . . 42
For Windows. . . . . . . . . . . . . . . . . . . . . . . . . . 42
For Mac OS X. . . . . . . . . . . . . . . . . . . . . . . . . . 42
Checking the Number of Sheets of Paper Fed. . . . . 42
Cleaning the Product. . . . . . . . . . . . . . . . . . . . . . 42
Cleaning the exterior of the product. . . . . . . . . . 42 Cleaning the interior of the product. . . . . . . . . . 43
Transporting the Product. . . . . . . . . . . . . . . . . . . 43
Checking and Installing Your Software. . . . . . . . . 46
Checking the software installed on your
computer. . . . . . . . . . . . . . . . . . . . . . . . . . . . . 46 Installing the software. . . . . . . . . . . . . . . . . . . . 47
Uninstalling Your Software. . . . . . . . . . . . . . . . . . 47
For Windows. . . . . . . . . . . . . . . . . . . . . . . . . . 47
For Mac OS X. . . . . . . . . . . . . . . . . . . . . . . . . . 48
Error Indicators
Error Indications on the Control Panel. . . . . . . . . . 50
Troubleshooting for Printing
Diagnosing the Problem. . . . . . . . . . . . . . . . . . . . 52
Checking product status. . . . . . . . . . . . . . . . . . 52
Paper Jams. . . . . . . . . . . . . . . . . . . . . . . . . . . . . . 54
Removing jammed paper from inside the
product. . . . . . . . . . . . . . . . . . . . . . . . . . . . . . 54 Preventing paper jams. . . . . . . . . . . . . . . . . . . . 55
Print Quality Help. . . . . . . . . . . . . . . . . . . . . . . . . 55
Horizontal banding. . . . . . . . . . . . . . . . . . . . . . 56 Vertical banding or misalignment. . . . . . . . . . . 56 Incorrect or missing colors. . . . . . . . . . . . . . . . 57 Blurry or smeared print. . . . . . . . . . . . . . . . . . . 57
Miscellaneous Printout Problems. . . . . . . . . . . . . . 58
Incorrect or garbled characters. . . . . . . . . . . . . 58 Incorrect margins. . . . . . . . . . . . . . . . . . . . . . . 58 Printout has a slight slant. . . . . . . . . . . . . . . . . 58 Inverted image. . . . . . . . . . . . . . . . . . . . . . . . . 58 Blank pages print. . . . . . . . . . . . . . . . . . . . . . . 59 Printed side is smeared or scuffed. . . . . . . . . . . 59 Printing is too slow. . . . . . . . . . . . . . . . . . . . . . 59
Paper Does Not Feed Correctly. . . . . . . . . . . . . . . 60
Paper does not feed. . . . . . . . . . . . . . . . . . . . . . 60 Multiple pages feed. . . . . . . . . . . . . . . . . . . . . . 60 Paper is improperly loaded. . . . . . . . . . . . . . . . 60 Paper is not ejected fully or is wrinkled. . . . . . . . 60
The Product Does Not Print. . . . . . . . . . . . . . . . . 61
All lights are off. . . . . . . . . . . . . . . . . . . . . . . . 61
Lights came on and then went out. . . . . . . . . . . 61 Only the power light is on. . . . . . . . . . . . . . . . . 61
Product Information
System Requirements. . . . . . . . . . . . . . . . . . . . . . 62
For Windows. . . . . . . . . . . . . . . . . . . . . . . . . . 62
For Mac OS X. . . . . . . . . . . . . . . . . . . . . . . . . . 62
Technical Specifications. . . . . . . . . . . . . . . . . . . . 62
Printer specifications. . . . . . . . . . . . . . . . . . . . . 62 Mechanical. . . . . . . . . . . . . . . . . . . . . . . . . . . . 64 Electrical. . . . . . . . . . . . . . . . . . . . . . . . . . . . . 64 Environmental. . . . . . . . . . . . . . . . . . . . . . . . . 64 Standards and approvals. . . . . . . . . . . . . . . . . . 65 Interface. . . . . . . . . . . . . . . . . . . . . . . . . . . . . . 65
Where To Get Help
Technical Support Web Site. . . . . . . . . . . . . . . . . . 66
Contacting Epson Support. . . . . . . . . . . . . . . . . . . 66
Before Contacting Epson. . . . . . . . . . . . . . . . . . 66 Help for Users in Europe. . . . . . . . . . . . . . . . . . 67 Help for Users in Taiwan. . . . . . . . . . . . . . . . . . 67 Help for Users in Singapore. . . . . . . . . . . . . . . . 68 Help for Users in Thailand. . . . . . . . . . . . . . . . 68 Help for Users in Vietnam. . . . . . . . . . . . . . . . . 69 Help for Users in Indonesia. . . . . . . . . . . . . . . . 69 Help for Users in Hong Kong. . . . . . . . . . . . . . 69 Help for Users in Malaysia. . . . . . . . . . . . . . . . . 70 Help for Users in India. . . . . . . . . . . . . . . . . . . 70 Help for Users in the Philippines. . . . . . . . . . . . 71
Index
4

User’s Guide
Introduction
Introduction
Where to Find Information
The latest version of the following manuals are available on the Epson support website. http://www.epson.eu/Support (Europe)
http://support.epson.net/ (other than Europe)
Start Here (paper):
Provides you with information on setting up the product and installing the software.
User’s Guide (PDF):
Provides you with detailed operating, safety, and troubleshooting instructions. See this guide when using this product with a computer.
To view the PDF manual, you need Adobe Acrobat Reader 5.0 or later, or Adobe Reader.
Caution, Important and Note
Caution, Important, and Note in this manual are indicated as below and have the following meaning.
!Caution
must be followed carefully to avoid bodily injury.
cImportant
must be observed to avoid damage to your equipment.
Note
contain useful tips and restrictions on product operation.
Operating System Versions
In this manual, the following abbreviations are used.
Windows 8 refers to Windows 8, Windows 8 Pro, and Windows 8.1.
Windows 7 refers to Windows 7 Home Basic, Windows 7 Home Premium, Windows 7 Professional, and Windows 7 Ultimate.
Windows Vista refers to Windows Vista Home Basic Edition, Windows Vista Home Premium Edition, Windows Vista Business Edition, Windows Vista Enterprise Edition, and Windows Vista Ultimate Edition.
Windows XP refers to Windows XP Home Edition, Windows XP Professional x64 Edition, and Windows XP Professional.
5
User’s Guide
Introduction
In this manual, Mac OS X 10.9.x refers to OS X Mavericks and Mac OS X 10.8.x refers to OS X Mountain Lion. Additionally, Mac OS X refers to Mac OS X 10.9.x, Mac OS X 10.8.x, Mac OS X 10.7.x, Mac OS X 10.6.x, and Mac OS X 10.5.8.
6

User’s Guide
Important Instructions
Important Instructions
Safety Instructions
Read and follow these instructions to ensure safe use of this product. Make sure you keep this guide for future reference. Also, be sure to follow all warnings and instructions marked on the product.
Use only the power cord supplied with the product and do not use the cord with any other equipment. Use of other cords with this product or the use of the supplied power cord with other equipment may result in fire or electric shock.
Be sure your AC power cord meets the relevant local safety standard.
Never disassemble, modify, or attempt to repair the power cord, plug, printer unit, or options by yourself, except as specifically explained in the product’s guides.
Unplug the product and refer servicing to qualified service personnel under the following conditions: The power cord or plug is damaged; liquid has entered the product; the product has been dropped or the
casing damaged; the product does not operate normally or exhibits a distinct change in performance. Do not adjust controls that are not covered by the operating instructions.
Place the product near a wall outlet where the plug can be easily unplugged.
Do not place or store the product outdoors, near excessive dirt or dust, water, heat sources, or in locations subject to shocks, vibrations, high temperature or humidity.
Take care not to spill liquid on the product and not to handle the product with wet hands.
Product Advisories and Warnings
Read and follow these instructions to avoid damaging the product or your property. Make sure you keep this guide for future reference.
Setting up/using the product
Do not block or cover the vents and openings in the product.
Use only the type of power source indicated on the product’s label.
Avoid using outlets on the same circuit as photocopiers or air control systems that regularly switch on and off.
Avoid electrical outlets controlled by wall switches or automatic timers.
Keep the entire computer system away from potential sources of electromagnetic interference, such as loudspeakers or the base units of cordless telephones.
7

User’s Guide
Important Instructions
The power-supply cords should be placed to avoid abrasions, cuts, fraying, crimping, and kinking. Do not place objects on top of the power-supply cords and do not allow the power-supply cords to be stepped on or run over. Be particularly careful to keep all the power-supply cords straight at the ends and the points where they enter and leave the transformer.
If you use an extension cord with the product, make sure that the total ampere rating of the devices plugged into the extension cord does not exceed the cord’s ampere rating. Also, make sure that the total ampere rating of all devices plugged into the wall outlet does not exceed the wall outlet’s ampere rating.
If you plan to use the product in Germany, the building installation must be protected by a 10 or 16 amp circuit breaker to provide adequate short-circuit protection and over-current protection for the product.
When connecting the product to a computer or other device with a cable, ensure the correct orientation of the connectors. Each connector has only one correct orientation. Inserting a connector in the wrong orientation may damage both devices connected by the cable.
Place the product on a flat, stable surface that extends beyond the base of the product in all directions. If you place the product by the wall, leave more than 10 cm between the back of the product and the wall. The product will not operate properly if it is tilted at an angle.
When storing or transporting the product, avoid tilting it, placing it vertically, or turning it upside down; otherwise ink may leak.
Allow spaces behind the product for the cables, and space above the product so that you can fully raise the front cover.
Avoid places subject to rapid changes in temperature and humidity. Also, keep the product away from direct sunlight, strong light, or heat sources.
Do not insert objects through the slots in the product.
Do not put your hand inside the product during printing.
Do not touch the white flat cable and ink tubes inside the product.
Do not use aerosol products that contain flammable gases inside or around the product. Doing so may cause fire.
Do not move the print head by hand; otherwise, you may damage the product.
Always turn the product off using the P button. Do not unplug the product or turn off the power at the outlet until the P light stops flashing.
Before transporting the product, make sure that the print head is in the home (far right) position.
If any of the ink tanks are not filled up to the lower line, refill the ink soon. Continued use of the product when the ink level is below the lower line on the tanks could damage the product.
If you are not going to use the product for a long period, be sure to unplug the power cord from the electrical outlet.
Handling ink
We will provide ink-related safety instructions and product advice/warnings in the linked section.
8
User’s Guide
Important Instructions
& “Refilling Ink” on page 31
9
User’s Guide
Getting to Know Your Product
Getting to Know Your Product
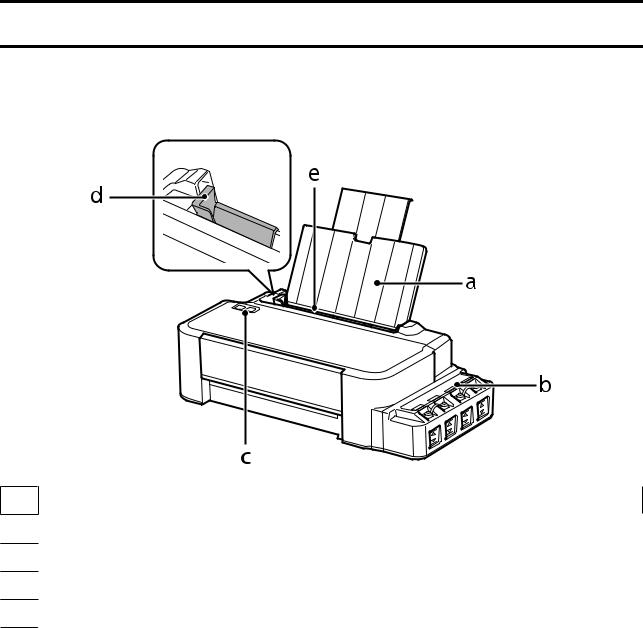
Product Parts
a.Paper support
b.Ink tank unit
c.Control panel
d.Edge guide
e.Rear paper feed
10

User’s Guide
Getting to Know Your Product
a.Front cover
b.Ink reservoir tanks (Ink tanks)
c.Print head (under this section)
a.USB port
b.AC inlet
11
User’s Guide
Getting to Know Your Product
Guide to the Control Panel
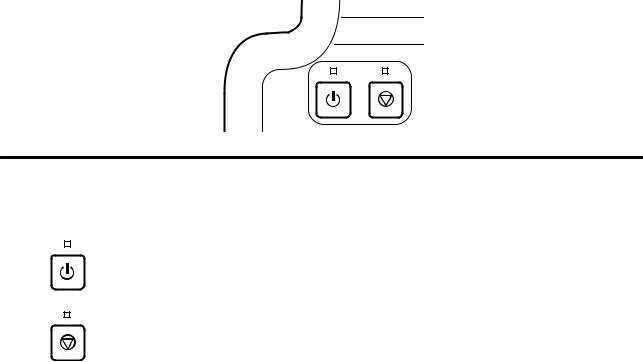
Buttons and lights
Buttons |
Function |
|
|
|
Turns the product on or off. The P light stays on when the product is on and flashes when the |
|
product is receiving data, printing, or cleaning the print head. |
|
|
|
Resume printing after a paper out error, paper jam error, multiple-paper feed error, or ink waste |
|
pad error. |
|
Cancels the current operation. |
|
If the y light is on or flashing, a problem has occurred during printing. |
|
& “Error Indications on the Control Panel” on page 50 |
|
|
12
User’s Guide
Paper Handling
Paper Handling
Introduction to Using, Loading, and Storing Media
Keep the following points in mind to achieve optimum print results.
Note:
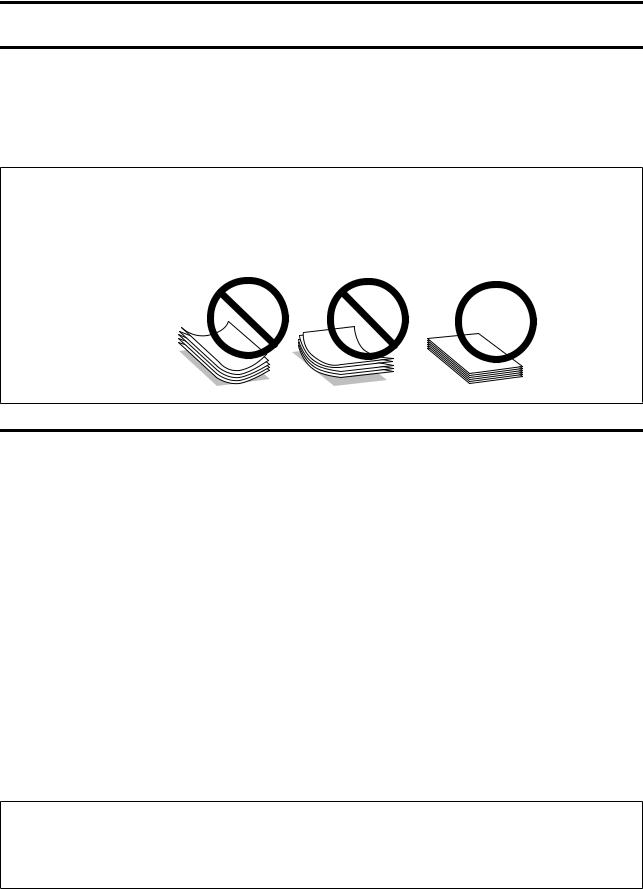
Load the paper into the rear paper feed with the printable side face up. See the instruction sheets packed with the paper for more information.
If the paper is curled, flatten it or curl it slightly in the opposite direction before loading. Printing on curled paper may cause ink to smear on your prints.
Storing paper
Return unused paper to the original package as soon as you finish printing. Keep unused paper and prints away from high temperature, humidity, and direct sunlight.
Selecting Paper
Refer to the table below for the loading capacities of paper and other media.
Media Type |
Size |
Loading capacity (sheets) |
|
|
|
Plain paper*1 |
Letter*2 |
up to 6mm |
|
A4*2 |
up to 6mm |
|
|
|
|
Legal |
1 |
|
|
|
*1 Paper with a weight of 64 g/m2 (17 lb) to 90 g/m2 (24 lb).
*2 The loading capacity for manual 2-sided printing is 15 sheets.
Note:
The availability of special media varies by location. For the latest information on media available in your area, contact Epson support.
& “Technical Support Web Site” on page 66
13
User’s Guide
Paper Handling
Loading Paper
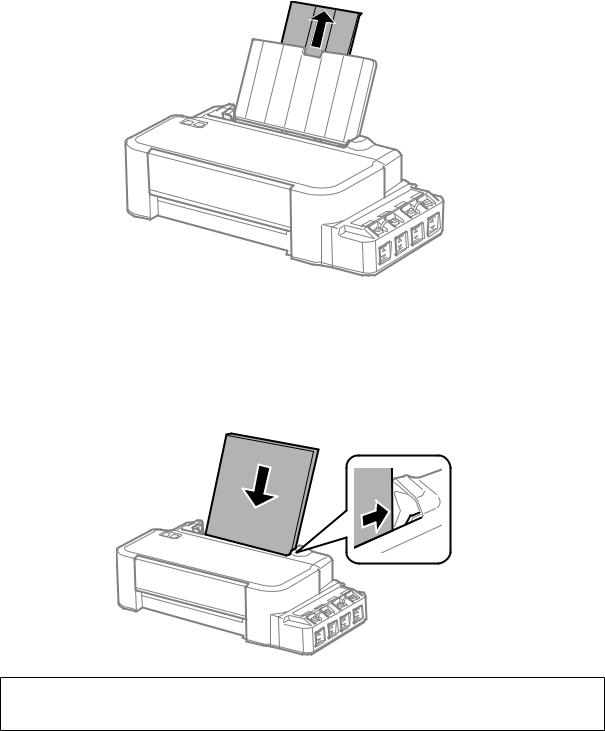
Follow these steps to load paper:
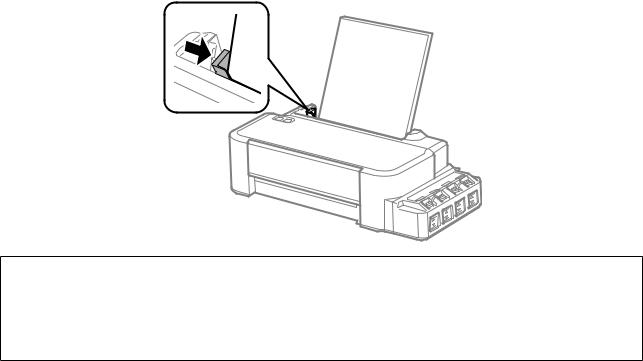
A Slide out the paper support.
B C D
Slide the edge guide to the left.
Fan a stack of paper, then tap it on a flat surface to even the edges.
Load the paper with the printable side face up, against the right side of the rear paper feed.
Note:
Always load paper into the rear paper feed short edge first, even when you are printing landscape-oriented pictures.
14
User’s Guide
Paper Handling
E Slide the edge guide against the left edge of the paper, but not too tightly.
Note:
Leave enough space in front of the product for the paper to be fully ejected.
Do not load paper above the H arrow mark inside the edge guide.
& “Selecting Paper” on page 13
15

User’s Guide
Printing
Printing
Printer Driver and Status Monitor
The printer driver lets you choose from a wide variety of settings to get the best printing results. The status monitor and the printer utilities help you check the product and keep it in top operating condition.
Note for Windows users:
Your printer driver automatically finds and installs the latest version of the printer driver from Epson’s Web site. Click the Software Update button in your printer driver’s Maintenance window, and then follow the on-screen instructions. If the button does not appear in the Maintenance window, point at All Programs or Programs in the Windows Start menu, and check in the EPSON folder.
If you want to change the language of the driver, select the language you want to use from the Language setting in your printer driver’s Maintenance window. Depending on the location, this function may not be available.
Accessing the printer driver for Windows
You can access the printer driver from most Windows applications, the Windows Start menu, or the taskbar. To make settings that apply only to the application you are using, access the printer driver from that application.
To make settings that apply to all of your Windows applications, access the printer driver from the desktop or the taskbar.
Refer to the following sections to access the printer driver.
Note:
Screen shots of the printer driver windows in this User’s Guide are from Windows 7.
From Windows applications
A B
Click Print or Print Setup on the File menu.
In the window that appears, click Printer, Setup, Options, Preferences, or Properties. (Depending on your application, you may need to click one or a combination of these buttons.)
From the desktop
Windows 8:
Select Desktop, Settings charm, and Control Panel. Then select Devices and Printers from the Hardware and Sound category. Right-click on the product, or press and hold the product, and select Printing preferences.
Windows 7:
Click the start button, select Devices and Printers. Then right-click the product and select Printing preferences.
16

User’s Guide
Printing
Windows Vista:
Click the start button, select Control Panel, and then select Printer from the Hardware and Sound category. Then select the product and then click Select printing preferences.
Windows XP:
Click Start, Control Panel, (Printers and Other Hardware,) then Printers and Faxes. Select the product, then click Printing Preferences on the File menu.
From the shortcut icon on the taskbar
Right-click the product icon on the taskbar, then select Printer Settings.
To add a shortcut icon to the Windows taskbar, first access the printer driver from the Start menu as described above. Next, click the Maintenance tab, and then the Monitoring Preferences button. In the Monitoring Preferences window, select the Shortcut Icon check box.
Getting information through online help
In the printer driver window, try one of the following procedures.
Right-click the item, then click Help.
Click the  button at the top right of the window, then click the item (for Windows XP only).
Accessing the printer driver for Mac OS X
The table below describes how to access the printer driver dialog.
Dialog Box |
How to Access It |
|
|
Page Setup |
Click Page Setup on the File menu of your application. |
|
Note: |
|
Depending on your application, the Page Setup menu may not appear in the File menu. |
|
|
Click Print on the File menu of your application. |
|
|
|
Epson Printer Utility 4 |
For Mac OS X 10.9, 10.8 or 10.7, click System Preferences on the Apple menu and then click |
|
Printers & Scanners (for Mac OS X 10.9) or Print & Scan (for Mac OS X 10.8 or 10.7). Select |
|
your product from the Printers list box, click Options & Supplies, Utility, and then click Open |
|
Printer Utility. |
|
For Mac OS X 10.6, click System Preferences on the Apple menu and then click Print & Fax. |
|
Select your product from the Printers list box, click Options & Supplies, Utility, and then click |
|
Open Printer Utility. |
|
For Mac OS X 10.5, click System Preferences on the Apple menu and then click Print & Fax. |
|
Select your product from the Printers list box, click Open Print Queue and then click Utility |
|
button. |
|
|
17
User’s Guide
Printing
Basic Operations
Basic printing
Note:
Before you print, load paper properly.
&“Loading Paper” on page 14
Refer to the section below for the printable area.
&“Printable area” on page 63
After completing the settings, print one test copy and examine the results before printing an entire job.
Basic product settings for Windows
A B
Open the file you want to print.
Access the printer settings.
& “Accessing the printer driver for Windows” on page 16
C D E
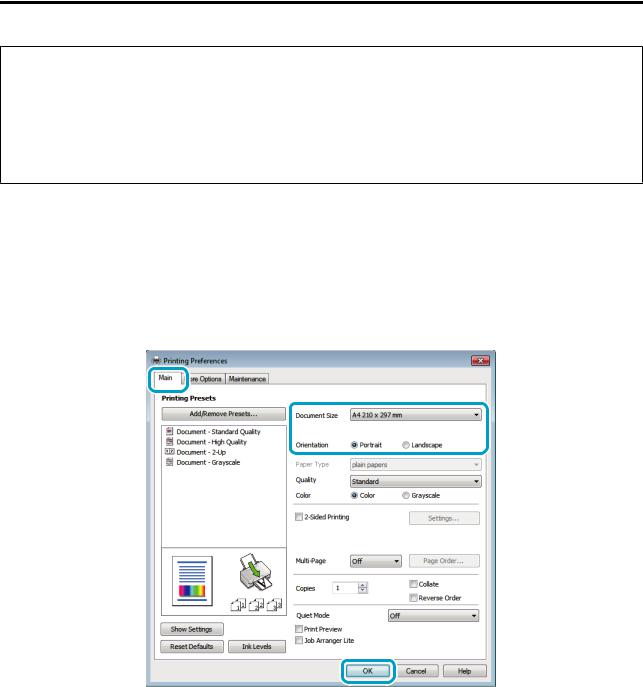
Click the Main tab.
Select the appropriate Document Size setting. You can also define a custom paper size. For details, see the online help.
Select Portrait (tall) or Landscape (wide) to change the orientation of your print.
18
User’s Guide
Printing
F Click OK to close the printer settings window.
Note:
To make changes to advanced settings, refer to the relevant section.
G Print your file.
Basic product settings for Mac OS X
Note:
Screen shots of the printer driver windows in this section are from Mac OS X 10.7.
A B
Open the file you want to print.
Access the Print dialog box.
& “Accessing the printer driver for Mac OS X” on page 17
Note:
If the simplified dialog box is displayed, click the Show Details button (for Mac OS X 10.9, 10.8 or 10.7) or the d button (for Mac OS X 10.6 or 10.5) to extend this dialog box.
19
User’s Guide
Printing
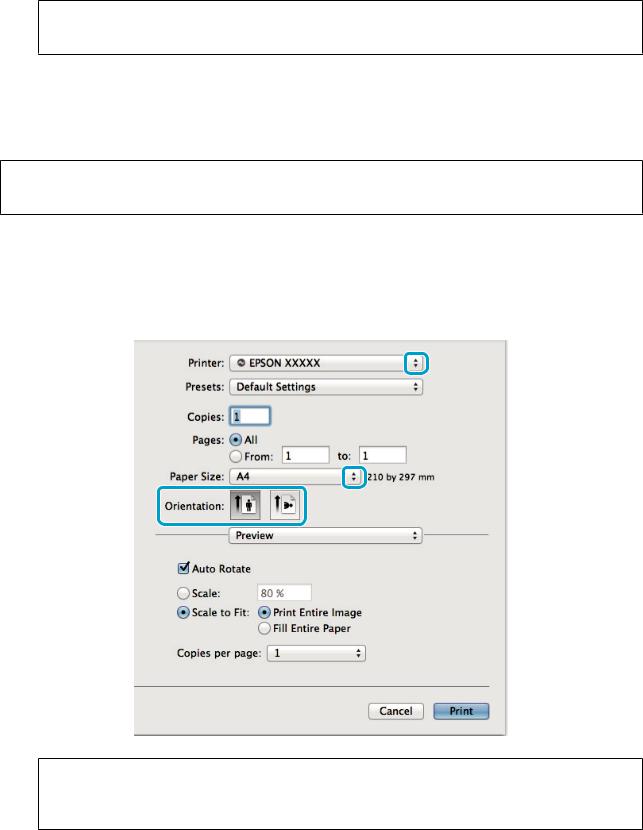
C Select the product you are using as the Printer setting.
Note:
Depending on your application, you may not be able to select some of the items in this dialog box. If so, click Page Setup on the File menu of your application, and then make suitable settings.
D E F
G
Select the appropriate Paper Size setting.
Select the appropriate Orientation setting.
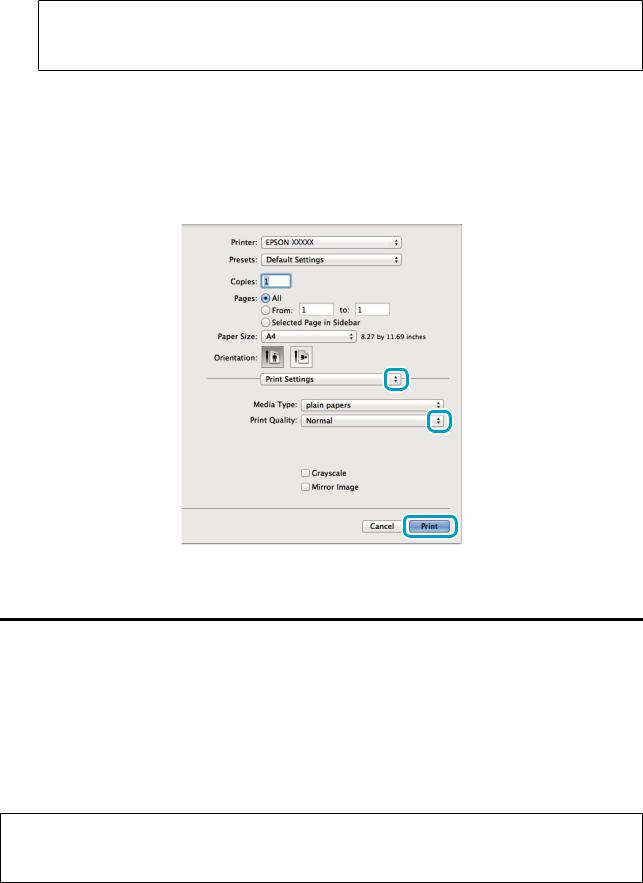
Select Print Settings from the pop-up menu.
Click Print to start printing.
Canceling printing
If you need to cancel printing, follow the instructions in the appropriate section below.
Using the product button
Press y to cancel a print job in progress.
For Windows
Note:
You cannot cancel a print job that has been completely sent to the product. In this case, cancel the print job by using the product.
20
User’s Guide
Printing
A B C
Access the EPSON Status Monitor 3. & “For Windows” on page 52
Click the Print Queue button. The Windows Spooler appears.
Right-click on the job you want to cancel and then select Cancel.
For Mac OS X
Follow the steps below to cancel a print job.
A B C
Click your product icon in the Dock.
In the Document Name list, select the document which is printing.
Click the Delete button to cancel the print job.
For Mac OS X 10.9 or 10.8:
Click the  button to cancel the print job.
21
User’s Guide
Printing
Other Options
Product presets (for Windows only)
Printer driver presets make printing a snap. You can also create presets of your own.
Product settings for Windows
A |
Access the printer settings. |
|
& “Accessing the printer driver for Windows” on page 16 |
B Select a Printing Presets in the Main tab. Product settings are automatically set to the values displayed in the pop-up window.
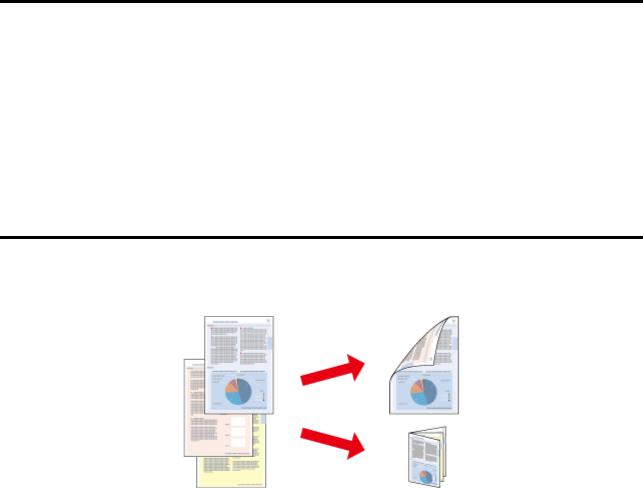
2-sided printing (for Windows only)
Use the printer driver to print on both sides of the paper.
Two types of 2-sided printing are available: standard and folded booklet. 2-sided printing is only available for the following papers and sizes.
Paper |
Size |
|
|
Plain paper |
Legal, Letter, A4 |
|
|
22

User’s Guide
Printing
Note:
This feature is not available for Mac OS X.
This feature may not be available at some settings.
This feature may not be available when the product is accessed over a network or is used as a shared printer.
The loading capacity differs during 2-sided printing. & “Selecting Paper” on page 13
Only use papers that are suitable for 2-sided printing. Otherwise, the printout quality may deteriorate.
Depending on the paper and the amount of ink used to print text and images, ink may bleed through to the other side of the paper.
The surface of the paper may be smeared during 2-sided printing.
This feature is available only when EPSON Status Monitor 3 is enabled. To enable the status monitor, access the printer driver and click the Maintenance tab followed by the Extended Settings button. In the Extended Settings window, check the Enable EPSON Status Monitor 3 check box.
Product settings for Windows
A B C
Access the printer settings.
& “Accessing the printer driver for Windows” on page 16
Select 2-Sided Printing check box.
Click Settings, and make the appropriate settings.
Note:
If you want to print a folded booklet, select Booklet.
D Check the other settings and print.
Note:
The actual binding margin may be different from the specified settings depending on your application. Experiment with a few sheets to examine actual results before printing the entire job.
Make sure that the ink is completely dry before reloading the paper.
23
Loading...