


 Loading...
TwinTip-Holder for TransferMan® NK 2
Montage-Anleitung · Mounting Instruction

TwinTip-Holder for TransferMan NK2
Inhaltsverzeichnis
1 Sicherheitshinweise . . . . . . . . . . . . . . . . . . . . . . . . . . . . . . . . . . . . . . . . . . . . . 3 2 Übersicht . . . . . . . . . . . . . . . . . . . . . . . . . . . . . . . . . . . . . . . . . . . . . . . . . . . . . . 4
3 Komponenten . . . . . . . . . . . . . . . . . . . . . . . . . . . . . . . . . . . . . . . . . . . . . . . . . . 4 Montagemöglichkeiten . . . . . . . . . . . . . . . . . . . . . . . . . . . . . . . . . . . . . . . . . . . . .4
3 Montage . . . . . . . . . . . . . . . . . . . . . . . . . . . . . . . . . . . . . . . . . . . . . . . . . . . . . . . 5
3.1 Kapillarenausrichtung . . . . . . . . . . . . . . . . . . . . . . . . . . . . . . . . . . . . . . . . . . . . . 7 3.2 Anschluss der Kontrolleinheit an das Steuerpult. . . . . . . . . . . . . . . . . . . . . . . . . 7 3.3 Anbau der Kontrolleinheit . . . . . . . . . . . . . . . . . . . . . . . . . . . . . . . . . . . . . . . . . . 8
4 Steuerung des TwinTip-Holders über die Kontrolleinheit . . . . . . . . . . . . . . . 9
4.1 Rote Taste . . . . . . . . . . . . . . . . . . . . . . . . . . . . . . . . . . . . . . . . . . . . . . . . . . . . . . 9 4.2 Schwarze Taste . . . . . . . . . . . . . . . . . . . . . . . . . . . . . . . . . . . . . . . . . . . . . . . . . 10 4.3 Ausrichtung der Kapillaren . . . . . . . . . . . . . . . . . . . . . . . . . . . . . . . . . . . . . . . . 10
5 Technische Daten . . . . . . . . . . . . . . . . . . . . . . . . . . . . . . . . . . . . . . . . . . . . . . 11 6 Bestellinformationen . . . . . . . . . . . . . . . . . . . . . . . . . . . . . . . . . . . . . . . . . . . . 12
Contents |
|
|
1 |
Safety precautions. . . . . . . . . . . . . . . . . . . . . . . . . . . . . . . . . . . . . . . . . . . . . . |
13 |
2 |
Overview. . . . . . . . . . . . . . . . . . . . . . . . . . . . . . . . . . . . . . . . . . . . . . . . . . . . . . |
14 |
|
3 components . . . . . . . . . . . . . . . . . . . . . . . . . . . . . . . . . . . . . . . . . . . . . . . . . . |
14 |
|
Mounting options. . . . . . . . . . . . . . . . . . . . . . . . . . . . . . . . . . . . . . . . . . . . . . . . |
14 |
3 |
Mounting . . . . . . . . . . . . . . . . . . . . . . . . . . . . . . . . . . . . . . . . . . . . . . . . . . . . . |
15 |
3.1 |
Capillary alignment . . . . . . . . . . . . . . . . . . . . . . . . . . . . . . . . . . . . . . . . . . . . . . |
17 |
3.2 |
Connecting the control unit to the control board . . . . . . . . . . . . . . . . . . . . . . . |
17 |
3.3 |
Mounting the control unit . . . . . . . . . . . . . . . . . . . . . . . . . . . . . . . . . . . . . . . . . |
18 |
4 |
Controlling the TwinTip-Holders with the control unit . . . . . . . . . . . . . . . . |
19 |
4.1 |
Red button. . . . . . . . . . . . . . . . . . . . . . . . . . . . . . . . . . . . . . . . . . . . . . . . . . . . . |
19 |
4.2 |
Black button . . . . . . . . . . . . . . . . . . . . . . . . . . . . . . . . . . . . . . . . . . . . . . . . . . . |
20 |
4.3 |
Aligning the capillaries. . . . . . . . . . . . . . . . . . . . . . . . . . . . . . . . . . . . . . . . . . . . |
20 |
5 |
Technical data . . . . . . . . . . . . . . . . . . . . . . . . . . . . . . . . . . . . . . . . . . . . . . . . . |
21 |
6 |
Ordering information . . . . . . . . . . . . . . . . . . . . . . . . . . . . . . . . . . . . . . . . . . . |
22 |
2
1 Safety precautions
Please read the next section carefully before you unpack the device and check to see if it is complete.
•Follow the micromanipulator safety precautions!
•Follow the safety precautions for the connected injectors!
•Make sure that the control board of the micromanipulator is not lying on the joystick when you connect and assemble the control unit!
•Connections should only be carried out without power supply! Pull the mains plug!
•Incorrect handling can result in injury!
Ensure that the capillaries being used are not aimed at persons when the injectors (i.e. CellTram, FemtoJet, etc.) are connected.
The capillaries can fly from the capillary holder where there is strong pressure. Blowpipe effect!
Protect eyes with safety glasses!
•During mounting and dismantling please check without fail that the red and black retainer for the capillary holder are in the position "Down"! See the figures in Section 4.
In the "Up" position damage / or destruction of the electromechanics may quickly result if the retainer is pressed down either by hand or other means.
•Transfer
If the device is passed on to someone else, please include the instruction manual.
•Disposal
In case the product is to be disposed of, the relevant legal regulations are to be observed.
The disposal of electrical devices is regulated within the European Community by national regulations based on EU Directive 2002/96/EC on waste electrical and electronic equipment (WEEE).
According to these regulations, any devices supplied after 13.08.05 in the business- to-business sphere, to which this product is assigned, may no longer be disposed of in municipal or domestic waste. They are marked with the following symbol to indicate this.
As disposal regulations within the EU may vary from country to country, please contact your supplier if necessary.
13

2 Overview
3 components
Control unit |
TwinTip-Holder Mounting angle |
Mounting options
The TwinTip-Holder is mounted onto the TransferMan NK 2 installed on the left or righthand side.
Left-hand side mounting |
or |
right-hand side |
14
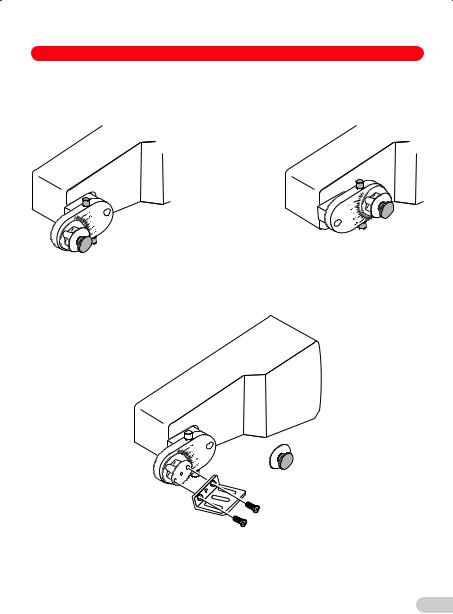
3 Mounting
The mounting examples are for a right-hand side mounted micromanipulator.
The X-head in both positions
Screwing on the mounting angle
15
Loading...