


 Loading...
oPhotometer®gN)manual
Register your instrument!
www.eppendorf.com/myeppendorf
Eppendorf BioPhotometer® D30
Operating manual
Copyright © 2014 Eppendorf AG, Hamburg. No part of this publication may be reproduced without the prior permission of the copyright owner.
Trademarks
Eppendorf®, the Eppendorf logo, Eppendorf BioPhotometer®, Eppendorf μCuvette®, and UVette® are registered trademarks of Eppendorf AG, Hamburg, Germany.
Cy® is a registered trademark of GE Healthcare UK Ltd., Buckinghamshire, UK.
Trademarks are not marked in all cases with ™ or ® in this manual.
This product is manufactured under license to issued U.S. Patent No. 6,122,052.
6133 900.053-02/052014
Table of contents |
3 |
Eppendorf BioPhotometer® D30 |
|
English (EN) |
|
Table of contents
1 Operating instructions . . . . . . . . . . . . . . . . . . . . . . . . . . . . . . . . . . . . . . . . . . . . . . . . . . . . . . . . . . . . . . 7
1.1 Using this manual . . . . . . . . . . . . . . . . . . . . . . . . . . . . . . . . . . . . . . . . . . . . . . . . . . . . . . . . . . . . . 7 1.2 Danger symbols and danger levels . . . . . . . . . . . . . . . . . . . . . . . . . . . . . . . . . . . . . . . . . . . . . . . . 7 1.2.1 Danger symbols . . . . . . . . . . . . . . . . . . . . . . . . . . . . . . . . . . . . . . . . . . . . . . . . . . . . . . . 7 1.2.2 Danger levels. . . . . . . . . . . . . . . . . . . . . . . . . . . . . . . . . . . . . . . . . . . . . . . . . . . . . . . . . . 7
1.3 Symbols used . . . . . . . . . . . . . . . . . . . . . . . . . . . . . . . . . . . . . . . . . . . . . . . . . . . . . . . . . . . . . . . . 7 1.4 Abbreviations used . . . . . . . . . . . . . . . . . . . . . . . . . . . . . . . . . . . . . . . . . . . . . . . . . . . . . . . . . . . . 8
2 Product description . . . . . . . . . . . . . . . . . . . . . . . . . . . . . . . . . . . . . . . . . . . . . . . . . . . . . . . . . . . . . . . . 9
2.1 Main illustration . . . . . . . . . . . . . . . . . . . . . . . . . . . . . . . . . . . . . . . . . . . . . . . . . . . . . . . . . . . . . . 9 2.2 Delivery package. . . . . . . . . . . . . . . . . . . . . . . . . . . . . . . . . . . . . . . . . . . . . . . . . . . . . . . . . . . . . . 9 2.3 Features. . . . . . . . . . . . . . . . . . . . . . . . . . . . . . . . . . . . . . . . . . . . . . . . . . . . . . . . . . . . . . . . . . . . 10 2.3.1 Methods . . . . . . . . . . . . . . . . . . . . . . . . . . . . . . . . . . . . . . . . . . . . . . . . . . . . . . . . . . . . 10 2.3.2 Operation. . . . . . . . . . . . . . . . . . . . . . . . . . . . . . . . . . . . . . . . . . . . . . . . . . . . . . . . . . . . 10 2.3.3 Result output . . . . . . . . . . . . . . . . . . . . . . . . . . . . . . . . . . . . . . . . . . . . . . . . . . . . . . . . . 10 2.3.4 Device self test . . . . . . . . . . . . . . . . . . . . . . . . . . . . . . . . . . . . . . . . . . . . . . . . . . . . . . . 10
3 Safety. . . . . . . . . . . . . . . . . . . . . . . . . . . . . . . . . . . . . . . . . . . . . . . . . . . . . . . . . . . . . . . . . . . . . . . . . . . 11
3.1 Intended use . . . . . . . . . . . . . . . . . . . . . . . . . . . . . . . . . . . . . . . . . . . . . . . . . . . . . . . . . . . . . . . . 11 3.2 User profile . . . . . . . . . . . . . . . . . . . . . . . . . . . . . . . . . . . . . . . . . . . . . . . . . . . . . . . . . . . . . . . . . 11 3.3 Warnings for intended use . . . . . . . . . . . . . . . . . . . . . . . . . . . . . . . . . . . . . . . . . . . . . . . . . . . . . 11 3.3.1 Personal injury . . . . . . . . . . . . . . . . . . . . . . . . . . . . . . . . . . . . . . . . . . . . . . . . . . . . . . . 11 3.3.2 Damage to device . . . . . . . . . . . . . . . . . . . . . . . . . . . . . . . . . . . . . . . . . . . . . . . . . . . . . 12
3.4 Information on product liability . . . . . . . . . . . . . . . . . . . . . . . . . . . . . . . . . . . . . . . . . . . . . . . . . 14 3.5 Safety instructions located on the device . . . . . . . . . . . . . . . . . . . . . . . . . . . . . . . . . . . . . . . . . . 14
4 Installation . . . . . . . . . . . . . . . . . . . . . . . . . . . . . . . . . . . . . . . . . . . . . . . . . . . . . . . . . . . . . . . . . . . . . . 15
4.1 Preparing installation . . . . . . . . . . . . . . . . . . . . . . . . . . . . . . . . . . . . . . . . . . . . . . . . . . . . . . . . . 15 4.2 Selecting the location . . . . . . . . . . . . . . . . . . . . . . . . . . . . . . . . . . . . . . . . . . . . . . . . . . . . . . . . . 15 4.3 Connecting the device to the mains . . . . . . . . . . . . . . . . . . . . . . . . . . . . . . . . . . . . . . . . . . . . . . 15 4.4 Connecting the printer . . . . . . . . . . . . . . . . . . . . . . . . . . . . . . . . . . . . . . . . . . . . . . . . . . . . . . . . 16 4.4.1 Thermal printer DPU-S445 . . . . . . . . . . . . . . . . . . . . . . . . . . . . . . . . . . . . . . . . . . . . . . 16 4.4.2 Thermal printer DPU-414 . . . . . . . . . . . . . . . . . . . . . . . . . . . . . . . . . . . . . . . . . . . . . . . 16
4.5 Connecting PC or USB stick for data export. . . . . . . . . . . . . . . . . . . . . . . . . . . . . . . . . . . . . . . . 17
5 Operation . . . . . . . . . . . . . . . . . . . . . . . . . . . . . . . . . . . . . . . . . . . . . . . . . . . . . . . . . . . . . . . . . . . . . . . 19
5.1 Overview of operating controls . . . . . . . . . . . . . . . . . . . . . . . . . . . . . . . . . . . . . . . . . . . . . . . . . . 19 5.1.1 Entering text . . . . . . . . . . . . . . . . . . . . . . . . . . . . . . . . . . . . . . . . . . . . . . . . . . . . . . . . . 21 5.2 Inserting the cuvette . . . . . . . . . . . . . . . . . . . . . . . . . . . . . . . . . . . . . . . . . . . . . . . . . . . . . . . . . . 22
5.3 Summary of the measuring procedure . . . . . . . . . . . . . . . . . . . . . . . . . . . . . . . . . . . . . . . . . . . . 23 5.3.1 Preparing the measurement . . . . . . . . . . . . . . . . . . . . . . . . . . . . . . . . . . . . . . . . . . . . . 23 5.3.2 Measuring procedure . . . . . . . . . . . . . . . . . . . . . . . . . . . . . . . . . . . . . . . . . . . . . . . . . . 23 5.3.3 Important measurement instructions . . . . . . . . . . . . . . . . . . . . . . . . . . . . . . . . . . . . . . 27

Table of contents
4Eppendorf BioPhotometer® D30 English (EN)
6 Methods . . . . . . . . . . . . . . . . . . . . . . . . . . . . . . . . . . . . . . . . . . . . . . . . . . . . . . . . . . . . . . . . . . . . . . . . 29
6.1 Selecting a method . . . . . . . . . . . . . . . . . . . . . . . . . . . . . . . . . . . . . . . . . . . . . . . . . . . . . . . . . . . 29 6.2 Photometry method description . . . . . . . . . . . . . . . . . . . . . . . . . . . . . . . . . . . . . . . . . . . . . . . . . 30 6.2.1 Absorbance method group . . . . . . . . . . . . . . . . . . . . . . . . . . . . . . . . . . . . . . . . . . . . . . 30 6.2.2 Routine method group . . . . . . . . . . . . . . . . . . . . . . . . . . . . . . . . . . . . . . . . . . . . . . . . . 30 6.2.3 Basic method group . . . . . . . . . . . . . . . . . . . . . . . . . . . . . . . . . . . . . . . . . . . . . . . . . . . 31
6.3 Method parameters. . . . . . . . . . . . . . . . . . . . . . . . . . . . . . . . . . . . . . . . . . . . . . . . . . . . . . . . . . . 32 6.4 Method procedure. . . . . . . . . . . . . . . . . . . . . . . . . . . . . . . . . . . . . . . . . . . . . . . . . . . . . . . . . . . . 34 6.4.1 Check parameters . . . . . . . . . . . . . . . . . . . . . . . . . . . . . . . . . . . . . . . . . . . . . . . . . . . . . 35 6.4.2 Measure standards . . . . . . . . . . . . . . . . . . . . . . . . . . . . . . . . . . . . . . . . . . . . . . . . . . . . 36 6.4.3 Measure samples . . . . . . . . . . . . . . . . . . . . . . . . . . . . . . . . . . . . . . . . . . . . . . . . . . . . . 37 6.4.4 Measure samples: Results displays. . . . . . . . . . . . . . . . . . . . . . . . . . . . . . . . . . . . . . . . 39 6.4.5 Process results . . . . . . . . . . . . . . . . . . . . . . . . . . . . . . . . . . . . . . . . . . . . . . . . . . . . . . . 42 6.4.6 Print & export . . . . . . . . . . . . . . . . . . . . . . . . . . . . . . . . . . . . . . . . . . . . . . . . . . . . . . . . 43 6.4.7 Finish the series of measurements . . . . . . . . . . . . . . . . . . . . . . . . . . . . . . . . . . . . . . . . 45
7 Functions. . . . . . . . . . . . . . . . . . . . . . . . . . . . . . . . . . . . . . . . . . . . . . . . . . . . . . . . . . . . . . . . . . . . . . . . 47
7.1 Functions of the User main group . . . . . . . . . . . . . . . . . . . . . . . . . . . . . . . . . . . . . . . . . . . . . . . 47 7.1.1 Results memory. . . . . . . . . . . . . . . . . . . . . . . . . . . . . . . . . . . . . . . . . . . . . . . . . . . . . . . 48 7.1.2 General method parameters . . . . . . . . . . . . . . . . . . . . . . . . . . . . . . . . . . . . . . . . . . . . . 49 7.1.3 Absorbance spectra library . . . . . . . . . . . . . . . . . . . . . . . . . . . . . . . . . . . . . . . . . . . . . . 51 7.1.4 Device settings . . . . . . . . . . . . . . . . . . . . . . . . . . . . . . . . . . . . . . . . . . . . . . . . . . . . . . . 51 7.1.5 Device calibration . . . . . . . . . . . . . . . . . . . . . . . . . . . . . . . . . . . . . . . . . . . . . . . . . . . . . 52 7.1.6 Info . . . . . . . . . . . . . . . . . . . . . . . . . . . . . . . . . . . . . . . . . . . . . . . . . . . . . . . . . . . . . . . . 52
8 Maintenance . . . . . . . . . . . . . . . . . . . . . . . . . . . . . . . . . . . . . . . . . . . . . . . . . . . . . . . . . . . . . . . . . . . . . 53
8.1 Cleaning . . . . . . . . . . . . . . . . . . . . . . . . . . . . . . . . . . . . . . . . . . . . . . . . . . . . . . . . . . . . . . . . . . . 53 8.1.1 Cleaning the cuvette shaft cover . . . . . . . . . . . . . . . . . . . . . . . . . . . . . . . . . . . . . . . . . . 53 8.2 Disinfection/Decontamination. . . . . . . . . . . . . . . . . . . . . . . . . . . . . . . . . . . . . . . . . . . . . . . . . . . 54
8.3 Checking the device . . . . . . . . . . . . . . . . . . . . . . . . . . . . . . . . . . . . . . . . . . . . . . . . . . . . . . . . . . 54 8.3.1 Checking the photometer unit . . . . . . . . . . . . . . . . . . . . . . . . . . . . . . . . . . . . . . . . . . . 55 8.3.2 Device self test . . . . . . . . . . . . . . . . . . . . . . . . . . . . . . . . . . . . . . . . . . . . . . . . . . . . . . . 58
8.4 Replacing fuses . . . . . . . . . . . . . . . . . . . . . . . . . . . . . . . . . . . . . . . . . . . . . . . . . . . . . . . . . . . . . . 58 8.5 Decontamination before shipment . . . . . . . . . . . . . . . . . . . . . . . . . . . . . . . . . . . . . . . . . . . . . . . 59
9 Troubleshooting . . . . . . . . . . . . . . . . . . . . . . . . . . . . . . . . . . . . . . . . . . . . . . . . . . . . . . . . . . . . . . . . . . 61
9.1 General errors . . . . . . . . . . . . . . . . . . . . . . . . . . . . . . . . . . . . . . . . . . . . . . . . . . . . . . . . . . . . . . . 61 9.2 Error messages . . . . . . . . . . . . . . . . . . . . . . . . . . . . . . . . . . . . . . . . . . . . . . . . . . . . . . . . . . . . . . 62 9.3 Result flags . . . . . . . . . . . . . . . . . . . . . . . . . . . . . . . . . . . . . . . . . . . . . . . . . . . . . . . . . . . . . . . . . 65
10 Transport, storage and disposal . . . . . . . . . . . . . . . . . . . . . . . . . . . . . . . . . . . . . . . . . . . . . . . . . . . . . 67
10.1 Transport . . . . . . . . . . . . . . . . . . . . . . . . . . . . . . . . . . . . . . . . . . . . . . . . . . . . . . . . . . . . . . . . . . . 67 10.2 Storage . . . . . . . . . . . . . . . . . . . . . . . . . . . . . . . . . . . . . . . . . . . . . . . . . . . . . . . . . . . . . . . . . . . . 67 10.3 Disposal. . . . . . . . . . . . . . . . . . . . . . . . . . . . . . . . . . . . . . . . . . . . . . . . . . . . . . . . . . . . . . . . . . . . 67
Table of contents |
5 |
Eppendorf BioPhotometer® D30 |
|
English (EN) |
|
11 Technical data. . . . . . . . . . . . . . . . . . . . . . . . . . . . . . . . . . . . . . . . . . . . . . . . . . . . . . . . . . . . . . . . . . . . 69
11.1 Power supply. . . . . . . . . . . . . . . . . . . . . . . . . . . . . . . . . . . . . . . . . . . . . . . . . . . . . . . . . . . . . . . . 69 11.2 Ambient conditions . . . . . . . . . . . . . . . . . . . . . . . . . . . . . . . . . . . . . . . . . . . . . . . . . . . . . . . . . . . 69 11.3 Weight/dimensions . . . . . . . . . . . . . . . . . . . . . . . . . . . . . . . . . . . . . . . . . . . . . . . . . . . . . . . . . . . 69 11.4 Photometric properties . . . . . . . . . . . . . . . . . . . . . . . . . . . . . . . . . . . . . . . . . . . . . . . . . . . . . . . . 70 11.5 Further technical parameters . . . . . . . . . . . . . . . . . . . . . . . . . . . . . . . . . . . . . . . . . . . . . . . . . . . 70 11.6 Application parameters . . . . . . . . . . . . . . . . . . . . . . . . . . . . . . . . . . . . . . . . . . . . . . . . . . . . . . . . 71
12 Evaluation procedure . . . . . . . . . . . . . . . . . . . . . . . . . . . . . . . . . . . . . . . . . . . . . . . . . . . . . . . . . . . . . . 73
12.1 Absorbance values . . . . . . . . . . . . . . . . . . . . . . . . . . . . . . . . . . . . . . . . . . . . . . . . . . . . . . . . . . . 73 12.1.1 Blank . . . . . . . . . . . . . . . . . . . . . . . . . . . . . . . . . . . . . . . . . . . . . . . . . . . . . . . . . . . . . . . 73 12.1.2 Background correction . . . . . . . . . . . . . . . . . . . . . . . . . . . . . . . . . . . . . . . . . . . . . . . . . 73 12.1.3 Cuvette correction. . . . . . . . . . . . . . . . . . . . . . . . . . . . . . . . . . . . . . . . . . . . . . . . . . . . . 74 12.2 Evaluation with factor or standard . . . . . . . . . . . . . . . . . . . . . . . . . . . . . . . . . . . . . . . . . . . . . . . 74
12.3 Evaluation with standard curve/line . . . . . . . . . . . . . . . . . . . . . . . . . . . . . . . . . . . . . . . . . . . . . . 75 12.4 Dilution . . . . . . . . . . . . . . . . . . . . . . . . . . . . . . . . . . . . . . . . . . . . . . . . . . . . . . . . . . . . . . . . . . . . 76 12.5 Special evaluation procedures for nucleic acids and protein UV . . . . . . . . . . . . . . . . . . . . . . . . 77
12.5.1Ratios A260/A280 and A260/A230.. . . . . . . . . . . . . . . . . . . . . . . . . . . . . . . . . . . . . . . . 77
12.5.2 Conversion to molar concentrations and nucleic acid quantities . . . . . . . . . . . . . . . . . 77 12.5.3 Calculating the factor for protein in "General Method Parameter" . . . . . . . . . . . . . . . 79
13 Ordering information . . . . . . . . . . . . . . . . . . . . . . . . . . . . . . . . . . . . . . . . . . . . . . . . . . . . . . . . . . . . . . 81
Certificates . . . . . . . . . . . . . . . . . . . . . . . . . . . . . . . . . . . . . . . . . . . . . . . . . . . . . . . . . . . . . . . . . . . . . . 83

Table of contents
6Eppendorf BioPhotometer® D30 English (EN)
Operating instructions |
7 |
Eppendorf BioPhotometer® D30 |
|
English (EN) |
|
1Operating instructions
1.1Using this manual
Read this operating manual completely before using the device for the first time. Also observe the instructions for use of the accessories.
This operating manual is part of the product. Thus, it must always be easily accessible.
Enclose this operating manual when transferring the device to third parties.
You will find the current version of the operating manual for all available languages on our webpage under www.eppendorf.com.
1.2Danger symbols and danger levels
The safety instructions of this operating manual indicate the following danger symbols and danger levels:
1.2.1 |
Danger symbols |
|
|
Electric shock |
Explosion |
|
Toxic substances |
Hazard point |
|
Material damage |
|
1.2.2Danger levels
DANGER |
Will lead to severe injuries or death. |
|
|
WARNING |
May lead to severe injuries or death. |
|
|
CAUTION |
May lead to light to moderate injuries. |
|
|
NOTICE |
May lead to material damage. |
|
|
1.3Symbols used
Depiction |
Meaning |
||
|
|
|
|
1. |
|
|
Actions in the specified order |
2. |
|
|
|
|
|
|
|
|
Actions without a specified order |
||
|
|
|
|
• |
List |
||
|
|
|
|
|
|
|
Additional information |
|
|
|
|
|
|
|
|

Operating instructions
8Eppendorf BioPhotometer® D30 English (EN)
1.4Abbreviations used
A
Absorbance
DNA
Deoxyribonucleic acid
dsDNA
Double-stranded DNA
M
mol/L (molar)
OD600
Optical density at a wavelength of 600 nm
RNA
Ribonucleic acid
ssDNA
Single-stranded DNA
UV
Ultraviolet radiation
Vis
Visible light
CV
Coefficient of variation (standard deviation/average value) in percent
Product description |
9 |
Eppendorf BioPhotometer® D30 |
|
English (EN) |
|
2Product description
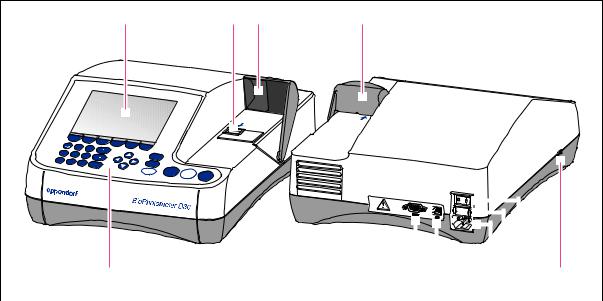
2.1Main illustration
p
g
7 qrs
4 hi
8 tuv
a
2 bc
9 wxyz
3 d ef
µ
1 |
|
2 |
3 |
3 |
|
|
|
absorbance |
|
|
|
|
height |
|
|
|
|
8.5 m m |
|
method |
|
|
|
|
function |
exit |
|
|
|
|
|
|
|
|
0 |
delete |
|
|
|
% |
|
|
|
|
|
enter |
blank |
|
|
|
|
|
|
|
|
|
|
|
|
|
|
|
|
|
|
|
|
|
|
|
|
|
|
|
|
|
|
|
|
|
|
|
|
|
|
|
|
|
|
|
|
|
|
|
|
|
|
|
|
|
10 |
|
9 |
|
8 |
|
|
|
|
|
|
7 6 |
5 |
4 |
||||||||
|
|
|
|
|
|
|
|
|
|
|
|
|
|
|
|
|
|
|
|
|||
Fig. 2-1: BioPhotometer D30: Front view and rear view |
|
|
|
|
|
|
|
|
|
|
|
|
|
|
|
|
||||||
1 |
Display |
6 |
Fuse holder |
|
|
|
|
|
|
|
|
|
|
|
|
|
|
|
|
|||
2 |
Cuvette shaft |
7 |
Mains/power connection |
|
|
|
|
|
|
|
||||||||||||
3 |
Cuvette shaft cover |
8 |
USB connection for PC |
|
|
|
|
|
|
|
||||||||||||
4 |
USB connection for USB stick and printer |
9 |
Connection for RS-232 printer |
|
|
|
||||||||||||||||
5 |
Mains/power switch |
10 |
Operating controls |
|
|
|
|
|
|
|
|
|
|
|
|
|
|
|
|
|||
The name plate is located at the bottom left on the underside of the device.
2.2Delivery package
Quantity |
Description |
|
|
1 |
BioPhotometer D30 |
|
|
1 |
Power cord |
|
|
4 |
4 UVettes |
|
Original Eppendorf plastic cuvette, individually packaged, PCR clean, protein-free |
|
|
1 |
Operating manual, in multiple languages |
|
|

Product description
10Eppendorf BioPhotometer® D30 English (EN)
2.3Features
The BioPhotometer D30 is a UV VIS photometer for measuring liquids in cuvettes. As the measuring data are collected at fixed wavelengths, the device especially is suited for routine applications in the biomolecular, biotechnological, biochemical and cytological areas in research and development.
2.3.1Methods
Preprogrammed methods and method templates
•Concentration determination of nucleic acids and proteins
•Determining the bacterial density by turbidity measurements: Method OD 600
•Method templates for different measurement and evaluation procedures:
–Quick absorbance measurements
–Evaluations with factor, standard and standard curve
•It is possible to create individual methods on the basis of the preprogrammed methods and templates.
•Quick measurement of absorbances without any further evaluation: Absorbance method group.
2.3.2Operation
The preprogrammed methods and templates are combined into clearly arranged groups from which the desired method can be quickly selected. After calling up the method, you are guided through the measuring procedure in clear steps. If required, a help box in the display will provide you with hints. The 3 measuring keys (standard, blank, sample) enable you to start the measurement quickly and directly.
2.3.3Result output
The BioPhotometer D30 emits the results on the display as well as via a printer which is available at Eppendorf. With a USB connection, you can transfer result data from the device to a USB stick, a printer or directly to a PC.
2.3.4Device self test
Directly after switching on, the device checks the functioning of the photometer unit by itself. Access the Device calibration function for a more comprehensive test (see Device self test on p. 58).
Safety |
11 |
Eppendorf BioPhotometer® D30 |
|
English (EN) |
|
3Safety
3.1Intended use
The BioPhotometer D30 is to be used in molecular biology, biochemistry and cell biology research laboratories. The BioPhotometer D30 exclusively is determined for use in the interior of buildings. All country-specific safety requirements for operating electrical equipment in the laboratory must be observed.
The BioPhotometer D30 is used for photometric concentration determination of biomolecules in liquids as well as for turbidity measurements of microbiological cultures in routine laboratories.
Only use Eppendorf accessories or accessories recommended by Eppendorf.
3.2User profile
The device and accessories may only be operated by trained and skilled personnel.
Before using the device, read the operating manual carefully and familiarize yourself with the device's mode of operation.
3.3Warnings for intended use
3.3.1Personal injury
DANGER! Electric shock as a result of penetration of liquid.
Switch off the device and disconnect the power plug before starting cleaning or disinfection work.
Do not allow any liquids to penetrate the inside of the housing.
Do not spray clean/spray disinfect the housing.
Only plug the device back in if it is completely dry, both inside and outside.
DANGER! Risk of explosion.
Do not operate the device in areas where work is completed with explosive substances.
Do not use this device to process any explosive or highly reactive substances.
Do not use this device for processing any substances which could generate an explosive atmosphere.
WARNING! Electric shock due to damage to device or mains cable.
Only switch on the device if the device and mains cable are undamaged.
Only use devices that have been properly installed or repaired.
In case of danger, disconnect the device from the mains supply by pulling the power plug from the device or the mains socket or, by using the isolating device intended for this purpose (e.g., emergency stop switch in the laboratory).
Safety
12Eppendorf BioPhotometer® D30 English (EN)
WARNING! Damage due to UV radiation.
Microliter cuvettes, e.g., Hellma® TrayCell (or microliter cuvettes with a similar design) divert the radiation from the light source within the cuvette so the radiation can escape upward when the lid is not closed.
Before starting a measurement, ensure that the lid on the microliter cuvette is not open.
WARNING! Damage to health from toxic, radioactive or aggressive chemicals as well as infectious liquids and pathogenic germs.
Observe the national regulations for handling these substances, the biological security level of your laboratory, the material safety data sheets and the manufacturer's application notes.
Wear personal protective equipment.
For full instructions regarding the handling of germs or biological material of risk group II or higher, please refer to the "Laboratory Biosafety Manual" (Source: World Health Organization, current edition of the Laboratory Biosafety Manual).
WARNING! Damage to health due to contaminated device and accessories.
Decontaminate the device and the accessories before storage and shipping.
CAUTION! Poor safety due to incorrect accessories and spare parts.
The use of accessories and spare parts other than those recommended by Eppendorf may impair the safety, functioning and precision of the device. Eppendorf cannot be held liable or accept any liability for damage resulting from the use of incorrect or non-recommended accessories and spare parts, or from the improper use of such equipment.
Only use accessories and original spare parts recommended by Eppendorf.
3.3.2Damage to device
NOTICE! Damage from the use of aggressive chemicals.
Do not use any aggressive chemicals on the device or its accessories, such as strong and weak bases, strong acids, acetone, formaldehyde, halogenated hydrocarbons or phenol.
If the device has been contaminated by aggressive chemicals, immediately clean it by means of a mild cleaning agent.
NOTICE! Damage to the device from fumigating with aggressive chemicals.
Do not use fumigation to disinfect the device.

Safety |
13 |
Eppendorf BioPhotometer® D30 |
|
English (EN) |
|
NOTICE! Corrosion from aggressive cleaning agents and disinfectants.
Do not use corrosive cleaning agents, aggressive solvents or abrasive polishes.
Do not incubate the accessories in aggressive cleaning agents or disinfectants for a longer period of time.
NOTICE! Damage to electronic components due to condensation.
Condensate can form in the device after it has been moved from a cool environment to a warmer environment.
After installing the device, wait at least for 3 h. Only then connect the device to the mains.
NOTICE! Function impairment due to mechanical damage.
After mechanical damage to the device, ensure that the measuring and evaluation functions of the device are operating correctly by completing an inspection.
NOTICE! Damage from overheating.
Do not install the device near to any heat sources (e.g., heating, drying cabinet).
Do not expose the device to direct sunlight.
Ensure unobstructed air circulation. Keep free a clearance of at least 5 cm around all ventilation grilles.
NOTICE! Material damage from incorrect use.
Only use the product for its intended purpose as described in the operating manual.
Ensure adequate material resistance when using chemical substances.
In case of doubt, contact the manufacturer of this product.
NOTICE! Damage as a result of incorrect packing.
Eppendorf AG is not liable for damage caused by improper packing.
The device may only be stored and transported in its original packaging.
NOTICE! Damage due to improper cleaning of the cuvette shaft.
Only clean the cuvette shaft using a moist cotton swab .
Do not allow any liquid to enter the cuvette shaft.
Do not reach with your fingers into the cuvette shaft.

Safety
14Eppendorf BioPhotometer® D30 English (EN)
3.4Information on product liability
In the following cases, the designated protection of the device may be compromised. Liability for any resulting property damage or personal injury is then transferred to the operator:
•The device is not used in accordance with the operating manual.
•The device is used outside of its intended use.
•The device is used with accessories or consumables which are not recommended by Eppendorf.
•The device is maintained or repaired by people not authorized by Eppendorf.
•The user makes unauthorized changes to the device.
3.5Safety instructions located on the device
Depiction |
Meaning |
Location |
|
|
|
|
Hazard point |
Rear side of the device |
|
Follow the operating manual. |
|
|
|
|
|
The device needs to be readjusted |
Bottom of the device |
Gerät nach dem Öffnen |
after it has been opened. |
|
justieren! |
|
|
Adjust device after |
Do not open the device. |
|
opening! |
|
|
|
|
|
|
|
|

Installation |
15 |
Eppendorf BioPhotometer® D30 |
|
English (EN) |
|
4Installation
4.1Preparing installation
Keep the transport carton and the packing material for subsequent safe transport or storage.
Check the completeness of the delivery using the information in the delivery package (see Delivery package on p. 9).
Check all parts for any transport damage.
4.2Selecting the location
Select the location for the BioPhotometer D30 according to the following criteria:
•2 grounded sockets for the BioPhotometer D30 and for the printer.
•Solid laboratory bench with horizontal work surface
Space requirement of the device: 50 cm (with printer: 75 cm) width, 50 cm depth.
•Temperature: 15°C to 35°C.
•Avoid temperature fluctuations (e.g, caused by open windows).
•Avoid direct sunlight.
•Humidity: 25% to 70% relative humidity.
Ensure that no objects (e.g., loose sheets, notebooks) that could impede the flow of air are positioned under the device.
4.3Connecting the device to the mains
1.Place the BioPhotometer D30 on a suitable work surface.
2.Verify that the mains/power supply voltage and mains/power frequency match the information on the name plate.
3.Connect the device to the mains/power line and switch it on with the power switch.
4.Remove the protective film from the display.

Installation
16Eppendorf BioPhotometer® D30 English (EN)
4.4Connecting the printer
4.4.1Thermal printer DPU-S445
Prerequisites
Software version 3.4.4.0 or higher is installed on the device.
Connect the thermal printer DPU-S445 to the USB port for printers.
1.Connect the printer cable with the USB port for printers 4 (see Main illustration on p. 9).
2.Connect the printer cable with the printer.
3.Connect the printer to the mains/power line using the supplied mains/power adaptor and mains/power cord (printer accessory) and switch it on.
For information on the printer, refer to the operating manual of the printer.
4.4.2Thermal printer DPU-414
Connect the thermal printer DPU-414 to the serial printer connection.
1.Connect the printer cable to the serial printer connection 9 and tighten the locking screws.(see Main illustration on p. 9).
2.Connect the printer cable to the printer and tighten the locking screws as well.
3.Connect the printer to the mains/power line using the supplied mains/power adaptor and mains/power cord (printer accessory) and switch it on.
Information about modifying printer settings can be found in the operating manual for the printer.
The DIP switches are preset for the BioPhotometer D30 according to the following table.
Tab. 4-1: Setting the DIP SW for the thermal printer
DIP SW-1 |
Meaning |
|
|
|
|
1 |
(OFF) |
Input = Serial |
|
|
|
2 |
(ON) |
Printing Speed = High |
|
|
|
3 |
(ON) |
Auto Loading = ON |
|
|
|
4 |
(OFF) |
Auto LF = OFF |
|
|
|
5 |
(ON) |
Setting Command = Enable |
|
|
|
6 |
(OFF) |
Printing |
|
|
|
7 |
(ON) |
Density |
|
|
|
8 |
(ON) |
= 100% |
|
|
|
|
|
|
DIP SW-2 |
Meaning |
|
|
|
|
1 |
(ON) |
Printing Columns = 40 |
|
|
|
2 |
(ON) |
User Font Back-up = ON |
|
|
|
3 |
(ON) |
Character Select = Normal |
|
|
|

Installation |
17 |
Eppendorf BioPhotometer® D30 |
|
English (EN) |
|
DIP SW-2 |
Meaning |
|
|
|
|
4 |
(ON) |
Zero = Normal |
|
|
|
5 |
(ON) |
International |
|
|
|
6 |
(ON) |
Character |
|
|
|
7 |
(ON) |
Set |
|
|
|
8 |
(OFF) |
= U.S. |
|
|
|
|
|
|
DIP SW-3 |
Meaning |
|
|
|
|
1 |
(ON) |
Data Length = 8 bits |
|
|
|
2 |
(ON) |
Parity Setting = NO |
|
|
|
3 |
(ON) |
Parity Condition = Odd |
|
|
|
4 |
(OFF) |
Busy Control = XON/XOFF |
|
|
|
5 |
(OFF) |
Baud |
|
|
|
6 |
(ON) |
Rate |
|
|
|
7 |
(ON) |
Select |
|
|
|
8 |
(ON) |
= 9600 bps |
|
|
|
4.5Connecting PC or USB stick for data export
You can connect a FAT 32-formatted USB stick to the USB port 4 (see Main illustration on p. 9).
Alternatively, you can connect the device for the data export directly to a PC by using a USB cable:
Prerequisites
•PC with Windows, version XP, SP2 or higher version.
•USB cable with a type A and type B plug each.
Connect the device to the PC by using the USB cable on the USB port 8 (see Main illustration on p. 9).
• You do not need any special PC software for the data transmission: the transferred data packets are recognized by the PC like a USB stick as a removable medium. For viewing the data, you only need to open the registered data packet.
•The transmission of data to the USB stick or to the PC is started after completing the series of measurement in the print & export (see Print & export on p. 43) method step.

Installation
18Eppendorf BioPhotometer® D30 English (EN)
Operation |
19 |
Eppendorf BioPhotometer® D30 |
|
English (EN) |
|
5Operation
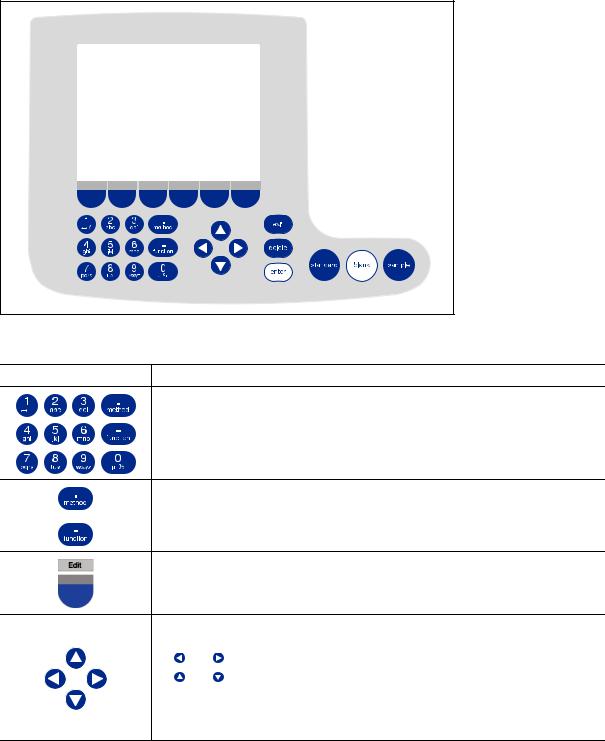
5.1Overview of operating controls
Fig. 5-1: Control panel of the BioPhotometer D30
Key: Function
Keypad: Enter digits and text.
Keys 1 to 9 as well as 0: When entering text, next to numbers you also can enter letters and special characters by pressing the key several times. Alternatively, you can switch to a displayed keyboard with the [Keyboard] key.
Outside of entry fields: Call up method selection.
Outside of entry fields: Call up function selection.
Softkey: Select functions.
The key assignment changes along with the software dialog. The current function is displayed directly above the key on the display.
Move the cursor to the left, right, up, down.
• Navigation between input fields.
• |
and |
keys inside an entry field: Navigate within the character string. |
• |
and |
keys in a result display: Navigate between the sample results of |
|
the series of measurement. |
|
• and
and  keys within a graph: Navigate on the x-axis of the graph, e.g. for displaying the wavelength-dependent absorbance values in a scan.

Operation
20Eppendorf BioPhotometer® D30 English (EN)
Key: Function
Exit the current selection for the next higher level.
Delete entry. Within a sequence of signs, the sign on the left of the cursor is deleted
• Call up selected method or function.
• Open the selection list.
• Confirm entry or selection.
Start standard measurement.
Start blank measurement.
Start sample measurement.
Operation |
21 |
Eppendorf BioPhotometer® D30 |
|
English (EN) |
|
5.1.1Entering text
You can enter texts when assigning method names and result units. Restriction: Only digits, letters and the underscore "_" are allowed for method names.
Entry via keyboard:
Use the  and
and  cursor keys to navigate within the entry field and to change single positions in the name.
Softkeys:
•[Keyboard]: Display keyboard.
•[abc]: Change between upper and lower case letters when making entries with the keypad.
•[Save]: Save entered text.
•[Cancel]: Cancel text input.
Entry via the displayed keyboard:
Use the cursor keys to select the displayed signs and respectively confirm your selection with the enter key. As for a PC key pad, you can use the "Shift" resp. the "Caps Lock" key for changing the capitalization for the next entry or for all following entries.
Softkeys:
•[Numbers]: Switch to entry using the keyboard.
•[Save]: Save entered text.
•[Cancel]: Cancel text input.
Operation
22Eppendorf BioPhotometer® D30 English (EN)
5.2Inserting the cuvette
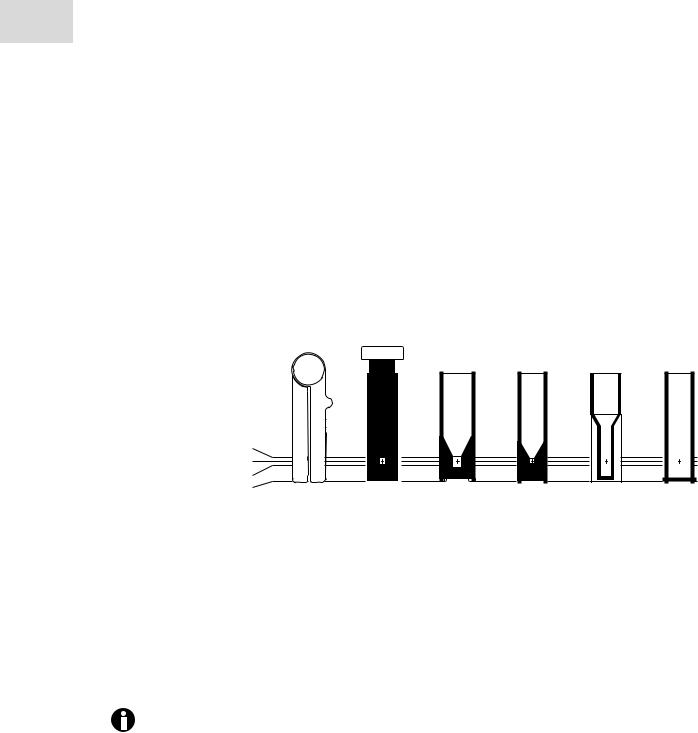
Standard rectangular glass or plastic cuvettes can be inserted in the cuvette shaft:
•External dimensions: 12.5 mm × 12.5 mm
•Height of light path: 8.5 mm higher than cuvette base
•Total height: min. 36 mm
The cuvettes must be optically transparent for the respective measuring wavelength. For measurements in the UV range, Eppendorf offers the plastic cuvette UVette which is transparent for wavelengths of 220 nm and higher and therefore also is suitable for measuring nucleic acids.
Cuvettes |
Eppendorf |
Hellma ® TrayCell * UVette ® |
μCuvette G1.0 |
|
Basic area 12.5 mm × 12.5 mm
Min. overall height |
36 mm |
|
|
|
Min. filling level |
10 mm |
|
|
|
Light path |
8.5 mm |
|
|
|
Max. height of base |
7 mm |
|
|
|
|
0 mm |
|
|
|
Min. volume Photometry |
See manufacturer See manufacturer |
50 μL |
||
|
|
information |
information |
|
|
|
|
* or similar microliter cuvette |
|
Ultra-micro Semi-micro Macro
70 μL |
400 μL |
1000 μL |
Prerequisites
•The cuvette is free from contamination by dust or fingerprints and free from scratches.
•The cuvette shaft is free from particles, dust and liquid.
•The measuring volume in the cuvette is sufficient. Ensure that the minimum measuring volume has been reached.
•The measuring solution is free from particles and bubbles.
•The cuvette temperature and temperature control of the cuvette are above the temperature of the dew point that applies for the ambient conditions (humidity and temperature).
The direction of the light path is marked with an arrow on the housing.
1.Position the cuvette so that the optical window of the cuvette is pointing towards the direction of the light path.
2.When inserting the cuvette, press it completely to the bottom against the slight resistance.

Operation |
23 |
Eppendorf BioPhotometer® D30 |
|
English (EN) |
|
5.3Summary of the measuring procedure
5.3.1Preparing the measurement
1.Switch on the device and, if required, the printer.
The device performs a self test (taking approx. 1 minute) and displays the method selection.
2.Make ready the cuvettes for the measurements (see Inserting the cuvette on p. 22).
3.Prepare the measuring solutions for measuring the blank values, if required, also the standards and the samples.
4.Open the cover of the cuvette shaft. The cover can remain open during the measurements.
You should not use any measuring solution for standards and samples with a lower absorbance than 0.02 to 0.03 A (e.g. dsDNA concentration between 1.0 and 1.5 μg/mL). The detection limit of the device may be significantly lower, nevertheless, the impact of disturbances from the measuring solutions (particles, bubbles, turbidity) on the reliability of the result is very high for these low absorbance values.
5.3.2Measuring procedure
5.3.2.1 Selecting a method
Use the cursor keys to select the desired method and call up the method with the enter key.
For an overview and a detailed description of the methods, refer to the next chapter (see Methods on p. 29).
Wizard: The wizard at the top of the display will take you through the method procedure step-by-step.
Help box: You will receive help texts in the lower right of the display during each step of the procedure.
Softkeys: The [< Back] and [Next >] softkeys allow you to move between method steps in the wizard.

Operation
24Eppendorf BioPhotometer® D30 English (EN)
5.3.2.2 Checking parameters
Check the parameter setting. The [Page dn] and [Page up] softkeys allow you to call up the parameter list pages. You can modify and save parameters using [Edit].
5.3.2.3 Measuring the blank and standards
For evaluations without standards (e.g. DNA measurements), this method step is omitted.
1. Start by measuring a blank (blank key). 2. Then measure all standards one by one
(standard key).
The display always marks the standard that is to be measured next. Use the [Graph] resp. [Table] softkey to change the result view.
Press [Next] to accept the evaluation calculated from the standard results.
Operation |
25 |
Eppendorf BioPhotometer® D30 |
|
English (EN) |
|
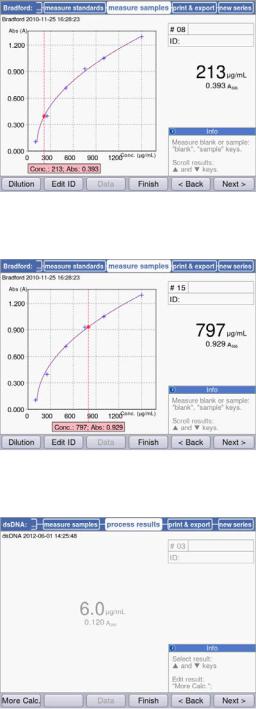
5.3.2.4 Measuring samples
The sample key is used for measuring your samples consecutively.
Blank results will remain saved for the duration of one series of measurement. However, a new blank measurement always is possible. (The adjacent figure shows a measuring procedure with evaluation via the standard curve and, in addition to the sample result, the graph of the standard evaluation.)
5.3.2.5 Finalizing the method
1.Press [Finish], to complete the measuring series and return to the method selection.
2.After all measurements have been completed, switch off the device and close the cuvette shaft cover to protect the cuvette shaft from contamination.
5.3.2.6 Optional: process results
For the methods of the Nucleic acids method group, you can postprocess the results in the process results method step.
Use the  and
and  cursor keys for selecting systematically any results of the series of
measurement for postprocessing.
More Calc. softkey: Convert the concentration results to molar concentrations or to nucleic acid quantities (unit mass or mol).

Operation
26Eppendorf BioPhotometer® D30 English (EN)
5.3.2.7 Printing and exporting
1. Compose data packets for all samples or for selected samples.
2. Print the data, save them to a USB stick or transfer them to a PC via a USB cable.
Loading...