


 Loading...
Eppendorf Research® pro
Instruction Manual · Mode d’emploi · Manual de Instrucciones

Contents / Sommaire / Indice
Inhalt / Contents / Sommaire / Indice / Indice |
|
Teil A / Part A / Section A / Parte A / Parte A |
|
Instruction Manual........................................................................................................................ |
3 |
Mode d’emploi ........................................................................................................................... |
33 |
Manual de Instrucciones ............................................................................................................ |
63 |
Part B / Teil B |
|
Programming / Programas ......................................................................................................... |
93 |
Ordering Information / Programa de ventas............................................................................. |
109 |
Evaluate the quality of our operating manuals on www.eppendorf.com/manualfeedback Evaluer nos manuels d'utilisation sur www.eppendorf.fr/manualfeedback!
¡Díganos que opina de nuestras instrucciones de manejo en www.eppendorf.es/manualfeedback!
eppendorf and eppendorf Research are registered trademarks.
Registered trademarks are not marked in all cases with TM or ® in this manual.
Research pro pipettes are manufactured under
U.S. Patent No. 4,671,123; 4,905,526; 5,187,990; 6,199,435; 6,499,365
No part of this publication may be reproduced without the prior permission of the copyright owner Copyright© 2000 Eppendorf AG, Hamburg
2

Part A – Contents
This operating manual is valid as of software version V.1.56 and data record 2.
Software version and data record appear in the display after the battery pack has been inserted (see Sec. 3.3).
1 |
Safety precautions and applicational limitations ..................................................... |
4 |
|
Intended use ................................................................................................................. |
4 |
|
Handling ........................................................................................................................ |
4 |
|
Care and maintenance .................................................................................................. |
4 |
|
Battery........................................................................................................................... |
4 |
2 |
Technical data.............................................................................................................. |
5 |
|
Battery........................................................................................................................... |
5 |
|
Power unit ..................................................................................................................... |
5 |
3 |
Startup ......................................................................................................................... |
6 |
3.1 |
Delivery package........................................................................................................... |
6 |
3.2 |
Inserting the battery ...................................................................................................... |
6 |
3.3 |
Charging the battery ..................................................................................................... |
6 |
4 |
Operating principle ..................................................................................................... |
7 |
4.1 |
Display and keypad....................................................................................................... |
7 |
4.2 |
Function units................................................................................................................ |
8 |
|
Ejector with extension ................................................................................................... |
8 |
|
Hook on the hand rest................................................................................................... |
8 |
|
Contact surface on the rear of the pipette .................................................................... |
8 |
|
Acoustic signals ............................................................................................................ |
8 |
5 |
Operation ..................................................................................................................... |
6 |
5.1 |
Mode of operation......................................................................................................... |
9 |
5.2 |
Essential operating information..................................................................................... |
9 |
|
Aspirating and dispensing speeds .............................................................................. |
10 |
|
Loading gels................................................................................................................ |
10 |
5.3 |
Pipetting in the standard mode................................................................................... |
11 |
5.4 |
Pipetting with separate blow-out (Blow = BLO).......................................................... |
12 |
5.5 |
Pipetting with separate rinsing (Rinse = RNS) ............................................................ |
13 |
5.6 |
Reverse Pipetting (RP) ................................................................................................ |
14 |
5.7 |
Pipetting with the MAN option .................................................................................... |
15 |
5.8 |
Pipetting with a preselected fixed volume (FIX) .......................................................... |
17 |
5.9 |
Dispensing (DIS).......................................................................................................... |
19 |
5.10 |
Notes on the programs ............................................................................................... |
21 |
5.10.1 |
Example for programming pipetting in the program level........................................... |
23 |
5.11 |
Device parameters ...................................................................................................... |
24 |
5.11.1 |
Changing the calibration (CAL) ................................................................................... |
25 |
5.11.2 |
Information on initialization (INI) .................................................................................. |
26 |
6 |
Care, sterilization and maintenance........................................................................ |
27 |
6.1 |
Care............................................................................................................................. |
27 |
6.2 |
Sterilization.................................................................................................................. |
27 |
|
Lower part of multi-channel model ............................................................................. |
27 |
|
Lower part of single-channel model............................................................................ |
28 |
6.3 |
Maintenance................................................................................................................ |
29 |
6.4 |
Decontamination prior to dispatch.............................................................................. |
29 |
7 |
Troubleshooting ........................................................................................................ |
30 |
|
Program notes only for program version prior to V. 1.56 ............................................ |
32 |
A
Contents
3

1
Safety precautions and applicational limitations
1 Safety precautions and applicational limitations
Intended use
The Research pro is a lab device intended for dispensing liquids in the volume range from 0.5 µL to 5 mL, in combination with matching pipette tips.
In vivo applications (applications in or on the human body) are not permitted.
The Research pro may only be operated by trained specialist staff. All users must have read the operating manual carefully and familiarized themselves with the device's mode of operation.
To guarantee problem-free, safe operation of the pipette, it is essential to observe the following points:
Handling
–Use the Research pro only when a pipette tip is attached.
–Pipette tips are solely designed for disposable usage.
–Do not lay down the Research pro when a filled pipette tip is attached.
–After liquid has been aspirated, press the Actuate key only when you are sure that the liquid shall be dispensed correctly.
–When the pipette is switched on and when the Reset key is pressed, the piston may move. Please ensure beforehand that the liquid in the pipette tip shall be dispensed correctly.
–Emergency stop: A moving piston can be stopped by pressing the Reset key.
–When using infectious, radioactive, toxic and other solutions which may pose health risks, please observe the safety precautions laid down for your country.
–Do not use the Research pro in a potentially explosive environment or with potentially explosive chemicals.
–When using organic solvents and aggressive chemicals or their vapors, please check their compatibility with the pipette tip (PP) and pipette.
–When using solutions with physical data which deviates greatly from those of water, carry out the procedure for checking the dispensing volume, as described in Sec. 5.11.1.
–Operate the Research pro at temperatures between 15 °C and 40 °C only and at a humidity of max. 80 % at a temperature up to 31 °C.
–When using Filtertips or 200 µL tips with the 300 µL pipette, observe the volume restriction (see Sec. 5.11).
Care and maintenance
–Do not clean the display or any of the labeling using acetone or aggressive solutions.
–Do not allow any liquid to enter the device.
–Repairs may be carried out by authorized service personnel only.
–Use original spare parts and accessories (battery, pipette tips) only.
Battery
–Charge up the battery before operating the device for the first time (see Sec 3).
–Charge the battery in the pipette only, using the charging adapter or the charging stand and the original power unit.
–If a flashing battery symbol appears in the display, stop dispensing and charge the battery.
–When changing the battery, do not allow the battery to come into contact with any metallic surfaces.
–Dispose of used batteries as special waste, in accordance with legal stipulations to this effect. Batteries may not be disposed of together with household waste!
–If rechargeable batteries are damaged, avoid touching them with the hands.
–Never charge the Research pro without a battery.
–Before storing the Research pro for a long period, be sure to remove the charged battery.
–When the Research pro is stored for a long time, charge the batteries approximately every
4 |
six months. |
|

2 Technical data
Single-channel |
|
|
|
|
|
|
|
|
|
|
||||
Volume range |
|
Step size |
Color |
Pipette tip |
Volume |
|
Max. permissible error |
|||||||
|
|
|
|
|
code |
epT.I.P.S. |
|
|
|
Error |
|
|
||
|
|
|
|
|
|
|
|
systematic |
|
random |
|
|||
|
|
|
|
|
|
|
|
|
|
|||||
|
µL |
|
|
µL |
|
|
µL |
% |
|
µL |
|
% |
µL |
|
|
|
|
|
|
|
|
|
|
|
|
|
|
|
|
0.5 |
– |
10 |
|
0.01 |
light |
20 µL L |
1 |
± 2.5 |
|
± 0.025 |
|
± 1.8 |
± 0.018 |
|
|
|
|
|
|
gray |
|
5 |
± 1.5 |
|
± 0.075 |
|
± 0.8 |
± 0.04 |
|
|
|
|
|
|
|
|
10 |
± 1.0 |
|
± 0.1 |
|
± 0.4 |
± 0.04 |
|
5 |
– |
100 |
|
0.1 |
yellow |
200 µL |
10 |
± 2.0 |
|
± 0.2 |
|
± 1.0 |
± 0.1 |
|
|
|
|
|
|
|
|
50 |
± 1.0 |
|
± 0.5 |
|
± 0.3 |
± 0.15 |
|
|
|
|
|
|
|
|
100 |
± 0.8 |
|
± 0.8 |
|
± 0.2 |
± 0.2 |
|
20 |
– |
300 |
|
0.5 |
orange |
300 µL |
30 |
± 2.5 |
|
± 0.75 |
|
± 0.7 |
± 0.21 |
|
|
|
|
|
|
|
|
150 |
± 1.0 |
|
± 1.5 |
|
± 0.3 |
± 0.45 |
|
|
|
|
|
|
|
|
300 |
± 0.6 |
|
± 1.8 |
|
± 0.2 |
± 0.6 |
|
|
|
|
|
|
|
|
|
|
|
|
|
|
|
|
50 |
– 1,000 |
|
1 |
blue |
1,000 µL |
100 |
± 3.0 |
|
± 3 |
|
± 0.6 |
± 0.6 |
|
|
|
|
|
|
|
|
|
500 |
± 1.0 |
|
± 5 |
|
± 0.2 |
± 1 |
|
|
|
|
|
|
|
|
1,000 |
± 0.6 |
|
± 6 |
|
± 0.2 |
± 2 |
|
100 |
– 5,000 |
|
10 |
violet |
5 mL |
500 |
± 3.0 |
|
± 15 |
|
± 0.6 |
± 3 |
|
|
|
|
|
|
|
|
|
2,500 |
± 1.2 |
|
± 30 |
|
± 0.25 |
± 6.25 |
|
|
|
|
|
|
|
|
5,000 |
± 0.6 |
|
± 30 |
|
± 0.15 |
± 7.5 |
|
|
|
|
|
|
|
|
|
|
|
|
|
|||
Multi-channel |
|
|
|
|
|
|
|
|
|
|
|
|||
0.5 |
– |
10 |
|
0.01 |
light |
20 µL L |
1 |
± 5.0 |
|
± 0.05 |
|
± 3.0 |
± 0.03 |
|
|
|
|
|
|
gray |
|
5 |
± 3.0 |
|
± 0.15 |
|
± 1.5 |
± 0.075 |
|
|
|
|
|
|
|
|
10 |
± 2.0 |
|
± 0.2 |
|
± 0.8 |
± 0.08 |
|
5 |
– |
100 |
|
0.1 |
yellow |
200 µL |
10 |
± 2.0 |
|
± 0.2 |
|
± 2.0 |
± 0.2 |
|
|
|
|
|
|
|
|
50 |
± 1.0 |
|
± 0.5 |
|
± 0.8 |
± 0.4 |
|
|
|
|
|
|
|
|
100 |
± 0.8 |
|
± 0.8 |
|
± 0.25 |
± 0.25 |
|
20 |
– |
300 |
|
0.5 |
orange |
300 µL |
30 |
± 2.5 |
|
± 0.75 |
|
± 1.0 |
± 0.3 |
|
|
|
|
|
|
|
|
150 |
± 1.0 |
|
± 1.5 |
|
± 0.5 |
± 0.75 |
|
|
|
|
|
|
|
|
300 |
± 0.6 |
|
± 1.8 |
|
± 0.25 |
± 0.75 |
|
|
|
|
|
|
|
|
|
|
|
|
|
|
|
|
50 |
– 1,200 |
|
5 |
green |
1,250 µL |
120 |
± 6.0 |
|
± 7.2 |
|
± 0.9 |
± 1.08 |
|
|
|
|
|
|
|
|
|
600 |
± 2.7 |
|
± 16.2 |
|
± 0.4 |
± 2.4 |
|
|
|
|
|
|
|
|
1,200 |
± 1.2 |
|
± 14.4 |
|
± 0.3 |
± 3.6 |
|
The technical data is valid only when the Research pro is used with Eppendorf pipette tips. The multi-channel data is valid for eightand twelve-channel pipettes. The 50 – 1,200 model is available as an eight-channel version only.
Test conditions in accordance with ISO 8655 for piston-stroke pipettes with an air cushion by means of a standardized fine balance with a moisture trap. Number of determinations:
10 pipettings; degassed distilled water, 20 °C – 25 °C ± 0.5 °C; maximum speed; PIP in standard mode of operation (Sec. 5.3); prewetted pipette tip; dispensing onto inside of tube.
If the place where the pipette is used is at extremely high altitude, an adjustment must be made in line with the ambient air pressure.
Battery
Nickel-metal hydride battery pack, 1,200 mAh / 2.4 V reversible overcurrent and overtemperature protection. Overcharging protection when connected to Research pro. Charging time: approx. 9.5 hours for a fully discharged battery.
Power unit
Input voltage, country-specific: 230 V ± 10 %, 50/60 Hz; 120 V ± 10 %, 60 Hz; 100 V ± 10 %, 50/60 Hz; 240 V ± 10 %, 50 Hz
Output voltage: 9 V DC; 200 mA (1.8 VA)
Technical specifications subject to change! |
5 |
2
data Technical
3
Startup
3 Startup
3.1 Delivery package
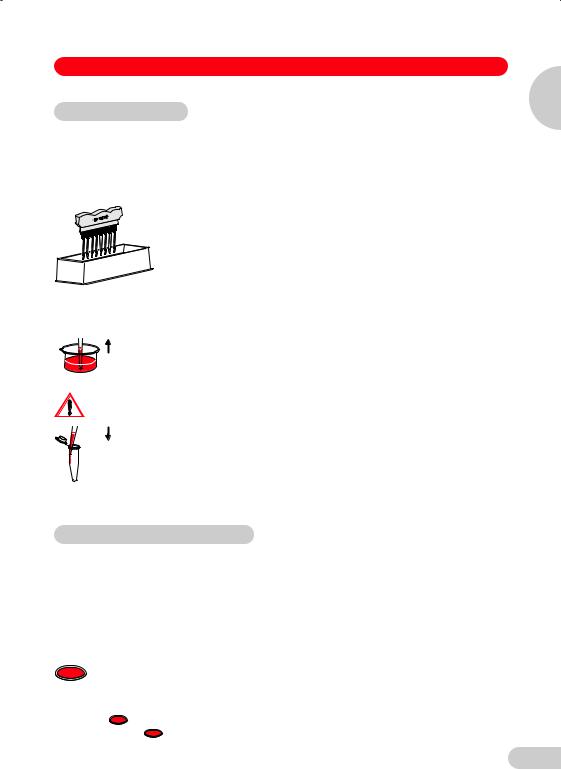
The Research pro is supplied as a single-channel, eight-channel or twelve-channel pipette for different volume ranges. The pipette is delivered with or without a charging adapter, depending on the order number. If the pipette is ordered without an adapter, a charging stand for one or four pipettes is required. If this charging stand is not already available in the lab, it must be ordered separately. According to the type of order, the delivery package contains the following:
•Charging adapter with connected power unit or, if necessary, charging stand with separate power unit
•Special tool(s) according to the pipette type
•Operating manual with measuring protocol and EC conformity assurance document
•Ni-MH battery pack
•Tube of silicone grease
•For multi-channel pipettes: Reagent reservoir for liquid aspiration
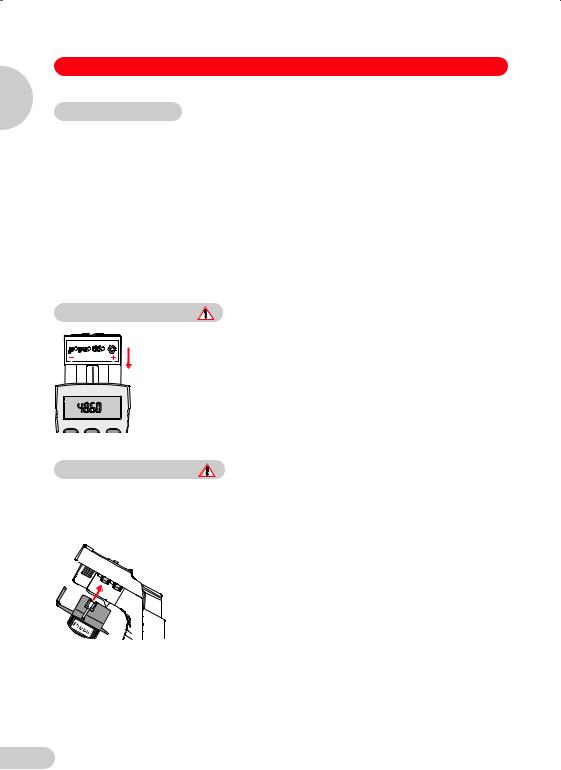
3.2 Inserting the battery
1200mAh |
4V.2/ |
NiMH |
Using your thumb and forefinger, take hold of the lid of the battery |
|
compartment on the rear of the pipette and remove it by tilting it to the side |
||||
|
XXXXX |
|
||
4860002.501-xx |
and pulling it upwards. Insert the battery pack (see diagram). |
|||
|
|
|
||
|
|
|
Close the lid of the battery compartment. If the battery has been inserted |
|
50–1000 µL |
|
incorrectly, the lid cannot be closed properly. The positive and negative |
||
|
|
|
poles of the battery should not come into contact with any metallic objects |
|
|
|
|
outside the pipette. When the battery is inserted, the Research pro carries |
|
Program |
Speed |
Option |
out a test routine (e.g. for the display of pipette type, software version, data |
|
|
|
|
||
record). The battery must be fully charged before the device is used for the first time.
3.3 Charging the battery
The battery is charged in the pipette. Charging may only be carried out using the charging adapter supplied or the charging stand with the original power unit. A pipette which does not contain a battery must not be recharged! A new battery does not attain its full capacity until two or three complete charging/discharging cycles have been completed.
Before recharging, please compare your voltage requirements with the voltage specifications on the plug-in unit.
For charging purposes, the charging adapter is placed upon the
Research pro. Alternatively, the Research pro can be placed in the
charging stand.
During the start and termination of the charging process, "CON"
appears briefly on the left-hand side of the display. The display is switched on during the charging process. The battery symbol appears
in a rolling form. During charging, the Dispensing function is frozen. When the charging process has finished, the battery symbol appears in the display without moving. When the pipette has been charged, it may remain in the charging stand. To increase the charging capacity, the battery should occasionally be discharged until the flashing battery symbol appears. To avoid a total discharge, the fully charged battery should be removed from the Research pro before extended periods of non-use (e.g. several months). In this case, all data remains stored. In order to avoid a total discharge, the battery that has been removed should be re-charged every six months. Dispose of used batteries according to legal regulations.
6

4 Operating principle
4.1 Display and keypad
Direction Speed
Aspirating / dispensing
Battery symbol
Flashes when the battery is low
Operating mode
Appears during editing of
programs
Appears at the program level
Number of the program
Program
Double-click to open the program level.
PROG 1 – 5 appears in the display.
Speed, option, volume are frozen. The program level can be quit by pressing the key once.
Speed
Display of speeds 


 and
and 


by pressing key repeatedly.
Select
Change by pressing  .
.
Select rocker
This switch can be pressed upwards or downwards.
Selection of basic modes:
PIP = Pipetting (Sec. 5.1 – 5.7)
DIS = Dispensing |
(Sec. 5.9) |
FIX = Fixed-volume |
|
for pipetting |
(Sec. 5.8) |
Program
After double-click  :
:
Selection in the program level (Sec. 5.10)
|
50–1000 µL |
|
|
EDIT |
PROG 12345 |
R |
CAL |
Program Speed Option
Select |
R |
Volume |
|
|
Ejector |
|
Actuate key |
||
for pipette |
|
for aspirating |
||
tips |
|
and |
||
|
|
dispensing |
||
|
|
liquid. |
||
|
|
ENTER key |
||
|
|
with |
EDIT |
. |
|
|
|
|
|
To switch on: Press any key firmly
To switch off: Automatically after 10 min of non-use
Options
Appears when factory calibration is replaced by user calibration.
Appears when Reset is requested.
RESET key
 Liquid can be dispensed during a Reset!
When the piston is moving: Emergency stop!
Option
For PIP and FIX, the options are selected by pressing the key repeatedly:
=Display blank: Standard operation (Sec. 5.3)
BLO = BLOW (separate blowout, Sec. 5.4)
RNS = RINSE (Rinsing / mixing, Sec. 5.5)
RP = REVERSE PIPETTING (Sec. 5.6)
MAN = Manual (Sec. 5.7)
Volume rocker
for changing the volume. For FIX: To select the fixed volume.
The rocker can be pressed upwards or downwards.
Pressed briefly: Individual
|
changes |
Held down: |
Rapid changes |
2nd pressure |
|
point: |
High speed |
Automatic stop for min./max. volume and for overflow obtained by releasing and then pressing the rocker again.
4
principle Operating
7

4
Operating principle
4 Operating principle
4.2 Function units
The Research pro is a microprocessor-controlled pipette which executes the piston movement with the aid of a stepper motor. The power supply is a rechargeable nickel-metal hydride battery.
Upper end position
Basic position
End of blow-out
For sample aspiration, the piston moves upwards from the basic position.
The sample is aspirated into the pipette tip.
Return to the basic position
–via short single steps = Dispensing
–entire path = Pipetting.
Residual liquid discarded via blow-out (BLOW).
Dispensing and Reverse Pipetting require a different basic position than that for Pipetting. The request to change the basic position is indicated in the display by R .
Ejector with extension
|
The force translation of the ejector for pipette tips ensures that tips are ejected |
|
very easily. The extension can be individually adjusted to accommodate left- |
|
and right-handed users as well as different hand sizes. Select the desired |
Ejector |
setting by simply sliding the extension into the position as required. |
Extension |
|
Hook on the hand rest
Loosening the screw enables the hook on the rear of the pipette to be adjusted to suit all hand sizes.
Contact surface on the rear of the pipette
Both upper surfaces are required for charging the nickel-metal hydride battery. The lower surfaces are the data interfaces for the Service Department.
The contact to the charging adapter or the charging stand cannot be confused with any other contacts.
Acoustic signals
Certain signals assist the user for different operations:
–Short signal to acknowledge that the keypad has been pressed.
–Slightly higher tone to indicate that the function for which the key has been pressed cannot be executed.
–Louder tone to indicate that a piston movement has ended.
–Longer tone to indicate that a specific sequence of steps (e.g. Dispensing) has ended.
–Louder tone to indicate an error message.
The acoustic signals are a great help when you are familiarizing yourself with the operating procedure of the Research pro. They can also be switched off if required (see Sec. 5.11).
8
5 Operation
5.1 Mode of operation
The Research pro is switched on by pressing any key. Attach an Eppendorf pipette tip to the Research pro. The color coding of the Actuate key corresponds to the color code of the racks for pipette tips. The dispensing liquid is aspirated into the pipette tip.
When the 200 µL tips are used together with the 300 µL pipette and when Filtertips are used, the volume restriction option must be activated in the device parameters (Sec. 5.11).
The liquid which is to be aspirated is taken from a suitable vessel. When multi-channel pipettes are used, the "Reagent reservoir" vessel is recommended.
Before commencing pipetting activities with multi-channel pipettes, turn the adapter in the required direction.
In addition to the description found in the subsequent sections 5.3 – 5.11, the following general procedure takes place: Attach the pipette from the rack. Slight force may be used if necessary.
When aspirating liquid, immerse the pipette vertically – and as little as possible – into the liquid. Following aspiration, remove the pipette tip from the liquid after the acoustic signal has been emitted. If air bubbles have been aspirated, this process must be repeated.
Never lay the pipette down when the tip is filled!
If necessary, carefully remove any external wetting from the pipette tip.
To dispense liquid, position the pipette tip in the aspirating vessel, as shown in the illustration.
Depending on the type of problem (carryover, contamination), discard the pipette tip after that by pressing the Eject key, attach a new tip and reaspirate liquid.
5.2 Essential operating information
The following sections contain step-by-step explanations of the operating procedure. It is essential to work through these sections with the pipette in your hand. The volume shown in the display information contained in the operating manual does not necessarily correspond to the volume range of your pipette.
As a supplement to this manual, an interactive demonstration is available to familiarize users with the operation of the Research pro – see our home page www.eppendorfna.com
Reset If a Reset is requested in the display, this Reset is always accompanied by a piston
R |
movement. For this reason, please ensure that any residual liquid in the pipette tip is |
|
dispensed beforehand! A Reset can also be used to empty the pipette tip and to end |
||
|
||
|
an operating process. If you quit an input field during programming (e.g. changing the |
|
|
speed) using Reset, the changes which have been made are not stored. |
|
|
If R is pressed during the piston movement, this functions as an emergency brake. |
|
|
Pressing R again empties the pipette tip. |
5
Operation
9

5
Operation
5 Operation
Motor- If R is held down until a piston movement begins, a motor reset is effected. reset This reset routine lasts roughly 10 seconds.
The accuracy of the piston movement is ascertained with the motor reset.
Program The Research pro has two operating levels. The basic modes for pipetting (PIP and  FIX) and dispensing (DIS) are accessed in the first level by pressing the Select rocker. PROG appears in the display by double-clicking the "Program" key. You are now in the second level (program level). Using the Select rocker, select from the programs (Sec. 5.10). This level can be quit by pressing the "Program" key briefly once. PROG disappears from the display.
Please note the following descriptions of the symbols used in the program sequence:
An Actuate key which has |
An Actuate key which has |
been pressed briefly is light. |
been held down is dark. |
If the piston movements appear in the display without any volumes, this indicates a process which is not connected to liquid aspiration or dispensing.
Aspirating and dispensing speeds
The selected speed can be viewed by pressing the Speed key several times. The speed is changed as follows:
|
Sequence |
|
Magnifying glass indicates |
Comment |
|
for pressing keys |
important display information |
||||
|
|||||
Speed |
Select |
|
|
Display and selection of |
|
|
|
|
|
aspirating speed. |
|
Speed |
Select |
Speed * |
|
Display and selection of |
|
|
|
|
|
dispensing speed. |
|
*This procedure does not necessarily have to be completed using the Speed key. Any key – with the exception of Reset – may be used. If a key other than the Speed key is used to complete the procedure, the function of this key is also executed at the same time.
The direction of the arrow for speed flashes in this input field. The speed can be altered before every dispensing or aspiration.
Different speeds can already be stored for the three basic modes (PIP, DIS, FIX).
Important! High speeds 


 have a much lower current consumption than low speeds.
Loading gels
With the 10 µL and 100 µL Research pro, the lowest speeds for liquid dispensing  are ideal for loading gels. To enable users to work rapidly and with a low electricity consumption, the highest possible speed for liquid aspirating
  should be used. Depending on the task at hand, gels can be loaded in the Standard mode (Sec. 5.3) or by using the BLO (Sec. 5.4) or MAN (Sec. 5.7) options. Using the BLO option makes it possible to discharge the blowout outside of the gel pouch, thus preventing turbulence in the gel pouch.
10
5 Operation
5.3 Pipetting in the standard mode
In the Standard mode, blow-out is executed automatically when liquid is dispensed. The standard mode is recommended for rapid series pipetting with aqueous solutions.
Programming
Select |
If PROG |
|
appears in the |
|
display: Press |
|
the Program key |
|
briefly until |
|
PROG |
|
disappears. |
Activate the selection rocker until "PIP" appears in the left side of the display.
Volume |
Volume selection (here: 800 µL). |
|
The volume rocker has two |
|
pressure points for fast or slow |
|
volume adjustment for up and |
|
down. |
Option OptionOption |
If necessary, press the Option key |
|
several times. In the Standard |
|
mode, the display remains blank in |
|
this case. |
Pipetting procedure |
|
If R appears in the display: Press the R |
key briefly. |
|
Liquid is aspirated. |
|
Liquid is dispensed with blow-out. |
Alternative pipetting procedure |
If the Actuate key is held down |
|
when liquid is dispensed, the |
|
device returns to the basic |
|
position when the key is released. |
|
Note: Necessary when dispensing |
|
into existing liquid: |
|
Before releasing the key, remove |
|
the pipette tip from the solution in |
|
order to prevent any solution from |
|
being aspirated unintentionally. |
|
The pipette is now once again |
|
ready to aspirate. |
5
Operation
11

5
Operation
5 Operation
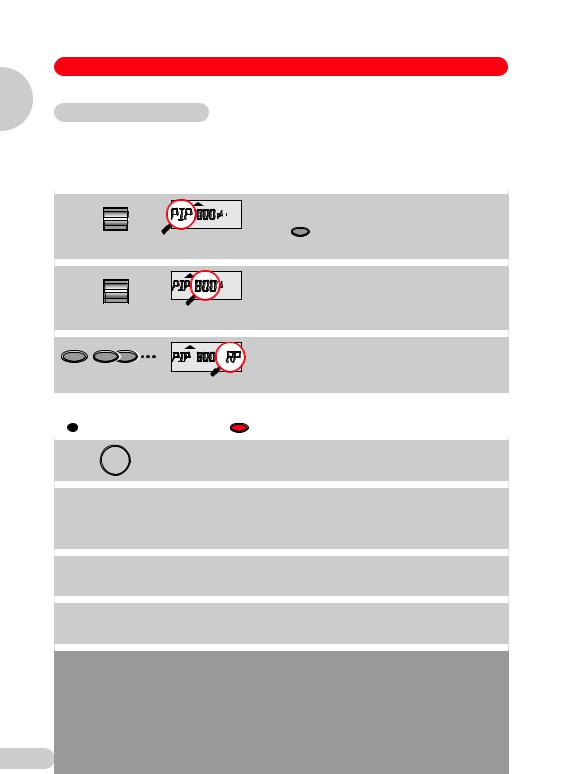
5.4 Pipetting with separate blow-out (Blow = BLO)
BLO is recommended for use with liquids with a high wetting power or with liquids which are prone to the formation of foam (e.g. solutions containing protein). The residual liquid is dispensed by pressing the Actuate key separately.
Programming
Select |
If PROG appears in Select "PIP" for pipetting. |
|
the display: Press |
|
the Program key |
|
briefly until PROG |
|
disappears. |
Volume
Option OptionOption
Volume selection (here:
800 µL). The volume rocker has two pressure points for fast or slow volume adjustment for up and down.
If necessary, press the Option key several times until BLO appears in the display. BLO is selected for blow-out.
Procedure
If R appears in the display: Press the R key briefly.
Liquid is aspirated.
Liquid is dispensed.
Blow-out:
Delayed dispensing of residual liquid.
Alternative blow-out procedure
If the Actuate key is held down during the blow-out, the return does not take place until the key has been released.
The pipette is now once again ready to aspirate.
12

5 Operation
5.5 Pipetting with separate rinsing (Rinse = RNS)
Rinsing (RNS) is recommended for volumes below 10 µL. RNS is suitable for mixing the dispensing volume and the specimen liquid when large volumes are used.
It is strongly recommended to use the "max. speed" setting.
Programming
Select |
If PROG appears in Select "PIP" for pipetting. |
|
the display: Press |
|
the Program key |
|
briefly until PROG |
|
disappears. |
Volume |
Volume selection (here: 5 µL). |
|
The volume rocker has two |
|
pressure points for fast or slow |
|
volume adjustment for up and |
|
down. |
Option OptionOption |
If necessary, press the Option |
|
key several times until RNS |
|
appears in the display. RNS is |
|
selected for rinsing. |
Procedure |
|
If R appears in the display: Press the R |
key briefly. |
|
Liquid is aspirated. |
|
Rinsing/mixing takes place three |
|
times after liquid has been |
|
dispensed. |
|
Mixing volume results from |
|
dispensing volume and the |
|
volume of the blow-out step |
|
(BLO). |
Alternative mixing procedure |
If the Actuate key is held down |
|
|
|
when liquid is dispensed, |
|
mixing takes place until the key |
|
is released. |
|
Return to basic position by |
|
pressing the key when device |
|
is not immersed in the liquid. |
|
The pipette is now once again |
|
ready to aspirate. |
5
Operation
13
5
Operation
5 Operation
5.6 Reverse Pipetting (RP)
RP is recommended for solutions with a high viscosity or with a slightly higher vapor pressure. "Reverse Pipetting" is liquid aspiration with a blow-out. The liquid is dispensed without a blowout. If Filtertips are used, please observe the volume restriction (Sec. 5.11).
Programming
Select |
If PROG appears in Select "PIP" for pipetting. |
|
the display: Press |
|
the Program key |
|
briefly until PROG |
|
disappears. |
Volume |
Volume selection |
|
(here: 800 µL). The volume |
|
rocker has two pressure points |
|
for fast or slow volume |
|
adjustment for up and down. |
Option OptionOption |
If necessary, press the Option |
|
key several times, until RP |
|
appears in the display. RP is |
|
selected. |
Procedure |
|
If R appears in the display: Press the R |
key briefly. |
|
Aspiration of liquid with blow- |
|
out. |
|
Liquid is dispensed. |
Blow-out is discarded.
If necessary, replace the tip.
Pipette is once again ready to aspirate liquid with blow-out.
Alternative procedure for dispensing and aspirating
If the Actuate key is held down when liquid is dispensed, the next liquid aspiration without blow-out takes place when the key is released.
The liquid from the blow-out
may continue to be used.
14
5 Operation
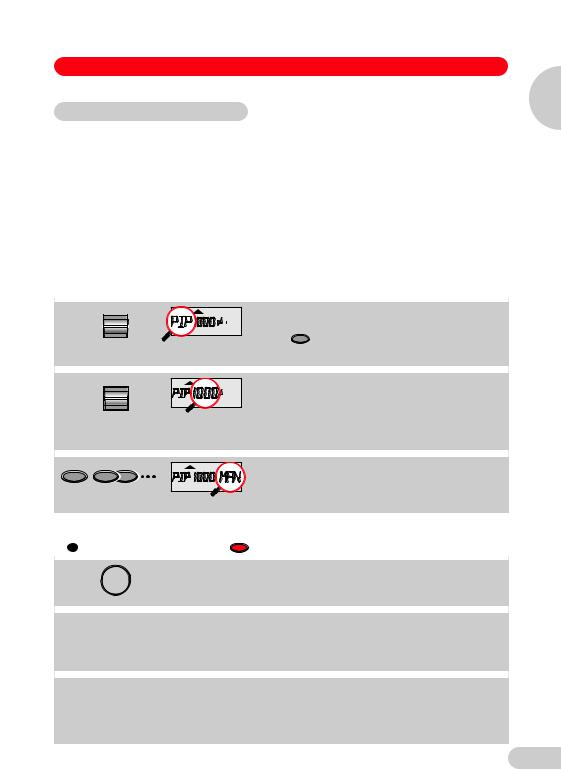
5.7 Pipetting with the MAN option
Note: The MAN (manual) option is the equivalent of operation with a mechanical piston-stroke pipette. Liquid is aspirated and dispensed only when the Actuate key is held down. The volume display increases the number of applications available in comparison to a mechanical pipette:
1.Aspirating: Measuring a small, unknown amount of liquid via aspiration into the pipette tip. The volume of aspirated liquid appears in the display. If necessary, dilute the liquid to the defined end volume by aspirating additional liquids. Liquids can be separated by aspirating air bubbles. The display shows the total volume.
2.Dispensing: Titration is carried out. The amount of liquid dispensed appears in the display. There is no blow-out.
Setting lower speeds is strongly recommended.
Programming
Select |
If PROG appears in Select "PIP" for pipetting. |
|
the display: Press |
|
the Program key |
|
briefly until PROG |
|
disappears. |
Volume |
Volume selection |
|
(here: 1,000 µL). |
|
The volume rocker has two |
|
pressure points for fast or slow |
|
volume adjustment for up and |
|
down. |
Option OptionOption |
If necessary, press the Option |
|
key several times, until MAN |
|
appears in the display. MAN is |
|
selected. |
Carrying out liquid aspiration |
|
If R appears in the display: Press the R |
key briefly. |
|
Liquid is aspirated. The |
|
aspirated liquid appears in the |
|
display. |
Volume |
The direction is changed using |
|
the volume rocker. |
|
Volume correction, |
|
e.g. for removing an air bubble. |
5
Operation
15

5 Operation
5
Volume |
The direction is changed again |
|
|
using the volume rocker. This |
|
|
change of direction can be |
|
Operation |
repeated without restriction. |
|
A defined end volume has |
||
|
||
|
been reached. A special |
|
|
acoustic signal is emitted. |
|
|
Dispensing is carried out by |
|
|
pressing the key again. |
|
Carrying out dispensing/titration |
|
|
|
Aspirate the defined total |
|
|
volume by holding down the |
|
|
Actuate key. |
|
|
When the key is pressed |
|
|
briefly: |
|
|
The amount of liquid |
|
|
dispensed appears in the |
|
|
display. |
|
|
Press key again: |
|
|
Total of dispensed liquid is |
|
|
displayed. |
Note: We recommend low speed for dispensing. The speed can also be reduced between individual dispensing steps (see Ch. 5.2, "Speed for aspiration and discharge").
or
Note:
Volume
Total amount of liquid is dispensed. A special acoustic signal is emitted.
Blow-out is not executed. Blow-out can be actuated by pressing the R key.
Press the key again to aspirate liquid.
The direction can also be changed after partial dispensing. The volume display changes after the Actuate key has been pressed. No additional projection of the volume occurs following the repetition of the procedure. The display starts at 0.
16

5Operation
5.8 Pipetting with a preselected fixed volume (FIX)
FIX is used to rapidly set five frequently used pipetting volumes.
Five FIX volumes are predefined in the pipette. FIX volumes can be changed via programming.
Programming FIX fixed volumes
Select |
If PROG |
Select "FIX" for fixed volume. |
|
appears in |
|
|
the display: |
|
|
Press the |
|
|
Program key |
|
|
briefly until |
|
|
PROG |
|
|
disappears. |
|
Program |
|
Hold down the Program key until |
|
3 3 |
EDIT appears. |
EDITEDIT |
The volume flashes. |
|
|
|
|
Select |
|
Select the memory slot using the |
|
12345 |
Select rocker. |
EDIT |
|
|
Volume |
|
Using the Volume rocker, select the |
|
5 |
volume for the memory slot |
EDIT |
(here: 5). |
|
|
|
|
Select |
|
Select the next memory slot for |
|
12345 |
purposes of changing the volume. |
EDIT |
|
|
Volume |
|
Define the next volume |
|
3 |
(here: memory slot 3). |
EDIT |
|
|
Program |
|
The program is ended by pressing |
|
|
the Program key. |
|
3 |
EDIT and the flashing volume |
|
|
|
|
|
disappear from the display. |
or |
|
|
If R appears in the display: Press the R key briefly. |
|
|
|
|
The selected volume is aspirated. |
|
|
Programming is ended. |
|
3 |
EDIT and the flashing volume |
|
|
|
|
|
disappear from the display. |
5
Operation
17

5
Operation
5 Operation
Selecting a fixed volume (with option and speed)
|
Select |
|
|
If PROG |
Select "FIX" for fixed volumes. |
|
|
|
|
appears in |
|
|
|
|
5 |
the display: |
|
|
|
|
|
|
|
|
|
|
|
Press the |
|
|
|
|
|
Program key |
|
|
|
|
|
briefly until |
|
|
|
|
|
PROG |
|
|
|
|
|
disappears. |
|
|
Volume |
|
|
|
Select from the five FIX volumes. |
|
|
|
3 |
|
|
Option |
OptionOption |
|
|
|
Press the Option key repeatedly |
|
|
|
|
|
until the desired option appears. |
|
|
|
3 |
|
|
Speed |
Select |
|
|
|
Display and selection of aspirating |
|
|
|
|
|
speed. |
Speed |
Select |
Speed |
|
|
Display and selection of dispensing |
|
|
|
|
|
speed. |
Note: The option and speeds selected are applicable for all fixed volumes.
It is possible to store the pipetting volume with speed and option by using Prog (Sec. 5.10).
Procedure
The procedure depends on the option selected. Information on the procedure according to the option selected is contained in Sections 5.3 to 5.7.
18
Loading...