


 Loading...
Register your instrument!
www.eppendorf.com/myeppendorf
Mastercycler pro
Operating manual
Manual de instrucciones
Copyright© 2013 Eppendorf AG, Hamburg. No part of this publication may be reproduced without the prior permission of Eppendorf AG.
Trademarks
Eppendorf®, the eppendorf logo, Mastercycler®, SteadySlope®, vapoprotect® and Eppendorf twin.tec® are registered trademarks of Eppendorf AG.
Registered trademarks are not marked with ® or ™ in all cases in this manual.
Notice
The software of the Mastercycler pro contains open source software. License information is available as PDF documents via the Eppendorf node. To export the license documents, connect a memory device, select the Eppendorf node in the navigation tree and press the softkey.
Operating manual. . . . . . . . . . . . . . . . . . . . . . . . . . . . . . . . . . . . . . . . . . . . . . . . . . . . . . . . . . . . . . . . . . . . . . 3
Manual de instrucciones . . . . . . . . . . . . . . . . . . . . . . . . . . . . . . . . . . . . . . . . . . . . . . . . . . . . . . . . . . . . . . . 91
6321 900.150-03/082013

Table of contents
Mastercycler pro 3
English (EN)
Table of contents
1 Operating instructions . . . . . . . . . . . . . . . . . . . . . . . . . . . . . . . . . . . . . . . . . . . . . . . . . . . . . . . . . . . . . . 7
1.1 Using this manual . . . . . . . . . . . . . . . . . . . . . . . . . . . . . . . . . . . . . . . . . . . . . . . . . . . . . . . . . . . . . 7 1.2 Danger symbols and danger levels . . . . . . . . . . . . . . . . . . . . . . . . . . . . . . . . . . . . . . . . . . . . . . . . 7 1.3 Symbols used . . . . . . . . . . . . . . . . . . . . . . . . . . . . . . . . . . . . . . . . . . . . . . . . . . . . . . . . . . . . . . . . 8 1.4 Abbreviations used . . . . . . . . . . . . . . . . . . . . . . . . . . . . . . . . . . . . . . . . . . . . . . . . . . . . . . . . . . . . 8
2 Product description . . . . . . . . . . . . . . . . . . . . . . . . . . . . . . . . . . . . . . . . . . . . . . . . . . . . . . . . . . . . . . . . 9
2.1 Main illustration . . . . . . . . . . . . . . . . . . . . . . . . . . . . . . . . . . . . . . . . . . . . . . . . . . . . . . . . . . . . . . 9 2.2 Delivery package. . . . . . . . . . . . . . . . . . . . . . . . . . . . . . . . . . . . . . . . . . . . . . . . . . . . . . . . . . . . . 11 2.2.1 Mastercycler pro and Mastercycler pro S . . . . . . . . . . . . . . . . . . . . . . . . . . . . . . . . . . . 11 2.2.2 Mastercycler pro 384 . . . . . . . . . . . . . . . . . . . . . . . . . . . . . . . . . . . . . . . . . . . . . . . . . . 11
2.3 Features. . . . . . . . . . . . . . . . . . . . . . . . . . . . . . . . . . . . . . . . . . . . . . . . . . . . . . . . . . . . . . . . . . . . 12 2.3.1 Features of the Mastercycler pro variants. . . . . . . . . . . . . . . . . . . . . . . . . . . . . . . . . . . 13 2.3.2 Networking . . . . . . . . . . . . . . . . . . . . . . . . . . . . . . . . . . . . . . . . . . . . . . . . . . . . . . . . . . 13
3 Safety. . . . . . . . . . . . . . . . . . . . . . . . . . . . . . . . . . . . . . . . . . . . . . . . . . . . . . . . . . . . . . . . . . . . . . . . . . . 15
3.1 Intended use . . . . . . . . . . . . . . . . . . . . . . . . . . . . . . . . . . . . . . . . . . . . . . . . . . . . . . . . . . . . . . . . 15 3.2 User profile . . . . . . . . . . . . . . . . . . . . . . . . . . . . . . . . . . . . . . . . . . . . . . . . . . . . . . . . . . . . . . . . . 15 3.3 Note on product liability . . . . . . . . . . . . . . . . . . . . . . . . . . . . . . . . . . . . . . . . . . . . . . . . . . . . . . . 15 3.4 Warnings for intended use . . . . . . . . . . . . . . . . . . . . . . . . . . . . . . . . . . . . . . . . . . . . . . . . . . . . . 15 3.5 Warning signs on the device. . . . . . . . . . . . . . . . . . . . . . . . . . . . . . . . . . . . . . . . . . . . . . . . . . . . 19
4 Installation . . . . . . . . . . . . . . . . . . . . . . . . . . . . . . . . . . . . . . . . . . . . . . . . . . . . . . . . . . . . . . . . . . . . . . 21
4.1 Unpacking the device . . . . . . . . . . . . . . . . . . . . . . . . . . . . . . . . . . . . . . . . . . . . . . . . . . . . . . . . . 21 4.2 Selecting the location . . . . . . . . . . . . . . . . . . . . . . . . . . . . . . . . . . . . . . . . . . . . . . . . . . . . . . . . . 22 4.2.1 Space requirements and bearing capacity . . . . . . . . . . . . . . . . . . . . . . . . . . . . . . . . . . 22 4.2.2 Mains connection . . . . . . . . . . . . . . . . . . . . . . . . . . . . . . . . . . . . . . . . . . . . . . . . . . . . . 22
4.3 Installing the instrument. . . . . . . . . . . . . . . . . . . . . . . . . . . . . . . . . . . . . . . . . . . . . . . . . . . . . . . 23 4.4 Shut down . . . . . . . . . . . . . . . . . . . . . . . . . . . . . . . . . . . . . . . . . . . . . . . . . . . . . . . . . . . . . . . . . . 26
5 Operation . . . . . . . . . . . . . . . . . . . . . . . . . . . . . . . . . . . . . . . . . . . . . . . . . . . . . . . . . . . . . . . . . . . . . . . 27
5.1 Initial steps . . . . . . . . . . . . . . . . . . . . . . . . . . . . . . . . . . . . . . . . . . . . . . . . . . . . . . . . . . . . . . . . . 27 5.1.1 Using the vapo.protect heated lid . . . . . . . . . . . . . . . . . . . . . . . . . . . . . . . . . . . . . . . . . 27 5.1.2 Control panel keys. . . . . . . . . . . . . . . . . . . . . . . . . . . . . . . . . . . . . . . . . . . . . . . . . . . . . 30
5.2 Initial start-up of the Mastercycler pro . . . . . . . . . . . . . . . . . . . . . . . . . . . . . . . . . . . . . . . . . . . . 31 5.2.1 Defining the administrator PIN. . . . . . . . . . . . . . . . . . . . . . . . . . . . . . . . . . . . . . . . . . . 31 5.2.2 Other steps . . . . . . . . . . . . . . . . . . . . . . . . . . . . . . . . . . . . . . . . . . . . . . . . . . . . . . . . . . 32
5.3 User login and logout . . . . . . . . . . . . . . . . . . . . . . . . . . . . . . . . . . . . . . . . . . . . . . . . . . . . . . . . . 33 5.3.1 Logging in as a user . . . . . . . . . . . . . . . . . . . . . . . . . . . . . . . . . . . . . . . . . . . . . . . . . . . 33 5.3.2 Changing the user . . . . . . . . . . . . . . . . . . . . . . . . . . . . . . . . . . . . . . . . . . . . . . . . . . . . . 33 5.3.3 Logging out as a user . . . . . . . . . . . . . . . . . . . . . . . . . . . . . . . . . . . . . . . . . . . . . . . . . . 34
5.4 Overview of operation with the control panel. . . . . . . . . . . . . . . . . . . . . . . . . . . . . . . . . . . . . . . 35 5.4.1 Navigation tree overview . . . . . . . . . . . . . . . . . . . . . . . . . . . . . . . . . . . . . . . . . . . . . . . 35 5.4.2 Using the navigation tree . . . . . . . . . . . . . . . . . . . . . . . . . . . . . . . . . . . . . . . . . . . . . . . 36 5.4.3 Using external storage media . . . . . . . . . . . . . . . . . . . . . . . . . . . . . . . . . . . . . . . . . . . . 37 5.4.4 Selecting export file formats . . . . . . . . . . . . . . . . . . . . . . . . . . . . . . . . . . . . . . . . . . . . . 38

Table of contents
4Mastercycler pro English (EN)
5.5 Managing folders and programs. . . . . . . . . . . . . . . . . . . . . . . . . . . . . . . . . . . . . . . . . . . . . . . . . 39 5.5.1 Creating folders and programs . . . . . . . . . . . . . . . . . . . . . . . . . . . . . . . . . . . . . . . . . . . 39 5.5.2 Copying folders and programs . . . . . . . . . . . . . . . . . . . . . . . . . . . . . . . . . . . . . . . . . . . 40 5.5.3 Deleting folders and programs . . . . . . . . . . . . . . . . . . . . . . . . . . . . . . . . . . . . . . . . . . . 40
6 Programming . . . . . . . . . . . . . . . . . . . . . . . . . . . . . . . . . . . . . . . . . . . . . . . . . . . . . . . . . . . . . . . . . . . . 41
6.1 Overview of the program editor . . . . . . . . . . . . . . . . . . . . . . . . . . . . . . . . . . . . . . . . . . . . . . . . . 41 6.1.1 Opening the program editor . . . . . . . . . . . . . . . . . . . . . . . . . . . . . . . . . . . . . . . . . . . . . 41 6.1.2 Structure of the program editor . . . . . . . . . . . . . . . . . . . . . . . . . . . . . . . . . . . . . . . . . . 41
6.2 Defining general settings . . . . . . . . . . . . . . . . . . . . . . . . . . . . . . . . . . . . . . . . . . . . . . . . . . . . . . 42 6.2.1 Opening the header. . . . . . . . . . . . . . . . . . . . . . . . . . . . . . . . . . . . . . . . . . . . . . . . . . . . 42 6.2.2 Editing header settings . . . . . . . . . . . . . . . . . . . . . . . . . . . . . . . . . . . . . . . . . . . . . . . . . 42
6.3 Editing programs . . . . . . . . . . . . . . . . . . . . . . . . . . . . . . . . . . . . . . . . . . . . . . . . . . . . . . . . . . . . 44 6.3.1 Inserting a program step. . . . . . . . . . . . . . . . . . . . . . . . . . . . . . . . . . . . . . . . . . . . . . . . 44 6.3.2 Editing parameters . . . . . . . . . . . . . . . . . . . . . . . . . . . . . . . . . . . . . . . . . . . . . . . . . . . . 45 6.3.3 Deleting individual program steps . . . . . . . . . . . . . . . . . . . . . . . . . . . . . . . . . . . . . . . . 46 6.3.4 Deleting all program steps . . . . . . . . . . . . . . . . . . . . . . . . . . . . . . . . . . . . . . . . . . . . . . 47 6.3.5 Exporting a program listing . . . . . . . . . . . . . . . . . . . . . . . . . . . . . . . . . . . . . . . . . . . . . 47 6.3.6 Saving a program and exiting the editor . . . . . . . . . . . . . . . . . . . . . . . . . . . . . . . . . . . 47
7 PCR run . . . . . . . . . . . . . . . . . . . . . . . . . . . . . . . . . . . . . . . . . . . . . . . . . . . . . . . . . . . . . . . . . . . . . . . . . 49
7.1 Preparation . . . . . . . . . . . . . . . . . . . . . . . . . . . . . . . . . . . . . . . . . . . . . . . . . . . . . . . . . . . . . . . . . 49 7.1.1 Selecting the sample tubes . . . . . . . . . . . . . . . . . . . . . . . . . . . . . . . . . . . . . . . . . . . . . . 49 7.1.2 Loading the thermoblock . . . . . . . . . . . . . . . . . . . . . . . . . . . . . . . . . . . . . . . . . . . . . . . 50 7.1.3 Sample volume . . . . . . . . . . . . . . . . . . . . . . . . . . . . . . . . . . . . . . . . . . . . . . . . . . . . . . . 50
7.2 Starting the program. . . . . . . . . . . . . . . . . . . . . . . . . . . . . . . . . . . . . . . . . . . . . . . . . . . . . . . . . . 51 7.2.1 Status view . . . . . . . . . . . . . . . . . . . . . . . . . . . . . . . . . . . . . . . . . . . . . . . . . . . . . . . . . . 52 7.3 Interrupting or stopping the program. . . . . . . . . . . . . . . . . . . . . . . . . . . . . . . . . . . . . . . . . . . . . 53 7.3.1 Interrupting the program . . . . . . . . . . . . . . . . . . . . . . . . . . . . . . . . . . . . . . . . . . . . . . . 53 7.3.2 Continuing the program . . . . . . . . . . . . . . . . . . . . . . . . . . . . . . . . . . . . . . . . . . . . . . . . 53 7.3.3 Stopping the program . . . . . . . . . . . . . . . . . . . . . . . . . . . . . . . . . . . . . . . . . . . . . . . . . . 53
7.4 Using protocols . . . . . . . . . . . . . . . . . . . . . . . . . . . . . . . . . . . . . . . . . . . . . . . . . . . . . . . . . . . . . . 53 7.5 Shutting down and switching off the device. . . . . . . . . . . . . . . . . . . . . . . . . . . . . . . . . . . . . . . . 54
8 System management . . . . . . . . . . . . . . . . . . . . . . . . . . . . . . . . . . . . . . . . . . . . . . . . . . . . . . . . . . . . . . 55
8.1 Administrator functions . . . . . . . . . . . . . . . . . . . . . . . . . . . . . . . . . . . . . . . . . . . . . . . . . . . . . . . 55 8.2 Managing user accounts . . . . . . . . . . . . . . . . . . . . . . . . . . . . . . . . . . . . . . . . . . . . . . . . . . . . . . . 55 8.2.1 Creating user accounts . . . . . . . . . . . . . . . . . . . . . . . . . . . . . . . . . . . . . . . . . . . . . . . . . 55 8.2.2 Editing user accounts . . . . . . . . . . . . . . . . . . . . . . . . . . . . . . . . . . . . . . . . . . . . . . . . . . 56 8.2.3 Deleting user accounts . . . . . . . . . . . . . . . . . . . . . . . . . . . . . . . . . . . . . . . . . . . . . . . . . 56 8.2.4 Changing the PIN . . . . . . . . . . . . . . . . . . . . . . . . . . . . . . . . . . . . . . . . . . . . . . . . . . . . . 56
8.3 System settings . . . . . . . . . . . . . . . . . . . . . . . . . . . . . . . . . . . . . . . . . . . . . . . . . . . . . . . . . . . . . . 58 8.4 Cycler functions . . . . . . . . . . . . . . . . . . . . . . . . . . . . . . . . . . . . . . . . . . . . . . . . . . . . . . . . . . . . . 60 8.4.1 Cycler system functions . . . . . . . . . . . . . . . . . . . . . . . . . . . . . . . . . . . . . . . . . . . . . . . . 60 8.4.2 Self test . . . . . . . . . . . . . . . . . . . . . . . . . . . . . . . . . . . . . . . . . . . . . . . . . . . . . . . . . . . . . 61
8.5 Managing and backing up data. . . . . . . . . . . . . . . . . . . . . . . . . . . . . . . . . . . . . . . . . . . . . . . . . . 61 8.5.1 Backing up data . . . . . . . . . . . . . . . . . . . . . . . . . . . . . . . . . . . . . . . . . . . . . . . . . . . . . . 61 8.5.2 Exporting and importing programs . . . . . . . . . . . . . . . . . . . . . . . . . . . . . . . . . . . . . . . 62

Table of contents
Mastercycler pro 5
English (EN)
8.6 Performing a control panel software update. . . . . . . . . . . . . . . . . . . . . . . . . . . . . . . . . . . . . . . . 63 8.6.1 Performing an automatic software update . . . . . . . . . . . . . . . . . . . . . . . . . . . . . . . . . . 63 8.6.2 Performing a manual software update . . . . . . . . . . . . . . . . . . . . . . . . . . . . . . . . . . . . . 63
8.7 Transferring programs from the Mastercycler 533x. . . . . . . . . . . . . . . . . . . . . . . . . . . . . . . . . . 64
9 Quick start. . . . . . . . . . . . . . . . . . . . . . . . . . . . . . . . . . . . . . . . . . . . . . . . . . . . . . . . . . . . . . . . . . . . . . . 67
9.1 Login . . . . . . . . . . . . . . . . . . . . . . . . . . . . . . . . . . . . . . . . . . . . . . . . . . . . . . . . . . . . . . . . . . . . . . 67 9.2 Creating folders and programs . . . . . . . . . . . . . . . . . . . . . . . . . . . . . . . . . . . . . . . . . . . . . . . . . . 68 9.3 Copying folders and programs . . . . . . . . . . . . . . . . . . . . . . . . . . . . . . . . . . . . . . . . . . . . . . . . . . 68 9.4 Deleting folders and programs . . . . . . . . . . . . . . . . . . . . . . . . . . . . . . . . . . . . . . . . . . . . . . . . . . 69 9.5 Editing programs . . . . . . . . . . . . . . . . . . . . . . . . . . . . . . . . . . . . . . . . . . . . . . . . . . . . . . . . . . . . 69 9.6 Stopping and starting programs . . . . . . . . . . . . . . . . . . . . . . . . . . . . . . . . . . . . . . . . . . . . . . . . . 71 9.7 Switching off the device . . . . . . . . . . . . . . . . . . . . . . . . . . . . . . . . . . . . . . . . . . . . . . . . . . . . . . . 71
10 Maintenance . . . . . . . . . . . . . . . . . . . . . . . . . . . . . . . . . . . . . . . . . . . . . . . . . . . . . . . . . . . . . . . . . . . . . 73
10.1 Cleaning . . . . . . . . . . . . . . . . . . . . . . . . . . . . . . . . . . . . . . . . . . . . . . . . . . . . . . . . . . . . . . . . . . . 73 10.1.1 Cleaning the housing . . . . . . . . . . . . . . . . . . . . . . . . . . . . . . . . . . . . . . . . . . . . . . . . . . 74 10.1.2 Cleaning the heated lid . . . . . . . . . . . . . . . . . . . . . . . . . . . . . . . . . . . . . . . . . . . . . . . . . 74 10.2 Disinfection/decontamination . . . . . . . . . . . . . . . . . . . . . . . . . . . . . . . . . . . . . . . . . . . . . . . . . . . 76
10.3 Decontamination before shipment . . . . . . . . . . . . . . . . . . . . . . . . . . . . . . . . . . . . . . . . . . . . . . . 76
11 Troubleshooting . . . . . . . . . . . . . . . . . . . . . . . . . . . . . . . . . . . . . . . . . . . . . . . . . . . . . . . . . . . . . . . . . . 77
11.1 General errors . . . . . . . . . . . . . . . . . . . . . . . . . . . . . . . . . . . . . . . . . . . . . . . . . . . . . . . . . . . . . . . 77 11.2 Error messages . . . . . . . . . . . . . . . . . . . . . . . . . . . . . . . . . . . . . . . . . . . . . . . . . . . . . . . . . . . . . . 77
12 Transport, storage and disposal . . . . . . . . . . . . . . . . . . . . . . . . . . . . . . . . . . . . . . . . . . . . . . . . . . . . . 79
12.1 Packing . . . . . . . . . . . . . . . . . . . . . . . . . . . . . . . . . . . . . . . . . . . . . . . . . . . . . . . . . . . . . . . . . . . . 79 12.2 Transport . . . . . . . . . . . . . . . . . . . . . . . . . . . . . . . . . . . . . . . . . . . . . . . . . . . . . . . . . . . . . . . . . . . 80 12.3 Disposal. . . . . . . . . . . . . . . . . . . . . . . . . . . . . . . . . . . . . . . . . . . . . . . . . . . . . . . . . . . . . . . . . . . . 81
13 Technical data. . . . . . . . . . . . . . . . . . . . . . . . . . . . . . . . . . . . . . . . . . . . . . . . . . . . . . . . . . . . . . . . . . . . 83
13.1 Power supply. . . . . . . . . . . . . . . . . . . . . . . . . . . . . . . . . . . . . . . . . . . . . . . . . . . . . . . . . . . . . . . . 83 13.2 Weight/dimensions . . . . . . . . . . . . . . . . . . . . . . . . . . . . . . . . . . . . . . . . . . . . . . . . . . . . . . . . . . . 83 13.3 Ambient conditions . . . . . . . . . . . . . . . . . . . . . . . . . . . . . . . . . . . . . . . . . . . . . . . . . . . . . . . . . . . 83 13.4 Application parameters . . . . . . . . . . . . . . . . . . . . . . . . . . . . . . . . . . . . . . . . . . . . . . . . . . . . . . . . 84 13.5 Control panel. . . . . . . . . . . . . . . . . . . . . . . . . . . . . . . . . . . . . . . . . . . . . . . . . . . . . . . . . . . . . . . . 84
14 Ordering Information . . . . . . . . . . . . . . . . . . . . . . . . . . . . . . . . . . . . . . . . . . . . . . . . . . . . . . . . . . . . . . 85
14.1 Mastercycler pro . . . . . . . . . . . . . . . . . . . . . . . . . . . . . . . . . . . . . . . . . . . . . . . . . . . . . . . . . . . . . 85 14.2 Accessories . . . . . . . . . . . . . . . . . . . . . . . . . . . . . . . . . . . . . . . . . . . . . . . . . . . . . . . . . . . . . . . . . 85 14.3 Consumables . . . . . . . . . . . . . . . . . . . . . . . . . . . . . . . . . . . . . . . . . . . . . . . . . . . . . . . . . . . . . . . . 86 14.4 Recommended auxiliary materials . . . . . . . . . . . . . . . . . . . . . . . . . . . . . . . . . . . . . . . . . . . . . . . 87
Index . . . . . . . . . . . . . . . . . . . . . . . . . . . . . . . . . . . . . . . . . . . . . . . . . . . . . . . . . . . . . . . . . . . . . . . . . . . 88

Table of contents
6Mastercycler pro English (EN)
Operating instructions
Mastercycler pro 7
English (EN)
1Operating instructions
1.1Using this manual
Read the operating manual before you operate the device for the first time.
Please view this manual as part of the product and keep it somewhere easily accessible.
If this manual is lost, please request another one. The current version of the operating manual can be found on our website at www.eppendorf.com.
The sequences of actions in this operating manual are described for operation using the control panel and the language setting English.
Alternatively, you have the following possibilities:
•Operate the Mastercycler pro via a mouse (see p. 26).
•Change the dialog language (see p. 58).
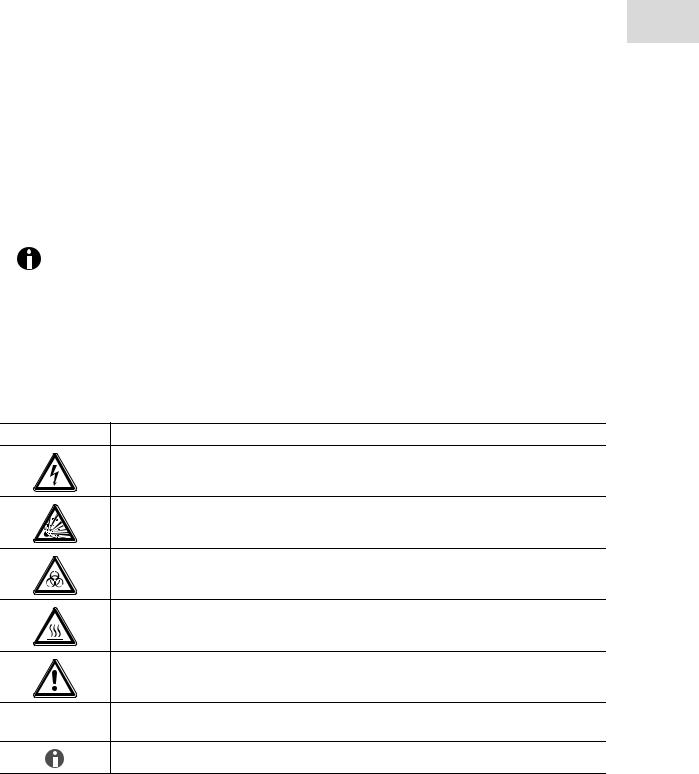
1.2Danger symbols and danger levels
Representation Meaning
DANGER
Risk of electric shock with potential for severe injury or death as a consequence.
DANGER
Risk of explosion with potential for severe injury or death as a consequence.
DANGER
Bio hazard with potential for risk to health or death as a consequence.
DANGER
Risk of burns.
WARNING
Warning of potential injury or health risk.
CAUTION
Refers to risk of damage to property.
Refers to particularly useful information and tips.

Operating instructions
8Mastercycler pro English (EN)
1.3Symbols used
Depiction |
Meaning |
||
|
|
|
|
1. |
|
Actions in the specified order |
|
2. |
|
|
|
|
|
|
|
|
Actions without a specified order |
||
|
|
|
|
• |
List |
||
|
|
|
|
Text |
Display text or software text |
||
|
|
|
|
|
|
|
Additional information |
|
|
|
|
|
|
|
|
|
|
|
|
1.4Abbreviations used
ESP
Electronic Sample Protection
PCL
Printer Command Language (standard for controlling printers)
PCR
Polymerase Chain Reaction
Portable Document Format
PIN
Personal Identification Number
PS
PostScript® (standard for controlling printers)
TSP
Thermal Sample Protection
USB
Universal Serial Bus

Product description
Mastercycler pro 9
English (EN)
2Product description
2.1Main illustration
1 |
2 |
3 4 |
5
6
7
8
11
9
10
Fig. 2-1: Mastercycler pro - front and rear view
1 |
Lid handle |
7 |
Mains switch |
|
For opening and closing and also locking and |
|
0 = switched off, I = switched on. |
|
unlocking the heated lid. |
8 |
Terminal block |
|
|
||
2 |
vapo.protect heated lid |
|
See detail drawing (Fig. 2-2 on p. 10). |
3 |
Address display |
9 |
Retaining clip |
4 |
Status lamp |
|
For control panel. |
|
|
||
5 |
Rear plate with ventilation slots |
10 |
Thermoblock |
|
|
||
6 |
Mains connection socket |
11 |
Nameplate |
|
|
Product description
10Mastercycler pro English (EN)
|
|
|
Printer |
RS 232 |
Control Panel CAN_out CAN_in Term Address |
||||||||||||||||||||||||||||||||||||||||||||
|
|
|
|
|
|
|
|
|
|
|
|
|
|
|
|
|
|
|
|
|
|
|
|
|
|
|
|
|
|
|
|
|
|
|
|
|
|
|
|
|
|
|
|
|
|
|
|
|
|
|
|
|
|
|
|
|
|
|
|
|
|
|
|
|
|
|
|
|
|
|
|
|
|
|
|
|
|
|
|
|
|
|
|
|
|
|
|
|
|
|
|
|
|
|
|
|
|
|
|
|
|
|
|
|
|
|
|
|
|
|
|
|
|
|
|
|
|
|
|
|
|
|
|
|
|
|
|
|
|
|
|
|
|
|
|
|
|
|
|
|
|
|
|
|
|
|
|
|
|
|
|
|
|
|
|
|
|
|
|
|
|
|
|
|
|
|
|
|
|
|
|
|
|
|
|
|
|
|
|
|
|
|
|
|
|
|
|
|
|
|
|
|
|
|
|
|
|
|
|
|
|
|
|
|
|
|
|
|
|
|
|
|
|
|
|
|
|
|
|
|
|
|
|
|
|
|
|
|
|
|
|
|
|
|
|
|
|
|
|
|
|
|
|
|
|
|
|
|
|
|
|
|
|
|
|
|
|
|
|
|
|
|
|
|
|
|
|
|
|
|
|
|
|
|
|
|
|
|
|
|
|
|
|
|
|
|
|
|
|
|
|
|
|
|
|
|
|
|
|
|
|
|
|
|
|
|
|
|
|
|
|
|
|
|
|
|
|
|
|
|
|
|
|
|
|
|
|
|
|
|
|
|
|
|
|
|
|
|
|
|
|
|
|
|
|
|
|
|
|
|
|
|
|
|
|
|
|
|
|
|
|
|
|
|
|
|
|
|
|
|
|
|
|
|
|
|
|
|
|
|
|
|
|
|
|
|
|
|
|
|
|
|
|
|
|
|
|
|
|
|
1 |
2 |
3 |
4 |
5 |
6 |
7 |
|
|
|
|
|
|
|
|
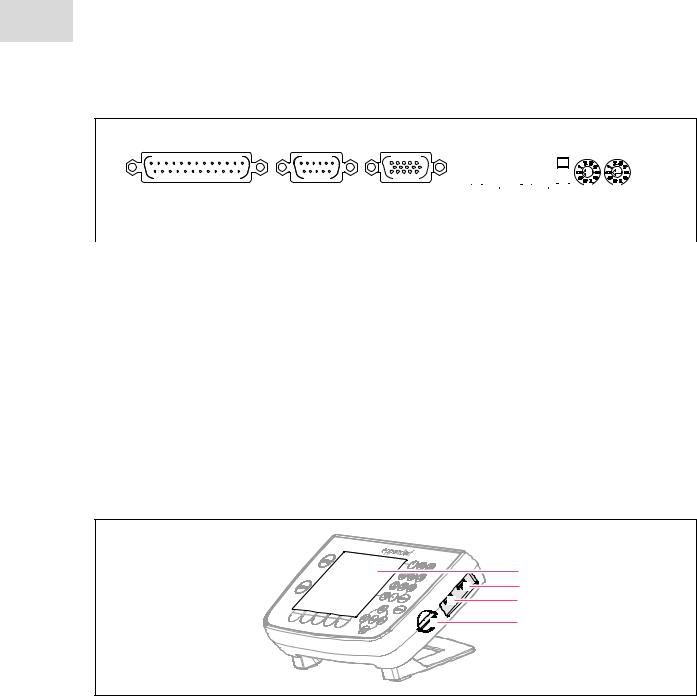
Fig. 2-2: Terminal block |
|
|
|
|
|
|
|
1 |
Parallel interface |
|
5 |
CAN in |
|
|
|
|
Connection for printer. |
|
|
Data inlet for connecting several |
|||
2 |
Serial interface (RS 232) |
|
|
Mastercycler pro or Mastercycler ep. |
|||
|
|
|
|
|
|
||
|
Connection for Eppendorf temperature validation 6 |
Term switch |
|
|
|
||
|
system. |
|
|
Termination of CAN bus when networking several |
|||
3 |
Control panel connection |
|
|
Mastercycler pro or Mastercycler ep. |
|||
|
|
Lower position: ON. Upper position: OFF. |
|||||
|
|
|
|
||||
4 |
CAN out |
|
7 |
Address dial |
|
|
|
|
Data outlet for connecting several |
|
|
|
|
||
|
|
|
|
|
|
|
|
Mastercycler pro or Mastercycler ep.
Setting of device address when networking
several Mastercycler pro or Mastercycler ep.
1
2
3
4
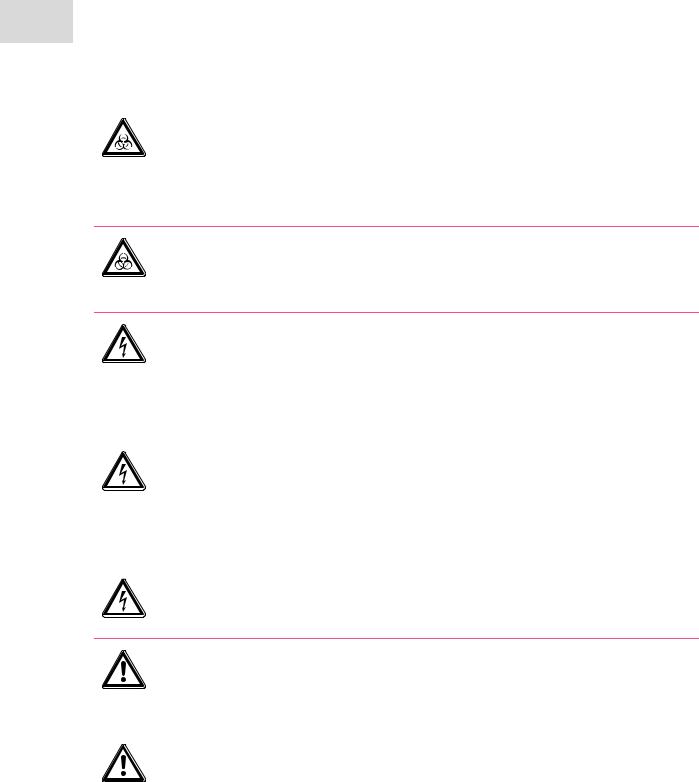
Fig. 2-3: Control panel |
|
|
|
1 |
Display |
3 |
USB port 2 |
2 |
USB port 1 |
|
For mouse, printer or storage medium. |
|
|
||
|
For mouse, printer or storage medium. |
4 |
MMC slot |
|
|
|
For data exchange via a MultiMediaCard (MMC). |
Only devices meeting the IEC 950/EN 60950 (UL 1950) standards may be connected to the interfaces of the Mastercycler pro and the control panel.
Product description
Mastercycler pro 11
English (EN)
2.2Delivery package
The contents of the delivery package depend on the variant of your Mastercycler pro.
2.2.1Mastercycler pro and Mastercycler pro S
Quantit |
Order no. |
Order no. |
Description |
y |
(International) |
(North America) |
|
|
|
|
|
|
|
|
Mastercycler pro |
1 |
6321 000.019 |
- |
230 V / 50 - 60 Hz |
or |
6321 000.027 |
950030010 |
120 V / 50 Hz, with USplug |
|
|
|
|
|
|
|
Mastercycler pro S |
1 |
6325 000.013 |
- |
230 V / 50 - 60 Hz |
or |
6325 000.021 |
950030020 |
120 V / 50 Hz, with US-plug |
|
|
|
|
|
|
|
Operating Manual Mastercycler pro |
1 |
6321 900.150 |
- |
|
|
|
|
|
|
|
|
Certificate of Conformity |
1 |
- |
|
|
|
|
|
|
|
|
|
Mains cable |
1 |
- |
- |
|
|
|
|
|
|
|
|
Eppendorf PCR tubes 0.2 mL |
1 |
- |
|
100 pieces |
|
|
|
|
|
|
|
Eppendorf twin.tec skirted |
|
|
|
96-well PCR plates |
1 |
- |
|
PCR clean, 2 pieces |
|
|
|
|
|
|
|
PCR film |
1 |
- |
|
self-adhesive, 5 pieces |
|
|
|
|
2.2.2Mastercycler pro 384
Quantit |
Order no. |
Order no. |
Description |
y |
(International) |
(North America) |
|
|
|
|
|
|
|
|
Mastercycler pro 384 |
1 |
6324 000.010 |
- |
230 V / 50 - 60 Hz |
or |
6324 000.028 |
950030030 |
120 V / 50 Hz, with US-plug |
|
|
|
|
|
|
|
Operating manual |
1 |
- |
|
|
|
|
|
|
|
|
|
Certificate of Conformity |
1 |
- |
|
|
|
|
|
|
|
|
|
Mains cable |
1 |
- |
- |
|
|
|
|
|
|
|
|
Eppendorf twin.tec |
|
|
|
384-well PCR plates |
1 |
- |
|
2 pieces |
|
|
|
|
|
|
|
PCR film |
1 |
- |
|
self-adhesive, 5 pieces |
|
|
|
|

Product description
12Mastercycler pro English (EN)
2.3Features
Product variants
The Mastercycler pro is available in three variants.
•Mastercycler pro
•Mastercycler pro S
•Mastercycler pro 384
All variants are provided with the following features:
Triple Circuit Technology
All Mastercycler pro thermomodules feature extremely fast heating and cooling rates. Triple Circuit Technology ensures a homogeneous temperature distribution and enables the generation of specific temperature gradients for PCR optimizations.
SteadySlope
SteadySlope Technology ensures that the heating and cooling ramp rates for thermal modules are identical in both gradient and normal operation. That means you can expect identical temperature control characteristics in both optimization and routine experiments, as well as a reliable transfer of the optimization results to the routine application.
vapo.protect
All variants of the Mastercycler pro have avapo.protect heated lid. A flexible pressure element ensures that force is applied evenly to the surface of the tubes or plate. This reduces evaporation from the reaction sample effectively. The vapo.protect heated lid performs automatic tube height adjustment for all sample tubes and PCR plates.
TSP
The heated lid of the Mastercycler pro series is equipped with TSP technology (Thermal Sample Protection). The thermoblock is continuously kept at 20°C during the lid heating phase. This means TSP reduces the thermal load on your samples and minimizes the probability of non-specific product formation during the PCR.
Self-test function
You can use the integrated self test function of the Mastercycler pro in combination with the control panel with USB ports to check whether the thermoblock is functioning properly without the need for any further tools. A separately available USB key is required for the self test function (see Accessories on p. 85).
Control
The Mastercycler pro is controlled via the control panel. It can also be controlled via the PC software CycleManager pro.

Product description
Mastercycler pro 13
English (EN)
2.3.1Features of the Mastercycler pro variants
Variant |
Features |
Mastercycler pro |
• Freely programmable temperature gradient over 12 rows. |
|
• A gradient range of up to 20°C. |
|
• Robust, specially coated aluminum block. |
|
• Holds up to 96 PCR tubes (0.2 ml) or a 96-well PCR plate. |
Mastercycler pro S • Highest temperature control speed due to silver block: up to 6°C/s.
•Standard PCR possible in under 30 min.
•Pulse function for device-driven hot start for avoiding non-specific PCR product formation.
•Freely programmable temperature gradient over 12 rows.
•Extended gradient range of up to 24°C.
•Holds up to 96 PCR tubes (0.2 ml) or a 96-well PCR plate.
Mastercycler pro 384 • Freely programmable temperature gradient over 24 rows.
•A gradient range of up to 20°C.
•Holds a 384-well PCR plate.
2.3.2Networking
Mini-satellite system
Up to five devices from the Mastercycler pro or Mastercycler ep series can be interconnected and operated via a central control panel. The procedure for setting up this type of configuration is described separately (see Operating multiple Mastercycler pro via a control panel ("mini-satellite" system) on p. 23).
PC control
You can use the PC software CycleManager pro to control up to 30 devices from the Mastercycler pro or Mastercycler ep series in a network. This software is available separately for purchase (see Accessories on p. 85).

Product description
14Mastercycler pro English (EN)

Safety
Mastercycler pro 15
English (EN)
3Safety
3.1Intended use
The Mastercycler pro is intended to be used in research and routine laboratories in the field of biomedical sciences.
The Mastercycler pro is used to control the temperature of aqueous solutions, suspensions, and emulsions in closed micro test tubes for enzymatic reactions, typically for polymerase chain reaction (PCR).
The Mastercycler pro is intended exclusively for indoor use.
3.2User profile
This device must only be used by skilled personnel with the appropriate training.
Before using the device, read the operating manual carefully and familiarize yourself with the device's mode of operation.
3.3Note on product liability
In the following cases the protection provided in the device may be impaired. The liability for the function of the device passes to the operator if:
•The device is not used in accordance with the operating manual.
•The device is used outside the range of application described herein.
•The device is used with accessories or consumables (e.g. tubes and plates) which are not recommended by Eppendorf.
•The device is maintained or repaired by persons not authorized by Eppendorf.
•The owner has made unauthorized modifications to the device.
3.4Warnings for intended use
Read the operating manual first and follow the general safety instructions below before using the Mastercycler pro.
DANGER! Risk of explosion!
Do not operate the device in rooms where work is being carried out with explosive substances.
Do not use this device to process any explosive or highly reactive substances.
Do not use this device to process any substances which could create an explosive atmosphere.
Safety
16Mastercycler pro English (EN)
DANGER! Risk when handling toxic or radioactively-marked liquids or pathogenic germs.
Follow national regulations governing the handling of these substances.
For complete instructions regarding the handling of germs or biological material of risk group II or higher, please refer to the "Laboratory Biosafety Manual" (Source: World Health Organization, current edition of the Laboratory Biosafety Manual).
WARNING! Risk to health and bio hazard when operated with lid open.
The tube lids may pop open at high block temperatures.
Close the lid of the device when heating samples.
DANGER! Electric shock as a result of penetration of liquid.
Switch off the device and disconnect it from the power supply before starting cleaning or disinfecting.
Do not allow any liquids to enter the inside of the housing.
Do not perform spay disinfection.
Only reconnect the device to the power supply once it is completely dry.
DANGER! Lethal voltages inside the device.
Ensure that the housing is always closed and undamaged so that no parts inside the device can be contacted by accident.
Do not remove the housing of the device.
Do not allow the device to be opened by anyone except service personnel who have been specifically authorized by Eppendorf.
DANGER! Electric shock.
Switch off the device and disconnect the power plug before starting to maintain or clean.
WARNING! Damage due to incorrect power supply.
Only connect the device to power sources that match the electrical specifications on the device's nameplate.
Use only sockets with protective earth.
WARNING! Injury from trapping or crushing.
Do not place your fingers between the lid and the housing when opening and closing the device or when opening it into the cleaning position.
Do not reach in under the open lid.
Take care that the stand is properly engaged so that the lid stays in the opened position.

Safety
Mastercycler pro 17
English (EN)
WARNING! Burns from hot thermoblock and heated lid.
The thermoblock, the inner side of the heated lid and micro test tubes/PCR plates can reach temperatures of over 50 °C very quickly.
The heated lid should be kept closed until temperatures of 30 °C or less are reached.
Take note of the symbols on the thermoblock warning that surfaces may be hot.
If you are using well caps consisting of thermally insulating material, please keep in mind that the temperature on the inside of the heated lid can be significantly higher than the temperature displayed.
Before starting cleaning wait for the thermoblock and heated lid to cool down.
WARNING! Injury from sharp-edged components.
When the Mastercycler pro is in the open position, sharp-edged components are exposed. When cleaning the Mastercycler pro, the sharp edges on the rollflex cable and the guide rail may cause injuries.
Take special care and wear protective gloves.
WARNING! Risk to health if used incorrectly.
If incubation is performed incorrectly, sample material may be released and the thermoblock and the heated lid damaged.
Ensure that the PCR plates are correctly inserted in the thermoblock.
Always close the heated lid before heating the samples to prevent the lids of the tubes from bursting open.
WARNING! Risk to health from contaminated device
Perform decontamination before storing or dispatching the device and/or its accessories.
CAUTION! Unsuitable tubes can result in sample material escaping.
Unsuitable tubes may be so severely damaged that sample material is released.
Use only tubes whose properties meet at least the requirements specified in these operating instructions.
This is especially important when working with infectious material.
WARNING! Poor safety due to incorrect accessories and spare parts.
The use of accessories and spare parts other than those recommended by Eppendorf may impair the safety, function and precision of the device. Eppendorf accepts no warranty or liability for damage caused by non-recommended accessories and spare parts or incorrect use.
Use only accessories recommended by Eppendorf and original spare parts.

Safety
18Mastercycler pro English (EN)
WARNING! Risk of injury when lifting and transporting the device.
Lifting the device with the wrong posture may cause serious damage to your health. If the device falls to the ground it can cause injuries.
Do not lift the device by the handle or the housing of the heated lid.
Carry the device securely with both hands to prevent it from slipping.
Always keep a straight back when lifting and carrying the device.
CAUTION! Damage to heated lid from sharp-edged sample tubes or objects.
Use only tubes whose properties meet at least the requirements specified in these operating instructions.
Do not use any sharp-edged or sharp objects on the heated lid.
Extra caution should be exercised when cleaning so as not to damage the heated lid.
CAUTION! Escaping liquid can cause damage to the device.
If the flexible pressure unit of the heated lid is damaged, liquid can escape and enter the device.
1.Leave the lid open.
2.Disconnect the power plug immediately from the power supply.
3.Contact Eppendorf Service.
CAUTION! Damage to the thermoblock from incorrect operation.
Do not fill sample material directly into the thermoblock.
CAUTION! Damage to electronic components through formation of condensation.
After the device has been moved from a cool to a warmer environment, formation of condensation can occur inside the device.
Allow the device to warm up for at least 12 hours after being set up before you connect it to the mains power supply.
CAUTION! Material damage from uneven work surface.
Position the device on level and stable work surface which is capable of bearing the weight of the device. The device must not be placed on a trolley or at an angle.
CAUTION! Damage due to overheating.
Do not place the device close to sources of heat (e.g. radiator, drying cabinet).
Do not expose the device to direct sunlight.
Allow air to circulate freely by leaving at least 10 cm to adjoining devices or to the wall and keep the underside of the device clear.

Safety
Mastercycler pro 19
English (EN)
CAUTION! Lack of safety due to missing operating manual.
When passing on the device, always enclose the operating manual.
If you lose the operating manual, request a replacement. The current version of the operating manual and the safety instructions can also be found on our websitewww.eppendorf.com.
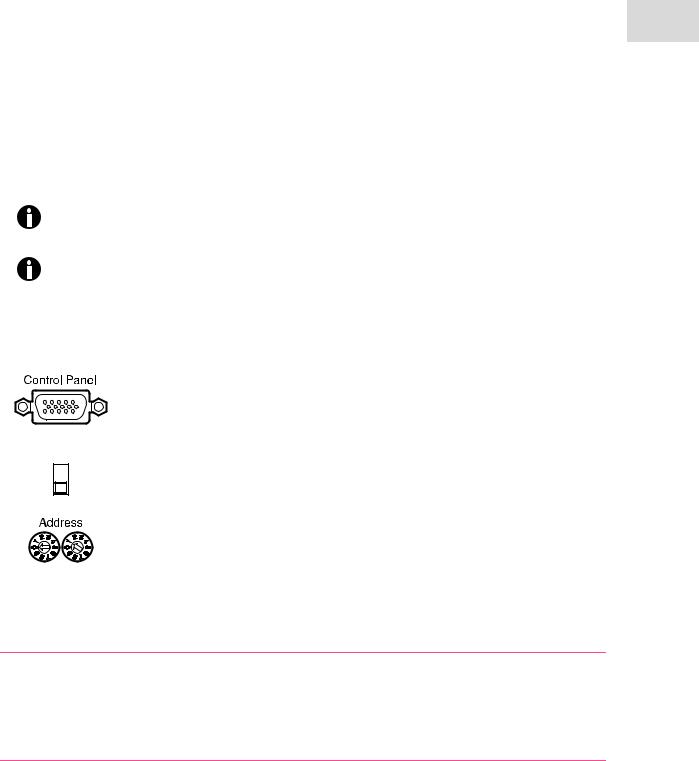
3.5Warning signs on the device
This section explains the warning signs used on the Mastercycler pro.
1 |
2 |
1 |
WARNING |
|
Risk of burns from the hot thermoblock (triangle with tip |
|
facing down) or the hot inner side of the heated lid |
|
(triangle with tip facing up). |
|
Gradient operation can result in the temperature being |
|
hotter on the right side than on the left side |
2 |
WARNING |
|
Risk of burns from hot surfaces. |

Safety
20Mastercycler pro English (EN)
Installation
Mastercycler pro 21
English (EN)
4Installation
4.1Unpacking the device
WARNING! Risk of injury when lifting and transporting the device.
Lifting the device with the wrong posture may cause serious damage to your health. If the device falls to the ground it can cause injuries.
Do not lift the device by the handle or the housing of the heated lid.
Carry the device securely with both hands to prevent it from slipping.
Always keep a straight back when lifting and carrying the device.
1.Release the four plastic locking clips at the long sides of the carton by pulling out the flaps.
2.Lift the carton lid and take the foam upper part off the Mastercycler pro.
3.Take the carton insert out of the carton lid (contains the mains cable).
4.Take the Mastercycler pro out of the plastic bag.
5.With both hands, hold the Mastercycler pro by the lower half of the housing and lift it out of the package.
6.Remove all the packing material.
7.Visually check the device to ensure that no damage has occurred during shipment.
8.Check the completeness of the delivery (see Delivery package on p. 11).
Never use a device if it shows any signs of damage. In this case, contact your distributor or the appropriate Eppendorf office.
• Retain the packing material for shipping or storing the Mastercycler pro at a later date.
• Ship the Mastercycler pro only in the original packing material.

Installation
22Mastercycler pro English (EN)
4.2Selecting the location
4.2.1Space requirements and bearing capacity
CAUTION! Material damage from uneven work surface.
Position the device on level and stable work surface which is capable of bearing the weight of the device. The device must not be placed on a trolley or at an angle.
CAUTION! Damage due to overheating.
Do not place the device close to sources of heat (e.g. radiator, drying cabinet).
Do not expose the device to direct sunlight.
Allow air to circulate freely by leaving at least 10 cm to adjoining devices or to the wall and keep the underside of the device clear.
Information regarding the dimensions and weight of the device components can be found separately(see
Weight/dimensions on p. 83).
When selecting a location for the Mastercycler pro ensure that the following criteria are met:
•The surface must have sufficient bearing capacity and ensure the required stability.
•The feet at the front of the unit must be secured to prevent them from slipping.
•The device must be positioned at a height which provides for convenient and safe operation.
•Additional space is required for free air circulation at the back of the device (10 cm) and for the control panel at the front (14 cm).
4.2.2Mains connection
CAUTION! Connected devices may be shut down due to a power supply overload.
The total current consumption of the devices can exceed the maximum permitted supply rating when multiple power sockets are used. In this case, the mains fuse interrupts the electric circuit. The connected devices are shut down.
Do not use multiple sockets when connecting several Mastercycler pro.
Information on the power consumption of the Mastercycler pro is provided separately (see Power supply on
p.83).
•You need an earthed wall socket for the power supply of the Mastercycler pro. Use the supplied power cable to connect the Mastercycler pro.
•The control panel is supplied via the Mastercycler pro and does not require an additional power supply.
Installation
Mastercycler pro 23
English (EN)
4.3Installing the instrument
This section describes how to start up the Mastercycler pro with the control panel and how to operate several devices belonging to the Mastercycler pro and Mastercycler ep series with each other in a network.
The connections and switches are located at the back of the device (see Main illustration on p. 9).
• Follow the steps below to define the settings and connect the devices before switching on the Mastercycler pro.
•Never disconnect the control panel from a Mastercycler pro that is switched on.
4.3.1Operating a Mastercycler pro via a control panel
1. Connect the cable on the control panel to the Control Panel connector of the Mastercycler pro.
Term |
2. Set Term switch to ON (lower position). |
|
3. Use the address dials to set the address of the Mastercycler pro to 01. To do this, turn the left dial into position 0 and the right dial to 1, as shown in the illustration.
4.Connect the power cable to the Mastercycler pro and to the mains supply.
4.3.2Operating multiple Mastercycler pro via a control panel ("mini-satellite" system)
CAUTION! Connected devices may be shut down due to a power supply overload.
The total current consumption of the devices can exceed the maximum permitted supply rating when multiple power sockets are used. In this case, the mains fuse interrupts the electric circuit. The connected devices are shut down.
Do not use multiple sockets when connecting several Mastercycler pro.
A control panel can be used to control up to five devices belonging to the Mastercycler pro or Mastercycler ep series (also in combination). Each additional device connected requires its own CAN bus cable. CAN bus cables are available separately for purchase (see Accessories on p. 85).

Installation
24Mastercycler pro English (EN)
1. Connect the cable on the control panel to the "Control Panel" connector of the first device.
CAN_out |
2. Connect the CAN bus cable to the "CAN_out" connector of the first device. |
|
CAN_in |
3. Connect the free end of the CAN bus cable to the "CAN_in" connector of the |
|
second device. |
||
|
Connecting additional devices
4. Always use the CAN bus cable to connect the "CAN_out" connector of the last connected device to the "CAN_in" connector of the new device.
Term |
5. Set the Term switch of the first and last device to "ON" (lower position). |
|
Term |
6. Set the Term switch of all other devices to "OFF" (upper position). |
|||
Note: If the network consists of exactly two devices, the Term switch of both |
||||
|
|
|
||
|
|
|
||
|
|
|
devices must be set to "ON". |
|
|
|
|
|
|
7. For the first device connected to the control panel, set the address to 01.
8. Define one unique address from 02 to 05 on each additional device.
Device 3 |
Device 2 |
Device 1 |
CAN_out |
CAN_in Term |
Address |
CAN_out |
CAN_in Term |
Address |
CAN_out |
CAN_in Term |
Address |
Control Panel |
Fig. 4-1: Address and Term settings and wiring connections for a network consisting of three devices
Each address may only be assigned once within the network.
The address that was set for the Mastercycler pro will be displayed by the two-digit address display 3 on the heated lid during operation (see Main illustration on p. 9).

Installation
Mastercycler pro 25
English (EN)
4.3.3Connecting Mastercycler pro to an existing Mastercycler ep
You can extend an existing system of one or more Mastercycler ep devices with a corresponding control panel using devices of the Mastercycler pro series.
When operating the Mastercycler pro with a Mastercycler ep control panel (without USB connections), the following restrictions apply:
•The self test function is not available.
•The PDF file format is not available for exporting programs, protocols and log files.
•No USB devices can be connected. Information for connecting a PS/2 mouse can be found in the Mastercycler ep operating manual.
Prerequisites
Before a Mastercycler pro can be connected to an existing Mastercycler ep system, the software of the control panel and of the connected Mastercycler ep has to be updated. For more information, contact the Eppendorf branch for your country (see back cover flap).
1.Follow the instructions in the Mastercycler ep operating manual to update the control panel software.
2.After restarting the control panel, synchronize all connected Mastercycler ep with the control panel.
3.Shut down the control panel (see p. 54) and switch off all Mastercycler ep devices.
4.Set the address of the new Mastercycler pro to the next free address number.
Example:
If you already operate two Mastercycler ep devices, set the address of the new
Mastercycler pro to 03.
5.Connect the cables and define the Term settings.
6.Switch all devices on and register them at the control panel.
The Mastercycler pro is displayed as an additional cycler node on the control panel.
4.3.4Using the USB ports
The control panel of the Mastercycler pro has two USB ports (see Fig. 2-3 on p. 10) for connecting a mouse, printer, storage medium or the self test USB key.
If you would like to use more than two USB devices at the control panel at the same time, you can make use of a USB hub.

Installation
26Mastercycler pro English (EN)
4.3.5Connecting the printer
The Mastercycler pro can be connected to a parallel interface printer in order to print protocols and programs in text format.
Connect the printer via a parallel data cable to the parallel interface (see Fig. 2-2 on p. 10) of the Mastercycler pro.
A printer with USB interface can be connected to the control panel to print protocols, programs and self test certificates.
Prerequisites
The USB printer must be compatible with the PostScript® or PCL printer standards. Further information can be found in the operating manual for your printer.
1.Us a USB cable to connect the printer to one of the two USB ports (see Fig. 2-3 on p. 10) of the control panel.
4.3.6Connecting the mouse
You can connect a USB mouse (not included in the delivery package) to the control panel.
Connect the plug of the mouse to one of the USB ports on the right-hand side of the control panel (see Fig. 2-3 on p. 10).
The mouse pointer appears in the display.
4.4Shut down
Proceed as follows if you do not want to use the Mastercycler pro for longer than a week.
1.Load the block with an empty PCR plate(see p. 50).
2.Close the heated lid and flip the handle forwards (see p. 27).
3.Disconnect the Mastercycler pro from the power supply.
Do not leave the lid of the Mastercycler pro in an open position in order to avoid the block from becoming contaminated.

Operation
Mastercycler pro 27
English (EN)
5Operation
5.1Initial steps
Check the correct installation
Before the Mastercycler pro is started up for the first time, ensure the following:
•The device is correctly connected.
•The device is free of damage.
•Make sure that air can circulate freely around the ventilation slots on the rear of the device and around the fan behind the feet.
5.1.1Using the vapo.protect heated lid
Thevapo.protectheated lid features a heated flexible pressure unit. When the lid closes, the pressure unit comes to rest lightly on the surface of the sample tubes. A liquid cushion in the pressure unit is then used to create a pressure to ensure that the tubes are pressed uniformly into the thermoblock thereby protecting the tube seals against evaporation. The heating process prevents condensation from forming in the upper area of the tube when the reaction liquid is heated.
5.1.1.1 Closing the heated lid
Prerequisites
The thermoblock of the Mastercycler pro is loaded with sample tubes or a PCR plate (see Loading the thermoblock on p. 50).
CAUTION! Damage to heated lid from sharp-edged sample tubes or objects.
Use only tubes whose properties meet at least the requirements specified in these operating instructions.
Do not use any sharp-edged or sharp objects on the heated lid.
Extra caution should be exercised when cleaning so as not to damage the heated lid.

Operation
28Mastercycler pro English (EN)
1 |
2 |
1.Pull vapo.protect heated lid forwards at the lid handle as far as possible so that the lid handle can be rotated.
2.Flip the handle over the heated lid until it clicks into place.
You can now start a program run or manually temperature-control the lid and the samples.
5.1.1.2 Opening the heated lid
WARNING! Risk to health and bio hazard when operated with lid open.
The tube lids may pop open at high block temperatures.
Close the lid of the device when heating samples.
WARNING! Risk of burns from the hot thermoblock and heated lid.
The thermoblock and the heated lid very quickly reach temperatures above 95 °C.
Keep heated lid closed until the temperature of the thermoblock is below 30 °C.
Open the heated lid in one go as follows:
Flip the lid handle up over the heated lid and push the heated lid by the handle to the rear position until it stops.

Operation
Mastercycler pro 29
English (EN)
5.1.1.3Status lamp
The vapo.protect heated lid is equipped with a status lamp 2(see Main illustration on p. 9) which allows the current operating status of the Mastercycler pro to be visible from far off.
Status lamp |
Operating status |
|
|
Illuminates green |
The Mastercycler pro is idle. |
|
|
Flashes green |
A program run is active. |
|
|
Flashes orange |
The program run is waiting for user intervention in a pause or hold step(see |
|
Editing programs on p. 44). |
|
|
Flashes red |
A fault has occurred. Additional information on the type of fault is displayed on |
|
the control panel (see Error messages on p. 77). |
|
|
5.1.1.4Address display
The vapo.protect heated lid is equipped with a two-digit address display so that the cycler can be identified easily (see Main illustration on p. 9).
The displayed address number matches the cycler numbering in the operating software. The address setting is described separately.
Operation
30Mastercycler pro English (EN)
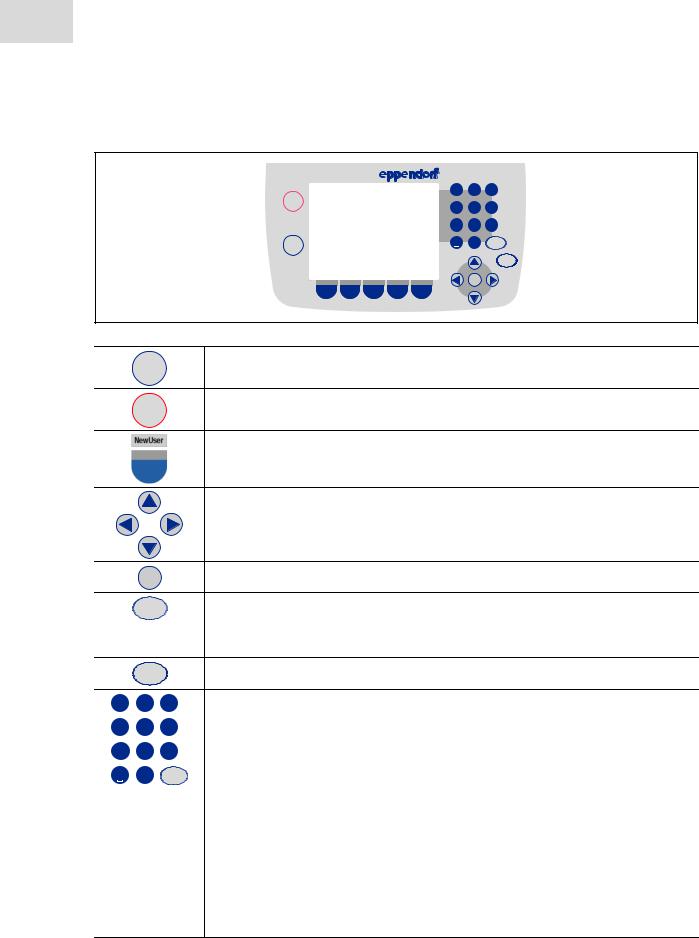
5.1.2 Control panel keys
|
1 |
2 |
3 |
|
|
abc |
def |
Stop |
4 |
5 |
6 |
|
|||
|
ghi |
jkl |
mno |
|
7 |
8 |
9 |
|
pqrs |
tuv |
wxyz |
|
0 |
. |
Delete |
Start
Enter
Next
Start the selected program.
Start
Stop the running program.
Stop
Function keys
The function of the key changes with the software dialog and appears in the display immediately above the key.
•Step-by-step navigation.
The current position of the cursor is marked.
• Move the cursor within an alphanumerical input field.
Move cursor into the next input field.
Next
|
Delete |
|
Delete the following elements: |
|
|
|
• Delete characters that are to the right of the cursor. |
||
|
|
|
||
|
|
|
• Marked signs. |
|
|
|
|
• Marked folders or programs. |
|
|
Enter |
|
• Confirm input. |
|
|
|
• Open selection lists. |
||
|
|
|
||
1 |
2 |
3 |
• Enter digits and text in input fields. |
|
|
abc |
def |
|
|
4 |
5 |
6 |
In the case of numerical input fields (e.g. temperature and time entries) the keys |
|
ghi |
jkl |
mno |
only represent numbers. For decimal numbers with numbers after the decimal |
|
7 |
8 |
9 |
||
point, use the period as a decimal point. |
||||
pqrs |
tuv |
wxyz |
||
0 . |
Delete |
Alphanumerical input fields have keys with multiple functions. |
||
|
|
|
||
To enter text, keep pressing the key with the relevant letter until the desired letter is displayed.
Example: To enter pcr 3 in a text field, press the following keys in quick succession:
1.for p: press 7 once
2.for c: press 2 three times
3.for r: press 7 three times
4.for the blank space: press 0 (zero) twice
5.for 3: press 3 four times
Loading...