


 Loading...
manualEN)MultiCon
epBlue™ with MultiCon
Software manual
Software-Version 40.1
Copyright© 2013 Eppendorf AG, Hamburg. No part of this publication may be reproduced without the prior permission of the copyright owner.
Trademarks
Eppendorf®, the Eppendorf logo, epMotion®, and epT.I.P.S.® are registered trademarks of Eppendorf AG.
Excel® and Windows® are registered trademarks of Microsoft Corporation in the United States and other countries.
Registered trademarks are not marked in all cases with ® or ™ in this manual.
The software of the device (firmware) contains open source software. License information is available on request from Eppendorf AG.
Only for epMotion M5073 and 5075m: Limited Use Label License NOTICE TO PURCHASER; LIMITED LICENSE FOR RESEARCH USE ONLY.
This product and its use may be covered by one or more patents owned by Gen-Probe Incorporated. The purchase price for this product includes only limited, nontransferable rights under certain claims of certain patents owned by Gen-Probe Incorporated to use this product for research purposes only. No other rights are conveyed. Purchaser is not granted any rights under patents of Gen-Probe Incorporated to use this product for any commercial use. Further information regarding purchasing a license under patents of Gen-Probe Incorporated to use this product for any other purposes, including, without limitation, for commercial use, may be obtained by contacting Gen-Probe Incorporated, Attn: Business Development Department, 10210 Genetic Center Drive, San Diego, California 92121-4362, U.S.A.
5075 900.866-01/122013

Table of contents epBlue™ with MultiCon 3
English (EN)
Table of contents
1 Operating instructions . . . . . . . . . . . . . . . . . . . . . . . . . . . . . . . . . . . . . . . . . . . . . . . . . . . . . . . . . . . . . . 9
1.1 Using this manual . . . . . . . . . . . . . . . . . . . . . . . . . . . . . . . . . . . . . . . . . . . . . . . . . . . . . . . . . . . . . 9 1.2 Danger symbols and danger levels . . . . . . . . . . . . . . . . . . . . . . . . . . . . . . . . . . . . . . . . . . . . . . . . 9 1.2.1 Danger symbols. . . . . . . . . . . . . . . . . . . . . . . . . . . . . . . . . . . . . . . . . . . . . . . . . . . . . . . . 9 1.2.2 Danger levels. . . . . . . . . . . . . . . . . . . . . . . . . . . . . . . . . . . . . . . . . . . . . . . . . . . . . . . . . 10
1.3 Symbols used . . . . . . . . . . . . . . . . . . . . . . . . . . . . . . . . . . . . . . . . . . . . . . . . . . . . . . . . . . . . . . . 10 1.4 Abbreviations used . . . . . . . . . . . . . . . . . . . . . . . . . . . . . . . . . . . . . . . . . . . . . . . . . . . . . . . . . . . 11 1.5 Glossary. . . . . . . . . . . . . . . . . . . . . . . . . . . . . . . . . . . . . . . . . . . . . . . . . . . . . . . . . . . . . . . . . . . . 12
2 Product description . . . . . . . . . . . . . . . . . . . . . . . . . . . . . . . . . . . . . . . . . . . . . . . . . . . . . . . . . . . . . . . 17
2.1 Features. . . . . . . . . . . . . . . . . . . . . . . . . . . . . . . . . . . . . . . . . . . . . . . . . . . . . . . . . . . . . . . . . . . . 17 2.1.1 epBlue . . . . . . . . . . . . . . . . . . . . . . . . . . . . . . . . . . . . . . . . . . . . . . . . . . . . . . . . . . . . . . 17 2.1.2 Assistants . . . . . . . . . . . . . . . . . . . . . . . . . . . . . . . . . . . . . . . . . . . . . . . . . . . . . . . . . . . 18
3 Operation. . . . . . . . . . . . . . . . . . . . . . . . . . . . . . . . . . . . . . . . . . . . . . . . . . . . . . . . . . . . . . . . . . . . . . . . 19
3.1 Starting and exiting epBlue . . . . . . . . . . . . . . . . . . . . . . . . . . . . . . . . . . . . . . . . . . . . . . . . . . . . 19 3.1.1 Starting epBlue . . . . . . . . . . . . . . . . . . . . . . . . . . . . . . . . . . . . . . . . . . . . . . . . . . . . . . . 19 3.1.2 Starting epBlue for the first time . . . . . . . . . . . . . . . . . . . . . . . . . . . . . . . . . . . . . . . . . 19 3.1.3 Logging in as User. . . . . . . . . . . . . . . . . . . . . . . . . . . . . . . . . . . . . . . . . . . . . . . . . . . . . 19 3.1.4 Logging off as a user. . . . . . . . . . . . . . . . . . . . . . . . . . . . . . . . . . . . . . . . . . . . . . . . . . . 20 3.1.5 Exiting epBlue and switching off MultiCon . . . . . . . . . . . . . . . . . . . . . . . . . . . . . . . . . 21
3.2 Initial steps . . . . . . . . . . . . . . . . . . . . . . . . . . . . . . . . . . . . . . . . . . . . . . . . . . . . . . . . . . . . . . . . . 21 3.2.1 Using the touch screen and mouse. . . . . . . . . . . . . . . . . . . . . . . . . . . . . . . . . . . . . . . . 21 3.2.2 Using the screen key pad . . . . . . . . . . . . . . . . . . . . . . . . . . . . . . . . . . . . . . . . . . . . . . . 21 3.2.3 File menu. . . . . . . . . . . . . . . . . . . . . . . . . . . . . . . . . . . . . . . . . . . . . . . . . . . . . . . . . . . . 22 3.2.4 Status area. . . . . . . . . . . . . . . . . . . . . . . . . . . . . . . . . . . . . . . . . . . . . . . . . . . . . . . . . . . 23
4 epBlue Application Runner - Carrying out the application . . . . . . . . . . . . . . . . . . . . . . . . . . . . . . . . 25
4.1 Opening an application . . . . . . . . . . . . . . . . . . . . . . . . . . . . . . . . . . . . . . . . . . . . . . . . . . . . . . . . 25 4.2 Preparing the application run . . . . . . . . . . . . . . . . . . . . . . . . . . . . . . . . . . . . . . . . . . . . . . . . . . . 26 4.2.1 Selecting the device . . . . . . . . . . . . . . . . . . . . . . . . . . . . . . . . . . . . . . . . . . . . . . . . . . . 26 4.2.2 Entering the sample quantity . . . . . . . . . . . . . . . . . . . . . . . . . . . . . . . . . . . . . . . . . . . . 27 4.2.3 Setting the HEPA air filter and the UV lamp. . . . . . . . . . . . . . . . . . . . . . . . . . . . . . . . . 27 4.2.4 Placing the labware on the epMotion worktable . . . . . . . . . . . . . . . . . . . . . . . . . . . . . 28 4.2.5 Setting the run parameters for the optical sensor . . . . . . . . . . . . . . . . . . . . . . . . . . . . 28 4.2.6 Setting the ID tracking parameters . . . . . . . . . . . . . . . . . . . . . . . . . . . . . . . . . . . . . . . . 29 4.2.7 Entering the filling level of the labware . . . . . . . . . . . . . . . . . . . . . . . . . . . . . . . . . . . . 31
4.3 Starting the application. . . . . . . . . . . . . . . . . . . . . . . . . . . . . . . . . . . . . . . . . . . . . . . . . . . . . . . . 34 4.4 Controlling the application . . . . . . . . . . . . . . . . . . . . . . . . . . . . . . . . . . . . . . . . . . . . . . . . . . . . . 34 4.5 Ending the application . . . . . . . . . . . . . . . . . . . . . . . . . . . . . . . . . . . . . . . . . . . . . . . . . . . . . . . . 35
5 epBlue LogViewer - Managing logs . . . . . . . . . . . . . . . . . . . . . . . . . . . . . . . . . . . . . . . . . . . . . . . . . . 37
5.1 Displaying protocols . . . . . . . . . . . . . . . . . . . . . . . . . . . . . . . . . . . . . . . . . . . . . . . . . . . . . . . . . . 37 5.2 Saving the protocol as a PDF file . . . . . . . . . . . . . . . . . . . . . . . . . . . . . . . . . . . . . . . . . . . . . . . . 38

Table of contents
4epBlue™ with MultiCon English (EN)
6 epBlue Application Editor - Creating and editing applications. . . . . . . . . . . . . . . . . . . . . . . . . . . . . 39
6.1 Overview . . . . . . . . . . . . . . . . . . . . . . . . . . . . . . . . . . . . . . . . . . . . . . . . . . . . . . . . . . . . . . . . . . . 39 6.2 Creating an application . . . . . . . . . . . . . . . . . . . . . . . . . . . . . . . . . . . . . . . . . . . . . . . . . . . . . . . . 39 6.2.1 Menu bar . . . . . . . . . . . . . . . . . . . . . . . . . . . . . . . . . . . . . . . . . . . . . . . . . . . . . . . . . . . . 39 6.2.2 Creating an empty application . . . . . . . . . . . . . . . . . . . . . . . . . . . . . . . . . . . . . . . . . . . 40 6.2.3 Copying applications. . . . . . . . . . . . . . . . . . . . . . . . . . . . . . . . . . . . . . . . . . . . . . . . . . . 40 6.2.4 Saving an application . . . . . . . . . . . . . . . . . . . . . . . . . . . . . . . . . . . . . . . . . . . . . . . . . . 41 6.2.5 Positioning labware. . . . . . . . . . . . . . . . . . . . . . . . . . . . . . . . . . . . . . . . . . . . . . . . . . . . 41 6.2.6 Defining the application parameters of the labware. . . . . . . . . . . . . . . . . . . . . . . . . . . 44 6.2.7 Activating ID tracking of the labware . . . . . . . . . . . . . . . . . . . . . . . . . . . . . . . . . . . . . . 44 6.2.8 Defining procedures . . . . . . . . . . . . . . . . . . . . . . . . . . . . . . . . . . . . . . . . . . . . . . . . . . . 45 6.2.9 Checking an application . . . . . . . . . . . . . . . . . . . . . . . . . . . . . . . . . . . . . . . . . . . . . . . . 47
6.3 Commands . . . . . . . . . . . . . . . . . . . . . . . . . . . . . . . . . . . . . . . . . . . . . . . . . . . . . . . . . . . . . . . . . 47 6.3.1 Sample transfer command . . . . . . . . . . . . . . . . . . . . . . . . . . . . . . . . . . . . . . . . . . . . . . 48 6.3.2 Reagent transfer command . . . . . . . . . . . . . . . . . . . . . . . . . . . . . . . . . . . . . . . . . . . . . . 56 6.3.3 Dilute command . . . . . . . . . . . . . . . . . . . . . . . . . . . . . . . . . . . . . . . . . . . . . . . . . . . . . . 57 6.3.4 Pool command. . . . . . . . . . . . . . . . . . . . . . . . . . . . . . . . . . . . . . . . . . . . . . . . . . . . . . . . 60 6.3.5 Pool one destination command. . . . . . . . . . . . . . . . . . . . . . . . . . . . . . . . . . . . . . . . . . . 60 6.3.6 Comment command . . . . . . . . . . . . . . . . . . . . . . . . . . . . . . . . . . . . . . . . . . . . . . . . . . . 61 6.3.7 Exchange command . . . . . . . . . . . . . . . . . . . . . . . . . . . . . . . . . . . . . . . . . . . . . . . . . . . 62 6.3.8 Magnetic separation command. . . . . . . . . . . . . . . . . . . . . . . . . . . . . . . . . . . . . . . . . . . 62 6.3.9 Mix command . . . . . . . . . . . . . . . . . . . . . . . . . . . . . . . . . . . . . . . . . . . . . . . . . . . . . . . . 63 6.3.10 Number of samples command . . . . . . . . . . . . . . . . . . . . . . . . . . . . . . . . . . . . . . . . . . . 64 6.3.11 Temperature command . . . . . . . . . . . . . . . . . . . . . . . . . . . . . . . . . . . . . . . . . . . . . . . . . 65 6.3.12 Thermomixer command . . . . . . . . . . . . . . . . . . . . . . . . . . . . . . . . . . . . . . . . . . . . . . . . 66 6.3.13 Vacuum command. . . . . . . . . . . . . . . . . . . . . . . . . . . . . . . . . . . . . . . . . . . . . . . . . . . . . 68 6.3.14 Transport command . . . . . . . . . . . . . . . . . . . . . . . . . . . . . . . . . . . . . . . . . . . . . . . . . . . 69 6.3.15 User intervention command . . . . . . . . . . . . . . . . . . . . . . . . . . . . . . . . . . . . . . . . . . . . . 70 6.3.16 Wait command . . . . . . . . . . . . . . . . . . . . . . . . . . . . . . . . . . . . . . . . . . . . . . . . . . . . . . . 70 6.3.17 Importing commands from a CSV file. . . . . . . . . . . . . . . . . . . . . . . . . . . . . . . . . . . . . . 71
6.4 Pattern. . . . . . . . . . . . . . . . . . . . . . . . . . . . . . . . . . . . . . . . . . . . . . . . . . . . . . . . . . . . . . . . . . . . . 76 6.4.1 Menu bar in the Edit Pattern window . . . . . . . . . . . . . . . . . . . . . . . . . . . . . . . . . . . . . . 77 6.4.2 Defining regular patterns . . . . . . . . . . . . . . . . . . . . . . . . . . . . . . . . . . . . . . . . . . . . . . . 77 6.4.3 Defining irregular patterns . . . . . . . . . . . . . . . . . . . . . . . . . . . . . . . . . . . . . . . . . . . . . . 79
6.5 Optical sensor . . . . . . . . . . . . . . . . . . . . . . . . . . . . . . . . . . . . . . . . . . . . . . . . . . . . . . . . . . . . . . . 80 6.5.1 Detect volumes . . . . . . . . . . . . . . . . . . . . . . . . . . . . . . . . . . . . . . . . . . . . . . . . . . . . . . . 80 6.5.2 Detect tips . . . . . . . . . . . . . . . . . . . . . . . . . . . . . . . . . . . . . . . . . . . . . . . . . . . . . . . . . . . 83 6.5.3 Check labware placement . . . . . . . . . . . . . . . . . . . . . . . . . . . . . . . . . . . . . . . . . . . . . . . 83
7 epBlue Application Editor - Managing applications and folders. . . . . . . . . . . . . . . . . . . . . . . . . . . . 85
7.1 Menu bar and start screen . . . . . . . . . . . . . . . . . . . . . . . . . . . . . . . . . . . . . . . . . . . . . . . . . . . . . 85 7.2 Copying and deleting applications . . . . . . . . . . . . . . . . . . . . . . . . . . . . . . . . . . . . . . . . . . . . . . . 86 7.2.1 Copying applications. . . . . . . . . . . . . . . . . . . . . . . . . . . . . . . . . . . . . . . . . . . . . . . . . . . 86 7.2.2 Deleting an application . . . . . . . . . . . . . . . . . . . . . . . . . . . . . . . . . . . . . . . . . . . . . . . . . 86
7.3 Changing the labware properties . . . . . . . . . . . . . . . . . . . . . . . . . . . . . . . . . . . . . . . . . . . . . . . . 86 7.4 Importing and exporting applications. . . . . . . . . . . . . . . . . . . . . . . . . . . . . . . . . . . . . . . . . . . . . 87 7.4.1 Importing applications . . . . . . . . . . . . . . . . . . . . . . . . . . . . . . . . . . . . . . . . . . . . . . . . . 87 7.4.2 Exporting applications . . . . . . . . . . . . . . . . . . . . . . . . . . . . . . . . . . . . . . . . . . . . . . . . . 89
7.5 Saving an application as a PDF file. . . . . . . . . . . . . . . . . . . . . . . . . . . . . . . . . . . . . . . . . . . . . . . 90

Table of contents epBlue™ with MultiCon 5
English (EN)
8 epBlue Labware Editor - Creating and managing labware . . . . . . . . . . . . . . . . . . . . . . . . . . . . . . . . 91
8.1 Overview of labware . . . . . . . . . . . . . . . . . . . . . . . . . . . . . . . . . . . . . . . . . . . . . . . . . . . . . . . . . . 91 8.2 Managing labware. . . . . . . . . . . . . . . . . . . . . . . . . . . . . . . . . . . . . . . . . . . . . . . . . . . . . . . . . . . . 92 8.2.1 Menu bar . . . . . . . . . . . . . . . . . . . . . . . . . . . . . . . . . . . . . . . . . . . . . . . . . . . . . . . . . . . . 92 8.2.2 Deactivating and activating labware . . . . . . . . . . . . . . . . . . . . . . . . . . . . . . . . . . . . . . . 93 8.2.3 Delete labware. . . . . . . . . . . . . . . . . . . . . . . . . . . . . . . . . . . . . . . . . . . . . . . . . . . . . . . . 93 8.2.4 Import labware . . . . . . . . . . . . . . . . . . . . . . . . . . . . . . . . . . . . . . . . . . . . . . . . . . . . . . . 93 8.2.5 Export labware . . . . . . . . . . . . . . . . . . . . . . . . . . . . . . . . . . . . . . . . . . . . . . . . . . . . . . . 95 8.2.6 Viewing the properties of the labware . . . . . . . . . . . . . . . . . . . . . . . . . . . . . . . . . . . . . 96 8.2.7 Setting the bottom tolerance. . . . . . . . . . . . . . . . . . . . . . . . . . . . . . . . . . . . . . . . . . . . . 96
8.3 Creating labware combinations . . . . . . . . . . . . . . . . . . . . . . . . . . . . . . . . . . . . . . . . . . . . . . . . . 98 8.3.1 Creating a labware combination. . . . . . . . . . . . . . . . . . . . . . . . . . . . . . . . . . . . . . . . . . 98 8.3.2 Creating a labware combination based on existing labware . . . . . . . . . . . . . . . . . . . 100
8.3.3Equipping the racks, thermoracks and Reservoir Rack modules with individual
vessels . . . . . . . . . . . . . . . . . . . . . . . . . . . . . . . . . . . . . . . . . . . . . . . . . . . . . . . . . . . . . 102 8.3.4 Equipping the Reservoir Rack with reservoirs and Reservoir Rack modules . . . . . . . 103 8.4 Labware library . . . . . . . . . . . . . . . . . . . . . . . . . . . . . . . . . . . . . . . . . . . . . . . . . . . . . . . . . . . . . 104 8.4.1 Loading labware definitions from the Eppendorf webpage . . . . . . . . . . . . . . . . . . . . 104 8.4.2 Requesting labware definitions. . . . . . . . . . . . . . . . . . . . . . . . . . . . . . . . . . . . . . . . . . 105 8.4.3 Adding a labware definition to the labware library. . . . . . . . . . . . . . . . . . . . . . . . . . . 105
8.5 Labware types in epBlue. . . . . . . . . . . . . . . . . . . . . . . . . . . . . . . . . . . . . . . . . . . . . . . . . . . . . . 105 8.5.1 Reaction vessels . . . . . . . . . . . . . . . . . . . . . . . . . . . . . . . . . . . . . . . . . . . . . . . . . . . . . 105 8.5.2 epT.I.P.S. Motion . . . . . . . . . . . . . . . . . . . . . . . . . . . . . . . . . . . . . . . . . . . . . . . . . . . . . 105 8.5.3 MTP plates . . . . . . . . . . . . . . . . . . . . . . . . . . . . . . . . . . . . . . . . . . . . . . . . . . . . . . . . . 105 8.5.4 PCR plates . . . . . . . . . . . . . . . . . . . . . . . . . . . . . . . . . . . . . . . . . . . . . . . . . . . . . . . . . . 106 8.5.5 Filter plates . . . . . . . . . . . . . . . . . . . . . . . . . . . . . . . . . . . . . . . . . . . . . . . . . . . . . . . . . 106 8.5.6 Racks . . . . . . . . . . . . . . . . . . . . . . . . . . . . . . . . . . . . . . . . . . . . . . . . . . . . . . . . . . . . . . 106 8.5.7 Rack 96 . . . . . . . . . . . . . . . . . . . . . . . . . . . . . . . . . . . . . . . . . . . . . . . . . . . . . . . . . . . . 106 8.5.8 Rack LC . . . . . . . . . . . . . . . . . . . . . . . . . . . . . . . . . . . . . . . . . . . . . . . . . . . . . . . . . . . . 106 8.5.9 ReservoirRack . . . . . . . . . . . . . . . . . . . . . . . . . . . . . . . . . . . . . . . . . . . . . . . . . . . . . . . 106 8.5.10 Reservoir Rack Module TC . . . . . . . . . . . . . . . . . . . . . . . . . . . . . . . . . . . . . . . . . . . . . 107 8.5.11 Thermoracks . . . . . . . . . . . . . . . . . . . . . . . . . . . . . . . . . . . . . . . . . . . . . . . . . . . . . . . . 107 8.5.12 Tip Holder . . . . . . . . . . . . . . . . . . . . . . . . . . . . . . . . . . . . . . . . . . . . . . . . . . . . . . . . . . 107 8.5.13 Thermoadapter . . . . . . . . . . . . . . . . . . . . . . . . . . . . . . . . . . . . . . . . . . . . . . . . . . . . . . 108 8.5.14 Thermoblocks . . . . . . . . . . . . . . . . . . . . . . . . . . . . . . . . . . . . . . . . . . . . . . . . . . . . . . . 108
9 epBlue simulation - Simulating applications . . . . . . . . . . . . . . . . . . . . . . . . . . . . . . . . . . . . . . . . . . 109
9.1 Simulating the application . . . . . . . . . . . . . . . . . . . . . . . . . . . . . . . . . . . . . . . . . . . . . . . . . . . . 109 9.1.1 Starting a simulation . . . . . . . . . . . . . . . . . . . . . . . . . . . . . . . . . . . . . . . . . . . . . . . . . . 109 9.1.2 Controlling the simulation. . . . . . . . . . . . . . . . . . . . . . . . . . . . . . . . . . . . . . . . . . . . . . 110

Table of contents
6epBlue™ with MultiCon English (EN)
10 epBlue ID - Working with ID tracking. . . . . . . . . . . . . . . . . . . . . . . . . . . . . . . . . . . . . . . . . . . . . . . . 111
10.1 ID lists . . . . . . . . . . . . . . . . . . . . . . . . . . . . . . . . . . . . . . . . . . . . . . . . . . . . . . . . . . . . . . . . . . . . 111 10.1.1 Overview . . . . . . . . . . . . . . . . . . . . . . . . . . . . . . . . . . . . . . . . . . . . . . . . . . . . . . . . . . . 111 10.1.2 Input lists and result lists . . . . . . . . . . . . . . . . . . . . . . . . . . . . . . . . . . . . . . . . . . . . . . 112 10.2 Commands for working with IDs . . . . . . . . . . . . . . . . . . . . . . . . . . . . . . . . . . . . . . . . . . . . . . . 112
10.3 Reading IDs into epBlue . . . . . . . . . . . . . . . . . . . . . . . . . . . . . . . . . . . . . . . . . . . . . . . . . . . . . . 113 10.4 Managing ID lists . . . . . . . . . . . . . . . . . . . . . . . . . . . . . . . . . . . . . . . . . . . . . . . . . . . . . . . . . . . 114 10.4.1 Displaying ID lists . . . . . . . . . . . . . . . . . . . . . . . . . . . . . . . . . . . . . . . . . . . . . . . . . . . . 114 10.4.2 Filtering and sorting ID lists . . . . . . . . . . . . . . . . . . . . . . . . . . . . . . . . . . . . . . . . . . . . 115 10.4.3 Import ID lists . . . . . . . . . . . . . . . . . . . . . . . . . . . . . . . . . . . . . . . . . . . . . . . . . . . . . . . 115 10.4.4 Export ID lists . . . . . . . . . . . . . . . . . . . . . . . . . . . . . . . . . . . . . . . . . . . . . . . . . . . . . . . 116 10.4.5 Delete ID lists . . . . . . . . . . . . . . . . . . . . . . . . . . . . . . . . . . . . . . . . . . . . . . . . . . . . . . . 116 10.5 Making the basic settings for the epBlue ID. . . . . . . . . . . . . . . . . . . . . . . . . . . . . . . . . . . . . . . 117 10.5.1 Making the basic settings for the epBlue ID. . . . . . . . . . . . . . . . . . . . . . . . . . . . . . . . 117
11 epBlue settings - Checking components and making the basic settings . . . . . . . . . . . . . . . . . . . . 119
11.1 Overview . . . . . . . . . . . . . . . . . . . . . . . . . . . . . . . . . . . . . . . . . . . . . . . . . . . . . . . . . . . . . . . . . . 119 11.2 Levelsensor options . . . . . . . . . . . . . . . . . . . . . . . . . . . . . . . . . . . . . . . . . . . . . . . . . . . . . . . . . 119 11.3 Tool interlock. . . . . . . . . . . . . . . . . . . . . . . . . . . . . . . . . . . . . . . . . . . . . . . . . . . . . . . . . . . . . . . 120 11.3.1 Lock the tool . . . . . . . . . . . . . . . . . . . . . . . . . . . . . . . . . . . . . . . . . . . . . . . . . . . . . . . . 121 11.3.2 Unlocking the tool. . . . . . . . . . . . . . . . . . . . . . . . . . . . . . . . . . . . . . . . . . . . . . . . . . . . 121 11.4 Dosing device . . . . . . . . . . . . . . . . . . . . . . . . . . . . . . . . . . . . . . . . . . . . . . . . . . . . . . . . . . . . . . 121 11.4.1 Reading out the tool . . . . . . . . . . . . . . . . . . . . . . . . . . . . . . . . . . . . . . . . . . . . . . . . . . 121
11.5 Gripper . . . . . . . . . . . . . . . . . . . . . . . . . . . . . . . . . . . . . . . . . . . . . . . . . . . . . . . . . . . . . . . . . . . 122 11.5.1 Moving the gripper arms . . . . . . . . . . . . . . . . . . . . . . . . . . . . . . . . . . . . . . . . . . . . . . 122 11.6 Temperature control unit X . . . . . . . . . . . . . . . . . . . . . . . . . . . . . . . . . . . . . . . . . . . . . . . . . . . . 123
11.7 Thermomixer. . . . . . . . . . . . . . . . . . . . . . . . . . . . . . . . . . . . . . . . . . . . . . . . . . . . . . . . . . . . . . . 124 11.7.1 Checking the mixing function of the thermomixer . . . . . . . . . . . . . . . . . . . . . . . . . . . 124 11.7.2 Checking the temperature control of the thermomixer . . . . . . . . . . . . . . . . . . . . . . . 125 11.8 Magnetic separation . . . . . . . . . . . . . . . . . . . . . . . . . . . . . . . . . . . . . . . . . . . . . . . . . . . . . . . . . 126
11.9 UV lamp . . . . . . . . . . . . . . . . . . . . . . . . . . . . . . . . . . . . . . . . . . . . . . . . . . . . . . . . . . . . . . . . . . 127 11.9.1 Decontaminating the worktable . . . . . . . . . . . . . . . . . . . . . . . . . . . . . . . . . . . . . . . . . 127 11.10 HEPA air filter . . . . . . . . . . . . . . . . . . . . . . . . . . . . . . . . . . . . . . . . . . . . . . . . . . . . . . . . . . . . . . 128 11.10.1 Switching on the HEPA air filter . . . . . . . . . . . . . . . . . . . . . . . . . . . . . . . . . . . . . . . . . 128 11.10.2 Switching off the HEPA air filter . . . . . . . . . . . . . . . . . . . . . . . . . . . . . . . . . . . . . . . . . 129 11.11 Setting the barcode reader . . . . . . . . . . . . . . . . . . . . . . . . . . . . . . . . . . . . . . . . . . . . . . . . . . . . 129
12 epBlue settings - Creating and managing users. . . . . . . . . . . . . . . . . . . . . . . . . . . . . . . . . . . . . . . . 131
12.1 Managing the user accounts as an administrator. . . . . . . . . . . . . . . . . . . . . . . . . . . . . . . . . . . 131 12.1.1 Logging in as administrator in epBlue . . . . . . . . . . . . . . . . . . . . . . . . . . . . . . . . . . . . 131 12.1.2 epBlue user groups . . . . . . . . . . . . . . . . . . . . . . . . . . . . . . . . . . . . . . . . . . . . . . . . . . . 131 12.1.3 User accounts . . . . . . . . . . . . . . . . . . . . . . . . . . . . . . . . . . . . . . . . . . . . . . . . . . . . . . . 133 12.1.4 Assigning a new password for a user account . . . . . . . . . . . . . . . . . . . . . . . . . . . . . . 136
12.2 Managing your own user account. . . . . . . . . . . . . . . . . . . . . . . . . . . . . . . . . . . . . . . . . . . . . . . 136 12.2.1 Signing into and out of the user account . . . . . . . . . . . . . . . . . . . . . . . . . . . . . . . . . . 136 12.2.2 Changing the password of your own user account. . . . . . . . . . . . . . . . . . . . . . . . . . . 136

Table of contents epBlue™ with MultiCon 7
English (EN)
13 epBlue Settings - Saving data and creating print templates. . . . . . . . . . . . . . . . . . . . . . . . . . . . . . 139
13.1 Data backup . . . . . . . . . . . . . . . . . . . . . . . . . . . . . . . . . . . . . . . . . . . . . . . . . . . . . . . . . . . . . . . 139 13.1.1 Securing the database. . . . . . . . . . . . . . . . . . . . . . . . . . . . . . . . . . . . . . . . . . . . . . . . . 139 13.1.2 Creating an automatic backup . . . . . . . . . . . . . . . . . . . . . . . . . . . . . . . . . . . . . . . . . . 140 13.1.3 Restoring the database . . . . . . . . . . . . . . . . . . . . . . . . . . . . . . . . . . . . . . . . . . . . . . . . 141 13.2 Changing the device name . . . . . . . . . . . . . . . . . . . . . . . . . . . . . . . . . . . . . . . . . . . . . . . . . . . . 142
13.3 Print templates . . . . . . . . . . . . . . . . . . . . . . . . . . . . . . . . . . . . . . . . . . . . . . . . . . . . . . . . . . . . . 143 13.3.1 Create print templates. . . . . . . . . . . . . . . . . . . . . . . . . . . . . . . . . . . . . . . . . . . . . . . . . 144 13.3.2 Saving print templates as default . . . . . . . . . . . . . . . . . . . . . . . . . . . . . . . . . . . . . . . . 144 13.3.3 Delete print templates. . . . . . . . . . . . . . . . . . . . . . . . . . . . . . . . . . . . . . . . . . . . . . . . . 144
14 epBlue - Software error messages . . . . . . . . . . . . . . . . . . . . . . . . . . . . . . . . . . . . . . . . . . . . . . . . . . 145
15 Ordering information . . . . . . . . . . . . . . . . . . . . . . . . . . . . . . . . . . . . . . . . . . . . . . . . . . . . . . . . . . . . . 175
15.1 Accessories . . . . . . . . . . . . . . . . . . . . . . . . . . . . . . . . . . . . . . . . . . . . . . . . . . . . . . . . . . . . . . . . 175
Index . . . . . . . . . . . . . . . . . . . . . . . . . . . . . . . . . . . . . . . . . . . . . . . . . . . . . . . . . . . . . . . . . . . . . . . . . . 176

Table of contents
8epBlue™ with MultiCon English (EN)

Operating instructions epBlue™ with MultiCon 9
English (EN)
1 Operating instructions
1.1Using this manual
Your epMotion operating manual consists of hardware instructions and software instructions. Short instructions are available for optional software enhancements.
The operating manual is part of the product.
The current version of the operating manual can be found on our webpage: www.eppendorf.com.
Read the operating manual in full before using the device.
Store the operating manual at an easily accessible location.
The device may only be transferred with the operating manual.
If the operating manual is lost, replace it immediately. Please contact Eppendorf AG for further details.
1.2Danger symbols and danger levels
The safety precautions in these instructions have the following danger symbols and danger levels:
1.2.1 |
Danger symbols |
|
|
Biohazard |
Explosion |
|
Strong magnetic field |
UV radiation |
|
Electric shock |
Heavy loads |
|
Cuts |
Hot surface |
|
Hazard point |
Material damage |

Operating instructions
10 epBlue™ with MultiCon English (EN)
1.2.2 Danger levels |
|
|
|
DANGER |
Will lead to severe injuries or death. |
|
|
WARNING |
Can lead to severe injuries or death. |
|
|
CAUTION |
May lead to light to moderate injuries. |
|
|
NOTICE |
May lead to material damage. |
|
|
1.3 |
Symbols used |
|
||
|
|
|
|
|
Depiction |
Meaning |
|||
|
|
|
|
|
1. |
|
|
Actions in the specified order |
|
2. |
|
|
|
|
|
|
|
|
|
|
|
|
|
Actions without a specified order |
|
|
|
|
|
• |
|
List |
||
|
|
|
|
|
Text |
|
Display text or software text |
||
|
|
|
|
|
|
|
|
|
Additional information |
|
|
|
|
|
|
|
|
|
|
|
|
|
|
|
Operating instructions epBlue™ with MultiCon 11
English (EN)
1.4Abbreviations used
BCR
Bar code reader
CSV
Comma Separated Value
DNA
Deoxyribonucleic acid
DWP
Deepwell plate
epT.I.P.S.
eppendorf Totally Integrated Pipetting System
HEPA
High Efficiency Particulate Air (filter)
LH
Liquid Handling
LIMS
Laboratory Information Management System
MTP
Microplate
PCR
Polymerase chain reaction
Portable Document Format
TMX
Thermomixer
USB
Universal serial bus
UV
Ultraviolet radiation
VAC
Vacuum unit

Operating instructions
12epBlue™ with MultiCon English (EN)
1.5Glossary
A
Administrator
User who has the rights to administrate epBlue.
Application
Program for a specific application. An application includes the procedure and the equipping of the worktable.
B
Bar code reader
Device for scanning a barcode.
Blow-out
Movement of the piston. The liquid in the pipette tip will be dispensed after the pipetting step.
C
CleanCap
Optional epMotion equipment. The CleanCap includes a HEPA air filter and at least one UV lamp.
Command
A step in a procedure. Various parameters can be set for commands. Each command triggers an action, e.g., the transport of liquids.
CSV file
Text file for exchanging structured information.
D
Destination labware
Rack or plate with destination positions.
Destination location
Labware that liquid is dispensed into exclusively during the application.
Dispensing tool
Tool that aspirates and dispenses liquid. Single-channel dispensing tools and eight-channel dispensing tools are available for various volume ranges.
E
Entry list
ID list assigned to a labware at the start of the application. The ID list contains the name of the labware, IDs for the positions of the labware and descriptions. epBlue imports and exports the IDs of the labware by means of entry lists. epBlue can process entry lists in the formats CSV and XML.

Operating instructions epBlue™ with MultiCon 13
English (EN)
epBlue
Software for creating and administering applications and labware. The epMotion is controlled using the software. The software includes a user administration system. Modular extension of epBlue is possible. With the epBlue ID module you can track samples during the application. The labware is labeled with IDs for this purpose. The sample tracking is documented automatically.
epT.I.P.S. Motion
epMotion pipette tips. Only epT.I.P.S.® Motion can be used on the epMotion. epT.I.P.S.® Motions are available with or without a filter.
F
Filling volume
Maximum liquid volume of a labware. The epMotion uses the gripper to transport the labware up to the filling volume. The epMotion aspirates liquid from the labware up to the filling volume. The filling volume is higher than the working volume.
G
Gripper
Tool that transports labware.
H
Height adapter
Adapter for low labware. The height differences among the labware will be offset to decrease the tool holder paths, thereby decreasing the run time of the application as well.
HEPA air filter
Air filter. The air filter prevents particles such as dust and germs from the environment entering the epMotion work room.
I
ID
Character string which is used by the epBlue ID module to identify the labware.
Input list
ID list with information on source labware. The input list contains the IDs of the source positions. epBlue creates an input list for each source labware for which ID tracking is active.
Intermediate labware
Rack or plate with intermediate positions.
Intermediate location
Position in the labware that is both source and destination of liquid transfers.

Operating instructions
14epBlue™ with MultiCon English (EN)
L
Lab administrator
User who has the rights to administrate applications and labware.
Labware
Racks, plates, tips, etc. which are placed on the worktable.
Location
Area where labware is placed on the worktable.
M
MagSep
System consisting of the magnetic finger module, thermomixer and PrepRack and reagents for nucleic acid preparation with the epMotion.
MultiCon
epMotion operator panel. You can control your epMotion using the control unit and the epBlue software.
P
Pattern
Pattern in which liquid is aspirated and dispensed. Patterns are defined in a transfer command. Patterns are defined as regular patterns and irregular patterns. Patterns are independent in x-direction and y-direction.
Procedure
Sequence of commands that are executed one after the other. Part of an application.
R
Rack
Mount for tubes or pipette tips.
Remaining volume
Volume that cannot be aspirated from a vessel. The distance from the pipette tip to the vessel base, defined in the software, and the defined immersion depth of the pipette tip in the liquid, must be observed. Therefore, the pipette tip cannot aspirate the volume. The remaining volume depends on the vessel geometry.
Reservoir
Reservoirs are used to hold reagents. Reservoirs are hung in a ReservoirRack or placed directly on the worktable.
Result list
ID list with information on destination labware and intermediate labware. The result list contains the IDs of destination positions and intermediate positions. epBlue creates a result list for each destination labware and intermediate labware for which ID tracking is active.

Operating instructions epBlue™ with MultiCon 15
English (EN)
S
SafeRack
Rack with ep.T.I.P.S. Motion pipette tips. The SafeRack features a partition that prevents the contamination of adjacent tips. Use the SafeRacks if you would like to use tips several times.
Source labware
Rack or plate with source positions.
Source location
Position in the labware that liquid is aspirated from exclusively during the application.
T
Thermal module
Thermal module for labware that is integrated in the worktable.
Thermoadapter
Heat-conductive adapter for holding plates.
Thermoblock
Thermoadapter that is permanently connected to a PCR plate or PCR vessel.
Thermorack
Temperable rack for smaller vessels, e.g., Safe-Lock tubes for 0.5 mL, 1.5 mL or 2 mL.
V
Vacuum unit
The vacuum unit uses a vacuum to suck liquid from a filter plate. The vacuum unit consists of a vacuum manifold, vacuum pump and Vac Frame.
Vessel
Tube or single well of a plate.
W
Working volume
Liquid volume for a labware. The epMotion fills a vessel with low levels of contamination up to the working volume. The working volume is less than the filling volume.
Worktable
epMotion work surface where labware and tools are placed. In the software, the epMotion worktable is shown as the epBlue worktable.

Operating instructions
16epBlue™ with MultiCon English (EN)

Product description epBlue™ with MultiCon 17
English (EN)
2 Product description
2.1Features
The epBlue software is used to control the epMotion. epBlue consists of several components.
Which modules are available depends on the features of your epMotion and the specification of the software.
2.1.1 |
epBlue |
|
|
|
|
|
|
Module |
|
Description |
Operating manual |
|
|
|
|
Application Editor |
• Create applications. |
(see epBlue Application Editor - Creating |
|
|
|
|
and editing applications on p. 39) |
|
|
• Manage applications. |
(see epBlue Application Editor - Managing |
|
|
|
applications and folders on p. 85) |
|
|
|
|
Application Runner |
• Execute applications. |
(see epBlue Application Runner - Carrying |
|
|
|
|
out the application on p. 25) |
|
|
|
|
Application Simulator |
• Simulate applications. |
(see epBlue simulation - Simulating |
|
|
|
|
applications on p. 109) |
|
|
|
|
ID list management |
• Manage ID lists. |
(see epBlue ID - Working with ID tracking |
|
|
|
|
on p. 111) |
|
|
|
|
Labware Editor |
• Manage labware. |
(see epBlue Labware Editor - Creating and |
|
|
|
|
managing labware on p. 91) |
|
|
|
|
Log Viewer |
• Display and print logs. |
(see epBlue LogViewer - Managing logs on |
|
|
|
|
p. 37) |
|
|
|
|
Settings |
|
• Check components of the device. |
(see epBlue settings - Checking |
|
|
• Perform basic settings. |
components and making the basic settings |
|
|
|
on p. 119) |
|
|
• User administration. |
(see epBlue settings - Creating and |
|
|
|
managing users on p. 131) |
|
|
• Backup database. |
(see epBlue Settings - Saving data and |
|
|
|
creating print templates on p. 139) |
|
|
• Perform basic settings for ID |
(see epBlue ID - Working with ID tracking |
|
|
tracking. |
on p. 111) |
|
|
|
|

Product description
18epBlue™ with MultiCon English (EN)
2.1.2Assistants
Assistants are programs for a specific application. Assistants are optionally available and described in separate operating manuals. The following assistants are available for epBlue:
Prep Assistant
• Nucleic acid preparation with Eppendorf MagSep kits. After that, a PCR setup can be performed.
PCR Assistant
•Create PCR master mixes and dilution series for quantification standards, normalization of sample concentrations, and setting up PCR reactions.
LH assistant
•Create Liquid Handling applications such as assay setup, pooling and reformatting of samples; cherry picking.

Operation epBlue™ with MultiCon 19
English (EN)
3 Operation
3.1Starting and exiting epBlue
3.1.1Starting epBlue
Prerequisites
•The device does not show any sign of external damage. Switch on the epMotion using the mains/power switch. Switch on the MultiCon.
To start epBlue, double-click on the epBlue symbol on the desktop.
Alternatively, open the Windows start menu and select Programs >Eppendorf > epBlue. epBlue is started. The login screen appears.
3.1.2Starting epBlue for the first time
Prerequisites
•epMotion and MultiCon were installed by a service technician.
•epBlue has been started (see p. 19).
•epBlue displays the login screen.
1.Log in as an administrator (see Logging in as administrator in epBlue on p. 131).
2.Create user accounts (see Creating a user account on p. 134).
3.Log off as administrator.
4.Log on to epBlue as a user (see Logging in as User. on p. 19).
3.1.3Logging in as User.
Prerequisites
•epBlue has been started (see p. 19).
•epBlue displays the login screen.
•The administrator has created a user account for the user.
1.Enter the name of the user account and the password.
If you have forgotten your password, please contact your administrator (see p. 136).
2.Press the Login button.
The epBlue start screen appears. The symbols that are displayed depend on your user rights and the features of your epMotion.

Operation
20epBlue™ with MultiCon English (EN)
Abb. 3-1: epBlue start screen
1 |
2 |
3 |
4 |
|
|
5
Fig. 3-1: epBlue start screen
1 |
Eppendorf menu |
4 |
Status area |
|
Exit the program. |
|
epMotion status. |
2 |
Menu bar |
5 |
Working range |
|
Contains functions that can be accessed in all |
|
Contents and applications. |
|
applications. |
|
|
3Information area
Contains information on the open file.
3.1.4Logging off as a user
You can only log off if all applications started from your user account have been exited. If you want to log off before completing an application, the application has to be ended manually.
Prerequisites
•All applications have been ended and saved.
•Changes to the labware have been saved. In the File menu, select the Log off entry.
You are logged out of your account. The login screen appears.
Operation epBlue™ with MultiCon 21
English (EN)
3.1.5Exiting epBlue and switching off MultiCon
1.In the Eppendorf menu, select Close.
2.When the program is ended, shut down MultiCon.
3.Switch off the epMotion using the mains power switch.
3.2Initial steps
3.2.1Using the touch screen and mouse
You can operate the MultiCon by using the touch screen or a USB mouse.
Connect the mouse to a USB interface on the MultiCon.
Tab. 3-1: Touch screen/mouse comparison
Touch screen |
Mouse |
|
|
Tap |
Click using the left mouse button |
|
|
Tap and hold 2 s |
Click using the right mouse button |
|
|
Drag |
Drag with the left mouse button pressed down |
|
|
Tap twice |
Double click using the left mouse button |
|
|
3.2.2Using the screen key pad
Enter the numbers and letters using the screen key pad.
Abb. 3-2: Screen key pad
Fig. 3-2: Screen key pad
Automatically show the screen key pad.
epBlue automatically shows a key pad if you have selected an input field.
Manually show the screen key pad.
In the File menu, select the Show keyboard entry.

Operation
22epBlue™ with MultiCon English (EN)
Switch the automatic display of the screen key pad on and off.
In the File menu, select the Show keyboard automatically entry.
Tab. 3-2: epBlue key combinations
|
Enter special characters. |
Press the letter key for 2 s. |
|
|
|
|
Confirm your entry. |
Press the key once. |
|
|
|
|
Switch between lowercase |
To enter a capital letter, press the key once. Then press |
|
letters and capital letters. |
the letter. |
|
|
To switch the key pad to all capital letters, press the key |
|
|
twice. |
|
|
|
|
Switch the key pad. |
To switch between the English and German key pads, |
|
|
press the key once. |
|
|
|
|
Show the screen key pad. |
Press the key once. |
|
|
|
3.2.3File menu
Abb. 3-3: File drop-down menu
Fig. 3-3: File drop-down menu
Exit to start screen entry
Show the epBlue start screen.
Menu – Show keyboard
Manually show the screen key pad.
Menu – Show keyboard automatically
Switch the automatic display of the screen key pad on and off.
Sound enabled entry
Switch the system sound on or off.
Log Off entry
User is logged out. The login window appears.

Operation epBlue™ with MultiCon 23
English (EN)
Abb. 3-4: Help drop-down menu
Fig. 3-4: Help drop-down menu |
|
Device manuals entry |
About epBlue entry |
Open the operating manual of the device. |
Show the epBlue version. |
Software manuals entry |
|
Open the operating manual of the software. |
|
3.2.4Status area
The status area is located in the top right of the screen.
If you click on the epMotion in the status area, the following information will be displayed:
•Serial number of the epMotion
•Features of the epMotion
•Firmware version
•epMotion status
•Actual temperature of a thermal module or Thermomixer.
Example Info: C3:21°C. The thermal module in location C3 has a temperature of 21°C.

Operation
24epBlue™ with MultiCon English (EN)
epBlue Application Runner - Carrying out the application |
|
epBlue™ with MultiCon |
25 |
English (EN) |
|
4 epBlue Application Runner - Carrying out the application
This chapter describes how to carry out an application on the epMotion.
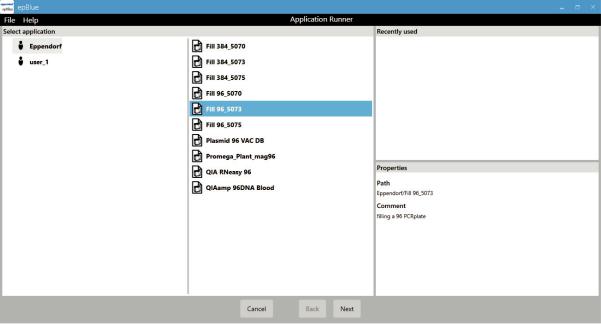
4.1Opening an application
Abb. 4-1: Selecting an application
Fig. 4-1: Selecting an application
Prerequisites
•epMotion is ready for operation.
•Application Runner is started.
1.Select the application in the Select application area.
Recently used applications can be found in the Recently used area. Open applications in the Select application area have a red padlock  . The Properties area displays the properties of the selected application.
2.Press the Next button. The application is opened.
epBlue Application Runner - Carrying out the application
26epBlue™ with MultiCon English (EN)
4.2Preparing the application run
4.2.1Selecting the device
Abb. 4-2: Selection of an available device
Fig. 4-2: Selection of an available device
NOTICE! Tool collisions with incorrectly positioned labware.
Labware must be positioned on the epMotion worktable as defined in the application. Tools and labware become damaged in a collision. A collision can lead to sample loss.
Check the positioning of the labware before starting the application.
In the Available devices area, the connected epMotion is displayed.
Prerequisites
epMotion is ready for operation.
1.Select the device for the application run.
2.Press the Next button.

epBlue Application Runner - Carrying out the application |
|
epBlue™ with MultiCon |
27 |
English (EN) |
|
4.2.2Entering the sample quantity
Abb. 4-3: Process control window
Fig. 4-3: Process control window
The window Process control appears if the sample quantity in the application is variable.
1.Enter the sample quantity for the current run.
2.Press the OK button.
4.2.3Setting the HEPA air filter and the UV lamp
Abb. 4-4: Setting the parameters for the HEPA air filter and the UV lamp
Fig. 4-4: Setting the parameters for the HEPA air filter and the UV lamp
If your epMotion is equipped with a HEPA air filter and UV lamp, you can define the settings for the HEPA air filter and the UV lamp.
Activate or deactivate the HEPA air filter.
Define whether a decontamination is to be carried out before the application.
The worktable may only be decontaminated if no labware or tools are present on the worktable.
epBlue Application Runner - Carrying out the application
28epBlue™ with MultiCon English (EN)
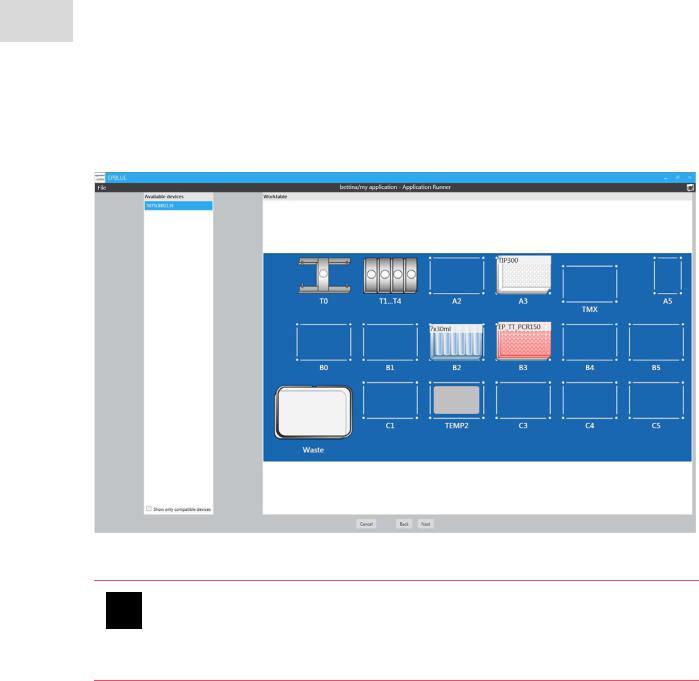
4.2.4Placing the labware on the epMotion worktable
Position the labware on the epMotion worktable according to the application.
Additional information on positioning the labware can be found in the hardware operating manual.
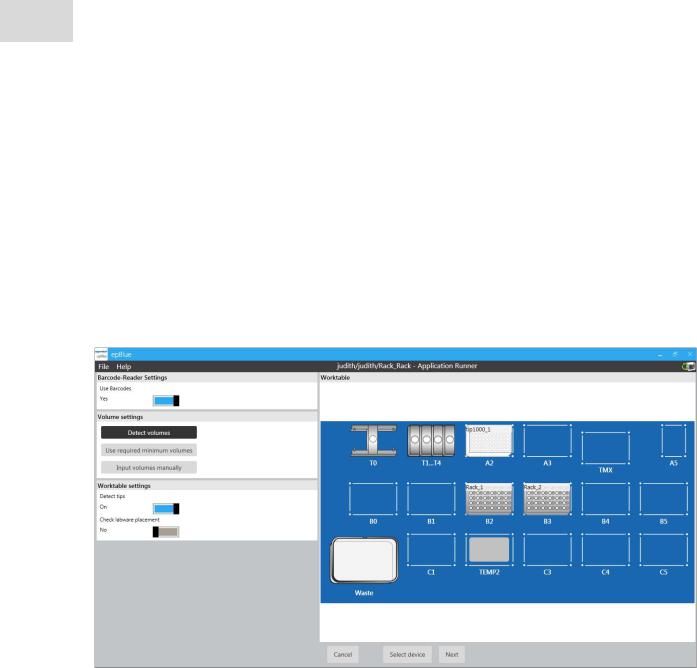
4.2.5Setting the run parameters for the optical sensor
If you have the epBlue ID module, the Use bar codes checkbox will appear in the window.
In the application, you defined the application parameters for the optical sensor. You can enter run parameters to use other settings of the optical sensor for an individual run. The run parameters overwrite the application parameters for this run only (see Optical sensor on p. 80).
Abb. 4-5: Setting the run parameters
Fig. 4-5: Setting the run parameters
Use Barcodes checkbox
Activate ID tracking.
Detect volumes radio button
Activate the Detect volumes function. The parameters set in the application for the labware are used.
Use required minimum volumes radio button epBlue assumes that all vessels are filled with the minimum required volume for this run. Use this function for dry runs.
Input volumes manually radio button
Deactivate the Detect volumes function. You have to enter the sample volume manually.
Detect tips checkbox
Activate the Detect tips function.
Check labware placement checkbox
Activate the Check labware placement function.

epBlue Application Runner - Carrying out the application |
|
epBlue™ with MultiCon |
29 |
English (EN) |
|
1.Set the functions of the optical sensor.
2.Activate ID tracking, if required.
3.Press the Run button.
4.2.6Setting the ID tracking parameters
If you have the epBlue ID module and ID tracking is activated for the labware, a window appears. In the labware settings, you defined whether the IDs are entered manually or read in via the entry list. The window displays the corresponding option.
4.2.6.1 Entering IDs manually
Abb. 4-6: Entering IDs manually
Fig. 4-6: Entering IDs manually
Prerequisites
•Labware ID tracking is activated.
•The manual scan option is activated for the labware.
1.Press the Next button.
You are prompted to enter the IDs for the labware. The labware is marked with a red border.
2.Enter the name for the ID list that is created during the application for this labware in the List name field.
3.Read the ID with the barcode reader or enter it manually.
4.If 2 IDs are to be assigned for a reagent, 2 entry fields appear. If you are using only one ID, press the
Use only one ID button.

epBlue Application Runner - Carrying out the application
30epBlue™ with MultiCon English (EN)
5.Confirm your entry with the OK button.
6.Press the Next button to enter the ID for the next labware.
7.When all IDs have been entered, the application starts.
4.2.6.2 Reading the IDs with an entry list
Prerequisites
•Labware ID tracking is activated.
•The Entry list option is activated for the labware.
1.Press the Next button.
You are prompted to enter the IDs for the labware. The labware is marked with a border.
2.Press the Select ID list button.
The Select ID list window appears.
By default, the window shows all compatible entry lists.
3.Import the entry list, if required (see p. 115)
4.Select the entry list to be imported.
5.Press the OK button.
6.Enter the ID for the selected position.
epBlue compares the entered ID with the ID of the entry list.
7.If the ID does not correspond to the ID of the entry list, an error message appears. Correct the corresponding ID.
8.When all IDs have been entered, the application starts.
Loading...