


Register your instrument!
www.eppendorf.com/myeppendorf
Centrifuge 5430/5430 R
Operating manual
Manual de instrucciones
Copyright© 2013 Eppendorf AG, Hamburg. No part of this publication may be reproduced without the prior permission of the copyright owner.
Trademarks
Eppendorf®, the Eppendorf logo. CombiSlide®, and QuickLock® are registered trademarks of Eppendorf AG, Hamburg, Germany.
Centriplus® is a registered trademark of Millipore Corporation, Billerica, USA. Microtainer® is a registered trademark of Becton Dickinson, Franklin Lakes, NJ, USA. Trademarks are not marked in all cases with ™ or ® in this manual.
Operating manual. . . . . . . . . . . . . . . . . . . . . . . . . . . . . . . . . . . . . . . . . . . . . . . . . . . . . . . . . . . . . . . . . . . . . . 3 Manual de instrucciones . . . . . . . . . . . . . . . . . . . . . . . . . . . . . . . . . . . . . . . . . . . . . . . . . . . . . . . . . . . . . . . 69 Declarations and Certificates . . . . . . . . . . . . . . . . . . . . . . . . . . . . . . . . . . . . . . . . . . . . . . . . . . . . . . . . . . . 111 Menu structure of Centrifuge 5430/5430 R . . . . . . . . . . . . . . . . . . . . . . . . . . . . . . . . . . . . . . . . . . . . . . . . 127 Rotor F-35-6-30: Adapters for round-bottom tubes and blood taking systems . . . . . . . . . . . . . . . . . . . . . 128
5427 901.124-04/072013

Table of contents
Centrifuge 5430/5430 R 3
English (EN)
Table of contents
1 Operating instructions . . . . . . . . . . . . . . . . . . . . . . . . . . . . . . . . . . . . . . . . . . . . . . . . . . . . . . . . . . . . . . 7
1.1 Using this manual . . . . . . . . . . . . . . . . . . . . . . . . . . . . . . . . . . . . . . . . . . . . . . . . . . . . . . . . . . . . . 7 1.2 Danger symbols and danger levels . . . . . . . . . . . . . . . . . . . . . . . . . . . . . . . . . . . . . . . . . . . . . . . . 7 1.2.1 Danger symbols . . . . . . . . . . . . . . . . . . . . . . . . . . . . . . . . . . . . . . . . . . . . . . . . . . . . . . . 7 1.2.2 Danger levels. . . . . . . . . . . . . . . . . . . . . . . . . . . . . . . . . . . . . . . . . . . . . . . . . . . . . . . . . . 7
1.3 Symbols used . . . . . . . . . . . . . . . . . . . . . . . . . . . . . . . . . . . . . . . . . . . . . . . . . . . . . . . . . . . . . . . . 7 1.4 Abbreviations used . . . . . . . . . . . . . . . . . . . . . . . . . . . . . . . . . . . . . . . . . . . . . . . . . . . . . . . . . . . . 8
2 Product description . . . . . . . . . . . . . . . . . . . . . . . . . . . . . . . . . . . . . . . . . . . . . . . . . . . . . . . . . . . . . . . . 9
2.1 Main illustration . . . . . . . . . . . . . . . . . . . . . . . . . . . . . . . . . . . . . . . . . . . . . . . . . . . . . . . . . . . . . . 9 2.2 Delivery package. . . . . . . . . . . . . . . . . . . . . . . . . . . . . . . . . . . . . . . . . . . . . . . . . . . . . . . . . . . . . 10 2.2.1 Centrifuge 5430. . . . . . . . . . . . . . . . . . . . . . . . . . . . . . . . . . . . . . . . . . . . . . . . . . . . . . . 10 2.2.2 Centrifuge 5430 R . . . . . . . . . . . . . . . . . . . . . . . . . . . . . . . . . . . . . . . . . . . . . . . . . . . . . 10
2.3 Features. . . . . . . . . . . . . . . . . . . . . . . . . . . . . . . . . . . . . . . . . . . . . . . . . . . . . . . . . . . . . . . . . . . . 11 2.4 Rotors . . . . . . . . . . . . . . . . . . . . . . . . . . . . . . . . . . . . . . . . . . . . . . . . . . . . . . . . . . . . . . . . . . . . . 12 2.4.1 rcf display and calculation . . . . . . . . . . . . . . . . . . . . . . . . . . . . . . . . . . . . . . . . . . . . . . 16
3 Safety. . . . . . . . . . . . . . . . . . . . . . . . . . . . . . . . . . . . . . . . . . . . . . . . . . . . . . . . . . . . . . . . . . . . . . . . . . . 18
3.1 Intended use . . . . . . . . . . . . . . . . . . . . . . . . . . . . . . . . . . . . . . . . . . . . . . . . . . . . . . . . . . . . . . . . 18 3.2 User profile . . . . . . . . . . . . . . . . . . . . . . . . . . . . . . . . . . . . . . . . . . . . . . . . . . . . . . . . . . . . . . . . . 18 3.3 Application limits . . . . . . . . . . . . . . . . . . . . . . . . . . . . . . . . . . . . . . . . . . . . . . . . . . . . . . . . . . . . 18 3.3.1 Declaration concerning the ATEX directive (94/9/EC) . . . . . . . . . . . . . . . . . . . . . . . . . 18 3.3.2 Maximum service life for accessories. . . . . . . . . . . . . . . . . . . . . . . . . . . . . . . . . . . . . . 18
3.4 Information on product liability . . . . . . . . . . . . . . . . . . . . . . . . . . . . . . . . . . . . . . . . . . . . . . . . . 20 3.5 Warnings for intended use . . . . . . . . . . . . . . . . . . . . . . . . . . . . . . . . . . . . . . . . . . . . . . . . . . . . . 20 3.5.1 Personal injury or damage to the equipment . . . . . . . . . . . . . . . . . . . . . . . . . . . . . . . . 20 3.5.2 Incorrect handling of the centrifuge . . . . . . . . . . . . . . . . . . . . . . . . . . . . . . . . . . . . . . . 21 3.5.3 Incorrect handling of the rotors . . . . . . . . . . . . . . . . . . . . . . . . . . . . . . . . . . . . . . . . . . 22 3.5.4 Extreme strain on the centrifuging tubes . . . . . . . . . . . . . . . . . . . . . . . . . . . . . . . . . . . 23 3.5.5 Aerosol-tight centrifugation . . . . . . . . . . . . . . . . . . . . . . . . . . . . . . . . . . . . . . . . . . . . . 24
3.6 Safety notes on the device . . . . . . . . . . . . . . . . . . . . . . . . . . . . . . . . . . . . . . . . . . . . . . . . . . . . . 24
4 Installation . . . . . . . . . . . . . . . . . . . . . . . . . . . . . . . . . . . . . . . . . . . . . . . . . . . . . . . . . . . . . . . . . . . . . . 25
4.1 Selecting the location . . . . . . . . . . . . . . . . . . . . . . . . . . . . . . . . . . . . . . . . . . . . . . . . . . . . . . . . . 25 4.2 Preparing installation . . . . . . . . . . . . . . . . . . . . . . . . . . . . . . . . . . . . . . . . . . . . . . . . . . . . . . . . . 25 4.3 Installing the instrument. . . . . . . . . . . . . . . . . . . . . . . . . . . . . . . . . . . . . . . . . . . . . . . . . . . . . . . 26
5 Operation . . . . . . . . . . . . . . . . . . . . . . . . . . . . . . . . . . . . . . . . . . . . . . . . . . . . . . . . . . . . . . . . . . . . . . . 28
5.1 Overview of operating controls . . . . . . . . . . . . . . . . . . . . . . . . . . . . . . . . . . . . . . . . . . . . . . . . . . 28 5.2 Menu navigation . . . . . . . . . . . . . . . . . . . . . . . . . . . . . . . . . . . . . . . . . . . . . . . . . . . . . . . . . . . . . 29 5.3 Configure centrifuge . . . . . . . . . . . . . . . . . . . . . . . . . . . . . . . . . . . . . . . . . . . . . . . . . . . . . . . . . . 30 5.3.1 Set menu language . . . . . . . . . . . . . . . . . . . . . . . . . . . . . . . . . . . . . . . . . . . . . . . . . . . . 30 5.3.2 Setting the date and time . . . . . . . . . . . . . . . . . . . . . . . . . . . . . . . . . . . . . . . . . . . . . . . 30
5.4 Preparing for centrifugation . . . . . . . . . . . . . . . . . . . . . . . . . . . . . . . . . . . . . . . . . . . . . . . . . . . . 32 5.4.1 Switching on the centrifuge . . . . . . . . . . . . . . . . . . . . . . . . . . . . . . . . . . . . . . . . . . . . . 32 5.4.2 Inserting the rotor . . . . . . . . . . . . . . . . . . . . . . . . . . . . . . . . . . . . . . . . . . . . . . . . . . . . . 32 5.4.3 Automatic rotor detection . . . . . . . . . . . . . . . . . . . . . . . . . . . . . . . . . . . . . . . . . . . . . . . 32 5.4.4 Manual rotor detection . . . . . . . . . . . . . . . . . . . . . . . . . . . . . . . . . . . . . . . . . . . . . . . . . 32 5.4.5 Loading the rotor . . . . . . . . . . . . . . . . . . . . . . . . . . . . . . . . . . . . . . . . . . . . . . . . . . . . . 33 5.4.6 Closing the centrifuge lid . . . . . . . . . . . . . . . . . . . . . . . . . . . . . . . . . . . . . . . . . . . . . . . 35

Table of contents
4Centrifuge 5430/5430 R English (EN)
5.5 Cooling (only 5430 R) . . . . . . . . . . . . . . . . . . . . . . . . . . . . . . . . . . . . . . . . . . . . . . . . . . . . . . . . . 36 5.5.1 Temperature adjustment . . . . . . . . . . . . . . . . . . . . . . . . . . . . . . . . . . . . . . . . . . . . . . . . 36 5.5.2 Temperature display . . . . . . . . . . . . . . . . . . . . . . . . . . . . . . . . . . . . . . . . . . . . . . . . . . . 36 5.5.3 Temperature monitoring . . . . . . . . . . . . . . . . . . . . . . . . . . . . . . . . . . . . . . . . . . . . . . . . 36 5.5.4 FastTemp. . . . . . . . . . . . . . . . . . . . . . . . . . . . . . . . . . . . . . . . . . . . . . . . . . . . . . . . . . . . 36 5.5.5 FastTemp pro . . . . . . . . . . . . . . . . . . . . . . . . . . . . . . . . . . . . . . . . . . . . . . . . . . . . . . . . 37 5.5.6 Continuous cooling . . . . . . . . . . . . . . . . . . . . . . . . . . . . . . . . . . . . . . . . . . . . . . . . . . . . 38
5.6 Centrifuging . . . . . . . . . . . . . . . . . . . . . . . . . . . . . . . . . . . . . . . . . . . . . . . . . . . . . . . . . . . . . . . . 39 5.6.1 Centrifugation with time setting . . . . . . . . . . . . . . . . . . . . . . . . . . . . . . . . . . . . . . . . . . 39 5.6.2 Centrifuging in continuous operation . . . . . . . . . . . . . . . . . . . . . . . . . . . . . . . . . . . . . . 40 5.6.3 Short-spin centrifugation . . . . . . . . . . . . . . . . . . . . . . . . . . . . . . . . . . . . . . . . . . . . . . . 40 5.6.4 Removing the rotor . . . . . . . . . . . . . . . . . . . . . . . . . . . . . . . . . . . . . . . . . . . . . . . . . . . . 41
5.7 Standby mode . . . . . . . . . . . . . . . . . . . . . . . . . . . . . . . . . . . . . . . . . . . . . . . . . . . . . . . . . . . . . . . 41 5.8 User instructions on rotors . . . . . . . . . . . . . . . . . . . . . . . . . . . . . . . . . . . . . . . . . . . . . . . . . . . . . 42 5.8.1 Rotor F-35-6-30: rotor removal tool . . . . . . . . . . . . . . . . . . . . . . . . . . . . . . . . . . . . . . . 42 5.8.2 Rotor A-2-MTP . . . . . . . . . . . . . . . . . . . . . . . . . . . . . . . . . . . . . . . . . . . . . . . . . . . . . . . 43 5.8.3 Rotor FA-45-24-11-HS: using the special rotor key . . . . . . . . . . . . . . . . . . . . . . . . . . . 43 5.8.4 QuickLock . . . . . . . . . . . . . . . . . . . . . . . . . . . . . . . . . . . . . . . . . . . . . . . . . . . . . . . . . . . 44
6 Operating controls and function . . . . . . . . . . . . . . . . . . . . . . . . . . . . . . . . . . . . . . . . . . . . . . . . . . . . . 45
6.1 Device menu . . . . . . . . . . . . . . . . . . . . . . . . . . . . . . . . . . . . . . . . . . . . . . . . . . . . . . . . . . . . . . . . 45 6.2 Settings in the device menu . . . . . . . . . . . . . . . . . . . . . . . . . . . . . . . . . . . . . . . . . . . . . . . . . . . . 47 6.2.1 Programs . . . . . . . . . . . . . . . . . . . . . . . . . . . . . . . . . . . . . . . . . . . . . . . . . . . . . . . . . . . . 47 6.2.2 Use program keys . . . . . . . . . . . . . . . . . . . . . . . . . . . . . . . . . . . . . . . . . . . . . . . . . . . . . 47 6.2.3 Other menu items . . . . . . . . . . . . . . . . . . . . . . . . . . . . . . . . . . . . . . . . . . . . . . . . . . . . . 48 6.2.4 Settings . . . . . . . . . . . . . . . . . . . . . . . . . . . . . . . . . . . . . . . . . . . . . . . . . . . . . . . . . . . . . 49
7 Maintenance . . . . . . . . . . . . . . . . . . . . . . . . . . . . . . . . . . . . . . . . . . . . . . . . . . . . . . . . . . . . . . . . . . . . . 50
7.1 Prepare cleaning/disinfection . . . . . . . . . . . . . . . . . . . . . . . . . . . . . . . . . . . . . . . . . . . . . . . . . . . 50 7.2 Cleaning/disinfection . . . . . . . . . . . . . . . . . . . . . . . . . . . . . . . . . . . . . . . . . . . . . . . . . . . . . . . . . 50 7.2.1 Cleaning and disinfecting the device . . . . . . . . . . . . . . . . . . . . . . . . . . . . . . . . . . . . . . 51 7.2.2 Cleaning and disinfecting the rotor . . . . . . . . . . . . . . . . . . . . . . . . . . . . . . . . . . . . . . . 51
7.3 Additional service instructions for Centrifuge 5430 R . . . . . . . . . . . . . . . . . . . . . . . . . . . . . . . . 52 7.4 Glass breakage . . . . . . . . . . . . . . . . . . . . . . . . . . . . . . . . . . . . . . . . . . . . . . . . . . . . . . . . . . . . . . 53 7.5 Fuses . . . . . . . . . . . . . . . . . . . . . . . . . . . . . . . . . . . . . . . . . . . . . . . . . . . . . . . . . . . . . . . . . . . . . . 53 7.6 Decontamination before shipment . . . . . . . . . . . . . . . . . . . . . . . . . . . . . . . . . . . . . . . . . . . . . . . 53
8 Troubleshooting . . . . . . . . . . . . . . . . . . . . . . . . . . . . . . . . . . . . . . . . . . . . . . . . . . . . . . . . . . . . . . . . . . 54
8.1 General errors . . . . . . . . . . . . . . . . . . . . . . . . . . . . . . . . . . . . . . . . . . . . . . . . . . . . . . . . . . . . . . . 54 8.2 Error messages . . . . . . . . . . . . . . . . . . . . . . . . . . . . . . . . . . . . . . . . . . . . . . . . . . . . . . . . . . . . . . 55 8.3 Emergency release . . . . . . . . . . . . . . . . . . . . . . . . . . . . . . . . . . . . . . . . . . . . . . . . . . . . . . . . . . . 57
9 Transport, storage and disposal . . . . . . . . . . . . . . . . . . . . . . . . . . . . . . . . . . . . . . . . . . . . . . . . . . . . . 58
9.1 Transport . . . . . . . . . . . . . . . . . . . . . . . . . . . . . . . . . . . . . . . . . . . . . . . . . . . . . . . . . . . . . . . . . . . 58 9.2 Storage . . . . . . . . . . . . . . . . . . . . . . . . . . . . . . . . . . . . . . . . . . . . . . . . . . . . . . . . . . . . . . . . . . . . 58 9.3 Disposal. . . . . . . . . . . . . . . . . . . . . . . . . . . . . . . . . . . . . . . . . . . . . . . . . . . . . . . . . . . . . . . . . . . . 58
10 Technical data. . . . . . . . . . . . . . . . . . . . . . . . . . . . . . . . . . . . . . . . . . . . . . . . . . . . . . . . . . . . . . . . . . . . 59
10.1 Power supply. . . . . . . . . . . . . . . . . . . . . . . . . . . . . . . . . . . . . . . . . . . . . . . . . . . . . . . . . . . . . . . . 59 10.2 Ambient conditions . . . . . . . . . . . . . . . . . . . . . . . . . . . . . . . . . . . . . . . . . . . . . . . . . . . . . . . . . . . 59 10.3 Weight/dimensions . . . . . . . . . . . . . . . . . . . . . . . . . . . . . . . . . . . . . . . . . . . . . . . . . . . . . . . . . . . 60 10.4 Application parameters . . . . . . . . . . . . . . . . . . . . . . . . . . . . . . . . . . . . . . . . . . . . . . . . . . . . . . . . 60

Table of contents
Centrifuge 5430/5430 R 5
English (EN)
11 Ordering Information . . . . . . . . . . . . . . . . . . . . . . . . . . . . . . . . . . . . . . . . . . . . . . . . . . . . . . . . . . . . . . 62
11.1 Centrifuge 5430 . . . . . . . . . . . . . . . . . . . . . . . . . . . . . . . . . . . . . . . . . . . . . . . . . . . . . . . . . . . . . 62 11.2 Centrifuge 5430 R . . . . . . . . . . . . . . . . . . . . . . . . . . . . . . . . . . . . . . . . . . . . . . . . . . . . . . . . . . . . 62 11.3 Rotors, rotor lids and seals . . . . . . . . . . . . . . . . . . . . . . . . . . . . . . . . . . . . . . . . . . . . . . . . . . . . . 63 11.3.1 Rotors with QuickLock rotor lid . . . . . . . . . . . . . . . . . . . . . . . . . . . . . . . . . . . . . . . . . . 63 11.3.2 Rotors with rotor lid thread. . . . . . . . . . . . . . . . . . . . . . . . . . . . . . . . . . . . . . . . . . . . . . 65 11.3.3 Rotors with rotor lid for attaching. . . . . . . . . . . . . . . . . . . . . . . . . . . . . . . . . . . . . . . . . 67 11.4 Accessories . . . . . . . . . . . . . . . . . . . . . . . . . . . . . . . . . . . . . . . . . . . . . . . . . . . . . . . . . . . . . . . . . 67 11.4.1 Adapter . . . . . . . . . . . . . . . . . . . . . . . . . . . . . . . . . . . . . . . . . . . . . . . . . . . . . . . . . . . . . 67 11.4.2 Other accessories . . . . . . . . . . . . . . . . . . . . . . . . . . . . . . . . . . . . . . . . . . . . . . . . . . . . . 68 11.4.3 Fuses for Centrifuge 5430. . . . . . . . . . . . . . . . . . . . . . . . . . . . . . . . . . . . . . . . . . . . . . . 68

Table of contents
6Centrifuge 5430/5430 R English (EN)

Operating instructions
Centrifuge 5430/5430 R 7
English (EN)
1Operating instructions
1.1Using this manual
Read this operating manual completely before using the device for the first time. Please also note the operating instructions for the accessories, if applicable.
This operating manual is part of the product. Thus, it must always be easily accessible.
Enclose this operating manual when transferring the device to third parties.
If this manual is lost, please request another one. For the current version, please refer to our webpage www.eppendorf.com (international) or www.eppendorfna.com (North America).
The Centrifuge 5430/5430 R is available in two versions: key pad or rotary knobs. This operating manual generally describes how to operate the keypad version but it also applies to the rotary knob version.
1.2Danger symbols and danger levels
The safety instructions in this manual appear with the following danger symbols and danger levels:
1.2.1 |
Danger symbols |
|
|
Biohazard |
Explosion |
|
Electric shock |
Crushing |
|
Hazard point |
Material damage |
1.2.2 Danger levels
DANGER |
Will lead to serious injuries or death. |
|
|
WARNING |
May lead to serious injuries or death. |
|
|
CAUTION |
May lead to light to moderate injuries. |
|
|
NOTICE |
May lead to material damage. |
|
|
1.3Symbols used
Example Meaning
You are requested to perform an action.
1.
Perform these actions in the sequence described.
2.
•List.
Press this key to perform the described action.
Text |
Terms from the display of the device. |
||
|
|
|
|
|
|
|
References useful information. |
|
|
|
|
|
|
|
|

Operating instructions
8Centrifuge 5430/5430 R English (EN)
1.4Abbreviations used
MTP
Micro test plate
PCR
Polymerase chain reaction
PTFE
Polytetrafluorethylene
RZB/rcf
Relative centrifugal force – g-force in m/s2
rpm
Revolutions per minute – in rpm
UV
Ultraviolet radiation

Product description
Centrifuge 5430/5430 R 9
English (EN)
2Product description
2.1Main illustration
1 |
2 |
3 |
4 |
5 |
|
|
|
|
|
|
|
|
|
|
|
|
|
|
|
|
|
|
|
|
|
|
|
|
|
|
|
|
|
|
|
|
|
|
|
|
|
|
|
|
|
|
|
|
|
|
|
|
|
|
|
|
|
|
|
|
|
|
|
|
|
|
|
|
|
|
|
|
|
|
|
|
|
|
|
|
|
|
|
|
|
|
|
|
|
|
|
|
|
|
|
|
|
|
|
|
|
|
|
|
|
|
|
|
|
|
|
|
|
|
|
|
|
|
|
|
|
|
|
|
|
|
|
|
|
|
|
|
|
|
|
|
|
|
|
|
|
|
|
|
|
|
|
|
|
|
|
|
|
|
|
|
|
|
|
|
|
|
|
|
|
|
|
|
|
|
|
|
|
|
|
8 |
7 |
|
6 |
|||||||||||||||
Fig. 2-1: Front and rear view of Centrifuge 5430
1 |
2 |
3 |
4 |
5 |
1 |
|
|
|
|
|
|
|
|
|
|
|
|
|
|
|
|
|
|
|
|
|
|
|
|
|
|
|
|
|
|
|
|
|
|
|
|
|
|
|
|
|
|
|
|
|
|
|
|
|
|
|
|
|
|
7 |
8 |
6 |
9 |
|||||
Fig. 2-2: Front and rear view of Centrifuge 5430 R

Product description
10Centrifuge 5430/5430 R English (EN)
1 |
Emergency lid release |
6 |
Mains connection |
|
On both sides of the device (see Emergency |
|
Connection socket for the mains cable supplied. |
|
release on p. 57). |
|
Only 5430: The fuse holder is located beneath |
2 |
Centrifuge lid |
|
(see Fuses on p. 53). |
|
|
||
3 |
Control panel |
7 |
Mains switch |
|
Switch for switching the device on and off. |
||
|
Keys and dials (dependent on the device version) |
|
|
|
|
Switch position 0: The device is switched off. |
|
|
for operating the centrifuge(see p. 28). |
|
|
|
|
Switch position I: The device is switched on. |
|
|
|
|
|
4 |
Window |
8 |
ID plate |
|
Visual control for rotor stop or option for speed |
||
|
|
|
|
|
check via stroboscope. |
9 |
USB port |
5 |
Display |
|
Interface for error analysis and software updates |
|
by the Technical Service. |
||
|
Depiction of the current centrifuging parameters |
|
|
|
|
|
and device settings (see p. 28).
2.2Delivery package
2.2.1Centrifuge 5430
Quantity |
|
Order no. |
Order no. |
Description |
|
|
(International) |
(North America) |
|
|
|
|
|
|
|
|
|
|
Centrifuge 5430 |
1 |
|
– |
– |
See chapter Ordering Information for corresponding device |
|
|
|
|
version, equipment and order number |
|
|
|
|
|
|
|
|
|
Fuse |
1 |
|
5301 850.249 |
022654403 |
4 A (230 V), 2 pieces |
oder |
|
5427 850.341 |
022654381 |
8.0 AT UL (120 V/100 V), 2 pieces |
|
|
|
|
|
|
|
|
|
Rotor key |
1 |
|
5416 301.001 |
022634305 |
Standard |
|
|
|
|
|
1 |
|
– |
– |
Mains power cable |
|
|
|
|
Operating manual Centrifuge 5430/5430 R |
1 |
|
5427 901.124 |
5427901124 |
Languages: EN, DE, FR, ES, IT, PT |
1 |
|
5427 901.132 |
5427901132 |
Languages: DA, FI, EL, NL, SV (230 V devices only) |
|
|
|
|
|
2.2.2 |
Centrifuge 5430 R |
|
||
|
|
|
|
|
Quantity |
|
Order no. |
Order no. |
Description |
|
|
(International) |
(North America) |
|
|
|
|
|
|
|
|
|
|
Centrifuge 5430 R |
1 |
|
– |
– |
See chapter Ordering Information for corresponding device |
|
|
|
|
version, equipment and order number |
|
|
|
|
|
|
|
|
|
Rotor key |
1 |
|
5416 301.001 |
022634305 |
Standard |
|
|
|
|
|
1 |
|
– |
– |
Mains power cable |
|
|
|
|
Operating manual Centrifuge 5430/5430 R |
1 |
|
5427 901.124 |
5427901124 |
Languages: EN, DE, FR, ES, IT, PT |
1 |
|
5427 901.132 |
5427901132 |
Languages: DA, FI, EL, NL, SV (230 V devices only) |
|
|
|
|
|
Product description
Centrifuge 5430/5430 R 11
English (EN)
2.3Features
The multifaceted Centrifuge 5430 has a capacity of 48 × 2.0 mL and reaches max. 30,130 × g/17,500 min-1. The versatility is reflected in the available rotor options. You can select from 12 different rotors to centrifuge the following tubes for your various applications:
•Tubes (0.2 to 5.0 mL)
•PCR strips
•Microtainers
•Spin columns
•Cryo tubes
•Conical tubes (15/50 mL)
•Microplates
•PCR plates
•Deepwell plates (max. height 29 mm)
•Slides (with CombiSlide adapter)
Five program keys for rapid loading and saving of parameters, as well as another 45 program places, a large display and menu-controlled operation all make it easier to use the centrifuge. The Centrifuge 5430 has been designed based on latest ergonomic studies. This facilitates an intuitive and easy operation.
The Centrifuge 5430 is available with two different operator panels: one easy to clean keypad or blue rotary knobs to quickly set the centrifugation parameter.
The Centrifuge 5430 R has an additional temperature control function for centrifugation between -11°C and +40°C. The Fast Temp function is used to start a temperature control run without samples in order to quickly bring the rotor chamber, and rotor, bucket and adapter, to the set temperature. This temperature control cycle can also be started automatically at specified times using the Fast Temp pro function.
Product description
12Centrifuge 5430/5430 R English (EN)
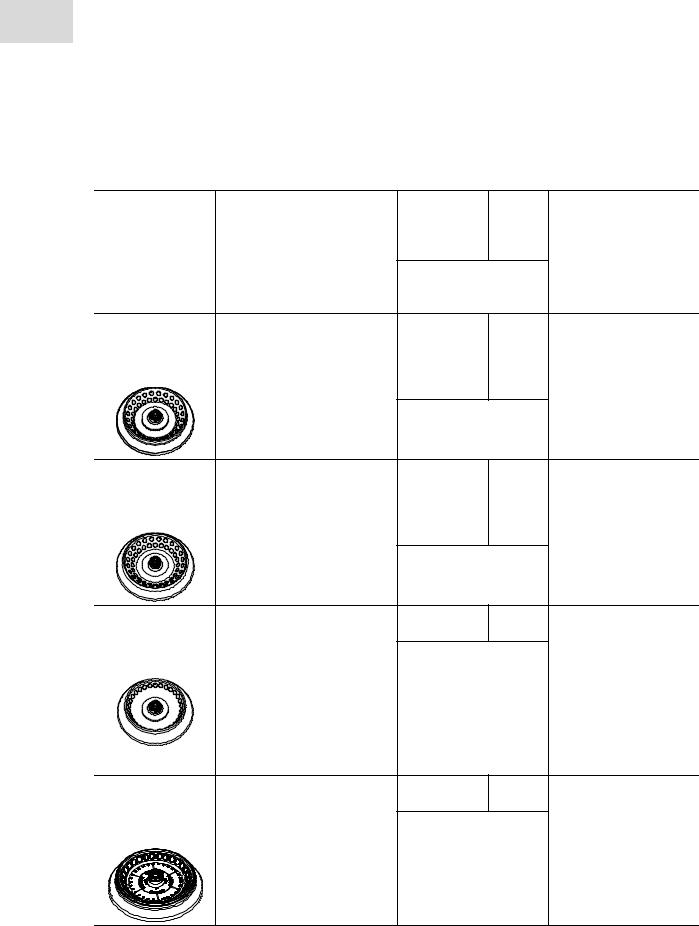
2.4Rotors
The Centrifuge 5430/5430 R can be operated with the following rotors. Before using tubes, observe the manufacturer's recommended specifications on resistance to centrifugation (max. g-force).
|
Max. capacity |
Max. g-force |
Max. |
Notes |
|
|
(rcf)/speed |
load per |
|
|
|
(rpm) without |
rotor |
|
|
|
adapter |
bore(1) |
|
|
|
Acceleration/ |
|
|
|
|
deceleration time (2) |
|
|
|
|
(soft): with soft ramp |
|
|
Rotor |
48 tubes 1.5/2.0 mL. |
Outer ring: |
3.75 g |
• Aerosol-tight(3) |
FA-45-48-11 |
With adapters: |
18,213 × g |
|
QuickLock rotor lid |
With aerosol-tight |
• 0.2 mL PCR tubes |
Inner ring: |
|
(aluminum). |
QuickLock rotor lid |
• 0.4 mL tubes |
16,048 × g/ |
|
|
|
• 0.5 mL tubes |
12,700 rpm |
|
|
|
• 0.6 mL Microtainer |
≤ 20 s/20 s |
|
|
|
|
≤ 61 s/65 s (soft) |
|
|
Rotor |
48 tubes 1.5/2.0 mL. |
Outer ring: |
3.75 g |
|
F-45-48-11 |
With adapters: |
18,213 × g |
|
|
With polypropylene |
• 0.2 mL PCR tubes |
Inner ring: |
|
|
rotor lid |
• 0.4 mL tubes |
16,048 × g/ |
|
|
|
• 0.5 mL tubes |
12,700 rpm |
|
|
|
• 0.6 mL Microtainer |
≤ 20 s/20 s |
|
|
|
|
≤ 61 s/65 s (soft) |
|
|
Rotor |
30 tubes 1.5/2.0 mL. |
20,817 × g/ |
3.75 g |
• Aerosol-tight(3) |
FA-45-30-11 |
With adapters: |
14,000 rpm |
|
QuickLock rotor lid |
With aerosol-tight |
• 0.2 mL PCR tubes |
≤ 15 s/15 s |
|
(aluminum). |
QuickLock rotor lid |
• 0.4 mL tubes |
≤ 61 s/65 s (soft) |
• PTFE-coated |
|
|
• 0.5 mL tubes |
|
|
(particularly resistant |
|
• 0.6 mL Microtainer |
|
|
to chemicals), |
|
|
|
|
marked: coated |
|
|
|
|
• Spin columns |
|
|
|
|
available, better with |
|
|
|
|
rotor FA-45-24-11-kit. |
Rotor |
30 tubes 1.5/2.0 mL. |
20,817 × g/ |
3.75 g |
|
F-45-30-11 |
With adapters: |
14,000 rpm |
|
|
With polypropylene |
• 0.2 mL PCR tubes |
≤ 15 s/15 s |
|
|
rotor lid |
• 0.4 mL tubes |
≤ 61 s/65 s (soft) |
|
|
|
• 0.5 mL tubes |
|
|
|
|
• 0.6 mL Microtainer |
|
|
|
Product description
Centrifuge 5430/5430 R 13
English (EN)
|
Max. capacity |
Max. g-force |
Max. |
Notes |
|
|
(rcf)/speed |
load per |
|
|
|
(rpm) without |
rotor |
|
|
|
adapter |
bore(1) |
|
|
|
Acceleration/ |
|
|
|
|
deceleration time (2) |
|
|
|
|
(soft): with soft ramp |
|
|
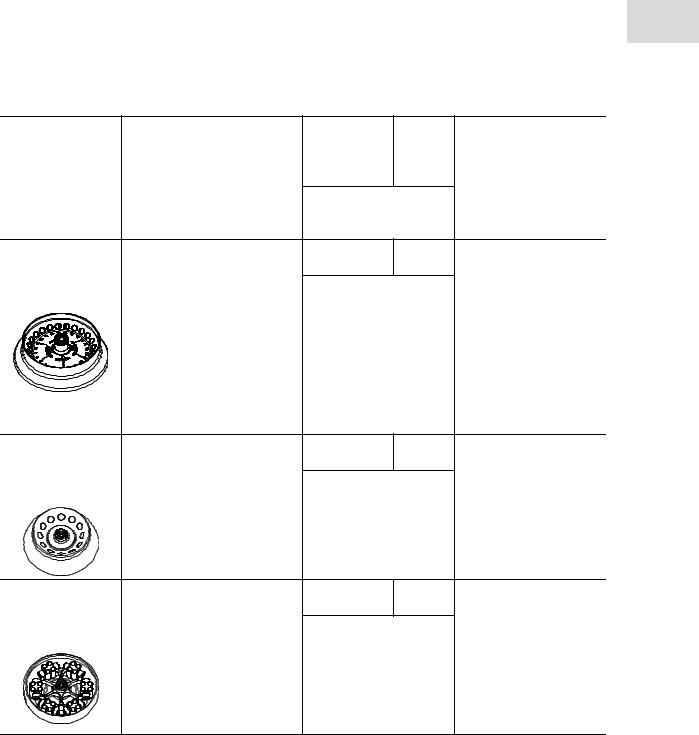
Rotor |
24 spin columns or 1.5/2.0 mL |
19.090 × g/ |
3.75 g |
• Aerosol-tight(3) |
FA-45-24-11-Kit |
tubes. |
13,200 rpm |
|
QuickLock rotor lid |
With aerosol-tight |
With adapters: |
≤ 15 s/16 s |
|
(aluminum). |
QuickLock rotor lid |
• 0.2 mL PCR tubes |
≤ 78 s/90 s (soft) |
• Uniquely high edge, |
|
|
• 0.4 mL tubes |
|
|
for all commercial |
|
• 0.5 mL tubes |
|
|
spin columns. |
|
• 0.6 mL Microtainer |
|
|
Also observe the note |
|
|
|
|
|
|
|
|
|
on centrifugation with |
|
|
|
|
open tube lids (see |
|
|
|
|
Fixed-angle rotors on |
|
|
|
|
p. 33) |
Rotor |
16 tubes 5.0 mL. |
21,191 × g/ |
9.5 g |
• Aerosol-tight(3) |
FA-45-16-17 |
|
14,200 rpm |
|
QuickLock rotor lid |
With aerosol-tight |
|
≤ 20 s/20 s |
|
(aluminum). |
QuickLock rotor lid |
|
≤ 61 s/66 s (soft) |
|
|
Rotor |
24 tubes 1.5/2.0 mL. |
16,049 × g/ |
3.75 g |
• Aerosol-tight(3) |
S-24-11-AT |
|
12,700 rpm |
|
QuickLock rotor lid |
With aerosol-tight |
This rotor exclusively is to be |
≤ 13 s/16 s |
|
(aluminum). |
QuickLock rotor lid |
used with 1.5/2.0 mL reaction |
≤ 61 s/66 s (soft) |
• The rotor must always |
|
|
vessels. Spin Columns and the |
|
|
be operated with a |
|
adapters including the |
|
|
rotor lid. |
|
corresponding 0.2 mL, 0.4 mL, |
|
|
|
|
0.5 mL and 0.6 mL vessels |
|
|
|
|
must not be used in this rotor. |
|
|
|
Product description
14Centrifuge 5430/5430 R English (EN)
|
Max. capacity |
Max. g-force |
Max. |
Notes |
|
|
(rcf)/speed |
load per |
|
|
|
(rpm) without |
rotor |
|
|
|
adapter |
bore(1) |
|
|
|
Acceleration/ |
|
|
|
|
deceleration time (2) |
|
|
|
|
(soft): with soft ramp |
|
|
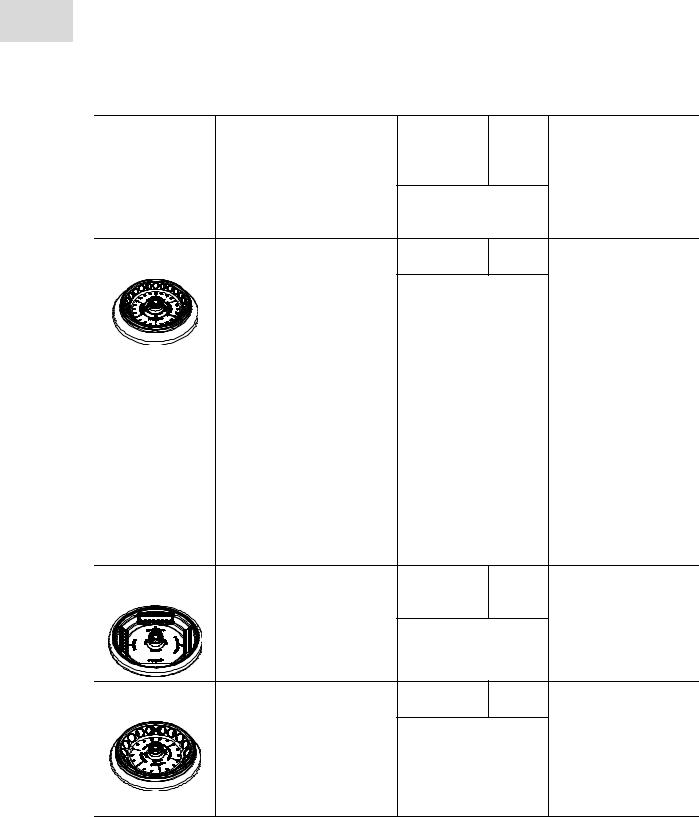
Rotor |
24 tubes 1.5/2.0 mL. |
30,130 × g/ |
3.75 g |
• Aerosol-tight(3) rotor |
FA-45-24-11-HS |
With adapters: |
17,500 rpm |
|
lid (aluminum). |
|
• 0.2 mL PCR tubes |
≤ 21 s/16 s |
|
• Max. g-force/speed |
|
• 0.4 mL tubes |
≤ 61 s/65 s (soft) |
(30,130 × g/17,500 |
|
|
• 0.5 mL tubes |
|
|
rpm) only with tubes |
|
|
|
approved by the man- |
|
|
• 0.6 mL Microtainer |
|
|
|
|
|
|
ufacturer for this |
|
|
|
|
|
|
|
|
|
|
speed. |
|
|
|
|
• PTFE-coated (particu- |
|
|
|
|
larly resistant to |
|
|
|
|
chemicals), marked: |
|
|
|
|
coated |
|
|
|
|
• Spin columns avail- |
|
|
|
|
able, better with rotor |
|
|
|
|
FA-45-24-11-kit. |
|
|
|
|
• The rotor can only be |
|
|
|
|
tightened and loos- |
|
|
|
|
ened using the special |
|
|
|
|
rotor key for rotor |
|
|
|
|
FA-45-24-11-HS (see |
|
|
|
|
p. 42). |
Rotor |
64 PCR tubes (0.2 mL) |
13,543 × g/ |
3.4 g |
|
F-45-64-5-PCR |
or |
11,800 rpm |
(without |
|
|
eight 5-tube or 8-tube |
|
adapter) |
|
|
PCR strips, |
≤ 12 s/15 s |
|
|
|
each with the enclosed |
≤ 62 s/65 s (soft) |
|
|
|
adapters. |
|
|
|
Rotor |
18 Cryo tubes |
8,324 × g/ |
8.7 g |
• Setting the g-force/ |
F-45-18-17-Cryo |
or |
8,900 rpm |
|
speed in increments |
|
18 sealable centrifugation |
≤ 8 s/11 s |
|
of 10 × g or 10 rpm. |
|
tubes, |
≤ 77 s/85 s (soft) |
|
|
|
max. Ø: 16.9 mm. |
|
|
|
|
With supplied adapters: max. |
|
|
|
|
Ø: 13.4 mm, max. tube length: |
|
|
|
|
50 mm. |
|
|
|

Product description
Centrifuge 5430/5430 R 15
English (EN)
|
Max. capacity |
Max. g-force |
Max. |
Notes |
|
|
(rcf)/speed |
load per |
|
|
|
(rpm) without |
rotor |
|
|
|
adapter |
bore(1) |
|
|
|
Acceleration/ |
|
|
|
|
deceleration time (2) |
|
|
|
|
(soft): with soft ramp |
|
|
Rotor |
6 conical tubes 50 mL, with or |
7,745 × g/ |
110 g |
• The rotor can only be |
F-35-6-30 |
without skirted bottom |
7,830 rpm |
|
removed and inserted |
|
or |
≤ 23 s/23 s |
|
using the supplied |
|
6 conical tubes 15 mL, with |
≤ 62 s/67 s (soft) |
removal tool. |
|
|
enclosed adapters |
|
|
• Centrifugation of |
|
or |
|
|
round-bottom tubes |
|
6 Centriplus centrifuge filter |
|
|
and blood taking |
|
units with adapters. |
|
|
systems can be |
|
|
|
|
completed using |
|
|
|
|
additional adapters |
|
|
|
|
(see p. 128). |
Rotor |
Two buckets to hold: |
2,204 × g/ |
170 g |
• PCR plates can only |
A-2-MTP |
• Microplates |
4,680 rpm |
(per |
be centrifuged with |
|
• Cell culture plates |
|
bucket) |
appropriate adapters. |
|
• PCR plates |
≤ 18 s/21 s |
|
• Max. loading height: |
|
• Deepwell plates (max. |
≤ 63 s/67 s (soft) |
29 mm. |
|
|
height 29 mm) |
|
|
• Only 5430 R: More |
|
• Slide (with CombiSlide |
|
|
efficient cooling via |
|
adapter) |
|
|
centrifugation without |
|
|
|
|
wind shield upper |
|
|
|
|
shell (see |
|
|
|
|
Swing-bucket rotor on |
|
|
|
|
p. 34). |
(1)Maximum load per rotor bore for adapter + tube + contents.
(2)According to DIN 58 970 (device versions: 230 V, 120 V and 100 V, 50 to 60 Hz).
(3)Aerosol tightness tested and certified by the Centre of Emergency Preparedness and Response, Health Protection Agency, Porton Down (UK) (see certificates at the end of this operating manual).
For the rotors and rotor lids labeled coated, color fluctuations may occur as a result of the production process. These fluctuations have no effect on service life or resistance to chemicals.
Fixed-angle |
Angle of |
|
|
|
|
of |
|
Swing-bucket |
of |
|
|
|
|
||||||||||||||||
|
rotor |
bores |
|
|
|
|
bores (mm) |
|
|
rotor |
bores (mm) |
|
|
|
|
||||||||||||||
|
|
|
|
|
|
|
|
|
|
|
|
|
|
|
|
|
|
|
|
|
|
|
|
|
|
|
|
|
|
|
|
|
|
|
|
|
|
|
|
|
|
|
|
|
|
|
|
|
|
|
|
|
|
|
|
|
|
|
|
|
|
|
|
|
|
|
|
|
|
|
|
|
|
|
|
|
|
|
|
24 |
|
11 |
|
|
AT |
|
|||
|
|
|
|
|
|
|
|
|
|
|
|
|
|
|
|
|
|
|
|
||||||||||
|
|
|
|
|
|
|
|
|
|
|
|
|
|
|
|
|
|
|
|
|
|
|
|
|
|
|
|
|
|
|
|
Aerosol-tight |
|
|
Number of |
|
|
|
|
|
Number of |
|
|
|
Aerosol-tight |
||||||||||||||
|
|
|
version |
|
|
|
bores |
|
|
|
|
|
bores |
|
|
|
|
version |
|||||||||||
|
|
|
|
|
|
|
|
|
|
|
|
|
|
|
|
|
|
|
|
|
|
|
|
|
|
|
|
|
|

Product description
16Centrifuge 5430/5430 R English (EN)
2.4.1 rcf display and calculation
Use the rpm/rcf key to switch the speed of centrifugation display from rpm to g-force (rcf). Ensure that the g-force displayed during switching is standardized to suit the rotor in question without an adapter. When adapters are used, the following maximum g-forces (rcf) can be achieved at maximum speed:
Rotor |
Adapter |
Max.centrifugation |
Max. g-force (rcf) |
|
|
|
radius rmax [cm] |
|
|
Rotor FA-45-48-11/ |
Without adapter |
Outer ring: 10.1 |
Outer ring: 18,210 |
|
Rotor F-45-48-11 |
|
Inner ring: 8.9 |
Inner ring: 16,048 |
|
|
|
|
|
|
|
For 0.2 mL PCR tubes |
Outer ring: 8 |
Outer ring: 14,425 |
|
|
|
Inner ring: 6.8 |
Inner ring: 12,261 |
|
|
|
|
|
|
|
For 0.4 mL tubes |
Outer ring: 10.1 |
Outer ring: 18,210 |
|
|
|
Inner ring: 8.9 |
Inner ring: 16,048 |
|
|
|
|
|
|
|
For 0.5 mL tubes |
Outer ring: 9 |
Outer ring: 16,229 |
|
|
|
Inner ring: 7.8 |
Inner ring: 14,065 |
|
|
|
|
|
|
|
For 0.6 mL Microtainer |
Outer ring: 10.1 |
Outer ring: 18,210 |
|
|
|
Inner ring: 8.9 |
Inner ring: 16,048 |
|
|
|
|
|
|
Rotor FA-45-30-11/ |
Without adapter |
9.5 |
20,871 |
|
Rotor F-45-30-11 |
|
|
|
|
For 0.2 mL PCR tubes |
7.4 |
16.215 |
||
|
||||
|
|
|
|
|
|
For 0.4 mL tubes |
9.5 |
20,871 |
|
|
|
|
|
|
|
For 0.5 mL tubes |
8.4 |
18,407 |
|
|
|
|
|
|
|
For 0.6 mL Microtainer |
9.5 |
20,817 |
|
|
|
|
|
|
Rotor |
Without adapter |
9.8 |
19,090 |
|
FA-45-24-11-Kit |
|
|
|
|
For 0.2 mL PCR tubes |
7.7 |
15,000 |
||
|
||||
|
|
|
|
|
|
For 0.4 mL tubes |
9.8 |
19,090 |
|
|
|
|
|
|
|
For 0.5 mL tubes |
8.7 |
16,950 |
|
|
|
|
|
|
|
For 0.6 mL Microtainer |
9.8 |
19,090 |
|
|
|
|
|
|
Rotor FA-45-16-17 |
For 5.0 mL micro test tubes |
9.4 |
21,191 |
|
|
|
|
|
|
Rotor S-24-11-AT |
Without adapter |
8.9 |
16,049 |
|
|
|
|
|
|
Rotor |
Without adapter |
8.8 |
30,130 |
|
FA-45-24-11-HS |
|
|
|
|
For 0.2 mL PCR tubes |
6.7 |
22,940 |
||
|
||||
|
|
|
|
|
|
For 0.4 mL tubes |
8.8 |
30,130 |
|
|
|
|
|
|
|
For 0.5 mL tubes |
7.7 |
26,364 |
|
|
|
|
|
|
|
For 0.6 mL Microtainer |
8.8 |
30,130 |
|
|
|
|
|
|
Rotor |
For PCR strips, inside |
7.7 |
11,987 |
|
F-45-64-5-PCR |
|
|
|
|
For PCR strips, outside |
8.7 |
13,543 |
||
|
||||
|
|
|
|
|
Rotor |
Without adapter |
9.4 |
8,320 |
|
F-45-18-17-Cryo |
|
|
|
|
For Cryo tubes |
9.0 |
7,970 |
||
|
||||
|
|
|
|

Product description
Centrifuge 5430/5430 R 17
English (EN)
Rotor |
Adapter |
Max.centrifugation |
Max. g-force (rcf) |
|
|
radius rmax [cm] |
|
Rotor F-35-6-30* |
For 15 mL conical tubes |
11.0 |
7,540 |
|
|
|
|
|
For 50 mL conical tubes |
10.5 |
7,197 |
|
|
|
|
|
for Centriplus centrifuge filter units |
11.1 |
7,567 |
|
|
|
|
A-2-MTP rotor |
Without adapter |
9.0 |
2,204 |
|
|
|
|
|
for 384 well PCR plates |
7.7 |
1,885 |
|
|
|
|
|
for 96 well PCR plates |
7.3 |
1,788 |
|
|
|
|
|
CombiSlide adapter |
7.7 |
1,885 |
|
|
|
|
*) Centrifugation of round-bottom tubes and blood taking systems can be done using additional adapters (see p. 128).
To determine the g-force (rcf) for a special adapter, you can perform a calculation according to DIN 58 970 with the following formula:
rcf = 1.118 · 10-5 · n2 · rmax n: speed in min-1 (rpm)
rmax: max. centrifuging radius in cm
Example:
In Rotor FA-45-30-11, the 0.5 mL adapter has a maximum radius of 8.4 cm. At 7,000 rpm, a maximum g-force of 4,600 × g is achieved.

Safety
18Centrifuge 5430/5430 R English (EN)
3Safety
3.1Intended use
The Centrifuge 5430/5430 R is intended exclusively for indoor use and for separating aqueous solutions and suspensions of various densities in approved test tubes.
3.2User profile
This device may only be operated by trained specialist staff. They must have carefully read the operating manual and be familiar with the function of the device.
3.3Application limits
3.3.1Declaration concerning the ATEX directive (94/9/EC)
DANGER! Risk of explosion.
Do not operate the device in areas where work is completed with explosive substances.
Do not use this device to process any explosive or highly reactive substances.
Do not use this device to process any substances which may generate an explosive atmosphere.
Due to its design and the environmental conditions inside the device, the Centrifuge 5430/5430 R is not suitable for use in a potentially explosive atmosphere.
The device only must be used in a safe environment, such as the open environment of a ventilated laboratory or fume hood. The use of substances which could create a potentially explosive atmosphere is not permitted. The final decision on the risks associated with the use of these types of substances is the responsibility of the user.
3.3.2Maximum service life for accessories
WARNING! Risk of injury from chemically or mechanically damaged accessories.
Even minor scratches and cracks can lead to serious internal material damage.
Protect all accessory parts from mechanical damage.
Inspect the accessories for damage before each use. Replace any damaged accessories.
Do not use rotors, rotor lids or buckets with signs of corrosion or mechanical damage (e.g., deformations).
Do not use any accessories whose maximum service life has been exceeded.
When inserting the buckets and rotors, ensure that they do not become scratched.
CAUTION! Risk of injury due to chemically damaged rotor lids or caps.
Transparent rotor lids or caps made from PC, PP or PEI may lose their strength under the impact of organic solvents (e.g., phenol, chloroform).
If rotor lids or caps have come into contact with organic solvents, they should be cleaned immediately.
Regularly check the rotor lids and caps for damages and cracks.
Immediately replace rotor lids or caps that have cracks or milky stains.

Safety
Centrifuge 5430/5430 R 19
English (EN)
The rotors listed below, and the corresponding buckets and rotor lids, have a maximum service life of the number of years or cycles listed in the table.
Since 2012, Eppendorf has been stating the maximum service life of the rotors and accessories both in years and in the maximum number of cycles. The decisive factor for the service life is which case occurs first, generally this is the number of years in operation.
Rotor |
Maximum service from commissioning onward |
|
|
|
|
FA-45-48-11 |
100,000 mechanical cycles |
10 years |
(With QuickLock) |
|
|
|
|
|
F-45-48-11 |
100,000 mechanical cycles |
10 years |
(With rotor lid thread) |
|
|
|
|
|
FA-45-30-11 |
100,000 mechanical cycles |
10 years |
(With QuickLock) |
|
|
|
|
|
FA-45-24-11-Kit |
100,000 mechanical cycles |
10 years |
(With QuickLock) |
|
|
|
|
|
FA-45-16-17 |
100,000 mechanical cycles |
10 years |
(With QuickLock) |
|
|
|
|
|
S-24-11-AT |
100,000 mechanical cycles |
10 years |
(With QuickLock) |
|
|
|
|
|
A-2-MTP |
100,000 mechanical cycles |
7 years |
With the corresponding bucket and upper shell |
|
|
of the wind shield |
|
|
|
|
|
QuickLock rotor lid |
- |
3 years |
|
|
|
Rotor lid and caps made of polycarbonate (PC), |
- |
3 years |
polypropylene (PP) or polyetherimide (PEI) |
|
|
|
|
|
Plastic adapters |
- |
1 year |
|
|
|
For all other rotors and rotor lids of this centrifuge there is no service life limit as long as the following requirements are met:
•Proper use,
•Recommended maintenance
•Undamaged condition
The date of manufacture is stamped on the rotors in the format 03/10 (= March 2010) or on the inside of the plastic rotor lids in the form of a clock  .
.
To ensure aerosol tightness, the following applies:
•Replace aerosol-tight rotor lids and caps after 50 autoclaving cycles.
•Replace the seal of QuickLock rotor lids after 50 autoclaving cycles.

Safety
20Centrifuge 5430/5430 R English (EN)
3.4Information on product liability
In the following cases, the designated protection of the device may be compromised. Liability for any resulting property damage or personal injury is then transferred to the operator:
•The device is not used in accordance with the operating manual.
•The device is used outside of its intended use.
•The device is used with accessories or consumables which are not recommended by Eppendorf.
•The device is maintained or repaired by people not authorized by Eppendorf.
•The user makes unauthorized changes to the device.
3.5Warnings for intended use
Read the operating manual and observe the following general safety instructions before using the Centrifuge 5430/5430 R.
3.5.1Personal injury or damage to the equipment
WARNING! Electric shock due to damage to device or mains cable.
Only switch on the device if the device and mains cable are undamaged.
Only use devices that have been properly installed or repaired.
In case of danger, disconnect the device from the mains supply by pulling the power plug from the device or the mains socket or, by using the isolating device intended for this purpose (e.g. emergency stop switch in the laboratory).
WARNING! Lethal voltages inside the device.
Ensure that the housing is always closed and undamaged so that no parts inside the device can be contacted by accident.
Do not remove the housing of the device.
Do not allow any liquids to penetrate the inside of the housing.
Do not allow the device to be opened by anyone except service personnel who have been specifically authorized by Eppendorf.
WARNING! Risk from incorrect supply voltage
Only connect the device to voltage sources which correspond to the electrical requirements on the name plate.
Only use sockets with a protective earth (PE) conductor and suitable power cable.
WARNING! Damage to health due to infectious liquids and pathogenic germs.
When handling infectious liquids and pathogenic germs, observe the national regulations, the biological security level of your laboratory, the material safety data sheets, and the manufacturer's application notes.
Use aerosol tight sealing systems for the centrifugation of these substances.
When working with pathogenic germs belonging to a higher risk group, more than one aerosol-tight bioseal must be used.
Wear personal protective equipment.
For full instructions regarding the handling of germs or biological material of risk group II or higher, please refer to the "Laboratory Biosafety Manual" (Source: World Health Organization, current edition of the Laboratory Biosafety Manual).
Safety
Centrifuge 5430/5430 R 21
English (EN)
WARNING! Risk of injury when opening or closing the centrifuge lid.
There is a risk of crushing your fingers when opening or closing the centrifuge lid.
When opening or closing the centrifuge lid, do not reach between the lid and device or into the latching mechanism of the lid.
Always open the centrifuge lid completely to prevent it from falling.
CAUTION! Poor safety due to incorrect accessories and spare parts.
The use of accessories and spare parts other than those recommended by Eppendorf may impair the safety, functioning and precision of the device. Eppendorf cannot be held liable or accept any liability for damage resulting from the use of incorrect or non-recommended accessories and spare parts, or from the improper use of such equipment.
Only use accessories and original spare parts recommended by Eppendorf.
NOTICE! Damage to device due to spilled liquids.
1.Switch off the device.
2.Disconnect the device from the power supply.
3.Carefully clean the device and the accessories in accordance with the cleaning and disinfection instructions in the operating manual.
4.If a different cleaning and disinfecting method is to be used, contact Eppendorf AG to ensure that the intended method will not damage the device.
NOTICE! Damage to electronic components due to condensation.
Condensate can form in the device after it has been moved from a cool environment to a warmer environment.
After installing the device, wait for at least 4 h. Only then connect the device to the mains power supply.
3.5.2Incorrect handling of the centrifuge
NOTICE! Damage from knocking against or moving the device during operation.
If the rotor bangs against the rotor chamber wall, it will cause considerable damage to the device and rotor.
Do not move or knock against the device during operation.

Safety
22Centrifuge 5430/5430 R English (EN)
3.5.3 Incorrect handling of the rotors
WARNING! Risk of injury from improperly attached rotors and rotor lids.
Only centrifuge with rotor and rotor lid firmly tightened.
If unusual noises occur when the centrifuge starts, the rotor or the rotor lid may not be properly secured. Immediately press the start/stop key to stop centrifuging.
CAUTION! Risk of injury due to asymmetric loading of a rotor.
Load rotors symmetrically with identical tubes or plates and buckets.
Only load adapters with suitable tubes or plates.
Always use tubes or plates of the same type (weight, material/density and volume).
Check that loading is symmetrical by balancing the adapters and tubes or plates used with
scales.
The device automatically detects imbalances during operation and stops the run immediately with an error message and a signal tone. Check the loading, balance the tubes and re-start the centrifugation.
CAUTION! Risk of injury from overloaded rotor.
The Centrifuge 5430/5430 R is designed for the centrifugation of material with a max. density of 1.2 g/mL at maximum speed and filling volume and/or load.
Do not exceed the maximum load of the rotor.
NOTICE! Damage to rotors from aggressive chemicals.
Rotors are high-quality components which withstand extreme stresses. This stability can be impaired by aggressive chemicals.
Avoid using aggressive chemicals, including strong and weak alkalis, strong acids, solutions with mercury, copper and other heavy metal ions, halogenated hydrocarbons, concentrated saline solutions and phenol.
If the rotor is contaminated by aggressive chemicals, clean it immediately using a neutral cleaning agent. This applies to the rotor bores, in particular.
Due to the manufacturing process, color variations may occur on rotors marked "coated". These color variations do not effect service life or resistance to chemicals.
NOTICE! If handled incorrectly, the rotor can fall over.
The rotor can fall over if the buckets are used as a handle.
Remove the buckets before inserting and/or removing a swing-bucket rotor.
Always use both hands to carry the rotor cross.
CAUTION! Risk of injury due to chemically damaged rotor lids or caps.
Transparent rotor lids or caps made from PC, PP or PEI may lose their strength under the impact of organic solvents (e.g., phenol, chloroform).
If rotor lids or caps have come into contact with organic solvents, they should be cleaned immediately.
Regularly check the rotor lids and caps for damages and cracks.
Immediately replace rotor lids or caps that have cracks or milky stains.

Safety
Centrifuge 5430/5430 R 23
English (EN)
3.5.4Extreme strain on the centrifuging tubes
CAUTION! Risk of injury from overloaded tubes.
Note the loading limits specified by the tube manufacturer.
Only use tubes which are approved by the manufacturer for the required rcf.
NOTICE! Risk from damaged tubes.
Damaged tubes must not be used, as this could cause further damage to the device and the accessories and loss of the samples.
Before use, visually check all of the tubes for damage.
NOTICE! Risk from open tube lids.
Open tube lids can brake off during centrifugation and damage the rotor and the centrifuge.Carefully seal all tube lids before centrifuging.
Exception: Note the information on the centrifugation of spin columns in the rotor FA-45-24-11-Kit (see p. 34).
NOTICE! Hazard to plastic tubes from organic solvents.
The density of plastic tubes is reduced when organic solvents (e.g., phenol, chloroform) are used, i.e. the tubes could become damaged.
Observe the manufacturer's specifications for chemical resistance of the tubes.
NOTICE! Sample tubes heat up.
In uncooled centrifuges, the temperature in the rotor chamber, rotor and sample can increase to above 40 °C, based on the run time, g-force (rcf)/speed and ambient temperature.
Note that this can reduce the centrifugation resistance of the sample tubes.
Please note the temperature resistance of the samples.

Safety
24Centrifuge 5430/5430 R English (EN)
3.5.5 Aerosol-tight centrifugation
WARNING! Risk to health due to limited aerosol tightness with incorrect rotor/rotor lid combination.
Aerosol-tight centrifugation is guaranteed only if the rotors and rotor lids intended for this purpose are used. The designation of aerosol-tight fixed-angle rotors always starts with FA.The aerosol-tight rotors and rotor lids of this centrifuge are additionally marked with a red ring on the rotor and a red rotor lid screw.
Aerosol-tight swing-bucket rotors are marked with AT (aerosol-tight).
For aerosol-tight centrifugation, always simultaneously use rotors and rotor lids which are marked as aerosol-tight in the centrifuge intended for the corresponding purpose. The details specifying in which centrifuge you may use the aerosol-tight rotors and rotor lids can be found on the rotor and, beginning from production date of October 2003, on the upper side of the rotor lid.
Only use aerosol-tight rotor lids in combination with rotors which are marked on the rotor lid.
Only use aerosol-tight buckets with the corresponding caps.
WARNING! Damage to health as a result of limited aerosol tightness and incorrect usage.
Autoclaving, mechanical stresses and contamination by chemicals or other aggressive solvents can impair the aerosol-tightness of the rotors and rotor lids.
Check the integrity of the seals of the aerosol-tight rotor lids or caps before each use.
Only use aerosol-tight rotor lids or caps if the seals are undamaged and clean.
Lightly grease the threads of the rotor lid screw with pivot grease after every proper autoclaving (121 °C, 20 min.) (int. order no. Int. 5810 350.050, North America 022634330).
Replace aerosol-tight rotor lids and caps after 50 autoclaving cycles.
For QuickLock rotor lids, the seal must be replaced after 50 autoclaving cycles.
Never store aerosol-tight rotors or buckets closed.
3.6Safety notes on the device
Symbol |
Meaning |
Location |
|
Hazard point. |
5430: Rear of the device |
|
|
5430 R: Right side of the |
|
|
device |
|
CAUTION |
Upper side of device, under |
|
Always tighten the rotor with the enclosed rotor |
the centrifuge lid. |
|
key. |
|
|
CAUTION |
Upper side of device, under |
|
Close all tubes and use a rotor lid. |
the centrifuge lid. |

Installation
Centrifuge 5430/5430 R 25
English (EN)
4Installation
4.1Selecting the location
NOTICE! If an error occurs, the objects in the immediate proximity of the device will be damaged.
In accordance with recommendations in EN 61010-2-020, leave a safety clearance of 30 cm around the device during operation.
Please remove all materials and objects from this area.
NOTICE! Damage from overheating.
Do not install the device near heat sources (e.g. heating, drying cabinet).
Do not expose the device to direct sunlight.
Ensure unobstructed air circulation. Maintain a clearance of at least 30 cm around all ventilation grilles.
Select the location for the device according to the following criteria:
•Suitable power connection as per the name plate (230 V/120 V/100 V).
•Stable, horizontal and resonance-free lab bench.
•A well ventilated environment which is protected from direct sunlight to prevent the device from heating up more.
4.2Preparing installation
Prerequisites
The weight of the centrifuge is 29 kg (5430) or 56 kg (5430 R). A second person is needed to unpack and position the device.
Retain the packaging material and the transport protection device for subsequent transport or storage. See also the instructions relating to transport (see p. 58).
Perform the following steps in the sequence described.
Centrifuge 5430 |
Centrifuge 5430 R |
||
|
|
|
|
1. |
Open the packaging board. |
1. |
Open the packaging board. |
2. |
Remove the covering cardboard. |
2. |
Remove the accessories. |
3. |
Remove the accessories. |
3. |
Lift and remove the front and rear transport |
4. |
Grip from the strap retainers and have two |
|
securing devices. |
|
persons lift the centrifuge out of the box. |
4. |
Grip from the fabric straps and have two people |
5. |
Pull off the strap retainers, do not cut. |
|
lift the centrifuge out of the box. |
6. |
Remove the front and rear transport securing |
5. |
Pull off the textile straps, do not cut. |
|
devices from the centrifuge. |
6. |
Remove the plastic sleeve. |
7.Remove the plastic sleeve.
8.Carefully lift the centrifuge on one side and pull off the transport securing device of the motor on the underside of the centrifuge.
Installation
26Centrifuge 5430/5430 R English (EN)
4.3Installing the instrument
Prerequisites
The device is on a suitable lab bench.
NOTICE! Damage to electronic components due to condensation.
Condensate can form in the device after it has been moved from a cool environment to a warmer environment.
After installing the device, wait for at least 4 h. Only then connect the device to the mains power supply.
NOTICE! Centrifuge 5430 R: compressor damage after improper transport.
Only switch on the centrifuge 4 h after installation.
Perform the following steps in the sequence described.
1.Let the device warm up to ambient temperature for at least 4 hours to avoid damaging electronic assemblies as a result of condensation and avoid damaging the compressor (only 5430 R).
2.Check that the mains voltage and frequency match the requirements on the device type plate.
3.Connect the centrifuge to the mains and switch it on using the mains/power switch on the rear of the device (Centrifuge 5430) or at the right side of the device (Centrifuge 5430 R).
•The standby key  lights green.
•The display is active.
•Only 5430: Lid opens automatically
4.Only 5430: Remove the transport securing device of the motor shaft.
5.If the scope of delivery includes a rotor, dismantle and remove it using the supplied rotor key.
6.Only 5430: Remove the transport securing device of the air guide ring.

Installation
Centrifuge 5430/5430 R 27
English (EN)
7.Use the details included in the scope of delivery to check that the delivery is complete.
8.Check all parts for any transport damage. Contact your dealer if any damage is found.
Retain the packaging material and the transport protection device for subsequent transport or storage. See also the instructions relating to transport (see p. 58).
Operation
28Centrifuge 5430/5430 R English (EN)
5Operation
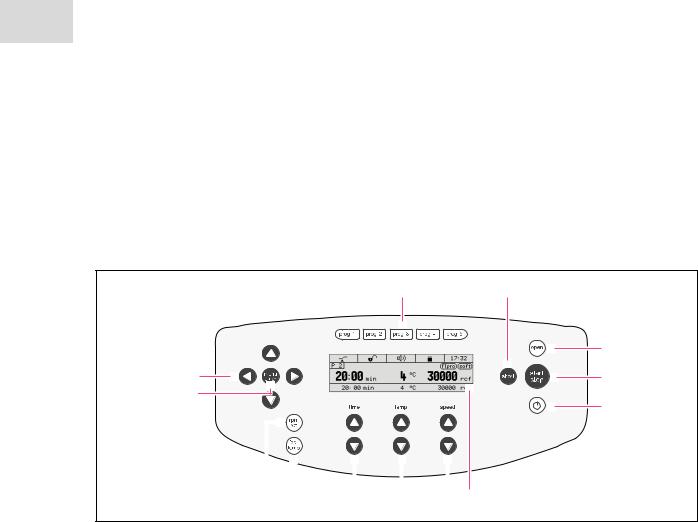
5.1Overview of operating controls
The Centrifuge 5430/5430 R is available in two versions: keypad or rotary knobs. This operating manual generally describes how to operate the keypad version. However, it also applies to the rotary knob version.
Before using the Centrifuge 5430/5430 R for the first time, familiarize yourself with the operating controls and the display.
1 |
2 |
|
3 |
13 |
4 |
12 |
5 |
|
|
|
|
|
|
|
|
|
6 |
|
|
|
|
|
|
|
|
|
|
|
|
|
|
|
|
|
|
|
|
|
|
|
|
|
|
|
11 |
10 |
9 |
8 |
7 |
||||
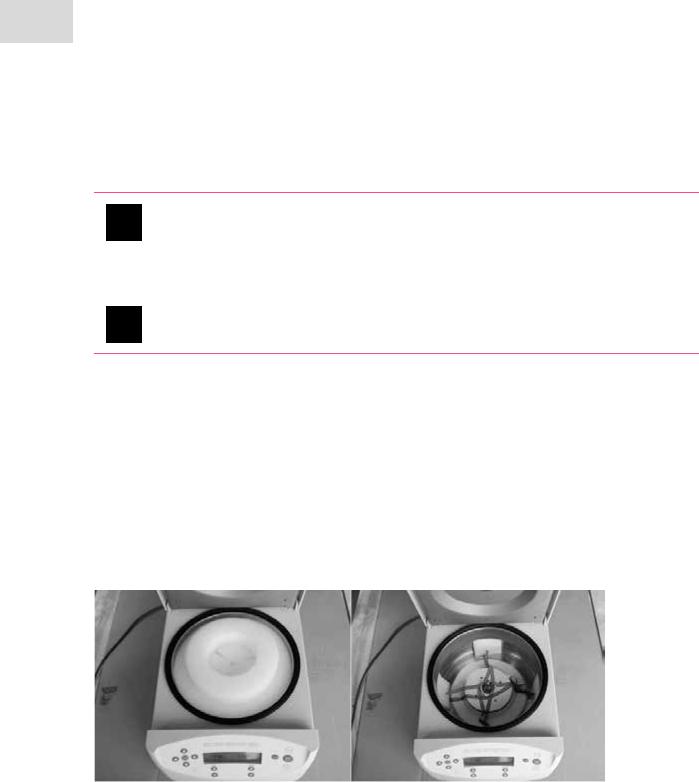
Fig. 5-1: Control panel and display of Centrifuge 5430/5430 R (keypad version).
1 |
Select program |
8 |
Adjust the temperature (only 5430 R) |
|
Press briefly: load the stored centrifuging |
9 |
Adjust the centrifuging duration |
|
parameters. |
||
|
|
Dependent on device version, designed as key or |
|
|
Press and hold (> 2 sec): save the current |
|
|
|
|
rotary knob. |
|
|
centrifuging parameters (see p. 47). |
|
|
|
|
|
|
2 |
Short Spin centrifugation |
10 |
Start the temperature control cycle Fast Temp |
|
(only 5430 R) |
||
|
(see p. 40) |
|
|
|
|
(see p. 36) |
|
|
|
|
|
3 |
Release lid |
11 |
Switch the displayed centrifuging speed (rpm/ |
|
|
||
4 |
Start and stop centrifugation |
|
rcf) |
5 |
Activate/deactivate standby mode |
12 |
Call and select the menu parameters |
|
Key lights green: centrifuge is ready for |
|
(see p. 47) |
|
operation. |
13 |
Navigating the menu |
|
Key lights red: standby mode active (see p. 41). |
||
|
|
(see p. 29) |
|
|
|
|
|
6 |
Display |
|
|
7Set speed of centrifugation
Dependent on device version, designed as key or rotary knob.

Operation
Centrifuge 5430/5430 R 29
English (EN)
1 |
2 |
|
|
3 |
|
4 |
|
|
5 |
|
6 |
|
7 |
|
|
|
|
|
|
|
||||
|
|
|
|
|
|
|
|
|
|
|
|
|
|
|
|
|
|
|
|
|
|
|
8 |
|
|
|
|
|
|
|
|
|
|
|
|
|
|
|
|
|
|
|
|
|
|
|
|
||
|
|
|
|
|
|
|
|
|
|
|
|
|
|
|
|
|
|
|
|
|
|
|||
|
|
|
|
|
|
|
|
|
|
|
|
|
|
|
|
|
|
|
|
|
|
|||
|
|
|
|
|
|
|
|
|
|
|
|
|
|
|
|
|
|
|
|
|
|
|||
|
|
|
|
|
|
|
|
|
|
|
|
|
|
|
|
|
|
|
9 |
|||||
|
|
|
|
|
|
|
|
|
|
|
|
|
|
|
|
|
|
|
||||||
|
|
|
|
|
|
|
|
|
|
|
|
|
|
|
|
|
|
|
|
|
|
10 |
||
|
|
|
|
|
|
|
|
|
|
|
|
|
|
|
|
|
|
|
|
|
|
|
||
|
|
|
|
|
|
|
|
|
|
|
|
|
|
|
|
|
|
|
|
|
|
|||
|
|
|
13 |
|
|
12 |
|
|
11 |
|
|
|
|
|
|
|
|
|
||||||
|
|
|
|
|
|
|
|
|
|
|
|
|
|
|
|
|
|
|
|
|
|
|||
Fig. 5-2: Display of the Centrifuge 5430/5430 R |
|
|
|
|
|
|
|
|
|
|
|
|
|
|
|
|
||||||||
1 Program number (if enabled) |
|
|
8 |
|
Soft ramp |
|
|
|
|
|
|
|
|
|
|
|
||||||||
2 Status of the function At set rpm |
|
|
|
|
|
: Rotor accelerates and brakes slowly. |
||||||||||||||||||
|
|
|
|
|
No symbol: Rotor accelerates and brakes rapidly. |
|||||||||||||||||||
: Start of operation when reaching 95% of the |
||||||||||||||||||||||||
|
|
|
|
|
|
|
|
|
|
|
|
|
||||||||||||
preset g-force (rcf) or speed. |
|
|
9 |
|
Standard display |
|
|
|
|
|
|
|
|
|||||||||||
: Start of run time immediately. |
|
|
|
10 Extended display (if enabled) |
||||||||||||||||||||
|
|
|
|
|
|
|
|
|
||||||||||||||||
3 Status of the key lock
11 g-force/speed
 : Centrifuging parameters cannot be modified
unintentionally. 12 Temperature (only 5430 R)
 : No key lock.
13 Centrifuging duration
4Status of the loudspeaker

 : Switched on.

 : Switched off.
5Status of the centrifuge
 : Centrifuge lid unlocked.
 : Centrifuge lid locked.
 (flashing): Centrifuging in progress.
6Temperature control cycle programming (only
5430 R)
 : Fast Temp pro is enabled, i.e., start time and temperature of the temperature control run have been programmed (see p. 37).
7 Time
Please also read the precise description of the individual functions (see p. 47).
5.2Menu navigation
The menu consists of two levels. To change settings, generally proceed as follows.
1. |
|
Open menu. |
|
|
|

Operation
30Centrifuge 5430/5430 R English (EN)
2. |
|
Select the desired menu item. |
|
|
|
3. |
|
Confirm selection. |
|
|
|
4. |
|
Select the setting of the parameters in question. |
|
|
|
5. |
|
Confirm changed setting. |
|
A tick appears in front of the confirmed setting. |
|
|
|
|
|
|
|
|
|
Keep pressing the key until you reach the desired menu level or exit the menu. |
6. |
|
Some menus can only be exited by selecting and confirming the menu item Back / |
|
|
Zurück / Retour / Atrás. |
|
|
|
5.3Configure centrifuge
5.3.1Set menu language
Proceed as follows to set menu language.
1. |
|
Open the menu. |
|
|
|
2. |
|
Select Settings. |
|
|
|
3. |
|
Confirm your selection. |
|
|
|
4. |
|
Select Language. |
|
|
|
5. |
|
Confirm your selection. |
|
|
|
6. |
|
Select English, Deutsch, Francais or Espanol. |
|
|
|
7. |
|
Confirm your selection. A tick appears in front of the selected language. The setting |
|
takes effect immediately. |
|
|
|
|
|
|
|
8. |
|
Press key several times to exit the menu. |
|
|
|
5.3.2Setting the date and time
Proceed as follows to set date and time.
1. |
|
Open the menu. |
|
|
|
 Loading...